The domed roof is becoming more and more common on modern houses. Round roofs are not uncommon in private suburban construction. At the same time, conventionally, all round-shaped roofs are divided into geodesic, arched and conical types. Each of these types has its own advantages and differs from the other type in installation technology.
General advantages of a dome roof:
- Provides maximum space in the attic or attic space;
- The ability to make any number of windows on the roof plane, which allows maximum use of natural light;
- The round shape prevents the accumulation of snow on the roof surface in winter;
- The sphere of the dome, in contrast to the pitched roof, has greater strength, with its relatively lower weight;
- The opportunity to obtain an overall unique exterior design of a country house.
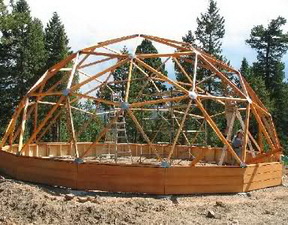
Geodesic dome roof
The geodesic dome roof project was first developed by the American architect R.B. Fuller in 1951. Manufacturing the roof according to his design allows us to obtain a dome with the most correct spherical shape.
House with geodesic dome roof.
Technology for constructing a geodesic dome roof
The roof structure absolutely lacks rafters and vertical supports for them, which are usual for pitched roofs. A typical roof frame consists of interconnected triangular elements assembled from timber with a cross-section of 100x50 mm and a length of 100-120 cm.
As a rule, after making the floor of the first floor, a mauerlat is mounted along the entire perimeter of the walls of a round house - a beam with a section of 100x100 or 50x100 mm, fixed horizontally using anchors or studs previously released from a monolithic slab with a 12 mm thread.
In the design of a conventional gable roof, the mauerlat is a single solid beam on which the lower sections of the rafters rest. In the design of a geodesic dome roof, the mauerlat is made from small pieces of timber equal to the side of the future triangles in the structure.
To connect the bars, five and six-bladed metal plates are used, which are called connectors or connectors. They represent a star, that is, a workpiece 6-8 cm long is cut from a metal pipe with a diameter of 100 mm. Then metal plates with dimensions of 60x150 mm are welded to the resulting ring by electric arc welding at the required angle.
 Connector (aka connector).
 After installing the Mauerlat along its entire circumferential length in increments of 100-120 cm, L-shaped metal plates are secured with self-tapping screws, in which holes are pre-made for attaching the edges of a conventional triangle. Having secured the edges of the triangle to the plates, at the vertex of the conditional triangle, its edges are connected using connectors.
 Construction of a dome roof.
 Thus, having secured the first row of triangles along the entire length of the Mauerlat, a beam is tied between their upper bases, thus forming inverted triangles. At the next stage, the ribs of the second row of triangles are mounted to the remaining two empty blades of the connectors.
In the technical design of the roof there is no ridge or any specific top. The joining of the last upper triangles is carried out similarly to the previous connection method, that is, connectors.
When the dome frame is fully assembled, to strengthen the spans of the triangles, additional sheathing is mounted on their plane, on top of which triangular-shaped sheets of plinth are mounted, followed by installation of bitumen shingles.
 Dome roof with tiles.
 Construction using the technology described above is used not only in the construction of roofs. In some European countries, entirely geodesic domed houses are built in this way. A distinctive feature of these buildings is that they have no facade walls. That is, after making the foundation, they immediately begin installing the domed roof.
 Frame of a geodesic dome.
 Geodesic Dome Roof Design
Unlike a gable roof, a domed roof cannot be designed on a regular sheet of Whatman paper in 2D. To design the entire structure, computer programs are required that allow 3D modeling - three-dimensional modeling. Or special calculators. You can use the calculator on our website, presented on the page: .
Unlike a pitched roof, a domed roof requires significantly less consumables. On average, the consumption of materials is lower by a third in comparison with a gable roof. When designing, it is necessary to calculate the exact number of timber blanks for the ribs and bases of the triangles, the number of mounting connectors and the total footage of the sheathing material.
Arched dome roof
The design of an arched roof is more similar to the design of a pitched roof. The design already contains full-fledged cuts, however, their shape initially resembles an arc.
Rafters for arched roofs are used in three types:
- Factory produced from laminated veneer lumber;
- Prefabricated timber, made independently;
- Factory-produced metal trusses.
The most expensive are rafters made of laminated veneer lumber. During their production, a thin edged board is saturated with moisture and placed in special spacers that set the bending of the board. Next, the board is artificially dried using a steam hood. After this, glued laminated timber is assembled from a dry curved board, the shape of which will be deliberately curved to a certain radius.

Curved rafters made of laminated veneer lumber.
During the installation process, the lower ends of the arched rafters are secured to the base of the Mauerlat, and the upper ends of the arched rafters are connected together by means of a small round wooden or metal ring.
 Connection of arched rafters.
 It is cheaper to manufacture arched rafters yourself or with the participation of specialists directly at the construction site. To assemble them, wooden beam blanks 60-100 cm long with a cross-section of 40x100 or 50x100 mm are used. Initially, a drawing is made on paper and the first rafter is assembled, which is later used as a sample. To fasten wooden beam blanks together, perforated metal plates and, in some cases, metal knitting needles that further strengthen the fastening are used.
 Dome roof rafters.
 If the area of the overlapped span exceeds 5 m, then metal trusses are used instead of wooden arched rafters. Depending on the choice of external roofing material and the presence of thermal insulation, the weight of a dome roof can vary significantly. For this reason, various rolled metal products are used to manufacture semicircular metal trusses. For example, they use both round or square pipes and structures assembled from channel bars.
You can read more about the different types of rafters for such a roof in a special article:.
Conical dome roof
A conical domed roof can be made either over the entire area of a country house, provided that its perimeter is round, or as part of a gable roof. The conical roof design uses only straight rafters. Basically, they use wooden beams with a section of 50x100 or 40x150 mm.
 Conical dome roof.
 The work begins with drawing up a project and there is such a nuance here. Despite the fact that the roof is conical, it is, first of all, dome-shaped, that is, it does not have a beginning, ridge, pediment and other elements inherent in gable roofs. All this allows for virtually no snow accumulation in the winter. This is where the catch lies for those who don’t know. Having decided that the load on the roof will be insignificant, its height is made small. The thing is that the design of the stops and spacers for the rafters directly depends on the height of the peak - the highest point under the roof. Let's consider two options.
The case when the attic space will not be used
If the attic is not planned to be used, then there is no point in having a high roof cone. The minimum permissible slope of the rafters should not be less than 15 cm per 1 linear meter. The lower ends of the rafters are mounted to the mauerlat with an outlet for further sheathing of the overhang. The upper ends of the rafters are connected to each other using knitting needles or self-tapping screws.

If the roof area is large, given that the roof slope is insignificant, then in order to prevent the rafters from sagging over time under the weight of the entire structure, vertical stops are installed approximately in the middle of their length. The bottom of the vertical stop is mounted to the ceiling beam or simply rests on a metal paw, in the case of a monolithic floor.
The case when you plan to use the attic space
In this case, the lower ends of the rafters are secured in the same way to the Mauerlat with an external outlet. However, the slope angle of the rafters in relation to the Mauerlat can be 70-75°. In the upper part, the rafters are connected to each other with long self-tapping screws, and after that, a sheathing board is placed around the entire roof along the rafters, followed by roofing decking.
 Connecting rafters and lintels using metal structures.
 As can be seen from the second example, if the slope of the rafters is set too high, then the main load will no longer fall on the middle of the rafters, but on their highest connection point. That is, the installation of supports is no longer required here. However, to prevent the upper connection point of all rafters from “walking,” their pairs are connected to each other with a spacer jumper made of 50x100 mm timber. For example, the design uses only 12 rafters, therefore, there are only 6 pairs - this is every two opposite rafters.
On what houses and foundations is it possible to build domed roofs?
The main condition for a domed roof is the correct geometry of the building. That is, a country house either initially has a round shape along its perimeter, or its perimeter has a regular square shape.
 Foundation for the construction of a domed roof.
 If the perimeter of a country house has the shape of a parallelepiped, then it is difficult to build a domed roof, but for example, a semicircular roof that is not much inferior is quite possible.
 A semicircular roof can be used where a dome roof is not suitable.
 In cases where the perimeter of the load-bearing walls of the house has an irregular shape or changes were made to the project during construction, for example, additional rooms were added, then the only solution is a combined roof, which may include both elements of a pitched roof and elements of a domed roof.
 Combination of different types of roofs.
 As for the base, a domed roof can be made on almost any wall. The fact is that it is necessary to take into account the load produced by the roof on the load-bearing walls. For example, if a house is built using frame technology, then it will not be possible to make a domed roof that uses metal rafters or reinforced concrete beams. The walls will not withstand such a load. On frame walls, it is optimal to make a roof based on wooden rafters. If the walls of a country house are made of brick, shell rock or monolithic concrete, then no special restrictions are imposed.
The rafter structure is made of laminated veneer lumber, like the one that not only decorated the house, but also partially became the support for the rafter legs, fanning out from a common center and forming a cone-shaped shape.
Seventeen spokes in a wheel
At the point where the upper edges of the 17 rafters meet, a support pillar is erected, on the top of which a strong semicircle of laminated wood is rigidly fixed. On a semicircle, like spokes in the rim of a wheel, the pre-pointed ends of the rafter beams are fixed, and not with their narrowest part, which ensures the necessary strength of the connection. Additional strength to the structural unit is given by small corner cuts on the lower plane of the rafter beam at the point of its connection with the supporting semicircle, as well as metal corners that fasten the wooden parts.
On the underside of the roof, at the point where the rafters are attached to the support beam along the perimeter of the semicircular wall, the distance between them, on the contrary, is quite large (65 cm), and the task becomes the opposite - to reduce this distance by half so that the sheathing for laying the tiles has a uniform, smooth bend. For this purpose, in the lower part of the rafter cone, between the main beams, auxiliary beams of a smaller cross-section are laid, giving the surface a smooth roundness and additional strength.
After that, a metal drainage gutter is installed that goes around the entire perimeter of the extension. Since it is quite difficult to find a curved gutter of the required length, it will have to be assembled from separate smaller sections, soldering them together. If the connections are made carefully, the prefabricated gutter will be impossible to distinguish from a solid one.
Flexible plastic sheathing
Sheathing for tiles, traditionally made from square wooden blocks sewn over the rafters, is not suitable in this case - it will not work to lay such bars with the required bend dictated by the shape of the conical roof: they will simply break. Therefore, there is another solution - a lathing made of flexible plastic bars. In terms of load-bearing capacity, they are not inferior to wooden ones of the same cross-section, and the flexibility of the polymer material allows them to be given a smooth arc shape. For additional reliability, lay the plastic bars in two layers, one on top of the other, and screw them to the rafters with self-tapping screws.
After which it’s the turn of the tiles. And here the conical shape of the roof will again prompt you to look for an adequate solution, because from bottom to top from row to row the width of the tiles should decrease, and they should have a slightly curved shape corresponding to the bend of the conical roof. Fortunately, the tile manufacturer has provided for such non-standard cases by including conical tiles in the range of products (for example, the series Altrot with a noble antique touch). Calculate the length of the rafters, the slope angle and the area of the roof, and buy the necessary roofing elements.
Laying is done in a fairly traditional way for tile roofing: from bottom to top. Lay each subsequent tile with an overlap on the side and the underlying one.
However, unlike a traditional roof with flat slopes, the tiles decrease in width from row to row, so each subsequent row consists of fewer and fewer elements, practically disappearing at the top point of the roof.
So, step-by-step instructions for building a conical (conical) roof with a circular sheathing:
1. Part of the half-timbered frame became an ideal rafter structure with the slopes offset by 30 cm
2. Lay a curved mauerlat beam on top of the concrete floor, to which fasten the rafters at a short distance from each other
3. Sharpen the ends of the rafters to close them more tightly at the top point of the conical roof. The far right beam is adjacent to the wall of the house
4. Place the upper ends of the rafters with corner cuts on a semicircular support and fasten them with metal corners
5. Rafter structure from the inside: The rafters should be laid evenly on a wooden semicircle fixed to the top of the support post
6. One short, one long: longitudinal bars of two sizes are used for sheathing - long, lying exactly on top of the rafters, and short, located in the middle of the spaces between the rafters
7. Lay the roll waterproofing from bottom to top, carefully smoothing out the folds. Carefully glue overlapping joints
9. Before laying the tiles, secure the copper drainage gutter, carefully soldered from individual parts
10. Gutter holders should be secured in the center of the rafters exactly under the soldered joints of the segments
11. The distance between the horizontal slats of the sheathing made of durable flexible plastic depends on the size of the tiles
12. At this point, the conical roof of the rotunda is ready to be covered. The shed roof of the rebuilt garage will also be finished with tiles.
13. For ease of operation, each element of the conical tile is marked with a stamp with the number of its row
14. When laying the first row, secure the tiles to a strong, durable and rot-resistant plastic sheathing
15. In the 2nd row, the width of the tiles is slightly less than in the first, in the third - less than in the second, and so on.
16. In the 4th row, due to the narrowing of the roof cone, tiles with a two-wave profile are usually used
17. Every second wave of the tiled profile ends smoothly in the fourth row
18. On the left edge of the roof, the rows are closed not by conical tiles, but by ordinary tiles of a standard configuration. the elements of which protrude somewhat beyond the edge of the roof, protecting the gable elements from the weather
20. The slope of the garage roof adjacent to the rotunda is covered with tiles of the same brand, but with a straight configuration
21. The procedure for laying the tiles is the same as in the case of the rotunda; the elements are screwed to the sheathing with self-tapping screws
22. At the junction of the garage roof and the surface of the outer wall, the waterproofing tape is masked by a strip of tin located on top of the tile covering.
Advice:
Where the roof meets the surface of the outer wall, it is necessary to provide reliable waterproofing. To do this, glue a waterproofing tape with a height of at least 10 cm in a continuous strip over the connection line.
Based on materials from the magazine Modern Repair and Construction
 100 pieces. flat tiles 2x2 DIY glowing plastic building blocks…
223.36 rub.
Free shipping★★ ★★ ★★ ★★ ★★ (4.90) | Orders (22)
Conical A roof is considered to have a perfect circle at its base; the surface of the roof resembles a straight cone in shape, where all connection points converge at the apex located exactly in the middle of the circle.
The name of the conical roof comes from the word cone (geometric figure) and it has nothing to do with horses. You can also find the name: cone roof.
The conical roof, even erected over the canopy of the building, gives the house an elegant and even fairy-tale look. In Rus', such roofs have been known since ancient times; many buildings were decorated with them: churches, houses, outbuildings, etc.

In our area, conical roofs are not very common, because their design is quite complex. But if the house was built in an area where there are ancient or elite buildings, then such an architectural solution will fit perfectly into the overall background.
But there are entire countries and cities in the world where conical roofs are traditional.
As an example, the kingdom of Lesotho, which is located in South Africa, where the traditional dwellings of the local Basotho people are round adobe houses with a conical thatched roof (on the right in the photo).
There are also places in Europe where cone-shaped roofs are traditional. Just look at the fabulous Trulli settlements, which in 1996 were included in the list of UNESCO protected sites.
"Trulli" are traditional residential peasant houses located in southern Italy. These buildings were made from limestone blocks using the dry masonry method. Groups of dwellings are connected by a common façade and form entire streets. The buildings themselves are crowned with conical roofs decorated with a small spire. This construction technology is still widely used in the southern regions of Italy today.


Conical roofs
A conical roof is a type of round roof. There are several more structurally related options for such roofs: conical gable, bell-shaped, domed.

In many cases, this type of roof is primarily a decoration of the building, and only then serves as its protection. When constructing roofs with conical elements, you should pay special attention to the joints, because a conical roof rarely covers the entire building; it is usually part of an architectural project.
To construct such a roof, rafter beams that converge at one point are often used. Usually in the middle of this point a support pillar is installed, on the top of which a semicircle is fixed, in which, like spokes in a wheel, the rafters are fixed. There is also a technology for frameless construction, when the roof structure is self-supporting.


Pros and cons of conical roofs
Thanks to its round shape, such a roof perfectly withstands any weather vagaries: the wind goes around such a roof without affecting the surface, therefore, cannot damage it, unlike buildings with rectangular roofs. Snow does not stick to it, which means this roof does not need to be cleaned. Conical roofs have increased strength and earthquake resistance. Due to the unusual design, the building acquires individuality, and it becomes possible to decorate the space under the roof in an unusual way.
The disadvantages of such a coating include the impossibility of placing windows on the roof itself. Made in a conical roof, they will greatly spoil the appearance. And without windows it is hardly possible to fully use the space under the roof. Due to the lack of windows, it is impossible to create an attic in a building with a conical roof. The consumption of roofing materials for such a structure is much greater than, for example, for a single-pitch or gable roof, which is caused by a larger area and increased consumption of roofing materials. In addition, the disadvantages include the complexity of the design. Construction of a roof of this type will require numerous financial costs, not only for high-strength building materials, but also for qualified builders and expensive tiles of a specific shape.
Due to the fact that the installation of such a roof is complicated and expensive, conical roofs are usually found not on modest country houses, but on elite and pompous buildings: cottages, temples, palaces.

A conical roof can be made over a round or multi-faceted structure. The rafter system diagram assumes a layered type of rafters. Since they require supporting elements - purlins, the upper support will be a ring purlin, which is fixed to the central pillar in such a way that the highest point of the turret cone is not loaded. The second support will be the same ring-shaped mauerlat, which is laid along the wall of the turret.
The design of the ceiling beams must be designed for concentrated loads at the location where the central pillar will be installed. The ring ridge girder is attached to the central post using braces. All components of the rafter system require careful calculation; if you do not feel confident in yourself, it is better to order a calculation from a construction company!
If you are going to use wood, then it is best to order elements of the rafter system from laminated veneer lumber, especially when subsequently using natural tiles as a roofing material. Since this is a very heavy material - one square meter of such a roof will weigh at least 40 kg, wooden rafter systems for it must have increased strength. The number of rafter legs, which are the stiffening ribs of the conical roof, will be determined by the cross-section of the material used and the required distance between them. In addition to natural tiles, bituminous shingles, wood shingles or metal can be used as roofing material for conical roofs.
If you decide to give the roof of your house or cottage a cone-shaped shape, reminiscent of the towers of ancient castles.
The rafter structure is made of laminated veneer lumber, as is the frame of the half-timbered structure, which not only decorated the house, but also partially became the support for the rafter legs, fanning out from a common center and forming a cone-shaped shape.
At the point where the upper edges of the 17 rafters meet, a support pillar is erected, on the top of which a strong semicircle of laminated wood is rigidly fixed. On a semicircle, like spokes in the rim of a wheel, the pre-pointed ends of the rafter beams are fixed, and not with their narrowest part, which ensures the necessary strength of the connection. Additional strength to the structural unit is given by small corner cuts on the lower plane of the rafter beam at the point of its connection with the supporting semicircle, as well as metal corners that fasten the wooden parts.
On the underside of the roof, at the point where the rafters are attached to the support beam along the perimeter of the semicircular wall, the distance between them, on the contrary, is quite large (65 cm), and the task becomes the opposite - reduce this distance by half, so that the sheathing for laying the tiles has a uniform smooth bend . For this purpose, in the lower part of the rafter cone, between the main beams, auxiliary beams of a smaller cross-section are laid, giving the surface a smooth roundness and additional strength.

After that, a metal drainage gutter is installed that goes around the entire perimeter of the extension. Since it is quite difficult to find a curved gutter of the required length, it will have to be assembled from separate smaller sections, soldering them together. If the connections are made carefully, the prefabricated gutter will be impossible to distinguish from a solid one.
Dome roof structure
Unlike a conical roof, which is built using a layered rafter system, a dome roof has a hanging rafter system. An ordinary three-hinged arch, which is essentially a hanging rafter, rests with one end on a mauerlat laid along the wall, and the other on a support ring, which is mounted at the top of a pillar installed in the center of the structure. If you like such structures, then the construction and design of a rafter system for it will require good technical knowledge in the field of classical “Sopromat” and “Theoretical Mechanics”. If you don’t have sufficient knowledge of either one or the other, it’s better to order a calculation from a construction company. They will do the math, but you can build it yourself.
The semicircular structure of the dome is obtained due to the annular sheathing, which is mounted on additional racks that rest against the hangers of the hanging rafter arches. Another method of constructing a dome was proposed by the American architect R.B. Fuller, he presented the dome as a structure formed by triangles. His project is called the “geodesic dome.” Despite the fact that this design was presented back in 1951, it did not become widespread. Most likely, due to the complexity of the calculations and unusual appearance.
Fastening the rafter system in a geodesic dome can be of two types:
- Connector, when triangles are assembled from pieces of timber and special connector locks directly above the walls of the house. This assembly method is shown in the video.
- Connectorless, when triangular panels are manufactured in advance and assembled on site into a common structure. Such a roof has many advantages, in particular, it can be almost completely glazed with PVC windows, and you will not have problems clearing it of snow. In addition, this design has excellent resistance to wind loads. In short, an interesting option for setting up a home greenhouse, for example.
This roof shape is a distinctive feature of Orthodox temples and churches. The specific shape of the rafter legs of the onion dome is called “crane”. We are dealing with a layered rafter system. Additional rigidity is given to the “cranes” by braces and struts installed at points of greatest load to prevent destruction of the dome structure. “Cranes” are cut out using special patterns from boards 4 cm thick; a double board of smaller thickness can also be used for this purpose. The cranes rest on a central pillar, which also serves as the basis for installing a cross crowning the head.
Installation options can be seen in the photo. If the dome is covered with metal, then a lathing with a pitch of 30 cm is arranged along the cranes. But it happens that the domes are covered with a scaly roof; this is the most labor-intensive method, since for each “scale” an additional circle is mounted that supports it. And when restoring wooden churches, the domes are covered with aspen ploughshares. Each plank is carefully curved to precisely follow the design of the onion. Layers of ploughshare are laid on the roof so that they do not allow water to flow between the rows.
Church domes are a complex type of architecture, it is almost impossible for a non-professional to install them; this is not a rafter system for metal tiles or other roofing material for the gable roof of an ordinary house. If the dome measures more than 3 m in diameter, then metal is used for its frame. Here the cranes with the support post will be fastened with spacers, also made of metal. The lathing will be metal strips, which are installed in increments of 0.4-0.5 m. Such domes are covered with a metal seam roof. Often metal sheets have the form of scales, the seams of which are soldered during installation.
Dome roof design
Unlike a conical roof, which is constructed using a layered rafter system, a domed roof is made using a hanging rafter system. As a rule, this is an ordinary three-hinged arch, which consists of hanging rafters. The arch rests at one end on a mauerlat laid along the wall, and its second end rests on a support ring mounted at the top of a pillar, which is installed in the center of such houses.

If you like a structure of this type, then you should take into account that its design and construction of the rafter system will require some technical knowledge in the field of strength of materials and classical theoretical mechanics. If you have sufficient knowledge of neither one nor the other, it would be correct to order a calculation from the specialists of a construction company. They will do all the calculations, and you can build it yourself.
The design of the semicircular dome is obtained by means of a ring sheathing, which is mounted on additional racks that rest against the hangers of the hanging arches of the rafters.
Geodesic dome
The foundation of the house is a frame covered with panels and moisture- and heat-insulating materials.
There is another way to construct a dome, which was proposed by the American architect R.B. Fuller. He imagined the creation of a dome in the form of a structure that is formed by triangles. “Geodesic Dome” is the name of this project. Despite the fact that it was introduced back in 1951, it did not become widespread. Most likely, due to the fact that this dome design has a rather complex calculation and unusual appearance.

In a geodesic dome, the rafter system can be secured in two ways:
- connector method - to assemble triangles directly above the walls of the building, pieces of timber and special connector locks are used;
- non-connector method - triangular panels are manufactured in advance, and their assembly into a common structure occurs at the site of construction of such buildings.
Advantages of a geodesic dome
The obvious advantages of buildings based on a geodesic dome determine the properties of the sphere:
- Maximum internal volume with the same usable area as a “rectangular” structure. Much more light and air. Approximately 30% less costs for construction materials.
- In the winter season, less heat is dissipated, and in the summer less heat is absorbed. Accordingly, costs for air conditioning and heating are reduced (up to 30%).
- A geodesic dome is quite lightweight; for its construction there is no need to build an expensive and powerful foundation.
- A domed house can have as many windows as you like, and the entire dome can be glazed. Moreover, this will not affect its strength characteristics at all.
- Strength unattainable for other buildings makes it possible for the dome structure to withstand enormous snow loads;
- The unsurpassed aerodynamics of the canopy provide it with excellent wind deflection.
- Based on the fact that the sphere has a smaller surface area, accordingly, less extraneous sounds will penetrate into the house, which will ensure a more comfortable life;
- The symmetry of the sphere creates the conditions for the most effective orientation of solar panels and solar collector modules on it.
- The dome structure has an original and aesthetic appearance.
Today, among the roofing structures familiar to seasoned craftsmen, the arched roof has taken a strong place. This roof design not only makes the house original and interesting, but also protects it from excessive wind loads. In addition, it is the arched ceiling that makes it possible to let in maximum light into the room if you choose transparent polycarbonate as the roof. Below are the advantages and disadvantages of such a domed roof and the principles of its installation in the material.
The use of arched roofs is widespread throughout the world today. Now in Russia they have begun to introduce such a design into the architectural field. In particular, such a roof is justified at the following facilities:
- Swimming pools and indoor sports grounds;
- Stop pavilions and sheds for transport;
- Greenhouses and conservatories;
- Arched country house;
- Capital buildings, such as powerful hangars, production workshops, etc.
Important: by the way, frameless roofs made of metal profiles have now been developed for the construction of hangars. Such structures have greater rigidity and strength, which allows the installation of large rooms without the use of a complex rafter system.
Pros and cons of a semicircular roof

It is worth knowing that arched roofs carry a lot of advantages both for the house itself and for its owner. The main positive aspects of such an arcuate overlap are:
- Reducing the wind load on the roof of the house. That is, moving along a sloping roof, the wind does not experience resistance, which means it does not tear off the roof and does not loosen the truss system.
- Unhindered descent of snow crusts from the roof. This point is important, since precipitation in the form of snow puts additional pressure on the ceiling.
- The ability to fill the room with natural light (provided that a transparent roof is used).
- Significant savings in attic space. The absence of a complex rafter system ensures this.
But the semicircular roof also has some disadvantages. These include:
- Some complexity of installation. Especially if the master decides to make the load-bearing frame from wood.
- It is impossible to use any material you like as a roofing material.
Materials for covering the arched roof covering

As a rule, lightweight roofing materials that have a certain elasticity are used to cover roof arches. In particular, as a roof can be used:
- Galvanized steel sheets. Such a material, with its flexibility, is capable of simultaneously forming both a coating and a load-bearing rigid frame. Moreover, steel with galvanized coating is resistant to corrosion.
- Plastic roll slate. The coating is made of polymers and has excellent elasticity. This roofing material has a smooth surface and a strong structure, which allows the master to use this material as an arched one.
- The profile flooring is arched. In this case, the coating has the structure of a standard profiled sheet. The only difference between these two types of coatings is their shape. Arched already has an arched shape. Its advantage is that such material can be mounted on the roof frame in whole fragments.
Important: arched corrugated sheeting must be ordered from the manufacturer according to the parameters of the arched roof (span width, height of its walls and arc height).
- Glued beam. With careful installation and the correct profile, you can make a wooden beam roof. And although this option is not beneficial from the point of view of durability, from an aesthetic point of view such a roof looks environmentally friendly and attractive.
- Drywall or plywood. The top of the materials will need to be covered with any roofing material such as bitumen shingles, etc.
- Light-conducting coatings(polycarbonate). Today it is the most popular for covering arches.
Roof frame materials

As for the materials to create the roof frame, a variety of different ones can be used. However, they should be divided into materials for use in capital industrial construction or for use in private work. So, for capital construction you can use:
- Reinforced concrete. To install such arches, complex special equipment is required, and the work will be very labor-intensive. Therefore, private craftsmen do not work with such material.
- Frameless profile sheets. It was written about them above that such material simultaneously performs both the function of a rigid frame and the function of a roofing covering.
In private construction, for the arch frame, you can use:
- Wooden arched rafters. The creation of such roof elements is up to the carpenter. Or you can order such rafters in a carpentry workshop. Most often they look like arcs or semi-arcs glued from thin boards.
- metal steel profile(square pipe). Durable and load-resistant material, but requiring some effort in bending the profile.
- Aluminum pipes. Ideal for arched roof frames. Aluminum is not subject to corrosion, is quite simple to work with and is easy to construct a frame. And when such legs are reinforced with spacers, the roof will be able to withstand any roofing material.
Important : for the device of an arcuate greenhouse, you can use pipessPVC.
Do-it-yourself arched roof on an aluminum profile

To build a semicircular roof with your own hands, you need to prepare aluminum pipes with a cross-section of 5 cm and a length of 5-6 m. And to cover the roof, in our case, we will take translucent polycarbonate of any shade. But it is worth remembering that although such a coating is modern and attractive, it is still better to use it for installing a canopy roof over a car, a pool roof or the roof of an extension. Since in the summer indoors under such a roof it will be very hot.
Important: polycarbonate tends to expand when heated under the sun. Therefore, when attaching covering sheets, it is necessary to leave a technical gap for the expansion of the roof.
Roof arc calculation

- To calculate the length of one arc and its radius, you need to take a sheet of graph paper and plot on it on a scale the width of the arch span (the distance from one wall of the house to the other) and its desired height above the span.
- Having measured everything and received the data, they are transferred to a sheet of graph paper.
- Now, in the center of the span in the diagram, we install a compass and, resting its second end with a pencil on the edge of one wall according to the diagram, we draw an even circle.
- Inside the circle you need to draw an even hexagon.
- The resulting lengths of the sides are on scale and will be the lengths of one arc, which will have to be added. In our case, for an arched roof, we will add three such lengths.
Important: the arcs of the arch can be made not from a single pipe, but from its parts. In this case, two half-arches can join at the top of the arch, forming a steeper or less steep bend.
Frame installation
The pipes must be bent using a special bend, first making cuts on the profile. It is important to remember that the more notches there are on the profile, the less steep the bending radius will be. And accordingly, the fewer notches, the larger the bending radius will be. The notches on the profile must be placed with the same spacing.
- The resulting arcs are attached with special brackets to a wooden Mauerlat. And they strengthen the structure with special stiffening ribs. You can use wood or a metal profile for this.
- The sheathing is attached along the entire perimeter of the arcs installed in increments of 50-70 cm. For polycarbonate, the lathing pitch can also vary within 70 cm. But it is better to make it equal to the width of one sheet. This will make installation of polycarbonate more convenient.
- When attaching roofing sheets, it is necessary to make holes in them for self-tapping screws in advance. Moreover, the holes should be several mm larger in order to expand the coating.
Important: to install polycarbonate, you need to use special self-tapping screws with thick washers and decorative covers.
- The roof gables are covered with any convenient material. The one from which the house box is built will look beautiful.
Advice: if you are not confident in your abilities when calculating the parameters of the arch, then use the services of professionals or at least use a special program to calculate the parameters of the arch.


