A good foundation is the key to long-term operation of a building, so any foundation that is repaired correctly can last a long time.
Due to violation of installation technology, this results in the most disastrous consequences, as a result of which the structure may be partially or completely destroyed.
It is quite possible to solve some problems on your own, thereby preventing the situation from getting worse.
Reasons for violation of the integrity of the base
All reasons influencing the destruction of bases and foundations are formally divided into 2 groups. The first implies a loss of bearing capacity associated with the weakening of the soil that serves as its support. In the second case, this is a violation of the integrity of the structure itself. This happens due to poor-quality installation or under the influence of negative factors that have a detrimental effect on it.
 Causes of foundation destruction
 | Factors | a brief description of |
|---|---|
| Decrease in soil bearing capacity | This happens due to erosion or flooding of the soil. It becomes oversaturated with moisture and loses its characteristic abilities. |
| Formation of voids in the soil | The main reason concerns washing, but the process occurs in a different order. The bearing capacity of the soil remains at its level, and a void is formed under the structure itself, as a result of which the base collapses. |
| The presence of negative substances in the soil that destroy the structure | Marls and limestones in the soil are considered the main destroyers of concrete foundations at the molecular level. |
| "Part-time jobs" | An underground void that forms in an area located near mines, oil wells, and groundwater intake sites. |
| Impact of groundwater | Interaction with water leads to the oxidation of metals, so even if the load-bearing capacity remains unchanged, the base may collapse. Special mention should be made of water with alkaline and acidic impurities. |
| Incorrect installation technology | The list of such causes of destruction could take a very long time. The main reason is considered to be the incorrect determination of the laying depth, which is explained by the owner’s savings. Another common reason occurs when pouring a strip foundation with your own hands. Instead of a high-quality concrete mixture, sand-lime brick, slag concrete and other materials are used that are considered unsuitable for use in the reinforced composition of the foundation of a house. |
Main types of deformation
 Subsidence is one of the common causes of foundation failure
Before thinking about the question of how to repair the foundation, you need to analyze what exactly could have caused the destruction and determine the nature of the defects at the moment.
There is a wide range of different options for deformation of the base, which can affect the life of the building as a whole. Here are the main ones:

To accurately determine the cause of the destruction of foundations and foundations, it may be necessary to perform a number of research works.
Independent determination of reasons
 Accurate determination of the causes of destruction of foundations and foundations and their subsequent elimination requires a number of actions and observational operations.
This is necessary to exclude the fact that the deformation was formed due to an isolated incident that may not be repeated.
For example, a very snowy winter with heavy rainfall, which excessively increased the pressure on the base of the building. In this case, repairs can be performed by restoring the decorative appearance. Others will require a more complex procedure.
Monitoring crack growth
The principle is to ensure that the resulting crack is increasing or its size remains unchanged. This will require special beacons, which are made of gypsum plaster and applied to the crack. Its thickness should not exceed 2 - 3 cm, and its length 10 - 12 cm. The middle of the beacon should be located strictly in the center of the gap. It should be taken into account that for better connection with the surface it is recommended to clean it. Having placed the beacons at the beginning and end of each crack and recording the date and their number on a piece of paper, all that remains is to observe their condition.
 If you see a crack at the base, place beacons and watch them
 At a certain interval of several days, you need to assess the condition and write everything down on paper. If the beacons burst, the crack continues to grow. By making an approximate increase in its size, it is possible to predict possible destruction and adopt appropriate methods to strengthen the foundation.
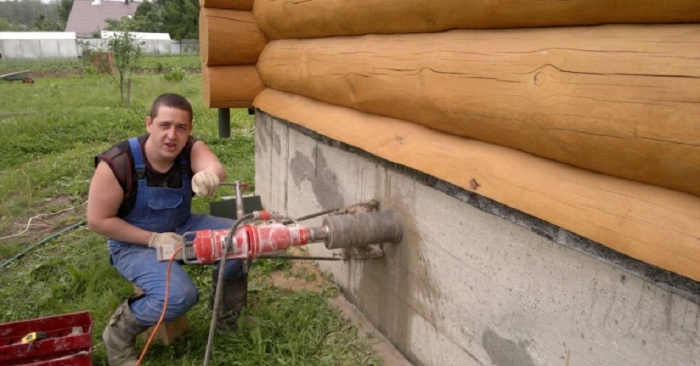
Shurfenie
 The method involves more information, but it is much more complicated. The principle is that several holes (pits) are dug close to the base. The average size should reach the depth of the base of the pillow, and the length is approximately 1 m.
The width is selected individually and is related to ease of use. To eliminate the possibility of collapse, it is advisable to make wooden formwork.
When repairing the foundation, it is necessary to install pits in the most problematic areas. While inside the pit, you can assess the condition of the bases and foundations, the quality and integrity of the waterproofing, determine the depth of the base, the level of groundwater and, if desired, take soil samples to analyze the content of acids and alkalis (for this you need to buy a kit in advance for performing such analyzes).
Only after the destructive factor that negatively affects the foundation has been identified can repair work begin.
Considering all the features of how to repair a strip foundation, you can do all the work yourself. This type of foundation is most popular when constructing houses and buildings, so you should start with it. The main reason requiring its reconstruction is the presence of cracks on the surface. 
The reasons for their occurrence include the following:
- installation of a brick plinth without the use of reinforcing mesh;
- rusty metal as reinforcement;
- lack of ventilation;
- production of a foundation without reinforcement and main frame;
- a base made on bulk soil;
- using concrete mixed in incorrect proportions or from low quality cement;
- lack of drains or their incorrect installation.
A minor crack in the structure requires a timely response from the owner and restoration. This is due to the penetration of moisture into the structure and the gradual destruction of the base under its influence. This is especially dangerous in winter. To learn how to repair the foundation of a house on a slope, watch this video:
Separately, it should be recalled that if cracks occur, you should not dig under the foundation. The soil in this place may sag, and the base will crack even further.
Possible repair options
 Foundation repairs involving sealing cracks can be performed using 2 methods: the first method is to use putty. The second involves the use of cement mortar. First you need to clean up all the resulting imperfections, then inject the prepared mixture, which is made by mixing cement with sand in a ratio of 1 to 2. The finished surface is rubbed with a rule with slight wetting with water. After complete hardening, you can paint it.
 If the base is constantly flooded, first of all, install drainage around the building
 Repairing the foundation of a house that is subject to periodic flooding is carried out with the installation of additional drainage necessary to drain water from the walls of the building. If this is problematic, you can limit yourself to making a fender barrier that directs water along a ditch or a high-quality blind area more than 80 cm wide.
If the appearance of a crack is associated with the installation of the foundation above the soil freezing level, it is necessary to carry out repairs to the strip foundation associated with its insulation. A groove is dug along the entire base, which must be filled with wet sand. The upper part is covered with thermal insulation, and then a blind area is made.
In cases where the destruction of the foundation is significant, major restoration may be required. In this case, a groove is dug, similar to the previously described method, the old surface is cleaned of peeling plaster and waterproofing and treated with a primer. To learn how to replace a foundation located in wet soil, watch this video:
Holes are drilled at a distance of 80–100 cm from each other, and reinforcement is inserted into them. 3–5 rows of such pins are made. The entire surface that needs to be repaired is covered with a metal frame made of reinforcement. Then the formwork is made and a new layer of foundation is poured, after which the blind area is made.

A common situation when there is a need to repair the foundation is rickety foundation pillars.
This happens due to a violation of the correct installation processes or severe heaving of the soil.
Reconstruction often requires the installation of new supports.
For detailed information on how to perform the work, step-by-step instructions are provided:

When lifting your house with a jack, you need to take into account the possibility of skewing or cracking of load-bearing walls when the sides are strongly raised. Therefore, these actions must be performed using several mechanisms or at small intervals of no more than 10 cm.
Repair of settling foundation
Methods for reconstructing foundations that have become rickety over time happen quite often. This mainly happens with buildings located on a brick or rubble foundation. These materials often crack and form deep cracks on the surface, which over time significantly destroy the base. To learn how to repair a settling foundation, watch this video:
The optimal option for repairing such structures is to replace the collapsing section with a monolithic concrete slab.
- to do this, you need to lift the house with a jack and fix it in this position;
- the collapsing area is dismantled, and a trench is dug under it, deep to the bottom of the old structure;
- holes are drilled, as described earlier, pieces of reinforcement are hammered into them;
- after which actions similar to those associated with a major reconstruction of a strip foundation are performed.
 The entire process of performing foundation repair work is relevant for the most common causes of problems with the foundation of a house. But it should be borne in mind that each current situation requires separate consideration and the adoption of measures related to reconstruction. Moreover, there are many cases where two houses standing next to each other with the same damage are deformed for completely different reasons.
Therefore, in order to ensure that your renovated house is not subject to repeated destruction, you need to carefully perform all the tests and necessary laboratory tests of the soil related to the strengthening and reconstruction of the building’s basement.
The sad topic of foundation repair touched me quite recently. Moreover, there was a need to restore the old building, which was built 8 years ago and its appearance was not at all “A” grade. Building a foundation, namely the entire basement floor, was quite expensive, time-consuming and unprofitable, and the place to build a house was not bad, so the only correct option was to restore what was there.
In fact, we had: poured concrete 3.5 meters underground, forming the ground floor, rose 0.5 meters above the ground and was leveled with red brick along the perimeter. There were cracks in the concrete, the edges were crumbling almost everywhere, the red brick had already turned into “mush” after 8 winters in the open air.
All this had to be solved by a major overhaul of the foundation, with the installation of formwork around the existing elevation of the foundation, processing of holes, cracks and reinforcement along the entire perimeter on which future walls would rest. It had to be done thoroughly and for centuries, since the wall was supposed to be made of shell rock 40 cm + 15 cm of aerated concrete + 15 cm of polystyrene foam + plaster. A kind of “thermos”, but a little heavy.
Cleaning the base before repairing the foundation of the house
You could safely pour a reinforced belt on top of all the construction waste and that would be enough, but when you do it for yourself, you want it better. It was decided to take a chisel, a small hammer, a scraper and a broom. A major overhaul of the foundation involved removing the old brick on top that had defrosted and crumbled, cleaning and sealing cracks, digging into loose areas of the base, and power washing the whole thing with water. As a result, only high-quality, solid concrete should remain, serving as support for the new base.
STAGE 1: chisel and hammer work. Repairing foundation cracks must be deep, so we knock out everything that doesn’t hold well; it’s better to remove more than less. All loose concrete that has been exposed to moisture must be replaced with high-quality, new concrete. You can also use a chisel to remove all excess on the surface of the base.
STAGE 2: Cleaning up large debris. Using a metal scraper, you can check whether there are still weak areas on the surface; if nothing falls off anywhere and you can hear a ringing sound everywhere from rubbing the metal, you can clean further and restore everything.
STEP 3: bathe the work surface. If you have a high-pressure washer, now is the time to give your concrete a bath, it gets hot in the summer after all! We remove dust, dirt and everything that is unnecessary on it, and proceed to installing the formwork and reinforcement.
When repairing the foundation with your own hands, you need not to be shy and work well with a hammer; it is better to remove the excess than to leave a damaged base, which over time can sag and cause cracking of the reinforced belt. In the end, you are building a house for yourself, and not for “Uncle Vasya” - it needs to be done beautifully. And “Uncle Vasya” can hit you in the neck if he suspects hack work!
Reinforcement and installation of formwork for foundation restoration
Now we are faced with a not very smooth and not very beautiful base, because someone chiseled it with a chisel! But durable! Now we need to make a beautiful reinforced belt from this garbage and align everything as much as possible so as not to greatly adjust the zero to the future masonry. It’s better to do everything right away according to the level - there will be much less worries in the future, and if you come across a smart mason, then there will be no need for additional leveling at all. Let's look at the repair of a brick foundation in more detail in step-by-step instructions.
STEP 1: hammer in reinforcement everywhere. The belt must be reinforced, so we take a grinder and cut rods from the 14th reinforcement into 30-60 centimeters. At the rate of 2 short and 2 long twigs for every 50 linear centimeters around the entire perimeter. We hammer in: those that are 30 cm on the side, those that are 60 cm on top, we deepen them by half. It is better to use a concrete drill or hammer drill to make holes and immediately set the desired mark on the tool’s depth gauge. If everything is done correctly, we will get a “hedgehog”: the reinforcement will stick out in all directions, on the sides by 15-20 cm, on top by 25-30 cm.


STEP 2: knitting reinforcement. We use special steel wire for knitting (if show-offs are not needed, we fasten everything with aluminum or any other wire) so that everything is in accordance with SNiP. It’s easier to work with a homemade crochet hook, or fasten it by hand (it’s better to ask your wife, children or neighbor to help, since you can spend not even 1 or 2 hours on this simple task). We take long reinforcement and knit it around the perimeter to each driven peg.
 Related fittings
  Hook for tying reinforcement
  Knitting side reinforcement
  Wire for tying reinforcement
STEP 3: setting up the formwork. It's a damn boring and uninteresting thing, but repairing the foundation of an old house can't be done without it. If the neighbor who helped with the viscous reinforcement has not yet escaped, you are lucky. Take a helper and start placing OSB shields around the perimeter that needs to be restored. It is easier to fasten with dowels to the concrete from the side, every 25 cm. Between the OSB sheets we insert wooden blocks, the length of which is equal to the required width of the base - this way we will make the same value everywhere. The sheets can be fastened directly with bars, screwing several wood screws into the ends, or tied together with wire.
 formwork for foundation repair
  Formwork for foundation restoration
 Fixing the foundation formwork
Important: when repairing an old foundation, it is better to use OSB sheets 15 mm thick - the sides will be perfectly smooth, 10 mm is not suitable, because even with abundant doweling and screeding through a block of wood, the plane will “drive” like a drunk after a feast.
STEP 4: check, measure. The strength of the formwork can be determined “by the tooth”. Of course, you shouldn’t chew unless absolutely necessary, but it won’t hurt to give the formwork a good tug and check all the fastening points of the bars between the OSB sheets, screeds and dowels. Remember that it is better to attach it one more time than for 1 dowel to come off and all the work will go down the drain, you won’t be able to do anything later. If you made the formwork with bricks, make sure that the cement has already set (changed color).
It should be immediately noted that repairing the foundation of a house with your own hands is not an easy process and you cannot be lazy and save time on attaching formwork or installing reinforcement. If you fill the base crookedly, it will be extremely difficult to level it and this is an extra expense. You should always use a level, apply it vertically and horizontally to the sheets, and check their installation.
The final stage of restoring the old foundation
Now we move on to the most interesting process: pouring concrete. Everything seems to be simple here: stand at the concrete mixer, work with a bucket, and the process is already underway. But there are several nuances that it would be advisable for anyone who does not often restore an old foundation to know. Some of them are self-explanatory, while others can be very useful advice for beginners and others. Now we will voice them and try to fully understand all the pitfalls.
- Before you begin repairing the foundation of a brick house, it is advisable to fill the entire area to be treated with water; it will wash away the dust, moisten the surface and significantly increase the adhesion of the two surfaces.
- You need to pour along a thread that is pulled strictly according to the level. This will allow you to get to zero and not later level the surface with materials whose density will be much lower than high-quality concrete. You can also trim it with a trowel.
- Restoring the foundation of a house should be carried out only with a high-quality, durable mixture. Use cement grade M 500 with low slag content, mix 1:4. Yes, it is a little more expensive, but it will last for centuries and with a guarantee that the work will not go to waste. A good result can be seen even by the “healthy” color of the hardened cement. Watch your neighbor so that he doesn’t mess around with the proportions!
- All the work needs to be done at once; it is highly not recommended to fill it in “layers” and especially not to join the masses over a period of several days or weeks. At the junction, the concrete will crack, the solidity will be significantly compromised, even in the presence of reinforcement. The restoration of the foundation must be as sharp as inflation, only then can we talk about quality.
- Initially, for the first pass it is better to use a liquid mixture so that it fills the entire relief and improves the adhesion of materials. You can also use plasticizers (or regular shampoo will also work - cheap and cheerful). 10 grams per 1 concrete mixer is enough. With such a thing, repairing the foundation of a private house will be much easier and better (easy to pour, good filling of voids everywhere, mixes quickly). And the result will be much smoother:
Poured foundation in formwork
Restored old foundation
Surface of the restored foundation
Foundation repair completed
- You cannot perform work at temperatures below +8 degrees, even at night. This significantly worsens the strength of the materials. Likewise, this cannot be done earlier than 1 month before frost.
After filling a certain gap, you need to check with the thread and check with a level everything that is being done - this is the key to the absence of problems in the future. Shields made from OSB sheets can be removed after 3-5 days; the next day they cannot be removed, since the base can be damaged. There is also no need to hold it for very long - concrete hardens better when ventilated from all sides.
We remove the formwork little by little after 1 week
Removed formwork after restoration of the foundation
Completion of foundation restoration
Ready repair foundation
Now the repair of the foundation of a brick private house has been completed, all you have to do is wait 3 weeks and you can begin to actively build walls. It is now +30 degrees outside with a humidity of no more than 40%, so you can do this even earlier - hardening according to the standards will be in 12 days at this air humidity and temperature. If the foundation is still a little crooked or the corner has turned, you need to trim it within the first 2-3 days after removing the formwork, until it hardens too much.
Now everything seems to be done. Good luck with the restoration to everyone and may your new foundation quickly settle into the walls and roof!


Violation of the integrity of a dilapidated structure over time is a natural phenomenon. Old wooden houses are especially susceptible to this fate. The cause of warped doors and windows, cracks in the walls is the destruction of the foundation. Timely elimination of factors that led to deformation of the supporting structure and wood itself will extend the life of the housing. Let's look at how to repair the foundation of a wooden house in detail. Depending on the extent of the changes, partial or complete reconstruction of the base is carried out. In some cases, a complete replacement of the old foundation is required.
Causes of destruction
The development of a foundation repair plan is preceded by identifying the reasons for the violation of its integrity. There are several factors that provoked the deformation:
- Increased load on the foundation. For example, they completed the construction of an attic or sheathed an old wooden building.
- Raising the groundwater level or poorly equipped rainwater drainage, resulting in soil erosion.
- Construction of other objects near the old wooden house that increase the load on the ground.
Such situations change the bearing capacity of the soil, which leads to distortion of the structure or its subsidence. Repair of the foundation of an old wooden house may be required as a result of loss of strength of the foundation material itself. This happens due to:
- incorrect choice of foundation type;
- incorrect proportions of the solution or inappropriate grade of concrete;
- violations of the technological process during laying;
- incorrectly determined level of soil freezing;
- unexpected exposure to water.
Correctly identifying the source of the problem is the starting point for planning the repair process. Assessing the condition of the support and identifying weak points will determine whether partial restoration or full-scale restoration of the base is necessary.
Determination of the degree of deformation
The degree of deformation of the support of an old house directly affects the content of the renovation plan. Conventionally, defects are divided into four levels. Partially peeled off finishing refers to minimal deviations and does not have a noticeable effect on the load-bearing performance of the base. This defect is visible without deep analysis and can be eliminated without difficulty.
Moderate severity
Extended repair of the foundation of a wooden house is required if there are cracks that appeared as a result of subsidence of the support or destructive processes in it. The following points deserve attention:
- The direction of the crack is determined. Horizontal cracks pose less danger.
- A vertical or zigzag fault is a serious defect that requires prompt foundation repair.
- What is the nature of the subsidence of the foundation under an old wooden house: temporary or progressive.
Advice! The installation of beacons in places of crevices will help to indicate the nature of the destruction of the foundation under a wooden structure.
The function of beacons will be performed by ordinary paper strips; in this case, to obtain a reliable picture, you should avoid getting them wet. Plaster plasters will also help. The most reliable way to make beacons is to apply a small amount of putty to the wall and mark a straight line. With a slight vibration, such a beacon will break. This technique allows you to record the growth of a crack and find out the rate of development of defects.

The subsidence of the foundation under wooden housing was temporary if the beacons were not damaged and remained motionless. This happens with a single shift of soil under the support of an old house. Foundation repair will consist only of eliminating existing cracks. The repair process includes the following steps:
- fault jointing;
- cleaning the gap from falling fragments and dust;
- treatment with a primer;
- sealing joints with cement mortar or a special compound.
The destruction of the beacons signals progressive faults in the foundation of the old wooden housing. Therefore, repairs to eliminate cracks will not be enough. This type of deformation is characterized as catastrophic and requiring urgent action.

Serious damage and permanent deformation
Serious defects can provoke the destruction of an old wooden home. The repair plan depends on the type of supporting structure; the most common are strip and column options. In some cases, it is not practical to strengthen the foundation; it is better to completely change the foundation for a standing house. If it is not possible to eliminate the deformations, the dwelling must be demolished.
Strengthening the strip base
The foundation under a wooden house can be strengthened if its defects are removable and the soil is stable.
Comment! The need for reinforcement also arises when it is planned to build a superstructure, and the supporting structure is not designed for additional load.
Let’s consider in detail how to strengthen the foundation of an old wooden house:
- Prepare a trench along the perimeter of the base, allowing for further pouring of the foundation.
- The old surface of the base of a wooden house is cleared of soil.
- Repair begins with drilling holes with a diameter exceeding the size of the reinforcement by 1 mm.
- The reinforcement hammered into the holes acts as a connecting link between the old supporting structure and the additional new one.
- The next step in the repair is the formation of a reinforced belt. Welding is used only at a few points; most of the strapping is done with wire. Such fixation will prevent deformation of the reinforced belt during the process of pouring and hardening of the concrete solution.
- Do-it-yourself repairs to the supporting structure of a wooden house continue by installing formwork.
- At the final stage of repair, concrete is poured to strengthen the old foundation. After it hardens, the formwork is removed, and the new foundation settles for some time, depending on the temperature and humidity level.
- High-quality repairs to the foundation of an old wooden dwelling include waterproofing a new foundation and forming a blind area to drain water.

Strengthening the supporting structure helps redistribute the load of the old structure over a larger area.
Attention! When repairing the strip foundation, do not forget to form vents in the foundation of a wooden house. This will ensure high-quality ventilation of the basement level.
The following video will demonstrate how to pour a rubble stone foundation:
Pile foundation repair
Piles driven under an old wooden house may become askew. Minor deviations can be corrected by straightening. To do this, a dig is made, the pile is given a strictly vertical position, and the space around the support is filled with a mixture of cement and gravel.
If the piles under an old wooden structure have collapsed or become severely deformed, surface repairs will not be enough. To replace old piles, asbestos-cement pipes with a diameter of 200 mm are suitable. Foundation repair consists of the following:
- To install a new support, a place is prepared under the old wooden housing.
- In addition, an inclined gutter is formed under the house for installation.
- In order for the pile to maintain a vertical level, its cavity is filled with a cement mortar of liquid consistency.
Important! The concrete mixture should saturate the sand and gravel bed prepared under the pile.
The next stage of repairing the old foundation by replacing the piles also includes strengthening the new pillars from the outside. A solution of cement and gravel acts as a fixative. Expanding the well below according to the mushroom cap principle will increase the stability of the pile and the strength of the foundation under a wooden structure several times.

Restoration of a columnar foundation
The process of repairing a columnar foundation consists of the following steps:
- The old wooden structure is raised to a certain height. Correct calculation of the required height allows you to carry out repairs and prevent the lower crown from sagging.
- The lopsided pillars are dismantled. If the support has become dilapidated, it is replaced with a new one. In other cases, the repair consists of aligning the pillars.
- The soil is removed at the installation site. Mandatory points for mounting supports are the corners of the old wooden structure and the junction of the internal walls.
- A cement-sand cushion is placed under the pillar.
- The repair continues by reinforcing the pillar, after which the concrete solution is poured.
The foundations of even the best-made wooden houses are destroyed over time, but there is no need to panic, because it is quite possible to repair the foundation yourself with a minimum of effort.
The need for reconstruction, strengthening, and repair of damaged and worn parts of the foundation of a wooden house is indicated by the following factors:
- subsidence of the building - complete or partial;
- the formation of gaps and cracks on the walls of the structure, the slope of its roof, door and window openings;
- shrinkage and coloring of the upper elements of the foundation of an old wooden house, a change in the clarity of its vertical and horizontal boundaries, destruction and visible deformation of the supporting columns.
Dilapidated old foundation
If such signs are detected, you should immediately begin to restore the foundation of a wooden house - a country house or used for permanent residence. Otherwise, after some time the building will simply collapse.
Causes of foundation problems include:
- mistakes that were made at the stage of creating and implementing the house project;
- the influence of nature and the time factor - the initial physical characteristics of any material are inevitably lost during operation;
- use of low-quality construction products and materials;
- significant weighting of the structure of the building - adding a second floor or attic;
- subsidence or displacement of soil.
The amount of existing damage to the base of a wooden house determines the type of repair. It can be capital or partial. In some cases, it is enough to perform high-quality strengthening of the old foundation in order to continue to enjoy an environmentally friendly and comfortable home made of wood.
Major repairs are done when there is significant cracking or destruction of the base.
The type of foundation should be taken into account. Restoration of columnar and pile foundations is carried out using one technology, strip foundations - using completely different ones. More on this later.
First, you need to assess the extent of the existing damage. To do this, you have to expose the old foundation - dig a half-meter ditch around the perimeter of the wooden house. Its depth should be such that you can see with your own eyes the condition of the foundation.

Repair of strip foundation
If there is uniform subsidence of the base of a wooden house without any significant distortions, it can be repaired without serious labor and financial costs. Proceed as follows:
- Remove destroyed and crumbling pieces of old brick or rubble masonry.
- Drill small holes in the foundation, drive anchors or pieces of reinforcing bars into them (do the work as carefully as possible), and connect them into one structure by welding.
- Fill the dug trench with concrete mixture. It is advisable to carry out this part of the operation gradually. Feed concrete into the ditch in sections of 120–150 cm, after each portion of the mixture, install partitions and connect them with reinforcement elements to the old base and to each other. Here it is important to achieve high-quality impregnation of the existing strip foundation with concrete mortar. This cannot be done quickly; get ready for a fairly lengthy process.
After the ditch is filled with concrete solution and completely set, the old house will receive additional support on the ground. In most cases, this is enough to stop the subsidence of the old strip foundation.
When subsidence of old masonry occurs evenly, but its appearance causes concern, experts recommend playing it safe and strengthening the existing foundation with a 25–30-centimeter reinforcing belt. Such reconstruction of the foundation of a house can be done with your own hands without any problems.
You need to arrange a cushion of gravel (about 0.2 m thick) at the bottom of the dug trench, mount it along the height of the base, and perform standard reinforcement of the old base. After this, pour concrete into the formwork. First pour one layer, lay a continuous steel mesh on it, then pour the second concrete layer.
As a result of all the described measures, the foundation of a country house or residential building made of wood will become wider and much more massive. Due to this, the erosion of the old strip base will stop. Note! It is imperative to install ebb sills on the weighted plinth.
If a house settles unevenly, it will be more difficult to repair its foundation. You will have to lift a wooden house off the ground to level or replace the old foundation. This operation is performed using hydraulic jacks. The algorithm for performing the work is as follows:
- Empty your home of all items that can be removed (household utensils, furniture, etc.). It is also advisable to remove the floor covering (if possible) and dismantle the doors and windows.
- Install hydraulic jacks at the corners of the house (optimally if at all four). You begin to lift the building. The process is slow. Raise the house 3–5 cm at a time, no more. Then neither the roof structure of a residential building, nor the ceiling, nor the wall surfaces will be subject to destruction or distortion.
- Having reached the required lifting height, install temporary supports under the house. As such, I-beams, channels or thick wooden blocks are usually used. Products should be chosen that are durable, since the building will rest on them until the completion of the house renovation.
- You are making a formwork structure. In this case, take into account the height of the base that you want to achieve. Install the formwork strictly according to the hydraulic level.
- You are reinforcing the old base. Do not forget that it will need to be connected to the new masonry (the procedure is described above).
- Pour the concrete and wait for it to harden.
Pros advise to then lay 2-3 rows of brick plinths on the repaired base. And only after that, lower the home onto the updated foundation. However, it is quite possible to install the house directly on a fresh reinforced concrete foundation.

Thorough foundation repair
Sometimes the bottom crown of a wood house also requires replacement. It is this part of the structure that rots first. The operation is simple. You need to carefully sand the new log for the crown, treat it with an antiseptic compound, and then install it in place of the destroyed element.
Important! Tar-based mastic should be applied to the area between the new crown and the base, and two sheets of roofing material should be laid on it (it is also possible to use another waterproofing material).
Briefly about options for self-repair of columnar and pile foundations
The foundation for a wooden country house is often made from piles. Also, buildings can be installed on brick supports. Options for repairing such foundations are given below:
- Straightening lopsided piles. In this case, you need to return the supports to their original vertical position. Make a dig from the side opposite to the warp. Then carefully straighten the support element and fill the vacated space in the ground with a mixture of gravel (2 parts) and cement (1 part), mixed with water. The proportions of liquid and cement are 1 to 2.
- Restoration of brick pillars. If supporting brick products are affected by erosion or crack as a result of long-term use, they can be restored by constructing a reinforcing concrete belt. This operation is similar to the one we performed when repairing the strip base. If the brick supports are in critical condition, you will have to raise the house and re-lay the stone pillars.
- Complete replacement of piles. This operation is performed in the event of destruction or serious deformation of the supporting elements. Raise the house with jacks. Dig a hole and a trench with a slope for the installation site of the new pile. Install a new support. It is best to use 20-centimeter asbestos-cement pipe products for this. Place a cushion of gravel and sand in the pit (thickness - 0.2 m). Place the pipe vertically and feed liquid cement mixture into it (in small portions).
Then the country house is lowered onto a new pile foundation. It is advisable to further strengthen the fresh supports from the outside - just pour the concrete mixture into the well with an installed asbestos-cement pipe.
We hope that our advice will help you qualitatively repair the foundation of your wooden home.
Laying out the foundation is one of the most important stages in the construction of a structure of any size, weight, configuration and purpose. The supporting structure performs several main functions: it accepts and ensures uniform distribution of loads created by the structure erected on top of it, and also protects the building from forces and stresses arising in the ground.
Violation of foundation construction technology in the future can result in the most catastrophic consequences, including the destruction of the building. Along with this, some problems that arose due to improper arrangement of the foundation can be corrected on your own, eliminating the risk of more serious damage. It is with information about repairing the foundation on your own that you are invited to read further.

The list of reasons that can lead to foundation deformations is given in the table.
Table. Why does the foundation collapse?
| Causes | Description |
|---|---|
| This can occur as a result of erosion and flooding of the soil - it becomes saturated with moisture, which leads to the loss of the necessary bearing capacity. The reason lies in the characteristics of some types of soils, which lose their bearing capacity when humidity increases to a certain level. | |
| The reason, again, is undermining, but the mechanism for developing the problem is somewhat different. In this case, the bearing capacity of the soil remains at the same level, but some of the soil is washed out from under the supporting platform, which leads to the formation of voids. Sandy and sandy loam soil types are most susceptible to such unfavorable changes. | |
| The presence of marls and limestones in the soil adversely affects the condition of calcites, which are the main elements of concrete. Upon contact with them, the structure of the material is destroyed at the molecular level. | |
| “Part-time work” refers to underground voids that form in areas of mine workings, oil production, large-scale pumping of groundwater, etc. | |
| Contact with water leads to corrosion of the materials used in the manufacture of the supporting structure. As a result, even if the bearing capacity of the soil remains at normal levels, the foundation may collapse. Particularly dangerous are waters with alkaline and acidic inclusions. | |
| The list of these includes many items. The most common deviation from the norm is a violation of the requirements regarding the depth of the supporting structure, justified by the desire of the developer to save on excavation and concreting. The second popular violation is the use of materials not intended for this purpose for concreting. For example, in an era of shortage of quality materials, many developers built foundations using sand-lime brick, slag concrete and other similar products, the strength, reliability and durability of which are in many ways inferior to properly executed reinforced concrete pouring. |

The table shows a list of the most common defects in supporting foundations.
Table. Foundation defects
| Defects | Description |
|---|---|
| The upper part of the support of such a building is used in more severe conditions compared to the wall beams, which is why it ages and collapses much faster. | |
| The problem is typical mainly for turbulent soils with a high degree of frost heaving. | |
| Most often, foundations settle due to violations of building codes and technologies at the stage of erecting the supporting structure. | |
| Prolonged contact of a concrete support with open air, precipitation and other atmospheric phenomena can lead to the destruction of the foundation. The situation is especially aggravated if the structure is poured in the winter. That is why it is necessary to either continue construction immediately after the foundation has gained the required strength (according to GOST - 28 days), or to build a shelter that will protect the structure from atmospheric influences. | |
| Improper placement of blocks often leads to destruction of the supporting structure - individual blocks simply crack and fall out, which does not have the best effect on the strength of the foundation. | |
| They arise for a wide variety of reasons. The most common of them were given earlier. | |
| Occurs mainly due to improper arrangement of piles, especially on soils highly susceptible to heaving. The problem usually appears within the first year after the support system is erected. | |
| Occurs in the following cases: - when providing insufficient supporting area of the foundation sole; - in case of emergency soaking of the surrounding soil; - when there is excessive load on the supporting structure; - when constructing a foundation in highly compressible soil types. |
|
| The following reasons lead to the occurrence of such deformations: - reduction in the strength of the foundation wall masonry below the permissible level; - excessive loading of the surface next to the building; - frost heaving of soil exceeding permissible values. |
|
| The reasons for this defect are as follows: - incorrect dressing of masonry or lack thereof; - reduction in the strength properties of masonry as a result of prolonged use, frequent soaking, various aggressive influences, etc.; - overload of the supporting structure. |
|
| Occurs when: - exposure to various aggressive factors on the surface of the supporting structure; - lack of waterproofing or insufficient quality of its arrangement. |
|
| This defect occurs mainly under the influence of excessive forces of frost heaving of the soil. The risks become especially high if the foundation was laid in violation of technology. | |
| Such cracks appear mainly when the foundation is overloaded and/or reinforcement of insufficiently large diameter is used when laying it. |
Necessary research before starting repairs
To determine the nature of the damage, the reasons for its occurrence, the possibility of independently eliminating defects and, in general, the need to take any action, it is necessary to carry out a number of research activities.

The point about the need to perform actions is included in the list for a reason. It is possible that the reasons that led to the occurrence of certain deformations of the supporting structure were isolated in nature and will never appear again. For example, once every 100 years there was a very snowy and frosty winter, during which even the soil under the foundation froze. If such weather conditions are not typical for the area in which the building is located, the entire repair may be reduced to just eliminating cosmetic defects. But diagnostics are performed under any circumstances, because... a problem that seems minor on the surface can actually be very serious and dangerous.
Study one. Determining whether cracks are getting larger

The task comes down to this: you need to understand whether the cracks continue to grow. If yes, the nature of the process and the speed of its development are additionally established.
The study is performed using special markers (beacons).

The simplest option for making a lighthouse is gypsum or cement mortar. It is most convenient to use a ready-made mixture for plaster. In general, you can use any material from this series that is not prone to plastic deformation after setting, i.e. the composition should be relatively fragile, but at the same time reliably adhere to the outer side of the base (the above-ground part of the foundation).
We recommend using a plaster mixture. Prepare it according to the manufacturer's instructions and apply a 0.3-0.5-centimeter layer to the crack. The length of the marker is about 100-120 mm. The composition is applied so that the crack is located approximately in the middle of the strip.

Complete each crack with at least two markers. Make one near the beginning of the fault, the second at its end. The principle is shown in the image.

Apply the plaster mixture with a narrow spatula. It is first necessary to clean the surface of the base from dirt in order to ensure the highest quality adhesion of the beacon to the base.

Without waiting for the marker to harden, print a thin horizontal stripe on it. To do this, just carefully press the side edge of a spatula, metal ruler or other suitable device into the mixture.
Number the markers by pressing out the numbers with a nail or toothpick. Record in your notebook the date of the study and the serial numbers of the beacons.

Next, observe. If the marker cracks, the foundation crack continues to widen. Every few days (the main thing is that equal time intervals are maintained between observations), measure the width of the crack with a plaster marker and record the results in a notebook. Such observations will help you draw conclusions about the rate of development of deformation and predict the possible outcome.

Follow the line left with a putty knife/ruler. If parts of this mark are displaced relative to each other, not only cracks occur, but also settlement of the structure. Common types of settlement and their relationship to fracture patterns are noted in the image above.
Plaster prices
plaster
Study two. Pit preparation
This event is characterized by more pronounced information content and increased labor intensity. The essence comes down to preparing several (at least two) pits near the foundation. The pit is a hole with a depth of up to the base of the support and a length of about 100 cm. Select the width individually so that in the future it will be convenient for you to work with the foundation. To prevent the earth from collapsing, you can support the walls of the pit with unedged boards.
The described pit looks something like this.


The dependence of the dimensions of the pit on the features of the foundation is presented in the table.
The pits are created in the most problematic areas with the most pronounced deformations. Thanks to such a hole, you can gain access to the supporting structure and see how deep it is laid, what it is made of (if the building was not built by the real owner), what condition it is in, and how high-quality the existing waterproofing is. Additionally, you can obtain information about the depth of groundwater. The latter will appear after 1-2 days.

If you wish, you can test groundwater for acidity and alkalinity. To do this, first purchase the appropriate tests in stores specializing in selling a variety of agricultural chemicals. Litmus paper is ideal.
After completing these diagnostic measures, you can proceed directly to repair work.
Foundation Repair: Instructions and Important Notes

You are invited to familiarize yourself with the procedure for carrying out repair activities, which can be carried out on your own or with minimal involvement of third-party labor and special devices.
Important! The above cases are the most common. If you follow building codes and regulations, preparation for foundation repair begins with creating a project for the upcoming work, which includes information about existing deformations and possible ways to eliminate them in a particular case.
In most situations, to successfully repair the foundation, especially if a wooden bathhouse is installed on top of it, the structure must be raised. This is done in different ways (with a crane, ropes stretched under the building, etc.), but the best method is considered to be the use of jacks.


Ideally, jacks should be installed along the entire perimeter of the building - this will ensure uniform distribution of loads and minimize the risk of destruction of building elements. At a minimum, you will need 2-3 jacks - in this case, you will gradually move them around the perimeter of the building, replacing them with metal support frames, but it will take more time to complete the work in such conditions. The recommended lifting capacity of the jack is 5 tons.
Prices for jacks with a lifting capacity of 5 tons or more
jacks 5t 6t 7t 8t 9t 10t

A fairly common problem is that the pillars begin to deviate from the vertical. This happens mainly under the influence of frost heaving forces or due to violations of the technology for filling pillars.
Important! Before starting work, read the information about the methods of tying reinforcement for the foundation and the instructions for preparing the mortar and constructing the formwork for it - the necessary information was previously provided in the relevant publications, so it is not described again.
In this case, the repair comes down to replacing the rickety pillars with new, correct supports.

The instructions are given in the table.
Table. Repair of columnar foundation
| Work stage | Description |
|---|---|
| First of all, it is necessary to install supports that will temporarily take over the functions of the remote support pillars. The image shows a support made of timber with a cross-section corresponding to (preferably exceeding) the dimensions of the concrete support pillar. The bottom wooden pad is necessary to create a larger support area and provide better load distribution. It is recommended to make a similar wooden platform between the bottom of the building and the top of the support. The installation of a wooden support is carried out at a minimum distance from the foundation pillar being replaced with the expectation that in the future it will be convenient to carry out the necessary work manipulations. If you have jacks, you can use them instead of wooden supports - it’s even more convenient. |
|
| The weak support is dismantled, right down to the sand and gravel cushion. Important! If it turns out that the pillars were tilted due to their not being deep enough, the presented guidelines additionally include the steps of excavating the existing sand and gravel backfill, deepening the holes and re-arranging the cushion. To destroy concrete, it is most convenient to use a hammer drill. The work is quite dusty, do not forget to wear safety glasses and a respirator. The reinforcement frame must also be dismantled. It is unlikely that you will be able to maintain its integrity and perfectly clear the hardened concrete, so you can make your work easier by arming yourself with a grinder, sawing the rods into individual elements and removing them from the hole intended for pouring the post. |
|
| A new reinforcing support is being constructed. For greater reliability, assemble it from reinforcement with a diameter of 2 cm. The maximum cell size is 20x20 cm. The height of the frame is selected in accordance with the height of the concrete support. You can see the required number of rods and the principle of their connection in the image. | |
| Install a reinforcing frame into the hole. | |
| Fill the first ball of concrete so that it covers the base of the reinforcing frame by 5-10 cm. Leave the pouring for about a day (preferably 2-3 days) so that the concrete gains its initial strength. | |
| Install prefabricated formwork from wooden planks and pour concrete to the top. It is advisable not to remove the formwork until the concrete reaches the required strength. According to GOST, under normal conditions (plus temperature), this takes 28 days. Also leave the support for the specified time. All rickety pillars are repaired in the same way. |
Additionally, we offer you an improved version of the technology described above, which involves the installation of a grillage - a monolithic reinforced concrete strip that connects the support pillars into a single system and ensures a much more efficient performance of the key functions of the foundation structure. The only drawback of the technology is that you will have to work with all the pillars, replacing them with lower supports in order to get space for pouring the grillage.
First, you do everything as in the technology described above, but reduce the height of the part of the pillar protruding above the ground (and therefore the formwork) by the height of the grillage. The recommended overall dimensions of the grillage are as follows: height – at least 300 mm, width – at least 400 mm.
The procedure for further actions is presented in the table.
Table. Continuing the repair of the columnar foundation
| Work stage | Description |
|---|---|
| Assemble the formwork from high-quality boards 4-5 cm thick. To fasten individual elements, it is preferable to use bolts - after the concrete has hardened, it will be much easier to unscrew them than to pull out nails for subsequent dismantling of the formwork. | |
| For reinforcement, steel rods with a diameter of 1.2-1.4 cm are suitable. The reinforcement is laid in two rows. The circuit is shown in the image. | |
| Mount the side walls of the formwork. You can get more detailed recommendations on how to properly carry out this stage of work in the previously mentioned publication. Leave gaps for pouring concrete. | |
| Pour concrete into the grillage formwork in uniform horizontal layers. |
Now all that remains is to wait at least a month until the concrete gains the required strength. After this, dismantle the formwork. The end result is a reliable, correct and durable support structure.

Repairing a settling foundation

This problem is most often encountered by owners of buildings built on brick or rubble support foundations. How to verify the presence of growing cracks (using plaster markers) was discussed earlier.
Having completed preliminary diagnostic measures, get to work. Let us say right away that it is possible to repair a rubble/brick foundation by replacing damaged sections of masonry, but it is not advisable - since the support has begun to crack now, the problem will certainly arise in the future. The best repair option in such a situation is to replace the precast foundation with a monolithic concrete slab.
First dig a trench around the perimeter of the building to get to the bottom of the support base.
Table. Repair of rubble/brick foundation
| Work stage | Description |
|---|---|
| Destroy a section of masonry 50-100 cm wide for subsequent installation of a jack. For destruction, use a hammer drill, sledgehammer and related auxiliary tools. It is better if you have several jacks available so that you can make similar openings in approximately meter increments along the perimeter of the building and fix the entire building on the jacks at once. Important! When using jacks, the structure is raised gradually, by a maximum of 100 mm in one go. Rushing in this matter can lead to irreversible damage to the geometry of the building. |
|
| As noted, it is better to install the jack on a support - this will increase the area and efficiency of load distribution. The support can be a pre-poured or finished concrete slab, building block, etc. To increase the contact area between the top of the jack and the “bottom” of the house, place a metal plate between them with a thickness of 1 cm and a length of approximately half the width of the selected opening. Once the fixtures are in place, lift the structure off the old support base and secure the position with jacks. Helpful advice! Before raising the building on jacks, it is highly advisable to temporarily dismantle the windows and doors, because they may not withstand such a test. Also, interior items and, if possible, the stove should be removed from the bathhouse in order to make construction as easy as possible. |
|
| Assemble support boxes from at least 2 cm (in diameter) reinforcement. The structure of these is shown in the image. Select the height of the box so that it fits into the opening between the base and the building and is firmly fixed there. The recommended support width is approximately half the width of the selected opening, i.e. 25-50 cm. In the image shown, the support is on the same platform as the jack. We will do it the other way, installing support structures directly on the previously equipped crushed stone backfill. You just need to further compact it thoroughly, because... the density could have decreased during the previous operation of the structure, and be leveled horizontally as much as possible. Work in a similar manner until you have installed metal supports around the perimeter of the entire building. It is recommended to keep the step between supports within 100 cm. |
|
| Install the inner wall of the formwork. This image shows the bottom support layer of compacted sand and gravel and metal support boxes. Recommendations for the installation of formwork structures were given earlier. |
|
| The reinforcement diagram is shown in the image. Place a similar row of reinforcement along the top. For work, use rods with a diameter of 14 mm. | |
| The outer wall of the formwork is mounted and concrete is poured. |
Helpful advice! In a similar manner, it is possible to replace not only a prefabricated rubble/brick foundation, but also a monolithic strip support base. Everything is done in the same order, only to destroy the concrete strip and remove the old reinforcing layer you will have to make much more effort than to replace a collapsing brick/ruble support.

As noted, one of the most common problems with bathhouses made of timber/logs is the premature failure of the lower crowns, which often begin to rot much faster than the material used to make the walls of the building.
Pre-dig several holes and assess the condition of the supporting structure from the bottom to the top. If there is significant damage to the foundation, repair it in accordance with one of the instructions above. If everything is normal with the base itself and only the lower rims are damaged, work in the sequence shown in the table.
Table. Repair of the foundation of a bathhouse made of timber/logs
| Work stage | Description |
|---|---|
| Armed with a chainsaw or other suitable tool, prepare openings in the lower crowns for subsequent installation of jacks. Select the width of the openings so that it is convenient to install/remove jacks. The distance between openings is up to 150 cm. |
|
| Place jacks in prepared openings. Raise the bath above the lower rims and fix the jacks in one position. Important! The structure should not be lifted jerkily or too quickly - there is a high risk of irreversible displacement of the walls. First raise one wall/corner by a maximum of 100mm, then move to the opposite wall/corner and do the same. In a similar manner, gradually raise the entire building. |
|
| After installing the jacks, cut out the remaining material for making the lower crowns. As an example, work with one wall of the building is shown. With the rest of the walls everything is done in exactly the same way. | |
| Install metal supports and remove jacks. Recommendations for assembling boxes are similar to the previous instructions. The optimal arrangement of supports is shown in the image. | |
| Everything is done the same as in the previous guide. | |
| The recommendations are similar to the previously discussed instructions. | |
| Pour the concrete, give it at least a month to gain strength and dismantle the formwork. Now your bathhouse stands on a reliable, strong and durable support base. You can forget about the problem of rotten lower crowns forever. |
The given foundation repair instructions are relevant for the most common cases of destruction of supporting structures. As noted, it must be remembered that each situation is individual and the foundations of two identical buildings can undergo completely different changes and deformations.
If you wish, you can familiarize yourself with information about more complex professional methods of strengthening and reconstructing foundations, which involve the use of special equipment and chemical reagents. Information on this matter was presented in detail by O. A. Korobova in her book “Strengthening Foundations and Reconstructing Foundations.”
O.A. KOROBOVA. STRENGTHENING FOUNDATIONS AND RECONSTRUCTION OF FOUNDATIONS. File for download
Video - Do-it-yourself foundation repair


