There is nothing more touching and more pleasant than a gift made with your own hands. Today we would like to invite you to talk about "Flowers for March 8" or "Flowers for Mother's Day". How can you turn an ordinary sheet of colored paper into a real work of art, which later will cause a lot of positive emotions in your loved one?
What is required
To make any paper craft, you need a few things:
- Colored paper.
- Corrugated paper.
- Thick colored or white cardboard (if, for example, you have not just one detail, but a full-fledged colorful application "flowers for mom").
- Stationery glue for paper.
- Convenient scissors (you have to cut and cut a lot).
- For voluminous and large-scale works, you can also use double-sided tape, colorful multi-colored tape, various ribbons and rhinestones for decorating paper flowers, a figured hole punch and much more.
Making an aster out of paper
The first flower we will make will be an aster. This flower for mom can be made in absolutely any color and size. In order to make such a flower, you will need to cut out five or six circles from paper. The first two should be larger, the next smaller and smaller. You can choose one color, or you can experiment and make an unusual multi-colored aster.

Fold each circle in half three times. This will give you a small triangle. Cut off the corner and make a cone that looks like one flower petal. When you unfold the triangle, you get a circle with openwork edges - petals. Next, we glue all the others to the largest circle in turn. In the center, you can fix a bead, rhinestone or a button. Or you can cut a core of a contrasting color from paper and just glue it.
Calla
These paper flowers for mom will glow with tenderness and sophistication. Noble calla lilies are usually pale purple or bright lilac in color. The colors are pleasant and will look very advantageous in a large-scale application.
To make these flowers, it is recommended to use double-sided paper. If you don't have one at hand, you can take foam paper or just stick the colored paper on each other from the wrong side. It is necessary to cut heart-shaped blanks from a large sheet.

An important part of this flower is its bright yellow stamen. It is even easier to make it. Take a small sheet of yellow paper, twist the flagellum out of it (turn the paper between your palms, as if you are forming a "sausage" from plasticine). All that remains is to place the stamen in the center of the heart and wrap its edges, creating a greater resemblance to a real flower.
This option is perfect if you need a colorful "flowers for mom" craft. It can also be used to decorate gift wrapping or to create a collage of flowers.
Lilies of the valley
These flowers, as a symbol of spring and the flowering of nature, have long been used to create bouquets, including from paper. Lilies of the valley can be made either from ordinary colored paper or from corrugated paper.
First you need to make a twig on which the flower will be attached. You can simply twist it out of paper, smearing it with glue a little inside. Next, we add a few leaves to it. We cut them out according to the form prepared in advance, or immediately draw them directly on paper.

Moving on to the flower. We cut several ribbons three centimeters wide or about ten centimeters long. On one side of this paper tape, you will need to make many cuts with scissors. Try to do this carefully so as not to cut through the sheet to the end. Now glue the initial part of the tape to the stem and twist it. You can periodically fix the paper with glue.
Fantasy flowers
A very original flower for mom can be made from the remains of colored paper. You will need to cut about fifty sharp-edged petals from different colored paper. It is better to fix such flowers with a thread.

Assembling the product is very simple. We take a couple of petals and apply to each other. Add petals of a different color, holding the base firmly with your fingers. And so it will be necessary to add all the prepared models, and in conclusion, fix everything with a thread. Try to combine colors and layers - this will make the flower more unusual and original.
Peonies
It is recommended to make peonies from corrugated paper. These are perhaps the most beautiful flowers for mom that you can think of and create with your own hands. They look great both in a single version and in a general bouquet.
To make peonies, we will need to cut six petals of various sizes from paper. And such blanks need six pieces of each size. In total, you should have 36 petals. The good thing about corrugated paper is that it can be stretched and wavy in the petal. Which is what needs to be done in this case.
Now let's move on to making the stamens. It should be quite bulky and dense. It is easy to make it by folding and layering. Cut into square pieces of corrugated paper. Roll the first flagellum, coat it with glue and glue the next square. We do this with all the blanks until the stamen is of the desired size.
Next, one petal must be glued to the stamen. As a result, you should have a fluffy and voluminous flower for mom, which can be bordered with green leaves or simply glued to the applique without decoration.
Bright dandelions
Bright and cheerful dandelions will always be able to diversify the severity of roses or callas in a paper bouquet. These flowers can be crafted from plain yellow paper. Cut long ribbons as we did with the lilies of the valley.

The difference will be that the strips cut with scissors from one edge should be very frequent and thin. When you attach the petals to the base, you will have a bright yellow and fluffy flower.
Roses
How to get around the beautiful rose? Many people immediately, as soon as they decided that they would make a flower for mom out of paper, opt for it. According to the principle that we will describe, you can make both small roses for applications, and large, even huge, roses for flowerpots.
The manufacturing principle is very simple and straightforward. We cut out hearts of the size that you intended for your flower from paper. It is important that the hearts are of different diameters. Make them the same number (large and small), in order to glue them evenly with smooth transitions to the base.
We make a base - a leg, attach the leaves to it and make a stamen. You can take any method for making the stem and stamen (we have already described them). Now it remains only, observing the dimension of the blanks, to fix the petals. It should be glued from a small petal to a large one.

And remember, whatever flower, whatever craft you make, your mother will definitely like it. It will be the best, brightest and most colorful flower in the world for her, because it was made with your hands!
What should a child do if his mother's holiday is on the nose, but there is no bouquet? Of course, make a bouquet of flowers for her with your own hands! On our site there are master classes of a wide variety of bouquets, and even preschool children will make the simplest of them. Today we will also make a bouquet from a series of fairly simple crafts, the flowers will be from plain paper napkins, but they look almost like real ones, fluffy, on green stems with leaves. Such flowers can stand for a long, long time in a vase, from March 8 to Mother's Day in November and will never wither :)
Master class making a bouquet of flowers from napkins
For crafts, we need: plain paper napkins (bright look better), skewers (or sushi sticks), green paper (colored or corrugated), glue, scissors.
Making a flower. We put the napkin in front of us. We will NOT move the napkin during the folding process so that you can better navigate which side and where to fold.

We fold diagonally.

Then along the second diagonal. The bottom corner will be the center of the circle.

And once again we fold so that the center of the circle remains in place.

Cut off the excess edges on the opposite side from the center of the future circle with scissors.

And cut off the corner, which will be the middle of the circle.

Expand the napkin. It turned out 1 layer of flower petals. One flower needs at least 2-3 such layers. We do more.

To make a stalk, we cut out a long strip of about 1 cm wide from green paper.

We smear the strip with glue and wind it diagonally around the skewer.

Cut out the leaves from green paper.

We collect the flower. We string a napkin on the stem.

We fix it with glue, press it at the base and glue it.

We string the next napkin, then another, just crush them with our fingers.

It turns out a lush flower bud. Spread the petals a little, and it will become even more luxuriant.

Glue the leaves on the stem.

The first flower is ready.

By analogy, we make the rest of the flowers. Just remember that there must be an odd number of them on a holiday - 3,5,7,9 ...

March 8? Mom will be very happy with such a bouquet presented by her children. Mothers Day? All the more pleasant is the attention and bouquet. And even on a regular weekday, make such a bouquet of flowers and show your cute mom or grandmother how you love them!
Summary:DIY paper flowers. How to make flowers out of paper. Corrugated paper flower. Paper flower master class. Volumetric paper flower. Outline flowers. DIY gift for mom.
March 8 - "International Women's Day", the holiday of Spring and Love. On this day, you cannot do without a bouquet of flowers for your beloved women: wives, mothers, grandmothers, daughters! And if these flowers are made by hand, then they are doubly pleasant to both give and receive! In this section, we have collected for you a large number of DIY master classes on making paper flowers.
1. Paper flowers. Paper flower
Origami tulip
With older children, you can make a more complex version of the tulip out of paper. A master class on making a tulip using origami technique, see the link \u003e\u003e\u003e\u003e

And here is another very beautiful paper tulip. you can download ready-made templates for making this paper craft, and follow this link to read the instructions.
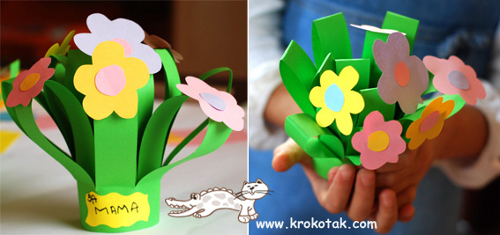
 Paper flowers. DIY gift for mom
 Another spring paper flower invites you to make the site Krokotak.com. For detailed instructions on how to make paper hyacinth, read

You can make a beautiful paper origami flower as a gift for your mom or grandmother with your own hands. For instructions on how to make such a flower out of paper, read the link.

How to make flowers out of paper
Paper flower stems can be made from plastic tubes. Multilayer flowers cut from colored paper of different colors look beautiful, as in the photo below. Flower stand - half of a cardboard chicken egg tray, painted with green paint.

How to cut paper flowers. To cut a flower out of paper, use the scheme shown in the photo below.


How to make a paper flower
To make a festive bouquet of paper flowers as a present for your mom for her birthday or March 8, see the instructions on this site.
2. Paper flowers master class
3. Volumetric paper flowers. Volumetric paper flower
In general, cardboard egg packaging is a very suitable material for making flowers with your own hands. For detailed instructions, see the link \u003e\u003e\u003e\u003e To decorate homemade flowers, the author of the craft used buttons. The flower stalks made of the so-called. chenille (fluffy) wire.


Flowers can be made from plain or corrugated paper. Attach them to the twigs with tape, a glue gun, or string.


More tree branches (with or without green leaves) can be decorated with small paper roses. It is very simple to make such roses. A spiral is cut out of double-sided colored paper, which is then twisted from the outer end into a multilayer cone. You can wind the spiral around a toothpick. For detailed instructions, see the link \u003e\u003e\u003e\u003e If you want to make such flowers for mom by March 8, then cut a few tree branches in advance and put them in the water at home. When green leaves bloom on them, decorate them with paper roses.

5. Paper flowers master class. Flowers from circles
This flowering twig is made using mixed media. Petals and leaves - using origami technique from circles. The techniques of twisting into a tourniquet and rolling into a ball are also used. For a detailed master class paper flowers, see the website
Every country celebrates Mother's Day with great joy, ours is no exception. It is celebrated annually, on the last Sunday of autumn. Among the huge number of holidays, this one is special. On such a day, attention is paid to the women who gave us life, the most dear people to everyone - our mothers. Best of all, your love and appreciation will help you express words, well, and a gift will perfectly complement them. You can do it yourself.
Mother's Day Cards
If you don't know what to give for Mother's Day, make a postcard with your own hands. A postcard is a great way to congratulate a loved one, and when it is also created with your own hand, it is doubly pleasant.
Postcard with chamomile
You will need:
- a sheet of white paper;
- colored cardboard;
- glue;
- decorative paper with a pattern or a piece of wallpaper;
- pencil;
- stationery knife;
- colored paper.
Now you need to follow these steps.
- Draw a daisy petal pattern. Then transfer it to paper and cut about 32 petals and two circles for the core out of white paper.
- Bend the petals slightly in the middle and use a pencil to twist their edges outward. Then glue half of them in a circle to one core, and the other half to the other. Thus, you should have two daisies.

- Glue the two flowers together, and then glue a circle cut out of yellow paper in the center of the top. Bend a sheet of yellow cardboard in half. Draw a flower on any paper that resembles a chamomile.
- Cut it out carefully so as not to damage the sheet. Now attach the template to the side of the cardboard that you marked the front, and transfer the drawing to the center of it. Now carefully cut out the flower.

- From patterned paper or wallpaper, cut a rectangle equal to the size of the postcard page, and then glue it inside (if you have a color printer, you can print the pattern below).

- Cut a few thin stripes out of green paper and curl them a little with scissors. Glue the strips in the upper right corner of the postcard, then attach a chamomile next to them. Draw and then cut out a ladybug and glue it to the flower.

Flower card
Postcards made using the quilling technique turn out to be incredibly beautiful. This technique seems complicated only at first glance; in fact, even a child can make a gift for a mother using it.
You will need:
- double-sided colored paper;
- wooden skewer or toothpick;
- scissors;
- glue.
Instructions for creating a postcard are presented below.
- Slice green paper lengthwise into strips of 5 mm. Wind one of the strips onto a stick, remove it and let the paper unwind a little. Then glue the end of the strip to the base.
- Holding the circle on one side, squeeze it on the other, as a result you should get a shape that resembles a leaf. Make five of these leaves.
- Now let's start making big flowers. Cut out several strips of colored paper, 35 mm wide (cut a sheet of paper lengthwise). Fold the strip 4 times and on one side cut it into thin strips, not reaching the edge about 5 mm.


- Cut strips out of orange or yellow paper that are 5 mm wide. Twist one of them tightly and fix its end with glue - this will be the core of the flower. Now glue the bottom end of the fringed strip to the core and twist it around.
- Glue the end of the fringed strip with glue and spread the petals outward with a toothpick. Make the required number of flowers. Small flowers are made in the same way as large ones. The only thing is that the strips for them should have a smaller width, about 25 mm.
- The middle can be made in two colors, for this use thin stripes of different colors, for example, red and orange.
- Wind a small piece of orange strip, then glue a piece of red strip to it, make the required number of turns, then glue the orange strip again, wind it and fix it.


- To make a two-tone flower, first make a base for a small flower. Without bending its petals, glue a fringed strip of a different color and larger size around the base of the workpiece.
- Now you need to make some curls, for this, fold the green strip in half. From the bent end, twist it onto a stick, then let it straighten.
- Glue a leaflet with the inscription to the base of the postcard (a sheet of colored cardboard is suitable as it), then assemble the composition and secure it with glue.
Wall newspaper
In addition to postcards for your beloved mothers, you can make a poster. A wall newspaper for mother's day can be made in completely different techniques. For example, drawing, applique, photo collage, you can use the same techniques as for making postcards. 

Whatever you decide to make a wall newspaper, be sure to write to the dearest person at least a few warm words and pleasant wishes.
Mother's Day Crafts
Children's crafts for Mother's Day will be a wonderful surprise for all mothers. Older children will be able to make them on their own, but babies with the participation of adult sisters, brothers, dads, or even their educators.
Paper shoe
High-heeled shoes are a purely feminine thing, so for the main day of all mothers, a craft in the form of them, and even filled with sweets, will come in handy.
You will need:
- beads;
- colored paper;
- ribbons;
- glue;
- marmalade, pills or colored caramels;
- scissors.
Instructions for creating a shoe are presented below.
- Print or draw a shoe template and decorations.

- Bend the parts along the dotted lines and glue them.


- After the shoe is dry, decorate it with a flower, beads, or any other decor. After that, wrap the sweets in a piece of organza or any other transparent fabric and place them inside the craft.

Such crafts for Mother's Day with your own hands can be made from plain paper, but they will look much more interesting if they are made of paper with a pattern.
Flower basket
This is a simple, but at the same time very cute craft. She will surely please many mothers.
You will need:
- three wooden skewers;
- green corrugated paper;
- a pair of paper plates;
- scissors;
- colored paper;
- paints;
- glue.
Your actions:
- Cut one of the plates in half; for greater decorativeness, you can do this with curly scissors. Paint half and a whole plate with regular or mother-of-pearl gouache, you can also use acrylic paints. After the paint is dry, glue the plates with the middle inward.

- Paint the skewers with green paint, they will play the role of stalks. Next, cut the colored paper into equal strips and make loops out of them, gluing the ends.

- Cut three circles out of colored paper or cardboard and glue four petal loops to each of them.
- Glue the skewers to the back of the flower heads, then cut out three more circles and stick them on the ends of the skewers, thereby hiding the gluing point. Cut out the leaves from corrugated paper (you can take plain paper) and glue them to the stems.

- Insert the resulting flowers into the basket and decorate as you wish.

Mother's Day Gifts
Every child dreams of giving his mom the best gift in the world. For a mother, however, nothing, even the most valuable thing, can compare with what made her child her own hands. A DIY Mother's Day gift can be anything - vases, paintings, appliques, photo frames, boxes, organizers, decor items, ornaments. Let's take a look at some interesting ideas.
Jar vase
Even a child can cope with the manufacture of such a vase. To make it, you only need a suitable jar, paint, double-sided and regular tape, a photo of a mother or child.
- Cut out a piece of cardboard to a size equal to the photo; it is better to make its edges wavy. Using double-sided tape, glue the piece to the center of the jar.
- Then cover the jar with several coats of paint. When the paint is dry, remove the cardboard fragment - a window will come out.

- Opposite the window from the inside of the can, glue the selected photo with tape.

- If your can has a raised lettering, you can add additional decor. To do this, simply scrape the paint off the bumps with a clerical knife.

Photo frame for mom
A good gift for Mother's Day is a photo frame. You can put your mother's favorite photo in it, this will make the gift even more beautiful and valuable. To make a photo frame, you can use different materials - buttons, shells, cereals, pencils, beads, artificial flowers, coffee beans and even pasta. 
- To create a frame, you can use any ready-made base or make it yourself from cardboard. To do this, you need cardboard from the box, scissors, a pencil, a ruler and glue.
- First you need to decide what size photo you will make a frame for. After that add 8 cm to each side. For example, if the photo is 13 by 18, our frame will be 21 by 26. Now draw, then cut out two rectangles equal to the size of the frame.
- In one of the rectangles, draw a rectangle to fit the photo, and then cut it out a millimeter closer from the marked lines to the middle.

If there are no ideas at all about what kind of craft to make the children for mom, all kinds of flower variations will always help out. A do-it-yourself paper flower for mom is always a win-win option, besides, the work is simple and interesting.
What do you need for the craft?
- Green and yellow cardboard;
- Red corrugated paper or napkin;
- A bottle cap and a piece of plasticine;
- Scissors, glue, pencil.

How to make a paper flower with your own hands?
The flower itself consists of three flowers of different sizes. Therefore, draw and cut out any three flowers with distinct petals from yellow cardboard. The shape should be the same, and the flowers should be slightly different in size.

Glue the flowers together, the largest one at the bottom.

Fold the flower petals down. It is better to do this with a pencil: place it under the petal and, with a slight pressure, stretch the pencil from the base of the petal to its tip, twisting it down a little. As a result, the flower will become voluminous, fluffed up and take on a beautiful appearance.

Make the center of the flower. To do this, take red corrugated paper, cut a strip from it and cut one edge of the strip finely and finely. Roll the strip into a tube and cut again. Of course, you can, without these tweaks, just cut the paper or napkin into small pieces with scissors.

Apply glue to the middle of the flower and glue the pieces of crepe paper.

What is a flower without leaves? Fold the green cardboard in half, draw a part of the sheet near the fold, for example, simple zigzags.

Cut out two leaves.

Make a stem out of green cardboard. Cut a strip (about 2-3 cm) from a narrower area and twist it into a tube, after passing a little with glue. Cut the tip of the stem into 4 pieces.
Now the components of the flower are ready, except for the plasticine, we proceed to assembling it.

Apply glue to the bottom of the flower and glue the stem with the side where it was cut into pieces.

Glue the green leaves, place the plasticine in the lid and secure the flower in it. Now it will be stable, which will make it possible to place it on the table without a vase or other suitable items.


