Step 1. Where is the Universal Report in 1C 8.3
The universal report in 1C 8.3 is called through the Reports – Universal report section:
The Universal Report form looks like this:

Step 2. How to generate a universal report to find errors in accounting
There are situations when a business transaction was completed using a Transaction entered manually: the amount in account 68.02 was reflected, but no movements were made in the VAT accumulation register of Purchases. As a result, the amount in the Purchase Book does not match the amount in the balance sheet for account 68.02.
Important! To understand which register to use to generate a Universal Report in 1C 8.3, you need to go through the flowchart presented below and understand as a result of which document you can find the required register:

It is enough to know that the data in the Purchase Book is collected according to VAT register Purchases to generate a Universal report on it. Since we will compare the Universal report with account card 68.02, the report must be configured so that the information in both the card and the report is presented in a single key.
Step 3. How to set up a universal report in 1C 8.3
Let's configure the report as follows by clicking on the Show settings button:
- On the Grouping tab, use the Add button to add the lines Organization and Registrar. At the same time, we added a grouping by organization to see the total amount by organization for easy comparison with the total amount in the card:

- On the Selection tab, set the selection for the desired organization using the Add button:

As a result, the report will look like this:

In this form, it is easy to compare with account card 68.02, since they have a similar structure. This allows us to understand which document has not made any movement in the Purchases VAT accumulation register or in the accounting register:

Here is an example table of registers that it is advisable to check if an error is detected in a particular accounting section:

Attention! Very often it is not enough to correct one register: perhaps the error will not go away, but will become more hidden and problematic. In particularly difficult cases, it will be necessary to correct a set of registers, and in this case it is better to give the 1C 8.3 database to a 1C specialist programmer for analysis.
Step 4. How to fix the found error
In our example, in the account card 68.02 there was an “extra” document Transaction entered manually, which generated amounts in the accounting accounts, but did not generate movements in the Purchases VAT accumulation register and did not end up in the Purchases Book. That is, in this case, you need to add movement along this register in this document. How to do this is described in detail in.
As a result, we get the following picture:

Step 5. How to use the Universal report in 1C 8.3
A universal report in 1C 8.3 can be built using directories, information registers, documents and accounting registers.
According to the accounting register
For example, instead of an account card, you can generate a Universal report on accounting registers with the following settings:


In order not to clutter the report on the Indicators tab, uncheck the boxes for unnecessary indicators:

Using the following window management commands:

You can place report windows side by side for easy data comparison:
By information register
For example, in 1C 8.3 it is necessary to find information on employees who already have personal bank accounts opened to transfer wages.
We will generate a Universal report for the information register of the same name, making the following settings:


If there are several organizations in the 1C 8.3 database, you can set the selection for the desired organization on the Selection tab. We get this option:

According to the directory
Suppose you need to get a list of Buyers with their addresses and phone numbers from the 1C 8.3 database. Let's make the following settings:

Important! We made a selection based on whether the counterparty was included in the Buyers group of the Counterparties directory, but if the user made a mistake and included the purchasing counterparty in another group, then this counterparty may not be included in the report.

The figure shows that the names of the indicators are in brackets, and next to them is the column heading, which is more understandable and readable for the user, which will be displayed in the report. To change the title, right-click on the line with the indicator and select “Set title”:

As a result, we get a report like this:

How the Universal report works in 1C
Let's consider a few more questions, the answers to which can be obtained using the Universal Report in 1C 8.3.
Question No. 1
How to make a selection in a Universal report only for a specific buyer and find out how much of a specific (certain) product range was sold to him?
Answer: When posting a Sales document (act, invoice) in 1C 8.3, movements are formed in the accounting register and VAT Sales (we do not take it in the case of separate VAT accounting). There is no analytics for goods in the VAT Sales register, so you will have to take data from the accounting register.
In this case, the Universal report is configured as follows:
- Period;
- Accounting Register;
- Posting journal (accounting and tax accounting);
- Subconto movements:
- Next, click on the Show settings button and add the following values on the Selection tab:
- Account Dt – Equal to – 62.01;
- Account Kt – Equal to – 90.01.1:

- On the Grouping tab the following values are added:
- Subconto 1 Dt;
- Subconto 3 Kt:


- After these settings, you need to click the Generate button and the Universal report in 1C 8.3 will be built in the required form:

Question No. 2
Expenses do not include wages, taxes and contributions. These expenses are not visible in KUDiR. The simplified tax system for payment is calculated without these expenses. How to find an error using the Universal Report?
Answer: Let's build an analysis in the Universal Report based on the accumulation register of Expenses under the simplified tax system. In this case, the Universal report is configured as follows:
- In the report header for selecting information, the following values are indicated:
- Period;
- Expenses under the simplified tax system;
- Balances and turnover:
- Type of expense;
- Consumption element:

- On the Indicators tab, the values should be set as in the figure:
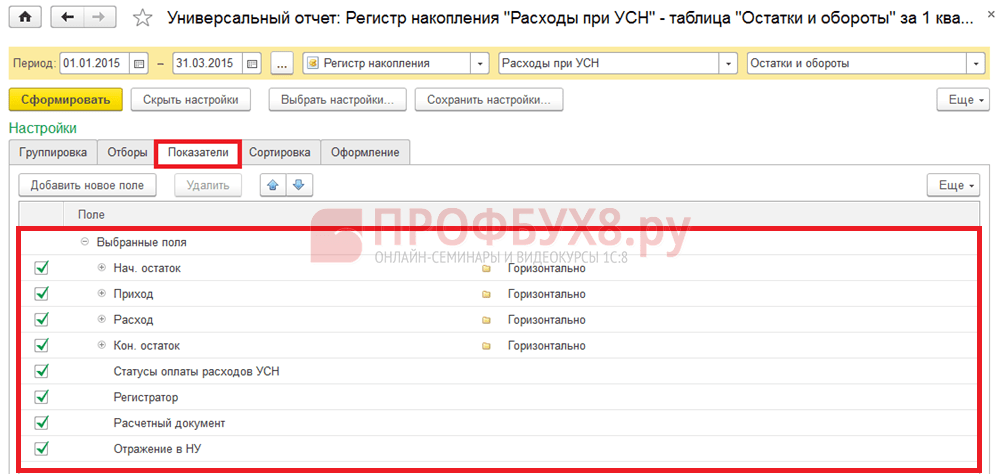

From the report we see that some expenses in the column Reflection in NU listed as Not accepted. This means that these expenses will not be automatically included by the program in KUDiR and an error was made when entering documents. It is necessary to correct the analytics in such documents, that is, the cost item must have the value Accepted in NU as shown in the figure:

After this, you need to re-post the payroll documents and re-close the months.
Question #3
In KUDiR, NU expenses do not include the cost of goods sold. How to find an error using the Universal Report?
Answer: In 1C 8.3, expenses are accepted into KUDiR in accordance with the conditions set in the accounting policy. When selling goods in accordance with the Tax Code of the Russian Federation, the following conditions are: the goods must be capitalized, payment for them must be made to the supplier, and the sale of these goods must be reflected. When all three conditions are met, the costs will be included in the KUDiR.
Let's build a Universal report in 1C 8.3 for the accumulation register of Expenses under the simplified tax system and clarify the conditions that are not met for acceptance as expenses in the NU. In this case, the Universal report is configured as follows:
- In the report header for selecting information, the following values are indicated:
- Period;
- Accounting accumulation register;
- Expenses under the simplified tax system;
- Balances and turnover:
- Next, click on the Show settings button and add the following values on the Grouping tab:
- Type of expense;
- Consumption element:

- On the Indicators tab, the values should be set as in the figure:

- After these settings, you need to click the Generate button and the report will be built in the required form:

As can be seen from the report, the reason why expenses for purchased goods do not fall into KUDiR is the lack of payment to the supplier for the goods.
Consequently, either the payment for the goods to the supplier was not made correctly, or it simply simply did not exist, and therefore the expense for the purchased goods should not fall into the KUDiR.
Question No. 4
How to view the price of goods receipt in 1C Enterprise 8.3 (8.3.8.1964) using the Universal Report?
Answer: There is no special report for tracking the price of goods receipt in 1C, but you can build your own report using the Universal Report on Receipt documents (act, invoice). In this case, the Universal report is configured as follows:
- In the report header for selecting information, the following values are indicated:
- Period;
- Document;
- Receipt (acts, invoices);
- Goods:
- Next, click on the Show settings button, and on the Grouping tab, add the Nomenclature value:

- On the Indicators tab, the values should be set as in the figure:

- After these settings, you need to click the Generate button and the report will be built in the required form:

ATTENTION! Please note that not every problem can be solved using the Universal Report. Its main inconvenience is that it works ONLY with one object of analysis: a directory, document, accounting register, information register or accumulation register.
It does not track complex connections between objects. For this purpose, there is a special DCS tool – Data Composition System. With its help, programmers and experienced users can generate complex reports, select the necessary information, and add their own fields for calculation.
Creating reports is one of the main functions of any accounting system. What types of reports exist in 1C Accounting 3.0, how reports are configured in 1C Accounting 8.3 and what tools exist for creating new reports - we will look at today.
Types of standard reports
The company's 1C accounting program is initially pre-installed with a wide range of reports that allow you to obtain all the necessary information. Their full list is presented in the “Reports/Standard Reports” section:
Also, each section of the program presents other types of standard reports, for example, salary reports in 1C 8.3 are stored in the “Salaries and Personnel/Salary Reports” section.
In each report, there is the possibility of “additional customization” of the report, namely, you can add or remove some additional fields, add grouping, selection, etc.
Let's consider the setup option using the example of adding an additional field to the standard report “Account balance sheet” (select account 10). To do this, from the “Show settings” button, go to “Additional fields”, add a new field, and in the selection form go to the field we need, for example, to reflect the item number in the report, select the “Article number” field, which is located inside the “Nomenclature” field (to expand the field you need to click “+”):

After clicking “Generate”, the additional field we selected appears.
As an example, consider a situation where the report requires including the entire list of items containing the word “boot” in the name. What do I need to do? By clicking “Show settings”, go to the “Selection” tab, add a new field, and in the window that appears, opening the “+” field “Nomenclature”, select “Name”.
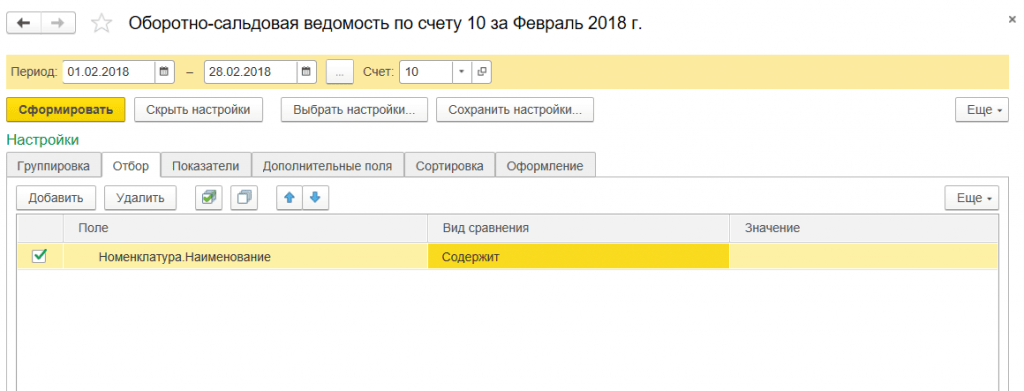
After generating the report, we receive a nomenclature that contains only the value we specified in the name.
Generating reports by document
In the “Standard reports” section there is a universal report that allows you to display information from such configuration objects as:
- Document;
- Directory;
- Accumulation register;
- Register of information;
- Calculation register.
Let's look at examples of situations where a report will help the user not to resort to developing external reports, but to use a standard settings mechanism.
For example, we need to generate a report that will reflect all goods received from a specific counterparty for a certain period. To do this, in the report header, select from the drop-down list the type of object – “Document”, the type of object – “Receipt (acts, invoices)”, and indicate the type – “Goods”.


*The Counterparty field is not there initially.
In the “Type of comparison” field set “Equal”, in “Value” select the desired counterparty from the directory.

At the top of the report, indicate the required period and generate the report.

You can save the settings we have made: to do this, click the “More/Save” button.
Let's consider a situation where, in order to correctly generate regulated reporting, it is necessary to check all movements in the “Separate VAT accounting” register by document.
To do this, in the report header, select the object type from the drop-down list - “Accumulation Register”, in the next field select the object type - “Separate VAT accounting”, in the last field select the type - “Balances and turnover”.
In order for the report to display information in the context of documents, click the “Show settings” button to go to the report settings, then go to the “Indicators” tab, add a new field and in the window that appears, select the “Registrar” field (“registrar” is the document that contains a movement was formed along the accumulation register). The newly added field is reflected at the bottom of the list of fields by default: using the “blue arrows” we move the “Registrar” field to the top of the list.

In this article, we looked at what options exist for working with reporting in 1C Accounting 8, how to use the report settings and what information can be obtained using a universal report.
The time has come to submit the next regulated report, the configuration has been updated and the latest version of the financial statements has been installed, but bad luck - the parameters of the required form do not include the required period!
No need to panic and blame the service company or programmer for everything! A few simple manipulations will save your nerves and time, and most importantly money!
For example, you need to submit a reporting form for the 4th quarter of 2014. Currently, there is no such period in the list for selecting parameters of the reporting form (Fig. 1).
In order to independently add the required period to the list of reporting periods, you need to go to the “Reporting Periods” directory through the main menu
Operations -> Directory... -> Reporting periods (Fig. 2). 
Advice! In order to quickly find the desired reference book or report in the general list, just start typing its name on the keyboard! In our example, just type “otch”.
In the directory that opens, click on the “Create” button (Fig. 3)

A window for creating a period will open, in which you need to specify the frequency and start date of the period being created, the rest will be filled in automatically! (Fig. 4). Click “record and close”.

The period “year 2014” has been created and will be displayed in the list, but inside it is empty, and we need to have subperiods equal to a quarter!
Let’s add them using the “Fill” button, provided that the cursor is on the desired period (2014 is highlighted in blue!) (Fig. 5).

In the window for generating reporting periods, check the boxes for the subperiods you need, in our example these are quarters (Fig. 6). Then click the “Fill” button.

Now the added period will appear in the parameters of our reporting form. The whole procedure will take no more than a minute. The result can be seen in Figure 7.

In the future, you will be able to independently add new periods or edit existing ones to suit your requirements. The same actions must be performed if the required period is not available when adding planned appointments. Good luck with your reporting!
Alexandra Luft. Consultation Line Specialist.
They say that the name 1C originally meant the phrase “one second”, i.e. programs must produce reports quickly, “in one second.” The speed of the reports is very important, but it is even more important that the reports provide the correct information - we will understand this using the example of creating a simple report in 1C 8.3 based on the Trade Management 10.3 configuration. To create correct reports, it is desirable (even strongly recommended) to be able to configure 1C and to be able to program a little in the internal language and query language of 1C, although, on the other hand, creating reports is an excellent opportunity to start mastering these skills.
This description is educational for understanding the basic principles of creating 1C reports
How to create a report in 1C 8.3
To create a report, you need to open 1C in configurator mode; to do this, in the 1C launch window, select the desired database in the list and click the Configurator button:
In the configurator itself, go to the File menu and select New:

In the menu that appears, select External report and click OK:

After this, a new report window will open. In the Name field, enter the name of the report; it must be without spaces or special characters:

How to make a report using a layout
This method most requires programming skills in 1C, but here we will not analyze the mechanisms for receiving and processing data, we will make a simple report to understand the mechanism for launching the report and displaying the report form on the screen:
In the report window (which opens when creating a report), in the lower list, place the cursor on the Layouts item and, when you right-click, click Add in the menu that appears:

In the layout designer that opens, you can specify the name of the layout, Spreadsheet Document should be selected as the layout type, and then click the Finish button in the designer:

This will open a layout window resembling an Excel sheet:

In this layout, you need to create areas - groups of rows or columns that the program will use as templates, insert data received from the database into them and display these templates on the screen, thereby putting together a report from these parts.
Let's create a report that displays a list of items. To do this, we will create two layout areas: the report header and the item line.
To create a header area, left-click on the line header (where the line number is indicated) to select the line like this (the entire line should be selected with one click on the header):

After that, go to the Table menu of the main menu, go to the Names submenu and click on the Assign name item:

The program will prompt you to specify the Area Name, the name should also not contain spaces or special characters, after that click OK, it should look like this:

Now in the created area you need to enter the text that will be displayed in the report and format it. To do this, enter text in the first cell, for example, “List of items.” Working with cells is similar to Excel.
To format text in a cell, right-click on the cell and click on Properties. The cell properties window will open on the right. Scrolling down the contents of the window, find the Font field and click on the “...” button:

In the window that opens, in the Style section, check the Bold box and click OK:

The layout should look like this:

In the same way, we create the item line area, but do not highlight it in bold:

In the line area you need to indicate that Name is a parameter, i.e. that the real name of the item will be substituted there when outputting the report. To do this, open the properties of the cell with the name and in the properties in the Filling field, select the value Option, this completes the layout setup:

We return to the main report window and in the lower list, right-click on the Forms item and click Add:

In the report form designer that opens, click the Finish button, the report form will open, double-click on the Generate button:

As a result, the button properties window will open on the right side of the screen; in the Action field, click on the magnifying glass:

After this, a form module will open in which you need to program the generation of a report:

First, replace the selected text with the following program code:
//create a spreadsheet document that will be filled with parts of the report and displayed on the screen
TabDocument = New TabularDocument;
//next, we get the layout that was created when creating the report
Layout = GetLayout("Layout");
//now we need to display the report header, for this we get the header area from the layout and display it in a spreadsheet document
AreaHeader = Layout.GetArea("Header");
TabDocument.Output(AreaHeader);
//using a query we get a selection of item names that need to be displayed in the report
Request = New Request;
Request.Text = "
|SELECT
| Name
|FROM
| Directory.Nomenclature
|";
//get the item line area from the layout - we will access it in a loop to display each item
AreaString = Layout.GetArea("String");
//process each name from the resulting selection in a loop
Select = Query.Run().Select();
While Select.Next() Loop
//to display the next line, you need to specify the next name in the area parameter (we configured the parameter itself when creating the layout)
AreaString.Parameters.Name = Selection.Name;
//the parameter has been filled in, now you can display the string
TabDocument.Output(AreaString);
EndCycle;
//the spreadsheet document has been generated, now we display it on the screen
TabDocument.Show("List of items");
When the text is copied into the form module, lines starting with a double slash “//” will be highlighted in green - these are comments that describe what each line of code does:

Let's summarize what lines of program code are needed to generate a report:
- It is necessary to create a spreadsheet document that will be filled with parts of the report and displayed on the screen; this is done with the line “TabDocument = New TabularDocument;”
- We need to get the report layout, from it we will get the report structure in parts (areas), this is done with the line “Layout = GetLayout(“Layout”)”
- To display each of the areas, you need to get it from the layout and output it to a spreadsheet document, this is done with the lines "Header Area = Layout.GetArea("Header")" and "TabDocument.Output(HeaderArea)"
- If you need to fill in parameters that become known only when the program is executed, then before displaying the area you need to fill in such parameters, this is done with the line “AreaString.Parameters.Name = Selection.Name”
- And only when the spreadsheet document is filled with all the necessary parts of the report, it is displayed on the screen, this is done with the line “TabDocument.Show(“List of items”)”
And now you can check the operation of the report - open 1C in enterprise mode (button 1C: Enterprise in the 1C launch window). In the main menu, go to the file menu, click Open:

Find and open the saved report file. In the form that opens, click the Generate button:

and we get a list of nomenclature:

This is just one way to create reports in 1C. In the following articles we will look at others.


