Such jewelry came as an absolute surprise in the fashion world. Who would have thought that such beauty could be created from scraps of fabric! And the best part is that they are so gentle, unexpectedly refined DIY fabric beads It's not at all difficult to do.


DIY fabric beads
For such jewelry work, scraps of fabric that remain after cutting and sewing and are stored somewhere in the corners of the cabinets will be useful. Once upon a time, our grandmothers sewed multi-colored blankets and rugs from such micro-cuts. From a long-forgotten skill, today this technique has turned into a fashionable craft for making original jewelry.
Strings of fabric beads made by yourself look good, and you won’t be able to buy such an exclusive model anywhere. As for materials and tools, any trinket can be used for fabric beads: from a scrap of fabric and bright braid to a metal chain. But first you will have to decide what outfit you need to make the jewelry for. After all, it is for this that you will need to choose pieces of fabric with the appropriate color and texture of the material.

To make fabric beads, you will need the fabric itself, beads and sewing tools: thread, scissors, soft meter

We sew a fabric “tube” according to the diameter of the beads, put the beads there one at a time, each time “tying the “tube”

You can choose multi-colored variegated scraps, similar in color, or simply plain pieces of fabric. Satin ribbons of different widths, light beads of different sizes, as well as beads may be suitable.
The most spectacular beads are made from fabric in which the colors smoothly blend into one another. Also in the process of work you will need threads to match the color of the selected fabric, a needle, padding poly, scissors, cotton wool and a little imagination. It is believed that there are more than ten ways to knit fabric beads with your own hands. Among them there are completely simple options, and there are also beads, the manufacture of which requires serious skills and abilities. Beads look very stylish when they are made by combining multi-colored velvet fabric with glass beads, transparent acrylic and even crystal beads. Fabric beads go well with metal ones. If you get the hang of it, you can make jewelry to match any dress. You can also please your girlfriends with such a hit gift.
Making fabric beads step by step
- So, according to the technology of how to make beads from fabric, you will need satin fabric and cotton wool.
- For the width of the fabric, 6 centimeters is enough, but the length can be any, as long as you can then put these beads on yourself over your head.
- First, the cotton wool needs to be divided into equal pieces, with which future fabric beads will look the same.
- Prepared cotton balls are laid out on the fabric one at a time, one at a time.
- Then the cotton wool is wrapped in fabric like a tourniquet.
- The resulting bead is tied into a knot on both sides. All subsequent pieces of cotton wool are also wrapped until the entire strip of fabric is finished.
- All that remains is to tie the ends of the bead threads.

You can make individual fabric beads. We take glue in a stick, rectangular pieces of fabric, beads, scissors and a knitting needle to adjust the beads if necessary

Make sure that the piece of fabric matches the diameter of the bead

Coat the fabric with glue...

...and wrap the bead in it

The edges can be sewn, knitted or glued too
You can make similar fabric beads with beads
- Beads of any size are taken. Moreover, you can use beads from a torn necklace, the appearance of which has become worn out over time and has lost its brightness.
- Squares of a suitable size for beads are cut from the brightest fabric.
- Each bead is carefully wrapped in a prepared square.
- The edges are sewn together with a needle and thread of a color matching the fabric. After all the beads are prepared, they need to be strung on a fishing line.
- You can alternate different types of beads: first take one wrapped in fabric, and then a bead without fabric, and so on until the end. You can tie a bead lock to the edge of the fishing line.
Fabric beads on a sewing machine
You can make fabric beads with your own hands using another technology. To do this, you will need a piece of fabric of a length that is suitable for the beads you have in mind. Its width should be slightly larger than the bead. We sew the strip along its entire length using a sewing machine or using a needle and thread. On one side, we sew up the edge of the strip immediately. Using a pencil or knitting needle, turn it right side out. We put the first bead into a fabric tube and tie it with a thin ribbon. The color of the ribbon should be in harmony with the color of the fabric. The bead should lie tightly in the fabric bag. Then we put the next bead and tie it. And we do this until the end of the fabric tube. Carefully sew up the edge. We fasten the ends together, and also tie the junction with a ribbon. This will make circular beads. Their size needs to be thought out in advance so that the beads can be easily put on over the head.

Make cute beads using a sewing machine

You will need fabric, scissors, a needle and thread and the beads themselves, and not necessarily a perfect round shape

Cut a long piece of fabric of the required width (twice the diameter of the beads + seam allowance)

Fold in half lengthwise...

We sew on a machine...

Turning it inside out...

We tie one end...

We insert the bead...

Let's tie it again...

And so on until the end
Fabric beads can be made without using beads. To make the process of working with fabric beads more understandable, you can watch DIY beads master class in pictures or videos at the end of the article. If you use your imagination, making such beads will be very fast and interesting. You just need to be able to do basic stitches. Take pieces of fabric of two colors. To make the beads more interesting, the fabric can be in contrasting colors or in such a way that the tones softly blend into each other. Identical circles are cut from the shreds. For example, three circles of a larger diameter and two of a smaller diameter are cut out of fabric of the same color. Each of them is sewn with an overlock stitch, but not completely: you need to leave a small unsewn gap for turning the workpiece inside out and filling it with padding polyester, which will give the beads a convex shape. The holes are closed with a blind stitch, and each pad is stitched from center to edge with a large stitch. As a result, each bead will produce eight separate petals. The finished flower beads are connected into one thread. Ribbons that match the color of the necklace are sewn to the ends of the beads: with their help, it will be attached to the neck. You can replace the ribbons with a ready-made strand of ribbons of the desired size, which will allow you to put the beads over your head.

Another way to make fabric beads. The materials are the same: fabric, beads, knitting needle, scissors, glue


Such fabric beads can be decorated with glass beads, bead modules, and sequins. You can also combine beads of contrasting sizes. Beads made from fabric woven on the fingers also look very extravagant. For such a necklace you will need: knitted fabric, scissors, large wooden beads, metal cylinders, accessories for attaching beads. First you need to cut the fabric into long strips and sew them together to form a kind of cord.
Weaving a necklace from a fabric thread works like this: the thread is located between the palm and thumb. There remains an end of 20 centimeters. The ball is pulled alternately between the fingers across the entire palm. Now the thread is intertwined around all fingers, first over one, then under the next. At the beginning of weaving, the thread is passed three times between the fingers in one direction and in the other direction. Similar DIY fabric beads become like a strip knitted on large knitting needles. This is achieved due to the fact that on each of the fingers, like an intertwined pattern, there is a loop that will be intertwined with the fingers in this order: each lower one, starting from the right side, is threaded over the upper one and removed. Then a new complete row is made in both directions and repeated again. To close the last row, you need to transfer the loop from one finger to another, stretching the bottom loop into the top one, and so on until the end of the row. All that remains is to thread the ends into the bead, secure with cylinders, and then attach the fittings.
Video
04.04.2018 07:56
You can make a lot of beautiful and interesting jewelry with your own hands from knitted yarn: bracelets, beads, keychains, headbands. It’s a pleasure to knit jewelry from it – it’s soft and pliable. In this article we will introduce you to some ideas for making jewelry from this beautiful textile material.
Knitted yarn, or also called ribbon, textile yarn, is a wonderful material for creating designer jewelry. Such decorations can be made suitable for any style of clothing and for any occasion - romantic and delicate, ethnic, boho style, casual and festive, and even brutal, especially if you use military-colored yarn for decoration. The yarn is sold in various color shades - the delicate and rich colors of the entire palette are so beautiful and varied that you just have to decide what you like. Just look how beautiful she is knitting yarn palette. You will probably like some shade.
It is worth noting that jewelry made from knitted yarn is voluminous, soft, pleasant and comfortable to wear. In order to add additional volume, you can use a large number of ribbons and weave the decoration in several stripes, combining different colors or using a single color.
In jewelry, the yarn can be positioned freely, without knots or complex weaves. Please note that you can make decor - a bow, a flower from the yarn itself. 


Many craftsmen use knitting yarn for knitting jewelry. To create them, you only need a crochet hook. The special thing about this type of jewelry is that you can make it without a clasp, since the yarn stretches. 
Also be sure to try weaving jewelry by tying the yarn in knots. Thanks to special knotting techniques, you can make many interesting options. To create jewelry, you can use your knowledge of the macrame technique, or you can tie the simplest knots and get an interesting solution. 


Knitted yarn goes very well with jewelry accessories: pendants, chains, rings, metal beads, glass beads. The combination of different materials and textures will give your jewelry a zest and add sophistication, shine, or create the desired idea for an image. 


A beautiful decoration can be made even without special knowledge of weaving; just braid the knitted cords and the stylish decoration is ready. In one product you can combine several options - braids and yarn without weaving and get an original decoration. 


Bring your ideas to life with amazing knitting yarn!
Try it yourself. You will need:
Today we will make beads from fabric with our own hands. Their distinctive feature is that each bead will be made using the popular squinting technique. We will tell you how to make beads, for which you only need scraps of fabric and simple jewelry. Don't worry, it's not difficult.
It is very important to learn how to make beads. Then you can assemble from them not only a necklace, but also a bracelet or even an unusual brooch. Nowadays fabric accessories are very popular. Check, craftswomen offer ready-made products quite often, and not everyone can afford them. Learn to make them yourself, then you will have a fashionable and beautiful accessory that any girl will envy.
What do we need?
- scraps of fabric (approximately 4*4 cm, but the exact size depends on the desired diameter of the beads)
- strong needle and strong thread
- cotton wool, yarn or any other filler (it is needed to “fill” the beads)
- beads, bugles, sequins or small beads for decoration (optional)
- cord or brooch base
How to make beads?
We cut out a square piece of fabric (about 4*4 cm) and use large stitches to mark a circle on it - one that fits completely into it.
We pull the thread and pull our shred into a bag.
At this stage, we fill it with cotton wool or other filler, and hide the excess ends inside. We tighten it tighter.

And now the squinting begins. We pierce our bag with a needle anywhere. We pass the thread through the entire future bead. We tighten it. We pierce in another place - skip and tighten. To prevent the bead from turning out one-sided, do this on all sides.
You can quilt the bead from all sides. This will make it almost perfectly round. If you choose a felt type fabric, it will be very similar to those made using the technique of dry or wet felting of wool (felting). Or you can deliberately make larger stitches to emphasize the squinting. In this case, by the way, it is better to choose satin fabric for the base.
Make as many beads as you need to make the desired accessory.

Standard beads using the squinting technique will require approximately 20 beads. It is much more beautiful when they are of different sizes: large in the center, smaller closer to the edges. To make beautiful beads, string squeezed beads onto a cord, alternating them with beads or charms. The same can be done to make a bracelet.
Another great idea is to create a brooch. Choose a large pin as a base (you can find them in craft departments) and carefully attach the squeezed beads to them.

Everyone has in their closet a collection of old, unnecessary T-shirts or summer T-shirts that are no longer pleasing with their style. Just don’t rush to throw them away, because from such seemingly useless things, you can build many useful and fashionable ones. For example, from old T-shirts or T-shirts you can make luxurious and stylish scarves, rugs, children's toys, dresses, sundresses and... You won't believe it, designer jewelry.

The news portal “site” in this article continues the theme of remaking old things into new ones, and this time we will talk about fashionable and stylish, one might even say, designer jewelry. Yes, yes, in this article you will learn how to make luxurious pendants, necklaces, beads, bracelets and earrings from old T-shirts and T-shirts.

To make stylish jewelry with your own hands from old T-shirts and T-shirts, you will need: old knitted T-shirts or T-shirts, scissors, pliers, and the necessary accessories (metal rings, chains, clips, fasteners, earrings, etc.)


DIY necklace from a T-shirt/shirt

Cut a piece of knitted T-shirt into thin strips, then pull them to form neat tubes. Now tie the finished laces onto a metal chain.

This way you can make a necklace of one color or using knitwear of different colors, a multi-colored necklace.


DIY necklace from a T-shirt/shirt

Another option for making a necklace with your own hands is to make several long strips of knitwear. In our case there are 5 of them. Each of them is 3 cm larger than the previous one.


The necklace is decorated with metal tubes of the same size.

To make these trendy earrings you will need earring loops, two metal rings, small pieces of chain and two strips cut from an old jersey/t-shirt.

Tie a metal chain on a metal ring, and tie a knitted cord on top.
DIY pendant from a T-shirt/T-shirt

To make such a fashionable pendant in a minimalist style, you will need a long chain (which is also the basis of the jewelry), a metal tube about 6 cm in size and several small pieces from an old T-shirt/T-shirt.

DIY necklace from a T-shirt/shirt

To make such an amazingly beautiful necklace you will need T-shirts in three different colors. In our case, it is dark blue, blue and light blue.

Braid the strips into a tight braid, and then thread it through the metal rings.


You can make a bracelet in the same way. And then you will have a fashionable and original set of jewelry.
DIY earrings from a T-shirt/T-shirt

Such simple at first glance, but fashionable and stylish earrings, can be made by anyone with their own hands.

A small piece of knitwear, two 2 cm metal tubes, loops, and two pieces of chain.
DIY bracelet from a T-shirt/T-shirt

As you can see, not only necklaces and earrings can be made from an old T-shirt/T-shirt, but also fashionable bracelets.

Braid your hair, invent your own unusual weaves from knitted strands and form a bracelet.
DIY beads from a T-shirt/shirt

Try making a two-color braid using knit cords from a tank top/T-shirt and weave a thin chain into it. And you will get luxurious and fashionable beads.

You can try to make a monochromatic braid and weave a chain into it, it will also turn out interesting and original.


Braid several voluminous braids from knitted pieces and connect them together. You will get voluminous and luxurious beads.


Or you can not braid anything at all, but join together pieces of knitwear of the same length.

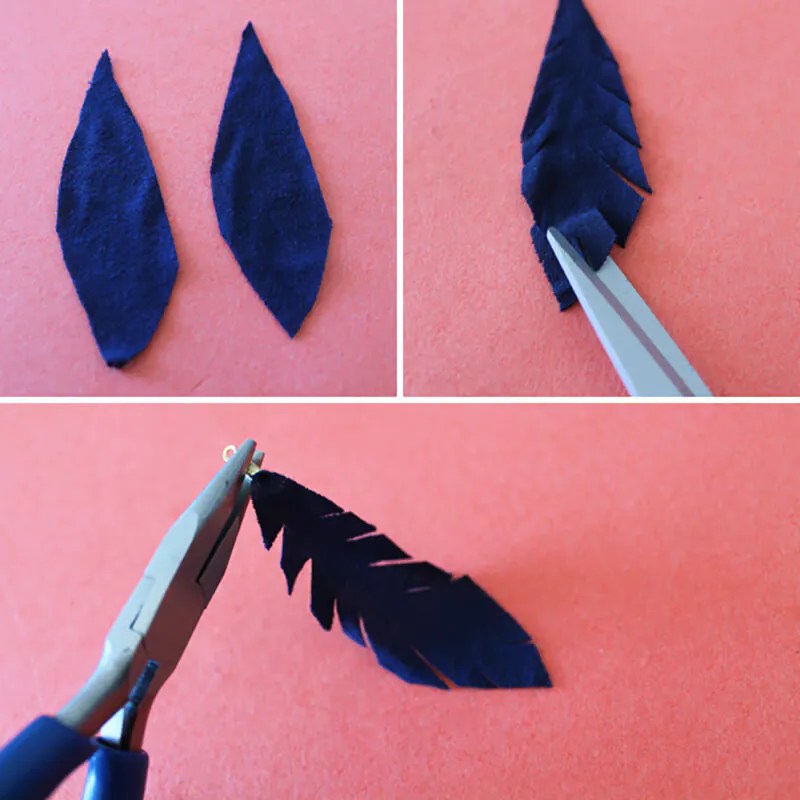
DIY feather earrings from a T-shirt/shirt

Cut out small leaves from an old T-shirt, thread earring holders into them, and your unusual feather-shaped earrings are ready.

DIY necklace from a T-shirt/T-shirt
Beads made from fabric yourself will be a wonderful addition to the extraordinary look of any woman.
Circles of the desired diameter are cut out of the fabric, which are pulled together at the edges inward using any convenient seam. To give the future bead volume, you should place a real bead, finely chopped fabric or yarn, a piece of cotton wool, padding polyester or foam rubber into the resulting fabric bag. After this, the bag is tightened with thread until it is given a round shape. In the case where there is no filler, the bag is tightly stitched in different directions and a textured blank is obtained.
To make cylindrical beads, rectangular strips of fabric are twisted into a tight tube. The resulting beads will become even more original if they are made from multi-colored scraps of fabric or glass beads or sequins. Another option for making cylindrical beads from fabric is to cut the fabric into long narrow isosceles triangles and twist them onto the rod, starting from the base. Secure the corner of the triangle with PVA glue. The result is a cylinder with a convex middle. To prevent the fabric from fraying, you can cover the beads with colorless nail polish. The number of beads is determined by the planned length of the finished product.
Fabric or ribbons that are sewn into the outer beads are suitable as fasteners using the tying method. The convenience of this clasp is that it allows you to adjust the length of the beads as desired. Ready-made locks for beads (carabiners, lobsters, springels) can be purchased at craft stores, or you can use a lock from an old chain.
Beads can be made from multi-colored scraps of fabric or decorated with beads, bugles, and sequins. Photo: thinkstockphotos.com
When assembling the entire composition between fabric beads, both metal beads and ordinary glass beads, matched both to the tone of the fabric and vice versa in a bright contrasting color, will look beautiful. Jewelry made with beads of different sizes or shapes will also look unique. Also a stylish addition are bows or flowers made from satin ribbons, or other various decorative elements. Each new detail added will transform your handmade beads into a completely new piece of jewelry.
Handmade beads will add charm and uniqueness to their owner. Unique in their design, almost weightless, such beads can be an excellent gift for any occasion.


