Modeling from cold porcelain is easier than working with salt dough and cheaper than making decor from polymer clay. Be sure to check out this technique on the Women's Hobbies website.
Needlewomen became acquainted with cold porcelain at the beginning of the last century. It was invented by craftsmen from Argentina who used a plastic mixture instead of clay to create small sculptures and figurines. But it soon became clear that the material is perfect for elegant jewelry, interior decor items, and artificial plants. Since then, modeling from cold porcelain has become more and more popular every day, gradually turning into an independent branch of decorative and applied art.
How to become a home sculptor: what you need to get started
Due to the fact that cold porcelain is a cheap, environmentally friendly and easy-to-use product, almost everyone, young and old, can learn to create with it. This hobby can be safely included in our list. At the same time, it is not at all necessary to have an art education or be a born sculptor.

For kids, this entertaining activity has a special benefit: in addition to the fact that they can create interesting things on their own, modeling also greatly develops fine motor skills and creative thinking. Excellent!
In order to learn how to create a variety of products from cold porcelain, from simple figures to naturalistic-looking flowers, you just need to be patient, high-quality modeling material and a minimal set of tools, which at first can even be replaced with suitable improvised means - a variety of knitting needles, sticks, knives , spoons or plasticine stacks.
By the way, the advantage of cold porcelain over the same plasticine is that after some time it completely hardens, so products made from it are more elegant, durable and resistant to mechanical damage. True, it takes several days for the final drying of crafts made from this material.
Many modern manufacturers of goods for “hanmade” and creativity have quickly navigated the consumer market, offering a wide selection of ready-made masses for modeling. But it is better for a novice master to use a homemade mixture. There are several good reasons for this:
- cold porcelain prepared at home is much cheaper, so there is no fear of spoiling it and, even more so, throwing away the raw materials;
- during the cooking process, it is not at all difficult to independently adjust the density and elasticity of the mass, so to speak, “for yourself,” so in the end it is more comfortable to work with it;
- You can make the right amount of material at any time.
The first composition of this unusual creative material, invented by the Argentines, included corn starch, glue, glycerin and vegetable oil. In principle, in our time the recipe has changed little, with the exception of small nuances that each master has his own.
Today, cold porcelain for modeling is usually prepared in two ways: by brewing and by mixing all the ingredients. For those who are encountering this process for the first time, it is better to do without cooking and use the recipe below.

Ingredients:
- 1 cup (250 g) cornstarch;
- ¾ cup PVA glue;
- ½ glass of water;
- 1 teaspoon glycerin;
- 1 teaspoon of any white hand or face moisturizer.
Preparation procedure:
All ingredients must be mixed in a suitable container. To begin with, it is better to dilute the glue with water, and then add it to the starch in small portions, stirring.
While kneading, add glycerin and cream to the mixture. You need to knead the resulting “dough” until all the ingredients turn into a homogeneous elastic mass. In this case, it is advisable to periodically lubricate your palms with a small amount of vegetable oil or cream so that the mixture does not stick to your hands so much and it is more comfortable to work.
If you need porcelain of a certain color for modeling, then during the mixing process you can add a couple of drops of liquid food coloring or a little oil paint to the mixture. But for painting finished products, almost any paint is suitable - from unnecessary cosmetic shadows to acrylic and gouache.

When choosing ingredients, keep in mind that the structure and color of the modeling mass depend on them: from potato starch it turns out denser and slightly grayish, and from corn starch it turns out airy, translucent, with a slightly yellowish tint. Cream and glycerin give cold porcelain a pleasant, smooth texture. They can be replaced with Vaseline, which makes the mass softer and more pliable to work with.
Modeling tools and accessories
To make the sculpting process easier, there are a lot of tools that are worth investing in once you realize that you like the chosen activity and decide to take creativity more seriously. Among them, the most useful are various stacks, bubbles, molds, and cutters.
Molds– these are forms for creating three-dimensional parts and compositions, and cutters(cuttings) - molds for cutting out flat elements, similar to those used for making cookies. It must be said that many craftsmen eventually begin to make these devices themselves from scrap materials.
Gurgles are called sticks with balls of different sizes at the ends. They are used to smooth the surface of the product, creating recesses and bulges.

In the process of making flowers, you also cannot do without a plastic board and a rolling pin for rolling out the mass. A machine for rolling out spaghetti dough greatly facilitates and speeds up the work - it also rolls out cold porcelain evenly and thinly.
How to turn a hobby into a way to make money
Modeling from cold porcelain is very easy to turn from an ordinary hobby into a fairly profitable business. Such decorative products are in very high demand on the handmade goods market and are gladly accepted for sale by art salons, souvenir shops, shops selling interior decor items, or salons specializing in holiday themed decorations. You can also sell your creations on special online platforms for craftsmen or create them to order.
Cold porcelain flowers are in particular demand among buyers. Beautiful compositions made by the hands of a skilled craftsman can sometimes be distinguished from real plants only by touch, so they are often bought to decorate expensive interiors in restaurants, salons or hotels.

So, go for it - and it is quite possible that your favorite hobby, in addition to an interesting pastime and the pleasure of creativity, will also bring you income. Read more about this in our other article.
Master classes on modeling
To make it easier for you to master the secrets of sculpting, we have prepared step-by-step instructions with photos.

In the age of technological progress, when industry overflows shelves with goods and there are no problems with purchasing finished products, people wanted to create with their own hands. And the Internet unites all creative people into communities. Thus, many needlewomen appeared who became interested in cold porcelain. The products they produce and display on their Internet pages are very beautiful. A flower made of cold porcelain or polymer clay is sometimes impossible to distinguish from a living one!
No one argues that for such creativity one must have the ability to draw and sculpt. But who said that this cannot be learned? It is enough to make the first products according to the proposed master classes. When mastery of technique comes, the ability to mix colors and an understanding of the behavior of the material, then ideas for further creativity will come. The easiest way is to buy a ready-made one and try it in action. But still, flowers turn out more beautiful from
Today, on the Internet, many needlewomen demonstrate their talent and the products they have created. Seeing this makes me want to try to do something similar. The hobby will require some tools and materials. This:
Devices with different tips;
Dough roller;
Cutting forms;
Two types of wire;
Floral tape;
Scissors.

To make a white rose that will not differ from a living one, you will need a special form. The petals roll out on it: they become as pink as possible.
Homemade recipe
You can buy ready-made porcelain, or you can make your own porcelain. The flowers, the making master class for which is described below, are sculpted from a homemade mixture. In order to prepare porcelain at home, the following materials are required:
Starch, maybe corn starch;
PVA glue;
Oil for children “Johnsons Baby”;
Vinegar or lemon juice;
Oily hand cream.
Starch and glue take 240 grams each, the remaining ingredients - 2 tablespoons or 50 grams each.

Cooking sequence
All ingredients are mixed in a bowl and placed in the microwave for 30 seconds. Then the mixture should be taken out and mixed thoroughly. The action is repeated three times. The last time the mixture will become so thick that it can hardly be stirred.

In this state, it is transferred to a cutting board greased with rich cream and thoroughly kneaded until elastic. This is how cold porcelain is prepared and other products made from it do not need to be heated or dried under special conditions: they dry while open in the air.

Therefore, it is necessary to ensure that the prepared mass does not lie open before modeling. The finished product is hermetically wrapped in film and stored in the refrigerator. To sculpt a flower from cold porcelain, it is enough to take a small portion of the material. Cover the rest and place back in the refrigerator. There are several other recipes for preparing the mixture, but this one is optimal and easy to make.

MK: cold porcelain, flowers
The finished material is white. But to sculpt products, you need to give it a certain color. You can use oil paints for this. Some needlewomen add color to porcelain by adding cosmetics to it: blush, eye shadow. A little dye is added to a small amount of the mixture and mixed well so that the color becomes even and the desired shade. In its consistency it resembles plasticine, but which hardens.

When the cold porcelain is ready, the sculpting of the flowers happens very quickly. To do this, a blank is made in advance from wire, napkins and PVA: a bud for the future rose. Rose petals will be placed around it. Before starting work, hands are generously lubricated with cream.

Modeling rose petals
A small piece of the mass is pinched off and rolled out in the palms. Then it is kneaded, given the desired shape, and the excess is cut off. Using a tool with a round tip, smooth the edge of the petal. It is made thin: much thinner at the edge than in the middle. Modeling flowers from cold porcelain is a painstaking task that requires patience.

You can make the tool yourself: a bead is placed on the tip of a wooden skewer, which will act as a stack. The resulting small petal is smeared with glue and applied to the workpiece. Excess glue is wiped off. You need to make several small petals that will completely cover the bud.

Next is a line of large, blossoming petals. They will be of medium size and should be glued so that they overlap one another. The top ones are the largest petals; a larger cake is rolled out for them. They are also conditioned with beads.

If there is a relief form, then on it. Or you just need to apply notches. The cold porcelain flower is assembled and should be sent out to dry. It is recommended to place the rose head down, hanging on a wire stem.

Stem and green leaves
To decorate the so-called greenery, you will need a lot of green. You can purchase it; you can add a little paint to your white porcelain and knead until the color is evenly distributed. There are special molds for leaves that can be used.

Roll out on a board greased with cream into a layer 1 - 1.5 mm thick. Leaves are squeezed out using a mold. They should be notched and given the appearance of real, living leaves. When making flowers from cold porcelain, you need to stock up on thin wire on which the greenery will be glued. The prepared wire is wrapped, the tip is smeared with glue and pressed into a porcelain leaf. Excess glue is wiped off with a napkin. The leaf is then attached to the stem of the rose.

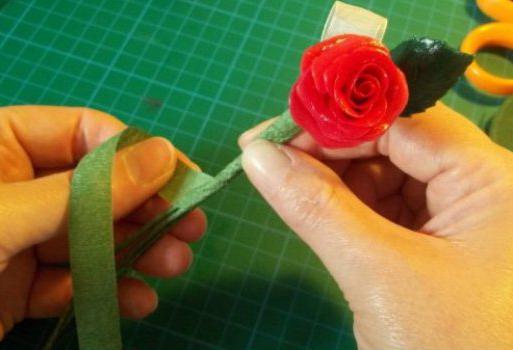
Some needlewomen use elements from artificial flowers in their work: they press the leaf against the porcelain so that the relief is imprinted and the leaf looks realistic. They are given shape using a stack. When all the parts are attached to the stem, it should be completely wrapped in floral tape and all attachment points should be hidden.
Cold porcelain flower
The finished product should be left to dry. Once the rose is dry, it can be varnished. But I would like to note that fresh flowers do not have shine. Therefore, the varnish can give away their artificial origin. The finished product can be left as is, with a matte surface. It all depends on what these flowers are for. If you put it in a vase, not everyone will understand that this product is made of artificial material. For decorative purposes they are varnished.

By preparing several roses of different sizes, you can make a beautiful decorative bouquet from them. To do this, bows from satin ribbon are added and a bouquet is assembled, which is beautifully tied.
Different types of flowers
There are several recipes for making cold porcelain at home. Flowers, the master class for creating which is described above, are just the beginning of an interesting hobby. Having mastered the technique and all the nuances, the craftswoman can no longer stop: after all, there are a huge number of flowers in nature and everyone wants to be captured in fine porcelain!
In addition, passion will always help solve the problem of a gift: after all, no one remains indifferent to porcelain products. And what is made with your own hands are exclusive works. It is difficult to repeat a flower made: each one turns out special.

Additional Porcelain Recipe
Many people use the first version of the recipe. But some people end up with a mass that is not elastic enough or cracks when it dries. Therefore, you can use another method of preparing porcelain, in which two ingredients remain unchanged. This is corn starch and PVA glue. They are taken in equal quantities: 250 grams for a full serving. 50 grams of glycerin and 50 grams of vinegar or citric acid are added to the mixture. Everything is mixed and heated in a water bath with constant stirring.
When the mixture has cooled slightly, it can be kneaded until elastic. The board and hands should be generously greased with rich cream. As in the first case, the finished mass is hermetically wrapped in film and stored in a cold place.
Beautiful flowers that are obtained from this material can decorate your home, making it stylish and original in its own way. Gradually, needlewomen begin to make amazing bouquets of different types of flowers: made from armfuls of lilacs or autumn asters. These can be entire compositions that are arranged according to the rules of floristic art. Hobby for porcelain is a beautiful and original hobby.
A piggy bank of creative ideas / Modeling
Cold porcelain. 19 recipes for making HF at home

Cold porcelain is a special mixture of corn starch, glue, oil and glycerin that is used for artistic modeling.
1:772 1:782Cold porcelain was invented in Argentina at the beginning of the last century. Cold porcelain for today is an absolutely harmless, convenient and very cheap material for modeling.
1:1125 1:1135Due to its very smooth and uniform texture and remarkable plasticity, it is very convenient to use.
1:1330 1:1340Both children and adults can work with cold porcelain. When cold porcelain hardens, it becomes hard, which distinguishes it favorably from plasticine. Also its advantage is that it can be easily prepared at home.
1:17931:9 2:516 2:526
- The product dries out by 20-30% after drying.
- Formalin is toxic - avoid contact with hands and mucous membranes. Serves to prevent the dough from cracking when drying. It should be added to the cooled mixture.
- You need to cook the mixture in glass or Teflon containers, but not in aluminum.
- Many recipes advise that the finished mass should be allowed to sit for 1 day.
- Never store the mixture in the refrigerator.
- To remove moisture, change the bag of the mass 24 hours after preparation and wrapping.
- To avoid cracks, you need to knead the mixture very thoroughly.
- It is important to coat the mass with baby oil before wrapping it in film, otherwise fungus may develop.
- Lubricate your hands with cream before working with cold porcelain so that the mass does not stick to your hands too much.
- Cold porcelain is ideal for sculpting flowers (unlike plastic and salt dough)
- For a more realistic color of the flowers, apply dry food coloring with a brush, then hold over the steam from the kettle. The porcelain will absorb the dye. It must be applied after the flower has already frozen.
- You can also color flowers with liquid food coloring, but the disadvantage of this method is that the flower turns out too bright and unrealistic. Acrylic paints can be used for deeper color
There are many different ways to make cold porcelain:
3:3615
3:9
Recipe 1
3:33- 1 cup PVA
- 1 cup starch
- 2 tbsp. glycerin
- 1 tbsp. l. cream (I use baby cream)
Pour the glue into a cup, put it on medium heat, immediately add the cream, stir quickly, add glycerin, stirring continuously.
3:470 3:480
Little by little, stirring constantly, add starch.
4:1090
Mix well.
5:1641
The mass thickens very quickly, at first it will look like cottage cheese
6:638
Then a lump forms. Place the lump from the cup on the table, greased with cream, and let it cool slightly.
7:1334Knead until the mass becomes homogeneous, like plasticine.
7:1448
Recipe 2
8:1983- 2 cups starch (corn)
- 2 cups white glue (any kind)
- 3 tbsp. spoons of glycerin
- 3 tbsp. spoons of white cream (Nivea) (you can use Vaseline)
- 3 tbsp. spoons of baby oil
- 1 teaspoon citric acid (for canning)
Combine all wet ingredients and cook over medium heat until smooth. Add cornstarch. Stir continuously until a ball forms. Remove the ball from the pan and stir with your hands. If too hot, cover with a damp towel until cool.
8:901 8:911
Recipe 3
9:1452- 3/4 cup white glue
- 1 cup cornstarch
- 1/2 cup water
- 1 teaspoon cold cream (we recommend using Ponds Cold Cream or Sorbolene, but any white cream will do)
- 1 teaspoon glycerin.

10:9
Recipe 4
10:33- 1/4 cup water
- 1/4 cup cornstarch
- 1/4 cup soda
Recipe 5
10:181- 1 cup starch (preferably rice, but if not, then corn)
- 1 cup dry chalk
- 2 cups of white vinyl glue (probably means vinyl-based PVA)
- 6 teaspoons liquid Vaseline
- 6 drops of formalin (formaldehyde) (sold in a pharmacy, CAUTION - toxic!).
Mix starch and chalk, slowly add glue and Vaseline. When it all thickens, add formalin.
If the mass is too dense, add a little water little by little. Mix well, store in a bag and in the refrigerator. You can add various paints (oil, acrylic, oils) and food coloring to the mixture.
Advantages of this cold porcelain:
1. No need to cook.
2. No cracks.

11:9
Recipe 6
11:33- 3 cups vinyl glue (PVA)
- 3 cups cornstarch
- 15 tbsp. water.
- 1 tbsp. baby oil or vegetable oil
- 1 tbsp. l. white hand cream
- 1 tbsp. stearic acid (to avoid cracking of the product after drying)
- 1 tbsp. l. formalin (formaldehyde)
- 1 tsp sodium benzoate. (to whiten the paste)
- 2 tbsp. l. rice starch (optional, optional)

Recipe 7
12:1280- 1 kg vinyl glue
- 0.5 kg corn starch
- 1 tbsp. stearine or stearic acid
- 1 tbsp. emulsion for bleaching dough (optional, can be replaced with white paint)
- 1 tbsp. lemon
- 2 tbsp. l. glycerin
- 3 tbsp. l. Vaseline
Place glue in a Teflon-coated frying pan, add cornstarch and mix. Add sodium benzoate, stearin, dough whitening emulsion, lemon, and then glycerin and petroleum jelly.
Cook over low heat, stirring constantly with a wooden spoon, for 20-25 minutes (or until it begins to stick to the sides of the pan). During preparation, the dough goes through several stages: first it has a creamy consistency, then it looks like cottage cheese and, finally, it is formed into a thick mass. It is ready when it pulls away from the sides. Remove from heat. Place on the countertop and knead until it cools and becomes smooth and pliable. Place in a tightly closed plastic bag and after 24 hours the mixture is ready for use.
12:9 13:516 13:526
Recipe 8
13:550- 1 glass of salt
- 1 glass of warm water
- 2 cups wheat flour
Pour a cup of warm water into a bowl, dissolve a glass of salt in it and add two cups of flour, knead the dough and knead for 10 minutes. When the mass does not stick to your hands, it is ready.
13:1033 13:1043 14:1550 14:9Recipe 9
14:33- ½ cup salt
- ½ cup hot water
- ½ cup cold water
- ½ cup cornstarch
- Food coloring of your choice...
Combine salt and warm water in a large saucepan and bring to a boil.
In a separate bowl, we mix cold water with cornstarch, mix well and add a few drops of food coloring.
Add the diluted starch to salted water and quickly stir everything. Keep the mixture on low heat, stirring constantly until the dough thickens.
Place the dough on a wooden base, let it cool slightly and knead until the mass becomes smooth. It can be used immediately or stored wrapped in a plastic bag or film in a tightly closed container.
15:9
Recipe 10
15:34- 250 gr. vinyl glue
- 500 gr. corn starch
- 4 tablespoons glycerin
- 0.5 cup hot water
- 2 teaspoons 5% formaldehyde

Recipe 11
16:842- 1 kg. vinyl glue.
- 600 gr. corn starch.
- 1 tbsp. sodium benzoate (a food preservative, available in pharmacies)
- 1 tbsp. stearic acid.
- 2 tbsp. glycerin.
- 3 tbsp. Vaseline.
- 1 tbsp. emulsion for bleaching dough (optional, or replace with white paint)

17:9
Recipe 12
17:34- 1 kg vinyl glue
- 600 gr. corn starch
- 1 tsp sodium benzoate (a food preservative, available in pharmacies)
- 1 tbsp. paraffin
- 3 tbsp. baby oil
- 2 tbsp. glycerin
- 1 tbsp. lemon juice or citric acid

Recipe 13
18:1058- 1 cup cornstarch
- 1 cup glue
- ½ glass of water
- 1.5 tsp. pure glycerin
- 1.5 tbsp. rich cream with lanolin
- 10 drops of formaldehyde
In a bowl, mix cornstarch and water until completely dissolved. Add glycerin, formaldehyde and cream, stirring constantly until lumps disappear. Place on low heat. Then add glue and continue stirring constantly for two to three minutes. Then remove the mass from the heat. Cool and knead again. Store in a plastic bag.
18:196918:9

Recipe 14
19:551- 250 gr. corn starch.
- 50 gr. cornstarch (for rolling out dough).
- 500 gr. vinyl glue.
- 1 teaspoon. stearic acid.
- 1 tbsp. sodium benzoate (a food preservative, available in pharmacies)
- 1 tablet of camphor.
- 1 teaspoon zinc oxide.
- 1 tbsp. glycerin.
- 1 tbsp. liquid Vaseline.
- 1 tbsp. hand cream (preferably white).
- 3 tsp. bleach for dough (optional or replace with white paint).
- 100 ml. water.
- 1 teaspoon. 5% formaldehyde (formaldehyde).
- 5 ml. alcohol.
Dissolve a camphor tablet in alcohol, stirring with a disposable spoon. Mix all ingredients in a separate bowl (except formaldehyde and 50 cr corn starch). Mix everything well and let stand for 20-30 minutes. Pour the mixture into a saucepan or frying pan with a Teflon coating and simmer over low heat, stirring constantly with a wooden spoon, until the mass reaches the consistency we need. When the mixture thickens, remove the dough from the heat and let it stand for a while. Place the mixture on the table and knead, adding formalin (formaldehyde) and slowly mixing in the remaining 50 grams. starch until the mixture cools.
Divide the dough into small portions and leave them to cool on a table sprinkled with starch. If the mass is still warm, you need to sprinkle it with starch, but do not overdo it, as the dough may be too tough.
As soon as the mass becomes cold, pack it in plastic bags and put it in a tank, closing the lid.
This dough can be colored with vegetable or food coloring (which is used for baking) and will last a very long time if stored as directed.

Recipe 15
20:551- 3 cups vinyl glue (wood glue)
- 1 glass of warm water
- 1 tablespoon sodium benzoate (a food preservative, available in pharmacies)
- 3 cups cornstarch
- 1 tablespoon glycerin (also in pharmacies)
- 3 tablespoons baby oil, such as Johnson brand
- 1 teaspoon formaldehyde (formalin) (pharmacy)
Mix the first 4 ingredients until there are no lumps. Add oil and glycerin. Cook over low heat in a non-stick frying pan, stirring with a wooden spoon until the mixture can be kneaded with your hands. Finish when the dough stops sticking to your fingers and is firm. After removing the mass from the heat, add formaldehyde (formalin) and knead again. Store in a glass or plastic container, tightly closed.
Let stand for one day. DO NOT store in the refrigerator, ever.
20:9

Recipe 16
21:551- 300 gr. corn starch
- 500 gr. white glue
- 1 teaspoon stearin
- 1 teaspoon sodium benzoate
- 2 tablespoons baby oil
- 2 tablespoons glycerin
- 2 tablespoons hand cream
- 1 tablespoon formaldehyde
- 1 cup hot water
- 5 teaspoons liquid paraffin
Sift the starch and add sodium benzoate, paraffin and stearin to a bowl. Microwave for 5 minutes to melt the stearin. Place remaining ingredients in a tin bowl. Using a blender, mix them. After this, add paraffin and a little hot water. Mix vigorously. Then add starch and continue stirring for about 5 minutes. Cook over low heat (stirring constantly) or in the microwave (stirring every minute) until the dough begins to separate from the sides. After this, place the mixture on a clean surface and let it cool until you can knead it with your hands. Knead the dough vigorously, and when it is homogeneous, wrap in film and refrigerate. You will notice that the mixture begins to sweat, then when it is cold, unwrap it and knead again. Then wrap it again in a plastic bag, but in a different one.
21:268521:9

Recipe 17
22:551- 1 cup cornstarch (a cup contains 240 grams of starch.)
- 1 cup PVA
- 2 tbsp. l. Johnson Baby oils
- 2 tbsp. l. “Vinagre” (wine vinegar) - can be replaced with lemon juice or a teaspoon of citric acid
- Spoon of dry tempera - if available
- At the end of 1 tbsp. l. cream (nutritious thick, Nivea type) - on the table to knead the mass.
Place the mixed mass in the oven for 30 seconds - stretch out and mix. And so only 3 passes for 30 seconds.
22:1397If you took less mass, set it for 20 seconds... Place it on the table with cream. Knead the mass for about five minutes.
22:159022:9

Recipe 18
23:551- 200 gr. vinyl glue
- 140 gr. corn starch
- 1 tbsp. vegetable oil (or baby oil)
- 1 tbsp. white vinegar
- 1 tbsp. l. white gouache paint (oil, tempera)
We combine: glue, vegetable oil, white vinegar and paint. Stir well. Add starch and place on low heat, stirring constantly with a spatula. Cook for 4 minutes. You should get a mass with the consistency of thick semolina. Stir the mixture over the heat until it becomes an elastic lump. Then we put it on cling film, smear our hands with cream and knead it very well. If it sticks to your hands, lubricate them with cream. After this, wrap the mass in film and store in an airtight container.
23:1776 23:9
Recipe 19
24:551- 2 cups vinyl glue
- 2 cups cornstarch
- 1 cup sodium benzoate.
- 1 tbsp. white vinegar.
- 2 tbsp. Vaseline.
- 4 tbsp. glycerin.
Place the starch in a saucepan, then add the glue, stirring with a wooden spoon to dissolve any lumps.
Add glycerin and stir to obtain a creamy consistency without lumps.
Dissolve sodium benzoate separately in hot water and add to the total mass, stirring continuously.
Place over low heat and stir continuously until thickened.
When the mass leaves the walls, remove from heat, sprinkle the table with starch and lay out the dough
Mix the mass very well. If it sticks to your hands, lubricate them with cream
Divide the finished dough into small pieces and store wrapped in plastic wrap or nylon, which should be placed in a jar. It is important to coat the mass with baby oil before wrapping it in film, otherwise fungus may develop. To remove moisture from the dough, change the bag after the first 24 hours.
24:9
Choose the recipe you like and make it healthy!
24:137 24:147
Cold porcelain is an accessible, cheap and most pliable material for modeling today. Working with cold porcelain is absolutely safe and does not require any special skills or knowledge; even a small child can engage in such creativity. You can prepare the material at home, that is, you don’t need to run around the shops and look for something special to make your dreams come true, the joy of touching art to create a unique decoration or piece of furniture with your own hands.
In appearance, cold porcelain resembles clay or plasticine, but after drying it becomes very hard. When sculpting from it, you can use any type of jewelry, any accessories, from small beads and beads, shells, buttons, twigs or dried flowers, to textiles of any structure - threads or rags left over from knitting, embroidery or tailoring. The surface of a product using the cold porcelain technique can be painted, sprinkled with small materials (sand, beads), and varnished.


The history of the creation of cold porcelain
The history of this modeling material dates back to the first years of the 19th century; records about it and the first products date back to that time. According to data, cold porcelain was invented by the Argentines, but there is no exact information about its origin and the history of its invention. There is much more information about the Russian master Ivanov Peter, who worked at the imperial porcelain factory and already at the beginning of the 19th century created unique products from a special type of porcelain. If you believe the archival documents of this St. Petersburg plant, it was Pyotr Ulyanovich who created the first flowers from cold porcelain. They were intended to decorate perfume bottles and eau de parfum, which were supplied to the emperor and his family.
But there is also earlier evidence of the existence of this material. In Chinese treatises on art and sculpture there are many descriptions of modeling from cold porcelain, but it is called differently, but its recipe is absolutely similar to the one used by Peter Ivanov.
Features of cold porcelain products
Products made from this material are extremely beautiful, but no less demanding. They must be stored or installed away from moisture and direct sunlight. You need to understand that cold porcelain is a polymer clay that can absorb moisture and become limp and lose color from exposure to sunlight. Vases with stucco, flowers and other decorations made of cold porcelain should not be placed on a window or near a source of water.
In rooms where objects made of this material are located, the optimal temperature regime for them must be maintained. If the air is colder than 10º C, the structure will collapse, as moisture particles in the composition crystallize. High temperatures also destroy cold porcelain - it simply dries out and crumbles.
You can extend the “life” of cold porcelain products using varnish coatings. They will not only protect against moisture, but also help maintain the shape, color and shine of the surface.


What can be created from cold porcelain
From this material you can sculpt everything - from women's jewelry to small interior items. Hair clips decorated with flowers made from this material look very original. For children, together with your children you can create fairy-tale characters, heroes of their favorite cartoons, which will decorate their room.
Many creative housewives decorate pots of indoor plants with cold porcelain moldings, frames, lamps and flowerpots.
A unique interior decoration will be garlands of flowers, greenery, animal or house figurines, and themed compositions made of cold porcelain. In addition, you can make an original and inexpensive gift for friends or loved ones.
How to prepare cold porcelain at home
Preparing polymer clay for modeling is not difficult. The simplest recipe for cold porcelain is rice or corn starch, PVA glue, glycerin and regular baby cream in a ratio of 1:1 (cups of glue and starch) and 2:1 (tablespoons of glycerin and cream).
The ingredients must be thoroughly mixed and left for 10-20 minutes. They will dissolve mutually, and the mass will take on the consistency that is ideal for modeling. Under no circumstances should the prepared material be placed in the refrigerator or stored at room temperature for more than 2 hours. You need to sculpt immediately and it is advisable to use up the entire volume of prepared material.

Some masters add citric acid to the mass. Products made from such porcelain are stored much longer, since the acid creates a preservation effect.
You can find examples of formulations containing water, but such compositions are fragile and not durable. Water, under the influence of external factors, reacts with other ingredients of the polymer clay composition, as a result of which an unpleasant odor may appear, the shape of the product may change, and its strength is significantly reduced.
To change color, food coloring and chalk are most often used. But the surface of souvenirs made of cold porcelain can be painted after it has completely dried, no earlier than a day after the end of modeling.
To work you will need the following tools:
- rolling pin and scissors,
- tweezers and nippers,
- stacks or toothpicks,
- brushes and paints,
- decorative cosmetics,
- gloves and cutting board,
- wet wipes,
- thin wire and glue for mounting the product.
Description of creating a sakura flower from cold porcelain
For beginner “sculptors”, the easiest way is to create flowers from cold porcelain, for example, sakura.
Part of the prepared material should be left white, and part should be painted a soft pink shade. Make small blocks from each - blanks for petals. The white block should be slightly thicker than the tinted one. The blanks need to be connected to each other along the length and cut into small rectangles.
The next step is sculpting the petals. The base of the petal will be pink and the edges will be white. We glue the petals with PVA, and in the middle, using a toothpick or a knitting needle, we make a small hole for the wire stem.


