You always want to decorate the most significant day in a special way. Ready-made decorations are quite expensive, and if you decorate a large hall with them, it will cost a pretty penny. Today, a fairly large number of needlework methods. Flowers can be made by quilling, beading, cold porcelain and even wool felting.
I'd like to recommend you the most an exquisite Dutch rose shop wherebuy roses in Almaty easy peasy. It's so convenient. You can go to the site and use the intuitive interface of the online store. Choose and order the number of gorgeous flowers you need and a huge selection of bouquets. We are waiting for you!
Further, continuing the topic: all these options are laborious and require certain skills in the technique. Original flowers from corrugated paper with your own hands can be made in literally 30 minutes. It always looks fresh and creative, plus easy disposal can be added to this.
Such jewelry has several important advantages that knock them out in the lead:
- the minimum amount of cash costs for the necessary materials;
- flowers can be made so realistic that they are almost impossible to distinguish from living ones;
- the material can be bought at almost any stationery or craft store;
- extraordinary beauty can be obtained without specialized tools and building complex diagrams;
- quick disposal is especially important when decorating large halls or rooms;
- will be an excellent gift or decorative element for any occasion;
- even a child can make this kind of jewelry.
Even with all the abundance of DIY methods, corrugated paper flowers have been and will be at the peak of popularity. A wonderful way to express yourself and make your wildest fantasies come true.

Preparatory work
Before embarking on the mystery of flower production, you must first of all equip yourself with all the necessary arsenal in advance. It is best to buy corrugated paper in rolls rather than sheets. The roll is large enough for a heap of buds, flowers and petals.
It is recommended to select paper in more natural shades, unless, of course, according to the idea, the final work should look natural and natural. For buds, leaves and stems, you should take several flowers, in this case, you can play with shadows. Then the flowers will look more "alive".

For the stem, you need to take a thin pliable wire, floral sleeve or any other materials.
You will also need thick cardboard for cutting blanks, glue and sharp scissors. Not necessary, but you can prepare fishing line or strong silk threads and a dummy knife.
It is best to work with good lighting, this can be both natural light and fluorescent lamps.
If there are small children or animals in the house, it is safer to work on a high table rather than on the floor.

Flower making process
At the initial stage, many needlewomen are faced with the question: how to make flowers from corrugated paper and where, in fact, you need to start. Of course, each craftswoman has already developed her own technology and some little secrets. However, nothing is impossible for those who want to achieve the heights of professionalism.
The most complex technologies always come down to the simplest steps:
- First, you need to draw the required templates on cardboard. For a more realistic flower, you should prepare several templates of different sizes and slightly different shapes.
- The more paper petal blanks there are, the better. In this case, you can remember the beautiful rose flower, which consists of a huge variety of petals of a wide variety of sizes.
- After the cardboard blanks are ready, you can start cutting them out of paper.
- Once all the petals are prepared, you can start creating the flower itself. To do this, you need to take 5-7 of the smallest petals and tie them tightly at the bottom. Thus, a tight bud is formed. For strength, you can glue the lower part with glue.
- After the bud is ready, you should attach each petal separately with gentle movements, slightly stretching the upper edges. By performing these actions, the petal is given a natural wavy shape.
- After all the petals have been collected into a finished flower, you can safely “plant” it on the stem.

The stem, like the flower, should look like natural. This can be easily accomplished with plain wire and green paper. It is necessary to measure out the desired piece of wire or floral sleeve and decorate it with prepared corrugated paper, cloth, or even paint it with acrylics. Then attach leaves and thorns, if the flower implies their presence. The finished flower "settles" on the stem with glue. Since the wire and the floral sleeve are movable, they can be given absolutely any shape and bend.

How to make realistic peonies.Bystep instruction
Peony is a magical flower that is traditionally a symbol of purity and love. A cute bouquet can be a great gift for a wedding or for the birthday of your beloved friend. Peony flowers in nature are quite large in size. For a bouquet of flowers, you do not need to make a large number of heads, 7 pieces will be enough.
If you want to achieve a shade close to the natural color, you can take snow-white or milky paper and give a few strokes of pink, orange or peach acrylic. You can make delicate peony flowers from corrugated paper with your own hands in just 20-30 minutes.
At the first stage, rectangles should be carefully cut out according to the template and slightly rounded, thereby giving a natural roundness to the petal.
To make one peony, you need to prepare 10 strips for small petals, 10 strips of wider paper for large petals and several strips of different sizes of green paper for making leaves. To give a realistic shape to the peony, it is necessary to cut out the petals slightly oval with a small stem, and the leaves slightly pointed towards the top.

After all the shapes are cut out, the petals need to be stretched slightly in width and height with neat movements, until the petal visually approaches the natural one. Next, give the petal a bulge on the outside, thus giving it a certain volume.
When stretching petals or leaves, it is necessary to avoid using nails, otherwise the tenderness and fragility will be spoiled by unwanted lines.
Then the process of "folding" the bud begins. To do this, take a few of the smallest petals and wrap one tightly in the other. During wrapping, it is necessary to ensure that each subsequent layer overlaps the seam of the previous layer.
Thus, gradually, the petals are stacked on top of each other in layers. When the flower has been collected, its base should be fixed with thread, fishing line or glue. Since a peony is a carelessly disheveled flower, you can safely tear some of the petals of the finished product slightly and then stretch the edges again.
In total, it will take about 25 petals to make one peony. Sepals are made from green paper. It is necessary to prepare about 10 green leaves, after shaping, wrap the finished peony with them.
In order to make the flower more voluminous and lush, at the initial stage, a round candy or a formed foil ball is placed in the core.
It should be remembered that natural flowers in nature do not have perfectly-even edges and lines, so the less neatness in the bud, the better.

Master classfor making delicate lilies
The royal lily flower is sensuality combined with majesty. Bulky flowers made of corrugated paper always attract attention. This is not only a good addition to the main gift, but also a great decor element for any holiday or event.
Using the example below, it will be described step by step how you can make a wonderful lily from ordinary corrugated paper.
For work you will need:
- paper of light lilac, yellow and green shades;
- watercolor, gouache or acrylic paints;
- glue or glue gun;
- stem wire, about 30 cm;
- brush and sharp scissors.
If the paper is on a roll, then you need to cut a strip from it, 7 centimeters wide. From the obtained segment, cut into small rectangular blanks, which should be given a rounded shape of lily petals. Then, the edges need to be stretched a little with the pads of the fingers, for more naturalness, and slightly twisted with scissors or an ordinary pencil. Make a depression in the middle of the petal, thus giving it a natural roundness.
When the petals are completely ready, the magical process of reincarnation begins. To do this, you need to mix brown and dark lilac colors and draw natural dots at the base of the petal in the resulting tone. For more naturalness, the dots should be denser at the base and practically disappear towards the middle.
The stem is made from the wire. The desired piece of wire is cut off and decorated with a thin strip of green corrugated paper. Before wrapping the paper around the wire, it is recommended to stretch it properly. This is done so that all unnecessary stripes and folds disappear.

On either edge of the finished stem, make a pestle and form a stigma with hot glue. To be convincing, you should paint over this place with green paint.
The stamens are made from yellow paper. A small even square is cut from the roll. We cut the strips along its entire length, but leave the base solid. Then you need to twist each strip with twisting movements and treat the tip with a drop of hot melt glue. After all the work is done, lower the prepared stigmas in semolina, paint over with acrylic or gouache of a brown-chocolate hue and let dry.
The leaves for lilies are rather elongated. Cut long rectangular strips of green corrugated paper by stretching and curling them slightly. We glue the stamens to the pistil and add three lily petals to the finished structure, placing them slightly above the tips of the anthers.
After that, glue three more petals over the joints of the previous petals and twist the edges of the finished flower again.
The final stage is the "installation" of the finished lily on the stem, adding petals and fixing with drops of glue.

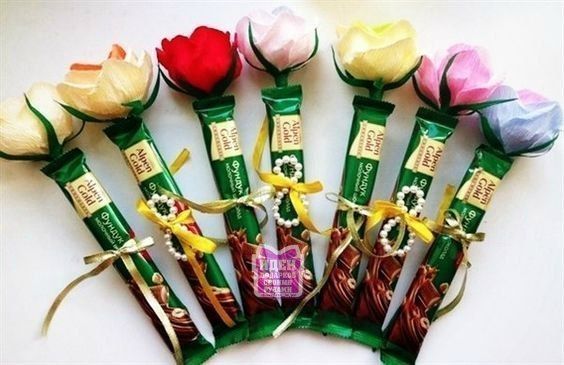
Corrugated flowers with sweets
Every needlewoman, having reached a certain level, wants to do something extraordinary and memorable. Not a single holiday or special event is complete without sweets and flowers. Modern craftswomen decided to combine these two components into one and call this trend a suite design.
Flowers made of corrugated paper with sweets have come into fashion not so long ago, but have already managed to conquer a fairly large number of the public with their originality and creativity. Today, through your PC, you can get acquainted with photos and videos with a huge number of master classes on making an unusual bouquet. A detailed step-by-step description will help to translate all your bold ideas into reality. The main thing is not to be afraid to experiment. Only in this case you will get bouquets that are worthy of decorating not only birthdays, but also weddings.

To make a bouquet, you will need chocolates, preferably round and wrapped. This will greatly facilitate the task during the formation of the flower bud. Paper can be taken in absolutely any color, here you can give free rein to your fantasies. Squares should be cut out of the corrugation, rounded and petals formed by stretching and stretching the finished canvas.
The next step is to cut out the squares of the baking film. The candy is wrapped in a finished square and a small tail is left at the bottom, which is then wrapped with a beautiful thread or ribbon of gold color. Gradually, layer by layer, we wrap the finished workpiece with petals, immediately giving the shape of a natural flower. It is necessary to try to ensure that the first layers completely cover the candy, but the subsequent ones may already be half-open.
A gorgeous bouquet is neatly formed from the finished flowers. This is done in different ways. You can "plant" each flower separately on a prepared wire, you can use skewers, a foam ball, a plastic bottle or polyurethane foam.
After the bouquet has been finished, it can be decorated with satin ribbons, various laces, beads, stones or rhinestones. Such an original gift will definitely leave lasting pleasant memories behind.
To create a spectacular bouquet, you don't have to stop at one type of flower. It can be a wide variety of combinations of daisies, roses, daffodils, poppies, tulips, orchids and so on.

Flowers of giant sizes
Do-it-yourself large flowers from corrugated paper can be made for any occasion. Such decoration will always look festive and unusual. Flowers of a gentle shade can be used to decorate a romantic party or wedding celebration. Huge, but at the same time fragile, as if made of porcelain, can give the holiday even more atmosphere.
Products of bright and flashy shades are suitable for a children's birthday. They will become irreplaceable not only in decorating a festive photo zone, but also in a photo session. Gorgeous growth flowers made of corrugated paper will be able to "meet" guests in front of the entrance. With such a huge bouquet, you can adequately meet your beloved wife from the hospital or give it to your girlfriend.

Step-by-step process for making a large rose:
- on thick cardboard, draw a petal pattern in the form of a heart and droplets;
- cut 15 large hearts and 5 petals in the form of droplets from paper according to a template;
- each cut out petal should be well stretched up and around, giving it a natural and natural shape;
- for petals in the form of droplets, it is necessary to wrap the edges beautifully, with a pen or pencil;
- for the petals in the form of a heart, we make wavy bends with a pencil only on the sides;
- for the stem you need a piece of ordinary soft wire, which must be decorated with floral tape or corrugated green paper;
- the formation of a bud should be started with small petals, having previously glued them to the stem with a drop of glue;
- after the base is formed, droplets are alternately glued to it, and then hearts;
- from a long strip of green paper, a sepal is cut out with small teeth;
- the finished sepal is fixed around at the base of the bud, fixed with green adhesive tape or a drop of glue.
At this stage, the rose is completely ready. In order to make the leaves, oblong molds should be cut out of green corrugated paper. After that, in the middle of the finished sheet, lay out the edge of the decorated wire, having previously moistened it with glue. Then fold both halves of the sheet so that the wire remains hidden inside the petal, and bend the remaining edges of the paper back.
At the final stage, the leaves are attached with adhesive tape to the stem and decorated with corrugated paper or a few strokes of acrylic paint.

Giant flowers made of corrugated paper can magically turn the most ordinary holiday into an enchanting celebration.
How to make flowers from corrugated paper with your own hands
4/5 - Ratings: 87The easiest way to feel the approach of any holiday is to start making home decor for the celebration. This time I decided to figure out how to make flowers from corrugated paper - realistic and stylized. Let's figure out together how to make flowers from corrugated paper and what is needed for this.
There are many handicraft techniques in the world that allow you to make beautiful flowers with your own hands - today flowers are made of beads and fabric, plain paper (quilling, origami, applique, and so on), they are knitted and felted, but still one of the most popular manufacturing methods remains assembly of flowers from corrugation. Why are these flowers good:
- they can be both photorealistic and fantasy;
- they are easy to make in a few minutes (as opposed to felting or beading);
- easy to dispose of (important for those who want to decorate a large hall with flowers for the holiday);
- very affordable materials - corrugated paper costs a penny, especially if you buy in rolls, not sheets;
- no special training required;
- there is no need to use any complex tool;
- it is easy to get an acceptable result without experience (for example, flowers can be made of paper with sweets - even small bouquets look very presentable);
- the products are bright and expressive (which is very important for children).
Getting ready for work
What is required in order to make do-it-yourself flowers from corrugated paper:
- several rolls of paper (it is better to choose matching colors and green for leaves and stems);
- wire, floral sleeve, or any other stalk attachment;
- cardboard for blanks;
- glue;
- sharp scissors;
- breadboard knife;
- threads and fishing line.
It is most convenient to work at a desk in good lighting. If you plan to make large flowers (more than 15 centimeters in diameter), then you can sit on the floor (of course, after sending your children, husbands, cats and your favorite dog for a walk).
Making flowers
The easiest option:
So, making flowers from corrugated paper of more complex options almost always follows the same scenario. I will describe it so as not to rewrite one by one:
- first you need to make a petal template;
- cut out 15-20 petals for each flower (if you want to make a realistic flower, then make petals of different sizes - for example, five small, five medium, five large);
- cut out the petals (when cutting, observe the direction of the corrugation);
- collect the central part of the bud (5-7 petals are twisted together, tying in the lower part and gluing);
- further, the petals need to be slightly stretched and bent so that they take the most natural shape for the plant;
- glue the prepared petals to the bud;
- fix the flower head on the prepared stem.
How to make a stem:
- we take a piece of wire, a floral sleeve, an ordinary twig - at our discretion, we measure the required length;
- cut off;
- we decorate with green corrugation, or fabric, or paper;
- imitate leaves, shoots and thorns;
- cut on both sides again.
Making realistic roses
After we have made the blank, we need to stretch the petals - this will give the required volume and we can simulate the natural bend of a rose petal:
Let's start assembling. We will need wire and thread. First, bend the wire as shown in the photo and wind our workpiece around the wire, forming a bud:
The outer petals need to be not only stretched, but also slightly smoothed out the corrugation - this will give the effect of a wavy edge, and the flower will look lush.
Make a sepal from green paper according to the photo instructions:
Arrange some leaves for the stem and fix them.
Sprinkle hairspray on the finished flower for a little shine.
And this is the easiest way to create a rose:
A similar version of twisting a rose flower, but already with explanations from the author:
Realistic peonies
A peony is a large flower in itself, so it is better not to try to make small flowers, but to collect some really large and beautiful peonies. To make a large flower from corrugated paper, you need about twenty minutes.
By the way, if you want to achieve a more natural color, then you can take white paper and tint it with food coloring - delicate pink and orange flowers will really look like real ones.

The paper needs to be cut into rectangles, each rectangle should be rounded.
- The peony is a pretty disheveled flower, so the petals can be cut in some places and even gently torn off.
- You will need a lot of petals - more than 25.
- Use green paper for the sepal; 8-10 green leaves should be cut out of it.
- To get voluminous flowers, you can put candy in the center or form a ball of foil.
- Trim a few petals at random - the less neat, the more natural your flowers will be.
Or a more complicated option:
Decorative and stylized flowers
How to make simple flowers from corrugated paper? Step-by-step instructions for making different colors and different methods.
Realistic lilies. Photo of creation step by step:
We make large flowers from corrugated paper - roses.

Such graceful and simple corrugated paper flowers can be useful for photo shoots or interior decoration, and they can also be used to create various decorative compositions on the street (just keep in mind that the flowers are quite light and can be carried away by a gust of wind). In general, growth flowers are often used for decoration, but making them according to the same principle as small flowers is not too laborious.
Huge poppies:
Photo step by step: stylized poppies, but in miniature.
In order to make lush artificial poppies, you need paper of three colors (black, red, green), wire, thread, glue or a stapler, and of course scissors.
- Cut a cylinder about ten centimeters long from a roll of black paper.
- Tie tightly with a thread and cut into a fringe along one edge - this will be the middle of our flower.
- You can also make a box in the middle - for this you need to take the scraps and wrap them in black paper to make a ball. The ball is fixed with a thread or staple staple, and attached to the center of the fringe.
- A roll of red paper must be unfolded and cut into six parts, each part folded like an accordion.
- Lay all the accordions one on top of the other and secure them well with thread.
- The corners of the accordions must be rounded off with scissors.
- All petals need to be well expanded (we straighten each accordion, and we get a petal).
- Use dense wire or wooden laths as stems - they need to be wrapped in green corrugation, cut out large leaves and attached to the stems.
- Fix the poppy heads on the stems and spread the petals.
Or a slightly different option on how to make a poppy flower step by step From and To:
Now you know how to make more colors from corrugated paper. If you want to make giant flowers, then it will not be very difficult for beginners, however, it is worth considering some points:
- use high-quality paper - of course, even from junk paper, the master can make something beautiful, but for beginners it is better to rely on good materials;
- huge flowers must have weights, otherwise they will simply fall (or fix them with fishing line on the wall);
- do not smooth out the petals completely, leave a slight ripple;
- many petals are better than few (large roses of four petals look very pitiful);
- for a field composition, use several shades of green paper - then ordinary herbs and plants will look natural;
- if a child is engaged in making voluminous flowers with you, make sure that he does not cut himself with paper, scissors, fishing line or thread;
- for decoration, use made flowers of two or three shades - more flowers may look awkward.
More ideas and inspiration
Already wanted to make beautiful flowers from corrugated paper with your own hands? Great, so you liked the ideas I proposed and mk. I'll tell you a little more about what you can do with your own hands from corrugated paper.
Cute daisies:
See how crepe paper crafts are made - gorgeous roses that look better than live ones!
And according to this master class, you can learn how to do sweet flowers from corrugated paper do it yourself. And so, flowers made of corrugated paper with sweets, decorated in the form of a heart:
By the way, sweet bouquets of corrugated paper flowers are a great find for any occasion. Such bouquets usually attract more attention than a traditional flower basket and are remembered for a long time.
And this is how you can make a Christmas flower - Poinsettia from corrugated paper:
Make paper flowers with your own hands from corrugated colored paper, or make a bouquet of flowers to decorate a holiday, or maybe you want to make paper flower garlands to decorate the hall? There is nothing easier - learn how to make roses from corrugated paper step by step, and you can give a master class on any type of flowers.
Try to make corrugated flowers at least once, and then it won't be difficult for you to make a new product - watch different step-by-step videos and make chic bouquets with your own hands!
Any vegetation instantly transforms the space, making it more alive and natural. Alas, real flowers do not retain their attractive image as long as we would like. Recently, corrugated paper flowers have become popular. You can create wonderful bouquets from them or something more original. In our article we will talk about working with this material. We invite you to dive into the world of handicrafts with us!
Paper flowers: application ideas
These non-trivial crafts decorate both ceremonial events and living spaces in any style. Let's take a closer look at exactly how they can be used:
- Flowers have gained incredible popularity as a decor for weddings, birthdays, corporate events and other themed festivities. Garlands, arches, bouquets for weddings are made of them, used for photo studios.
- Flower arrangements are also used to decorate exhibition centers, handicraft shops, beauty salons and showrooms.
- Flowers in vases, pots, on ceilings, in the form of wreaths, topiary are suitable for the interior of a dwelling.
- For the New Year, dress up the tree with small rose inflorescences, creating the illusion of flowering.
- On the wall or ceiling of the children's room, you can hang colorful versions of peonies.
- Before Christmas, hang a wreath of spruce branches and flowers on the door.
- On Valentine's Day or for a wedding, design a red, pink or white heart.
- Another trend is to create giant flowers the size of a person. Place them against a wall or form a whole forest in the room.
Thus, corrugated paper flowers are truly capable of making any space unique and elegant. Moreover, the very process of creating a rainbow decor is very exciting and can even attract a child. Try to make a flower yourself and connect your child, having previously selected a simple task for him.


Roses
Rose flowers are one of the most popular and desirable for millions of girls. And this is not surprising, because a beautiful bouquet is distinguished by nobility and sophistication. However, before appearing before our eyes in the form we are accustomed to, the plant went through a long way of selection from the dog rose. We will hardly have time to talk about the intricacies of crossbreeding and selection, but read on how to create a man-made miracle on your own.
For this flower, it is best to choose several similar shades so that its appearance is close to natural. As for the number of petals, it can be arbitrary. Consider making a rose from white and crepe paper. Work plan:
1. Cut out 8 small, 10 large and medium, and 8 largest petals. Half of the total is from crepe, and the same amount is from white paper.
2. Make a long strip of green base for the stem and 4 narrow and oblong green leaves that attach at the bottom of the bud.
3. Round the petals with your fingers, straighten one edge, slightly turning it in the opposite direction, and twist the other.
4. Take the stalk wire and wrap it with the tape we have already prepared.
5. We compose the bud itself. Twist the bottom edge of the smallest petal onto the wire, wrapping it completely. Apply glue to the base and place the next small petal on it. Press half of it tightly against the first, the subsequent parts are sealed in the same way.
6. The rest of the petals are attached as their size increases.
7. Finally, glue the leaves.
Thus, we got a delightful rose that looks like a real one. There are also simplified techniques, but their result is not as realistic.


Peonies
Delicate peonies, created with your own hands, will harmoniously complement the interior of a bedroom, nursery, kitchen or hall, and will also be an excellent decor for a party.
What we need: corrugated paper in several shades; plain paper or cardboard for stencils; floral ribbon in green; PVA glue; wire; scissors; pencil.
On the prepared materials, sketch out samples of leaves and petals, cut them out. Cut the corrugated paper along the line, the width of each of them should correspond to the length of the blanks. Fold the strips into an accordion, and place a stencil at the top and cut out the future parts of the bud along it.
Make frequent and long slots in the stamen templates, apply glue to the base and wrap the blank on the wire. Secure the stamen with floral tape. Grease the lower part of the large leaves with glue, push the stem inside and press the bases of the sheets.
Add bulges to the smallest petals: grab the edges and gently pull to the sides, and press the top edge to get a light wave. Next, fix the petals at the bottom of the stamen. Do the same with the heart-shaped parts. At the end, the 3 largest petals are added to the bud.
Glue a sepal to the bottom of the flower, and wrap the stem with floral tape. A cute and romantic flower is ready!


Sakura branch
The most revered flower of the Land of the Rising Sun delights in its beauty. Every spring, the Japanese strive to celebrate under the cherry blossoms, enjoying the first warm rays of the sun.
We offer a simple master class that will help bring a delicate spring decor to your home. To create a flowering branch, you will need: a dry branch, corrugated paper in muted tones, PVA or silicone glue, scissors, cardboard or paper for blanks, a pencil.
1. On the materials for the blanks, sketch out the stencils of stamens, petals and leaves and cut them out.
2. Cut the corrugated paper into rectangular pieces for leaves and petals, as well as squares that will become stamens.
3. Align the details for the petals in the center with a pencil or scissors.
4. Create a stack of all rectangles and cut according to the patterns. Cut the squares from one edge into strips.
5. Slightly press and roll all the elements in the middle into a bundle. Grease the lower part of the stamen with glue and twist.
6. Fasten the lower parts of the three petals together. Give volume to the leaves.
7. Glue the stamen and leaves to the bottom of the bud.
8. Dry the glue, and then glue the flowers to the branch.


Chamomile
If you have a desire to fill your interior with summer joy and the warmth of the sun, then you will not be able to ignore the delicate field daisies. They blend perfectly with any wildflowers, allowing you to create a versatile summer bouquet. Such a bouquet made of paper will delight you for a long time and in any season.
Before you start making, arm yourself with the following tools and materials: corrugated paper in yellow, green and white; ruler, pencil and scissors; glue or glue gun; wire, about 10-20 cm.
1. First make white chamomile petals. Take white corrugated paper and cut a 5 cm strip.
2. Cut the finished strips into thinner strips so that the width of each is 1.5–2 cm.
3. After the first two steps, cut out the petals from the strips.
4. To make the petals more natural and convex, we need to stretch the blanks in the middle.
5. To make the stem of our future chamomile, we tightly wrap the wire with green corrugated paper. Attach the ends of the paper using glue.
6. From a roll of yellow you need to make a strip 1 cm wide. After that, make shallow cuts along the entire length of the workpiece. Next, wrap the blank on the tip of the stem and form a chamomile stamen.
7. Glue each element in turn on the base of the flower. When the whole bud is ready, we make sepals from green paper and stretch the petals to the sides. Our chamomile is ready!


Carnation
Graceful and delicate carnations will be a charming decoration for your interior. Carnation compositions work wonderfully with wildflowers such as yarrow or gypsophila. This decor fits perfectly into the rustic style - the so-called "country".
Stock up on the necessary tools and materials: wire for making the stem; scissors, tape, glue; corrugated paper in green and white or pink; pastel crayons.
1. The first step is to create the petals of our carnations. To do this, we need to make two pieces of white paper: one 5 cm, the other 3 cm.
2. Using lilac crayon, paint over the edges of the small strip so that one tip is more saturated. We do this from both sides.
3. Next, we will cut small teeth around the colored edge of the strip, then fold it 4 times and make 4-6 shallow cuts.
4. Twist the strip into a bud. When about 10 cm remains until the end, stretch the remaining part and get a wavy bend along the entire length. We fix it with glue or tape.
5. In the same way, create large petals, but so that they are slightly wider.
6. Using wire and corrugated paper, make a stem and glue the finished bud to it.
7. From green paper we make a sepal and a couple of leaves. To make them look more natural, they should be stretched in order to add volume.


Mysterious wreath for Halloween
Despite the fact that Halloween is an unconventional holiday for our region, it has already managed to organically fit into our holiday calendar. This decoration is suitable for themed surroundings for All Saints' Day, as well as for a contrasting interior in a modern style.
To make this unusual wreath, you need to have the following: a blank for a wreath made of polystyrene or expanded polystyrene; corrugated paper of your choice (for example, black and purple); large sequins or decorative beads; spray paint can; glue or glue gun; paper for templates of our future petals; scissors and thin lace.
1. Making a blank. If necessary, paint it in the desired color, then prepare templates for the petals of different shapes and cut them out.
2. Cut the corrugated paper into long strips so that the width matches the length of the templates. We fold our strips with an accordion, placing a template on top, and cut out.
3. To make our petals look natural, let's give them a convex shape. This can be achieved by stretching them in the center. When all the details are ready, we form a flower out of them. Apply glue to the base and collect the flower from about 5-7 petals.
4. Make similar flowers using a different color of paper. Then randomly glue all the flowers onto the base of the wreath.
When you're done, you can lightly sprinkle the finished wreath with paint and glue the beads onto it in a random fashion to give it a finished look. This completes our wonderful wreath!


DIY paper flowers - photo
Our article would not be complete without a photo gallery. There are many more colors that can be made from corrugated paper than we could possibly cover. We have selected illustrative photographs of ready-made compositions of irises, tulips, forest trees, orchids, lilies and many other flowers, as well as ideas for their use in the interior. Happy viewing!


The easiest way to feel the approach of any holiday is to start making home decor for the celebration. This time I decided to figure out how to make flowers out of corrugated paper - realistic and stylized. Let's figure out together how to make flowers from corrugated paper and what is needed for this.
There are many handicraft techniques in the world that allow you to make beautiful flowers with your own hands - today flowers are made of beads and fabric, plain paper (quilling, origami, applique, and so on), they are knitted and felted, but still one of the most popular manufacturing methods remains assembly of flowers from corrugation. Why are these flowers good:
- they can be both photorealistic and fantasy;
- they are easy to make in a few minutes (as opposed to felting or beading);
- easy to dispose of (important for those who want to decorate a large hall with flowers for the holiday);
- very affordable materials - corrugated paper costs a penny, especially if you buy in rolls, not sheets;
- no special training required;
- there is no need to use any complex tool;
- it is easy to get an acceptable result without experience (for example, it can be done with sweets - even small bouquets look very presentable);
- the products are bright and expressive (which is very important for children).
What is required in order to make do-it-yourself flowers from corrugated paper:
- several rolls of paper (it is better to choose matching colors and green for leaves and stems);
- wire, floral sleeve, or any other stalk attachment;
- cardboard for blanks;
- glue;
- sharp scissors;
- breadboard knife;
- threads and fishing line.
It is most convenient to work at a desk in good lighting. If you plan to make large flowers (more than 15 centimeters in diameter), then you can sit on the floor (of course, after sending your children, husbands, cats and your favorite dog for a walk).
Making flowers
The easiest option:
So, making flowers from corrugated paper of more complex options almost always follows the same scenario. I will describe it so as not to rewrite one by one:

How to make a stem:
- we take a piece of wire, a floral sleeve, an ordinary twig - at our discretion, we measure the required length;
- cut off;
- we decorate with green corrugation, or fabric, or paper;
- imitate leaves, shoots and thorns;
- cut on both sides again.

Making realistic roses

To make roses, prepare high-quality paper in the most natural shades. You shouldn't take burgundy or fuchsia, use gentle tones - cold shades of pink, tea tones. These roses will look very, very natural.
- Take paper and make a pattern for the petals, as shown in the photo:

- After we have made the blank, we need to stretch the petals - this will give the required volume and we can simulate the natural bend of a rose petal:

- Let's start assembling. We will need wire and thread. First, bend the wire as shown in the photo and wind our workpiece around the wire, forming a bud:

- The outer petals need to be not only stretched, but also slightly smoothed out the corrugation - this will give the effect of a wavy edge, and the flower will look lush.
- Make a sepal from green paper according to the photo instructions:

- Arrange some leaves for the stem and fix them.

- Sprinkle hairspray on the finished flower for a little shine.
And this is the easiest way to create a rose:
A similar version of twisting a rose flower, but already with explanations from the author:
Realistic peonies
A peony is a large flower in itself, so it is better not to try to make small flowers, but to collect some really large and beautiful peonies. To make a large flower from corrugated paper, you need about twenty minutes.
By the way, if you want to achieve a more natural color, then you can take white paper and tint it with food coloring - delicate pink and orange flowers will really look like real ones.


Or a more complicated option:
Decorative and stylized flowers
How to make simple flowers from corrugated paper? Step-by-step instructions for making different colors and different methods.
Realistic lilies. Photo of creation step by step:

We make large flowers from corrugated paper - roses.

Such graceful and simple corrugated paper flowers can be useful for photo shoots or interior decoration, and they can also be used to create various decorative compositions on the street (just keep in mind that the flowers are quite light and can be carried away by a gust of wind). In general, growth flowers are often used for decoration, but making them according to the same principle as small flowers is not too laborious.
Huge poppies / anemones:
Photo step by step: stylized poppies, but in miniature.
In order to make lush artificial poppies, you need paper of three colors (black, red, green), wire, thread, glue or a stapler, and of course scissors.
- Cut a cylinder about ten centimeters long from a roll of black paper.
- Tie tightly with a thread and cut into a fringe along one edge - this will be the middle of our flower.
- You can also make a box in the middle - for this you need to take the scraps and wrap them in black paper to make a ball. The ball is fixed with a thread or staple staple, and attached to the center of the fringe.
- A roll of red paper must be unfolded and cut into six parts, each part folded like an accordion.
- Lay all the accordions one on top of the other and secure them well with thread.
- The corners of the accordions must be rounded off with scissors.
- All petals need to be well expanded (we straighten each accordion, and we get a petal).
- Use dense wire or wooden slats as stems - they need to be wrapped in green corrugation, cut out large leaves and attached to the stems.
- Fix the poppy heads on the stems and spread the petals.
Or a slightly different option on how to make a poppy flower step by step From and To:
Now you know how to make more colors from corrugated paper. If you want to make giant flowers, then it will not be very difficult for beginners, however, it is worth considering some points:
- use high-quality paper - of course, even from junk paper, the master can make something beautiful, but for beginners it is better to rely on good materials;
- huge flowers must have weights, otherwise they will simply fall (or fix them with fishing line on the wall);
- do not smooth out the petals completely, leave a slight ripple;
- many petals are better than few (large roses of four petals look very pitiful);
- for field composition, use several shades of green paper - then ordinary herbs and plants will look natural;
- if a child is engaged in making voluminous flowers with you, make sure that he does not cut himself with paper, scissors, fishing line or thread;
- for decoration, use made flowers of two or three shades - more flowers may look awkward.
More ideas and inspiration
Already wanted to make beautiful flowers from corrugated paper with your own hands? Great, so you liked the ideas I proposed and mk. I'll tell you a little more about what you can do with your own hands from corrugated paper.
Check out how to make crepe paper crafts - cute daisies that look better than live ones!
And according to this master class, you can learn how to do sweet flowers from corrugated paper do it yourself. And so, flowers made of corrugated paper with sweets, decorated in the form of a heart:
By the way, corrugated paper is a great find for any occasion. Such bouquets usually attract more attention than a traditional flower basket and are remembered for a long time.
And this is how you can make a Christmas flower - Poinsettia from corrugated paper:
Make paper from corrugated colored paper, or make a bouquet of flowers to decorate a holiday, or maybe you want to make flower garlands from paper to decorate the hall? There is nothing easier - learn how to make roses from corrugated paper step by step, and you can give a master class on any type of flowers.
Try to make corrugated flowers at least once, and then it will not be difficult for you to make a new product - watch different step-by-step videos and make chic bouquets with your own hands!
Corrugated paper flowers are generally used to decorate gifts. But if you decorate a photo frame, a wall clock with them, make a panel or an elegant one, then they will decorate the interior and bring lightness into it. Before you learn how to create flowers from corrugated paper with your own hands, you need to understand what material is suitable for this and what else is needed to make the craft look like a real plant.
Getting to know the material
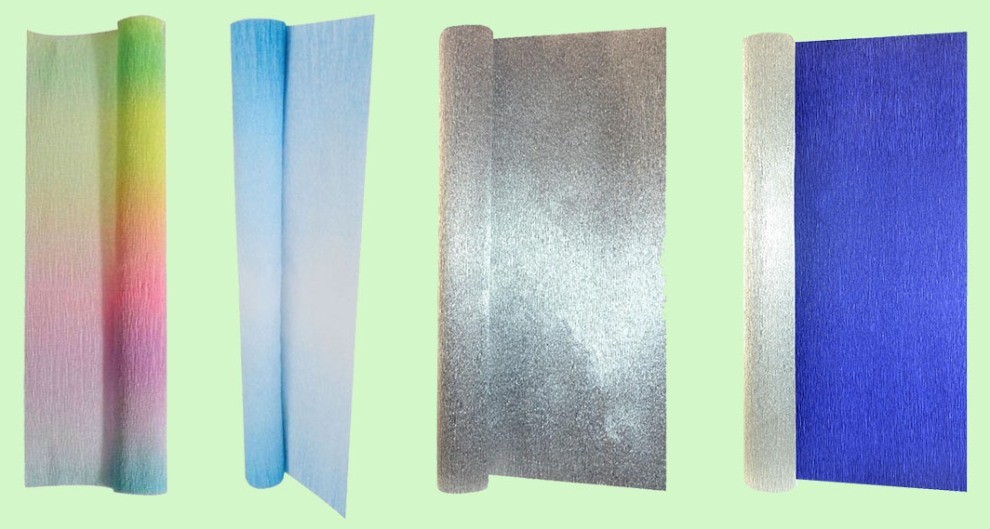
Corrugated paper is also called crepe or crepe paper. The only difference is that gaufrer is French and crepe is English. The Russian language also has an analogue - a reaper, pressed paper. There are several options for corrugated paper on sale, but the main classification is divided by sheet density:
Paper for creativity and gift wrapping: density 30–50 g, small folds, the height of which is not regulated. It is not very suitable for floristry, since it stretches poorly, tears and gets soaked from glue.

Floral paper is used for flower wrapping and sweet design. Its density is in the range 120-180 gr. Deep pleats provide the right amount of stretch for true-to-life colors.

Corrugated board has a high density and is only suitable for making gift boxes.

Please note that “fine crepe” is stated on the packaging of creative paper. The floristic paper marking contains the inscription “crepe extra”, and the sheets themselves have transverse textured stripes.

The folds on floristic paper are called flutes, which are divided into three types:
- E-flut up to 1.6 mm high - for making small flowers;
- B-flut up to 3.2 mm high - for growth paper flowers;
- A-flut up to 4.8 mm high - for packaging.
The color palette includes not only plain paper, but also metallized double-sided, with a gradient and rainbow color.
Also, for creativity we need auxiliary materials:
- Type tape, which is used as a colored tape for decorating the base of the flower and stem;
- Scissors and stationery knife;
- PVA glue (thick), thermal gun;
- Threads for attaching petals, sheets;
- Floristic and ordinary wire;
- Wooden sticks for stems;
- Foam balls or candies for the center of the flower.
And also: ribbons, frames, baskets, vases and even cups and saucers - the decor is limited only by the imagination of the master.
Basic techniques and secrets of creating flowers from corrugated paper
Florists have come up with hundreds of ways to make flowers from corrugated paper with their own hands. However, there are basic techniques, combining and transforming which you can achieve almost perfect resemblance to the original.
Stem
Please note that the stem for any type of flower is created according to the same principle:
- The base is a floral wire, wooden stick or paper tube.
- You need to attach the stem to the head of the flower at the initial stage (it is passed through the layers of paper that form the petals) or the flower is collected directly on the stem.
- The stem can be decorated with either a thin strip of corrugated paper with glue or green type tape.
- For a greater resemblance to a real branch, it is necessary to cut the leaves and attach them to the stem, masking the junction with tape.
How easy it is to curl a thin paper tube is explained in this video:
Stamens

A ready-made strip of corrugated paper of two or more colors is used, or you can cut it out of the sheet yourself. Grind down into layers.
Picking should be done immediately - then it will not be possible to pull the thread without damaging the paper.
Then the workpiece is spirally wound on a rod or attached to a surface, and the collected waves create volume.
Also twisting are made for this ball.

But in this case, a strip of corrugated paper is folded in half and then rolled up. To prevent the flower from disintegrating during the assembly process, it must be glued as the roll grows. At the end, you should gently straighten the curls with your fingers, forming an open rose. The base is a foam ball on which roses are glued.
Flowers made in a similar technique from corrugated paper are shown in a master class on creating a rose with an original curled edge:
This technique is popular for making chrysanthemums, daisies, daisies, carnations, and other flowers with many small petals. The base is a long strip with cut fringes or cut out rounded petals. For example, this charming rose.

Flowers from individual petals
These delicate flowers are made without a base by joining individual petals cut from a template.

For sakura flowers you will need:
- three long rectangular stripes with rounded edges for the petals,
- one long rectangular strip with pointed edges for leaves,
- for the core, a short strip with transverse notches.
The blanks of the petals and leaves should be folded in half, mark the center and straighten the edges, forming a bend. The assembly is carried out using glue by simply joining the blanks one on top of the other; a twisted core is attached to the center of the resulting flower.
Blanks for pansies are cut out of multi-colored paper, if desired, the middle can be tinted and veined. The assembly of the flower is carried out by connecting the petals to each other also with glue or thread. Floristic wire will be appropriate here as a stem.
This chamomile is collected using a similar technology, but a stick is used as a base to make a bouquet.
To make this tulip as close as possible to the real one, it was necessary to create a core using a special technology.

Flowers on a fixed basis
There are many options for flowers that are made using this technique: chamomile, but the most common is the English rose.

The peculiarity is that the petals are wound on a base - a foam or paper ball, which can be replaced with a small round candy.
MASTER CLASS ON THEME
This is exactly the principle that this
1. Cut corrugated paper strips approximately 6 cm wide and 10 cm long. The colors can be combined according to your preference: delicate milk core and rich yellow, orange or red outer petals.
2. Fold the blanks with an accordion along the width of the petal, round the edges.

3. Using your fingers, spread the corrugations a little, forming a wavy edge, then wrap the petals with toothpicks, giving a natural shape.

4. The petal blank should be stretched, giving it a semicircular shape - this will facilitate the formation of the flower.
5. We wrap the base of the flower with a rectangular strip without cuts, pulling the corrugations so that the paper tightly envelops the ball or candy. We fix it with a drop of glue, and pull the bottom with a thread.
6. All subsequent petals overlap in a circle, tightening with a thread. At the end of the work, we decorate the place of assembly with a sepal of green or any other color in accordance with the intended composition.

Council. If you want to make a bouquet on the stems, then the sticks should be glued with hot glue to the base of the flower - a ball or candy before the flower begins to form.
Here is a slightly simplified, but no less effective version of this flower.

Master Svetlana Bormotova proposed a simple technique that turns an ordinary rose into an exquisite flower:

This decorative artichoke is also created on a fixed base. An incredibly beautiful decor element!

It is not immediately possible to guess that a sweet is hidden in a graceful daffodil - you will definitely be sorry to violate such grace:

Original compositions and examples of creating decor
The traditional decoration is bouquets in a vase. You can collect a bouquet of daisies, roses, tulips, and for experienced florists it will not be difficult to create a branch of gladiolus:
If you love indoor flowers, but do not have time to grow them, then a corrugated paper orchid flower is just what you need. It is a difficult job that requires certain skills, but the result is worth it.
You can decorate a room not only with bouquets of paper flowers. For example, for indoor weddings, you can create a photo zone of paper flowers. They are attached to a perforated wall with a wire bent in the form of a hook.

Using the techniques described, you can create a topiary. A foam ball is taken as a basis, which is pasted over with corrugated paper petals.

This "cool magazine" harmoniously combines the created bouquet and the sweet filling of the box with the warmth. Such a gift will definitely be remembered for a long time!

Your guests will immediately pay attention to decorating the interior, but they will not immediately understand how this cup does not fall ...

With a little patience and effort, you will create elegant decorations for your room, make an unforgettable celebration or simply and loved ones with an unconventionally decorated simple gift.
Master classes from the unique master Lia Griffith
Lia Griffith makes incredibly beautiful corrugated paper flowers! Her step-by-step master classes are accessible and understandable, despite the fact that they are presented in English.


Inspiration and beautiful colors!
Categories

