Add site to bookmarks
- Kinds
- Choice
- Installation
- Finishing
- Repair
- Installation
- Device
- Cleaning
Ball valve: replacement of an old product and installation of a new one
Ball valves are modern products that have replaced conventional rod valves, at the bottom of which a thick rubber band was screwed to stop water. The stem of such a tap pressed the rubber, as a result of which the water stopped flowing. Modern ball valves are more convenient and attractive in appearance, they have only one drawback: if the water contains a large amount of various salts, then the ball-sphere quickly slacks and the product stops working.
When installing a ball valve on a thread, it is necessary to wind fum-tape, flax or liquid fum.
To prevent this from happening, you need to open and close the tap at least once every 2 months to knock down salt deposits. Installing a ball valve is a fairly simple event, and you can do it yourself. However, in order to correctly and efficiently perform the installation of a ball valve, you need to prepare for its installation and clearly follow the instructions.
Preparing to install a ball valve
In order for the installation of a ball valve to be easy and without any difficulties, it is necessary to properly prepare for it. It is very convenient in that it allows you to turn off the water immediately after the need arises. For this, as a rule, a ball valve is used, which is installed on a common water riser.
The installation of ball valves makes the use of water supply and various maintenance and repair work easier and more convenient.

In order to install a ball valve, it is necessary to shut off the water supply in the entire riser. In view of this, you need to worry in advance about obtaining permission to turn off the water supply from the relevant companies. You should prepare all the tools and materials that are necessary in order to properly install the ball valve on the riser with your own hands. The set of tools for installation is minimal:
- gas or adjustable wrench;
- fum tape (yellow or white tape for winding threads).
Back to index
To properly install the ball valve on the riser with your own hands, adhere to the following recommendations. When replacing an installed element, you must begin by draining the existing piping system. If the installation is carried out in an apartment or a private house, then in the place where the old fittings will be dismantled, it is necessary to prepare several rags or some suitable container for draining water from the system. This will allow you to work in more comfortable conditions in the future.

It is necessary to determine the future installation site so that the valve is installed with the possibility of normal access to it and the freedom to turn the valve handle to the open and closed positions is ensured.
Do-it-yourself high-quality installation of a crane requires, first of all, the right choice of product. The ball valve must be selected in such a way that its diameter corresponds to the diameter of the riser on which it will be installed. Please note that the valve flanges may have different types of threads. Before you buy a product and start installing it yourself, you need to decide on the appropriate type of element.
The type of product will depend on the location of its installation on the existing pipeline. Before proceeding with the installation of a ball valve with your own hands, pay attention to the arrow on the marking. The direction of the arrow must correspond to the direction of motion of the medium. This condition is very important to observe for the normal functioning of the system. You need to choose a model with a suitable thread. Ball valves are of several types:

When screwing a ball valve onto a pipe, it must have at least 4 threads.
- with external thread on both sides;
- with internal thread on both sides;
- on the one hand external, and on the other - internal;
- American on one side and domestic on the other.
The installation of the product is carried out only after the fum-tape or flax with sealing paste is pre-wound on the thread, which will ensure the sealing of the connection. Instead of fum tape and linen, you can use liquid fum (suitable for connections no larger than 2 ′).
When winding tape and linen, make sure that the direction of winding coincides with the direction of winding the element onto the pipe. After the installation is completed, you must once again make sure that nothing prevents the normal rotation of the handle of the product.
If, when winding the ball valve onto the pipe, it rotates too easily (by hand), then more fum-tape or flax should be wound until the product is twisted with a certain effort. Try not to apply excessive efforts either, since in this case the installation can end in failure: the product will simply burst.
WITH
a mixer, and therefore a mixer, because by mixing hot and cold water, it gets warm at the outlet. Install faucet- the matter is not complicated and it does not always make sense to pay money to an invited plumber. But before you install a mixer, you need to choose it, and here, alas, in the vast majority of cases, the ratio between quality and price is the most direct - the more expensive the mixer, the better it is. This is about quality. But besides this, the question of how to install a mixer can refer to its most diverse types. For example, install a faucet in the bathroom or in the kitchen.
Content
1.
2.
2.1
2.2
3.
Mixer price and quality
There are two points in the task of installing a mixer, the first is that mixers of the middle price group, the most common among the general population, in the vast majority of cases are not provided with installation instructions, however, we will tell you how to install a mixer of this class further.
The other side of the issue is expensive elite sanitary ware, which is installed so individually that it makes no sense to talk about installing a mixer worth 10,000 rubles or more, since they are made in relatively small batches and our description may not correspond to the particular model you purchased. And even a small discrepancy carries the risk of damage to expensive equipment. But this is not a problem, because such mixers are just equipped with very accurate installation diagrams and instructions (if this is not the case, they are trying to foist a fake on you under the guise of an elite device). In addition, having learned how to install a typical mixer, you can handle the expensive one, except by fiddling a little longer.
Do-it-yourself mixer installation
Consider installing a faucet in a wall-mounted bathroom, as this is the most troublesome type of installation.
Necessary tools and materials for installing the mixer
To assemble the mixer, subsequent installation, as well as to remove the old one, if necessary, you tools required- a pair of adjustable wrenches with a working width of at least 32 mm. Also may be useful:
Gas key number two (especially if you have to remove the old mixer),
big pliers,
hexagons for 6; 8; 10 and 12
Phillips and flat head screwdrivers.
To screw in eccentric adapters, you may need a regular open-end wrench 12 by 14.
Installing the mixer yourself is quite simple. Almost everyone can do this task, you just need to take into account some points that will save your repair from flooding, help save nerve cells and save money.
About how to do without plumbing and install the mixer in the kitchen with your own hands without errors, and will be discussed further.
Walls, floors, countertops and any other surface may be damaged in the course of work.. Even if serious damage can be avoided, then you definitely won’t save them from dirt.
So the first step before installing the faucet will be cover everything around with cardboard or at least oilcloth.
Consumables and tools
You will need:
- adjustable wrench (it is also called a "bob key");
- two "studs" (rod with external thread) for fasteners;
- two hoses (usually come with a mixer);
- round plates with a small hole in the middle - gaskets;
- you may need pliers and a few wrenches (for 13 or 14) wrenches.
Examination
We put the new mixer in its "legitimate" place. And immediately check how tightly the lower mount is fixed. The mixer must stand "confidently" on the surface if it moves - you need to tighten the bolts a little harder. In some cases, when the length of the fastener does not allow you to “pull up” the mixer, you can make the bolts a little shorter with a file or leave the substrate.
spout, that is, the moving part of your mixer, also shouldn't talk. Try turning the faucet to the maximum allowable angle while holding the entire faucet with your free hand.
The handle(s) should "walk" only along its own path, and clearly - without backlash. Otherwise, the mixer is considered defective.
Step-by-step instruction
 First of all, need to turn off the water. And, of course, both cold and hot.
This is done with the help of special valves that are located on the risers. They need to be fully tightened and checked for water flow.
By the way, so that there is a little more space for work, you can pull the sink out a little(where possible, of course).
First went
We fix the first hose on the mixer, through which water will flow. The mixer usually has markings that will help you figure out where to connect cold and where hot. If you put the tap right in front of you, then on the right there will be an eyeliner with cold water.
It is better to connect the first hose where the short fitting is located (this is such a threaded rod). After that, from the pins on the mixer bronze nuts are removed, and the studs themselves are twisted.
Fixing on the sink
Run a hose through the hole in the sink, screwed to the mixer at one end, then we connect the second. Our faucet is already on the sink, it's time for the bronze nuts, which we removed from the studs.
We draw the tap to the sink with them, but do not forget that at first both sides must be sealed.
In order to properly fix the studs with nuts, it is better not to rely on finger strength, but to use a wrench. You don't need to tighten too hard. If you overdo it, you can damage the sink and break the bolts - the faucet will leak.
Connecting to the system
Now that the mixer is firmly in place, it's time to connect the faucet to the water supply. The hoses are attached to the pipes with a union nut.
As earlier, You have to be careful not to over tighten it.. Too much stress can noticeably bring the need for repairs in the kitchen closer.
If you put the crane directly in front of you, then on the right there will be an eyeliner with cold water.
For information on how to properly install the faucet in the kitchen, see the video clip:
Good to know

- Before putting water into a new mixer, it will not be superfluous to carefully check all connections.. The faucet itself must also be firmly fixed on the surface of the sink.
To protect yourself from surprises, before starting the water, check if it is in the off state.
- If you are not just installing a mixer, but changing the old one to a new one, then it will not be superfluous drain all the water first. To do this, before disconnecting the wires, tighten the valves and open the taps.
- The place where the new mixer will be located should be thoroughly cleaned before starting work.. Sometimes cleaning products are enough, and sometimes you have to use sandpaper.
- Before fixing the faucet securely in place, it is best to check how straight it is and only then tighten the fixing bolts.
It is worth noting that sometimes repairs or cabinets of kitchen furniture make installing a faucet a real nightmare. In this case, it is better not to rely on your own strength and seek help from professionals. Remember an insecurely fixed crane can lead to much greater expenses than it will save on the labor of a plumber.
The kitchen faucet is one of the most heavily used plumbing fixtures. Any, even the most high-quality, similar device requires some maintenance over time - replacing a leaking cartridge or loosely closing faucets. However, it also happens that the body itself from the mixer becomes unusable - from constant exposure to water, irreversible surface erosion processes begin, the threads in the sockets for valves or the cartridge are “eaten”, the chrome coating is erased. And if the product is made of low-quality silumin, then the complete destruction of the body with the appearance of cracks and chipping off of fragments is quite possible.
Maybe not such a fatal situation - just the owners decided to update the interior of the kitchen, and this issue cannot be dispensed with without installing new modern plumbing. was told in a special article of our portal. Now we will talk about how to change the faucet in the kitchen yourself, without resorting to calling a specialist.
This process , Although and very responsible, but still quite affordable for an ordinary landlord.
What is required for work
To carry out work on replacing the mixer, you must immediately prepare the necessary components, accessories, tools, consumables.
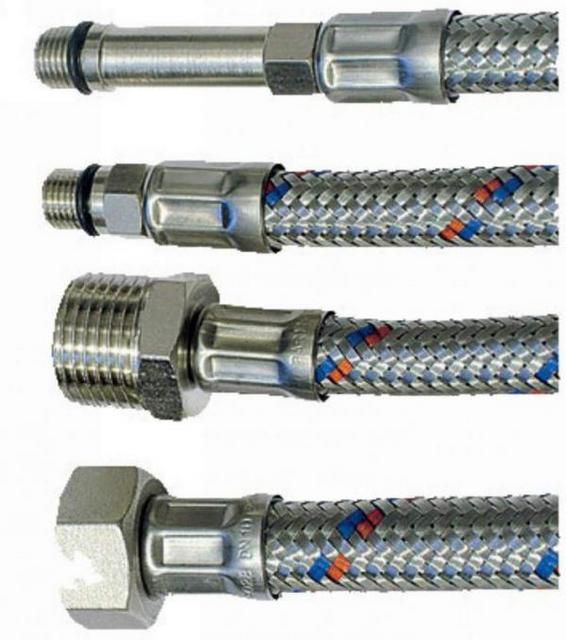
- We assume that the mixer has already been purchased. However, be sure to check if the length of the flexible hoses that are included is sufficient. As a rule, those that come with the kit have only 300 mm, which may not be enough. In addition, if the faucet is not a "brand name" then the quality of these metal braided sleeves usually leaves much to be desired and should be replaced immediately.

When choosing and purchasing such hoses, be sure to pay attention to the fact that the length of their fitting (otherwise it is often called a needle) should be different - this will facilitate assembly, since turnkey hexagons will not interfere with each other.
In addition, you need to choose the right type of threaded connection with a water pipe. This applies to both the diameter and the type of threaded part ("father" or "mother"). Most often, of course, female hoses with a ½ inch nut are used - for direct connection in the corresponding pipe. Nevertheless, options are possible, for example, if a collector comb or a ball valve with a “mother” outlet is installed.
Hoses should not be placed in tension, tightness, but they should not be purchased with a very large margin of length. When pressure drops (opening and closing the tap), they will twitch, vibrate, and this causes rapid wear of the rubber tube placed under the steel braid. It begins to rub and may leak in the near future.
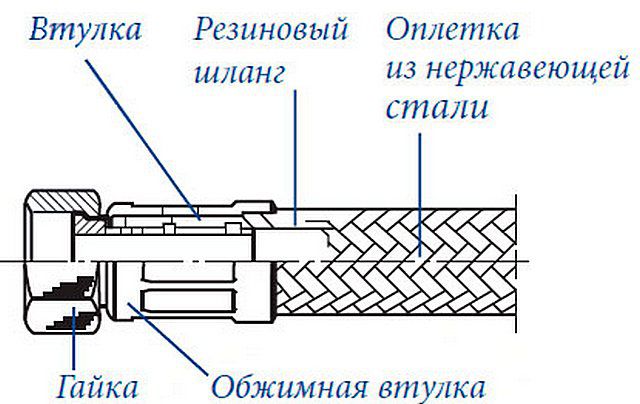 Schematically - the device of a flexible hose in a braid
 More durable and reliable in this respect are corrugated stainless steel hoses.
They are, of course, more expensive, and mounting them is somewhat more difficult. But such hoses have excellent rigidity - they will retain the bend given to them during installation.

Some craftsmen prefer to get by with flexible hoses, making water supply to the mixer from a metal-plastic pipe. To do this, you need to purchase a set of pieces with fittings for metal-plastic.
Such an eyeliner, of course, is also more difficult to perform than with flexible hoses, but once you have installed such pipes, you will no longer have to worry about this section.

Video: how to choose really high-quality hoses
- From the tools for work you will need:
- Spanners. It is guaranteed that you will need a 10 and 22 × 24 wrench. Very often, fastening nuts on studs require a 11 wrench. If the mixer is attached to the sink with a large diameter nut, then it is better to prepare an adjustable wrench.
- Screwdrivers with a straight and curly tip.
— Pliers.
- In some cases, you can not do without a gas key.
- If the installation is to be carried out on a new sink, which does not yet have a hole, or on a countertop, an electric drill with appropriate crowns (usually with a diameter of 35 mm) will be required.
- To work in low light conditions, under the sink, you will most likely need a backlight - a flashlight.
- Materials may require:
— Seals for threaded connections. They will be needed when there is a need to mount a coupling, an adapter on a water pipe, packing a fitting for a metal-plastic, etc. You should not trust the fum tape - it is better to use ordinary linen tow and sealing paste (like "Unipak") - such a connection will be guaranteed against leakage.
- If the installation of the mixer will be carried out with the temporary dismantling of the sink, then it is necessary to prepare a silicone sealant and, of course, a syringe for the convenience of applying it.
- situations are possible when the old "stuck" threaded connections will not be disassembled. Can help in this case pulverizing bottle of universal lubricant composition "WD-40".
After everything is prepared, you can proceed to the next steps.
Prices for popular faucet models
Faucets
Dismantling of the old mixer and preparatory work
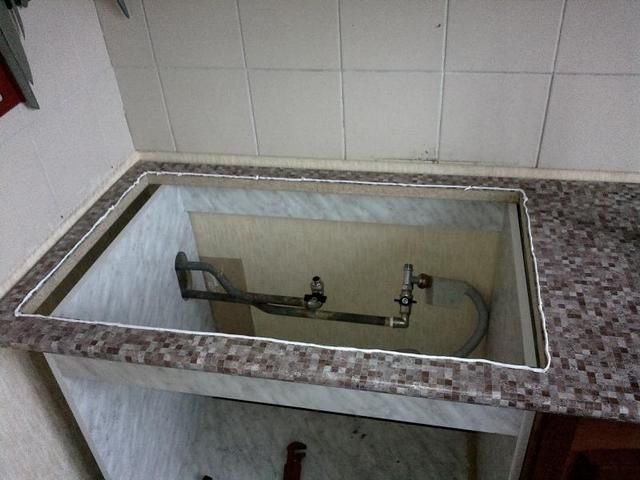
- Before starting work directly under the kitchen sink, it is necessary to Firstly, turn off the supply of both cold and hot water. To do this, the valves at the entrance to the apartment are closed, or, if it is provided for by the internal wiring system, they block the water supply from the collector to the kitchen. Sometimes taps are installed directly under the sink. Of course, it is theoretically possible to block only them. However, practice shows that when working in a tight space, the possibility of accidentally opening a ball valve with an awkward movement of a hand or elbow is not ruled out. In order to prevent such a misunderstanding, it is still better to turn off the water supply to the kitchen completely.
- After the valves are closed, you should open the valve on the mixer - this normalizes the pressure in the pipe. Under the connection area of old hoses, it is necessary to substitute a basin or other container of suitable dimensions. The hoses are twisted, it is possible to exit the water remaining in the pipes.
- Now you need to remove the old one. This matter is not as simple as it might seem at first glance.
— Firstly, it is very difficult to work in an uncomfortable position, in a very cramped space, lying on your back, especially if the sink is embedded in a kitchen cabinet.
- Secondly, the "classic" location of the mixer - between the wall and the sink bowl. In such a narrow niche, it is very difficult to wield a wrench - there is simply no place to overlay and turn it.
- Thirdly, almost certainly all the connections from time and dampness have rusted, “got stuck” and will not succumb so easily.

In numerous Internet articles on replacing the mixer, this stage is sometimes described in passing, such as “unscrew the pin with a screwdriver and pull out the mixer”. Experienced craftsmen know the price of such statements - with a very high degree of probability, these very studs will not give in to a screwdriver, rather, a rusted slot will be cut off. This means that you will need a key, and the “convenience” of working with it under these conditions has already been mentioned.
Which exit? If it is possible to remove the sink (and there is such an opportunity in the vast majority of cases), then there is no need to hesitate - both dismantling and subsequent installation of the mixer will be completed both faster and much better. It is better to spend a very small amount on the purchase of sealant and carry out fairly simple steps to remove the sink and then reinstall it - in the end, you will still win.

- To dismantle the sink, of course, you will need to disconnect it from the sewer. You can remove the flexible corrugated hose from the sewer pipe, or, which is probably more convenient for further work, simply unscrew the retaining ring on the siphon and remove this "glass" from the sink drain pipe.
- Now, comfortably seated, it will be easy to remove the spent his mixer. Depending on its design, either a large lock nut or studs are unscrewed. You may need to spray these knots with WD-40 to make them loosen. There are situations when this does not help either - then you have to take drastic measures - cut them off with a hacksaw or grinder. The main thing is not to damage the sink.
Sometimes you have to resort to cutting with a grinder when replacing an old type mixer installed on a hard steel pipe connection.

It is extremely difficult to disassemble rusted gons or covered with several layers of paint. Therefore, it is more profitable to simply cut off from the higher threaded part. Next - by circumstances. If you manage to release a high-quality threaded pipe for further connection of a flexible hose, then the issue is simplified. If not, then, apparently, you will also have to cut the thread with a lerka.
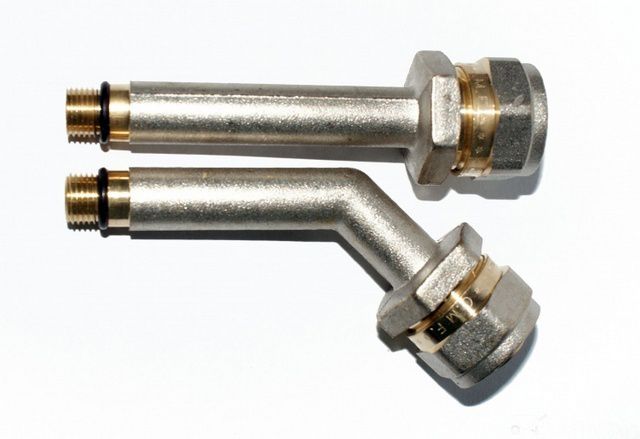
- In order not to postpone for later, it is necessary to immediately revise the condition of the water pipes suitable for washing, in particular, those threaded sections to which it is planned to fasten flexible hoses. In order for the hose gasket to fit snugly against the pipe cut, it must be even around the entire circumference, not have sharp or protruding edges, geometry distortion due to corrosive effects. If in doubt, it is better to “pack” a factory-made threaded extension in this place - this will guarantee a reliable connection to the hose.
 It is advisable to "update" the threads on the pipes by installing such extensions
 Installation is carried out on tow, the fibers of which are wrapped around the threads on the pipe clockwise, and then smeared with sealing paste. The extension cord is tightened with an open-end or gas wrench until it stops.
- If desired and if funds are available, shut-off valves can be installed immediately if they have not previously been installed. This will allow you to subsequently carry out any repair work in the kitchen, for example, in the event of an emergency, without turning off the general home water supply network.
- In the event that it is planned to supply water with metal-plastic pipes, it makes sense to immediately “pack” transition fittings onto steel pipes.
- If it is planned to install a new faucet on an old sink, then it is necessary to carefully clean the area around the mounting hole from build-up of scale, accumulated dirt, rust marks, etc. Such cleaning is carried out both from the front and from the bottom.
- In the case when it is planned to install a new sink, it is necessary, of course, to immediately try to purchase one that already has an installation hole. However, some models are not equipped with it, and you will have to take appropriate measures.
If the sink is made of stainless steel, then a special tool is used for this, which cuts perfectly even holes in metal up to 1 mm thick.

The diameter is selected based on the mixer model. So, if it is mounted on studs, then 28 or 32 mm will be enough. When mounting on a nut, a hole with a diameter of 35 mm is required.
 Hole cutting process is easy
 It is easy to use - a hole with a diameter of 8 mm is drilled in the intended place. The device is inserted with the cutting part from below, twisted with a bolt so that the cutting edges fit snugly against the metal. Then, turning the bolt with a wrench, the knives are rotated around the circumference.
The situation is more complicated if the sink is ceramic. To cut a hole in this case, you need a diamond crown. But even its presence in the home arsenal does not guarantee success - such a sink can easily be damaged if there is no experience in such work.
Advice - in both cases it is better to turn to professionals. Usually in good plumbing salons they will definitely tell you where and how this can be done, and in some cases such a service can even be provided on the spot.

If the mixer will be installed on the countertop, then the hole is drilled in it. To do this, you can use an electric drill with a crown - a hole saw Ø 28 or 32 mm. Making the right hole with such a tool in a wood composite panel will not be difficult.
Installation of a new mixer
As has been repeatedly mentioned in the article, faucet models may differ in the way they are attached to the surface of a sink or countertop.

- The diagram shows a mixer, which is mounted on threaded studs. The kit of such a product includes the studs themselves with brass nuts, a crescent-shaped clamping bracket with holes for the studs, and a rubber or polymer gasket of the same configuration.

There are mixer models that use only one stud, but this design will not differ in particular stability (rotation around the axis is not excluded), and it is better to purchase with two.

This design ensures reliable installation on surfaces up to 30 ÷ 35 mm thick, which is especially important when mounting the mixer on a countertop.
- Another option - the mixer has a cylindrical threaded part and a nut at the bottom, usually M 34.

Such models are more suitable for installation on a metal sink. It is important that there is no complex relief configuration from below in the hole area - an absolutely flat area is required, otherwise a snug fit and reliable fixation will not be achieved.
Installation of different types of mixers has its own characteristics.
A. Installation of a faucet with mounting on nut
The elongated lower cylindrical part will not prevent the flexible hoses from being screwed in, so the installation begins, in fact, with attaching the faucet itself to the sink.
- A sealing rubber ring is necessarily included in the kit of the carrier, and a special groove is provided for it on the lower end of the housing. The first step is to install a gasket in this groove.

- The threaded cylindrical part is inserted into the sink hole. In this case, it is necessary to ensure that the rubber ring remains in place, does not move.

- Then, a wide rubber gasket is installed from below, which should also be included in the package.
 The gasket is put in place...
 - The brass fixing nut is screwed on. It has a kind of "skirt" - an extension in the form of a washer, which will provide maximum pressure through the already installed rubber gasket.
 ... and then - clamping nut ...
 - The nut is tightened with an adjustable wrench so as to ensure the immobility of the mixer on the sink. In this case, it is necessary to check the correct orientation of the spout - it must be positioned so that the sectors of rotation to the left and right of the central position are equal, and the switch lever or valves are exactly relative to the sink. With an angular arrangement of the mixer, the position of the spout is selected diagonally.
 ... which is tightened with a key, fixing the position of the mixer on the sink
 - Correcting the position is easy - you can loosen the nut, align the mixer and fix it again.
- Now you can proceed to the installation of hoses. To begin with, a hose with a short fitting is screwed in and tightened with a 10 wrench.

No winding of the threaded part of the fitting with tow or fum tape, as a rule, not required - it has one or two sealing rings, which should provide reliable sealing. The fitting is screwed in to the stop with medium force - it is dangerous to overtighten, as the rubber ring may be damaged. Usually, the effort of the hand is enough, and only then no more than one more turn with the key.
 ... and then, in the same way - with an elongated
 - The next step is to install the second hose in the same way - with an elongated fitting.
- If it is planned to supply water through a metal-plastic pipe, then the fittings with fittings are screwed in in the following sequence - first the one that has a bend, and then a straight one.
- After the hoses (fittings) are screwed in, the sink can be installed in place.
Find out how to choose the right one from our new article.
B. Installation of a faucet with a mount on hairpins
The peculiarity of the installation in this case is that the hoses are screwed into the hole of the countertop or sink before the mixer is installed, otherwise it will not be possible to tighten them qualitatively.
- First, brass nuts are removed from the studs, and the studs themselves are screwed into the corresponding holes on the lower end of the mixer. The studs are usually slotted for a straight or curly screwdriver, but, as a rule, they are easily twisted by hand, without much effort. A strong tightening is not needed here - just wrap them up to the stop with a depth of 8 ÷ 10 mm so that they stand stably, without play.

You can immediately try on how the figured gasket and pressure plate will be put on the studs, but then these elements should be removed - they will be installed later.
- Both hoses are threaded into the hole in the sink (countertop) with the fittings up.
- Be sure to check the presence and correct installation of the sealing ring on the mixer body - in the same way as described above.
- The next step is to screw in the flexible hose fittings. The sequence of work does not change - first short, then extended.
- Mixer with connected hoses and screwed-in studs is inserted into the installation hole of the sink or countertop.

- From below, a figured gasket is first put on the studs, and then a metal pressure plate. They are baited and manually, as far as possible, brass nuts are tightened.

- After checking the correct location of the sealing ring on the body and the direction of the spout, the nuts are tightened with a 10 (sometimes 11) wrench until they stop, so that the mixer is securely fixed on the surface, without the slightest play.
 Neatly installed faucet - bottom view
 - It is important to check that there are no gaps near the case, not closed gasket- this sometimes happens when the hole in the sink is too large and the mixer is not properly centered in it.
Everything, the mixer is installed, you can install the sink in place.
We repeat that all of the above actions, of course, can, under certain conditions and with due dexterity, be performed without dismantling the sink, but it's an extra hassle.
Find out which one to choose, as well as consider the nuances, from our new article.
Video - Installing a faucet in the kitchen
Prices for accessories for mixers
Accessories for mixers
Connecting the mixer to the water supply
Installation of a sink is a separate topic that requires detailed consideration in an article specially dedicated to it. It can only be noted that if it is mortise and mounted in the old place, then a strip of sealant must be applied to the cleaned surface of the countertop around the installation perimeter. After pressing, it must securely close the gap to prevent water from penetrating through it.
If the sink is consignment note and adjoins the wall, then after its installation, the gap between them is also sealed with a sealant.
Now it remains only to connect the hoses to the water pipes. Hose nuts are usually already equipped with rubber gaskets, and neither winding nor excessive force is required to reliably seal the connection. On the contrary, too much tightening can lead to the destruction of the gasket and the appearance of a leak. It is enough to tighten by hand until it stops, and then only ½ turn tighten with a key 22 or 24.
With a metal-plastic eyeliner, of course, there will be fuss a few more- it is necessary to carefully measure the required length, set the required bend to it, and then tighten it in the appropriate compression fittings.
Video: connecting a mixer on a hard connection
Usually, when connecting hoses or supply pipes, they follow the scheme: on the left - hot water, on the right - cold.
If the sink was removed, then do not forget to connect it back to the sewer by installing the siphon in place and inserting the corrugated hose with a sealing cuff into the intended outlet of the sewer pipe.
In fact, everything, you can turn on the water supply and try the mixer in operation. There is, however, one more subtlety - it is recommended to first shed water with the tip removed - the aerator. The fact is that small inclusions can accumulate in pipes, hoses, or even in the mixer itself, which can quickly clog the holes of this nozzle. After a few liters of water have drained, the aerator is easy to install in its original place.
At the first start-up, all connections must be checked for leakage. If there are signs of leakage, it is necessary to immediately eliminate these shortcomings with a small tightening.
The article examined the most common how to install kitchen faucets. However, more complex options can also be encountered.
- So, for example, if the mixer spout is a shower head on a retractable hose, then one more switching and adjustment will have to be carried out.

A hose will be located below (in the diagram - item 1) in a corrugated braid or without it, about 1.5 m long, with a fitting at the end. This fitting, after installing the mixer in a regular place, is screwed into the socket intended for it on the body. A sinker (item 2) is installed on the most flexible hose - it will return it to its place and hold it in this position, and at the same time it will serve as a limiter for the length of the hose being pulled out. The position of this sinker can be changed using the locking screw.
- Another option is when two channels are provided in the mixer spout - for ordinary tap water and for purified drinking water. On such models, an additional fitting (pos. 3) is provided for connecting another hose coming from the system installed under the sink and aftertreatment.

Switching on the mixer for a set of drinking water is carried out by a separate tap or lever (pos. 4).
There are also more “fancy” schemes - with thermostats placed under the sink, autonomous boilers, electronic control units, with a mechanical draft connected to the drain plug of the sink bowl, and others. The installation technology in this case should be detailed in the proposed product data sheet. However, if there are ambiguities in this matter, you should not engage in amateur activities - it is better to invite a specialist.
Before installing the mixer, it is better to read about the rules for its installation. Otherwise, you may end up with a leak in the bathroom or toilet if you have a sink there.
You can fix the faucet to the sink yourself without calling a plumber. The very first rule in the installation of the mixer, which must be applied, is to remove the sink from the cabinet on which it stands. Also, you need to have plumbing tools with you for work.
To fix the mixer, it is necessary to screw the connecting hoses into it. Screwing should be done by hand, and then tighten the hoses that are already screwed in half a turn. To do this, use a wrench. In general, you will need a number of tools.

To change the mixer you will need:
- Screwdrivers;
- adjustable wrench;
- Spanners;
- Lubricant;
- Dry rag.
Next, process the gaskets. Then install the seal, insert the connecting hose into the hole in the sink and install the faucet. But do not forget that you need to put a seal on the needles from the bottom of the sink.
Be sure to put the seal on the hairpin or needles.
Install a metal washer and tighten the nut as an additional fastener. Now you can put the sink on the cabinet and screw on the fixture.
As you can see, assembling the mixer is easy. It attaches without any problems. Always keep tools close to you that you may need at any time. Do not forget about the installation of seals that will prevent leakage. And then your mixer will work for many years.
One of the components of the mixer is a crane box. What types are there, how to choose and replace correctly, you will learn from our article:.
We disassemble how to connect the mixer to the water supply
To connect the mixer to the water supply, it is enough to have ingenuity and the tools necessary for this. If you have had experience with such an installation before, great, if not, then it's okay. Connection is not difficult.
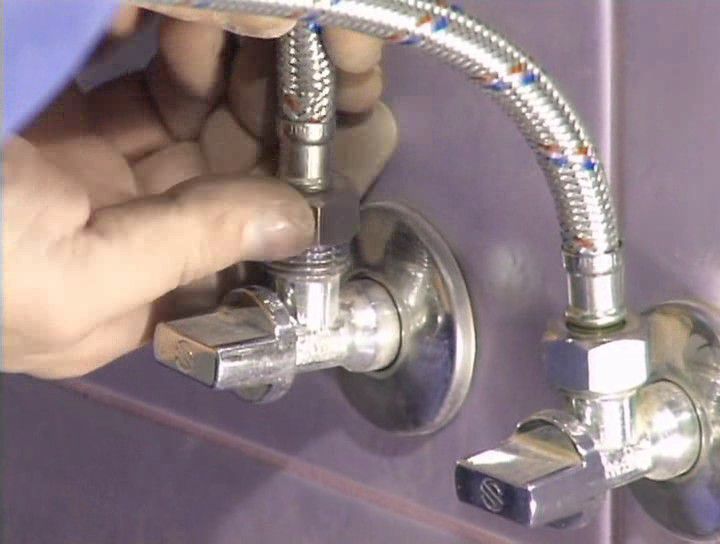
Installation of the mixer to the wall is carried out using the FUM tape. Connection to the water supply occurs using eccentrics. They are screwed to the fittings that are found on the water pipes. Eccentrics shift the distance between the water pipes to the desired distance between the mixer inlets.
Scheme of installing a mixer to water pipes:
- Put the eccentrics to the fittings;
- Screw the mixer block;
- Put decorative eccentrics;
- Screw the complete block;
- Checking.

Once you have finished placing the eccentrics, you need to attach the mixing block to them. We fasten it to the eccentrics.
In the case when both sides of the mixer block go easily and do not spin without problems, you have set everything correctly.
Then you need to remove the block and install decorative eccentrics, then the entire block with seals. This installation is completed.
Installation of the mixer to the water pipes takes place in just one hour. Follow the instructions and then you will put the mixer correctly. The main thing to remember is that all scrolling should go without problems and stupor. This means that you are doing everything right.
How does the popular single-lever mixer work? You will learn about its types and features by reading the following material:
What is a flexible connection for cold and hot water
Connections that are made of flexible materials are an excellent attribute for connecting not only faucets in the kitchen, but also toilets and showers. This is an indispensable eyeliner for connections, as it is reliable and both cold and hot water can flow through it.
A flexible connection is a rubber hose, which is covered with a metal braid, secured with fittings, nuts and gaskets. The hose is often made from rubber, which is used in the food industry. It bends well and is durable in use. The diameter of such hoses can be different.
A rubber hose covered with a metal braid is what a flexible connection is.

Flexible connection includes:
- Rubber hose;
- metal braid;
- Fittings;
- nuts;
- Gaskets.
Braid material is aluminum, stainless steel or nylon. They protect the connection from external environments. Aluminum braid, as a rule, lasts 3-4 years. The stainless steel braid has been in operation for 8 years. Nylon - more than 15 years.
Flexible connection is often used in plumbing. Durable rubber hose allows the connection to bend under different loads. The metal braid protects it from external influences and aggressive environments. And fittings with nuts perfectly fasten connections with conductive parts of the pipeline.
Proper installation: how to install a faucet on a stainless steel sink
In the correct installation of the mixer, there are some nuances that are not visible at first glance to the layman who is going to do such installation. Especially, it is important to know the installation rules for a sink, which is made of stainless material.
First of all, you need to prepare the countertop for installation. Once this is done, proceed to the installation of the mixer itself. To do this, first of all, wrap the threads of the flexible hoses with a special tape or use a polymer sealing thread, screwing them into the mixer body.
Please note that when screwing the hose, do not support them by the metal braid. You just rip it out.

The mechanism for installing the mixer on a stainless steel sink:
- Wrap the threads of the flexible hose;
- Pass the hose nuts into the holes for the mixer;
- Stretch the faucet body to the stainless sink;
- Glue the sealing tape;
- Insert the fasteners into the grooves of the sink;
- Apply sealant around the perimeter;
- Place the sink with mixer tap on the countertop.
Following this installation mechanism, you will put the faucet on the stainless steel sink correctly.
Installing the mixer on stainless steel is not a hassle. Even if you have a sink made of thin metal, you just need to make a plywood liner to put it on the back side. Then the mixer will hold strong and securely on the stainless steel sink.
How to install a faucet on the sink (video)
Both the plumber and the owner of his house can put the mixer on the sink. If you have at hand all the necessary tools for plumbing work, then installation will take you only a couple of hours. Follow all rules and installation mechanism to install the faucet correctly. And then you will be happy to use tap water.


