Are you planning a move? The program for designing houses “Interior Design 3D” will help you save time, effort and money. Where to place the living room, and where to place the nursery, how to arrange the furniture in the room and how to equip the kitchen - the editor will solve any question. Read the article and find out what’s special about the designer and what features it will allow you to create a professional three-dimensional model of a house in a couple of minutes.
Drawing house layouts in the program is very easy!
Advantages of designing a house in the program
"Interior Design 3D"
There is a lot of software for creating room layouts: from very primitive to professional. Why should you choose “3D Interior Design”? There are several good reasons for this:
- ✓ High speed. You can create a house plan in literally 5 minutes!
- ✓ The editor interface is intuitive and fully implemented in Russian.
- ✓ The result can be shown as 2D plan or visual 3D model.
- ✓ Export the result in a convenient form: printing, saving to PC, creating a working file to continue editing in the future.
- ✓ Wide range of tools: the program has catalogs of doors and windows, room blanks, a collection of furniture, and a rich selection of finishing materials.
- ✓ Download free version editor and you can draw a house right now!
Country house interior design
“Interior Design 3D” is a tool that will help you develop a detailed virtual layout of a home of any size and draw up a plan for subsequent home renovation.

Country house design
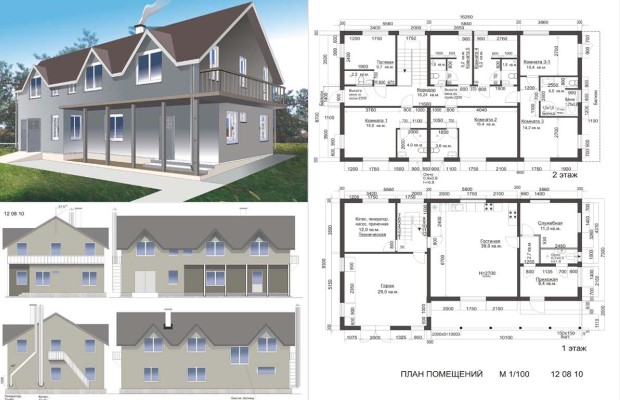
3D layout of a private house
Planning a private house is a long, multi-stage process. A smart and advanced designer will allow you to select interior and exterior finishes. You can comfortably plan your home with simple mouse clicks and receive a full-fledged 3D model.

3D layout of a private house
What to consider when designing a house
When arranging your home, keep the following in mind:
- ✓ square. Suburban buildings usually have a lot of space. Organize it so that the rooms are not too empty.
- ✓ colors. Do not choose bright shades for decoration. They quickly become addictive and boring. Stick to neutral tones.
- ✓ decor. Include things that can highlight the cozy atmosphere of a country house. They will also help fill the “empty” space.
How to use house modeling software
The program for house planning “Interior Design” will help you create a full-fledged three-dimensional model of housing with your own hands, thinking through the details to the smallest detail:
- ✓ draw a plan;
- ✓ install windows and doors;
- ✓ select external and internal decoration;
- ✓ add furniture and decorative items.
Let's go through each stage of the work in a little more detail.
- Step #1. Create a drawing
Create a clean project and select "Start from scratch". Using the tool "Draw a room", draw a figure on the diagram. Be sure to respect the scale. Similarly, add all other premises to the diagram, both residential and utility. Adjacent rooms must have adjacent walls.
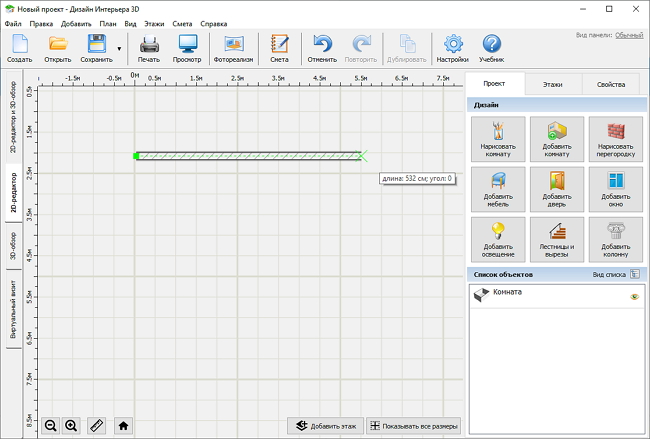
Draw a floor plan manually
If the building has several floors, go to the tab of the same name and add a new level to the layout. Use stairs to connect floors.
Preparing a building model and, in particular, designing frame houses requires the mandatory selection of materials for facade cladding. The software allows you to customize the exterior finishing at this stage. First of all, uncheck the box next to the line "Transparent walls", if it exists. Open “Properties”, click on the item "The walls are outside" and choose the optimal material.
- Step #2. House layout
Next, you need to arrange windows and interior doors. To do this, use the commands of the same name from the “Project” tab. The catalogs include all possible models. You can choose wide three-chamber and four-chamber windows to let in more natural light. A compact single window can be installed in the attic. In the selection of doors you will find not only traditional solutions, but also doorways, including arched ones. Their use will add style and visually make the space more open.

Select a suitable window from the program directory
- Step #3. Creating a home interior design
Customize finishing materials for walls, floors and ceilings in each room. Use ready-made textures - the designer includes dozens of options that imitate real materials - wallpaper, tiles, carpet, bags and bricks. Each surface has its own set of textures. Visit the Properties tab to select finishes for your home design. Upload your own image if desired.

Choose your favorite wallpaper from the catalog
Try to maintain one style. Take a look to get inspired and find suitable ideas.
- Step #4. Furniture arrangement
Equip your home with furniture. For convenience, the set is divided into thematic sections. Open item "Bedroom"– and you will see beds, nightstands and wardrobes, click "Living room"– and you will find sofas, display cases and walls, click "Kitchen". – and you can choose a stove, refrigerator and dining table.

Arrange furniture in each room
The appearance of objects can be customized to your liking by accessing the “Properties” tab. In particular, change the finishing material of the selected item, record its exact location and adjust the dimensions. When furnishing your home, focus on comfort and functionality. Evaluate - this will make it easier for you to figure out which layout will be ideal for you.
Download the house design program
“Interior Design 3D” has no analogues in terms of simplicity and ease of use among those that can be found in Russian. Unlike online editors, with this program you do not depend on an Internet connection, and you can freely design a house at any convenient time. on this site - take the first step towards the home of your dreams!
A home modeling program will help you decide which home layout will be most optimal for each family member. The software is perfect for both renovation companies and novice users who want to independently choose the design for all rooms. All settings are so clear and accessible that anyone can easily create a model of even a multi-story building. Download the software to your computer and appreciate its benefits!
- ✓ The interface is made in Russian.
- ✓ In the catalogs you will find furniture for furnishing the kitchen, bathroom, bedroom, nursery, living room and hallway. You can adjust the size and appearance of objects.
- ✓ The planner includes a collection of textures to cover walls, floors and ceilings.
- ✓ The private house design program allows you to view the result in classic 2D mode, 3D review or through a “Virtual Visit”.
- ✓ Create one-story, two-story houses and even entire mansions. To connect multi-tiered buildings, the house design program offers staircase models. Adjust their width and specify the number of steps.
- ✓ Using the estimate function, you can easily understand how much construction and repairs will cost you.
Every person has the inherent desire to live in a cozy and comfortable home. With the help of the special Dom 3d program, anyone can easily create the interior of their dreams. On our website you are given the opportunity to download House 3d, as well as familiarize yourself with all the features, advantages and advantages of this program.
Brief information about the program House 3d
The developer of this program is a company of the same name, which managed to create a multifunctional and easy-to-use product that is accessible to various categories of users. Thanks to its intuitive interface, ease of use, as well as a wide range of functions and capabilities, this program will be appreciated by novice amateur designers who are taking their very first steps in the field of residential interior design.
The program is able to work perfectly on any computer devices with the operating system Windows XP, Vista, as well as Windows 7 or 8 installed. This application is not very demanding on system resources, so it functions without problems even on old computers with little power. There are currently no versions of this program available for other popular operating systems.
The main functions of the program are three-dimensional visualization of the interiors of houses and apartments, design of all kinds of furniture, three-dimensional design of various interior details. Developers are constantly working to expand the functionality of their program, taking into account the wishes and suggestions of active users.
Main features and capabilities of the House 3d program
 A significant advantage of the program is that it is distributed free of charge, making it available to absolutely everyone. If you are interested in downloading the House 3d program in Russian, then you can do this at any time directly on our website.
The interface of this application is very simple and intuitive, so even untrained users can quickly master it.
This program excels at tasks such as:
- comprehensive modeling of residential buildings;
- design of individual pieces of furniture and other parts;
- creating residential interior design;
- high-quality three-dimensional design of various parts.
An important feature of the program is the presence of a built-in architectural module designed specifically for the construction of the walls of a future house, its roof, realistic door and window structures, staircases of various types, openings, as well as many other elements that play a very important role in arranging a holistic space.
Using special convenient functions, any user can easily design a variety of cabinet furniture, as well as lay out wall and floor tiles in various rooms of a virtual home. This program also allows you to use a variety of color schemes in your created projects, experiment with textures and textures in order to ultimately find the most suitable option.
According to the developers, compared to some other free programs and applications designed for modeling houses and interior design - in particular, Sweet Home 3D and Google SketchUp - the House 3D program offers users a much larger number of useful functions and opportunities for creativity. To expand the functionality of this simple and accessible software, a very extensive catalog is provided, which contains many products - a variety of cabinet and upholstered furniture, as well as additional accessories. They can be added to the created interior.
Advantages of the version House 3D 3.1
 The developers strongly recommend using only the latest version of this software. This is due to the fact that previous editions do not support the new file format. Today this is version 3.1 - compared to its predecessors, it has become even more advanced and functional.
You can download the latest version of the House 3D program at any time directly from our website. It will please you with its new useful features, including:
- convenient facade manager;
- hatch of the third type with editing function;
- the possibility of using fences, railings and other elements;
- spiral staircases.
In addition, there are some general improvements - for example, the ability to edit door and window structures and resize them on the screen, new additional materials for decorating floors and ceilings, additional lighting sources, as well as some other elements.
Why do you need the House 3D program?
 Creating cozy and comfortable home interiors is a very interesting and exciting activity, and with the help of the right software it will also become very easy.
If you want to try your hand at design and develop your own interior design for your home or apartment, all you need is this editor.
Anyone can successfully use this software, since the work does not require any specific knowledge, skills or specific experience in this field. Even the developers themselves position House 3D as software for beginners and hobbyists, but not for professional interior designers. Rating 3.97 75
Many of us dream of our own country house, where we could come for the weekend and take a break from the annoying and noisy city life. And if we talk about the independent construction of such a house, then the most difficult stage will probably be the selection of a suitable project that fully meets the requirements and wishes of the future owner. Designing a house on your own is quite difficult; this procedure requires certain knowledge and skills.
First you need to figure out what a country cottage should be like. There may be quite a lot of requirements, but they all boil down to three important points:
- multifunctionality;
- simplicity of design;
- aesthetics.
There are a lot of ready-made projects on the Internet, both standard and individual. But when choosing one or another of them, you should not rush; first of all, you should decide - is an individual project really necessary?

Important! Such projects are used mainly for non-standard sites, where the construction of a standard house is problematic or even impossible.
The best option (in terms of time and finances) would be to purchase a standard project and then link it to a specific site by an experienced architect. But this is provided that only slight adjustments are required, and if you need to completely change the project, then it is better to immediately order an individual version.
If plannedDIY house design, then it is unlikely to be possible to do without a qualified specialist, since when drawing up problems may arise with numerous technical details - the number and location of lamps, sewerage connections, thickness/height of walls, etc. Based on this, we can distinguish only two possible (read: inexpensive) options.
- You can contact designers who will make a sketch of the house, but without any technical details. With such a sketch, you can easily build a small country house, but only with the most primitive layout.
- Another way to save money is to ask for help from student project designers who have already learned the basics of the profession.
Important! Regardless of who and how the project was drawn up, construction must be entrusted to a qualified foreman who is able to determine “by eye” what exactly needs to be done to implement this or that detail.
If this is not done, then in the event of the destruction of the house there will be no one to blame, since according to the law the foreman cannot be responsible for the compliance of the house design with safety requirements.

If an architect was involved in the design of the house, then you need to remember the basic requirements and, if possible, fulfill them.
- It is necessary to provide the architect with a site plan, the results of geological research, and a detailed description of all existing landscape elements (forests, country roads, ponds, etc.) that can affect the location of the house.
- You also need to notify the contractor about all restrictions imposed by the management company or legislation. This could be, for example, a ban on construction in a water protection zone, requirements for the strength of the facade, or the height of the house.
- In most cases, communication inputs must be connected at your own expense. This also applies to gas supply, which should be handled exclusively by specialized companies.
- Before starting work, the architect will ask the customer to fill out a so-called questionnaire, which will indicate the basic requirements for the project. All these points are mutually agreed upon in writing.
- Sometimes the architect himself suggests making certain adjustments. A striking example of such adjustments could be a bedroom for elderly family members, which is moved from the second to the first floor so that there is no need to often move up the stairs.
- Customers often treat documents with disdain, which is fundamentally wrong. It is necessary to carefully study and fill out the questionnaire - this will significantly reduce the time of drafting the project.
- Creating an individual project takes a long time - on average it takes three months. This moment is an additional incentive to independently draw up a project.
Important! Sometimes the customer, after reviewing the finished project, wants to make adjustments or additions. Of course, this will also increase the preparation time.

DIY project
As mentioned earlier, you can design a house with a primitive layout with your own hands. To create a sketch of a “dream house” you only need paper and pencil; no specific skills or an architect’s diploma are needed. Below is the sequence of main actions.
Stage 1. Geological exploration

Design should begin with georeconnaissance of the site. This will allow you to obtain accurate information about the properties of the soil and the depth of groundwater (the latter is necessary when planning the foundation and basement). It is advisable to carry out exploration in the spring, when groundwater rises to its highest level.
Stage 2. Determining the scale

First, take a sheet of paper in a box. Let’s say one meter of land is two squares. In this case, the scale will be 1:100, that is, 1 mm in the project will equal 10 cm in real life.
Stage 3. Marking the contour of the site
Next, you need to draw the outline of the site with all adjacent buildings in order to correctly determine the location of the house. At the same stage, the number of floors and whether there will be other structures in the yard are determined. If there are already some objects on the site that will not be removed (for example, a swimming pool), then they are applied first. So the design will be carried out taking into account the free space.
Important! You need to be prepared to use the tape measure multiple times, because everything needs to be done in accordance with the scale.

Stage 4. Start of planning
Let's say the house has two floors, two bedrooms, two toilets, a living room, a kitchen and a basement.
If there are any structures nearby, then there must be at least three meters between them and the house - this is necessary for fire safety.
Stage 5. Basement
Next you need to start planning the basement. If the groundwater level is high enough, then installing a basement will increase the total cost by about a third. Therefore, it is advisable to simply make an additional room instead, but provided that the area of the site allows this.
Stage 6. Ground floor
After determining the height and type of foundation, the issue of building materials that will be used to build the house is decided. Next, a hall is drawn, the living room and kitchen are connected to it, and the toilet is placed in the formed “pocket”.
Then you need to see what happened. Let’s say right away that you shouldn’t get upset about this, because this is just a rough sketch.

It turned out quite well, but some things could be improved.
- The kitchen and toilet should be located next door - this will facilitate the layout of communications. In the first version of the project, these rooms are located far from each other.
- The living room usually gathers a lot of people, so its area should be appropriate. The hall should be slightly reduced and thus the living room should be expanded.
- You also need a staircase to the second floor, so you need to find a place for that too.
- In the first sketch there were no auxiliary rooms - such as, for example, a boiler room.
The basement may need to be modified. There were some changes in the second version of the sketch.
- The dining room was swapped with the kitchen, since the exit from the living room should lead directly to the dining room, where the family will gather.
- The dimensions of the bathroom have changed. It was decided to place the bathroom on the second floor, so the free space of the first floor was saved in favor of the boiler room.
- A staircase appeared.
- The living room has been enlarged.
Stage 7. Second floor

On the second floor everything is much simpler. The toilet is located in the same place so that there are no problems when connecting communications. The wall between the bedroom and the recreation room moves somewhat in favor of the bedrooms.
You also need to plan out all the windows and the front door.
Stage 8. Roof
When designing a roof, you should remember one simple rule: the more bends and connections, the higher the value of the house. In addition, a roof that is too complex will be unreliable and, over time, leaks will form in the bends.
Stage 9. Thermal insulation
In order to reduce heat loss, all non-residential premises should be located in the northern part of the house. In addition, thermal insulation largely depends on the quality of the materials used for insulation, as well as on the location of the windows.
Important! Despite the fact that the house looks ideal on paper, once it is built you may no longer like it. At the same time, using an unfinished and “raw” sketch, you can build a quite decent cottage that will last for decades.
Step 10: Approvals
So, the project is almost ready, all that remains is to take it to the architecture department for approval. Most likely, the department will offer to modify it somewhat - you should not refuse. In addition to the project itself, the architecture must provide:

Important! Risu NK must be accompanied by a realistic estimate for building materials.

conclusions
Designing a house, like any other important event, should be thought out in advance, because the future may depend on it. The above project already takes into account the possibility of increasing the size of the family (there are two bedrooms on the second floor - one of them is a children's room).
Video – DIY house design
Private construction is a complex and rather lengthy process that cannot be completed without a properly drawn up project. It’s quite possible to create the latter with your own hands. But for this you will have to study all the features of designing individual buildings. And, believe me, there are a lot of them.
We are planning individual housing construction - let's start small
Now many specialized companies offer to design any house. It is very comfortable. But, unfortunately, such services are not cheap. Therefore, private developers often try to plan a home on their own, without having sufficient knowledge to do so. We will try to correct the situation by describing the main stages of designing private housing construction with our own hands. With the right approach to the matter, any motivated self-taught master will be able to perform most of this operation without the help of specialists.
Designing a house always begins with determining what kind of building we want to get in the end. At this stage of work we need to find out the following:
- Will the house be used year-round or is it planned to live in it exclusively in the summer (seasonal cottage outside the city, dacha).
- How many residents is the house designed for? This is necessary in order to accurately determine the number of bedrooms, as well as the size of the kitchen and living room, where the whole family will often gather.
- What part of the land plot will be optimal for building a private house. It can be located in depth or at the beginning of the available free space.
- What outbuildings are planned to be built? You need to think about where to install an autonomous septic tank, equip a well for water supply, build a private bathhouse, a garage for a car, and so on.
Based on such data, we will be able to preliminary draw a plan for the future home, make a schematic marking of the existing plot of land, rationally and harmoniously placing all additional buildings on it. After this, you can begin to solve more serious problems.
Design stages - we adhere to a certain scheme
To make a truly high-quality house project, you need to go through several stages sequentially. We need to create:
- 1. Draft design.
- 2. Architectural plan.
- 3. Structural design.
- 4. Engineering and technical justification.
- 5. Design project for a future home.
Making a preliminary design of a house yourself, as was said, is as easy as shelling pears. First, we draw a simple diagram of the main building and utility structures, and sketch out the desired style and spatial solutions. Then there are two ways - turn to specialists with your sketch or try to independently draw an accurate plan for the building, foundation, floors and roof of the building. You also need to make diagrams of the transverse and longitudinal sections of the dwelling, the external appearance of its facade.
Drawing a preliminary design of a house is not enough. In addition, you will need to indicate all the features (structural) of its individual parts, and determine the materials that will be used for construction work. Based on the specified sketches and drawings, a working project is created. It is the main document for builders.
Next we move on to the architectural stage. We determine the dimensions of all premises of the home and their location. Then a diagram is drawn with marks about where the door and window openings and other architectural elements will be located. We also solve other important issues - the slope of the roof, the thickness of the walls, and so on. After all these steps we will have a lot of drawings. Moreover, explanatory notes will have to be prepared for each of them. If you have some drawing skills, you can draw a project on paper. It is even easier to carry out architectural planning using special computer programs. We'll talk about them a little later.

The construction of houses cannot be completed without determining their design features. Let's move on to the next stage. We design the foundation and the depth of its penetration into the ground, interfloor ceilings, chimney, rafter system, walls, roofing and other elements of a residential building. We display the results of the work on the drawings and immediately calculate the amount of materials that will be required for construction work.
Next, we are engaged in the preparation of engineering and technical documentation. Many private developers often omit this part of the design, which is fundamentally wrong. Without planning engineering and technical systems, building comfortable houses for living is impossible in principle! It is imperative to create a project with calculations and determination of locations for heating, ventilation, water supply and waste disposal, and electricity supply. Usually it consists of several sections (sewage, water supply, and so on). If you plan to equip your home with a security alarm, it is described in a separate document.
The final stage of the design activities is the development of the building’s exterior design and interior solutions. We choose colors for finishing interior rooms, wall surfaces, roofing, facades, and decide on the style. Advice. It makes sense to do a house project yourself in cases where a person plans to carry out most of the construction work independently. Not every self-taught master will be able to use the documentation compiled by professional architects. The average person will not understand many of the drawings and, as a result, will not be able to do everything correctly. If we ourselves were able to draw up a project, it will not be difficult for us to translate all its provisions into reality.
Tips for amateur designers - a must-read!
We always start designing our own home with geological exploration activities. They will allow you to find out the characteristics of the soil on a building plot and find out at what depth the soil waters lie. It is advisable that such work be carried out by specialists with the appropriate equipment. Moreover, geological exploration is best carried out in the last days of autumn or early spring. At this time, groundwater rises to its maximum height.
A survey of soil characteristics will make it possible to choose the optimal type of foundation for a home and determine the possibility of arranging a basement. If soil waters rise too high during floods, it is not rational to build a subfloor (ground floor). In such situations, the cost of building houses increases by 25–30%. Perhaps it would be wiser to abandon the underground and build a separate utility room instead.
If you are not sure that you will be able to correctly draw a plan for your future home, it is recommended to pay attention to ready-made (standard) solutions. It's easy to find them on the Internet. But here it is important to understand that such plans in most cases are incomplete and require serious revision. No one will post projects for free that take a lot of time to prepare.

Do not try to blindly copy standard solutions for the construction of private houses. It’s better to take some ready-made project as a basis and study it. And then try to make a house design that is truly suitable for yourself, based on the data obtained from analyzing a typical building.
If you are a beginner designer, opt for simple projects. The fewer bends, complex angles and original structural elements you plan, the easier and more economical it will be to build a private home.
Having decided to make a drawing of a simple but reliable house, consider measures aimed at increasing its energy efficiency. This is very important these days. Energy prices are skyrocketing. Every person tries to minimize heating costs. Construction industry experts recommend placing living rooms in private houses on the south side, and utility rooms on the north side. This trick is the simplest and most effective way to save energy.
You can reduce your home heating costs in another simple way. Having decided to draw a plan for your home, try to equip it with a reasonable number of windows, and not very large ones. You need to draw several diagrams. Look at the results of your work. And then choose an option in which the windows look beautiful and at the same time do not have an overly large area. Experts also advise making a plan that includes the use of high-quality modern heat insulators for various structural elements of a residential building. Good insulation materials for individual houses provide a significant reduction in the cost of maintaining a comfortable temperature in them in the winter.
Computer is the best assistant for private developers
Modern technologies allow you to properly design a cozy home. There is nowhere without them now. Creating the perfect house project will require minimal effort if you use special programs. They are easy to find on the Internet. Such programs make it possible to create models of various homes in 3D. The results of buildings designed on a computer clearly demonstrate all their advantages and disadvantages. Models can be zoomed in and out, rotated and viewed from any angles and angles. Many home planning programs are self-distributed for free, but they are well adapted for ordinary users. Let us describe several of the most well-known programs of this type.
Let's start our review with a product called SketchUp. If you want to quickly and competently complete a house project on your computer, use this program. It is free and yet truly multifunctional. SketchUp will design any building in 3D and help you create a chic interior or landscape design. The program has a lot of textures, makes it possible to change any structural part of the building and the scale of drawings, and export drawings of the compiled plan to CAD and PDF files.
Working with SketchUp yourself is very easy. The program is intuitive, although it is still better to undergo a little training so that the quality of the drawn models is the best. You can also receive lessons on how to create construction documents and drawings at a professional level. Then drawing up plans and diagrams will be even more effective.
You can also design a house using more serious software - ArchiCAD. This brainchild of the GRAPHISOFT company is actively used by professional architects and designers. It is also popular among amateurs who want to build their own cozy cottage. ArchiCAD is a complete set of tools for designing buildings and interiors. She does everything - creates models, develops technical and construction documentation, helps to correctly design stairs, fences, roofs and other elements of houses.
When planning residential buildings, she uses the most innovative visualization techniques. Please note that the licensed version of ArchiCAD is not distributed free of charge. But the results of projects made with the help of this program are so good and accurate that you don’t mind spending a little money. Nuance. To create technical documentation using ArchiCAD, you will have to learn the rules for using its main tools. It is impossible to work with the program without prior training.
Another program in our review is Arcone. You can also use it after completing the training. The “open and draw” option does not work here. Arcone is a complex multifunctional product. To use it correctly, you need to study each component of the program. And only after that proceed directly to the design.
Arcone contains about 400 materials and 1300 textures, as well as about 3000 typical three-dimensional objects. This program, developed by true professionals, is used by leading architects around the world. It will also provide real help to home craftsmen if they want to achieve the ideal quality of a private home project created with their own hands.
Use modern technologies, create the home of your dreams - comfortable, warm and reliable, and enjoy every minute spent in it. Good luck!
3D projects for creating designs for houses, apartments and other premises are traditionally created in AutoCad. This is a professional 3D modeling program. You can view the prices for this product and buy autocad here. If your profession is not related to design and architecture, then the free online program on the website will be enough for you www.homestyler.com
Pros of online house design:
- There is no cost to purchase a special program,
- All design work is done in the browser,
The main disadvantage: you must understand that this is not a professional program, and one way or another, you will be deprived of all the features that AutoCad offers.
Registration is required to use the program. Without it, you will not be able to save your project, and some functions will not be available to you. You can create your projects on your mobile phone. Special applications have been developed for this; download links can be found on the website.
This is what Autodesk online design offers us:

Click on the “Create Project” button from the top horizontal menu and start volumetric modeling.
You will be offered 3 options:
- start from scratch
- loading background image. This could be a diagram of a house,
- select a project from the gallery.

First, we “build” the walls of the house and create a general layout. In the toolbar on the left, you take objects (rooms, partitions, walls, openings) and drag them onto the work area. Here you can rotate them, change their size and proportions.
We add bulges, balconies, loggias using the “stretch with room enlargement” function - we add these objects to the perimeter of the room.
We change the scale of the project using the mouse wheel or using the magnifying glass from the top menu.
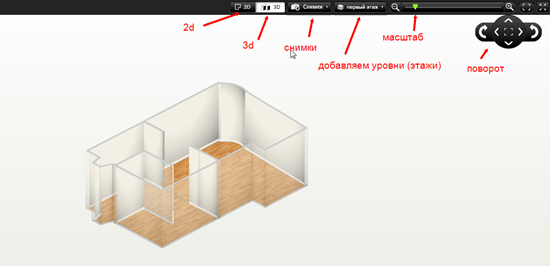
The 3D viewing function will be very useful to you; you will also find it on the top toolbar.
When the house is “built” - all the rooms, partitions, floors have been added, it’s time to move on to interior decoration. Click on the “home” icon on the left side of the program, and a hidden navigation will open in front of us.


