To keep you in a great mood in any weather, make new things from available materials. Quick crafts that take less than an hour to make.
The content of the article:
Sometimes you want to pamper your child with a new toy, but you don’t have the financial resources or time to make one. Therefore, we decided to select for you the fastest simple crafts that you will spend no more than an hour on. The family budget will not suffer, since they are made mostly from waste material and all sorts of leftovers.
How to make a doll from threads and a dandelion with your own hands?

You will create it while relaxing in a cozy chair. The main thing is to place everything you need nearby so that you don’t have to get up again. This:
- threads;
- half a sheet of cardboard;
- scissors;
- strip of flesh-colored fabric;
- markers.
- Wrap the threads around the card in an impressive layer.
- Tie the finished winding with thread. Determine where the doll's head will be. Mark it by also rewinding it with thread.
- Do the same for your right and left hands. To make a doll's hands from threads, wrap your hands at wrist level and cut the yarn in the area of the toy's fingers.
- Also use threads to separate the torso from the legs, and perform them using the same technique as the arms, just make them longer.
- Measure a strip of flesh-colored fabric according to the volume of the head, glue its sides.
- Wind hair threads around your hand and cut through the resulting roll on one side. Glue to the head, trim the bangs if desired.
- Use markers of different colors to draw facial features.
- Sew a sweater for a toy or tie it with a piece of fabric to make an apron. You can tie a handkerchief to make it a cloak. Children are happy to make such clothes, and they will certainly appreciate a new doll made from threads.
If you are making a girl doll, then you do not need to mark her legs. Let the threads cut evenly at the bottom become a skirt.
Such simple crafts will surely delight the kids. You can also create a fluffy dandelion from leftover threads.

For this charm you will need:
- yellow and green yarn;
- wire;
- PVA glue;
- knitting fork or metal staple;
- scissors;
- gypsy and thin needle.
- Wind the yellow yarn around a crochet fork. Thread a thread of the same color into the gypsy needle. Sew it down the middle.
- Lubricate the resulting line well with glue. Remove the created fabric of yarn from the fork and roll it with a roller.
- A thread is wound in the middle to give the workpiece a dumbbell shape. Coat the middle of this part with glue on top and wait until it dries.
- Such simple crafts are interesting for both adults and children. They are made quickly, but part of the time is spent waiting for the glue to dry. Therefore, it is better to make crafts in the evening, and continue the entertaining needlework the next day. What are we going to do now?
- Cut the resulting dumbbell in the middle. On the first and second flowers, you need to cut the loops with scissors and carefully comb them to get fluffy caps of two dandelions.
- The green yarn from which we will make sepals must be cut into pieces 4 cm long. We thread the same thread into a gypsy needle, sew the pieces across, but not in the middle, but 2/3 away from the edge.
- Trim the top with scissors, trim it, make another line parallel to the first.
- Apply glue to the back side of the flower and attach the sepals here. Wrap it with the same thread you used to stitch it. Glue both ends and leave the workpiece to dry.
- Meanwhile, you will wind the green thread onto the glue-coated wire. You will get a stem.
- Insert a thick needle into the sepal from below and twist to make a hole for the stem. Install it there, having previously lubricated this part with glue.
- The leaves can be crocheted, but since we are making simple crafts, cut them out of green paper or cardboard and glue them to the stem.
How to quickly make crafts from animal tissue?
If you want to spend less than 30 minutes making a new toy, then make these funny mice. They don't even need to be sewn. By making the slits in a certain way, you will make these rodents.

See if you have:
- pieces of felt;
- juice straws;
- beads or small buttons.
- For each mouse you need to cut two parts from one fabric. The first will become a body, pointed on the muzzle, rounded on the other side. Cut out the ears in the shape of a figure eight.
- From a fabric of a different color you need to cut out a small circle for the nose and two larger ones for the ears, and glue them in place.
- Using scissors or a utility knife, make 4 cuts on the body of the mouse. Two will be vertical, at the back of the head, and the other two you will make in the rump area to place the straw here. Place the ears on the head, threading them through the slits.
- All you have to do is glue beads or buttons instead of eyes and marvel at how quickly crafts are made from simple materials.

If your child is bored, you can make a fabric applique with him. Such funny bunnies are also sewn onto the worn knees of children's trousers to update this item.

Transfer the applique onto the fabric and cut it out. The bunny is decorated by sewing a bow to his ears and a carrot on his body. Attach eyes and other facial features. If this is an applique, then you need to glue the hare onto the cardboard.
And here are some simple crafts - in the shape of birds. You can cut them out from leftover felt, glue on a nose, eyes, wings and perform a home performance.

DIY crafts from pine cones for children

They are also made simply and quickly.
To make gnomes, take:
- Pine cones;
- light plasticine;
- pieces of felt or fleece;
- glue;
- brush.
- Let the child roll a ball out of plasticine and use the back of the brush to make indentations for the eyes, mouth, and nose. They will be filled with pieces of plasticine of the corresponding color. So, the eyes can be brown or blue, the mouth red.
- Attach the head to the top of the pine cone. Cut a triangle out of felt and glue its sides together to form a cone. Place this cap on your character's head.
- Cut out mittens from the remaining fabric and attach them to the pine cone with plasticine.

For a craft made from pine cones like an owl, we will also need:
- 2 acorn caps;
- yellow paint with a brush;
- plasticine;
- accessories in the form of feathers, ribbons.
- First, you need to paint the cone and the acorn cap, and continue subsequent work when they are dry.
- Let the child roll small balls from black plasticine and stick them to upside-down acorn caps - these are the pupils.
- Make a nose out of orange plasticine, attach it in place.
- This owl craft made from pine cones is decorated with feathers or ribbon.
- pine cone;
- pieces of thick fabric;
- two toothpicks;
- cotton wool;
- 2 ice cream sticks;
- white paint.
- Let the child paint the pine cone and remove it until it dries completely.
- Mom will cut out a scarf from plaid fabric and tie it around the snowman’s neck. Make headphones from felt and glue them to the character’s head.
- The child will make a snowman’s nose and mouth out of plasticine and attach it to his face.
- Make your hands from wire wrapped in a strip of fabric or ribbon. You need to wrap the wire around the bump.
- Place toothpicks in the snowman's hands, with pieces of cotton wool glued to the bottom of these sticks.
- Paint the popsicle sticks and when dry, place the snowman on these skis.
Quick and easy to make and these are the piglets. Glue the scales from the cones to the fir cones in the form of ears. Attach the snouts that will become the acorn caps. You can use plasticine rather than glue for this.

Paint the piglets pink, you can use spray paint for this. Once it's dry, only then will you attach the little black beads that will become the eyes.
For this craft you need an unopened pine cone. But over time, the scales open up. To avoid this, dip the cones in wood glue diluted with water for half an hour.
Remove them from the solution and shake them off. After 3 days, the cone will dry completely, securing the scales, which will now not open. After this, you can cover this natural material with paint and make new objects.
The next simple craft is a forest corner. For her, take:
- CD disk;
- plasticine;
- spruce and pine cone;
- acorn cap;
- glue;
- paints;
- eyes for toys.
- Paint the disk green and draw flowers on its surface.
- Let the child roll the caps and stems of the mushrooms and connect them.
- The base for the hedgehog can be sculpted from plasticine or polymer clay. Then cover it with brown paint.
- When it dries, stick scales from a fir cone into the back of the hedgehog. Place a cap on his head.
- Glue the eyes, nose, mouth, put a cane stick in your hand. In the other there will be a basket with mushrooms, which are molded from plasticine.
- Attach the hedgehog to the stand, after which another wonderful craft is ready.
Tie floral wire to the pine cones and place picturesque flowers in a jar previously wrapped with twine.

You can also make another craft from pine cones for the garden, such as a wonderful decorative basket.

If you need to quickly make a hedgehog to bring to kindergarten, mold its body and head from beige plasticine, and roll out its eyes and nose from black plasticine. Stick in the seeds, which will become spines.

Simple crafts for a great mood
Now the sun rarely comes out, and the weather is increasingly cloudy. To avoid succumbing to despondency at this time of year, create mischievous tricks that will certainly improve your mood.

Place these cheerful flowers in a vase at home, which can be made from practically nothing. All you need to do is:
- colored paper;
- cardboard from a white box;
- marker;
- stationery knife;
- tape;
- scissors.

Color the eyes with a black marker and bend the petals forward.

Cut a stem from cardboard. At the top, on one side, glue the finished part, on the other, a pre-cut flower with petals.

Fold a green sheet of paper in half, draw an oval line on it, and cut along it. If available, use zigzag scissors. Keep the notches simple.

Tie the paper flowers with a ribbon, and if you have taffeta, then use this fabric for decoration. You have got a bouquet that will never fade and will make you happy.

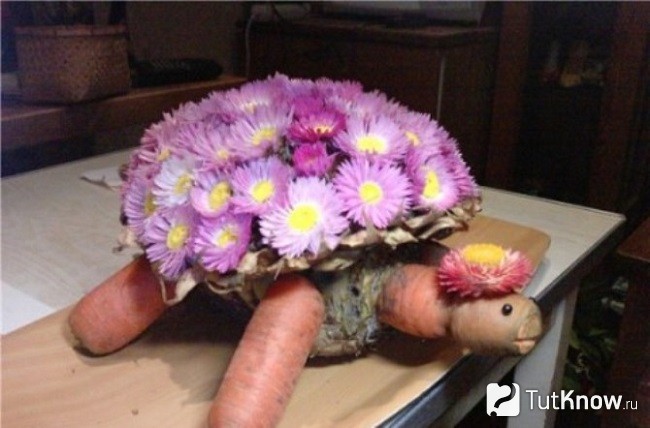
You can attach flowers with a toothpick to washed beets or pineapple. You will get a beautiful shell for a turtle. You will make her arms, legs and head and neck from carrots. Attach these parts to the body using toothpicks as well.
If you want the New Year to come quickly, decorate white objects in your apartment by turning them into snowmen.

Attach black magnets to the refrigerator, and now a holiday character has taken up residence in your kitchen. If you draw on a white vase or glue round eyes and an orange nose in the shape of a carrot, then another snowman will amuse everyone gathered at the table.
See what other quick and easy crafts you can make.
Making various crafts for children with your own hands together with your child is an exciting activity that significantly contributes not only to the development of the child, but also to strengthening your relationship with him. Any child will be very happy if he has the opportunity to do something beautiful with his parents. Therefore, even in the busiest schedule, try to set aside a piece of time to devote to activities with your children. The sections of our article will provide useful recommendations on how to make crafts with your own hands from various materials, taking into account the age characteristics of children.
DIY paper crafts for children
The most commonly used material for applied arts is, of course, paper. Moreover, it is worth paying attention not only to the usual color sets, but also to its other types: corrugated, velvet, designer. You can create crafts with your own hands for children from paper, either flat (appliques) or voluminous, using various techniques. For example, having learned to fold a flower using the origami technique, to form a beautiful bouquet of tulips.


The easiest DIY crafts for beginners
For those who are just starting to teach their child arts and crafts, we advise you to start with the simplest solutions, making easy crafts for children with your own hands. You might like examples of caterpillars made from paper rings, an applique of colorful fish, or funny little mice on a piece of cheese.


DIY cardboard crafts for children
Cardboard is an easily accessible material that can be easily cut, bent, painted, and is often used in children's creative works. In addition to a set of cardboard purchased in a store, cardboard boxes, disposable tableware, cereal packaging, egg honeycombs, and toilet paper rolls are used. In our photo catalog you will see what craftsmen make from cardboard for children. For example, a stand for pencils, funny animals, boxes.


DIY “house” craft
Cardboard houses are made to suit any size - it all depends on their purpose. Perhaps it will be a large structure the size of a child, a “home” for dolls, or a DIY “house” craft, made as a New Year’s decoration, gift wrapping. In any case, the manufacturing technology is the same, the differences will be in size and design. We have prepared some sketches from which you can make blanks. If you are making small structures, PVA glue and tape are enough to hold the parts together. When building a large house, it is better to use a heat gun for reliability. The DIY New Year's "house" craft is complemented by decor that imitates snow on the roof (cotton wool, foam balls), and the gift wrapping must have at least one opening flap, for example, a door, a roof slope.


How to make a DIY craft from fabric
Wonderful DIY crafts and toys are sewn using fabric. Moreover, not only a single piece, but various shreds, household napkins and even socks. Look at the photo, isn’t it true, the cute bunny came out of a sock? An older child will be able to do it on his own, but the baby will have to help. Make the necessary cuts and seams, and instruct the child to tightly stuff the figure and also draw a face.
You can also sew crafts for children with your own hands, which will become not only a decoration, a toy, but also a useful thing, for example, a large soft duck-ottoman, a photo of which is in our catalog, or a star pillow.


DIY children's crafts made from felt
Felt is a wonderful, comfortable fabric that comes in a vibrant range of colors. It allows you to sew a variety of DIY crafts for children, and then decorate the children's room with them. Household napkins (usually sold in a set of four colors) will help replace the fabric. These toy crafts are sewn together with your own hands, without the help of a sewing machine, by hand.
DIY children's crafts for the New Year
On the eve of the New Year holidays and children's matinees, rooms are decorated everywhere and lush Christmas trees are decorated. It’s quite possible to make a lot of interesting symbolic additions yourself without spending money on purchases. These can be the most original Christmas tree balls, garlands, and other decorations that a child can easily make.


DIY snowman craft
The snowman is a unique symbol of winter and, naturally, his presence will come in handy for the New Year’s interior. The photographs of our selection show options on how to make such crafts with your own hands step by step, using foam balls, socks, and pom-poms. A larger figure, decorated with thread, balloons, and glue, is suitable for a kindergarten matinee. Inflate five balloons of different sizes (two of the same size for the handles). Wrap each of them with a thread dipped in glue (PVA is quite suitable). When the workpieces are completely dry, the balls need to burst and be taken out from the inside. The finished balls are fastened together. The DIY “snowman” craft is almost ready. All that remains is to decorate the eyes (beads, buttons), the mouth from thread, and the carrot nose (sew from fabric). Traditionally, the head is complemented with a bucket, and the neck is decorated with a scarf.


DIY Santa Claus craft
You can't do without Santa Claus in the New Year's interior. The easiest way is to make it out of thick paper (cardboard). Use a ready-made template, or make a cone-shaped shape from a sheet, which you then “dress” with the help of multi-colored paper, shaping your face, beard, and hands. Children make similar crafts for the New Year with their own hands using fabric (you will find examples of patterns here), plastic bottles, and other improvised means.


DIY crafts for kindergarten
Various creative works for young children of kindergarten age should differ in simpler techniques and materials. The child is just beginning to learn how to do something beautiful on his own, so you need to choose the simplest but most interesting options.


DIY crafts for kindergarten children: applications
The most common way to teach children to create pictures is through appliqué. Such crafts for kindergarten with your own hands (photos are presented below) can be constructed not only using colored paper, you can also take thick fabric, artificial leather, velvet paper, improvised materials (cotton pads, cereals, etc.), natural raw materials (leaves, seeds) . Children of older groups can begin extensive work, for example, making an applique in an “aquarium” box with hanging representatives of the aquatic world.


DIY crafts for kindergarten from natural materials
Often, especially in the fall, exhibitions of works are held demonstrating do-it-yourself crafts for kindergarten from natural ingredients. Chestnuts, acorns, pine cones, sunflower seeds, pumpkins, colorful autumn foliage - all this provides great soil for the development of children's imagination. To make various figures and compositions, plasticine is additionally used to hold the parts together or form the base. Pictures of DIY crafts using natural raw materials are presented in our photo selection. Feel free to try using them by making a chestnut caterpillar, a hedgehog, and other samples.
DIY crafts for school
School work varies in complexity. While DIY crafts in elementary school have simple forms, high school students with sufficient skills are able to create more complex compositions, for example, a bouquet of roses from maple leaves, a cardboard town, or a paper basket with asters.
DIY crafts for school, photos of which are posted below, involve the use of a large selection of raw materials, including all sorts of improvised means (plastic dishes, DVDs, matches, buttons).


DIY crafts for schoolchildren using the cutting technique
Crosscutting is a fairly entertaining creative process that is suitable for children of different ages. It allows you to create “fluffy” pictures that will decorate your room, as well as an original gift for your family. Do-it-yourself crafts in elementary school have simplified versions until the child acquires certain skills. For example, in this way you can design only the outlines of a drawing.
To make a lush applique you will need corrugated paper, scissors, glue, a match or a toothpick with a blunt end, and a sketch on cardboard. Before making the craft with your own hands, we cut the paper into small squares (0.5 cm), which we sort by color. Lubricate the sketch with glue. We place the match in the center of the square, turn it (so that the corrugation is fixed to it), then glue it with its end to the sketch. Thus, we decorate the entire drawing using the necessary colors of corrugated squares.


Learning to create beauty yourself is the best way to develop a child’s creative abilities. DIY children's crafts significantly develop imagination, giving the joy of interesting time spent together with adults.
DIY crafts for children: a selection of 50 ideas with step-by-step examples updated: May 2, 2018 by: Kyiv Irina
Useful tips
You don't have to have a special gift to make something beautiful and unusual. If you know some tricks, you can make something beautiful. decoration for your home or gift, with minimal effort and using very few materials.
On our website you will also find:
Here is just a small part of simple crafts that absolutely anyone can do:
Simple DIY crafts
1. Autumn candles

You will need:
Leaves (real or artificial)
PVA glue (decoupage glue)
Brush or sponge

* Wipe the jar with alcohol to get rid of fats.
*Apply glue to the jar.
*Use straight leaves to decorate the jar.

* You can apply decoupage glue to the glued leaves.
*Add some thread and a candle for beauty.

2. Painted cup

You will need:
Oil markers
Scissors

* Cut out a stencil of any design or letter from cardboard.
* Place the stencil on the cup and start making dots around it with different colored markers.


Just do it yourself
3. Painted jars

You will need:
Alcohol (for cleaning the jar)
Acrylic paints
Decorations (flowers)

* Clean the jar with alcohol.
* Paint the jar any color and leave to dry.
* You can add a marker to the drink (in this case, there is a relief on the can that can be erased).
* Insert flowers into the vase.

4. Colored sneakers

You will need:
Fabric markers
White (light) sneakers
Pencil

* Using a pencil, draw the desired design on the sneakers.

* Trace the drawing with a marker and start coloring as you like.

The simplest crafts
5. Craft from wine corks

You will need:
Wine corks
Pencil
Super glue
* Draw any simple shape on paper - in this example it is the shape of a heart.

* Start gluing the corks to each other (apply glue only to the sides, do not apply to the ends, so as not to stick them to the paper), placing them on the drawing to eventually get a heart.

6. Infinity scarf from an old T-shirt


You will need:
Old/unwanted T-shirt
Scissors
Thread and needle (sewing machine)
*Trim off the left and right edges of the T-shirt (see image). The width of the T-shirt will then become 35 cm.

* Cut off a small part from the bottom and top (where the neck is).

* Sew both halves from the inside and you will have a scarf.

Easy and simple with your own hands
7. Bright vases made from glass bottles

You will need:
Watercolor paints
Bottles
Bowl and brush (if necessary)
Syringe (if necessary)
*Pour some paint into a bowl. You can mix several colors to get a different color.

*Pour the paint into the bottle. It’s more convenient to do this with a syringe - you fill the syringe with paint and then inject it into the bottle.

*Turn the bottle until the paint covers the entire glass inside.

* Turn the bottle over and leave it in that position in the sink - excess paint will flow out.

*When the paint is dry, you can add water to the vase and insert flowers into it.


8. Towel dryer
If you have an old ladder, you can Clean it, sand it if necessary, and even paint it. After that, you can put it in the bathroom to hang towels.

Simple paper crafts
9. Garland of paper cups

You will need:
Paper cups
Regular garland
Knife or scissors.

*Make a cross-shaped cut in each cup.
* Insert a garland light bulb into each hole.
* Decorate the room with a garland.
10. Golden canvas
Even if you don’t know how to draw at all, you can make a very beautiful project and decorate your interior with it.

You will need:
2 white canvases
Gold, blue and orange acrylic paint
Sponge brush
*Paint each canvas with 2-3 coats of gold paint - allow the paint to dry after each coat.
* Using a sponge brush, start painting the canvases. One will be blue and the other orange. Make some lines shorter, others longer.
11. Multi-colored keys
If you have several identical keys for different locks, use nail polish to color them. This way you will know which key is for which lock.

Crafts from simple materials
12. Colored candlesticks

You will need:
A wide glass and a narrow glass (or vases of different sizes)
Super glue
Food coloring
* Place the small glass in the large one, and secure both with glue - apply glue to the bottom of the small glass.
* Pour water into the gap between the glasses and add food coloring.
* Place a candle inside a small glass.
13. Vase made from a light bulb

You will need:
Bulb
Pliers
Screwdriver
Wire (if necessary)
Cover for the base of the vase (if necessary)
Super glue
Gloves and specials goggles (to protect hands and eyes)

* Use pliers to remove the tip of the light bulb.
* Use a screwdriver or pliers to remove excess glass at the base. You may have to get rid of several layers of glass - be careful and attentive.
* Glue the light bulb to the base (plastic cover).
* You can also hang a light bulb - use wire for this.
* You can complicate the task and add an LED light bulb. For this, in addition to the light bulb, you will need small batteries. All instructions can be seen in the video:
Simple crafts for kids
14. Ghost design on a T-shirt

You will need:
Wide adhesive tape
Light T-shirt
Scissors
* Cut out the details of your ghost from adhesive tape (eyes and mouth, for example)

* Glue all the parts carefully to the T-shirt.

15. Congratulations from the keyboard
This congratulation is very easy to make.

There are many ways to usefully spend your leisure time, and one of the most exciting ways for both adults and children is doing something with your own hands. To do this, it is enough to have a little imagination and desire.
From this article you will learn how to make an original thing for your home yourself and you will be able to see photos of simple but unusual crafts made at home.

Crafts made from plastic
Making a doll and sculpting a plastic face is a very entertaining activity that requires a little skill. But the result will certainly please you.

To do this you will need:
- Plastic (polymer clay);
- Sandpaper;
- Dry pastel;
- Wire;
- Foil;
- Primer;
- Glue;
- Brushes;
- Pliers.
First of all, you need to think through every detail and sketch out a sketch of the future doll on paper, and then begin making the wire frame.

Next, you need to form the head from clay in proportion to the body and give it volume. After completely working out all the details (nose, mouth, eyes, forehead, cheeks), you can apply dry pastel with a brush to give a natural shade to the skin.

The next stage will be sculpting the body, during which you need to pay special attention to small details, as well as giving the body a natural shape.

After the work is completed, you need to mark the parting on the doll's head and leave the clay to harden. In order to speed up the process, you can put the workpiece in the oven for a while.

Once the clay has hardened, you can begin to create the face using a brush and paints. Show your imagination.

Hair is an integral attribute of every doll. They need to be glued gradually, row by row, starting from the bottom.

The final stage will be sewing clothes for the doll.

Every mother will be glad to receive such an unusual doll as a gift from her child. A gift for dad could be face sculpting from polymer clay. All parents will definitely appreciate such beautiful crafts made at home!

Knitted crafts
Crocheting is a very simple and fun hobby. In order to knit a square potholder you need:
- Close three air loops into a ring.
- Knit one row in the first and third loops, and three rows in the second loop.
- To form a corner, you need to knit three more rows in each of the columns of the second row.
- The elastic band must be woven with colored threads.
- Tie the edging and loop with a shell.
There are many more types of knitting to create unique products.

Crafts for the garden
To decorate your garden plot, it is enough to make crafts at home from the simplest available materials; below are the most popular ones :)

For example, a shovel blade will turn into funny black birds in the blink of an eye.

Note!

You need to do the following:
- Paint the canvas, wait until the paint dries.
- Prepare the location of the birds: wrap the surface with thick wire.
- To make the paws, use the dough, place the piece on the wire, gluing the fabric to the top of the paws.
- Attach eyes made from dough to the top of the canvas. Do the same with the beak.
- Draw the pupils with black paint.

A shiny vase sparkling in the sun will be an excellent decoration. You can collect fruits and vegetables in it. To make it you will need disks, an unnecessary vase, and glue.

The discs need to be finely chopped and glued to the vase with the shiny side up. Let the glue dry.

Crafts for the New Year
You can also make a garland yourself! And now you will learn how to easily and simply make this craft with your own hands at home.

You will need:
- Light bulbs (220 V)
- 6 meters of wire
Work algorithm:
Note!

- Cut the wire into 50 cm pieces. There should be 9 of them. The last piece will be 150 cm in length. In the future, it must be used to connect the plug.
- Strip the ends of the wire and insulate them using heat shrink tubing.
- Assemble the sockets and screw in the bulbs connected in parallel.

You can decorate the garland with cups covered with special paper. Simply insert the light bulbs into the slots at the bottom of the cups. It will turn out very beautiful!

Another New Year's attribute is the Christmas tree.

To make a Christmas tree from buttons, you need to prepare a cone-shaped base from thick paper or cardboard and decorate it with buttons.

You can use buttons of a wide variety of colors and sizes, stick them on top of each other, or simply cover the finished Christmas tree with spray paint.

Crafts for Easter
Using wooden clothespins, tape and a paper plate, you can make a very cute basket:
Note!

- The side of the plate is cut, folded upward, and secured with tape.
- Clothespins divided into two parts are glued to the sides.
- The resulting basket is decorated with a satin ribbon with a bow.

An Easter bunny made of felt will be an excellent decoration for the holiday.

Step-by-step instruction:
- Cut out the parts in the required quantity and sew them together with the right sides facing inward.
- Cut the fabric in the allowance areas, turn the resulting blanks inside out and stuff them with padding polyester.
- Sew the resulting parts together.
- Decorate the face, paws and ears using embroidery or paint.
Such crafts will certainly decorate your holiday!

Children's crafts
You have learned how easy it is to make decorations for the garden, home and holidays. But that's not all! Beautiful and unusual crafts can be made at home and for children.

For example, an ordinary egg tray can easily turn into a cute hedgehog. It’s enough to rummage through the closets and find everything you need for this:
- Egg trays;
- Wrapping paper;
- Acrylic paints;
- Beads;
- Scissors;
- PVA glue.

First you need to fold the wrapping paper so that its shape resembles a pyramid. This is a preparation for the future hedgehog. Then make a hedgehog's face from one cell, gluing it to the top of the pyramid.

Then you need to glue the pre-prepared needles and ears. The nose for the hedgehog will be a pip cut from the end of one of the cells.

To finish everything off, you need to glue beads to the hedgehog in place of the eyes and paint it with paints.

For those parents who love to sew with their children, the following lesson on making felt mice is suitable:
- Make a pattern from felt, cut and sew the parts together.
- Stuff the resulting blank with cotton wool. Place a coin on the bottom for stability.
- Sew on ears, eyes and tail.
- Make a mustache from threads.

Now your kids can proudly boast to their peers that they sewed these mice themselves!

Crafts for your home
Unusual hand-made candlesticks can be a wonderful element for decorating a room. To bring your idea to life, you will need to find several small jars, dried leaves and glue.

Making a candlestick is quite simple:
- To remove dirt, you need to wipe the jar with an alcohol-containing solution.
- Place the leaves on the glue-coated surface of the jar and let dry.
- All that remains is to light the candle, place it in the candlestick and enjoy the warmth and comfort that the soft light of the candle creates.
Nothing brightens up a room and brings it to life like flowers. To create a bouquet you will need: wire, corrugated paper and tape.

Step-by-step instruction:
- Cut out the required number of petals from paper. To create one flower you will need from 10 to 15 such petals.
- The core is made of yellow paper, cut into a fringe at one edge.
- Leaves are cut out of green paper.
- A piece of wire of the required length must be wrapped with green tape, wrapped on one side with a strip of yellow paper intended to create a core and secured.
- Glue the petals, making them voluminous in advance.

The flower is almost ready. All that remains is to glue the green leaves onto the stem.

The most ordinary polyplastic box will be noticeably transformed if liquid wallpaper is applied to it.

Crafts for decorating a room
Each of you can make very unusual things that will decorate your home and attract the attention of guests.

Such an item could well be an ordinary key holder. To make it you will need thick napkins, cardboard, glue and paints.

Step-by-step instruction:
- From a cardboard blank, you need to cut out the base for the key holder of the required size and glue the loops on one side on which it will be hung.
- Since the key holder will imitate brickwork, you need to cut out small rectangles from cardboard and stick them on the base.
- Prepare a sign with the inscription and stick it in the center of the workpiece.
- Carefully glue the crumpled napkins to the “bricks” and additionally soak them with glue.
- When the workpiece is completely dry, you need to paint it to match the color of the brickwork. If necessary, the procedure can be repeated.
- To consolidate the result, you should coat the key holder with varnish and let it dry.

The simplest paper bags will find a second life in your skillful hands. It is enough to cut them into equal strips, wrap them around a stick, carefully remove them and secure them at both ends. After which these tubes need to be woven into a basket around a flower pot.

Then insert the rope into the pre-made holes in the top of the pot, securing it with knots. And in less than an hour, a new original flowerpot will decorate your home!

Photos of crafts at home


Useful tips
There is always time for children to do something.
There are a huge number of beautiful and unusual crafts that you can make for children or with them.
For such crafts, you don’t always need to prepare a lot of tools and parts, but rather just have paper, thread, glue and scissors.
Read also:
- 20 creative ideas for kids
- Crafts made with a glue gun and hot glue
- Children's crafts for kindergarten
Here are some fun crafts you can do with your kids:
Crafts for children with photo instructions: homemade cinematograph

1. Take some photos using heart-shaped sticky notes stuck to the wall. Glue one heart for the first photo, 2-3 hearts for the second, etc.

2. Print the photos. You can take small photos, smaller than 10x15.
3. Stack all the photos and secure them at one end with a stapler or tape.

Paper crafts for children: piñata in the shape of a watermelon slice

You will need:
Thin colored paper (corrugated paper)
Scissors
Pencil
Stationery knife (if necessary).

1. Prepare two sheets of cardboard of the same size and draw a watermelon slice on each.
2. Cut out the slices.
3. To make the slice voluminous, you will need to cut out several strips of cardboard, 10-15 cm wide.
4. Start gluing all the parts with tape - connect two slices with cardboard strips (step 3). The bottom may need to be folded or cut into smaller strips. Leave some room for sweets to fill the insides of the slices.
5. Fill the inside of the slice and seal it with the last cardboard piece.
6. Cut thin colored paper (yellow, red and green) into strips 2 cm wide. Cut fringe on each strip. Think about exactly how much paper and what color you will need.
7. Begin carefully gluing the strips onto the cardboard piece. Start at the bottom and work your way up, wrapping the cardboard in this crepe paper.
8. Cut out watermelon seeds from black tissue paper and glue them to the piñata.

New crafts: Mr. Toast


Crafts for beginners: a cup of tea with a small note

You will need:
Scissors
Tea bag.
Paper crafts (master class): Cardboard hat-cake

You will need:
Paper plates
Colored cardboard
Wide braid
Rubber
Compass or other tool for creating a circle
Stationery knife
Ruler
Pencil
Scissors
Regular and double-sided tape.

1. Cut out circles from a cardboard plate for each layer of the cake. For the first layer, simply cut a small circle from the plate (bottom of the plate).
2. Cut three strips of different lengths from colored cardboard - the length of each depends on the circumference of each circle (layer of the cake).
3. Glue the ends of the strips together to form rings.
4. Apply glue around the circumference of the plate and attach a ring of colored cardboard.

5. Apply glue on top of the ring (along the edge) and glue a circle cut from a plate (bottom of the plate). You have completed the first layer.
6. For the second layer, apply glue and attach the second ring. Glue a circle on top of this ring as well. You have completed the second layer.
7. If you wish, you can create a third layer in the same way (4-6)
8. Cut a long strip from the braid, tie a bow in the middle and glue it to the top of the cake.
9. Make holes along the edges of the plate that is at the base of the cake and tie an elastic band so that the cake hat can be put on.
Crafts for children: small crown

You will need:
Felt in two colors
Braid (golden)
Thread and needle
PVA glue (fabric glue)
Scissors
Rubber.

1. Cut two rectangles from felt. In this example, each size is 7 cm x 15 cm.
2. Place the rectangles on top of each other and glue them together.
3. Cut out the tops for the crown.

4. Glue gold braid to the bottom of the felt. Leave a little ribbon to hang down.
5. Sew the tops of the future crown along the edges.
6. Use a thread and needle to connect the ends of the felt, and glue the ends of the gold braid one on top of the other.

7. Cut out the number 1 from felt of a different color and glue it to the crown.
8. Make two small holes in the felt, one opposite the other, and insert the ends of the elastic into them. Tie knots at the ends. For reliability, you can sew an elastic band to the first layer of felt, thereby hiding any unevenness that could be on the outside of the crown.

Craft "Skates" (master class with photos)

You will need:
Safety pins
Felt or colored cardboard
Knitting thread
Chenille needle
Pencil and paper
PVA glue (for cardboard), fabric glue or hot glue (for felt)
1. Draw a skate on paper and cut it out.

2. Use as a template, trace the skate onto felt folded in half and cut out one shape that matches the two skates (see image).


3. Insert a safety pin and begin “tying the laces” of the skates using thread and a needle. Make the laces long so that the skates can be hung as decoration.


4. You can glue the ends of the felt.

DIY children's crafts: soft animal

You will need:
Cotton balls
Toy (plastic) eyes
Colored pompoms
PVA glue.
Take a cotton ball, glue toy eyes and a small pompom for a nose.


Simple crafts: thread spool in the shape of a cat

You will need:
Scissors
Pencil
Ruler.
1. Draw a cat on cardboard. It is advisable to make its body rectangular to make winding the thread more convenient.
2. Cut out your cat from cardboard.

3. For the eyes, it is enough to make two small holes.
4. Make a small cut in the upper part of the body to insert the end of the thread into. You can make another cut for the other end of the thread (when you start winding it).

DIY spring crafts: flowers made from pompoms

You will need:
Scissors
Knitting threads of different colors
Paper clips.

1. First you need to decide what size you want to make your pompom. From cardboard, cut out 4 semicircles with elongated “legs” on which you will wind the knitting threads.
1.1. Bend the legs of the arches to create the folds you will need later.
1.2. Cut out smaller cardboard arches and glue them to the larger arches (see image). This is necessary so that later it will be easier to insert the scissors when creating pompoms.

2. Glue together the part on the right (with a small semicircle glued) and on the left, so that the small semicircle is between the two large arches. Each piece received will be used to create half a pom pom.
3. Try drawing out your pom pom design on paper and draw a dotted line down the middle - this line shows the top view of your cardboard piece. Based on the picture, you will know where and what thread to wind.
Start winding from the center line, adding new layers of thread of different colors. When winding the threads, move slowly towards the outside of the part.

4. Repeat with the other cardboard half. You can wind it the same way as on the first half, or you can make a different design. If both halves have equally wound threads, then the flower will turn out with the same pattern on both sides.

5. Bend the legs of each arch with wound threads and glue these arches to make a complete circle. Use a paper clip to press down the bent legs.

6. Insert scissors into the gap between the cardboard pieces and begin cutting the wound threads in half. As a result, your hidden pattern will begin to appear.

7. Slide one thread between the cardboard pieces, tie a knot at the base and a knot at the ends of the thread so that the flower can be hung.

8. Remove the clamps. The pom pom will not be completely symmetrical, so you will need to trim it a bit with scissors.

* If you wind the threads in a certain order, you can make animals from pompoms. In some cases (when you need to make animal ears, for example), you need to insert pencils between the cardboard parts.

When creating animals, it will be very important to trim off the excess ends of the threads after you have created the pompom. This is necessary so that the animals turn out neat and symmetrical.
*You may need to practice a little.
Here's what you can get from pompoms:


