The construction of a slab foundation is economically justified with unsatisfactory bearing capacity of the soil in the building spot, high groundwater level, high content of clay that swells when freezing. Do-it-yourself construction of a slab is possible on a flat area with a guaranteed absence of third-party communications.
When pointing out the main drawback of the slab base - high cost, the opponents of this technology do not take into account that the slab is also an overlap, a floor on the ground, and allows you to integrate a heating system into it. This, ultimately, is cheaper than a deep strip base, the amount is quite comparable to MZLF with a safety margin of 300%.
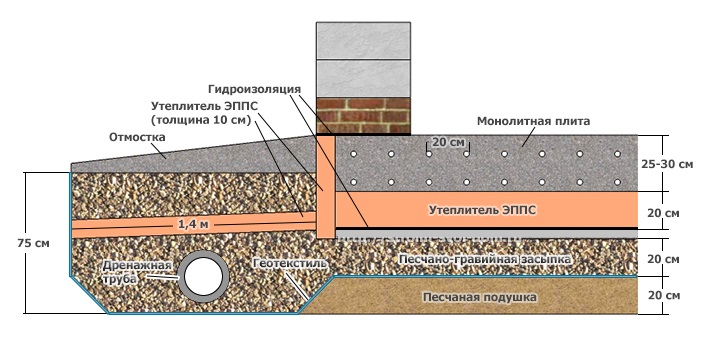
The scheme of the pie of a slab of a private house protected from frost heaving looks like this:
- sand - 15 - 20 cm, replaces heaving soil;
- crushed stone - 15 - 20 cm, is a draining layer;
- communications - necessary for life support systems;
- drainage - laid along the perimeter, collects water from the ground, removes it from concrete structures;
- concrete preparation - a thickness of 5 - 10 cm, is used as a rigid base for rolled waterproofing, which in its absence will be torn by sharp corners of rubble;
- waterproofing - two - three layers, roll materials based on polyester, fiberglass are recommended (Technoelast, Linocrom, Bikrost), the layer protects the concrete structure from moisture;
- thermal insulation - 15 - 30 cm, retains the geothermal heat of the bowels under the sole of the house, heaving soil does not freeze through, there are no heaving forces;
- stiffeners - increase the strength of the slab, are made across the long wall of the house and along the perimeter, directed downward from the sole;
- armored belt - two reinforcing meshes with a cell of 20 x 20 cm from bars 12 - 16 mm;
- warm floor - water circuits laid on top of the reinforcement or between the grids;
- concrete - thickness 20-50 cm, provides rigidity, strength of the slab;
- flanging - from expanded polystyrene, protects the plate at the ends;
- blind area insulation - expanded polystyrene sheets increase the perimeter of thermal insulation, cutting off lateral freezing.
The main advantages of the slab foundation are:
- lack of special equipment - all work can be done by hand;
- minimal excavation - it is enough to remove the fertile layer.
The main costs are for reinforcement, insulation, waterproofing and ready-mixed concrete, which is better to order for guaranteed filling of the formwork in one go.
Step-by-step instructions for installing a slab foundation
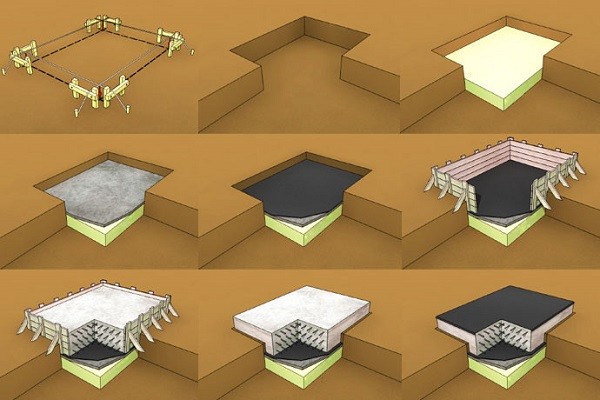
Step-by-step diagram of the slab foundation device
Research and calculation
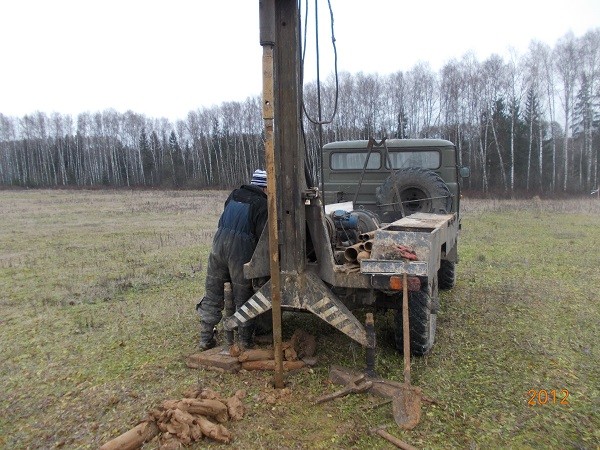
Soil sampling
When designing a monolithic slab, it is necessary to take into account the experience of similar structures in the region, the results of surveys (ground water level, the nature of the soil, the bearing capacity of the formation), the terms of reference (number of storeys, wall, roofing materials). Surveys include at least five geological pits (corners + middle of the slab).
The result of the research is the characteristics of strength, deformation of different layers of soil in the building spot, forecasting changes in the chemical composition during the operation of the dwelling, the degree of aggressiveness of groundwater.
It is necessary to compare several solutions to identify the best combination of construction budget and technical characteristics. Step-by-step calculation instruction:
- concrete grade - M200 and higher for a slab, M50 for preparation, according to the foundations of structures, buildings;
- GWL depth - anti-corrosion measures in the presence of perched water;
- when calculating prefabricated loads, the weight of the slab is not taken into account on sandy soil;
- the bearing capacity, deformations that can destroy the structure are calculated.
For this, special programs are used that have proven the performance of the foundations made according to their results in real operating conditions. The main documents at this stage are:
- soil classification -;
- enclosing structures, bearing -;
- anticorrosive of the power frame of the building -;
- design, manufacture of MZF -.
Unlike strip foundations, the slab has an increased bearing area, prefabricated loads from the building are distributed evenly, and the strength margin is very large.
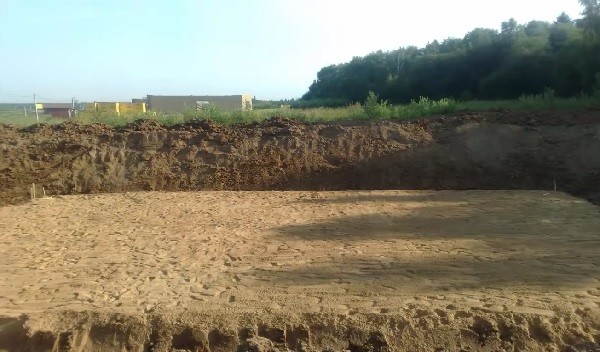
Marking and earthworks
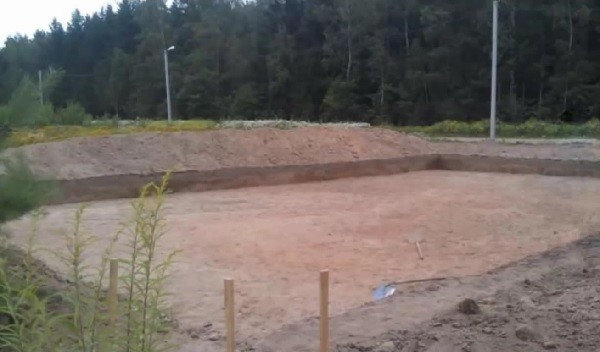
We remove the fertile layer of soil
The plate is forbidden to fill in the fertile layer. The layout of the house looks like this:
- axes - carried out in the building spot with a cord fixed on pegs installed further than the perimeter of the drainage system;
- pit - 0.5 meters more than the slab on each side (for drainage), the slab protrudes at least 10 cm beyond the dimensions of the building (depending on the project).
Due to the small amount of work to remove the fertile layer (20 - 40 cm) for a residential building, the work is done by hand without the involvement of special equipment. At this stage, it is necessary to ensure the protection of the monolithic structure from soil moisture (top water). To do this, drains are laid around the perimeter:
- geotextile, going to the edges of the ditch;
- a layer of compacted rubble;
- perforated pipe (corrugated or smooth in a dornite filter) with a slope towards the underground reservoir;
- backfilling with a natural filter (crushed stone fraction 10/20);
- covering with the remaining geotextiles.
Drains must not be laid under concrete preparation or foundation slab. The height of the backfill should be flush with the crushed stone base pad.
In addition, after pouring the slab into the building, it is impossible to introduce communications, therefore cold water pipelines and sewers are laid at the same stage. They do not have to be buried below the freezing mark, since the thermal insulation of the sole of the slab will retain geothermal heat, the earth will not freeze under the cottage. Enough depth of 1 - 1.2 m.
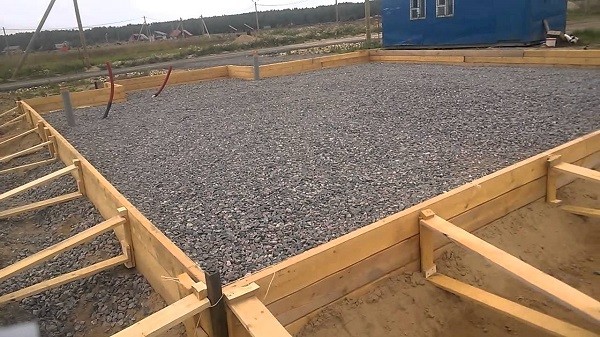
Substrate
We arrange a sand cushion. Sealing is a must.
Another measure to reduce heaving forces is the substrate. It is made by hand using technology:
- layer-by-layer compaction of sand - 10 cm backfill, abundant moisture, tamping with a vibrating plate, the second layer of the same thickness;
- layer-by-layer compaction of crushed stone - fraction 10/20, similarly.
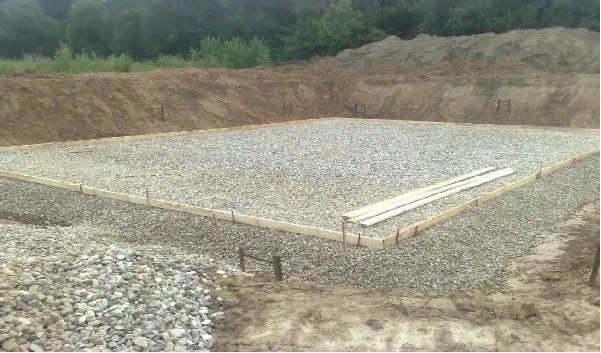
We lay down a layer of rubble.
Instead of crushed stone, sand, a mixture of ASGs can be used to a depth of 40 cm with compaction by the specified method. Only in this case, the monolithic foundation of the house will receive reliable support on the lower layer.
Concrete preparation and waterproofing
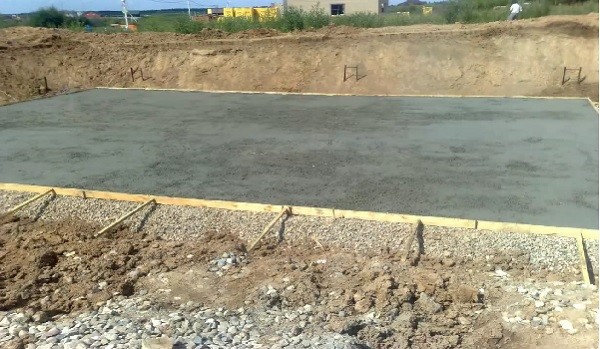
We do concrete preparation.
For a monolithic slab, a lower waterproofing cut-off is required to prevent corrosion of concrete and reinforcement inside it. Laying a waterproofing carpet made of rolled materials over a layer of crushed stone does not meet the operational conditions:
- the sharp edges of the stones break through the material;
- seams cannot be properly sealed.
Therefore, when building the foundation of a house with your own hands, concrete preparation is often used. This is a simple screed that solves two problems:
- providing a flat surface on which it is easy to stick the bituminous base of Bikrost, Linokrom, Technoelast, to reliably seal the seams;
- creation of an even base of the slab, strengthening its strength, stabilizing the geometry.
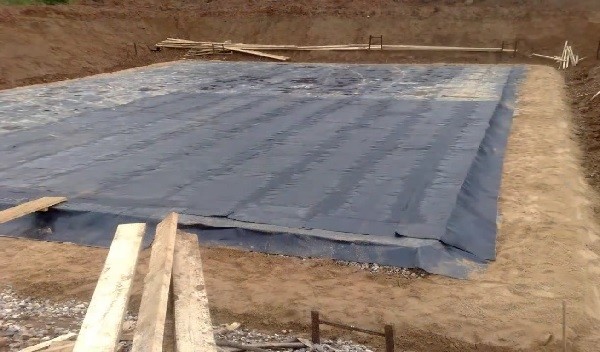
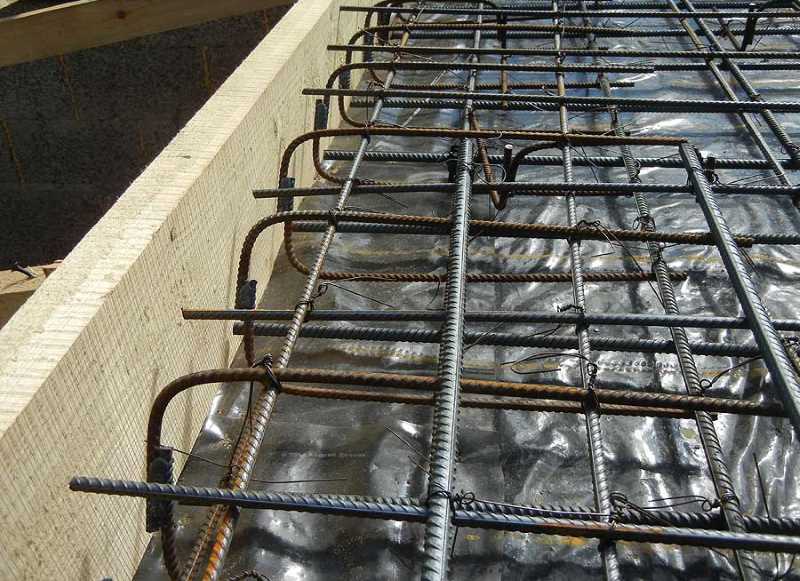
We install waterproofing.
The method of pouring into the formwork is standard, the thickness of the screed is 5 cm, reinforcement is not required. Roll materials provide a minimum construction budget, impregnation, primers are not used here. The recommended overlap of the strips is 15 - 20 cm, the seams are processed with hot or cold mastics on a bitumen basis. The edges of the waterproofing mat are extended beyond the perimeter of the concrete preparation so that, after pouring the slab, they can be run onto the sides and top surface.
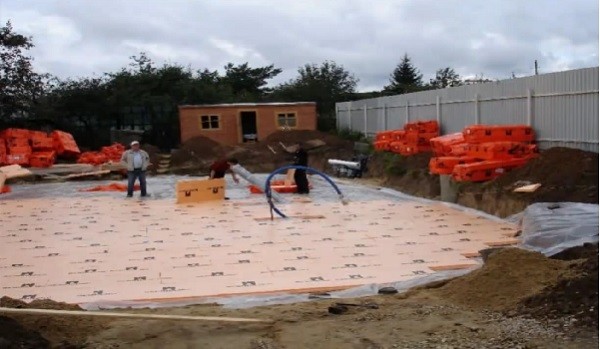
We lay insulation under the entire area of \u200b\u200bthe building.
Extruded polystyrene XPS is used as a heat insulator. It is laid in two layers (10 + 10 cm) closely for smooth boards. If stiffeners are provided in the project, the first layer is laid end-to-end with your own hands, in the second, gaps are created along the width of the ribs:
- along the perimeter;
- perpendicular to the long wall after 3 m.
In this case, the monolithic slab has a large margin of safety, the house is free from distortions during operation.
Reinforcement
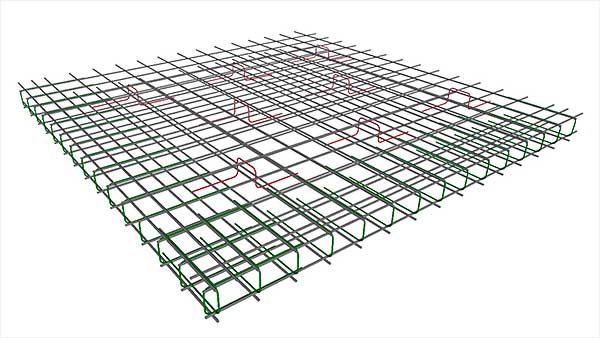
We create a reinforcing cage in accordance with the project.
Reinforcement of the slab with armored belts is carried out in accordance with the regulatory documentation for reinforced concrete, concrete structures. reinforcement scheme looks like:
- manufacture of clamps - a smooth 6 mm bar, bent in the form of a square, a triangle;
- creation of reinforcing meshes - longitudinal, transverse bars of a periodic profile with a diameter of 12 - 16 mm, connected with a knitting wire or connected by welding (cell 15 x 15 cm);
- reinforcement of stiffeners - four longitudinal bars connected with clamps;
- laying the lower belt - installed on concrete pads (thickness 15 - 25 mm, section 10 x 10 cm) to provide a protective layer (the reinforcement must be recessed in concrete);
- installation of the upper belt - clamps are placed on the lower grid, the upper card is attached to them.
From the ends, the plate is reinforced with U-shaped clamps.
It is not desirable to use separate bars inside the armored belt. They need to be bent on curved sections, in places of communication input nodes with common grid maps. To save reinforcement, the cell in some cases is enlarged to 20 x 20 cm.
formwork
We install and strengthen the formwork.
To pour a monolithic structure with your own hands around the perimeter, you need to install the formwork. It is constructed from OSB, chipboard, plywood or edged boards in the form of shields. The inner surface is sheathed with roofing felt or film to prevent chipping of concrete during stripping. The main document in the construction of formwork are standards; .
Shields are mounted along the perimeter, to protect the structure from freezing, 10 cm of expanded polystyrene can be laid vertically inside them. This insulation is also laid under the blind area of \u200b\u200bthe house to prevent lateral freezing. It is laid at the level of the sole of the slab, flush with the lower or upper layer of the heat insulator inside the formwork.
Pouring and curing concrete
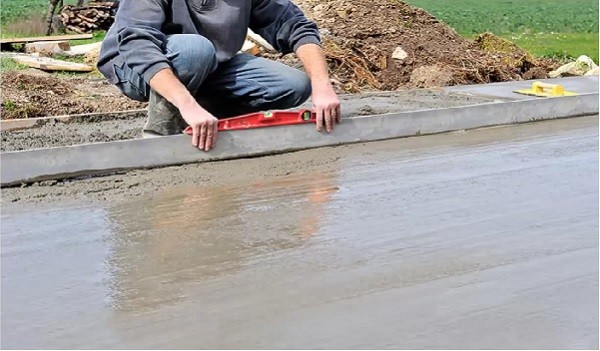
Pour concrete into the formwork and level the surface. Sealing is a must.
Requirements for the design, manufacture of the MZF are specified in the standards, according to which the work is carried out. When filling, the following conditions must be met:
- filling the formwork with concrete in one step;
- the maximum interval between feeding the mixture with a mixer after vibrocompaction of the previous section is 2 hours in warm weather;
- it is forbidden to distill concrete with shovels around the entire perimeter from one place - it is necessary to rearrange the mixer or use a concrete pump;
- vibrocompaction is carried out until the appearance of cement milk, hiding the crushed stone and the absence of bubbles;
- the step of lowering the nozzle of the deep vibrator cannot exceed its radius of action;
- in winter, the mixture is heated with a cable laid inside the formwork, covered with film materials, steam heating;
- vibrator nozzles must not be leaned against the meshes of armored belts;
- stripping is possible on the fifth - seventh day under normal conditions;
- the mirror of concrete must be protected from precipitation, should be covered with burlap, moistened from a watering can in the heat.
Subject to technology, recommendations on the choice of materials, reinforcement cross-sections, the slab foundation will not require restoration, it will serve three generations of property owners, at least. All the above technologies comply with the requirements of the specified regulatory documents and have operating experience in the regions of the Russian Federation.
Advice! If you need contractors, there is a very convenient service for their selection. Just send in the form below a detailed description of the work to be done and you will receive offers with prices from construction teams and firms by mail. You can see reviews of each of them and photos with examples of work. It's FREE and there's no obligation.


