Slate is a popular material that is inexpensive, but has high reliability and durability. If you paint it, then in terms of decorativeness, it can safely compete with modern roofing innovations. Therefore, the scope of application of slate is practically unlimited: asbestos-cement roofs can be found both on modest summer cottages and on luxury cottages. The spread of the material is also facilitated by the fact that laying slate on the roof is not a difficult job, anyone can do it. But in order for the coating made to serve, as it should, for at least half a century, it will be necessary to study all the nuances of this simple but important event.
Many people think that slate is a versatile roofing material. This is not true. To prevent precipitation from leaking under the slate, it is recommended to lay it only on single or gable roofs with a slope of at least 15 °. If you want to use a flatter roof as a base, you will have to build serious waterproofing under the crate from several layers of roofing material or membrane, as well as increase the overlap of adjacent sheets up to 300 mm.
Slate laying methods
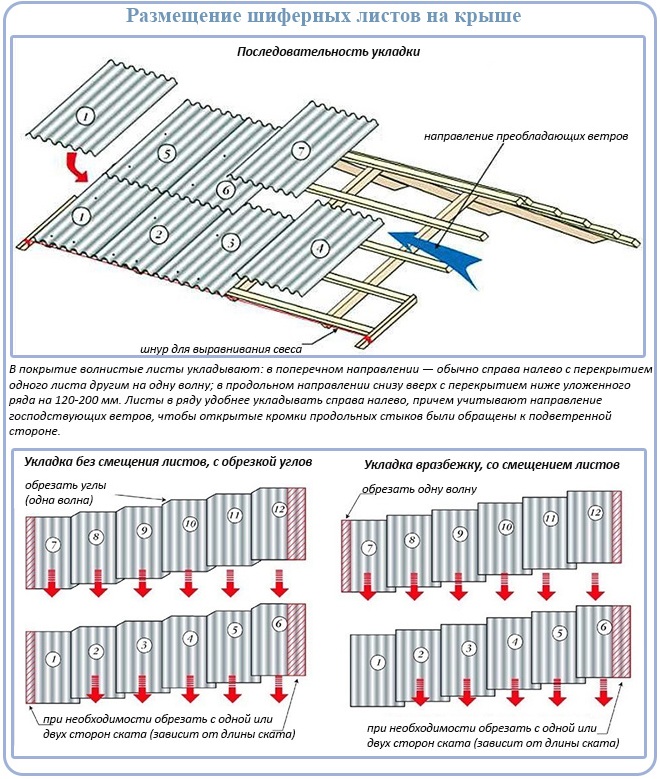
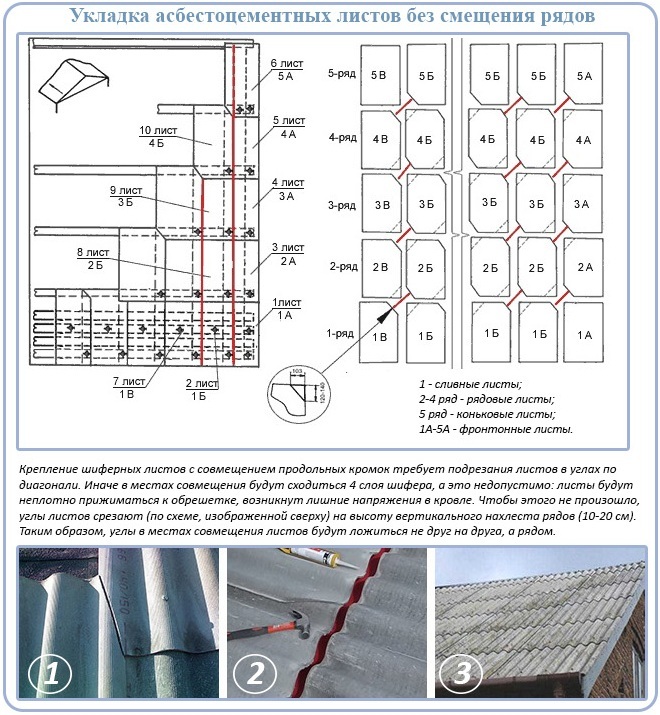
To obtain a roofing covering, the slate is fixed on the lathing in horizontal rows, moving from the bottom up (from the eaves). Each subsequent sheet in a row is superimposed on the previous one by 1-2 waves. Each subsequent row is also shifted to the previous one, as a rule, by 120-200 mm.
There are two ways to lay out slate:
- Scattered- when slate sheets of one horizontal row are mounted with a shift of 1-4 waves in relation to the sheets of the adjacent row. The joining line is stepped. This technology is recommended for roof slopes that are wide in the transverse direction (horizontally), but narrow along the slope.
- No offset- when slate sheets are mounted in the same, even rows, without shifting. The joints of all rows form one line. Since when laying it is not allowed to arrange a double overlap (that is, to combine more than 2 layers of slate at one point), the edges of the sheets are cut at an angle of 30 ° -60 °. This method is the most rational for covering slopes that are wide on the slope, but small in diameter.
As a rule, they are laid apart. This option is less time consuming as it does not involve a lot of pruning. Installing slate without offset is much more difficult, since almost every sheet has to be cut in the corners. But this technology also has a significant advantage - it saves material.
Let us consider step by step the process of covering the roof with slate, focusing on the difference in the two layout schemes.
Slate laying technology
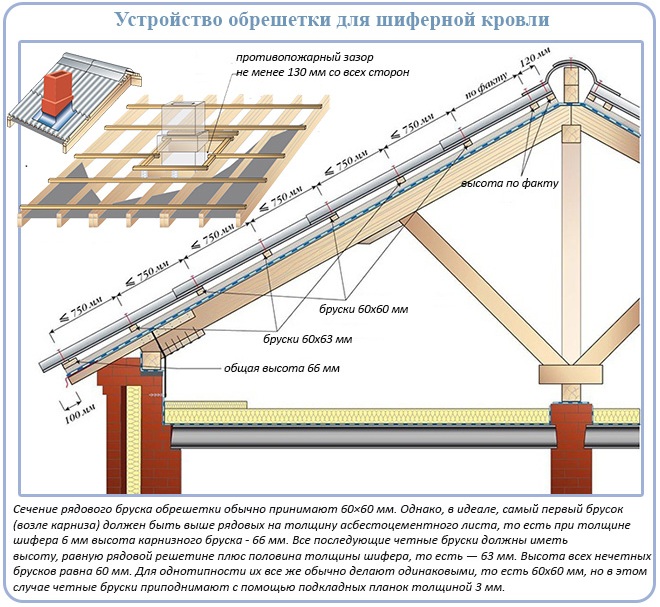
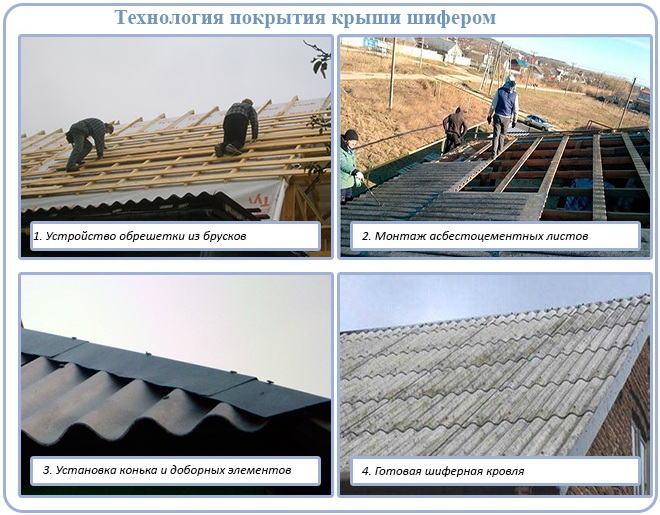
The first step for attaching the slate is to prepare the base - the crate, which is fixed directly to the rafters. The lathing is solid and sparse.
Solid sheathing is a flooring made of OSB, plywood or planks. Such a base, as a rule, is used if it is required to cover the roof with non-standard slate thickness.
For a typical slate with a thickness according to GOST, a sparse lathing is recommended - a structure made of bars installed with a certain step over the rafters. The suitable cross-section of the lathing is 40-70 mm. Too thin bars are not used, due to their possible damage under external load (for example, under the influence of snowfall). Too thick bars are also bad. When warped, they can cause the asbestos-cement fibers to break and the slate to crack.
As part of the lathing frame, it is recommended to use bars of different heights. Ordinary bars usually have a cross section of 60x60 mm, they are fixed in odd rows. Even rows are made up of elements whose height is slightly higher - half the thickness of the slate used. For example, if the thickness of the slate is 6 mm, then the height of the "even" bars is 63 mm. The first (cornice) bar also has a different height - 66 mm, which should rise above the privates by the thickness of the slate sheet. For uniformity, a different scheme is often used: they use slats of the same height - 60x60 mm, but, in even rows and near the cornice, they are built up with 3 mm thick linings.
The lathing is fixed on the rafters, at right angles, using nails or self-tapping screws. Since slate is a durable, non-bending material, 3 support bars are enough to install each sheet. The step of the lathing from the bars depends on the length of the sheet. The standard length is 1750 mm, respectively, the pitch of the lathing is 700-750 mm.
1-2 lathing beams are installed on the ridge (on each slope) for the subsequent fixing of the ridge parts on them. The height of the bars is selected on the spot, in fact.
Additionally, lathing is performed around the chimney. For this, ordinary bars are fixed along the perimeter of the pipe trunk at a distance of at least 130 mm from it (to ensure fire safety).
Stage # 2. Calculation of the amount of slate
Correct calculation of the amount of slate is another important step that will save the roofer from having to buy 1-2 missing sheets at the last moment and order transport for this.
It must be understood that not the entire surface of the material goes directly to the roof covering. Part of the area (along the perimeter of the sheet) is lost under the overlap.
Therefore, the calculation of the amount of slate is carried out as follows:
1. Determine the amount of slate in the transverse (horizontal) row (P) by the formula:
P = (L + 2C) / (B 2 - B 1),
- L- the width of the slope;
- WITH- removal of the overhang on the pediments;
- B 2- sheet width;
- IN 1- the width of the sheet under the overlap.
2. Determine the amount of slate in the longitudinal row (n) using the formula:
n = (L o + C 1) / (L 2 - L 1),
- L o- the length of the slope;
- C 1- the size of the overhang from the eaves (about 100 mm);
- L 2= Is the length of the sheet;
- L 1- the size of the longitudinal overlap of the sheet.
3. The resulting figures are rounded up to a whole number, multiplied and the total number of sheets per 1 roof slope is obtained. If the roof is gable, then the calculated number of sheets (+ 10% - for battle and scrap) is purchased in two times.
Stage # 3. Slate sheets cutting
Before lifting the slate sheets onto the roof, it is necessary to sort them out and, in accordance with the chosen laying scheme, cut them out.
You can cut slate with several tools:
- grinder;
- a hacksaw for wood or foam concrete;
- jigsaw;
- using a drill or slate nail and hammer.
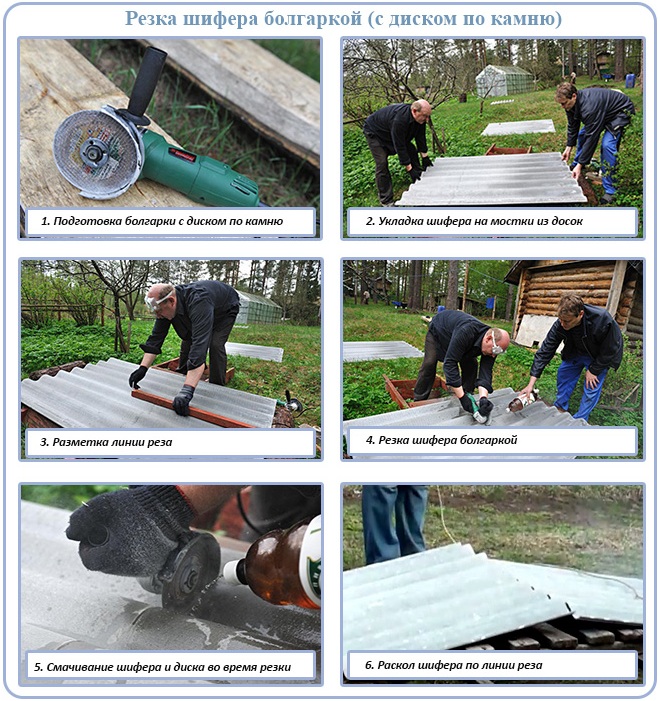
The easiest and fastest way to cut the slate is a grinder with a stone (concrete) disc or a diamond disc.
Cutting process:
- a sheet of slate is laid on a walkway made of boards so that the place of the cut is raised above the ground;
- mark the cutting line using a flat wooden lath;
- the place of cutting is watered with water to avoid overheating of the disc, to make the slate softer and more pliable, as well as to settle the emitted asbestos-cement dust;
- perform a cut, constantly wetting the cutting line and the grinder's disk (pouring water from a bottle over them).
Similarly, sheets are cut with a hacksaw or jigsaw, however, when using these tools, you need to be extremely careful not to break them.
Cutting methods with a drill or a slate nail deserve special attention.
When using a drill, a 2 mm drill is used to make through holes along the cutting line with a step of 0.5 cm.After drilling is completed, the sheet is placed on a support (table, for example) with one edge, and pressed on the other edge, after which the slate is split along the intended line.
Instead of using a drill, a sharpened nail and a hammer can be used to create through holes. To do this, set the nail on the marked line and hit the head with a hammer. The blows should be accurate, strong enough, but not sharp. In this way, multiple punched holes are punched at a small distance from each other. After that, the sheet is split into two parts.
The technology of cutting a slate sheet with a grinder is shown in the video clip:
Stage # 4. Laying slate sheets
Laying of slate begins on the side opposite to the direction of the prevailing winds. That is, the installation of sheets starts from the left side, if strong winds blow from the right, and vice versa. This will avoid blowing rain and snow into the overlap areas.
A cord is pulled along the eaves at a distance of the length of the overhang in order to level the rows of slate along it. Instead of a cord, you can use a flat wooden strip.
The sequence of work in the layout is random:
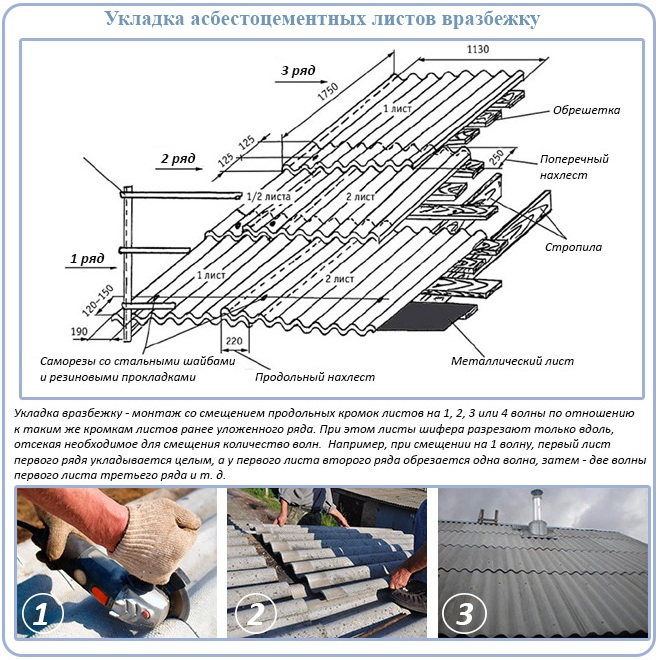
1. The first horizontal row begins to be made of whole sheets of slate. Each subsequent sheet overlaps 1-2 waves of the previous one (as a rule, there is 1 wave per overlap). Fastening is performed using roofing nails or self-tapping screws with soft (rubber) gaskets.
2. In the second row, the first sheet is cut into a number of waves, depending on the desired offset value. Then they put in whole, uncut, products. The sheets overlap the underlying row, forming an overlap of 200 mm - with a slope of 15-20 °, 150 mm - with a slope of more than 20 °. That is, the greater the slope, the less the allowable overlap.
3. The third and all subsequent rows begin with sheets cut by twice the number of waves cut off from the first sheet of the underlying row. For example, if the first sheet of the second row was shortened by 1 wave, then the first sheet of the third row will have to be cut by 2 waves, then by 3 waves, etc. It is more convenient to offset 1/2 the slate width. In this case, only the sheets in each even row will have to be cut in half. Odd rows are made up of whole sheets.
4. The ridge row is laid last, making it from sheets cut across.
In a layout without offset:
1. The first sheet is laid whole, not cut off. Align it along the cord, fix it with nails or self-tapping screws. For subsequent sheets of the first row, the upper right corner is beveled at an angle (if the installation begins on the right side of the slope).
2. At the first sheet of the second row, cut off the lower left corner, and then join it with the cut corner of the second sheet in the first row. Subsequent sheets are beveled in two corners - in the upper right and lower left (arranged diagonally). At the last sheet of the second row (located on the left), only the upper right corner is cut off.
3. The elements of the upper row (under the ridge) are trimmed along the lower left corner and in height - in fact. The corners of the last sheet are not cut. Such a scheme of forming corners is reliable only when stacking sheets from right to left. If the installation direction goes from left to right, then trimming is performed in opposite corners (instead of left corners - right corners and vice versa).
Stage # 5. Installation of additional elements
After covering the roof with slate, the finishing stage begins - the installation of additional elements. To overlap the ridge, it is advisable to use special ridge parts made of asbestos cement. Each such element consists of two parts connected by hinges. As an alternative to the factory part, you can use a galvanized sheet, bent on a sheet bending machine or with your own hands.
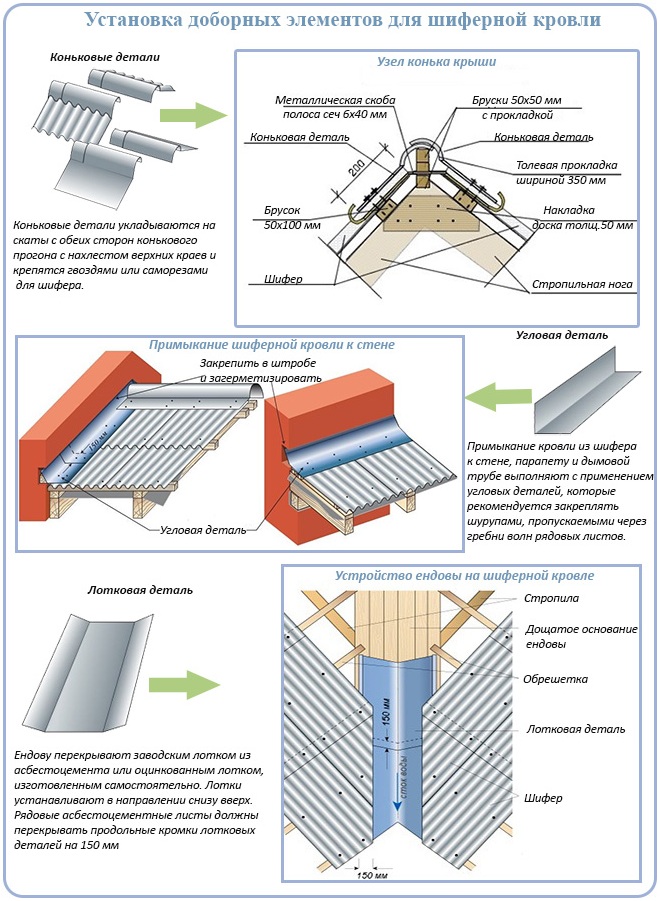
The collars of chimneys, dormers and places of abutment to the walls are decorated with corner pieces made of asbestos cement or galvanized collars. They are fixed over the slate sheets with self-tapping screws passed through the crests of the waves. The upper edge of the apron is attached to the wall and sealed. The lower edge covers at least 1 wave of an ordinary sheet.
The valleys are covered with galvanized or asbestos-cement trays, installing them from the bottom up. In this case, the longitudinal walls of the tray should be overlapped with slate sheets by at least 150 mm.
At the end of the fixing of the additional elements, the laying of the slate roof can be considered complete.
Features of fastening slate on the roof
An important nuance that should be discussed separately is the selection of fasteners and their use in the process of attaching slate to the roof.
As fasteners you can use:
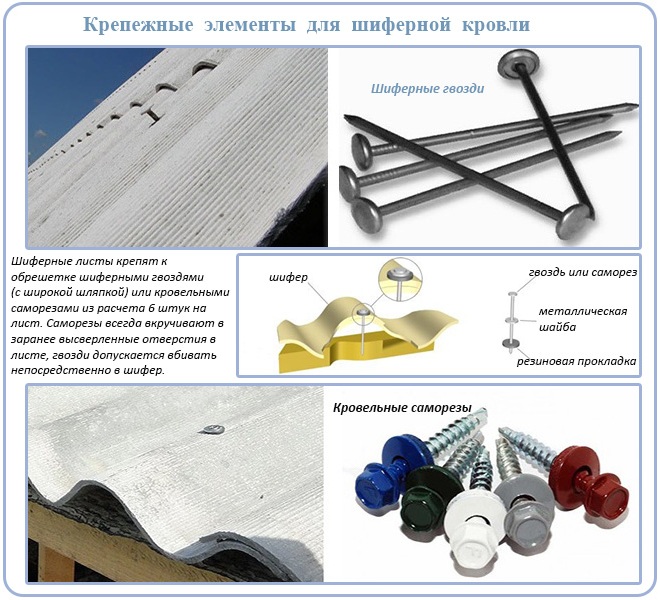
- Slate (roofing) nails. Made of durable steel, their main feature is an enlarged head, reaching 14 mm in diameter. To exclude the appearance of rust, the caps are made of galvanized or metal coated with an anti-corrosion compound. The length of the slate nails should be in direct proportion to the height of the slate wave. That is, the higher the slate waves, the longer the nails driven into them. According to the recommendations of experts, the length of the nails should be 10 mm longer than the total value of the slate wave height (where the fastener will be driven in) and the thickness of the lathing (bar or board). It is not necessary to bend the excess of the rod.
- Self-tapping screws for slate. These fasteners are more expensive than nails, but also more convenient to work with. Self-tapping screw heads can have three versions: for a wrench (hexagonal shape), for a flat screwdriver (with a straight slot), for a Phillips screwdriver (with a Phillips slot). A sealing washer with a rubber gasket is located under the head. Some manufacturers paint heads and washers in different colors (most often - according to the RAL base).
Fasteners are mounted in two ways (optional):
- Into slate holes pre-drilled with a drill. Their diameter should be 2-3 mm wider than the rods of the fasteners. The resulting gap will prevent the slate from cracking when the wooden lathing moves, but it can cause water to leak under the roof. To prevent this from happening, a rubber gasket is put on the fasteners, which seals the slate roof. Self-tapping screws for slate are equipped with such a gasket structurally, in contrast to roofing nails. Therefore, under the nails, the waterproofing washer will have to be bought separately or cut out independently - from rubber, roofing felt or roofing felts. Then it is put on the rod, under the hat.
- Without pre-drilled holes(This method is recommended by most "experienced" masters). In this case, only roofing nails without gaskets are used to fix the slate on the roof. The nail is driven into the coating with light hammer blows so that the asbestos-cement layer crumbles from impacts, and does not crack. Otherwise, the slate may burst. However, even with the correct technology of driving nails directly into the slate, it often cracks. This is due to the poor quality of the material, which, unfortunately, is common.
An important feature of the fastening: during installation, the nail or self-tapping screw is not pulled to the limit to the slate sheet, but a small gap of 2-3 mm is left - to compensate for temperature expansions. If you neglect this advice, then soon the slate roof will crack.
Fasteners are installed only in the upwardly protruding parts of the wave (in the ridge), where the slate is in contact with the lathing (to connect the roofing sheet with the lathing material). Fastening is carried out at a distance of 80-100 mm from the edges of the sheets.
- for 5-wave slate - fastening in the 2nd and 4th waves;
- for 6-wave slate - fastening in the 2nd and 5th waves;
- for 8-wave slate - fastening in the 2nd and 6th waves.
Since the slate usually rests on 3 lathing bars, and the fastening is performed at the points of contact of 2 waves with the lathing, the total number of nails (self-tapping screws) for each sheet is 6 pieces.
Some additional nuances of how to cover the roof with slate can be found in the video clip:
Conclusions - is it realistic to do everything yourself?
Slate roofing technology is very simple. It does not require much time, labor and money from you. Despite this, the roof will turn out to be beautiful (especially if you get acquainted with the paint for slate!), Reliable and durable.


