The technology of puttying walls for painting or wallpaper gives recommendations on the sequence of work in order to ultimately obtain a high-quality result when finishing the room. Putty can be used to perfectly level the surfaces of walls and prepare them for finishing coating. This article will tell you what wall putty offers.
The main purpose of putty is to level the surface after plastering. The process of puttingtying walls for painting is quite easy to do with your own hands, having first studied the recommendations and technology for carrying out the work.

There are quite a lot of options for preparing putty; the choice depends on the type of walls, the characteristics of the room, and the presence of high humidity in it.
Tip: When choosing any putty option, you should take into account the individual characteristics of the room during its operation.
In addition to finishing the room, there is material for external work. Its difference is its additional resistance to temperature changes, moisture and solar radiation.
Advantages of using putty:
- The finishing process can be completed easily and quickly.
- Affordable price of materials.
- Possibility of obtaining a flat and absolutely smooth surface.
- Variety of compositions according to their purpose.
What tools are needed when puttingtying wall surfaces?
The technology of puttying drywall (see Puttying drywall: practical tips and useful information) or other materials indicates the correct choice of the tool that is used in the work process.
In this case you will need:
- An electric drill with a special mixer attachment, which will be needed to mix the solution to the desired consistency. A special nozzle allows you to obtain a high-quality mixture, without lumps and additional inclusions.
- Set of spatulas. Multiple spatulas are required to perform certain functions. For example, using a small spatula, work is carried out in hard-to-reach places; it also applies material to a large spatula, the width of which is 35-50 centimeters.
- A set of brushes and rollers for applying primer. This is a mandatory process performed before and after puttying. The primer solution allows you to give the surface an antiseptic effect, which prevents the appearance of fungus and mold on the walls. In addition, the coating increases adhesion between the base of the wall and the putty.
- To level the walls, you will need a rule to identify and eliminate all existing irregularities.
- To control wall unevenness, if any, an alcohol or laser level is used.
- Sandpaper will be needed when sanding the surface to give it ideal smoothness (see How to sand walls after puttying). After applying the starting putty, it is recommended to use medium-grain sandpaper, and after the finishing putty, very fine sandpaper.
- To speed up the process of sanding the wall, you will need a manual sander.
- To stir the putty, you need a container with a volume of approximately 10 liters.
Tip: This list of tools should be purchased before you start puttingtying the walls.

How to choose materials for puttying walls
Putty is a paste-like material that allows you to prepare the base of the wall for its finishing.
According to the degree of readiness, the material can be:
- Dry composition requiring additional dilution with water(see How to dilute putty when doing your own repairs). The advantages of this mixture:
- affordable price;
- the ability to prepare a composition of any consistency;
- ease of breeding;
- easy to transport;
- long shelf life.
Lack of material:
- the presence of additional operations for preparing the solution before application, which increases the time of work;
- The finished composition has a limited period of use; it must be diluted in small portions.
Advice: Before starting to dilute the mixture, the instructions should be carefully studied, and when preparing all its recommendations should be strictly followed. Otherwise, the quality of the finished putty will be worse.
- Ready to apply to the surface. The basis for the manufacture of the composition is latex. Packaging of material - buckets or small tanks.
Advantages of the solution:
- the prepared solution can be used for a long period of time without drying out;
- there is no need for additional time required to prepare the solution. But, its cost is much higher than dry mixtures.
In relation to the main substance used to make putty, the compositions can be:
- Cement-based putty. It has good resistance to moisture and excellent performance. Disadvantages of the material:
- gives a slight shrinkage after drying;
- low level of elasticity of the coating;
- After drying, small cracks appear.
- Gypsum based(see Gypsum putty: its advantages and problems of use). It is characterized by the absence of shrinkage and great elasticity. Disadvantages include:
- dries quickly;
- low resistance to sudden changes in temperature and moisture.
- Polymer-based putty. Despite the high cost, it is used quite often, which is associated with obtaining a high-quality surface after puttying.
Tip: When choosing putty for walls, you need to pay attention to the size of its fractions. The smaller they are, the flatter and smoother the surface will be after finishing.
According to its intended purpose, putty can be:
- Starting. Is different:
- high strength;
- affordable price;
- used in the initial period to level walls, the layer thickness can reach twenty millimeters.
- Decorative or finishing. Designed to complete the puttying process. It is characterized by:
- White color;
- slight graininess;
- high durability.
- Universal. Combines starting and finishing compositions. Used when there are small flaws on the walls.
In the process of puttying any surface, a primer is required between operations (see Primer before puttying walls - is it necessary).
Wherein:
- The walls get rid of dust and dirt.
- Their adhesion or connection with putty improves.
Advice: Surfaces must be primed always and everywhere when applying adhesives or wet solutions. The walls are primed before laying the starting layer, after cleaning the putty with an abrasive mesh.
How to putty walls correctly

Before puttingtying plastered walls, the surfaces must be prepared:
- Cleaned from grease stains, traces of wallpaper or paint.
- The walls must be completely dry.
- It is unacceptable to putty on frozen surfaces.
- The surfaces are primed.
To better hold the putty on the wall, it is recommended to use a special reinforcing mesh.
Puttying walls can be done:
- Lighthouse way. In this case, beacons are used, which are slats made of:
- wood;
- gypsum;
- metal
The elements are placed in a vertical direction and secured to the wall with plaster mortar. In the same way, the walls should be leveled in the horizontal direction. When performing this step, a rule is used. As a result, the surface of the walls is without flaws.
- A cheaper way is to apply starting putty.
After drying the initial coating, decorative puttying of the walls is carried out with special finishing compounds, which allows the surface to be given an ideal plane, without cracks or other defects. The finishing coat is applied in a very thin layer.
Advice: Finishing putty cannot correct a poor-quality starting layer. It is performed only after the surfaces are perfectly leveled.
The technology for preparing and applying putty to the wall includes:
- When using dry compounds, a solution is prepared. To do this, the mixture is combined with water, thoroughly mixed until a homogeneous composition is obtained; the consistency should stick to the spatula.
- The starting putty is applied to the wall with a wide spatula and evenly distributed over the surface in vertical, horizontal directions and diagonally. To avoid the appearance of bumps, the putty should be applied with a slight overlap.
- To improve the quality of work, the solution must be prepared in small portions, otherwise you may end up with dried parts on the wall. One layer of putty dries in about 24 hours.
- Special spatulas are used to finish corners.
- After drying the starting layer, a finishing coating is applied, the thickness of which does not exceed two millimeters.
During the work process:
- When puttingtying walls with your own hands, the spatula is positioned at an angle of 30° to the wall.
- To obtain an ideal angle, apply a little solution to an angle spatula and distribute it evenly over the entire surface.
- Before plastering walls under wallpaper, it is necessary to determine its thickness and type. These indicators affect the thickness of the leveling putty solution applied to the wall.
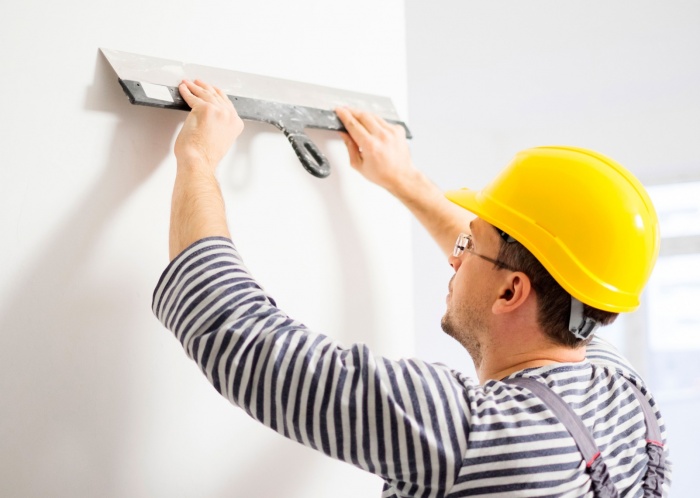
When subsequently painting the walls, surface preparation is carried out more carefully; an example is shown in the photo.

After applying the paint, even the slightest irregularities and other defects will be visible. The leveling layer is applied very thinly.
To determine the required amount of putty, the area of the walls is initially measured, and then the mass of the material is calculated based on its needs per square meter. It is more economical to use dry mixtures. But it’s more convenient to use ready-made formulations.
The choice of putty option depends on the preferences of the owner and his financial capabilities. How to apply putty on drywall, the technology for preparing the solution and the entire cycle of work is shown in the video in this article.
Putty is a thick or powdery material that is used to apply to the surface of walls to level them before applying wallpaper or paint products. Putty is made from sifted gypsum, flour glue, chalk, laundry soap and drying oil. However, this is not the entire composition, since manufacturers are constantly improving their material, adding new components to it, or replacing their best ones.
Painting walls is done for a reason, so you need to properly prepare the surface and give it a beautiful look. What is the difficulty of preparing walls for painting, compared to preparing walls for applying wallpaper? The problem is that the paint will not be able to hide all the defects that remain after sanding. This is the whole problem of preparing for painting, because when applying putty to the walls under the wallpaper, you will not need to work so much. That is why in this article we will tell you about all the intricacies and secrets of applying putty to a wall for painting. Therefore, we strongly recommend that you be attentive to the tips that you learn in our article. Thanks to this, you will have success in performing such painstaking work.
Features of wall putty
Before you start painting, you need to prepare the walls. To start puttingtying walls, you must first remove the old coating. If there is paint on your walls, it will need to be cleaned off, since the putty applied to such a surface will not last long. If the walls are plastered and in some places cracks are visible or the plaster is swollen, then it will need to be knocked down with a hammer drill or a hammer with a chisel, and then repair such places with fresh mortar. Only after such work can you begin to level the surface with putty.
However, there is another option. This is the construction of a frame on the wall to which you attach drywall with self-tapping screws. This option is cleaner. Although in this version there will be a lot of heavy work. After all, you will have to cut with a grinder, drill holes in the wall using an impact hammer, and also work a lot with a tape measure and a stationery knife. However, after doing this work, you will be able to reduce the time it takes to level the walls, and also save your money on putty, since you will only need to apply a thin layer to hide the color of the drywall and even out its joints. But this option also has its drawbacks, since drywall is not resistant to various mechanical loads. However, the plasterboard surface is really easy and pleasant to paint.

Plastering walls for painting
The process of filling walls does not end with the application of just one layer. This work must be done in stages. First you must apply a layer of starting putty, which is mainly intended for leveling uneven spots and holes of various sizes. When doing this kind of work, many people make the standard mistake of smoothing out every scratch and bump. This should not be done, since it will be easier to clean off the scratches with a spatula later than to smooth them out for a long time and uselessly. After drying, the first layer is sanded, then according to the technology you need to apply a primer to it, however, this is not critical. If you want to save money or see that you simply don't have enough primer, then don't worry.
After a little sanding you should apply a second coat using the same starting putty. This work will take you several days. After all, before you start sanding, you must wait a while until the wall is completely dry.

You must apply such layers until the wall is completely flat. After you have leveled the surface with the starting putty, you will need to apply a thin layer of finishing putty. When doing this kind of work, you must be very careful to do it very well. That is, do as little sagging and scratches as possible, since this is the final stage of work with putty. After finishing putty, you will only need to sand and prime the surface. However, remember that before priming you need to clean the walls from dust, pebbles, etc. This can be done with a broom or dry rags.
Advice! If you do not want to grind the surface for a long time, it must be properly covered with putty. How to do it? Apply another layer of finishing putty to the fresh first layer. Thanks to this procedure, you can do your job almost perfectly.
Why should wall painting only be done on putty walls? Because compared to plaster, putty has many more small particles. And plaster is more coarse-grained. Therefore, if you want to save money and paint the walls on plaster walls, remember that paint will not hide scratches and unevenness, which will be inherent in the surface in any case. In addition, a black wall is beautiful; you may see a color that is not at all what you expected. Because the paint will have a dull, unsaturated color. Therefore, we advise you to putty the walls before painting.
Important reminder! After application, the putty and plaster should dry naturally. Do not use hair dryers, heaters, fan heaters, etc. This will prevent the putty from cracking and crumbling.
The surface of the wall should consist of the following layers:
- The base is the first layer made of brick, concrete, wood, etc.
- Plaster or drywall.
- The first (starting) layer of putty. Possibly using a plastic mesh.
- Finishing layer of putty.
- Primer.
Tools needed when filling walls
Before you putty the walls for painting, you must prepare a tool. For this task you will need:

If you prepare everything you need, then puttying the walls for painting will be an easy task.
Choice of putty
The most important thing is to choose the right material. How to do it? Putties are divided into the following types:
- polymer;
- cement;
- plaster.

Each of the above types has both pros and cons.
Let's consider each of them separately.
Cement
Advantages: it can be applied to any surface, it is not afraid of moisture, it does not lose its properties over time, and most importantly, it has a low cost.
Disadvantages: Some may complain that this putty is not as flexible as other types of putties. It can also shrink over time.

Polymer
Advantages: in comparison with the previous option, this type of putty will not shrink, has good strength, resistance to temperature changes, and elasticity.
Among the shortcomings is the overpriced.

Plaster
Gypsum putty is the most popular nowadays. Advantages: has no toxic substances, dries quickly, fireproof, plastic, can be bought in almost every hardware store.
Disadvantages: a little expensive, does not have moisture-resistant substances, sets quickly.
Advice! Choose putties from well-known companies that have become famous for their quality. Or consult with experienced craftsmen who have tested more than one type of putty in their work.
Conclusion
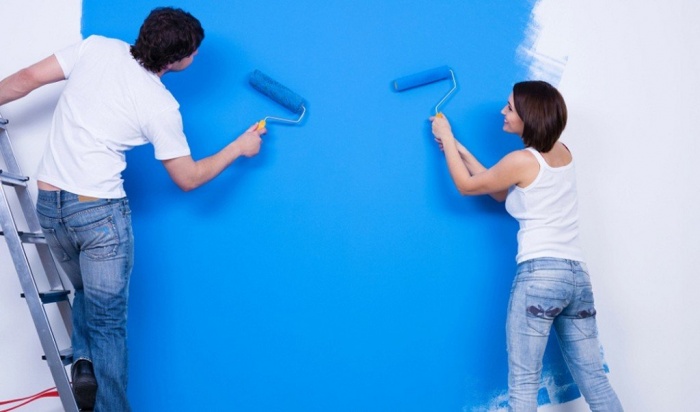
Once you have stocked up with all the necessary tools, have chosen the type of putty you need, and have also prepared the surface by applying putty to it, you can safely start painting the walls. Choose the appropriate wall painting options and feel free to get to work. After all, if you can prepare the walls yourself, then painting them will not be difficult for you. And thanks to proper preparation, the painted area will last a long time and look perfect.
When renovating an apartment, you often have to do painting work.
The finishing mixture should be applied in a layer of 1-2 mm.
Walls must be carefully prepared before painting.
They need to remove the old layer of paint, tiles or wallpaper. The surface must be smoothly plastered. The final stage of preparation is to putty the walls for painting. The work is quite difficult, but anyone who knows how to hold a tool in their hands can do it.
Walls should be puttyed for painting in stages. You need to be patient as this will take several days. Each layer will need to be thoroughly dried, sanded and primed. Without careful putty it is impossible to paint or paper the walls properly. How to putty walls for painting and why should you do it?
Read also:
How to glue.
How to prepare walls to be painted - read.
Purpose of putty
It is better to apply the rough mixture with two spatulas.
The plaster on the wall is a layer of fairly large particles. You can thoroughly rub the plastered surface. This wall is suitable for wallpapering. If you apply paint to it, in the light it will highlight all the small irregularities that will be clearly visible from the side. The putty mixture includes smaller particles. To level out small depressions and bumps, it is applied in a thin layer to the plaster. For better adhesion to the wall, the plaster layer should be treated with a primer with deep penetrating ability.
Work begins by applying a thin layer of putty using a wide spatula. The thickness of the initial layer can reach several millimeters. This depends on the size of the unevenness, which is usually felt when working with a spatula. You need to allow time for this layer to dry in accordance with the instructions on the material packaging. After drying, the putty is sanded, primed and a finishing layer up to 2 mm thick is applied. Usually this is enough, but sometimes it becomes necessary to apply an additional layer.
In the final form, the walls should resemble a multi-layered cake. The layers are arranged like this:
- base made of brick or any other material;
- layer of plaster. Its thickness can be 5-50 mm;
- base layer of putty. Its usual thickness is up to 3 mm, in some cases it can reach 10 and even 15 mm;
- finishing layer of putty. Its thickness is up to 2 mm;
- sometimes a superfinish putty is applied. Its layer does not exceed 1 mm.
Fresh plaster on the wall must dry well naturally. This process should not be accelerated by using a fan heater or other heat sources. With such drying, cracks and peeling will certainly appear.
Return to contents
Main types of putties
A good finishing putty is white. This saves paint.
- cement. It is highly resistant to moisture. Recommended for use in kitchens, bathrooms, washrooms and other places with high humidity levels. The mixture dries to a gray color that can show through thin wallpaper or white paint;
- plaster. Designed for treating walls in dry residential areas. This is an ideal option for preparing walls for painting in the bedroom and living room. When dry, a smooth white surface remains. Cannot be used when working on the outside of a building;
- polymer. It contains the most modern high-tech materials. Gives an exceptionally even layer with a smooth surface. The finished solution is very plastic and does not dry out for a long time. Recommended for use as a finishing layer;
- oil-glue. This is an outdated type of putty. Does not provide high quality and is used extremely rarely. It is not recommended to putty walls in residential areas.
When choosing putty mixtures, you should pay attention to the manufacturers of the material. The most famous and popular are Rotband and Vetonit (Weber Vetonit). It is usually sold in bags that indicate the expiration date and recommended storage conditions. A regular bag weighs 25 kg. It's enough for the whole apartment. Finishing putty is sold ready-made, packaged in plastic buckets. They hold 3, 5 or 7 kg. This is quite enough for an apartment. Superfinish putty is also sold in buckets weighing about 1.5 kg.
Return to contents
Some characteristics of putties
- Vetonit VH – used in wet and dry areas. The base is cement. Layer thickness – up to 2 mm. 1.2 kg of mixture is consumed per square m of wall area. You need up to 0.36 liters of water, 9 liters for a 25 kg bag. The shelf life of the finished mixture is 3 hours. Dries in 1-2 days. Packaging in bags of 5 and 25 kg;
- Vetonit KR+ based on polymer adhesive. Designed for use in dry rooms. The permissible layer thickness is up to 5 mm. Consumption of the finished mixture is 1.2 kg per 1 m². Amount of water – 0.36 l, per bag – 9 l. The working life of the mixture is 24 hours. Dries in a day. Bags of 5 and 25 kg;
- Vetonit KR is used in dry rooms. The basis is organic glue. The layer thickness is 1-3 mm with a mixture consumption of 1.2 kg. Water consumption – 0.4 l, per bag – 10 l. Usage period: 24 hours. Dries in a day. Packaged in 5 and 25 kg.
Return to contents
Puttying process
To work you need:
- basic putty;
- finishing putty;
- superfinish putty;
- small spatula 80-100 mm wide;
- large spatula 30-40 cm wide;
- corner spatula;
- fine-grained sandpaper or a special mesh for sanding;
- grater for securing the mesh;
- universal primer;
- paint roller for applying primer.
Preparatory work:
- clean the walls from large deposits of plaster;
- de-energize the electrical wiring and completely remove switches and sockets;
- Apply primer to the wall with a roller or brush and allow it to dry completely.
Prepare putty according to instructions. It dries quite quickly, so you should not dilute more than 5 kg of the mixture. Prepare the working mixture only in clean containers. Using a small spatula, the putty composition is applied to a large spatula, then onto the wall. If there is no experience in such work, then after a few minutes, through trial and error, the novice master will find his own way of tilting the spatula to evenly apply the putty to the surface of the plaster. The main thing is to try to cover all the depressions as evenly as possible.
Using a rule leaned against the wall, the plane of the surface is checked. You can illuminate the rules from the reverse side with a flashlight. It will show all the errors.
possible sagging is cut off with the sharp edge of a spatula.The entire surface needs to be sanded. This can be done more conveniently using a surface grinder. This work generates a lot of dust, so the use of special clothing, safety glasses and a respirator is recommended. After sanding, the wall needs to be vacuumed and primed. The next layer is applied in the same way. The corners are leveled with a corner spatula. After finishing work, all tools and utensils must be thoroughly washed and wiped dry.
It is impossible for a beginner to perform putty work perfectly, but with high quality it is quite accessible to anyone. Scratches from the spatula are repaired with a thin layer of super-finishing putty. When building a new house, professional builders prefer not to bother themselves with such work. For this reason, a new apartment usually requires expensive renovations.


Proper preparation of walls for painting is the most important stage of decorative finishing, ensuring the aesthetics of the result. The work involves leveling and filling the walls, and this can be done in several ways, varying in complexity and time consumption. In all cases, the base is a starting layer of putty, which can be supplemented with reinforcement and decorative material to achieve greater smoothness and durability of the coating. In addition, the surface needs to be sanded. What do you need to know to make your wall paint perfect?
Leveling the wall and preparing for puttying
To get perfectly smooth walls, their surface must be pre-treated, eliminating even the smallest differences in height and all noticeable defects in the base. Depending on the initial state of the walls, they can be leveled in one of several ways:
- on a frame structure.
Sanding will be a suitable option if the clean concrete base or old layer of plaster does not have significant unevenness, cracks or other defects. In this case, it is enough to remove the old coating (wallpaper, paint, decorative plaster, etc.) and remove the thin top layer of rough plaster or concrete using a grinding machine or a block with sandpaper. Before the walls are putty for painting, the base must be covered with two layers of primer, antiseptic and antifungal impregnation if there was mold. As a result of measurements, height differences should not exceed 2 mm.
If the unevenness is significant or the base has significant defects, it is necessary to completely or. The main surface is first sealed with mortar. The old finish should be removed completely, not just the damaged areas, even if some of it appears to be strong enough. Then a new layer of plaster is applied or sheets of drywall are installed using the appropriate technology.
When the preliminary leveling is completed, you should, as in the case of sanding, coat the surface with a primer. You can begin further work after 5–6 hours, since you can properly putty the walls for painting only on a perfectly dry surface - it is better to wait longer than to apply putty to a wet wall.
Types of putty
Spider web reinforcement
To create a high-quality painted wall, it is recommended to use a spider web; it will protect the wall from cracks. To prevent this, you can strengthen the finish - for this you use a spider web for walls to be painted.
- Glue is applied to the surface of the wall in an even thin layer.
- Strips of fiberglass are applied to the wall. They can have any size, the main thing is to correctly determine the front and back sides of the web, otherwise the material will adhere less well to the surface.
- The painting canvas is then flattened by hand and rolled with a roller to remove air bubbles from underneath it. It is important to ensure that the edges of the web align evenly with the corners of the room. If necessary, excess edges are trimmed.
- The top of the web is coated with glue until the entire web is saturated. The glue will act as a primer, which will reduce paint consumption and also provide better adhesion of the finishing plaster to the reinforcing layer.
- The following strips are glued overlapping; It is recommended to glue them parallel to the floor.

It takes a day for the adhesive to dry completely, after which you can begin applying the finishing putty. In addition, you can paint directly on fiberglass - in this case, an aesthetic relief will appear on the surface of the walls. needed only to obtain a perfectly smooth surface for painting.
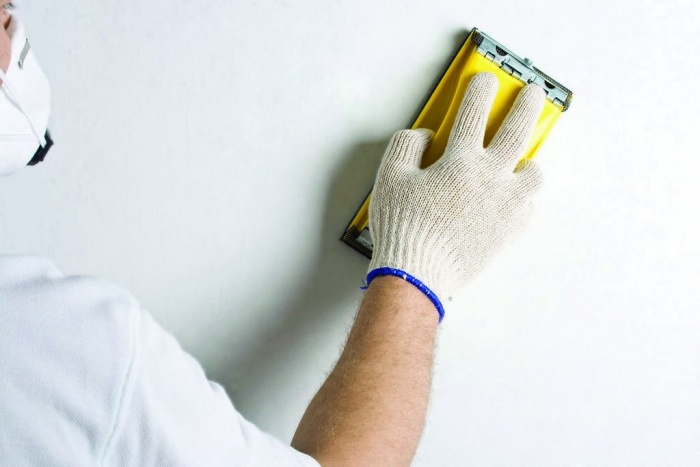
Grinding Features
The main rule of sanding is that you need to work with a perfectly dry surface before treating it with a primer. The secret is to use a wide spatula when applying putty and use a light when sanding.

First of all, you need to decide what is better for sanding the walls after puttying; the choice of tool will depend on the type of material (starting or finishing), as well as the type of surface. Based on the area of the wall, one of the following tools is selected:
- a wooden block with sandpaper - for small areas that can be easily processed by hand;
- electric grinder - for large surfaces, it should be taken into account that the joints of the walls will in any case have to be processed by hand;
- if there are protrusions, bas-reliefs and other areas with complex geometry on the wall, a machine with an eccentric will do.
Purchased tools
If a wooden block seems too inconvenient, for manual work you can use a special device with a handle and clamps that allows you to quickly change worn out sandpaper. Instead of paper, you can use an abrasive mesh.
Mesh is preferable because, unlike paper, it does not become clogged with dust and wears out more slowly; however, it is more expensive. The difference in price is offset by the amount of paper required - in order to get perfect walls for painting, you will need many sheets. To save money, you shouldn’t buy cut paper - it’s easy to cut it yourself, and sharpen your scissors at the same time. 
The grit size of the sanding block depends on the type of finish: for starting putty, a mesh size of 120 is suitable, for finishing putty - 80 or 60. Most likely, you will have to try several grit options - start with a coarse one, removing the most noticeable surface flaws, then use increasingly finer ones until If the wall is illuminated, shadows will not stop appearing.
More convenient to use and allows you to complete repairs faster; In addition, with its help you can get a truly flawless surface. However, purchasing power tools for processing a small area is not always cost-effective.
Homemade grinding devices
You will have to make the device yourself if necessary sanding walls for painting in hard-to-reach, small areas that cannot be reached with a bulky bar. A homemade tool is made as follows:
- a piece of plastic profile is cut so as to obtain a strip about 70 mm wide;
- on one side, sandpaper is glued to the profile using double-sided tape;
- the end of the segment is cut at an angle in the shape of an arrow.
If desired, you can cut and glue several strips of paper with different grain sizes. You need to work at an angle, and cut it as the sandpaper wears away - the principle is the same as when sharpening a pencil.
 Cleaning the corners is an important step in wall preparation
 Operating rules
Before starting sanding, you need to protect the room from dust - furniture, window and door openings, and decorative flooring are covered with polyethylene film. You need to work in a protective suit, a mask and always a respirator.
empstenup/ January 15, 2017 / /
To make painted walls look more aesthetically pleasing, they should be carefully leveled and flaws should not be given a chance. How to putty walls for painting yourself?
Preparing for work
For any repair work on walls, initial preparation of their surface is required. This will improve the quality of the decorative finish and make further painting easier. Since painting walls is a very complex process, capable of revealing the smallest defects and flaws, it is in the interests of the apartment owner to approach the matter seriously.


After leveling, the wall should become immaculately smooth and free of roughness. The ideal option for preparing the wall is putty. Unlike the material, the finished work is very expensive, and if there is no desire or opportunity to invite a master, it is better to learn how to putty the walls with your own hands. Knowing how to putty walls for painting will save your budget and teach you to be independent.
Before you begin, you need to prepare all the tools that may be useful:
- mixer or drill with attachment, in the event that an unfinished mass is used, but a dry mixture;
- container for diluting putty, you can replace it with a regular bucket;
- set of spatulas: small, large, angular;
- wide and narrow brush or ;
- metal rule for leveling a thick layer of putty on the wall;
- sandpaper for grouting after drying: coarse for rubbing the starting putty, fine for finishing;
- surface grinding tool or a manual skinner on which skins are attached for grouting walls.


You also need to make sure that the room has a stepladder or construction trestles with a wide stand for tools. To protect floors from dirt during work, you should cover them with newspaper or film.
Choosing putty

| Classification of putties | |||
| View | Purpose | Advantages | Flaws |
| Gypsum putty | Used for interior decoration | Ideal for sealing small cracks and processing seams between concrete or gypsum slabs; good heat and sound insulation; dries quickly; fire resistance | Not recommended for use in a bathroom or toilet, as it cannot withstand changes in temperature and humidity levels |
| Cement putty | Mainly used in rooms with high humidity, building facades, kitchens, baths and toilets | Insensitive to humid environments; low cost | Tendency to shrinkage, formation of microcracks; inelasticity, therefore, to avoid defects, it is applied in thin layers at certain time intervals |
| Polymer putty | For any premises with a normal level of importance | Combines the advantages of previous materials, surpassing them in quality, strength and ductility | High price |

How to calculate putty
There are cases when the calculation standards on the packaging turn out to be incorrect and far from reality. Since you have decided to do all the work yourself, you will have to calculate the material for consumption yourself. A little math will help with this, in which it is important to take into account the condition of the walls. If they are even, then the consumption for starting putty will be approximately 0.9 kg/m2, otherwise much more raw materials may be required. Finishing putty is consumed in the proportion of 0.5 kg/m2.

Stages of work
When starting puttying, the first step is to apply a primer to the entire surface to be treated in several layers, this will increase adhesion, protect the walls from fungus and extend the life of the repair.
The solution must be prepared strictly in accordance with the instructions on its packaging, or use a ready-made mixture. The setting time of the solution is about 45 minutes, so it makes sense to prepare it immediately before work. The result of the work depends on the consistency, so you need to make sure that it is not too thick and not liquid.

Important: when purchasing putty in a store, pay attention not only to its purpose and brand, but also to the expiration date! Expired material can cause unpleasant surprises - it may crack or fall off one day.
Treatment
Armed with a wide spatula, we get to work with our own hands. The starting putty contains fine sand, so we safely apply the solution overlapping in uniform layers of no more than 5 mm, allowing each of them to dry. All irregularities are smoothed out with a small spatula.

It is best to putty the surface to be painted with reinforcement - using a special nylon mesh between the layers. It will be difficult for a beginner who sets out to do all the work with his own hands to master this technology on his own, so it would be better if an experienced master shows how it’s done at least once. The starting putty is rubbed down no earlier than after 6-7 hours with coarse sandpaper or other abrasive material.
When working with putty, pay attention to the lighting in the room. Check the results with a bright lamp or spotlight at an oblique angle to the wall, then you will notice all the irregularities and save time and effort.
Completion
Next stage: finishing putty. It is applied to the starting putty and repeats the resulting plane. It is used to obtain the final result to make the wall perfectly flat. Apply with the thinnest strokes, not exceeding 1.5 mm. The dried wall is finally carefully sanded and primed before painting.

Very useful rules
Do-it-yourself puttying of walls is carried out according to the following rules:
- do not dilute the putty in large portions;
- do not allow direct sunlight to hit the wet putty surface;
- applying a second layer is carried out only after the previously applied layer has dried;
- hard-to-reach places are puttied with a small spatula;
- corners are sealed at the end;
- Beginners are advised to practice on inconspicuous surfaces before starting work.
2 videos about puttying walls for painting
Putty for painting: stages of work and result (35 photos)


