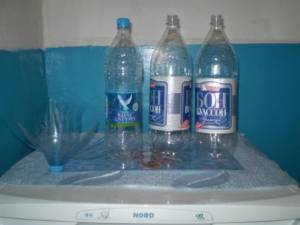
For work you will need:
white plastic bottles,
green plastic bottle;
a piece of cardboard;
glue "Moment" or "Super-glue",
scissors or utility knife.
Step by step guide
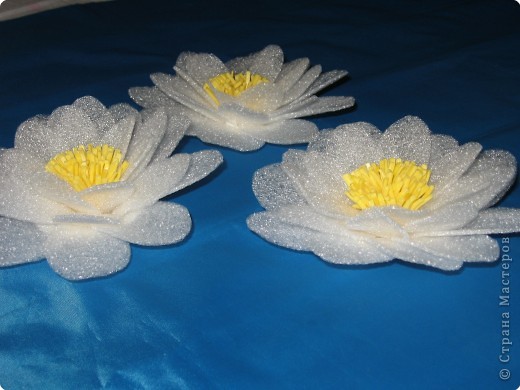
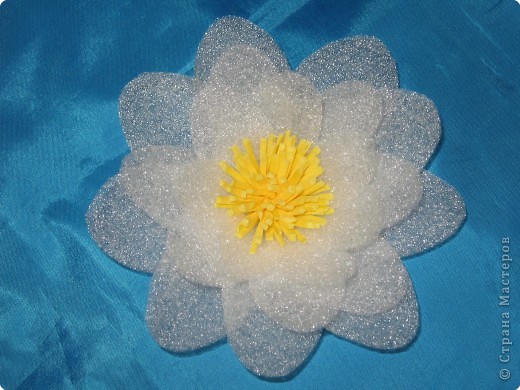
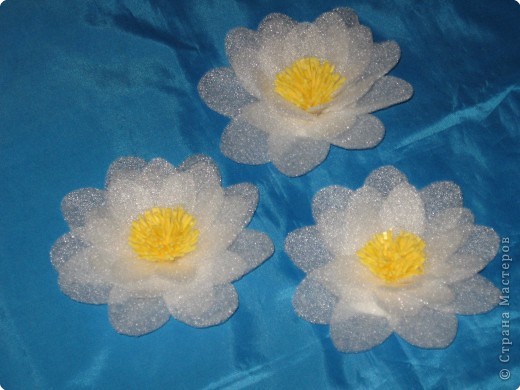
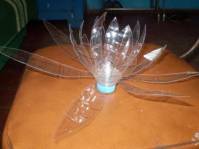
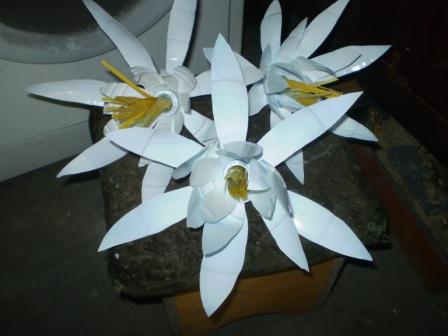
3 round plates with a diameter of 15, 12 and 9 cm are cut from the walls of transparent plastic bottles. 6 radial cuts are made on each blank (divided into 6 identical petals). In the center of the plate, an uncut round part with a diameter equal to the diameter of the bottle cap is left uncut.
Each petal is rolled up in the form of a cone-shaped bag, the outer edges of the petals are bent inward, and the overlap of the edges is stitched with a red-hot needle along the entire length of the seam so that the part does not unfold. You can glue the edges with Super Glue.
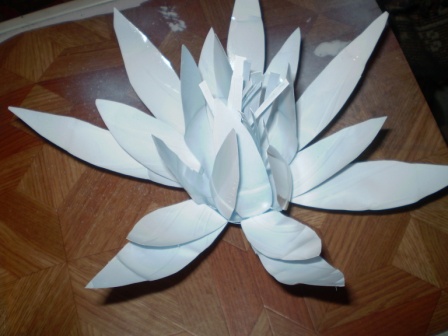
An oval is cut out of a green plastic bottle - this will be a water lily leaf. The sheet is glued onto a piece of thick cardboard and, when the glue dries, the cardboard edges are cut to form a plastic sheet. The center of the largest inflorescence is glued to the leaf or sewn with a thread, turning down the seams of the cone-shaped petals. At the same time, the tops of the cones will rise upward. Then the next inflorescence is glued inside, placing its petals between the petals of the previous one. Next, the smallest inflorescence is glued in, and a yellow bottle cap is glued to the central part of the flower.
Doing something with your own hands is always nice. Especially when close people are just delighted with the product that turned out. Nowadays, it has become popular to invent a variety of figurines from plastic bottles. They look very unusual, interesting and we spend the minimum amount of money on them. Water lilies from plastic bottles are considered quite popular. They will look harmoniously in a home pond or simply as an element of the decor of a garden, room, veranda.
Materials and getting started
What do we need in order to make our crafts from plastic bottles? Water lilies can be made from the following set of materials at hand (designed for one flower):
- three bottles of volume - one 1.5 l and two 2 l each;
- scissors;
- bottle cap;
- paint (preferably in a spray can).
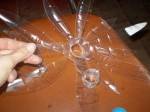
So, we cut the bottles as follows: the first two-liter is below the middle, the second is above the middle, one and a half-liter is just above the middle. In this work we will use the top of the bottle, with a neck. You should get products of approximately the same diameter, since at the end we will assemble them with each other. Thus, we ended up with three blanks.
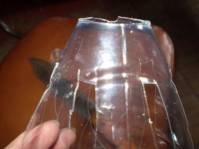
Let's get down to the main work. We cut the petals, leaving about 5 cm to the neck. The distance between the petals should be insignificant, then we cut off the neck - this will be the base of the craft. Next, you need to try on whether the lower part of the workpiece is put on the neck, and then you need to slightly bend each petal of the flower. A water lily from a plastic bottle will begin to take on the look of the future finished product... Repeat the same with the other two blanks. Note that the smallest (of a 1.5 liter bottle) does not need to bend the petals. Thus, we have come to the final stage. 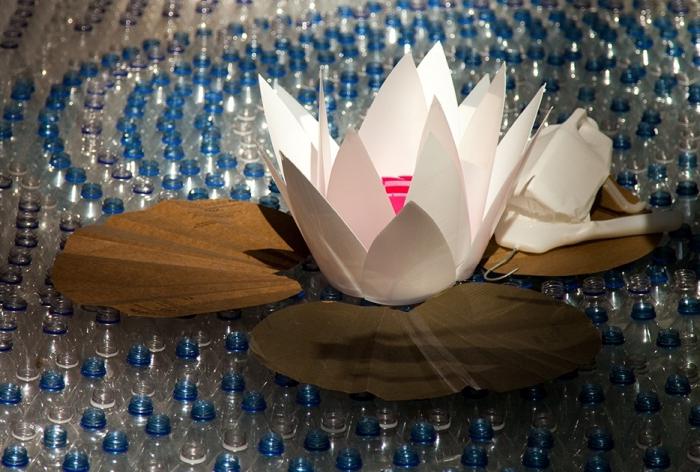
Manufacturing features
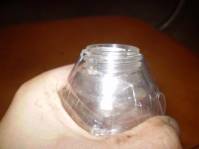
Let's start with the neck, we will string a blank with long bent petals onto it, and only then the rest. Please note that there should be three of them, of different lengths: the longest, middle and shortest. Therefore, play with the size and length of the product. Now we need a lid - we twist it and straighten the flower petals. A water lily from a plastic bottle must have a core. To make it, you need to cut out the middle part from the remaining bottle and cut into strips of 7 cm, not reaching the end. The blanks for the middle must first be painted yellow and twisted together (finished after complete drying). We insert the core into the neck of the water lily and fix it with super glue or silicone. A water lily from a plastic bottle by this stage should already be painted in white color (or leave it completely transparent, then you don't need to paint the core either). And it is recommended to cut the core so that it is not so long. As an addition, you can make leaves for the flower. One of the options is to make them out of linoleum, but if you wish, you can also use plastic. If you decide to make leaves from plastic bottles, you must attach them at the first stage of assembling the product. Also, a water lily can be made from paper, from plastic spoons and from other improvised means. It all depends on your imagination. 
A small afterword
A water lily from a plastic bottle is a very original craft, which, as we can see, will not take much time and will not require a significant investment of money. The technology is very simple and it is quite easy to make a flower. As a result, you will get a wonderful creation, made with your own hands and with great love. The water lily can be placed in or just on the lawn, in principle, anywhere, it depends on your creative idea.
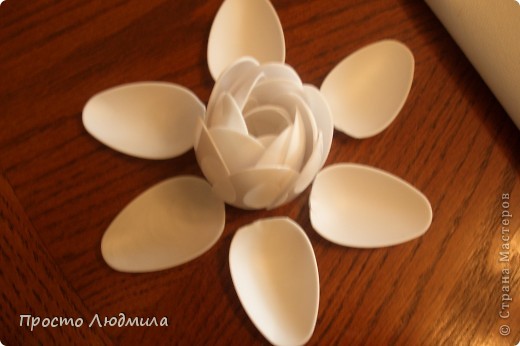
Single spoons different sizes became the material for work. It took me 6 small spoons and 30 large ones for one flower.
Stamens
I cut out the yellow egg cells, slightly twisted them with the help
knife, and from the bottom of the disposable plate - the bottom of the flower.
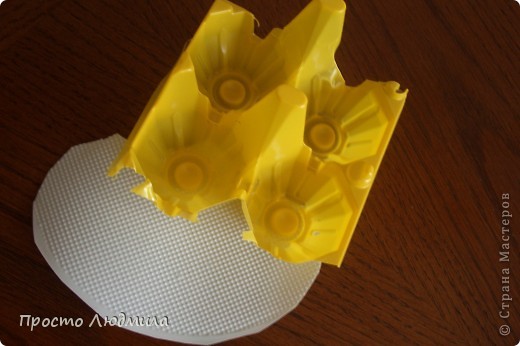
The spoon handles are easily cut with kitchen scissors.
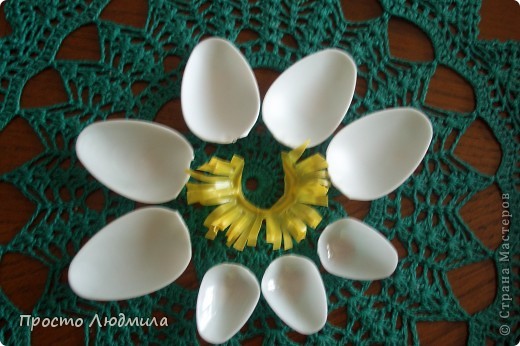
The first
a row is assembled from six small spoons using hot glue
pistol. In fact, a water lily has 8 petals in one row,
collected crosswise. I tried to do it right, but then
the flower turns out to be very open and flat - I liked the other
option that I present.
Further...
Five rows are assembled from large spoons, petals are stacked
alternately, the sixth petal starts up behind the first, so the first
the petal needs to be greased with glue only on one side. I folded them
left-right, then glued the first petal only with the right side.
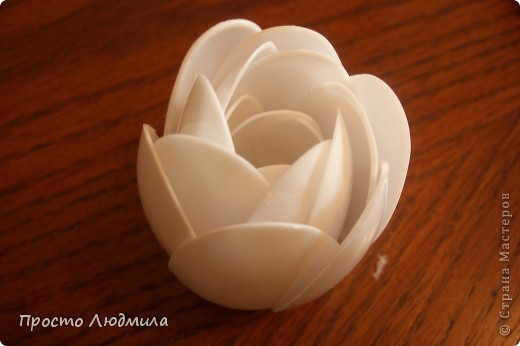
FROM
each row needs to change the angle of inclination of the petals so that the flower
"opened" and at the end of the row put on a flat surface,
checking if it turns out.
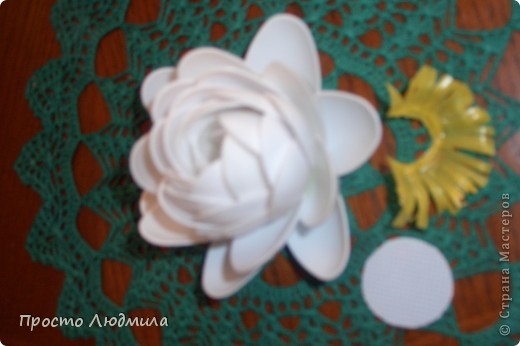
And the last step: glue the bottom to close the hole in the center
flower. Twist the stamens and insert from above. They do not need to be fixed, they
they themselves will occupy the entire provided volume and will not fall out.
Here's the result ... There are many different uses for this product.

I
made a sheet of green plastic folder for papers for the water lily,
pressed veins on it, glued a water lily and transparent beads -
droplets of water. I want to make a wreath, but I don't know what else is there yet
add. Maybe you can advise me, I will be glad to new ideas. Good luck,
I will be pleased if you like my water lily. With pleasure
I will answer the questions.
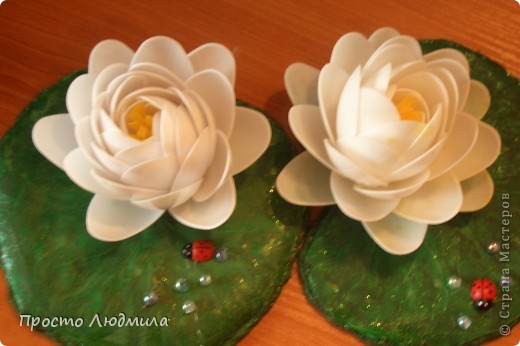
These flowers float on the water, do not sink or get wet. The flower core is made of foam.
Water lilies from plastic bottles (master class) 
-
made easy and simple, but just charming! By them you
you can decorate the shore of your makeshift pond or even
put into a reservoir. And most importantly in our step by step guide (14
steps), even a child can take them.
We need:
3 bottles - two - 2L, one - 1.5L
1 bottle cap
Scissors
Spray paint
Step 1. Trim the bottles approximately as shown in the picture.
Council. Take bottles with approximately the same width at the neck, they differ and then they may not fit during assembly. 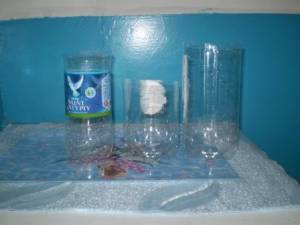
Step 2. We have got blanks from which we will make water lilies. 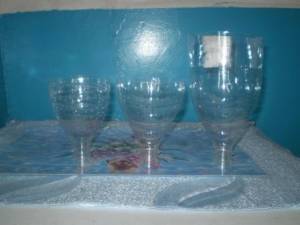
Step 3. Cut the petals, leaving a small gap between them. 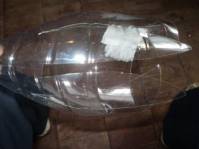
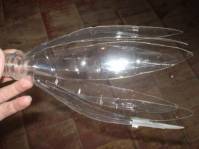
Step 4. Cut off the neck of the bottle. 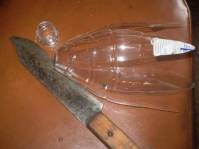
Step 5. Trying on whether the lower part of the petals will fit into the neck. 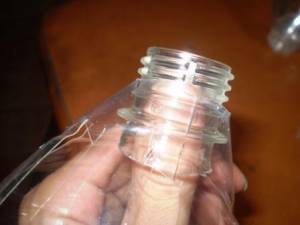
Step 6. Bend the petals of the water lily slightly. 
Step 7. Repeat procedure 1-6 with the second workpiece. For the third piece (I made it from a 1.5 liter bottle), skip step 5.
Step 8. Layer assembly order 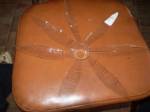

Step 9.Now we first string a blank with long petals on the neck, then medium and the last one with not bent petals. 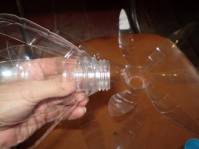
Step 10.We tighten the neck with a bottle cap. 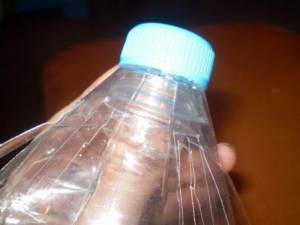
Step 11.Now you need to straighten the petals of the water lily. 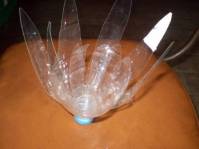
Step 12.We make
the core. Cut out the middle of the bottle and cut into small
strips of about 7-8 cm. Cut the rest as in the photo. 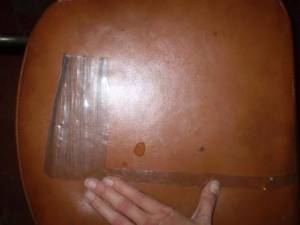
Step 13.We paint the core blanks. 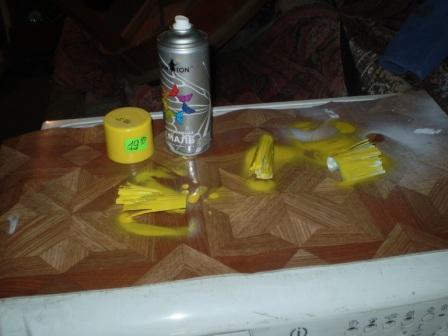

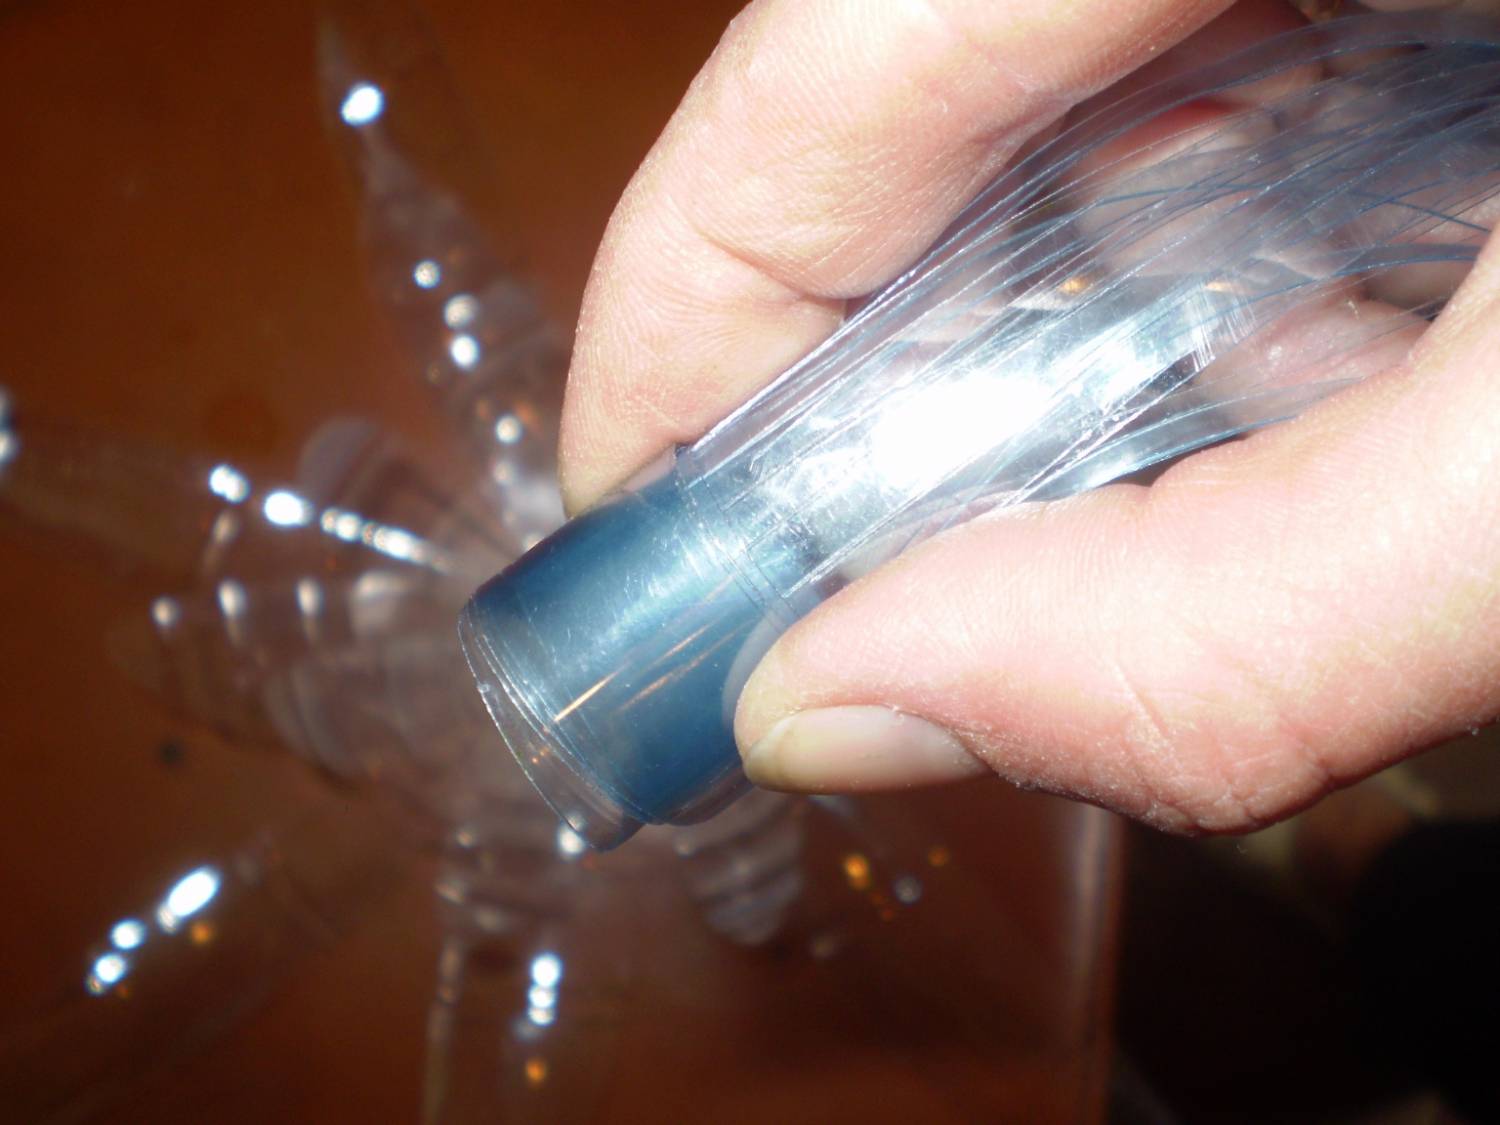
Step 14.Twist the core blank and insert the water lilies into the neck. You can glue the core onto silicone or super glue. 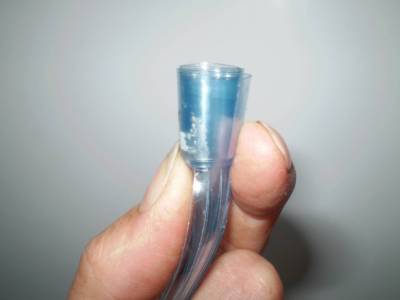
Step 15.Paint
water lily spray paint. Leave to ventilate, preferably on
outdoors until the paint stops smelling.
Council.
It is advisable to cut the core (about half) and paint in
yellow for more resemblance to a real water lily before you
insert it into the workpiece.
Paper is one of the most difficult and capricious materials to work with. That is why the masters love to work with her so much - the result is always worth the effort. Two sources of inspiration - material and nature, can be combined in one creation. An artificial water lily made of paper with his own hands will delight any master with the fact that he was able to repeat the unsurpassed example of the work of nature in paper.
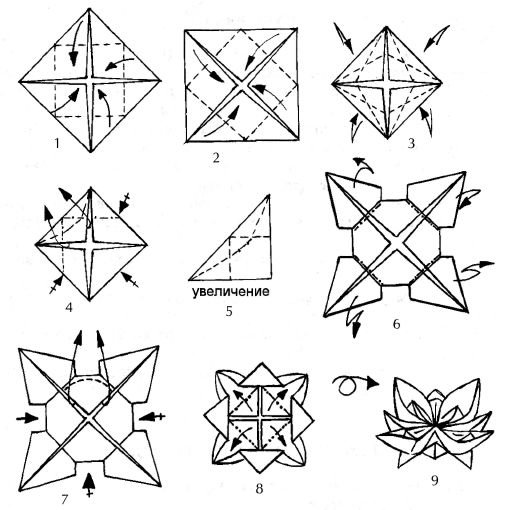
Water lily folding techniques
Modular origami
Using different techniques, you can layer water lilies that are not inferior in beauty to the real ones.
The most common option, however, is not the easiest, making a flower using the origami technique.
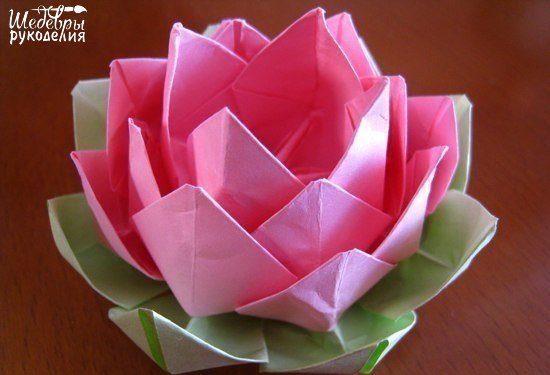
To fold the water lily, as in the photo, you will need:
- 4 sheets of A4 paper (red or pink);
- 2 sheets of A4 paper (green);
- a piece of wire.
A sheet of paper of the main color (this is red or pink) is divided into 4 even parts, located in width. To do this, you need to use a ruler and a simple pencil. The drawn lines are cut with scissors.
Now the strips of paper are folded in half in the longitudinal direction, that is, along the length. Then the corners and long sides of the strip are folded.
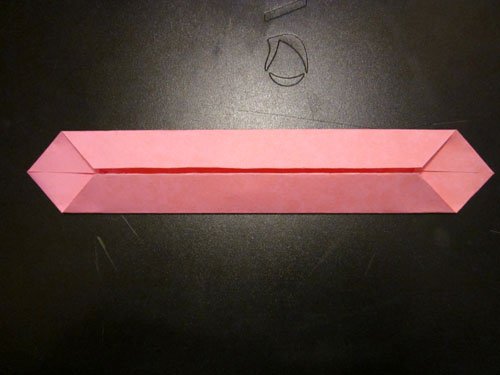
Now the resulting workpiece needs to be carefully bent along the fold in the middle in the other direction, outward, as if folded in half.
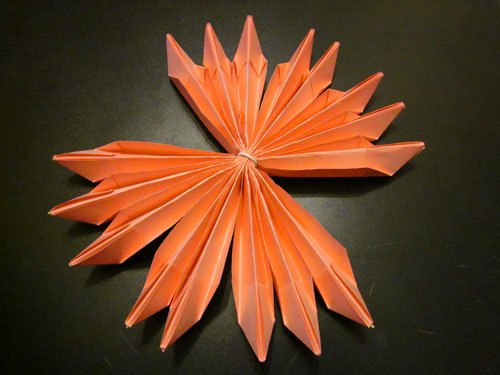
All 16 pieces of colored sheets, both red and green, must thus be prepared for further work. Only one, the very last green piece, needs to be turned not outward, but on the contrary - inward.
Now work begins with the module failures.
To do this, two red ones are superimposed on the green blank.
There are exactly 8 such sets to be made, just using all the parts prepared earlier.
All modules fit tightly to each other.
The middle is fastened with wire, carefully wrapping the center several times, and fastening the ends of the wire and carefully cutting it off. The workpieces are straightened. In order to straighten it evenly, you can use the wire as a support, pressing on it while bending the leaves and forming a circle.
Now you need to straighten the middle of the future petals. For this, the inner layer of the sheet is folded inward. The depth and height of the bend can be adjusted at your discretion. The main thing is to do it carefully, so that if something needed to be corrected, it could be done without leaving creases on the paper.
The second layer of petals is bent in the same way. They should fit more or less tightly to the previous one. The bottom of the workpiece, where there will be green leaves, is straightened in the same way.
If the leaves are not spread evenly, making the folds more or less, then the water lily will look even more like a real one.
Classic origami
To make a snowflake using the classical technique, you need to bend a sheet of paper strictly along the lines shown in the diagram. The diagram is detailed and clearly shows the directions of the folds with arrows. However, it will be more convenient for beginners to familiarize themselves with the description of addition.
- At the beginning of work, an initial form is made from a sheet of paper, which is called "Pancake".
A square sheet of paper (this is important, the sides must necessarily be equal to each other, otherwise the flower cannot be folded) folds diagonally. The lines of intersection of the diagonals are well smoothed with a ruler or the back of the nail. Each corner of the vertex folds in the direction of the center, with the vertex to the other corners.
- After that, all the corners of the workpiece are folded towards the center point.
- The same corners are folded again, and again towards the middle.
- It is necessary to outline all the lines. To do this, the sides of the triangle are bent in the opposite direction, towards the middle.
- All corners of the flower blank are bent "mountain". Before this, bends are made along the lines so that the corners are turned out.
- The petals are also folded back with a "mountain", while outlining the folds. The workpiece turns over and the petal pockets seem to be flattened. To do this, you need to press them well.
- The workpiece is turned over again. The inner corners are folded back with a "valley". To do this, they are turned outward.
- In the same way, it is necessary to open all the corners of the inner pancake.
- The workpiece is turned over again. If desired, you can draw out additional corners - petals. This will give the water lily a more natural and open look.
The resulting flower can be used as a table decor, to decorate a room with it, or as a craft for a child.
More ideas can be found in the video tutorials on the topic of the article.
Related videos
The use of plastic bottles for the manufacture of various crafts is not at all new and, moreover, very popular. What our craftsmen, especially amateur gardeners, do not make of them, decorating their personal plots. Many of us also used plastic bottles not only for household purposes, but also for creative purposes. Although it is difficult to surprise someone with crafts from plastic bottles for summer cottages, nevertheless, new ideas always arouse interest. This material it is considered waste and it does not require material costs, but you can make a useful and original thing from it. An important advantage of plastic, together with its low cost, is its strength and ductility. In our article, we will focus on such a product made from plastic bottles as a water lily. It is her summer residents who are often planted in decorative ponds. Water lilies are not in vain popular, because they bloom very beautifully above the water surface among the mass of large floating leaves. That is why there are no indifferent people to a water lily with large petals and a wide variety of colors. And plastic water lilies are a worthy alternative to water lilies, since such flowers are the highlight of the garden plot, regardless of the season.
Video: "How to make a water lily from a plastic bottle with your own hands"
So, in order to make a water lily for a garden from a plastic bottle with our own hands, we need:- 3 bottles (two 2-liter and one 1.5-liter);
- 1 plastic bottle cap;
- Special paint in a spray can;
- Scissors.
Master class with photo
1. The upper part of the prepared plastic bottles should be cut off by about 8-10 cm. It is better to take all bottles with the same neck width, because if they differ, they may not fit when assembling the flower. 2. Thus, you should get blanks from which the water lilies will be made. 3. Now carefully cut the petals, leaving a small gap between them. 4. Also carefully cut off the neck of the plastic bottle. 5. Now you need to try on. The bottom of the petals should fit into the neck. 6. Bend the petals of the water lily slightly. 7. And so you need to do with the second workpiece (from 1-6 points). 8. Working with the third workpiece, skip step 5. The order of assembling the layers of the flower should be as follows:- First, you need to put on a blank with the longest petals on the neck. The next is a blank with medium petals, and the last one with leaves not bent;
- Now carefully screw the neck of the bottle with the prepared cap;
- Carefully smooth out all the plastic petals of the made decorative water lily;
 You can attach this flower part to both super-glue and silicone. The whole water lily you also need to paint it with spray paint, and you can use not only its white color, but also pink. The product should be left in a ventilated area or outdoors until the paint is completely dry and no longer "smell". Another important tip: cut the core (in half) and paint it exactly yellow. This will ensure the most similarity of the plastic flower for the garden with a real water lily.


