Hot or cold forging is the most expensive and beautiful way to process metal. The material takes on the necessary forms, interior items are created from it, building construction... The gates, which are made of artistic forged elements, are durable, beautiful and reliable.

Unfortunately, forging is a rather expensive type of metal processing, so not many can please themselves with custom-made products. But there is a way out - to master cold forging yourself.

Types of forging
Hot


In this method, the metal is heated to a temperature at which the material becomes pliable and soft. This is followed by mechanical processing of metal by stamping, manual or hydraulic forging. This method of metal processing is very complex, laborious, and requires special tools and knowledge of the physical and mechanical properties of the metal.

A simpler, but no less laborious method of metal processing without heating. In cold forging, metal bends under great pressure. To carry out cold forging of metal, special tools are required.

Protective structures
This type of fence can be safely called a budget option. All forging elements are stamped. The frame and stiffeners are made of thick metal, the stamping elements are also not distinguished by their elegance and beauty. Strong and powerful gates fulfill their main function - the protection of personal territory.

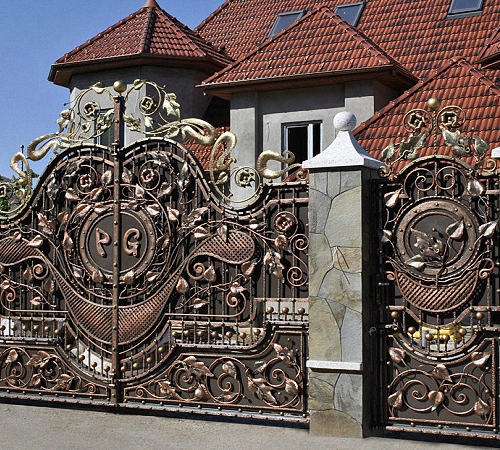
These designs can be safely called an exclusive piece of art. Most often, this type of gate is made to order according to individual drawings. All sash elements are handmade using hot forging. An unusual type of gate is primarily a decoration of the territory.
Combined gates
This type of construction combines artistic forging and stamped elements, thanks to which you can become the owner of exclusive, durable and beautiful gates for an affordable price.

The doors, made of cold forged elements, represent a prefabricated structure, where all parts are welded together. The elements themselves can be purchased ready-made or made yourself.

It is important to know that the manufacture of gates with swing sections is divided into 7 stages.
- Drawing development.
- The choice of material and tool.
- Installation of support pillars.
- Sash frame manufacturing.
- Manufacturing of forging elements for filling the sash.
- Fasteners for fittings and decorative ornaments.
- Painting of structures.
How to make a drawing or choose a gate design
On this stage work is required to be guided by two rules: the gate must be durable and reliable, and the design must be distinguished by beauty and originality. It is not difficult to combine these criteria.
It is important to consider the geometry of the sash. The shape can be any: from the classic square, to exclusive, with broken top lines, radius or ellipse. Also important are the height and width of the structure, the location of the stiffeners, the selection of fittings, the distance between the forging elements. It is advisable to make the crate of the gate so that people or animals cannot enter the territory through the bars.
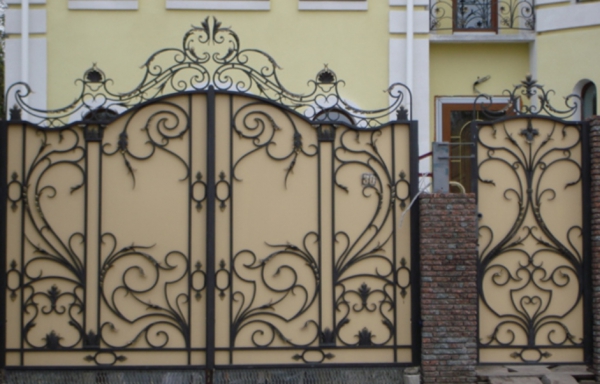
Some models of gates are supplemented with blank iron sheets, on top of which are adorned with forged elements. Blind gates with forging elements look beautiful and obscure the view of the site from the street side.
Material and tool for making blind forged gates
- Electric welding machine for finishing welding.
- Gas welding machine for spot welding.
- Strong vise, secured to a level surface.
- Curved yews with long arm.
- A set of electrodes.
- Grinder with a disc for grinding and polishing metal.
- Materials for creating a structure
- Support posts.
- Mortar for pouring pillars.
- Bricks.
- Profile tube for sash frame
- Steel sheets for blind filling, material thickness not less than 1 mm.
- Sheet steel for making forged lances with sharp points.
- Squares to create the base of the peak. The width of the ends is 1.4 mm. If you use thicker workpieces, it will be more difficult to twist them into a spiral. Workpieces with a smaller edge width can break during the twisting process.
As can be seen from the description of the material used, the design of the gate differs in the Gothic style: the blind filling of the leaves, on top of which peaks are attached on the front side, with sharp tips. The gate will have a stylish, unusual and unapproachable look.

Since the steel structure of the sash is quite heavy, the support posts must be reliable. Support posts require a metal pipe with a diameter of at least 25 cm, as well as facing bricks.
Step 1
It is required to mark the position of the pillars. At the same time, do not forget that metal structures will be bricked in the future. Therefore, it is advisable to calculate the thickness of the material in advance.
Step 2
To fix the pillars, you need to dig two deep holes, at least a meter deep. The width of the pit should not exceed the diameter of the metal pipe by 10 cm. Otherwise, the post may be skewed after hanging a heavy sash.

Step 3
The steel pipe must be inserted into the pit and covered with rubble. It is advisable to compact the crushed stone tightly. The pipe must be level, otherwise there will be problems with opening and closing the gate leaves.
Step 4
Pouring rubble. For these purposes, it is required to dilute cement and sand in proportions of 1 to 3, mix thoroughly. Then the dry mixture is diluted with water. The solution should be liquid and homogeneous.
Step 5
The resulting mixture is poured into pits with rubble. The position of the post is checked again. The solution dries for several days.
Step 6
Welding to the posts of the shank - fastening on which the back curtains for the sash will be located. The shank should be at least 6-7 cm wide and protrude from under the bricks. If the gate wings are too heavy, it is recommended to weld 3 bars to each post at the same distance.
Step 7
Reinforced pillars are required to be bricked. Bricks are laid with a trowel. Vertical joints between bricks should not be adjacent.


The sash construction will be standard - rectangular frames filled with steel sheets.

Step 1
The choice of the place where the frame for the gate leaves will be welded. It is important that the surface is absolutely flat, otherwise the frame will twist.
Step 2
The profile is cut into the blanks of the required size. When cutting metal, it is important to observe the geometry of the corners along which the weld will pass.
Step 3
The workpieces laid out on a flat surface are tacked by spot welding. Then a control measurement of all structural elements is carried out and the frame is checked for deformation and distortion.
Step 4
If everything is in order, then you can proceed to the finishing welding of the elements. Clamps can be used to rigidly attach the profile for fillet welding. Then, with the help of a grinder, you should clean out all the nodules at the seams.
Step 5
Fastening of blank steel sheets. Steel sheets, cut to fit the frame, are laid inside the profile and welded along the perimeter. The seams are cleaned. The draft of the sashes is ready.
Manufacturing of cold forging elements

Step 1
Steel strips with a thickness of 4-5 mm, having a width of at least 6 cm, are cut into 15 cm pieces. Then, lines are drawn on the steel fragments along which the upper corners need to be cut.
Step 2
With the help of a grinder, the steel is cut according to the marks. It turns out long triangles with a pointed top.

Step 3
Giving the workpiece a visual volume. To do this, using a grinder and an emery disc, the edges of the peak are processed. The element gains shape: a pointed top, thin corners and a thick middle.
To decorate a fence, many of these elements are required. It is important to cut one piece at a time so that the peaks are the same size and shape.
Base peak

For these purposes, tetrahedral steel is required. To decorate the gate, you can use a different length of rod with sharp points. For example, using pointed peaks, create a visual radius on closed gate leaves.
Step 1
The metal rod is cut to size. Since the peaks will be mounted mirrored, it is required to carefully consider the size of each element so that the overall structure looks perfect.

Step 2
Marking on a rod. If the turns are located after 15 cm, then you need to mark these segments with a pencil. Then you should start twisting the turns.
Step 3
A rod is clamped into a stationary large vice at the zero mark. In the curved yews, the same rod is fixed at the 15 cm mark. Then you need to turn the yews one turn. One loop is ready. You can make several turns on one segment. The main thing is that the mirror bases of the peak are symmetrical, and there is an equal number of turns along the entire length at the same distance.
In this way, all square workpieces are processed.
Step 4
Then all the decorative elements are assembled. Peak bases are welded with sharp tips.
Gate structure assembly

All decorative ornaments are welded to the front gates according to the scheme. It is important that the location of the peaks is symmetrical on the two valves. On the steel sheets of the sashes themselves, you can arrange forging elements in the form of curls or ornaments. These are rather complex parts, it is best to purchase them ready-made.
Then you need to weld the hinges to the ends of the flaps. They should be located at the same distance as the response loops on the posts. The two lower hinges are welded in one direction, then the sashes are hung. The uppermost hinge is attached in the opposite direction and welded to the hanging structures. This is so that the sashes cannot be removed.
At the junction of the shutters, brackets for the lock are welded on the back side. You can also use more modern locking hardware. This is the choice of the gate owner.
Gate painting
All steel elements must be carefully treated with an anti-corrosion coating. White bloom that appears after treatment must be removed with a dry cloth. Then you can start finishing painting the structure. Modern covering materials not only protect the metal, but also decorate it. The gate can be stylized in antique style by covering them with bronze paint or highlighting elements of forging with gold.
It is important to know that every few years the gate structure needs to be cleaned and repainted.

If you do not want to engage in the manufacture of forging elements yourself, you can simplify the manufacture of gates by ordering all the parts from specialized firms.
This method of making a gate can be safely called amateur: you just need to create or use a ready-made design drawing, calculate the number of required elements, order and independently assemble the gate structure using gas or electric welding.
Homemade gate will become a real decoration of any site, it is also worth noting their reliability, strength and safety.

Video - Manufacturing of forged elements and assembly of the gate structure. Do-it-yourself wrought iron gates
Bending and forging remain among the most highly artistic ways of decorating metal products. Since ancient times, furniture and interior items, fences and hedges, wickets and gates have been decorated with openwork metal curls. Metal or wooden gates with forged elements look sleeker and lighter. And just as a theater begins with a coat rack, a landscaped courtyard of a private household begins with a patterned gate. Such gates can be made by yourself so that they become the hallmark of your home.
Where to start when making your own forged gates?
Mastering blacksmithing, bending, forging and getting basic skills of a welder would be interesting for any home craftsman with an artistic taste. Moreover, it always makes sense to learn it, since metalwork is a profitable and exciting business.

You can start by making the simplest gratings or decorating with finished metal items. And then the whole courtyard can be decorated with intricate metal patterns:
- bench and gazebo;
- grilles for windows;
- porch and veranda;
- wicket and garage Doors swing forged.
All these products can be made in a common design or each time create new, more original masterpieces. Today it is very profitable to have such skills, since the same work on order will cost several times more.
Tip: If you already have some of these skills, don't be afraid to get started, learn the rest as you go. Today, all master classes and a detailed video at the end of the article are freely available.

1st Option - we work with ready-made gates
If you have a desire to do this business seriously, it is better to start with finished products. For example, it makes sense to start renovating your old metal gates with a wicket. To work for a while, you will have to remove them from the hinges to give the metal products a new look.
Before decorating the gate with forging and bending, they must be cleaned of dirt and rust, remove old paint using special nozzles of a grinder or a universal tool. You can sketch the new gate yourself or use the ready-made samples presented on our website - a photo of a wrought-iron gate.

Ready-made illustrations are always useful, even if the home master has an art education. This is due to the specific properties of the metal, so not all ideas are easy to implement without reading the best works folk craftsmen. Experts also recommend looking at ready-made elements for forged gates:
forging and bending elements:
- in the construction market;
- in the blacksmith shop;
- in a construction supermarket;
- on internet catalogs.
Some of the elements that might come in handy can be found in your yard or garage, something will fit in the form of basic or auxiliary elements. For example, large nuts are suitable as centerpieces for rosettes or handmade fantasy flowers. Small steel rings and cuttings from thick steel bars can also be useful.
It is recommended to paint the finished forged gates with patterns after completion of the work to give them a complete look. Therefore, it is worth considering this technique for decorating metal products.
Tip: White, gold and silver openwork elements on a black background of the gate look very elegant. Painting will also hide the dross and all work errors. For painting metal, use only a specialized primer and paint.
All these ideas will come in handy for creating a preliminary sketch of the gate with new decoration... You can make several sketches of patterns on the gate, so that the most interesting one can be approved with relatives and friends. There are 3 options for developing a sketch of a forged gate:
- take a ready-made sample and select and make all the fragments for it;
- make an author's drawing based on improvised materials with the addition of several ready-made elements;
- purchase the elements of forging you like and, on their basis, make 2-3 options for decorating the gate.

Tip: If the sketch, none of the sketch is impressive, and it is difficult to estimate what the finished gate will be like, lay out a pattern of ready-made elements on the floor to see the decor in full size. Probably, you will want to change something, and this is much better than being disappointed after welding and trying to redo something.
Self-made ornament against the background of the factory gate has many options, since human imagination is limitless. When the final version is approved, it remains to weld the forging and bending elements to the leaf and gates of the gate by spot welding. After cooling down with a grinder, correct welds on the gratings, on the sheet metal, defects are more difficult to eliminate, they will be hidden by painting.
Do not rush to hang the renovated gates on the hinges - this way it is more convenient to treat them with a metal primer and paint them with a special paint. It will be possible to paint over several elements on a single-colored gate later, after hanging the gate.
The so-called blacksmith's patina will be a spectacular decoration of swing metal gates with wrought iron elements. The use of metal patina will give the product an exclusive look, and will favorably emphasize homemade or purchased forged parts.
Attention: When decorating a gate with forged elements, do not overdo it and unnecessarily weight the product. It is better to make a graceful openwork pattern, which will visually give lightness and will not create additional stress on the hinges and gate supports.

2nd Option - we make forged gates ourselves
For those who have basic skills in working with a welding machine and know how to cut metal, it is worth deciding to make patterned forged gates with their own hands. Quite complex forged-welded gates with bent overlays are quite realistic to do with your own hands. From materials you will need:
- metal corner for frame construction;
- sheet metal for the closed part of the gate;
- round and square metal blanks;
- hinged hinges for gates;
- forged overlays for patterned finishing.
As described in the previous section, you can make them yourself or buy ready-made ones, as well as order from a blacksmith's or workshop. In retail, they come in a standard set, as shown:
All these curls and curly onlays will easily decorate the finished product. Self-production of wrought iron gates presupposes possession of certain skills, but there is nothing complicated about it. First, you have to choose a type of gate, and it is desirable that they have a wicket made in the same key. Finished metal gates have their own varieties:
- lattice, completely openwork;
- partially closed (with a metal backdrop) and decorations;
- lattice (with bent decorations);
- partially metal with wooden inserts;
- metal with forging and a wooden backdrop.
The exclusive design of such gates, in which all the skill and creativity is invested, always leave an indelible impression on passers-by and delight in aesthetics. At first glance, it seems that such beauty cannot be repeated, but if you use ready-made illustrations and do everything in stages, patiently observing the technology, everything will work out.
Yes, designers have more imagination and creative ideas, but no one offers to surpass masterpieces, it is enough to borrow good ideas... Or at least try to make the option that is technologically available. You can also use ready-made drawings of forged gates, only slightly adapting them to your conditions.
Paradoxically, iron is a ductile material that is ideal for many creative ideas. A drawing on a wrought-iron gate can be:
- geometric;
- fancy;
- abstract;
- with plant elements (grapes, flowers);
- with fragments characteristic of some styles (the "whip blow" from Art Nouveau);
- featuring animals, birds, characters.
Some forged elements can be part of the structure, while others can be used as shaped overlays on forged gates. You can also use a ready-made device for artistic bending of metal blanks - photo:

Mastering the basics of blacksmithing
You can start making forged gates with your own hands after:
- sample selected;
- a sketch of the future forged gate with a wicket is ready;
- there are drawings with exact dimensions;
- all elements of forging and their quantity are outlined;
- material for the manufacture of the base and finishing was purchased.
You will need:
- sheet metal for the backdrop (if any);
- corner for the gate frame;
- metal rod for bent parts;
- blanks for forging.
Cutting of sheet metal and pieces for decorating gates and wickets is made with the appropriate tool exactly to size.
Attention: It is difficult to accurately determine the length of the segments for bent and twisted parts. Therefore, it makes sense to make control samples from wire, and make the rest of the curly overlays according to their sizes. Further, according to the drawings, the frame of the gate and wicket is made.
Attention:
1. The dimensions of the corner segments must be accurate so that there are no deformations overall designotherwise there will be problems with their use. If the corner and the workpieces are thin enough, make sure that the frame does not "lead", this defect is then very difficult to fix.
2. The gate and wicket must be hinged at the top and bottom, exactly vertically, otherwise they will open spontaneously under their own weight!

Features of cutting metal blanks:
- at home, cut in the yard with a grinder with a special disc;
- you can use the services of a workshop or workshop where there is a metal cutting machine or other tool;
- for sheet iron, a grinder and a jigsaw with a metal file are used - for figured fragments;
- thin sheets (tin) are cut with scissors for metal.
The finished elements are welded in the form of a lattice or pattern to the frame of future gates with a welding machine.
Attention: Any product has a front and back side, the gate is installed with the front side facing the street! Weld seams are cleaned with a grinder.
The base on which the gate with a wicket will be mounted must be very strong. As a rule, use metal pipes or poles that can support a large weight of metal.
For the manufacture of forged parts for gates at home, they use a compact forge forge, which can be rented for several days - fig .:
You will also need piercing pins, a vise, an anvil and a blacksmith tongs to hold hot parts.
Red-hot workpieces are given the required shape with a special hammer on the anvil. You will also need different sized forging hammers.

For artistic bending, a special device is used, which can also be rented. This will help curl the prepared pieces of metal.
A forge is needed to maintain high temperatureto heat the metal to a plastic state, after which it lends itself to forging. When working with such equipment, be sure to use special protective clothing. The finished parts are joined by welding.
Blacksmith skills can be learned from the video at the end of the article.
Use of ready-made elements of forging and other decor
If your garage doors are reliable enough, but there is a desire to decorate them with forging elements, the easiest way is to buy ready-made ones. If there are few carved decorations, then there is no point in removing heavy metal gates from their hinges.
In specialized stores you can buy:
- ready-made inserts;
- graceful grilles;
- solid ornaments;
- curls;
- peaks;
- rings;
- ruffles;
- fancy forging elements.

After all the elements are welded into place, the gate is left closed for a day for a day. Further, the metal must be protected from corrosion and the destructive effects of weather factors. Painting with special metal enamels will make the gate more beautiful and hide minor welding defects.
The finished product must be primed before painting, preferably from a spray bottle. The gate can be painted in any color, depending on the overall design task - from white to black. Forging elements can be highlighted in a separate shade, for example, bronze powder is added to brown paint, and silver is added to gray paint to achieve a certain effect.
A house always begins with a gate, and they should not only provide security, but also be a kind of visiting card of the owners. Forged gates are considered the most beautiful and durable, but they are, accordingly, one of the most expensive. You can order such a gate from a workshop, but turnkey work will be expensive, and most likely, they will be made from blanks that are sold in any building materials store. And the bulk of the costs will fall on the assembly and welding of finished elements. A reasonable and zealous owner will be able to make wrought-iron swing gates with his own hands, and thereby save a significant amount of money. There are often photos of wrought iron gates on the Internet that are made by amateur craftsmen, and they look pretty good.
Before deciding on any type of gate, their specifications are usually studied. Swing wrought iron gates have their pros and cons.
The advantages are:
- Aesthetic and respectable look;
- Simple and durable construction;
- Durability;
- Ease of maintenance;
- Large selection of design;
- Possibility of installing wickets and automation;
- Do not require concreting of the site;
- The need for space for opening and closing;
- Increased wind load due to the large sash area.
Obviously, the advantages of this type of gate are much greater, and the disadvantages are not at all critical. The popularity of this type of gate confirms their fundamental nature.
Such gates consist of a forged part and a metal sheet.
However, it should be noted that fully forged gates will cost more than welded ones decorated with forged elements.
There are two ways to create a gate - professional and amateur. In the first case, all parts of the forged gate are made independently, for which you need to know how to work with metal. In the second case, you only need tools, ready-made metal elements and manufacturing instructions. The amateur method of making a gate does not require special knowledge and training, but even an amateur should be able to use a welding machine, clean seams and prepare metal for work. Accordingly, you need a welding machine and electrodes. You also need a drawing that you can draw yourself or copy from a ready-made version. After that, the number of forged items, including corners, rod or sheet metal, is counted and purchased at a building materials store.
Design features
The key principle of arrangement swing gates does not depend on finishes and materials. Therefore, no matter how they look, the initial manufacturing process will be standard.
Gate types
The main differences between forged gates are in the materials of execution.

In addition, the gates differ in type and are:
- Single leaf.
- Bivalve.
- Bivalves with a wicket.
Do-it-yourself combined gates made of profiled sheet with forged elements
Consider the process of making a gate from a profiled sheet with forged decorative elements... Their design is as follows:
- Racks (pillars) that act as supports for fastening the door leaf. They should be selected based on the weight of the future gate.
- Metal or wood frame. The most commonly used profile pipe is 60x40x1.5 or 40x20x1.5.
- Finished metal products - profiled sheet of at least 2 mm, rod or reinforcement, corners, forged elements.
- Hinges (adjustable or non-adjustable). The main thing is that they can withstand the weight of the gate.
- Locks or locks.
Important! If the weight of the product is from 150 kg and below, then the pipe should be 80x80x4; for a weight of 150 to 300 kg - 10x100x5; above 300 kg - 140x104x5.
Racks are made of concrete, brick or even wood. The main thing is to take into account the expected load. In the process of building brick supports, they must be reinforced with metal reinforcement. The foundation for the rack will have to be concreted to a depth of at least 1 meter. A corner or reinforcement inside the opening for attaching the racks is necessarily produced from the brick support.
Concrete supports are made from a mixture of cement, sand and fine gravel 1 to 4 and 25% water. The poured supports must stand for a week or two so that the concrete hardens and can be worked with.

Metal supports are concreted to a depth of at least one meter
Metal supports, even reinforced with mortar, can be bricked for reliability.
The frame is a rigid welded structure made of shaped pipe with internal steel frame to support rectangular... It must necessarily include special mortgages for the subsequent fastening of the skin. In this case, the frame and skin must be one piece without gaps or protrusions.
Tools for work
- Building level
- Welding machine
- Drill
- Drill
- Dowel
- Electrodes
- Bulgarian
- Grinding and cutting discs
- A hammer
- Shovel
- Roulette
- Master OK
- Corner
- Spray gun
- Riveter and rivets (if necessary)
Materials for work
- Anti-corrosion primer
- Thinner or gasoline
- Frame and canvas paint.
Material calculation
The calculation formula is standard. It is necessary to measure the width of the opening and its height, taking into account the technical clearance. From asphalt it is 5–7 cm, and from uneven grassy or earthy soil - 10 cm.

Gate size diagram
Important! The technical clearance also reduces the wind load!
The frame should be oriented to the size of the finishing material. This will make it possible to avoid joining seams on the face of the web. All numbers are applied to the drawing, which makes it easier to count.
Step-by-step guide for the manufacture and installation of the door leaf
Step 1. Drawing creation. Samples can be found online. If you have little experience in welding, then it is better to choose a simpler design project.
Step 2. Preparation of pipes. First of all, rust and oil contamination is removed from them. This is best done with a grinder with a brush attachment or grinder. Cleaned pipes are thoroughly degreased with gasoline or solvent. Next, an anti-corrosion primer is applied to them. The pipes are cut at an angle of 45.
Step 3. Welding the frame. After checking the internal dimensions and comparing the diagonals, the frame is welded. Welding of the frame is carried out with tacks of two centimeters with a distance of 25 cm between them. Triangles - "kerchiefs" are welded in the corners to make the structure rigid.
Step 4. Grinding the welds.
Step 5. Priming and painting the frame.
Step 6. Preparing the door leaf. First, a profiled sheet is cut with metal scissors or a grinder or a metal sheet is prepared. Advice! It is better to cut from the front side so that the edge is smoother.Further, the assembly of elements for the door leaf is carried out in accordance with the picture.
Step 7. Welding of all forged elements to each other (or welding them to the profiled sheet). The seams should be thin and inconspicuous.
Step 8. Cleaning and processing of seams. The scale at the welding sites is removed, the metal is primed and painted.
Step 9. Sewing the finished door leaf. For this, the sheets are laid on the frame part and welded at all points of contact. The profiled sheet can also be fastened with metal screws or rivets. Important! The canvas is fixed at a distance of 5–7 cm from the ground.
Step 10. Fastening the hinges to the posts and the door leaf by welding. The distance between the post and the gate should not be more than 2–3 mm. If the posts are brick or concrete, then the hinges are attached to metal posts attached to the base with dowels.
Step 11. Installation of shutters on hinges and installation of locks or bolts.
The profiled sheet can not only be decorated with forging from above, but also metal patterns can be placed directly on the canvas and fixed by welding. Important! No seams should be visible! First, large, and then small elements are welded!
Professional method or self-forging
For work, in addition to sheet metal and pipes, you will need a forge, oven or any other source of open flame.
Tools for work
- forge or oven;
- anvil for forging;
- pliers to take hot parts;
- hammers and hammers of various sizes;
- powerful clamping vice;
- machines and devices for bending and twisting of reinforcement;
- breakdowns for making holes;
- welding machine;
- angle grinder (grinder).
Making a peak
Step 1. Pieces in the form of squares or rhombuses are cut from a sheet of metal.
Step 2.Using a grinder, they are adjusted to the required size and shape.
Step 4. The hot metal is transferred to the anvil with tongs and splashed with a hammer. To give the original shape, cuts or notches are made.
Step 5. To temper the product, it is immersed in cold water. You can also wait for natural cooling.

One type of peak
Making spirals
Next, you can make spirals on which the peaks are put on - they look very impressive. This element is made from a square tube. A section of the required size is clamped in a vice, and the second vice is clamped where the turn is planned. The workpiece is heated and begins to scroll, holding it in a vice until it turns completely. When enough spins have been made, a spiral rod is obtained. Important! The number of revolutions on all bars must be the same. The finished and heated spiral is straightened on the anvil.

One type of spiral
Production of round and curved parts
Such parts are made from a sheet of metal with a thickness of 3 millimeters. The image of the element is transferred to the sheet. If the figure is completely round or larger than half a circle, then the workpiece is cut from a pipe of similar size. For figures with an incomplete diameter, reinforcement is used. Important! The reinforcement section should be one third larger! The armature is welded to the door surface at one end and bent manually using a tetrahedron, heated with a burner. Bending is done slowly, with constant tapping to avoid sharp bends. This principle applies to all fixed parts. Until the element matches the sketch, it is not completely welded to the base.

Such patterns often adorn wrought-iron gates.
- In the absence of extra money, it is better to stay on the standard version, which will cost less than the individual one.
- Excessive design will make the product more expensive, so if you need to save money, do not burden the gate with decorative elements.
- The material must comply with GOST, so it is better to purchase raw materials from large manufacturers who buy it in bulk at lower prices.
- The metal of the elements must be resistant to corrosion and mechanical damage.
- The quality of paints and varnishes must also be high. The entire surface of the gate must be painted evenly, therefore it is better to use a spray gun. The use of a roller or brush is undesirable.
- For the manufacture of gates, a profiled sheet with marking C.
- If you buy ball hinges, then the smoothness of the gate will increase, and the noise will decrease.
- Scratches on the profiled sheet are removed with spray paint.
- For heavy forged gates, not two, but three hinges are placed. The lower loop is located 40 cm from the ground.
Related Videos
If you approach the process with special attention and observe all stages of the production of swing gates, then the result will delight even the most demanding taste. As a result, homemade gates will cost much less, and the manufacturing and installation process will take only a few days.
Wrought iron gates and wickets for home and summer cottages are offered to your attention. The catalog of our site contains photos of forged gates, wickets and their detailed characteristics. The price of forged gates is notable for its affordability due to serial production and well-oiled technologies, and the quality meets international standards or even surpasses them in many ways. You can purchase any products in our company at the lowest prices thanks to the joint procurement service. To buy wrought iron gates and gates at a low price is acceptable for people who value their time and money.
Wrought iron gates are what we do with a soul in our production forged gate drawings photos... You can verify this by looking at the photo forged gate drawings photos in our photo gallery - an intricate ornament or a solid gate with a dense forged pattern - we will be happy to select the option you need forged gate drawings photos. forged gate drawings photos are a wonderful decoration for your home, see the pictures. We are glad to welcome you on the website of our company. We will tell you about forged gate drawings photos... If the plot is quite large, then a wrought-iron gate, made in the same style as forged gate drawings photos. forged gate drawings photos serve as excellent protection against various natural phenomena (rain, sun, snow and icicles). Our production of artistic forging is constantly improving, both the methods of manufacturing and the design of metal products. Our experienced craftsmen you will be able to ask a question different forged lattices and forged gate drawings photos.
We work for you at low prices to give you the opportunity to enjoy excellent quality at a great price. Price for forged gate drawings photos - the first thing the buyer pays attention to. There is an opinion that the price for them is very expensive and inaccessible to an ordinary buyer. But, you can buy graceful forged gate drawings photos inexpensively on our website at an affordable cost (from 7000 rubles). As you can see, you can turn your home ownership into a luxurious palace at the lowest price!
Information on wrought iron gates drawings photos
Forged gates do it yourself: photo and video of the process ...
Required knowledge for manufacturing wrought iron gates do it yourself.
Video materials, instructions in the diagrams, tips for painting and selection ...
How to make forged gates do it yourself - Vamzabor.net
Despite the high cost, forged gates can become a decoration
any... Photo beautiful wrought iron gates ... Example forged gate drawing.
Forged gates do it right with your own hands | Door Guide
Video and photo elements you can find in the internet. ... To do
forged gate drawings should be done in advance and calculate the amount


