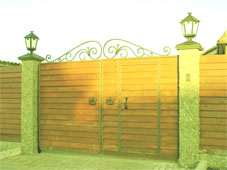
The wicket and gates should not only fulfill the function of protecting the yard, but also be comfortable and decorative. To make them look beautiful and organic, you need to choose the right material, which will also be durable. In addition, the installation technology must be maintained so that the gate does not hang down.
Choice of sizes of wickets and gates
There are no direct rules for choosing sizes. You can take into account the following recommendations for the selection of characteristic linear dimensions.
Gate
The wicket should allow you to simultaneously pass through it without difficulty and not be too wide. The wider the web, the greater the load on the hinges. The optimum width of the wicket is made of corrugated board. Through it it will be possible to bring in furniture and other dimensional items.
![]()
As for the height of the wicket, it should not be higher than 2 meters. If the site is fenced off with a high fence, then the installation of a high wicket will not look good, moreover, a large area of \u200b\u200bmaterial increases the load on the hinges, which can cause the wicket to hang down. If the passage is large, then from the top you can install a crossbar between the posts, which will improve their stability and keep them from distortions.
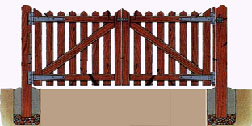
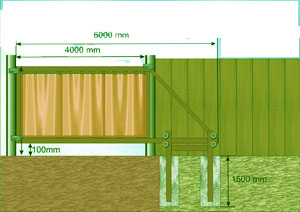
Goal
The width of the gate must be chosen based on what will pass through it. The width of the cars of domestic manufacturers ranges from 1.5 - 1.7 meters, and SUVs reach almost 2 meters in width. Therefore, even on this basis, you need to make the gate at least 2.5 meters wide. It should also be borne in mind that it will not be possible to equip a crossbar over them, because it may be necessary for a larger machine to drive in.
The height of the gate is usually made the same as wickets, or it can be made flush with the installed crossbar.
What material to make a wicket and gate
After the dimensions are determined, it is worth starting to choose the material that will be used to cover the frame of the gate and wicket. More and more gates and fences can be found from corrugated board. So why is she so popular? You can understand this by considering the advantages of corrugated board.
- Corrosion resistant. Manufactured this material made of steel sheet, which is specially treated with a galvanized coating. Due to this, it tolerates well the effects of water, cold and high temperatures.
- Retains color. It is resistant to ultraviolet rays thanks to the painting technology: varnished inside and polymer outside.
- Easy to use. Installation of structures made of corrugated board is carried out in a very short time.
- Decorativeness. A wicket made of corrugated board turns out to be interesting due to the curved structure of the sheet, and a large color gamut of material will allow you to choose it for any exterior of the house.

- Unpretentious care. The corrugated board is washed very easily, does not require special and careful maintenance.
- Durability. A structure made of corrugated board will last at least 30-35 years, if you follow the sheet cutting technology.
The use of corrugated board for the installation of gates and gates is the most optimal solution... Today, such components as practicality and durability are already coming to the fore.
How to make a gate from corrugated board with your own hands
The choice in favor of corrugated board is falling more and more often, so you need to figure out the question of making a wicket yourself.
Required tools and materials
To perform successful work, you need to prepare the following tools and materials:
- Building level.
- Screwdriver.
- Drill.
- Roulette.
- Grinder.
- Welding electric apparatus.
- Roofing screws in the color of the profiled sheet.
- Decking.
- Rectangular tube 60 x 40 mm.
- Lock, hinges.
- Grinder or scissors for metal.
- Concrete mortar and gravel.
- Shovel.
Installation of pillars
After all the necessary tools and construction Materials prepared, you can start preparing for the installation of the wicket.
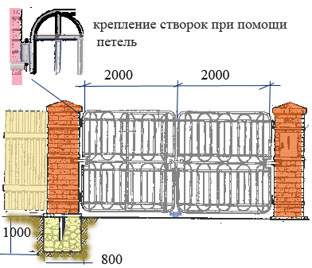
The first step is to install the support pillars. Only after their installation is it necessary to make the frame of the wicket, because it will be easier to adjust the width of the wicket to the distance between the posts, rather than vice versa.
It is best, of course, to put the pillars from iron pipes... If in brick fence, then you can make the support pillars of brick or concrete. But even in this case, pipes are installed as the base of the pillar.
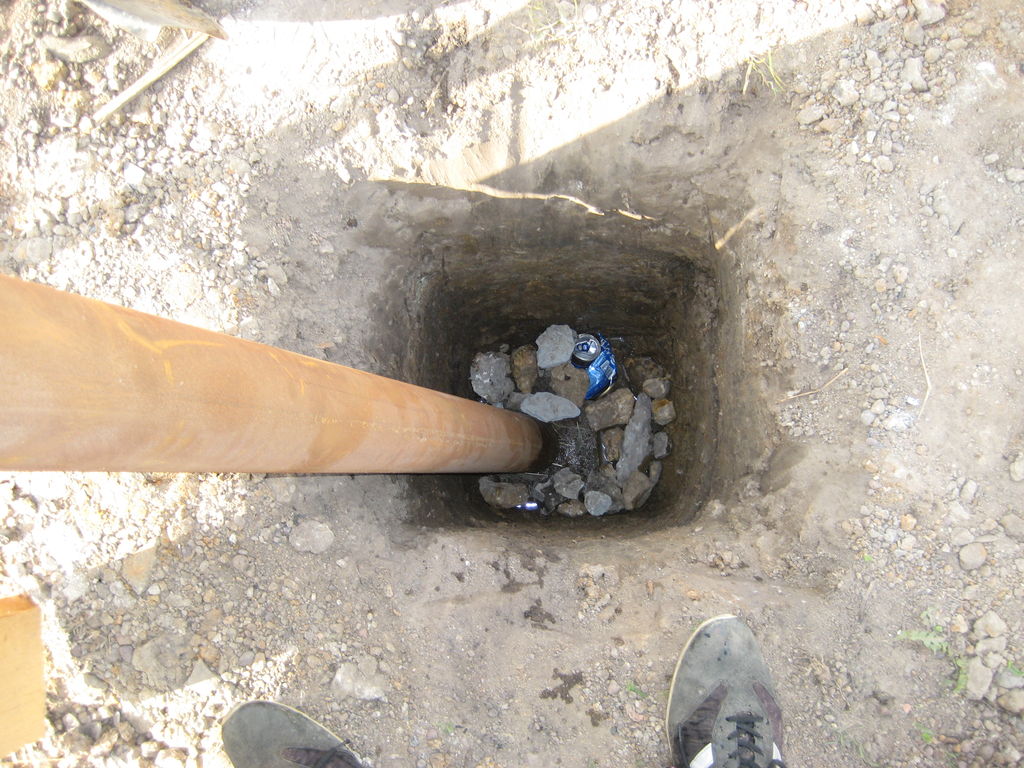
Regardless of the final shape of the supports, they must be installed securely and firmly. Therefore, it is necessary to dig holes for pipes below the depth of soil freezing.
After the pits have been dug, rubble or sand pillow... It is also necessary to protect the concrete from excess moisture with waterproofing on the sides of the pit. A cement-sand mortar is made and a 5-10 cm layer is poured. After that, they put a post and begin to pour concrete with a solution. In this case, you need to check the vertical level of the post from all sides.
The second pillar is also installed, only in this case it is necessary not only to watch the vertical level, but also the evenness in relation to the next pillar.
Important!A common problem with gates is swelling of pipes in winter due to their shallow shrinkage. Even if the post is set to the desired depth, it can move. Therefore, you can use the following method: dig two trenches 0.5-0.8 meters long from the bottom of the post. Weld pipes to them and make a post in the shape of an inverted T.
Frame
The frame is made of rectangular profiles. The profile is sold unprotected, therefore, before starting to weld the frame from it, it will be necessary to clean it of rust. To do this, you can use an ordinary wire brush or grinders.
Then you need to measure the width between the posts again and make sure that they are set up according to the intended plan at 1 meter wide. If there are small deviations, then take them into account in the plan for the manufacture of the frame.
The required size pieces are cut from the cleaned profile, from which the frame contour will be assembled. The ends of the profiles along the perimeter must be cut at an angle of 45 degrees and cleaned with a grinder. In addition to the frame, you will need to install one middle profile, which will serve as a stiffener. Or make two diagonal profiles that converge at the midpoint on one side of the frame.
After all the parts are prepared, they need to be attached to each other by electric welding. During welding, distortions must be avoided, so first I tack all joints with small seams.
The hinges and plate for installing the lock must be welded to the finished frame immediately. After that, you need to clean all the seams from scale and prepare the entire surface for primer and painting. A well-protected frame will last longer.
Installation of the frame on the support post
After the pillars are installed, the foundation has dried up after a few days, you can install the gate.
To hang the frame on a post, you need to put a bar under it. Checking the verticality of the frame with the building level, places from the mating parts of the hinges are marked on the post. It is worth remembering that you do not need to hang the gate close to the ground. In winter, snow and ice will collect, so for it to open freely, you need at least 10 cm of space under it.
In the marked places, the mating parts from the hinges are slightly attached, the wicket is hung on them and the operation of the hinges is checked. If the gate opens and closes well, then the hinges can be welded with a continuous seam.
When installing the wicket, remember to check that it does not open or close on its own. So that the hinges do not turn in the opposite direction, stoppers need to be welded onto them.

After the completion of all welding work, it is necessary to remove the scale from the hinges and the pillar with an angle grinder, prime and paint. Use special paint for metal.
Well, the last part of the work is installing the lock on the frame. To mark the location of the mating part of the lock, you can smear the crossbars with something, for example, toothpaste. The lock closes and from the remaining traces on the post, you can determine the place where the locking mechanism will go.
If the lock does not have a counter block, then in the marked places you can simply drill the holes and align them with a file to the required size. If the locking mechanism has a counter block, then you need to prepare a place for its installation. To do this, use a grinder, then prepare the holes for the mounting plate fasteners.
Installation of a profiled sheet on a frame
After the frame is suspended on the hinges, the lock is mounted, it is worth starting the last part of the work. The use of corrugated board often requires fitting the sheet to the desired size.
Cutting with a grinder is not advised, because a high-speed tool damages the protective coating, which will subsequently become centers of corrosion. Therefore, it is best to use metal scissors.
After the sheet of the desired size is cut, it is screwed to the frame. Fasteners should be on each ridge of the corrugated board, so the greatest strength of the connection will be achieved.
To protect against cuts and hide irregularities in the cut, use a decorative strip made of galvanized metal. Often they use a different color from the main sheet.
How to weld a frame
The manufacture and installation of wickets and gates are always important stages in the construction of a country house. They are performed at the final stages, like the final chord of all construction work.
A modern country house, cottage, cottage, parking lot, shop, shopping center cannot exist without reliable gates. A wide variety of door modifications will allow you to choose the most suitable option for everyone. For a garage, sectional doors or roll-up doors are best suited; for entering a protected area, swing gates or sliding gates, roller shutters are suitable for protecting windows and shop windows. Manufacturers are ready to offer us a huge range of door cladding, color shades. Goal you can automate and control them using a key button, remote control, mobile phone or even via the Internet. For roller shutters, you can find light and moisture sensors that will automatically close when it rains.
It is very important at the early stages of planning to calculate the optimal size of the gate, as this can save us a significant amount of money. To tell you unambiguously what exist standard sizes no one can, there are the dimensions of the gates that are ordered most often, for example, for sliding gates it is 4 meters in width and 2 meters in height. For swing gates, the value is approximately the same. Let's take a quick look at how to correctly calculate the size of the gate and not overpay the extra money.
Standard door sizes, optimal size, discount door dimensions.
Each type of gate has its own technical nuances that everyone should know.
- Sliding gates . The most common type of gate, requires a rollback space. When calculating the exact value, it is necessary to take into account all factors: what kind of vehicles will call in to your site, what is the height of the fence, what clearance do you want. The average vehicle width is about 1.8 - 2 meters + the distance for free passage is about 1 meter. The optimal width is about 3 meters. Standard height will be 2 meters (exactly 2 meters, otherwise, even if you have 10 centimeters more, you will have to overpay a tangible amount). Now let's take a look at the pricing for different sliding gate values. Gate 3000x2000 - 38,700 rubles, gate 4000x2000 - 39,500 rubles, 4200x2000 - 52,500 rubles, 4000x2500 - 57,600 rubles. As you can see above, the most optimal size of a sliding gate is 3m. x 2m. and 4m. x 2m. The difference is only 1000 rubles, but if you decide to order a gate of 4 meters or more, then you will have to pay from 5 to 10 thousand more.
- Swing gates. The traditional type of gate has been known to us for a long time. The main material for production is a shaped tube. Decking, rolled sheet, galvanized sheet, sandwich panels - cladding material. Automation can be done using 2 drives. Does not require a rollback space, can be opened both inward and outward. Most often, this type of gate is installed to restrict entry to a private or protected area. The dimensions for such gates are very similar to sliding gates. Gate 3000x2000 - 22100 rubles, gate 4000x2000 - 29400 rubles, 4500x2000 - 29900 rubles, 4000x2500 - 39500 rubles. As you can see above, the optimal size of automatic swing gates is 3m. x 2m., if 3 meters is not enough for you, then it is better to order 4.5 meters at once, the difference is only 500 rubles between 4 meters. But metal gates with dimensions that exceed 2 meters in height will cost you 10 thousand rubles more.
Bookmark this site
At the next stage, we prepare shaped pipes and metal. If you use new metal, then you need to wipe it with a rag that has been soaked in gasoline, and if you are using old metal, thoroughly clean it from rust.
After that, in accordance with the drawing, we cut all the material slowly and carefully, immediately for both leaves of the fence gate. Now we collect the entire structure and weld. It is imperative to remove the slag from the already finished structure of the fence gate using a grinder and a metal brush, and then grind the entire structure. The final stage in the construction of the frame for the fence gate is its priming and painting.
Now we carry out the cladding. For door sheathing, you can use polycarbonate, wood, metal profiled sheet, etc. If you plan to use profiled sheets for this purpose, then their fastening can be done using rivets or roofing screws.
Mark
The gates personify the hospitality of the owners of the house, their attitude to convenience, safety, reflect their material capabilities. The gates not only restrict the passage and passage into the site or into the garage, but also help control all movements. The market offers a wide variety of gate designs and materials. To help you figure out what kind of gates may be suitable for your site, we propose to get acquainted with the different options for gates and how to install them.
Important points in the construction of an entrance gate
Gate dimensions
Most often, gates are designed together with a fence. The gates are part of the entrance area, and the very first impression of your site may depend on their appearance.
Goal
Gate dimensions. The height of the gate is usually 1.6–1.8 m. Width is an important parameter of the entrance gate, and it depends on the type of vehicle for which the gate is designed. If the entrance is designed only for cars, then the width can be up to 3 meters.
If trucks, including heavy-duty vehicles, will enter your site for the delivery of building materials: concrete, fuel, fertilizers, etc., then the width of the gate should be approximately 4 meters or more. Such dimensions are also advisable from the point of view of fire safety, especially when the house is located in the depths of the site.

Entrance gate
Another important factor in the construction of a gate is how wide the street from which cars will enter. A narrow street requires great skill of the driver, so the narrower it is, the wider the gate should be.
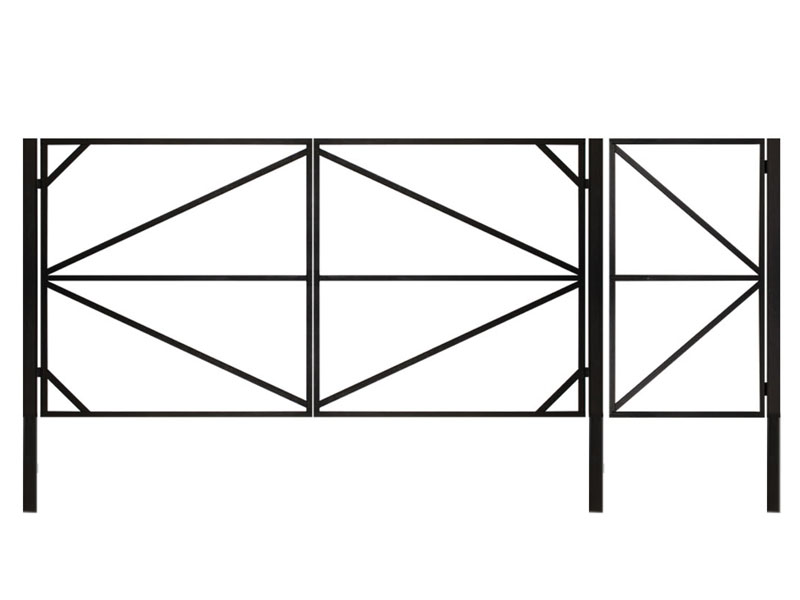
If there is a narrow passage on your site, less than 2.5 m, then sliding gates cannot be created due to lack of space. In this case, swing gates with leaves that have different widths are suitable: for example, the width of one is 1 m, the other is 3 m. Such gates are very convenient. For a car, three meters may be enough to drive in, so one leaf can be used in everyday use. If a larger car arrives, you can also open the second door. If automation is used, then the drive can only be installed on a wide leaf, and the second leaf can be opened by hand if necessary.
Swing gates with unequal leaves
Gate material
The appearance of the gate is very important, the choice of material depends on the degree of security that you plan to provide on your site and on the overall design of the site, house and fence. The gate leaf consists of a frame on which a panel of a certain material is sewn
- Corrugated galvanized sheet 0.5-0.7 mm thick, which is then painted;
- Smooth black sheet metal at least 2 mm thick;
- Plastic coated corrugated board;
- Welded metal structures *;
- Forged metal;
- Sandwich panels;
- Wood.
* Welded structures of door leaves are created using gas or electric arc welding, they can have forged pattern elements. In manufacturing, textured rolled products are usually used, that is, it is rolled onto a metal bar with rollers, or a pattern is stuffed with a hammer. The welding places are hidden under clamps made as decor, or they are cleaned and sealed. There are products that are created by forging by welding with clamps and rivets.
Gate material protection
Wooden gate:
- Painting;
- Antiseptic treatment.
Protective coatings for metal gates and gate metal parts:
- Painting with asphalt, bituminous and pitch varnishes;
- Organosilicon (CO);
- Rubber (KCh);
- Phenolic (FL);
- vinyl chloride (CS);
- polyurethane *;
- epoxy *;
- powder paints (applied at the factory - the powder is applied to the metal, and then heat treated in an oven).
* exterior paints - marked with number 1 after the letter designation
By type of opening, gateleading to your site can be:
- Swing;
- Recoil;
- Lifting lattice gates.
Swing gates
This type is considered traditional.
Wooden swing gates
They are suitable for the device of entry to the site, made in any style. The swing gate design consists of two leaves. The swing gate leaves open outward or inward by 90 degrees or more, if there is free space behind them. The closed doors are padlocked.
Advantages of swing gates:
Easy to install - you can install it yourself (see installation example below).
Disadvantages of swing gates:
- It is necessary to clear the space for opening the flaps.
- Free space is required to open the flaps.
- At high winds, deformation of the valves is possible, and the larger the width of the valve, the stronger the deformation.
In the closed position, the doors rest against the limiter installed in the middle of the entrance, in the open position they are locked with a spring clip. To operate the doors in winter, leave a gap of approximately 100-150 mm between the batten and the roadbed.

Swing gate device
Swing gates are automatic and manual. Usually, when automating swing gates, two drives are required. Most swing gate operators open the gate inward, so you need to make sure that there is enough space inside the area for opening leaves.
Before installing the gate, you need to pay attention to the fact that from the side into which the gate opens, the access road does not have a rise, so that when the gate is opened, the lower edge does not touch the roadbed.
Hinges for swing gates
Fastening the gate leaves with hinges
A gate usually needs 4 hinges. The rod diameter is chosen not less than 12 mm. Check the quality of the loop: the rod should enter the other half with a very small gap, this is checked by slightly shaking the loop - the rod should deviate as little as possible from the center. Metal plates 5-6 mm thick are welded to the hinges on both sides along the entire contour of the contact between the plate and the hinge.
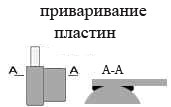
Welding plates
If the gate is made non-removable, then in this case it will not be possible to pry it off with a crowbar and get into the site, then the hinges are located towards each other. To do this, before welding, you can expand the hinges and plates on a plane, as in the figure.
![]()
Unfolding the door hinges before welding
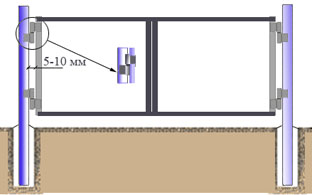
Gap between grate and post
Gate hinges are made with bearings or bronze bushings, they are installed strictly vertically. The builders say that bearing hinges (see picture) are more wear resistant than ball hinges: thanks to the bearing, the pin glides smoothly. The hinge is welded to the sash and post.

Bearing hinge for gates
Loops with balls - possible, but, according to builders, not the best option (see fig.).
Ball loop
Swing gate posts can be made of wood, steel pipe, reinforced concrete, brick. Gate leaves can be forged, made of wood - solid and lattice, smooth metal sheets, welded metal grating, corrugated board, from sandwich panels - depending on what material the fence is made of. The sash frame is made of wooden blocks, metal pipes, corners.
The shape of the sashes can be very different - from rectangular to arched, the leaf of the sashes is decorated with any decor: forged hinges, spiers, eyelets, etc.

Swing gate leaf shapes
Installation example of manual swing wooden gates with wooden posts
Wooden gates and wickets consist of a frame and lathing.
- Assemble the frames. Gate frames rectangular made of bars with a cross section of 50x100 mm with a diagonal jib to prevent sagging of the gate leaves. Frames are best assembled with epoxy glue. The connections are additionally reinforced with screws or dowels.
- Place the gate on the ground.
- Place the pillars on the sides.

Pillars knocked down by wooden slats
- Knock down the posts with slats (to withstand correct distance between the pillars). The bottom rail must coincide with the bottom edge of the wicket or gate.
- Dig holes under the pillars 10 cm wider than the pillars to 1.5 m depth.
- Pour broken brick or stone onto the bottom.
- Lower the pillars into the pits so that there is at least 100-150 mm between the surface of the ground and the lower rail of the gate, based on the snow cover in winter (in summer, you can fill the boards below the frame so that animals do not pass under the gate).
- Concrete the bases by securing the posts with spacers in a vertical position (the spacers are removed after two weeks).
- Before leaving the concrete to cure, check the horizontal and vertical position of the parts.
- Hang the gate leaves onto the hinges.
- After hinging the frames, nail the crate, starting from the middle of the gate: the first bar is nailed to one of the halves exactly at the joint of the frames: it will close the joint, forming a rebate necessary for locking the gate.
- Attach the latch that covers the flaps.
Install thrust bearings - small posts that hold the gate and prevent it from twisting and opening in the opposite direction when the gate leaves are closed.
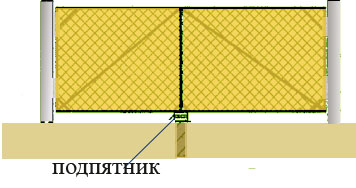
Gate heel
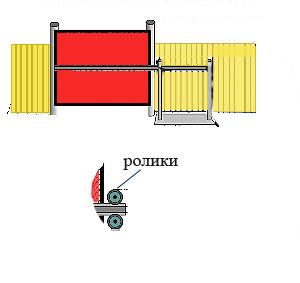
Sliding gates
Retractable or sliding (sliding) are also very popular nowadays.
The gate consists of elements - the door leaf and guides with a system of rollers. The rollers can be made of metal, coprolon material. The leaves move on roller supports parallel to the fence line. To install the gate, you need a foundation, where the support rollers will be located.
The gate, opening, moves horizontally, therefore, various elevations from the side of the gate rollback are unacceptable. The uneven fabric of the fence on the side of the sash rollback is also an obstacle to the installation of sliding gates.
For sliding gates, rollback space is required along the fence (rollback distances depend on the type of gate, see description below)
Sliding gate panels can be made from different materials (you can read about the materials in the article). Recently, sandwich panels are often used, which consist of two sheets of galvanized steel (as an option: anodized aluminum), and a layer of polyurethane foam is located between them.
Sliding gates are of several types:
- suspended;
- console;
- sliding on the rail.
ABOUTgeneral advantages of sliding gates:
- Compactness, do not require space for the open doors in front of the entrance.
- Withstands strong wind loads.
- There is no need to clear space to open the gate.
General disadvantages of sliding gates:
- Care must be taken to clean the roller bearings.
- It is necessary to have enough space to roll back the door panels (depending on the type of door - see below).
Types of sliding gates
Suspended
They are used very rarely. A beam is installed above the door opening. A gate was hung to this beam on rollers.
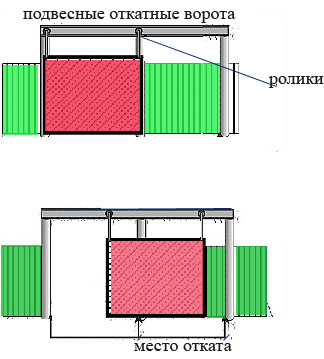
Hanging sliding gates
Advantages:
- Burglary resistance.
Disadvantages:
- Height restriction at the entrance (an increase in the height of the beam location entails an increase in the thickness of the post and an increase in the gate leaf area, which leads to a rise in the cost of the structure; as well as an increase in windage, that is, a decrease in resistance to wind loads). If a tall car suddenly has to drive into your overhead gates, the upper beam will become an obstacle for it.
- It is necessary to clean the guides from snow.
Sliding along the rail
Such gates are often used.
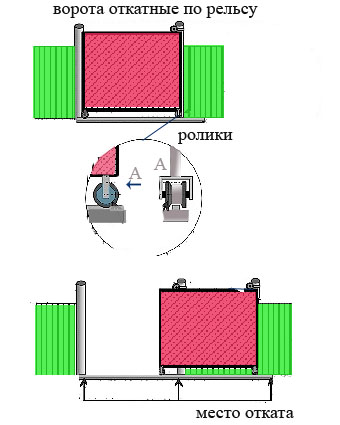
Sliding gates on the rail
They do not require a large rollback space and can close large openings - up to 6 m.A rail is laid along the gate opening at ground level, a gate panel is installed on it on wheels, two rollers on top of the post hold the gate in a vertical position, and the gate rolls along the rails ...
Advantages:
- They are used with a limited space for entering the territory.
- There is no need to clear the space in front of the entrance, which is necessary for opening the leaves (with swing gates).
Disadvantages:
- It is necessary to monitor the cleanliness of the rail.
- Need some rollback space.
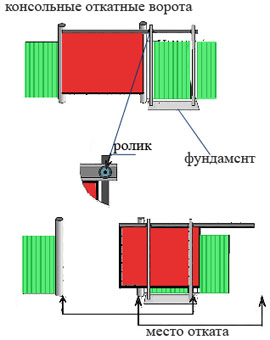
Cantilever sliding gates
Such gates have no rails under the gates and no beams above them.
Cantilever sliding gates
A cantilever sliding gate panel hangs over the opening. Rollback of cantilever gates: with a passage width of 4 m, at least 2 m of additional space is required to roll back the sash along the fence.
This type of gate, by the type of installation of the beam, is divided into types:
- beam from above,
- beam in the middle,
- beam from below, (sometimes a view with a telescopic beam is found).
The gate, when opening, moves horizontally, so you need to check that there are no obstacles in their path from the side of the rollback: slides, debris, etc. The winding fence on the side of the gate rollback is also an obstacle to movement.
Advantages of cantilever sliding gates:
- Some species can be installed at a low height from the ground - about 10 cm, and due to this, even during snowfalls, they retain their efficiency and mobility.
- They have no height restrictions.
disadvantages cantilever sliding gates:
- are considered difficult to perform.
Types of cantilever sliding gates
Console beam from above (from I-beam) at cantilever sliding gates
Console beam in the middle

Console beam bottom
The cost for sliding cantilever gates (for example, with frame sheathing with a sheet of corrugated board) with a panel width of 4 m and a height of 2 m - 1.5 thousand dollars. With the addition of automation, the cost will increase by $ 1,000.
Lifting lattice gates
This type of gate is usually made of wood.
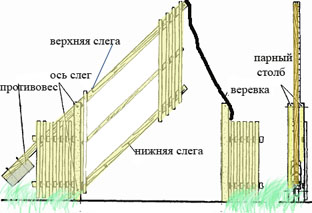
Lifting lattice gates
Recently they have been used infrequently. Hinged gates (upper and lower) are hung on axles in paired gate posts. At the end of the upper sled, a counterweight is fixed, balancing the sash with a crate made of a picket fence. The sash is hingedly fastened to the upper and lower slats. A locking device is made on the paired pillars of the gate, a cord is fixed for lowering and raising the sash.
Advantages:
- Covers openings up to 3 m.
- Can be made from scrap material.
Disadvantages:
- Inconvenient to operate;
- Unaesthetic.
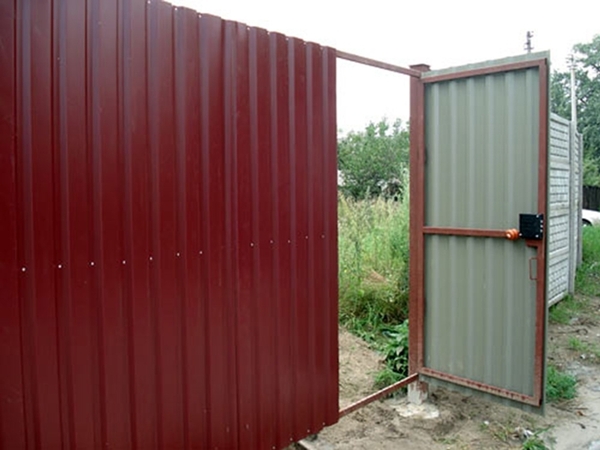
Wickets
At swing gates, wickets are most often arranged separately, but they can also be built into the leaf of swing gates, usually their width is about 1 m.
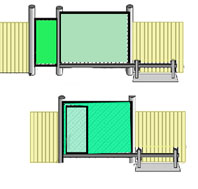
Wickets for swing and sliding gates
For sliding gates, wickets can be built-in and free-standing. For convenience, in the first place, the wickets are separate, since the built-in wickets have a threshold that is inconvenient for those entering. Built-in wickets have a threshold, sometimes high, through which it is inconvenient to step.
If you decide to arrange a sliding gate at the site of a fence or swing gates, then you should think in advance whether the gate will not interfere.
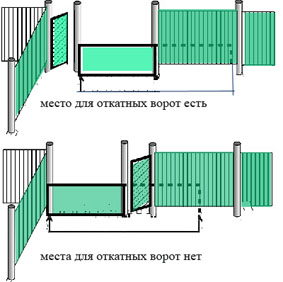
Rollback gate
Gate equipment
The gate and wicket should be equipped with a bell, an intercom and an electromagnetic lock. Such equipment is very convenient when the house is located in the depth of the site. The electromagnetic lock can be operated from home, and there is no need to go to the gate every time. Equipment is usually wired along the lower edges of the fence. To protect against thieves, you can use motion sensors (article) that give a signal or turn on the lighting: they could turn on the light when you drive in or enter your area.
conclusions
A private house begins with an entrance gate, which creates the mood with which the owner enters his plot. The gates leading to the site are responsible for safety, must be beautiful and durable, therefore, their choice must be thought out to the smallest detail, taking into account the characteristics of the area, the style of your home, and, of course, material opportunities. They can be manual and automated, made of ultra-modern materials or from improvised means, the main thing is that they provide their owners with comfort and a sense of security.
Attention: Prices are valid for 2009.
Many owners of their own cottages, summer cottages, home gardens have repeatedly faced the question, what should be the optimal gate width for a plot or for a private house? Moreover, the location and various options for such gates are of great importance, they affect how convenient the access to your home will be. The entrance to the territory should be spacious enough so that, if necessary, not only a car, but also a truck could drive up to the house. For example, if they bring you furniture, building materials, etc. To answer this question, it is necessary to take into account several important factors and nuances, which we will talk about in our article.
Correct gate position
If the construction of a house is only planned or is at the design stage, then it is necessary to choose the most optimal location of the entrance gate. To do this, you need to clarify who has the road near the site, which will determine the location of the gate. This is necessary in order to know for sure whether our gates will make it difficult to enter from other sections, impede traffic on the road, be located close to the carriageway, disrupting the traffic safety of other participants. This will be the most correct decision if you are going to receive all permits for the construction.
Important! The entrance gates should be perfectly combined with the general exterior of the house, while providing a convenient entrance to the territory.
The width of the entrance gate to the site
Entrance gate for passenger cars can be done starting from 2.4 meters wide. However, it must be remembered that in the future, trucks or special equipment, the width of which exceeds 2.5 meters, may also enter the site. It is for this reason that it is best to choose gate width starting from 3 meters.
The practicality of getting to your home
How practical the future arrival will be depends largely on the roadway, in other words, the road, and the minimum turning radius of your car. In the case when the value between the edges (outer) of the carriageway and the entrance gate is equal to the turning radius of the car or exceeds this value (as shown in Fig. 1), then in this case a car passing perpendicular to the gate will pass with a margin of both sides of the car to the gate leaves.
In the event that this distance is less than the turning radius of the car, then you will have to drive at an angle, cutting off the turn with the rear axle, and there is a possibility of hitting a curb or a post. Then it is best to choose a wider entrance gate, starting from 3.5-5 meters. If this distance is not enough, then it would be more rational to move the entrance gate 1-1.5 meters deep into the territory of the site. This approach will be most relevant for houses with narrow streets, heavy traffic, where you will have to cross the axis of the carriageway to enter the site.
As a rule, the average turning radius for passenger cars is approximately 5-6 meters, for trucks or with a trailer 6-7 meters, for fire trucks with ladders up to 10 meters. This distance is correctly measured when the car makes a turn and counting from the forward part of the vehicle (vehicle).
Swing-type entrance gates
Such gates are also called swing gates, consisting of several leaves or one, hinged hinges and bearing supports, which account for the entire mass of the gate and the possibility of opening. As a rule, swing gates are equipped with a lock, a limiter or a blocking latch is installed, which prevent accidental opening of the leaves. For the convenience of opening such gates, the motor is mounted on the doors, which will be controlled from the remote control, and in the absence of electricity, open them manually. As a rule, swing gates hide a lot of space during the opening process.
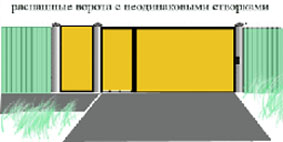
If you decide to choose this type of entrance gate, then you should provide enough free space behind them. This is done so that, while parking at the entrance, the car does not create obstacles to opening the gate to the garage (as shown in Figure 2). For gates with one shutter (Figure 3), the width can be up to 3 meters, which is associated with their design. Swing gates (with one leaf) are widely used for areas with long and narrow areas, located on one side of the fence. This saves space.
Sliding gates for your site
Such gates have only one sash moving along the fence inside the site. Such an entrance gate will become ideal solution in wide areas, where the distance from the garage to the entrance gate is small, such that it is not possible to install a swing-type gate. If you decide to install sliding ones, then you should fate a number important nuances... On one side, the safety fence must be straight and of sufficient length to allow the gate leaves to be fully positioned behind it after they are fully opened.
Avoid situations when the swing panels in the open position will obscure the wicket. Sliding gates are either rail-type or self-supporting. It depends on the method of travel.
Figure 5 shows a single-leaf rail gate moving on rails on special rollers. In this case, the guide is installed on a post, which will fix the flaps in a certain position, while providing them with a smooth movement.
In winter, it is quite difficult to operate rail-type gates when snow or even worse ice is packed on the rails, which greatly complicates the opening process and the movement of the rollers. To avoid this, it is necessary to install the rails slightly higher than the level of the entrance surface. In this case, a small bump will form, which will make it difficult to travel, but you can still use a heating cable for the rails.
Modern sliding gates have become especially popular due to their convenience and reasonable price policy. The design process should take into account the distance that will allow them to open them safely and completely.
Folding gates
If you own a narrow area, then it is best to choose a folding type of gate (telescopic), if there is no possibility to install another type of gate. The leaf in such gates is divided into several parts. During the opening process, the first part or segment will be hidden directly next to the support post. Then, with the help of a telescopic device, the first part of the gate is pushed back behind the fence, and the next part will go into its place. Such gates are very compact when folded. Such entrance gates require a little more space inside the plot, but you can install them in narrow areas.
Gates reviews we collected
Alexei.
When planning to install a 5-meter gate, trucks will periodically call in. If 3.5 meters, then a large truck or wagon is unlikely to be able to drive in, if you also take into account the arrival with a turn. But optimal size gate, I count 4 meters.
Tatyana.
The gate is an element that is chosen almost forever. My husband and I chose 5-meter swing doors. Since we have a small turning angle, the width of the roadway is only 3.5 meters, since the rest of the territory is occupied by sections. We drowned ourselves 1.5 meters deep into the territory, which allows both trucks and cars to enter without any problems. A neighbor has a 3.5-meter entrance gate without a deepening and the concrete mixer could not drive up to the house. If money and the area of \u200b\u200bthe territory allow you, then it is better and more correct to make a bigger gate.
Sergei.
I think the most optimal size for an entrance gate is 3.5-4 meters. Despite the fact that passenger cars can easily drive into 3-meter ones, and cargo ones - 3-meter ones. However, taxiing at an angle will not work. That's why I made a 4-meter gate, which I open inward. In such, a tractor and special equipment with a harrow and a cultivator can easily drive. One of these days, an EO excavator will arrive and dig ditches for households. the buildings.
Conclusion and useful video
As we can see from the article, the width of the entrance gate should be selected taking into account the size of the site, the turning radius and other factors that should be taken into account. Choose the most optimal entrance gate for your tasks and area. Good luck!


