A homemade stove for a bath from a pipe is a worthy alternative to factory-made heat sources. Not every lover of bathing procedures can afford such a unit, not to mention building a solid brick oven, for which there is not always enough space. At the same time, having necessary tool and skills, an iron stove can be made with your own hands at home or ordered by a familiar welder. Hence the purpose of this article is to tell you how to weld a bath stove with your own hands from a piece of large-diameter pipe or a gas cylinder.
First, a few words about the advantages of this approach to solving the problem. In general, homemade stoves for metal baths are made not only from pipes or cylinders, but also sheet steel - which one has in stock. Sheets are usually used to cook the body rectangular, inferior to cylindrical according to the following criteria:
- The complexity of manufacturing. The iron pipe is almost a finished firebox, and the sheet metal still needs to be cut, cut into blanks and assembled into one piece by welding.
- For the same reason, the price of a round product will be less, unless you do all the work yourself.
- The cylindrical shape of a sauna stove made of a pipe is better in terms of heat exchange with the surrounding air.
- A circular cross-section is always preferable to a rectangular one in terms of flue gas movement.
- A flat wall of the fuel chamber will last less and burn out faster than a pipe of the same thickness made from the same steel grade.
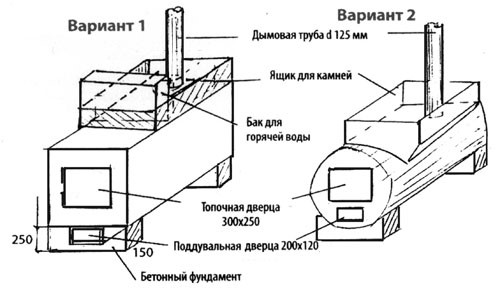
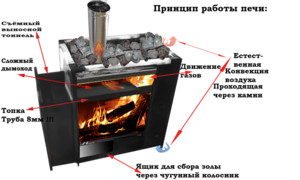
It is customary to solve the problem of making a furnace from a pipe or a gas cylinder in 2 ways: to make the body horizontal or vertical. Both options have the right to life and have their own pros and cons. A vertical stove for a bath is more compact than a horizontal one and is appropriate in a small steam room, where each square meter on the account. But it is inferior in terms of the duration of combustion and the efficiency of heat transfer, which is important.
During combustion, most of the heat rises upward, the side walls do not warm up so much. And at the top, the exchange surface area is small, but there is a way out through the chimney, where the warmth rushes with joy. This is not how the processes go in the horizontal design of the furnace, where the chimney pipe is far away and on the way to it, the hot gases will give off some of the heat to the semicircular arch of the body.
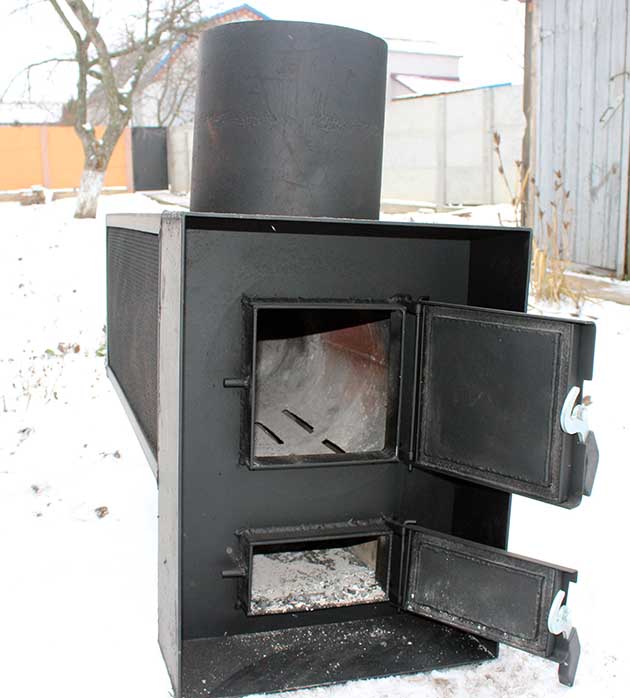
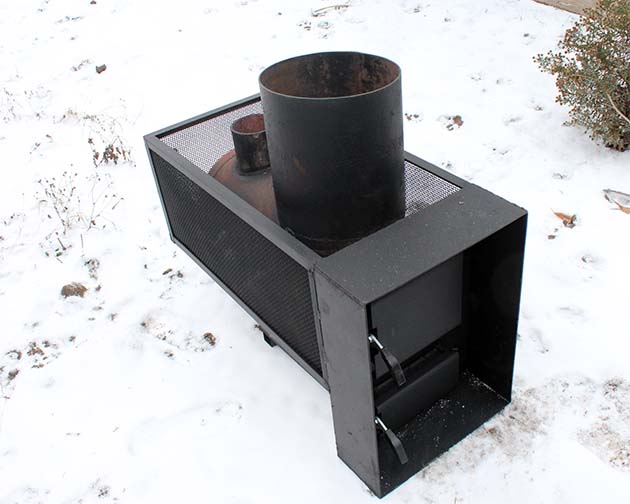 Finished product with a grid for a heater and a remote insert
 The efficiency of a horizontal metal furnace welded from a pipe with your own hands will always be slightly higher than that of a vertical one.
A similar situation is with burning firewood. Inside the vertical firebox, the flame covers the entire array of fuel, if you do not cover the air supply with the ash pan door. But you can't heat a bath like that, because the task of the heat source is to give out a lot of heat in a short period of time. In a firebox, elongated in length, the flame moves from the front to the back, burning the wood gradually and more efficiently. One caveat: such a heater takes up more space and is not suitable for every steam room.
How to make a horizontal stove in a bath
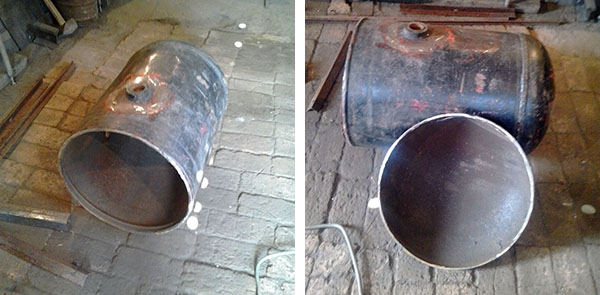
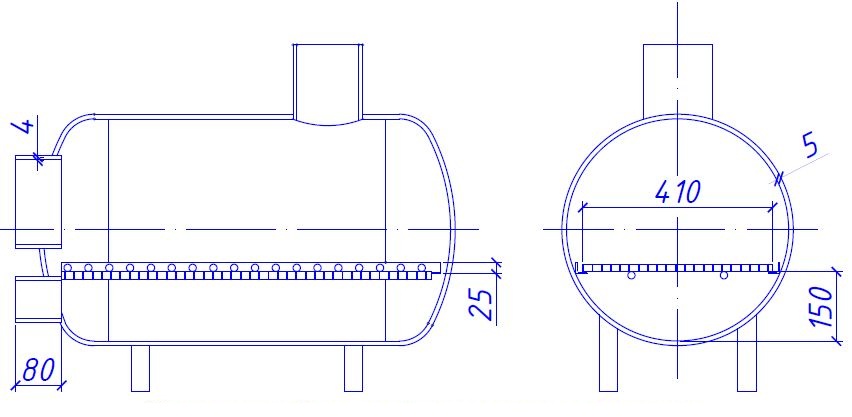
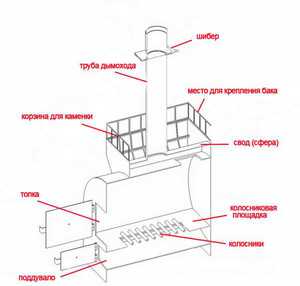
On the Internet, you can find a lot of information on the manufacture of various stoves for a metal bath, including drawings and videos. Information is not always complete and understandable to ordinary people, there are many repetitions. Therefore, below in the photo and in the drawings is a working copy of a metal sauna stove made by an expert of our project from a cylinder with a diameter of 0.5 m with a wall thickness of 5 mm.
Note. A heating unit for a bath from a cylinder is somewhat easier to manufacture and more convenient in operation, which will be explained later. You can weld the stove into the bath in the same way from a DN500 pipe (outer size 530 mm).
To carry out the work, the following additional materials must be prepared:
- sheet metal (Steel 10-20) 4 mm thick - on the doors;
- asbestos cord - for sealing the doors;
- pipe section DN150 for the chimney pipe;
- reinforcement made of low-carbon steel of a periodic profile, a diameter of 16-20 mm is suitable;
- corner 25 x 3 mm;
- suitable rolled metal for legs;
- purchased door handles.
Note. If the same stove is made from a DN500 pipe, then in addition, 5 mm thick sheet steel will be needed for mounting the side walls of the firebox.
To make the sauna stove reliable and serve long years, you need to choose the right grade of metal. Since such heat generators are usually assembled from materials at hand or purchased from scrap metal, high-carbon or alloy steel may be among the scraps, which is highly undesirable. The best option is steel with a carbon content of up to 2% (St10, St20).
Checking the color of sparks on emery
When welding high-carbon metal, the seams may crack as soon as the parts cool. Another point is that such steel is more susceptible to hardening and can be sticky from impact high temperature at maximum operating mode. This leads to deformation and rupture of the seams, which is unacceptable. It is also better not to mess with alloy steels, unless you are a professional welder.
Distinguishing low carbon metal is fairly straightforward. It is necessary to bring the edge of the sheet to the rotating circle of the emery machine and visually examine the color and behavior of the sparks. They should be light yellow and pour in a straight line, as shown in the photo above. If the color of the spark is closer to white and it scatters in different directions with many "stars", then the material contains a high percentage of carbon. Dull orange, red, or bright white color indicates that the steel is alloyed.
Work order
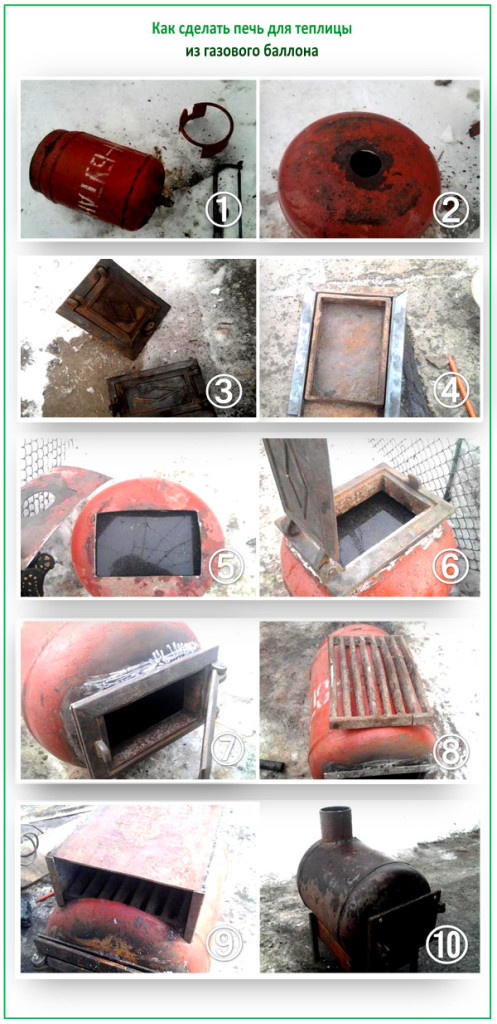
It makes no sense to list all the necessary tools for work, it is enough to mention the welding inverter, an angle grinder (grinder) and measuring devices. Instead of a grinder, a gas cutter is also perfect. The first operation is to cut the side of the cylinder along the factory weld with preliminary filling with water. We get an open opening for installing grate bars in the firebox of the stove and the cut off part where the doors must be put.
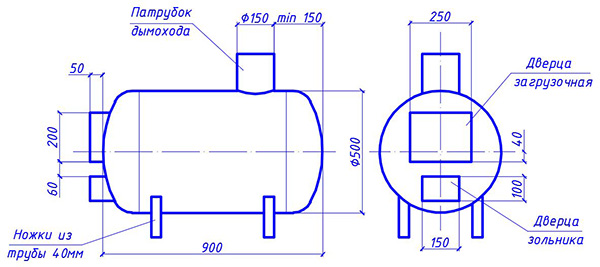
Then you need to cut the iron into workpieces of certain sizes, focusing on the drawing of a metal bath stove:
An important point regarding the question of how to correctly place the chimney pipe on the furnace body. To avoid large heat losses, you should not attach it to the back, as different craftsmen do. It is better to cut a hole and weld the pipe from above, stepping back from the edge at least 150 mm, as shown in the drawing. This will allow the flue gases to circulate in the back of the firebox before going outside and in this way more intensively transfer heat into the sauna room.
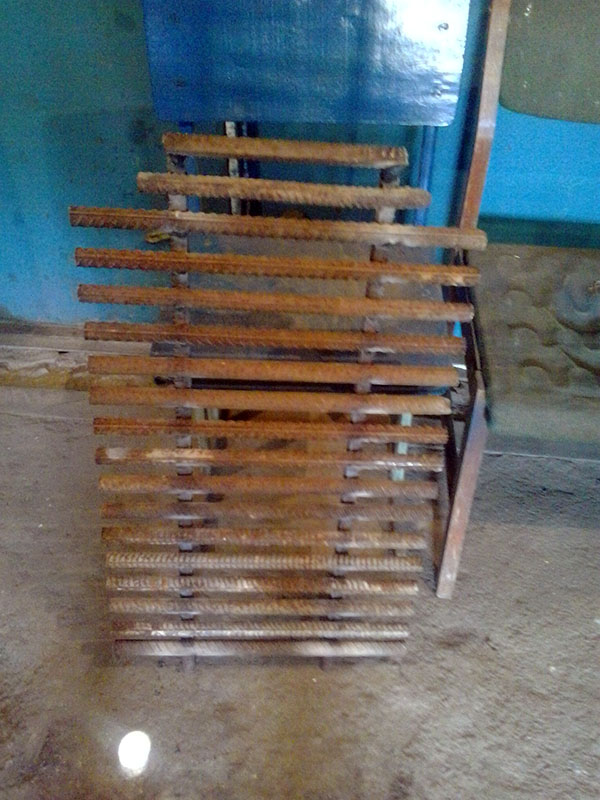
According to the dimensions indicated in the drawing, it is necessary to make a grate from the reinforcement by welding a set of transverse rods to 2 longitudinal rods with a step of 45-50 mm, as is done in the photo:
The design of this metal sauna stove provides for the support of the lattice on 2 corners attached to the inner walls of the firebox by means of electric welding. The grates should not be rigidly tied to the corners, but simply lie on top, as shown in the sectional drawing of the furnace:
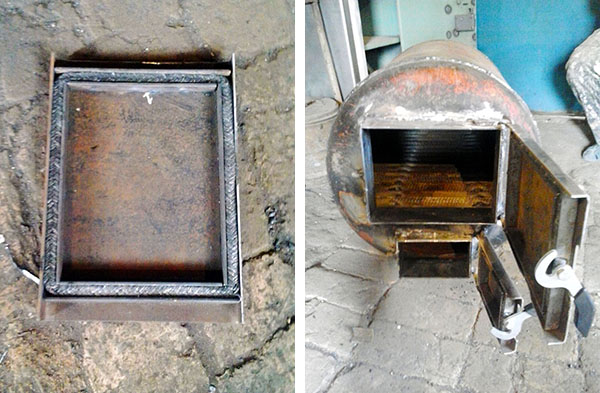
In the cut off part of the body, the grinder cut openings, where the frame of the doors is installed. Ribs are welded to the doors themselves from the inside, then awnings and purchased handles. An asbestos sealing cord is inserted between the ribs. It is better to mount the doors in place after homemade oven the grate is installed and the cut-off part is hermetically welded into place.
Due to the fact that the cylinder has rounding on the sides, a gentle rise of the bottom part is formed from the inside in front of the ash pan door. Thanks to him, a metal stove for a bath, made from a cylinder with your own hands, lends itself well to cleaning, ash is easy to rake out. In a homemade stove from a pipe, an uncomfortable sill will appear in this place, so the door should be set as low as possible.
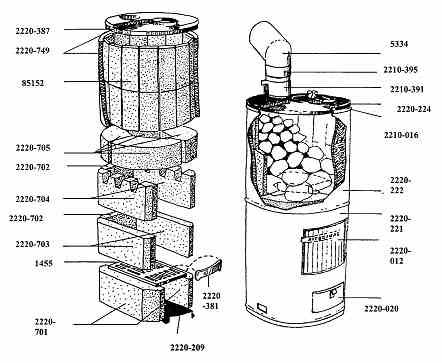
To protect against hard infrared radiation emanating from hot metal walls, as well as in accordance with the rules for setting up a bath, the expert recommends protecting the case with a net, filling it to the top with stones. Simply put, make a homemade stove that surrounds the stove from all sides, except for the front one. For filling, not any stones will fit, but those recommended for the bath:
- talcochlorite;
- basalt;
- river pebbles;
- white or crimson quartzite;
- gabbro-diabase.
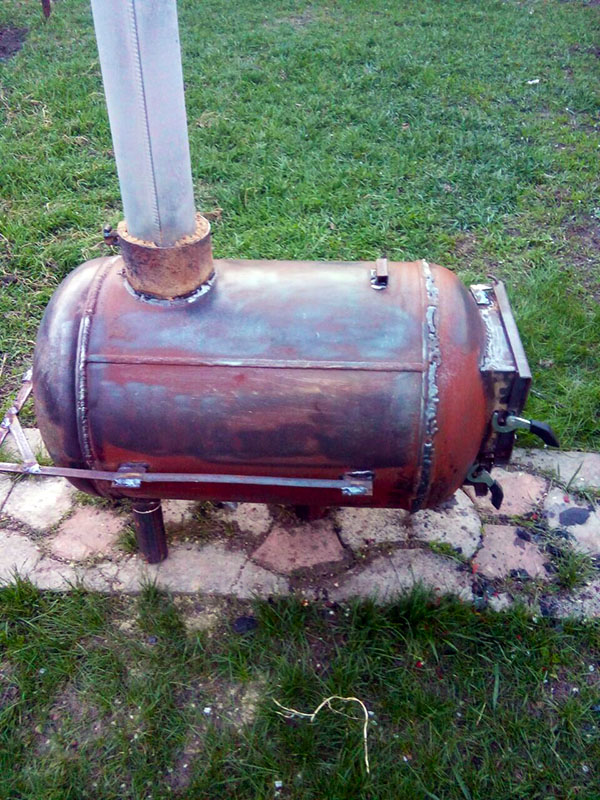
Unit with a remote firebox
The design of the previous version of the heater assumes heating the bath from the inside of the steam room, which is not always convenient. There are many factory-made models on sale that have a so-called remote firebox, which allows you to perform all manipulations from an adjacent room - a dressing room. You can also safely store firewood there.
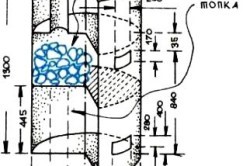
Anyone who is able to make a homemade metal stove from a pipe can easily weld a remote firebox to it, if necessary. The algorithm for carrying out the work is preserved, only the doors are installed on the front part of the firebox artificially pushed forward. A metal stove for a bath is shown in detail and with an indication of dimensions in the drawing:
Note. The total length of the body and the individual protruding structure may vary depending on the installation conditions of the heater (wall thickness, steam room dimensions, etc.). How a similar design of a stove with a drawer is welded in practice is described in the video:
In both presented designs, the amount of combustion air is controlled by opening the ash chamber door. The regulation can be optimized by integrating a simple spring-loaded flap device into the door. It is easy to make it from a piece of pipe with a diameter of 57 or 76 mm and a piece of thin metal. A 6 mm hole is drilled in the pipe, an axis of the same wire is inserted there, and a metal shutter is welded to it. The end of the axle is fixed with a nut with a spring, as shown in the figure:
Furnace - vertical boiler
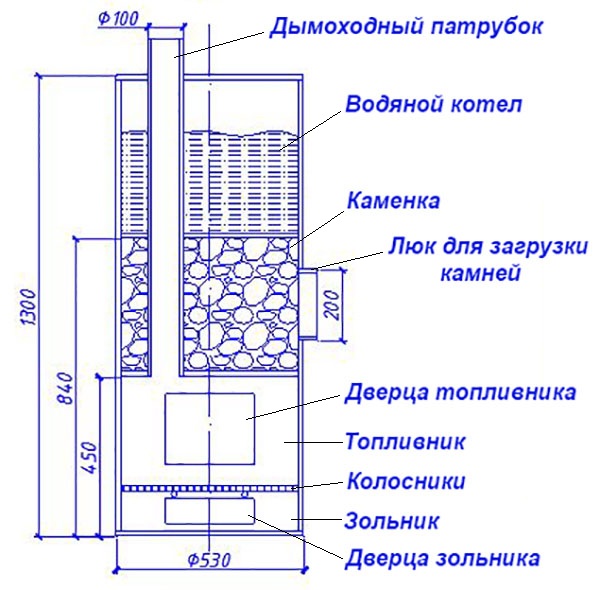
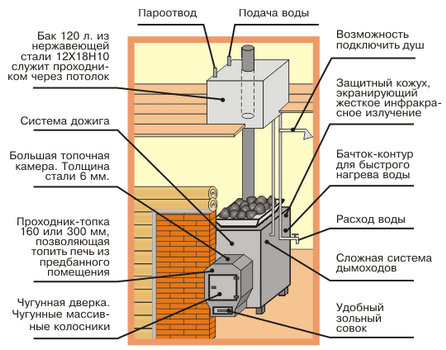
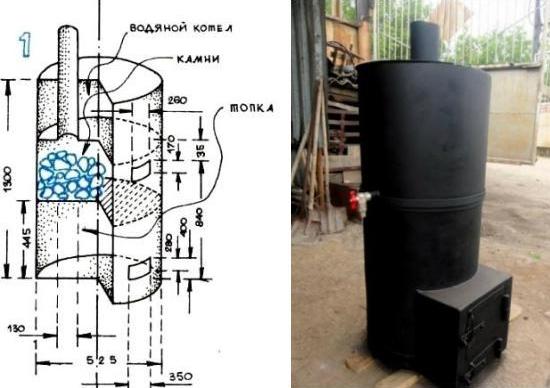
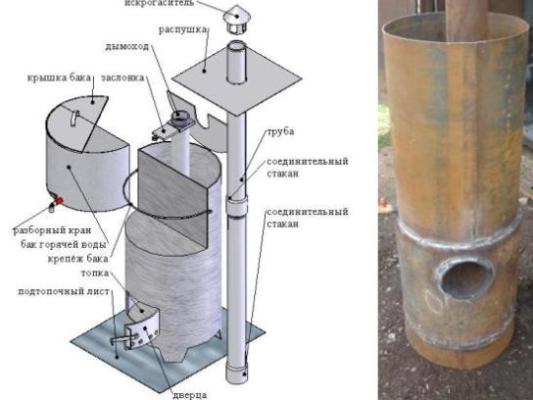
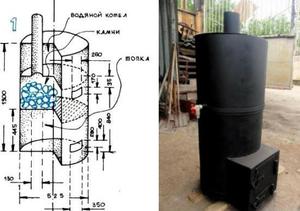
Vertical iron stoves made of pipes are also in demand among lovers of bath procedures, so they cannot be ignored. Another thing is that a lot of materials have been published on the Internet on assembling various simple bourgeois, it makes no sense to repeat them here. But there are products that deserve attention for their originality, for example, a home-made stove - a boiler with a built-in stove, whose diagram is presented below:
The unit perfectly solves the problem of lack of space in the steam room, since its vertical body contains 3 chambers - a fuel chamber, a heater and a water heating tank. True, the capacity of the combustion chamber is small and in the process of heating the bath, you will have to do several loads, but this is the price to pay for saving usable space. Again, if desired, the size of the firebox can be increased by removing the water boiler or making its volume smaller.
Council. The total height of the stove for the bath and each chamber separately can be selected by yourself, the main thing is to maximize the capacity of the firebox. Then the duration of burning from one bookmark of firewood will become longer.
The procedure for carrying out work on the manufacture of a vertical heater is as follows:
- Cutting and processing of pipe ends DN500, cutting openings for doors.
- Preparation of round metal blanks 5-10 mm thick for partitions, bottom and lid.
- Processing of cut parts and making furnace doors from them.
- Welding of a grate from reinforcement.
- Assembling a metal bath stove.
First, partitions are welded into the body, after which a chimney is passed through the holes in them and carefully scalded. The grate is installed, then the bottom is attached by welding. The tank lid is made of 2 parts - one is placed tightly, and the other is on the sheds. A pipe for draining water must be cut into the lower part of the boiler; after installing a metal stove, a tap must be screwed to it. Methods and techniques of work production are shown in detail in the video:
Conclusion
Although a homemade iron stove in the bathhouse looks unprepossessing compared to the factory "brethren", it will give you decent money savings. Even in the case when you buy all the materials, and entrust the work to the masters for a fee, you will get a heater twice as cheap as in a store. Moreover, it is almost impossible to find a product with a wall thickness of 5 mm or more on sale. And the unpresentable look of the unit is easily hidden under the heater.


- it's quite difficult. This requires knowledge of how to build nodes, floors and other components of the structure. Even if you were able to line up good bath, full success is not yet guaranteed. The firebox is of great importance here.
It is not so difficult to mount a wood-burning stove there with your own efforts. Especially if you intend to make a metal version with a tank. Stone and brick versions will require a lot of skill, effort and time. If you want to build them, but have little experience, contact the professionals.
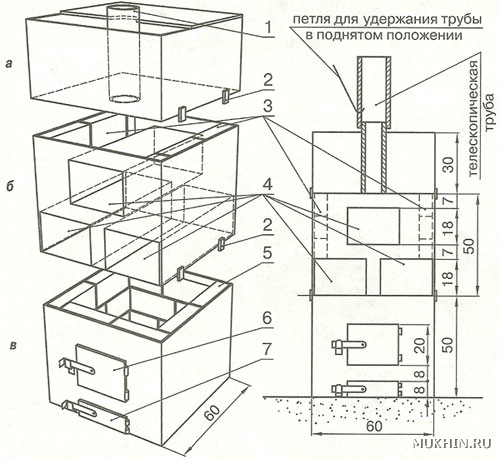
A metal oven can be made on the basis of a barrel. For example, as in this diagram:
If you do not have enough money and time to create a complex intricate furnace, then you can use available materials... With their help, you can make simple, but very reliable sauna stoves.
In this situation, manufacturing is carried out from metal. And the editing is going fast. Such oven options are suitable for rooms of any parameters. But in working with them it is necessary to strictly follow the fire safety criteria. Also, the furnace body must be thoroughly sealed. This gives your sauna visitors protection from carbon monoxide.
Very often, the main components for the manufacture of a sauna stove are a pipe and a barrel. Here it is important to competently carry out welding work. You must have skill in this matter. If not, invite a specialist. It is also important to consider the position of the oven.
This oven includes blower, combustion chamber and heater... Still need creation doors, cork tap, tank... You will need to provide for and smoke outlet... To do this, you need to arrange the appropriate pipes. Other components: valves, covers, handles, grates, plate, sleeve, grate and ears. The grids used here are formed from reinforcing rods.
Do not forget to arrange a window for the exit of the chimney.
Work stages
- Preparation of parts... First you work with a pipe. Its required parameters: 150 cm (length) and 50 (thickness) cm. Cut out the required elements from it. Each element must have a specific metal layer - at least 1 cm.
The pipe is cut into two sections. The first is 60 cm: a tank is created. The second - 90 cm: a heater and a combustion chamber.
- Convert a pipe to a furnace.The bottom of the pipe becomes a place for a 20 x 5 cm hole. This is a blower. Above it, a round steel plate is mounted by welding. Its minimum thickness is 12 mm.
The grate must be concentrated in the blower: a metal element is being prepared.
The grate should be fixed. To do this, four "ears" are welded to it.
Then a niche for the firebox is created. Here, the remains of a pipe are used, the parameters of which are 25 x 30 cm. From them you create the door of the combustion chamber. Hang the door on hinges, you can on hooks. Install a latch on the door.
A pipe element is welded over the combustion chamber. Its approximate parameter is 35 cm. It will become a heater. Maintain a minimum distance of 10 cm between its bottom and top. The back of this compartment is welded. A door with a maximum of 30 cm is produced.
50% of the heaters are filled with pebbles. The requirement for pebbles is large size, round shape. If not, electrical insulators will do. This is followed by the welding of the steel bar. It will hold the contents of this compartment.
A sleeve is mounted on the upper side of the created furnace. It is 5 mm in thickness, at least 5 cm in width. The coupling is created on early stage from a steel tire. One half of it is connected by cooking to the stove body. The second one rises above the furnace and becomes a site for connecting the tank.
An example of the design of such a furnace:
- Tank connection.A steel circle is welded to the end side of the tank in the lower part. Its thickness is at least 8 mm. Before that, make a hole in it (D ~ 12-15 cm). It will be followed by the installation of a chimney. Here it (the pipe) moves somewhat towards the rear wall of the tank. And the bottom of this pipe is cooked to its bottom. This prevents water from entering the combustion chamber.
The same steel element (semicircle) covers the top of the tank. The chimney (pipe) is connected to the hole in this circle. After these steps, a hole will appear in the upper side of the tank. Through it it will be possible to pour water into the tank. The neck must also be closed. To do this, create a lid with a handle.
A steel platform is cooked 35 cm from this tank. Use its 30 cm side to attach the already brick pipe. It has a latch and comes out on the roof. Next, a faucet with a valve is mounted. Its position is opposite the hole in the tank into which you will pour water.
This scheme will help you in this matter:
Also, when working on a tank device, they are usually guided by the following scheme: 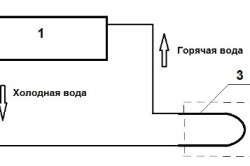
Here 1 is the water tank. 2 - Compartment for fuel. 3 - Working circuit.
Fourth step - installing the oven
Positioning the combustion chamber doors, fix them to the bath door. The position of the heater doors is diagonal to the opposite corner of the given room.
Before the installation stage, a concrete foundation is set up in the bath. Its height: 20-30 cm. Fire-resistant bricks are laid on it in two lines. They are fixed with a clay compound.
Mandatory parameters of the platform for the oven: 70 x 70 cm. Its minimum height is at least 20 cm. At this distance, it concentrates from the nearest wall.
An additional layer of 12 cm is arranged in the laid masonry. Its position is the section where the chimney exits to the street. The ceilings (mainly wooden) are covered with asbestos-felt heat protection. They are processed with clay composition. The pipe element between the ceiling and the roof is plastered and lime-covered. The pipe rises 50 cm above the roof.
If a wooden rather than brickwork is arranged in the bath, then the stove is necessarily surrounded by brick (these are safety criteria). Brick lining in height reaches 120 cm, and in thickness - up to 80, and on both sides of the oven.
After fixing the foundation, the installation of the created furnace follows.
If the bath has a separate position from the house and is not resistant to temperature fluctuations, it is necessary to increase the strength and resistance to frost.
Installation completed. The bath is required to be experienced. The first test should reveal possible flaws. The main thing on it is not to take a steam bath, but to study the operation of the stove and the conditions for a comfortable stay in the bath. If the test ends successfully, you can invite relatives and friends to the bathhouse.
Above, the method for creating a metal furnace with a tank in a vertical design was described. Here - the main component is a pipe of significant diameter.
In the horizontal version, the main component is container with a tank... The first option is more popular. Because pipes have more impressive thermal shock resistance. And the pipes burn out less than a furnace with a tank.
Other techniques for creating similar furnaces
Above, a template methodology for the independent manufacture of a metal bath stove equipped with a tank was described. It is not necessary to follow it thoroughly. This is especially true for details and their parameters.
For example, you can follow this pattern:
First find the pipe you want. Its diameter is decent, thickness: 0.5 - 1.5 cm, length - up to 2 m. It is cut into segments: 100 cm - into the combustion compartment, 60 - into the tank, the rest - into possible parts.
To create a blower, holes 5 x 20 cm are cut, for the firebox - 20 x 30 (more is possible, the main thing is that firewood can easily enter there). Above the blower in the pipe, an element is attached to fix the grate: a plate or a corner. The corner is more reliable. Single grate bars are stronger and better resist burning out. If you are using a plate, then take a product with a minimum thickness of 1.2 cm.
For doors, the remains of a pipe or purchased templates are used here.
Creating a sauna heater
A plate with a cutout is mounted above the combustion chamber. Metal bars will be placed on it. They are designed for a heater. Their parameters are 10 x 10.
The heater requires a pipe at least 10 cm in height.
A hole for the future door is created in the heater compartment. Dimensions: 25 x 30 cm. The position of the heater door is in the steam room, the furnace section is opposite the entrance.
The stove is filled with stones. Suitable options: jadeite, volcanite, diabase, quartzite. There should be no mica in the stones. So, when they heat up, they will release toxins.
Also, granite cannot be used: it quickly collapses.
Mandatory structure of stones: small crystals. The shape is round. The etiology is natural.
Tank question
The tank is an indispensable part of such a furnace. For its fastening, a special plate is welded onto the heater. A cutout for the chimney is arranged in it. Then both the tank and the pipe are mounted. The material for the tank is the same as for the firebox.
The top of the tank is covered with a lid, from the side a faucet is attached to it to start hot water. If you surround the smoke pipe with a brick, then the tank must meet the required parameters.
The correct hole position for this pipe is closest to the back of the oven itself.
If the stove is not surrounded by bricks and its position is next to the wall, then this near side should be covered with foil. The foil will be a good heat reflector.
If a blockade of stones is made around the stove, such operations are not necessary.
When the oven is sheathed with brick lines, the height of such masonry is a maximum of 12 cm, and the width is 8 cm. Otherwise, the heating of the brick will be very long.
To make your stay in the bath comfortable and safe, during the operation of the stove, cover the inner plane of the doors of the combustion chamber and the blower with asbestos sheets. This material will prevent the door handles from getting very hot. This will help prevent burns to your hands.
About the horizontal oven - on video
Oversized stove for a large bath, with a good heat transfer area and a volumetric heater. True, the commentators under the video said that from an economic point of view, such a stove was questionable, but the technical part was almost unanimously approved.
The easiest and at the same time the cheapest way to make a stove for a bath is to use a piece of ordinary steel pipe... Such a structure will function quite normally in any room, regardless of its size. Moreover, thanks to the sealed body, the stove made of a pipe will not emit carbon monoxide during operation, which means that it is absolutely safe for humans. Therefore, there is no need to build any additional fences.
How to weld a stove for a bath from a pipe? In reality, there is nothing complicated here - if you have the appropriate equipment and skills to work with a welding machine, the manufacturing procedure will take only a few hours.
First you need to take care of the foundation. To do it, you need to follow these steps.
Table. Instructions
| Step, no. | Illustration | Description |
|---|---|---|
| Step 1 | In the place where the stove will be located, a hole is dug 50 cm deep. The length and width depend on the dimensions of the future structure (the article considers the use of a pipe Ø 50 cm, which means that the dimensions of the foundation should be approximately 70x70 cm). | |
| Step 2 | The bottom of the pit is covered with gravel and carefully compacted. The thickness of the already compacted layer must be at least 30 cm. | |
| Step 3 | A thin layer of liquid cement mortar (cement with sand in a ratio of 1: 4, water as needed) is poured over the crushed stone "pillow" and left to cool for 24 hours. This is the sole of the future foundation. | |
| Step 4 | Waterproofing is laid on top of the hardened cement - several layers of roofing material. | |
| Step 5 | Next, the pit is poured with concrete made of cement, sand and fine gravel in a ratio of 1: 2.5: 4 (+ water) | |
| Step 6 | The surface of the poured foundation is checked with a level. If everything is in order with the horizontality, you can proceed to the removal of the brick site. | |
| Step 7 | A platform is being built from red or fireclay bricks (dimensions are the same - 70x70 cm). The brick should be laid in one or two rows, and only on the clay mortar. As a result, the platform should rise approximately 15-20 cm above the finished floor. |
It is also necessary to protect the walls of the room from strong heat. For this, a protective screen is constructed from bricks laid “on the edge” and linked with the same clay mortar.
The height of the screen should be 120 cm, the future stove will be located about 20 cm from it.
Brick screen - example
Making a vertical furnace from a steel pipe
The process will use a 1.5-meter pipe Ø 50 cm, the wall thickness should be at least 1 cm. The procedure is as follows.
Step 1.First, the pipe is cut into two parts - 90 cm and 60 cm. The smaller part will serve as a container for water (by the way, the diameter of this segment may be smaller), and in the larger one a firebox with a stove will be installed.
Step 2. A rectangular cutout is made at the bottom of the larger segment for the blower. Hole height should be 50-60 mm and width 180-200 mm. The blower itself, by the way, will also function as an ash pan.
Pipe cutting - blower hole
Step 3.A round steel plate 12 mm thick and with a diameter corresponding to the inner diameter of the pipe used is welded over the blowing hole. A hole is cut in the center of the circle for the grate. It is easier to buy and install a ready-made "shop" grate, but if you wish, you can do everything yourself - weld reinforcing rods in the form of a lattice onto the hole, but so that the gaps between them correspond to their diameter.
Step 4. A niche with dimensions of 300x250 mm is cut out for the combustion chamber (while about 50 mm should remain to the bottom of the chamber). Then a pair of hinges is welded on, a pre-cut door of appropriate dimensions is hung on them. A latch is attached to the door.
Note! If the firebox needs to be taken out to an adjacent room, then a special rectangular apron can be welded around the door with an indent from it (door) by 50-100 mm on each side.
Step 5. Further, a cut-off device is made above the combustion chamber - a rectangular steel sheet with cut corners. Through these cut corners, the sheet is welded to the body. The gaps left between the sides of the sheet and the walls of the pipe are sufficient for the passage of flue gases. This will promote the movement of smoke along the walls of the pipe, due to which they will be heated more intensively.
Step 6. Above, about 70-100 mm from the shutter, a grate made in advance from reinforcing rods Ø 1.2-1.5 cm is welded to the body. This grate will serve as the bottom of the heater. The heater door is installed so that a person can easily open it from the steam room. The manufacturing technology here is the same as for the door to the firebox.
Step 7... From above, the body is welded with a steel sheet with a hole made in it (the diameter of the latter must correspond to the diameter of the prepared chimney).
We weld on the steel sheet in which the cover will be installed
Step 8... As noted above, a section of the same pipe that was used for the body can serve as a water tank (if desired, the tank can be made of sheet steel). It is important that the bottom of this tub is made exactly like the top of the heater. With the help of a welding machine, a pipe is attached to its bottom - it will pass through the center of the entire tank and protrude from above by about 350-400 mm.
It is also necessary to equip a lid on the tank, made in the form of a semicircle. To do this, a piece of steel that will cover the tank is cut into two parts. One of them is welded, and the other is attached to the first with hinges - this will be the semicircle cover.
Step 9.At the bottom of the tank, a tap is cut to drain the water.
Note! It remains only to weld the gate to the chimney, about 30 cm from the water tank.
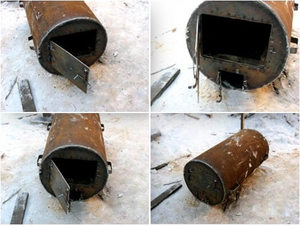
For this design, you can make a remote firebox. It is necessary to cut a sheet of steel, cut and weld. The stages are shown in the photo.
Sauna stoves made of pipe and steel. The design of the stoves is the same - it is a body divided into a water tank, a stove, a firebox and an ash pan. Steel sheets and gratings are used for separation. The chimney is brought out of the firebox through the tank and the stove
Video - Making a furnace from a pipe
Video - Vertical oven from a pipe
Basic requirements for installing the oven
With further installation works a number of requirements should be adhered to.
- The stove is installed on a previously prepared foundation, with a 20 cm indent from the wall.
- In the place where the pipe will go out, a thickening of about 120 mm is made.
- All wooden elements are covered with insulating material (this can be, for example, asbestos or felt) with a layer of clay applied to it.
- The chimney section between the ceiling and the roof is plastered and covered with lime mortar.
- The height of the pipe section above the roof must be at least 50 cm.
- The shelf must be placed next to the wall where the oven is located. When installing the shelf, you need to take care that the person sitting there does not touch the ceiling with his head.
Creating a horizontal oven
The horizontal design includes a hinged water tank and an external heater. Such a stove is more compact, and due to the increased depth of the combustion compartment, it will allow you to quickly heat the room. During the manufacturing process, you need to perform the following steps.
Step 1... A piece 80 cm long is cut from a steel pipe with a diameter of 50 cm. The edges are carefully leveled and cleaned.
We prepare the pipe
Step 2... A grate platform is being created. For this, a rectangle with dimensions of 80x40 cm is cut out of a steel sheet 1-1.2 cm thick. A hole is made inside the rectangle, after which reinforcement is welded to it (rectangle). Alternatively, you can purchase a ready-made grate made at the factory.
Step 3... The grate is welded inside the body. The pipe itself at this time is located so that the seam on it is under grate... The fact is that the metal burns out mainly in the places of welding, and such a simple technique will help to significantly reduce the thermal load on the seam.
Grizzly variant - rods are welded to a rectangular opening cut out in the body
Step 4. A rectangular facade (external firebox) (height - 0.7 m, width - 0.6 m) with a rounded top is made of steel sheet. A pair of rectangular cutouts are made in the facade - for the doors of the blower and the firebox.
Step 5. The back of the structure is also made of steel sheets, but the dimensions here are different - 0.9x0.7 m. By the way, the upper part of this element will also serve as a stove limiter.
Step 6. The back and front are welded to the body. A front stopper for the heater is welded in the center of the body, while it - the stopper - must exactly follow the contours of the body from below and the rear part from above.
Step 7. A rectangular opening of 150x150 mm is cut from the top of the case (in the back of it). The roof of the furnace is installed on top, made of sheet steel, with an opening for the chimney. It is important that the hole is 12-15 cm closer to the facade - this will provide not only cutting off the flame, but also complete combustion of the fuel (see the drawing above).
Step 8. A chimney is welded to the roof. By the way, the vault will simultaneously be the bottom of the heater. On the walls of the vault, it is necessary to weld a reinforcing lattice 20 cm high - this will increase the volume of the heater.
Step 9. Ash pan and firebox doors are attached. The oven is cleaned with a grinding wheel to remove rust and scale residues, after which it is covered with a layer of heat-resistant polymer-based paint. The first heating is done outside to bake the paint.
Note! The chimney is brought out into the street in the same way as in the case of a vertical stove.
Step 10. A water tank is mounted on top of the back. For this, a shelf is welded there, the dimensions of which correspond to the dimensions of the bottom of the tank. The stove is laid with stones, while one important rule is observed: it is necessary that their flat surfaces fit extremely tightly to the iron walls in order to heat them more efficiently.
Video - Making a furnace from a pipe (option with a horizontal arrangement)
Summing up. A few words about IR radiation
Iron stoves have many advantages, but they all have one drawback - during operation, they form hard infrared radiation, which leads to uneven heating of the air in the room. But this problem can be eliminated by doing around heater brickwork... The brick should be laid about 10-15 cm from the stove, so that the air will circulate freely along the walls. In addition, the masonry also performs a protective function - accidental touching a heated brick will not lead to a burn, which cannot be said about a hot metal.
The heart of any bath is a stove. This device must not only create a certain temperature, but also monitor the humidity of the air.
Considering this, professional craftsmen advise using a stove for a bath from a 530 cm pipe for these purposes.
Manufacturing procedure
First, you need to mention that all necessary materials can be purchased at scrap metal collection points. Also, many craftsmen believe that horizontal stoves for a bath from a pipe are less effective and impractical.... Therefore, it is better to create a vertical structure with a water tank at the top.
Required materials and tools
In order to create a stove in a bath from a pipe, you must have:
- welding machine, preferably gas;
- circular saw with cutting wheels for metal;
- measuring tool;
- brush with metal bristles;
- a hammer;
- thick-walled pipe with a diameter of 520-530 cm, a length of 1.5 meters;
- a pipe with a diameter of 100 mm, a length of 2 meters;
- a thick sheet of metal from which you can cut four circles along the diameter of the pipe;
- heat-resistant paint.
Advice!
It should be noted that all metal parts must have a good appearance, which would indicate that they are ready for welding.
Otherwise, you can find through holes in the manufacturing process, which were hidden under a thick layer of rust.

Manufacturing
- In order for the stove for a pipe bath to function correctly, it is necessary to divide the pipe into several parts, each of which would have its own volume corresponding to its purpose.
- To do this, a pipe with a diameter of 530 cm is cut across into three equal parts, 0.5 meters in each.
- Further, the manufacturing instruction assumes the creation of a firebox.
- First, you need to cut a circle around the diameter of the hole, which is welded to the bottom of the first resulting element.
- Then a window is made on the side of the product through which fuel will be loaded. In order for stoves for baths from a pipe to work efficiently, it is better to immediately equip them with small doors, which can be purchased separately.
- In the next step, another circle is cut out, which is welded to the upper hole of the firebox. In this case, a hole with a diameter of 90 mm must be made in the center of it. A weave pipe is welded onto it, which will serve as a chimney.
- It is worth noting that such bath stoves from a pipe are not equipped with grates for collecting ash and, accordingly, an additional door. However, if desired, such an element can be introduced into the structure, but the height of the firebox must remain equal to 0.5 meters.
- There are such drawings of a stove for a bath from a pipe, which assume that the chimney pipe will be installed from the next chamber, but then many small holes need to be made in the upper circle covering the firebox. Some craftsmen consider this design to be more effective.
- Next, a second piece of thick-walled pipe is put on top and welded. The resulting chamber will contain stones that will be able to carry out uniform heat exchange in the room. At the same time, there are many manuals telling how to weld not only equip the compartment with a window, but also a door. This is especially important if the chimney is attached to it from above, and at its bottom there will be holes leading to the firebox.
- The upper part of this chamber is also made with a hole for the hundredth pipe, but in one case it is simply put on through it, and in the second manufacturing version such a horizontal panel will be the basis for the chimney. All joints are also welded, monitoring the quality of the seams. The fact is that with intense heating, the metal will expand and this will be a serious test of this work.
- Some masters, when using electric welding, advise using special electrodes that create a seam that is resistant to high temperature and its sharp drops.
- At the next stage, a sauna stove from a pipe needs to create a water tank. To do this, a third element is put on top of the structure, which was cut off earlier and carefully welded. This will be a reservoir for water, and it will be heated not only due to the thermal conductivity of the metal, but also using the gases released during combustion, which will rise up the chimney.
- After that, with our own hands, we make a convenient cover that covers the surface. It doesn't have to be made of metal. A wooden board made of boards is quite suitable as a cover.
- Some masters suggest installing a faucet on the bottom of the tank so that you can pour water into the bucket without putting your hands in danger when in contact with steam.
- At the final stage ready product treated with a brush with metal bristles and covered with a layer of heat-resistant paint. It should be said right away that its price is quite high, but if there is a desire to give the structure a good appearance, then such costs are fully justified.
Advice!
It should be mentioned that there are a number of similar products, differing in the way of assembly and principle of operation.
This design presented as a framework that experienced master will always be able to modify and improve.
Output
In the video presented in this article, you will find additional information on this topic. Also, based on the text that is set out above, we can conclude that there is nothing difficult. However, to implement this project, you must have a special tool and be able to handle it.
Almost every owner country house or dachas dreams of having a steam bank on their site. As a result, some order the construction of a small structure for construction teams, while others do it on their own. But building and finishing the bath is only half the battle. The main thing is that for a good steam room you need a heater. And you don't have to spend money to buy it.
After reviewing the video instructions and simple drawings, you can make a good oven with your own hands. It will take the most simple materials, the main of which will be pipe 530.
Choosing a project for a stove in a bath
Homemade heaters design delights and stylish appearance do not differ, but a steam room with a volume of up to 20 cubic meters. meters are heated efficiently and quickly. By their design, pipe furnaces are divided into two types:
The vertical sauna stove has pipes 530. The design is similar to a conventional stove, but apart from the firebox compartment, it also has a water tank for heating water and a container for laying stones. This is a fairly compact model that takes up little space, so it is suitable for small steam rooms. At the same time, its main disadvantage is that the blowers and firebox doors are located in the steam room, and it also has a lower thermal efficiency.
Choice homemade oven depends on the layout and size of the steam room, and on the individual preferences of the owner of the bath.
Features of a homemade stove from a pipe
The heater design includes the following elements:
- firebox;
- a container for stones, which can be located both inside and outside the case;
- chimney;
- ash collection chamber;
- a water heating tank, which can be part of the body or located above the chamber with stones.
The chambers are separated from each other by grates.
Advantages
Furnaces for baths from the pipe are not the only option that you can do yourself. But they have a number of undeniable advantages:

Large thickness the walls have excellent heat capacity, which allows you to keep heat in the steam room even after fuel combustion.
The purchase of materials for the manufacture of a homemade stove does not require large costs. And if there is a suitable piece of pipe on the farm, sauna heater will cost almost free.
Preparation of materials and tools
Front furnace making for a bath from a pipe, you need to study video instructions and drawings, as well as prepare a workplace. This could be a covered outdoor shed, a home workshop, or a garage.
For work you will need:
Several sheets of metal with a wall thickness of 2-4 mm and dimensions from 600 to 800 mm.
Horizontal oven from a pipe - video
The main with a horizontal heater is the location of the stone basket and water tank outside the fuel compartment. The blowers and firebox doors are removed outside the steam room.
Stages of work on making a stove with your own hands:
With respect to the base of the furnace, the end walls are installed in the correct position and around the entire perimeter with the help of a welding machine at the joint are hermetically welded to the main pipe.
The horizontal sauna stove is ready. Now you can start her fire tests on the street.
Vertical sauna stove from pipe 530
If steam room small, then it can be equipped with a vertical structure.
DIY manufacturing technology:
The cutter is made of a rectangular metal sheet, which is welded to the pipe at the corners. Air will pass between the edges of the sheet and the walls of the pipe, which will ensure better heating of the oven for the bath.
The vertical oven for the bath is ready. Now you need to check its operation and can be installed in the steam room.
Installation and operation of pipe furnaces
Exploitation metal ovens associated with the risk of burns and fire. Therefore, when installing them, the following rules must be followed:
The water tank must be filled before starting the sauna. Water must not be poured into a dry hot tank, as steam shock can result in burns.
Having looked video instruction and having figured out the drawings, you can make a stove for a bath from a pipe with your own hands. This task will turn out to be really simple. The design will be highly efficient and, if properly installed and operated, is completely safe. The main thing is to carry out all stages of work strictly according to the instructions, without violating the technology.


