What Russian person doesn't like to be in a bath? And, of course, the heart of every bath is a stove. On the modern market there are many companies offering various designs of metal or brick bath stoves that use various types of fuel. However, the cost of such proposals often makes one think: "Is it so difficult to make stoves for a bath with your own?" It turns out that if you have minimal skills in the ability to handle a welding machine, it is not so difficult to do this.
Two varieties
The most common, easy to implement and cheap design is a pipe sauna stove, the drawings of which are quite simple and do not require any special knowledge of stove business. Consider two designs of stoves for a bath from a pipe: in one, the pipe is located vertically, in the other - horizontally.
Step-by-step manufacturing instructions
This is just one option. There are a lot of varieties of such stoves. There are remote fireboxes, there is even.
For a vertical pipe oven, you will need:
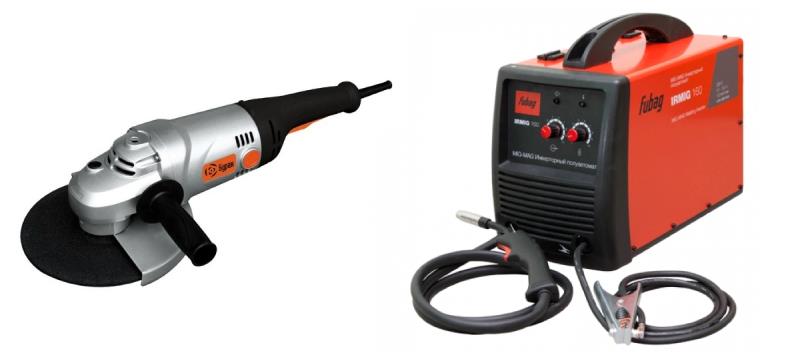
- welding machine;
- welding electrodes;
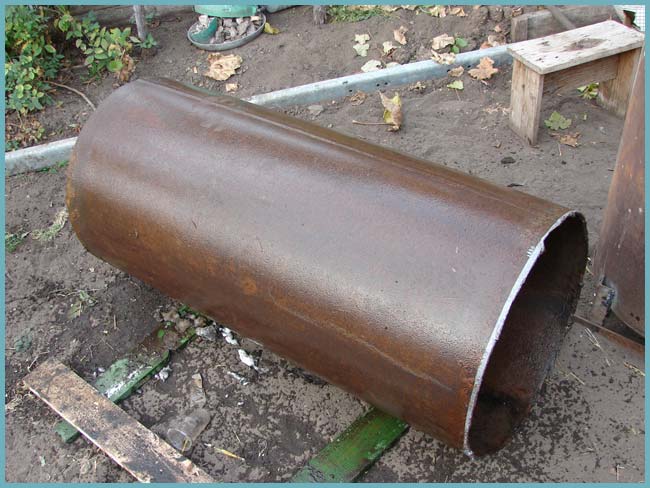
- two pieces of pipe measuring 60 and 90 cm and Ø 50 cm or more, with a wall thickness of about 10 mm;
- fittings (for grates and grates);
- pipe Ø 15 cm (for the chimney), the length of the pipe must be enough for it to protrude at least 40 cm above the roof level;
- mortise metal crane;
- pipe Ø 30–35 cm (for the heater);
- 2-3 sheets of metal, 8-10 mm thick;
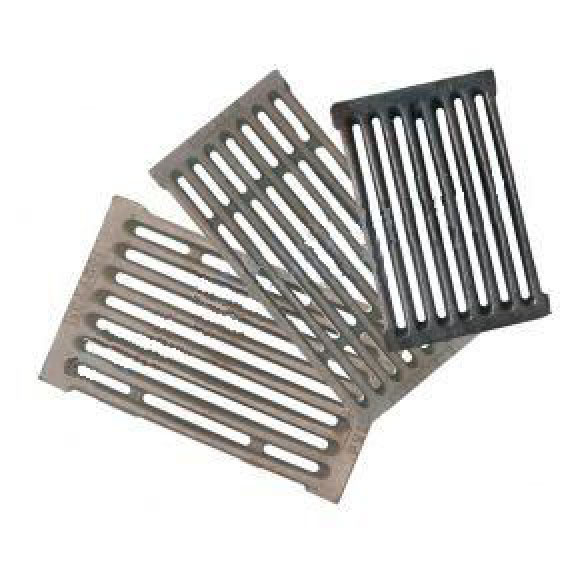
- grate (or steel bar for manufacturing);
- door hinges (4 sets).
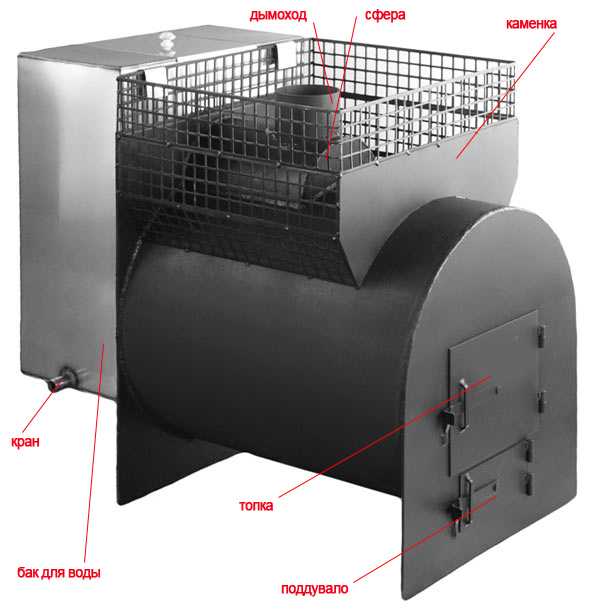
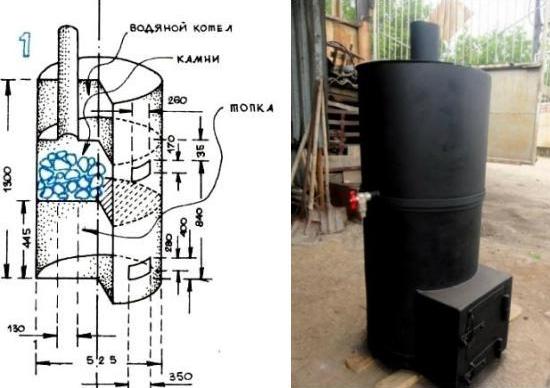
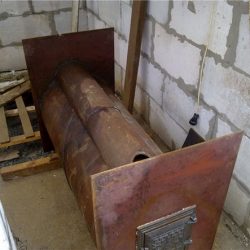
From a longer piece of pipe (90 cm) we make a firebox, and a short one (60 cm) will go to the water tank.

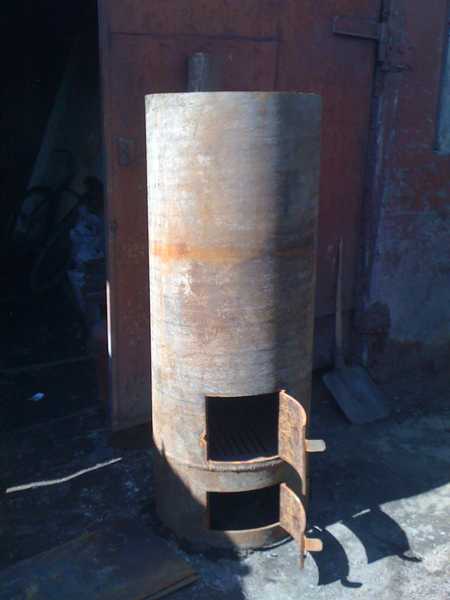
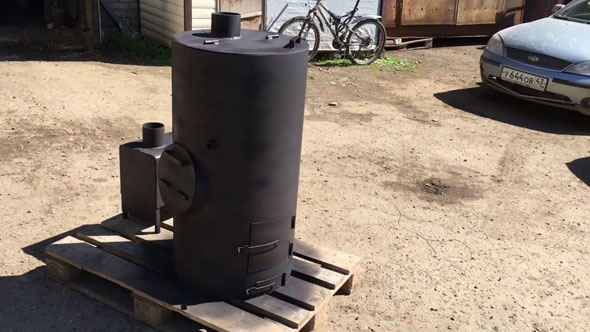
Well, our stove from a 500 mm pipe is ready. In the same way, a sauna stove is made from a pipe of 530 mm or any other diameter. The only limitation is that the wall thickness must be at least 10mm. Otherwise, the oven will quickly fail.
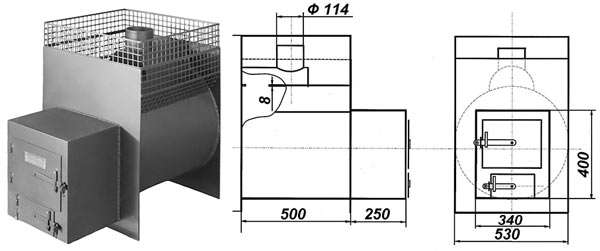
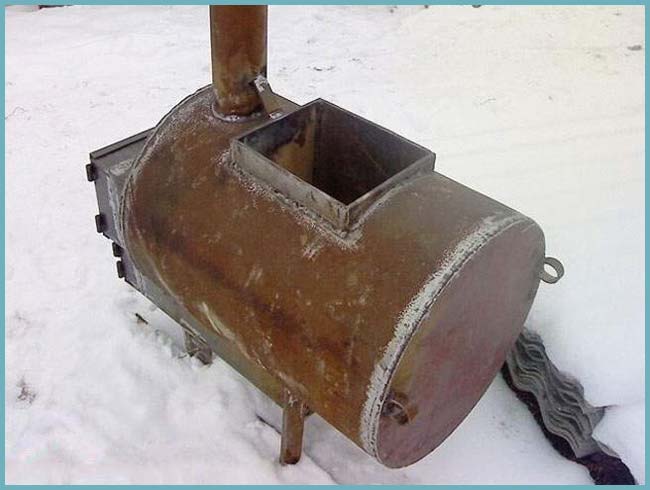
Horizontal oven
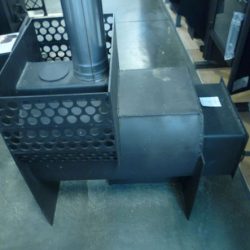
The drawing of a stove from a pipe is not very complicated. On the basis of this design, the "Heat" ovens are produced. They modified it a little, but the essence remained the same.
For a horizontal oven from a pipe you will need:
- welding machine;
- welding electrodes;
- tools for cutting metal (for example, a hacksaw for metal or a grinder);
- two pieces of pipe measuring 75 cm and Ø 53 cm, wall thickness about 10 mm;
- pipe Ø 20 cm and 35 cm long (for equipping a hemisphere);
- pipe Ø 11.4 cm (for the chimney);
- grates (or a steel bar for their manufacture);
- steel reinforcement (for grates and grates);
- door hinges (2 sets);
- several metal sheets, 8–10 mm thick;
- several sheets of stainless steel (for making a water tank);
- mortise metal crane;
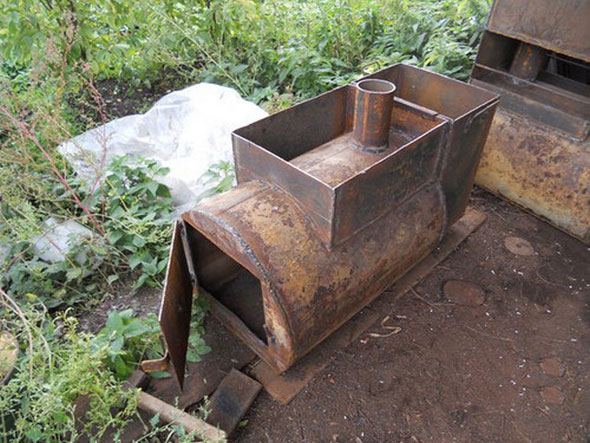
A feature of this design is that the water tank can be positioned either directly on the furnace body or hung behind it. The tank is often made separately. It is much more convenient.
- Place the main pipe horizontally. You can immediately weld the legs for stability, or you can make them solid by adding them when marking the end parts.
- We retreat from the lower point of the pipe a distance equal to 1/3 of the diameter and at this height we measure the distance between the pipe walls. Cut out a rectangle from a sheet of metal 750 mm long and equal to the measured distance. This will be a ground for laying firewood. In the center of the rectangle, cut a square or rectangular hole for grate... If you do not want to buy industrial grates, you can simply weld the reinforcement rods in the form of a lattice.
- We insert the resulting structure into the pipe and fix it by welding.
- Cut out two rectangles from metal sheets, 53 cm wide and 70 cm long. These will be the end parts of our furnace. We weld them to the ends of the main pipe.
- On the front side, using a grinder, cut out rectangular holes for the blower and fuel chamber doors, equip the doors (weld on the hinges, locks and put them in place).
- In the upper part of the main pipe, closer to the back wall, cut a hole for the smoke outlet. Its size and shape are not important, but not too large, of course.
- We cut a pipe Ø 20 cm and length 35 cm in half and weld the ends at one half, closer to the middle we cut a hole for the chimney (the shape and diameter must match).
- Then we “cover” the body with the prepared hemisphere so that the holes in the body and the “lid” do not coincide (they are displaced relative to each other). This is necessary to create an additional zigzag when the smoke comes out, so that the oven does not cool down too quickly. We fasten the structure by welding.
- Insert the pipe into the hole under the chimney and weld it on.
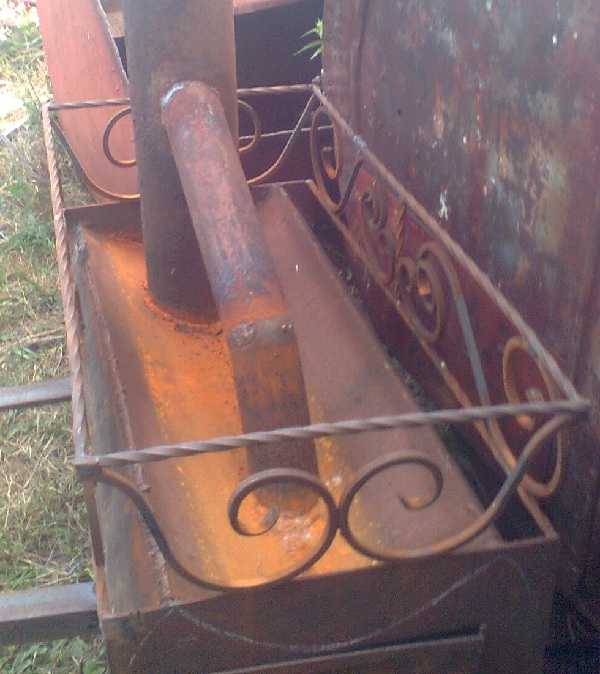
- We make a basket for stones from the reinforcement and place it on top of the firebox around the additional hemisphere.
- We make a water tank from stainless steel sheets, equip it with a lid and fasteners, with which the tank can be hung on the back wall of the furnace.

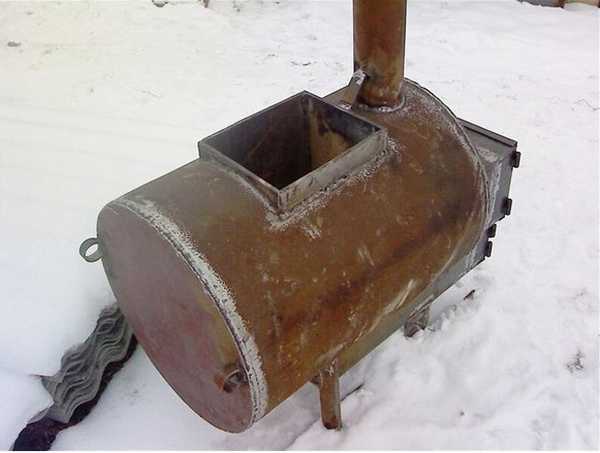
That's all, our homemade stove for a bath from a horizontal pipe is ready. As you probably already understood, making a metal stove for a bath with your own hands is not so difficult.
There are options with open or closed stoves, and the design of the tanks can be built-in, located directly on the body, or even taken out separately (for example, on the wall). There is, for example, another option with an open heater.
Even more different homemade bourgeois. There are a lot of designs. From the most basic to fairly complex structures.

The most common heating devices for garages and summer cottages - potbelly stoves
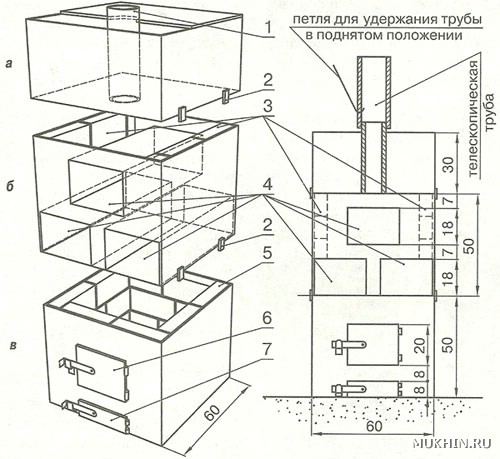
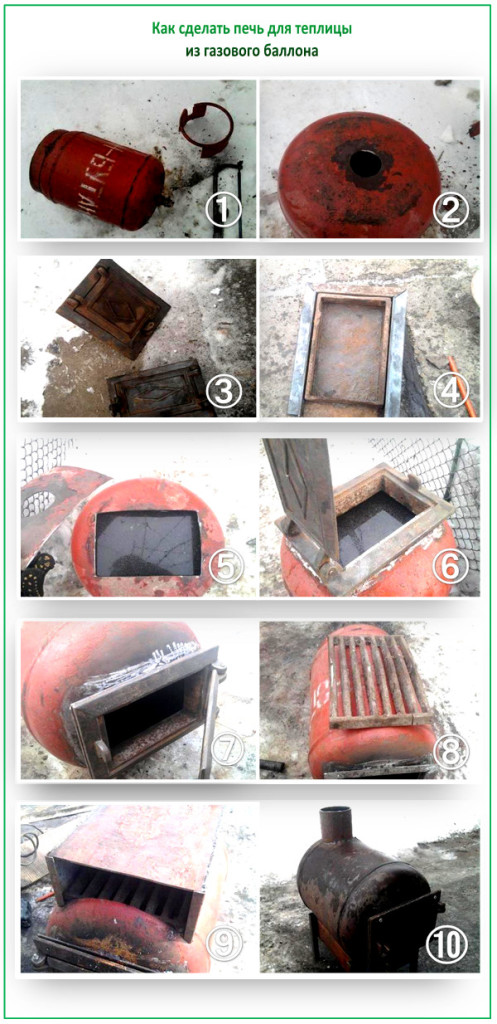
A very interesting version of this potbelly stove made of two barrels of different diameters nested one inside the other. How to make it: you need two barrels of different diameters, bricks instead of legs (you can weld metal, if you wish), doors and hinges, metal for making a grate and a lid. Pebbles, clay and sand will be needed to make backfill.

- Let's start with making the backfill: mix pebbles, sand and clay and ignite over a fire.
- We cut the same holes in both barrels for the blower and fuel filling. But you need to do this with an offset. We start with a smaller barrel. Cut out the blower door 2-3 cm above the bottom, above it 10-15 cm above the door for storing fuel. We also make it in a larger barrel, but the lower hole is already at a distance of 10-15 cm from the bottom, respectively, the second door is also higher (the distance between the doors is exactly the same as on the smaller barrel).
- Weld a grate circle in which the holes are cut into the smaller barrel above the hole for the blower door.
- Pour the prepared backfill on the bottom of the larger barrel. We select the level so that the holes for the doors match. Moreover, the barrels are in contact with the front sides, and a decent distance remains behind. Fill this entire distance with the same filling, compacting it well.
- Aligning the holes, weld them around the perimeter, weld the hinges and doors, install the locks.
- Next, you need to install the stove cover, cutting a hole in it for the chimney, and weld it well.
- The last step is to install the chimney.
That's it, the potbelly stove from the barrel is ready. The uniqueness of this design is that it gives a softer heat: most of the hard radiation is absorbed by the backfill. This structure can probably even be filled with stones by modifying the cover so that it is possible to service the stones (change the destroyed ones).
Whichever design you choose, there are some rules that should be followed in order to comply with fire safety:
- A stove of any design must be placed on a base made of fireproof materials, for example, heat-resistant tiles, bricks or sheets of asbestos cardboard.
- The dimensions of the stove must be such that the space in front of the stove to the wall is at least 1.2 m.
- Do not place a metal stove closer than 1 m from the wall. If the wall of the bath is upholstered with metal or plastered with a layer of at least 2.5 cm, this distance can be reduced to 80 cm.
- Adequate insulation of the chimney is also very important. The safest way to do it is from.
Follow these simple rules, and your homemade metal sauna stove will delight you for a long time with excellent work and strong heat. You can read more about how to install the oven in the article.
Building a bath is a rather complicated and expensive task, but in a country house a bath is a must. One of the most important elements of a steam room is a sauna stove. Almost everyone can build a stove from a pipe with their own hands, and how to do this will be described later.
A little about pipes
Before proceeding with the manufacture of the furnace, you need to select the appropriate pipes. All pipes are marked. The numbers of the applied marking determine:
- basic pipe dimensions;
- preparation method;
- steel grade;
- the standard by which they were produced.

To select a pipe for making a furnace from the marking, you will need to know the dimensions:
- inner diameter;
- wall thickness.
For example, 450 * 8. This means that the inner diameter is 450 mm and the pipe wall thickness is 8 mm.
A homemade stove for a bath from a pipe should warm up quickly and evenly enough. In this case, it is desirable to use a minimum amount of fuel. The sizes are considered optimal:
- diameter of about 0.5 m, that is, pipes of 500 mm, 510 mm and so on are suitable. Maximum 550 mm;
- wall 8-12 mm.
With such dimensions, the furnace will warm up as quickly as possible, while the metal will not undergo deformation due to high temperature.
What is required to make a furnace
To make a stove for a bath from a pipe with your own hands, you will need:
- a piece of metal pipe with an approximate diameter of 500 mm and a length of 1.5 m;
- a piece of pipe with a diameter of 300-350 mm and a length of 50 cm;
- metal sheet 10-12 mm thick;
- ready-made grates or metal rods for their own production;
- ready-made doors or metal sheets for their production;
- metal hinges. Necessary if you plan to make the oven doors yourself;
- grinder for metal cutting;
- welding.
In order to save as much as possible on the required materials, it is necessary to purchase not whole pipes and sheets, but their trimmings, which can be found in almost any hardware store.
Types of furnaces made from pipes
A stove for a bath from a pipe 530 mm (or other size) can be made:
- in vertical design;
- in horizontal design.
Vertical oven
The vertical stove for a pipe bath has a small size, which is naturally its main advantage. The grates and the stove are located one above the other, therefore the diameter of the stove is determined exclusively by the diameter of the pipe used.
Horizontal oven
The main advantage of a horizontal stove over a vertical one is the ability to move the combustion compartment from the steam room to the dressing room, which greatly simplifies the kindling stage. However, horizontal ovens take up more space and are therefore recommended for large steam rooms.

The choice of the furnace design depends on the dimensions of the pair section and the owner's priorities.
Making a stove with your own hands
After choosing the design of the furnace and purchasing all the necessary materials and tools, you can begin to manufacture it.
Furnace drawings
The first stage of construction is drawing up a drawing. A drawing of a stove for a bath from a pipe determines the installation locations of the necessary components.
You can make a drawing of a stove from a pipe yourself (this will require some knowledge) or use a ready-made one.
It is not recommended to start manufacturing the furnace without a preliminary drawing, since there is a possibility of making mistakes that can lead to the inoperability of the device. Incorrectly assembled stoves can adversely affect human health.
Horizontal oven manufacturing instructions
A do-it-yourself horizontal oven from a pipe is made according to the following scheme:
- a piece of pipe is cut out, the length of which corresponds to the drawing dimension of the furnace (the optimal furnace length is 0.7 - 0.9 m). The cut points are sharp, so it is recommended to sand them a little.
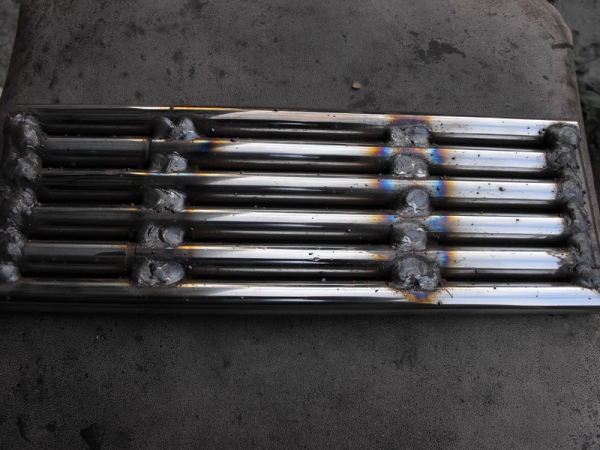
- a grate is installed in the lower part. Self-production of this device looks like this:
- cut out a rectangle of the required size from a metal plate (fully corresponds to the internal dimensions of the furnace);
- in the prepared rectangle, the middle is cut out so that there is room for welding at the edges;
- horizontally or vertically (at a small distance from each other) metal rods are welded;
- the manufactured (purchased) grate is installed in the prepared pipe section;
- the back of the stove is welded. For this, a sheet of metal is cut out with dimensions slightly larger than the diameter of the pipe. If the stove is supposed to be located in the upper part, then the length of the sheet must be increased by the size of the stone compartment. This will avoid additional welds;
- a sheet is being prepared for the front of the oven. The dimensions of the sheet should be slightly larger than the dimensions of the furnace;
- rectangular holes are cut in the prepared sheet for furnace door and blew. If ready-made doors are used, the dimensions of the holes must correspond to the dimensions of the doors;
- the front sheet is welded to the front of the stove;
- a hole is cut out in the upper part of the furnace body (approximately 15 * 15 cm) for installing the chimney;
- doors are hung;
- the finished furnace is cleaned from rust and scale formed as a result of welding.
If the stove is covered, it is recommended to heat it outside before installing it. As a result of this action, excess paint will burn, without harming human health.
Instructions for making a vertical oven
A do-it-yourself sauna stove from a pipe in a vertical design is made according to the following scheme:
- a piece of the main pipe with a height of 0.7-0.9 m is cut off;
- the places of the cuts are cleaned;
- a circle with a diameter equal to the diameter of the pipe is welded to the lower part of the pipe. This serves as the bottom of the stove;
- a hole for the blower is cut in the lower part of the pipe. The dimensions of the opening must match the dimensions of the door;
- grates are installed (how to make a grate yourself, described above). The grate needs to be installed slightly above the blower.
- a rectangular hole is cut above the grate, equal in size to the door being installed. This will create a combustion compartment;
- if necessary, a hole for stones is equipped. The simplest way to organize the heater is as follows:
- a rectangular hole is cut 10-15 cm above the combustion chamber;
- an additional grate is installed in the hole (it is on it that the stones will subsequently be located);
- a door is installed on the hole. If you open the door, then water can be poured onto the stones to obtain additional steam;
- doors purchased or made by yourself are installed on all holes;
- a hole is cut in the upper part for installing a chimney;
- as in the previous case, the oven is sanded and painted.
If desired, you can hang a tank for heating water on any stove.
Making a sauna stove on your own is possible only if the master knows how to handle a welding machine. The manufacturing process is not complicated, but it requires certain knowledge and skills.
The heart of any bath is a stove. This device must not only create a certain temperature, but also monitor the humidity of the air.
Considering this, professional craftsmen advise using a stove for a bath from a 530 cm pipe for these purposes.
Manufacturing procedure
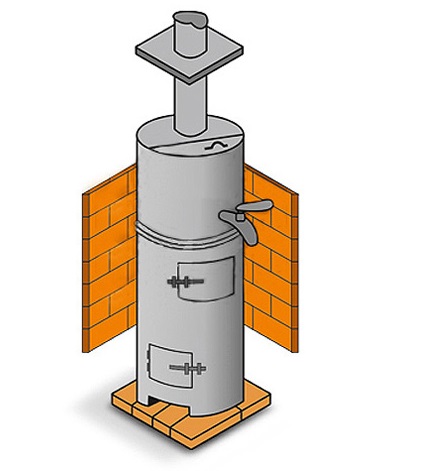
First, you need to mention that all necessary materials can be purchased at scrap metal collection points. Also, many craftsmen believe that horizontal stoves for a bath from a pipe are less effective and impractical.... Therefore, it is better to create a vertical structure with a water tank at the top.
Required materials and tools
In order to create a stove in a bath from a pipe, you must have:
- welding machine, preferably gas;
- circular saw with cutting wheels for metal;
- measuring tool;
- brush with metal bristles;
- hammer;
- thick-walled pipe with a diameter of 520-530 cm, a length of 1.5 meters;
- a pipe with a diameter of 100 mm, a length of 2 meters;
- a thick sheet of metal from which you can cut four circles along the diameter of the pipe;
- heat-resistant paint.
Advice!
It should be noted that all metal parts must have a good appearance, which would indicate that they are ready for welding.
Otherwise, you can find through holes in the manufacturing process, which were hidden under a thick layer of rust.

Manufacturing
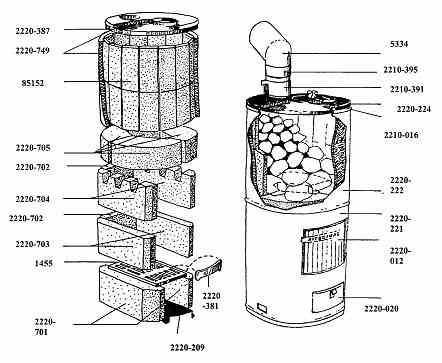
- In order for the stove for a pipe bath to function correctly, it is necessary to divide the pipe into several parts, each of which would have its own volume corresponding to its purpose.
- To do this, a pipe with a diameter of 530 cm is cut across into three equal parts, 0.5 meters in each.
- Further, the manufacturing instruction assumes the creation of a firebox.
- First, you need to cut a circle around the diameter of the hole, which is welded to the bottom of the first resulting element.
- Then a window is made on the side of the product through which fuel will be loaded. In order for stoves for baths from a pipe to work efficiently, it is better to immediately equip them with small doors, which can be purchased separately.
- In the next step, another circle is cut out, which is welded to the upper hole of the firebox. In this case, a hole with a diameter of 90 mm must be made in the center of it. A weave pipe is welded onto it, which will serve as a chimney.
- It should be noted that similar sauna stoves from the pipe are not equipped with grates for collecting ash and, accordingly, an additional door. However, if desired, such an element can be introduced into the structure, but the height of the firebox must remain equal to 0.5 meters.
- There are such drawings of a stove for a bath from a pipe, which assume that the chimney pipe will be installed from the next chamber, but then many small holes need to be made in the upper circle covering the firebox. Some craftsmen consider this design to be more effective.
- Next, a second piece of thick-walled pipe is put on top and welded. In the resulting chamber, stones will be placed, which will be able to carry out uniform heat exchange in the room. At the same time, there are many manuals telling how to weld not only equip the compartment with a window, but also a door. This is especially important if the chimney is attached to it from above, and at its bottom there will be holes leading to the firebox.
- The upper part of this chamber is also made with a hole for the hundredth pipe, but in one case it is simply put on through it, and in the second manufacturing version such a horizontal panel will be the basis for the chimney. All joints are also welded, monitoring the quality of the seams. The fact is that with intense heating, the metal will expand and this will be a serious test of this work.
- Some masters, when using electric welding, advise using special electrodes that create a seam that is resistant to high temperature and its sharp drops.
- At the next stage, a sauna stove from a pipe needs to create a water tank. To do this, a third element is put on top of the structure, which was cut off earlier and carefully welded. This will be a reservoir for water, and it will be heated not only due to the thermal conductivity of the metal, but also using the gases released during combustion, which will rise up the chimney.
- After that, with our own hands, we make a convenient cover that covers the surface. It doesn't have to be made of metal. A wooden board made of boards is quite suitable as a cover.
- Some masters suggest installing a faucet on the bottom of the tank so that you can pour water into the bucket without putting your hands in danger when in contact with steam.
- At the final stage ready product treated with a brush with metal bristles and covered with a layer of heat-resistant paint. It should be said right away that its price is quite high, but if there is a desire to give the structure a good appearance, then such costs are fully justified.
Advice!
It should be mentioned that there are a number of similar products, differing in the way of assembly and principle of operation.
This design presented as a framework that experienced master will always be able to modify and improve.

Output
In the video presented in this article, you will find additional information on this topic. Also, based on the text that is set out above, we can conclude that nothing is difficult. However, to implement this project, you must have a special tool and be able to handle it.
A pipe oven is one of the easiest and most affordable ways to organize high-quality heating of any size. Here you will not need to use large financial, labor or time resources - if you have drawings and experience in working with welding, you can build a functional firebox with your own hands in just a few hours. You can be sure of the safety of such an undertaking - the sealed body of the furnace reliably protects a person from carbon monoxide. Of course, these advantages can become a reality only with the competent manufacture of the firebox, so before proceeding directly to business, we suggest that you familiarize yourself with step by step instructions and video of furnace welding.
Preparatory work
First of all, take care of the tools and consumables... You will need:
- steel pipe: diameter - 50 cm, height - 1.5 m;
- metal sheet at least 1 cm thick;
- chimney: length - 50 cm, diameter - 30-35 cm;
- grate rods;
- steel sheets for doors;
- metal hinges;
- bricks;
- cement;
- sand;
- bulgarian;
- welding machine.
- Vertical - compact model in which the firebox and grate are placed one above the other. Ideal for small couples.
- Horizontal - a more traditional model with an enlarged combustion chamber. The latter is often brought into the dressing room to simplify the kindling process. Used mainly in large saunas.
Having decided on the type of oven, start drawing up a working drawing. In it you need to specify the location, size and configuration of all component parts future device.
Council. If you are doing this kind of work for the first time, it is better to refer to the finished drawing and make standard model, otherwise there is a risk of making mistakes that can provoke incorrect functioning of the oven.
Arrangement of a place for a stove
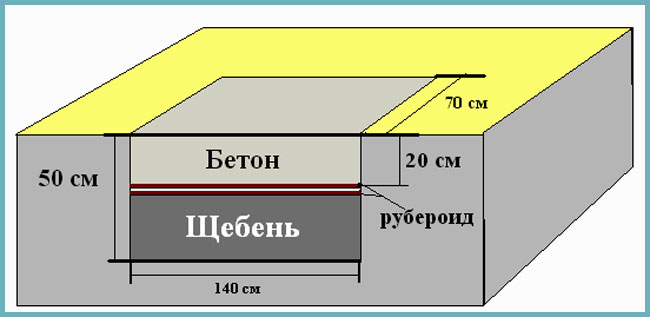
The next step is to prepare a place for installing a stove from a pipe. First, we make a solid foundation:
- In the area where the stove is planned to be located, dig a hole: depth - 50 cm, length - 70 cm, width - 70 cm.
- Fill the bottom of the resulting pit with fine gravel 30 cm high and carefully tamp the layer.
- Pour a layer of cement composition onto the crushed stone: 1 part of dry cement, 4-5 parts of sand + water. Leave the base to harden for a day.
- Lay several sheets of roofing material on the hardened cement - it will perform the function of waterproofing.
- Pour the roofing material with a concrete composition: 1 part dry cement, 2 parts sand, 4-5 parts fine gravel + water. Level the cast base with a level.
Preparing the site for installing the oven
When the foundation is dry, arrange a 70 x 70 cm brick platform on it. Lay the brick in one or two rows on a standard clay composition.
After that, construct a protective screen for the walls of the bath in the area of \u200b\u200bthe stove installation: lay the brick in one row "on the edge", interlocking with a clay compound. The optimum height of such a screen is 120 cm. The oven will need to be located at a distance of at least 20 cm from the protection.
Council. Use fireproof or red bricks for the pillow and screen.
Horizontal furnace manufacturing
A horizontal sauna oven is assembled according to the following scheme:
Council. The first time the stove needs to be heated not in a bath, but on the street, so that the paint is burnt without harm to humans.
After the oven is ready, you can fix the platform for the container with water on its back.
Vertical oven manufacturing
The sequence of welding a vertical furnace from a pipe:
As with the horizontal model, clean the furnace body and coat the finished structure with heat-resistant paint. You can make a water tank from the rest of the pipe.
Thus, there is really nothing unreal about making a furnace from a pipe. After reading the instructions, having studied the features of welding and having necessary tools, you will be able to successfully cope with the task even without outside help. And the reward for the efforts will be a reliable and safe firebox capable of heating any bath, regardless of its size.
Stove for a bath from a pipe: video
Sauna stove: photo


The mentality of our compatriots has one distinguishing feature: it is believed that a real man should be able to do everything with his own hands. A self-built stove for a bath from a pipe is a source of pride for a good owner. This is not only significant savings in the family budget, but also an opportunity to prove yourself as a true man. To realize your desires and make a high-quality oven, you need to understand its design and master the manufacturing technology. For a person who knows how to work with metal and a welding machine, there is nothing complicated about this. The finished structure may be inferior in design to industrial products, but it will be just as functional.
What should be a sauna stove from a pipe
Why choose metal tube furnaces at all? Firstly, it is much easier to make a metal stove than to build a brick one, for which a separate foundation must be planned even when designing a bath. Secondly, you can often find an unclaimed piece of metal pipe or barrel at a good owner “in the bins”, which reduces the cost of materials to a minimum. If the finished structure is assembled correctly, then it has the following advantages:
- high efficiency;
- strength;
- wear resistance;
- durability;
- safety;
- resistance to high temperatures.
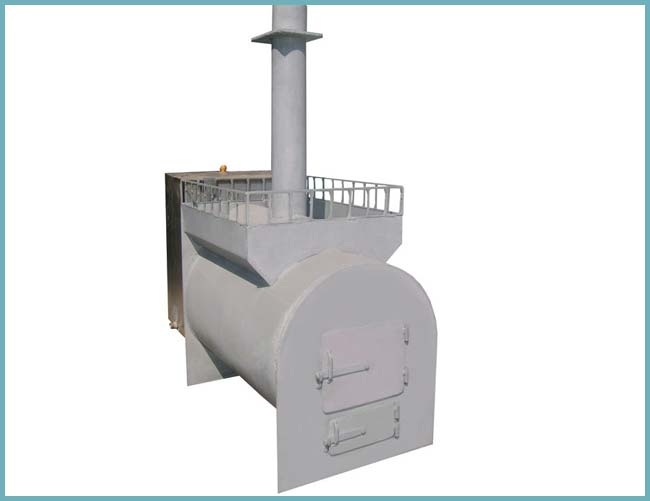
Furnaces can be vertical or horizontal. The photo shows a horizontal structure
Features of the work of a homemade bath stove
The metal case warms up quickly and begins to give off heat. The bath can be heated for 45-90 minutes. The heating rate depends on the characteristics of each specific design, the volume of the room and the initial air temperature. The owner himself chooses the performance of the furnace, determined by the diameter of the pipe or barrel, which he decides to use for the structure body. Homemade tube furnaces are best installed in small rooms, since it is usually difficult to achieve uniform heating of the entire volume of air.
It is necessary that the stove heats the lower part of the steam room to 45, and the upper one to 80 degrees (these are the minimum indicators). The tightness of the structure and the chimney plays an important role in ensuring the safety and quality of the furnace. The temperature of heating stones is also important. They should be heated so that they give the right amount of steam when watering.

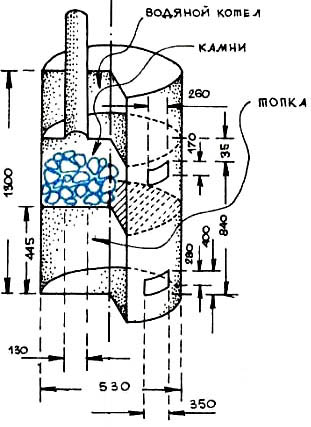
Vertical self-made oven from a metal barrel - a detailed design diagram showing the dimensions of each element
Making a stove for a bath from a pipe
Preparatory stage
For work you will need the following materials:
- metal pipe (wall thickness 10 mm, diameter at least 50 cm) 1.5 m long;
- metal pipe for the heater (diameter 30-35 cm);
- sheet metal with a thickness of at least 3 mm;
- reinforcement 8-10 mm;
- sand, crushed stone, cement, brick for equipping a place for a furnace.
You need to prepare tools:
- welding machine;
- electrodes,
- grinder.
It is necessary to carefully check the pipe for damaged areas. If there are no signs of corrosion and serious deformations, it must be cut into two unequal segments –0.9 and 0.6 m. The first segment will be needed for the firebox and the heater, and a hot water tank will be made from the second. If problem areas were identified when checking the pipe, they should be covered with metal patches or, if possible, functional holes should be located in weak spots.
Furnace manufacturing instructions
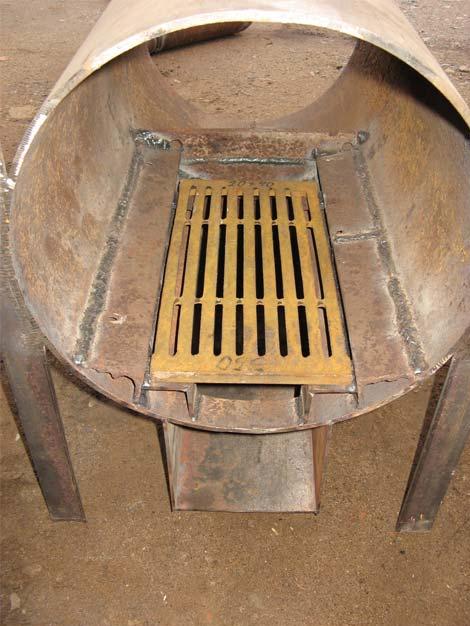
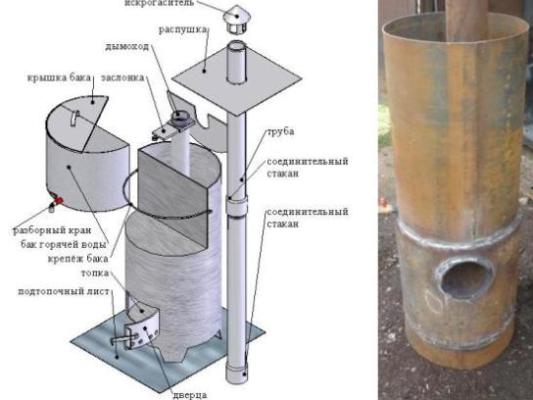
- It blew. The hole for it should be about 20x6. They cut it out at the base of the future stove. A groove is also cut out into which a grate-grate with powerful fasteners is installed.
- Firebox. The location of the firebox can be chosen at your discretion. For it, you need to prepare a niche 30 cm wide and 25 cm long. It is important to carefully cut out a piece of pipe so that you can then make a firebox door out of it. To do this, a handle, latch loops and hooks are welded to it.
- Kamenka. A "scoop" should be made from a piece of pipe, inserted into the stove perpendicular to the walls and welded. The open part for laying stones is equipped with a door.
- Coupling for fasteners. It must be welded to the top of the structure in order to be used later during installation.

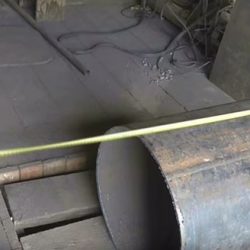
Photo instructions for making a furnace from a pipe
How to make a hot water tank
To make the bottom, you need to cut out a circle of sheet metal with a hole for the chimney, insert the pipe itself and weld it. Water heating will be provided by combustion products. It is imperative to achieve absolute tightness of the welding points. The tank is placed 10 cm above the level of the heater and welded. A removable cover is made for the upper part of the tank, and a water tap is installed from below. At a distance of 35 cm above the tank, a 30x30 cm metal plate must be welded for equipping the chimney.

Scheme homemade oven with hot water tank
Safety considerations: how to prepare the place for installing the oven
So that the sauna stove from the pipe will serve long years, was convenient and safe to use, you should properly arrange the place for it. You need to start with the foundation. Usually concrete is poured, you can also use foam concrete slabs. The recommended height of the foundation is 25-30 cm. A 70x70 cm brick platform is prepared on it. It is best to use refractory bricks and clay mortar. As a result, the site should be 15-20 cm higher than the floor.
The wall of the steam room must be protected with a 1.2 m high screen made of the same brick. The distance should be calculated so that after installation the stove is 20 cm from the brick screen. Steel sheet cladding can also be used as protection. It is necessary to consider the location of the stove so that its body does not come into contact with wood and other flammable materials. Wood trim steam rooms near the stove should be treated with antiseptics and fire retardants. This will help maintain the appearance and integrity of the walls. To protect the room from sparks from the firebox, a sheet of metal or other refractory material 50 × 70 cm in size is laid in front of it.
Attention! The installation of the furnace must be carried out strictly in accordance with fire safety rules PPB 01-93. Installation of furnaces is regulated by SNiP 41-01-2003.

When arranging the screen, remember that the height of 1.2 m is the minimum. If you want to protect as much as possible wooden walls steam room, you can make the screen up to the ceiling
There are no particular difficulties in the technology of manufacturing a tube furnace, but it is very important to perform all the work with high quality. Experts advise installing a movable damper in the chimney so that the thrust force can be adjusted. It is also advisable to make an afterburner to guarantee fire safety, especially if you have chosen a horizontal model. This will avoid excessive deposition and ignition of the soot. When the structure is ready, its appearance can be refined. The functional oven is ready. At minimal cost, you have ensured yourself a good sauna rest. You have something to be proud of!
Video: stove for a bath from a pipe


