In the difficult last century, it was difficult for the bourgeoisie who remained in the country and the common people. In the years of devastation after the revolution, the cold in city houses was added to hunger. The stokers did not work, and there was nowhere to take fuel for heating. In these conditions, Russian engineers, who did not leave their homes, had to go through the science of survival. Only a competent heating engineer could build a stove that would burn little fuel, heat well and not emit carbon monoxide. History has not preserved the author of the first potbelly stove. Therefore, it is believed that this is a product of folk art. Most likely, the idea was refined and improved with each new product made.
What is the structure
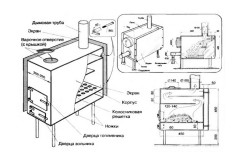
The principle of operation of such a heating device is simple. If you put a combustible material in a confined space and set it on fire, then with the access of air and the removal of combustion products, the casing will heat up and the heat will go into the room. The simplest stove device should have:
- firebox;
- door with openings for air intake;
- smoke exhaust pipe.
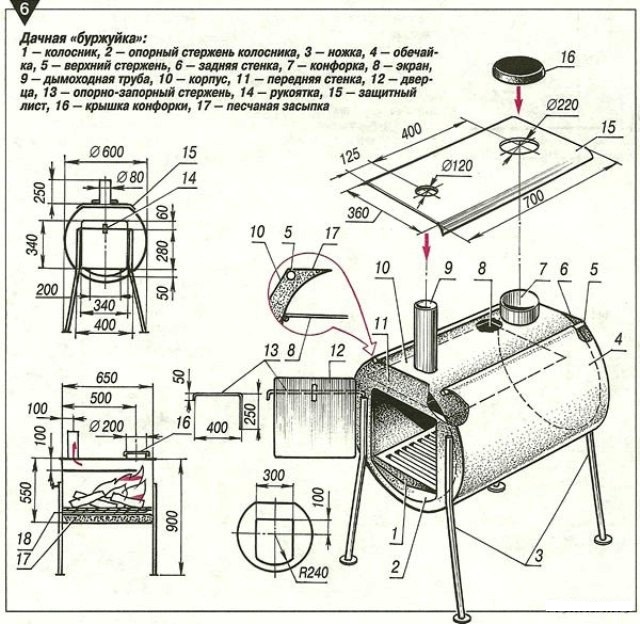
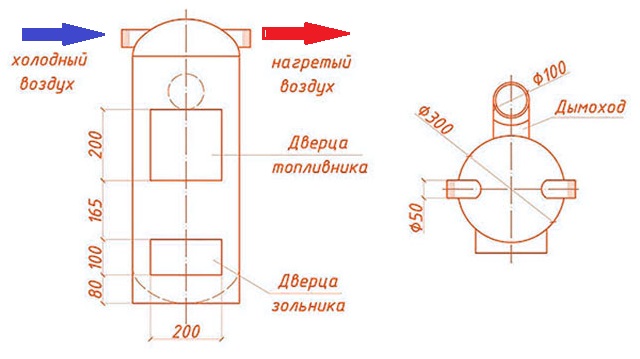
However, in order for the combustion to be efficient and the efficiency of the furnace to be high, it is necessary to maintain the ratio of the sizes of the units, create an air flow regulation, and the removal of ash residues. At the same time, it was necessary to achieve the completeness of fuel combustion and the use of heat from the outgoing pipe gas. Only a heat engineering calculation made it possible to create an effective inexpensive stove, which is still used today, creating new samples of a potbelly stove with their own hands. At the same time, for the effective operation of the stove, the ratios are taken from the drawing of the stove.
Basic technical requirements for the furnace
 Potbelly stove is not a nickname, but furnace design name... It is built according to the laws of heat engineering. The diameter of the pipe depends on the volume of the furnace. If you release all the gases that have arisen in the combustion process, then they will carry away the heat and the heating of the surface of the stove will be weak. Therefore, a resistance must be created for the furnace gas. From heat engineering calculations, the volume of the combustion chamber in liters should be 2.7 times smaller in numerical terms than the pipe diameter in millimeters. For example, if the firebox has a volume of 50 liters, then the pipe should be 130 mm.
For a do-it-yourself stove stove ratio 2.7 should be retained for the combustion chamber of the combustion zone, where the grate bottom zone is not included. Due to the reduced bandwidth gases remain in the oven. Now you need to make them work, that is, to give directional movement. As a result, it is possible to achieve a vacuum in the lower part of the firebox and suction of cold air. Combustion occurs more completely due to the movement of the flow. That's what shielding is for.
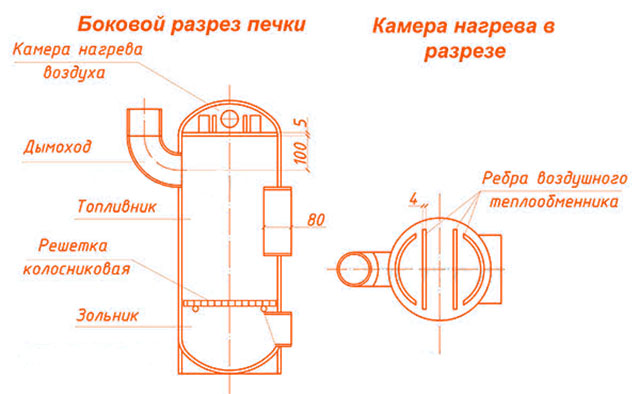
The screen device will solve the problem of creating an elevated temperature in the combustion zone. In this case, combustion is combined with pyrolysis, a smoldering mode without a flame. Shielding half of the stove surface became optimal. The inner screen is installed from two side and end surfaces, with a distance of 50 - 70 mm... At the same time, it protects the case from overheating, creates high temperature in the combustion zone and an economical initial combustion mode. This is due to shielding and convection.
At the beginning of the furnace, the space between the screen and the body is heated using convective energy flows. And the screen is made on the basis of precise aerodynamic calculations. Therefore, only vertical surfaces are fenced off as effective nodes.
Heat flow and fire hazard
 Despite the fact that grates are installed in the furnace, through which ash and small sparks fall on the plane almost cooled down, heat is transferred through the bottom to the lower surface. To prevent fire, the oven is installed on high legs and a layer of non-combustible material is laid below. It could be asbestos. A metal sheet is laid on top, protruding at least 35 cm along the perimeter. To prevent the coals from accidentally flying out into the air holes, an iron pallet is placed under the loading door. In addition, the stove is installed from the walls at a distance of at least 1.2 meters.
One of the parts of a potbelly stove that is dangerous in terms of fire is the chimney. It takes in very hot gases that continue to burn. Therefore, the pipe is hot, and if you bring it out, it is fire hazardous, sometimes flames burst out. The vertical part of the pipe is insulated, then a horizontal extended section with a slight slope is arranged for afterburning and cooling the gases. It is called hog.
Expander length not less than two and a half meters, the more it is, the better warm used. In this case, the hog is located 2.5 meters from wooden walls... In height, it should be the lowest point above the floor level by 2.2 meters. Old pre-revolutionary buildings had a sufficient height and length of heated premises. In modern conditions, the hog is hardly possible to install, but it is possible to lengthen the pipe and put on a protective screen.
Improvement of stove stoves
In the future, the stove stove was improved so that it can work on any kind solid fuel, use sawdust, liquid and gaseous fuels. For this improvements were made:
- grate bars installed;
- blowing completed;
- horizontal guides are arranged.
Equipped with a grate, the furnace coped well with burning coal. Arranged grates and horizontal screens in the firebox itself allowed the hot gases to be directed so that by opening the upper burners it was possible to cook food.
With the removal of the pipe up, the thrust increased vertically, and the stove turned from a heating one into a cooking stove. In this case, the grate and the blower played an important role. Do-it-yourself stove stoves made by hand had a different design. Often, grates are made removable and this allows you to transfer the stove from one combustion mode to another. So, the same device without grates and with top loading can serve as a furnace long burning sawdust.
The possibility of using one apparatus with different heat carriers made the round blower universal, if it is made with a removable pipe for supplying liquid fuel. The universal blower allows use different types of fuel:
- blown open - solid fuel combustion;
- with Loginov choke without grate - slow burning on sawdust;
- with installed grate and gasifier - operation on liquid fuel.
Modern use of stove stoves
 Such a simple development of a universal heater in extreme conditions could not be ignored by the industry. Canadian, Swedish and Finnish stoves are available in various designs. Such heating devices with a corresponding design replace a fireplace in a country house.
At the same time, a fireplace is an expensive structure that requires approval and installation project. Potbelly stoves are not considered stationary equipment. Therefore, they are a decent functional and inexpensive piece of furniture. The master's imagination is not limited by anything except for heat engineering calculations, the main drawing and fire safety measures.
Stoves are more widespread as heaters. country houses and garages. It is difficult to find two identical designs here. Each craftsman makes a stove with his own hands that will work to heat a house, a bath, a greenhouse.
The use of heat from the walls of the stove will be more complete if on its lateral vertical surfaces hang flat containers with water or weld the pockets on the sides with your own hands. Such stoves are used in baths and for heating water for household needs in the country. In addition, water holds and gives off heat longer than metal.
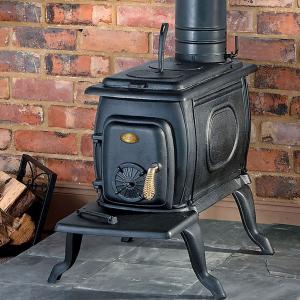
Cast iron stoves
 The cast iron construction does not need a screen, but keeps heat longer... Therefore, heavy cast thick-walled potbelly stoves are used in army camp life. They are reliable heaters and never burn out, there is nothing to burn. In addition, the military modified the design to an economical omnivorous consumer of fuel with a high degree of combustion. But you cannot boil tea on such an oven. This stove is irreplaceable for heating utility rooms.
Sawdust ovens
The sawdust stove, designed by engineer Bystrov, has a top loading and no grates. Burning continues for 19 hours until the contents are completely burned out. This oven is used for drying workers' clothes in change houses, drying walls. It is also used in artisanal smokehouses.
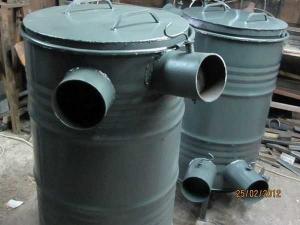
The design of a homemade sawdust oven is simpler. It consists of a perforated cylinder filled with sawdust, lowered into a cylindrical shell - a body. The mass of sawdust or waste smoldering in the core uses heat efficiently with an efficiency of up to 60%. First, the potbelly stove must be kindled from below with puppies.
Bulerian
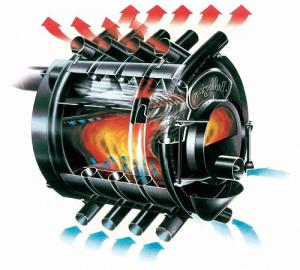
This is a kind of potbelly stove with unusual screens... They are arcuate pipes running inside the combustion chamber. Hollow pipes on both sides, air pipes. In the firebox, the air in the chimney heats up and rushes upward. A vacuum is created and a new portion of cold air enters. Air circulation allows the room to be heated very quickly. The convection of air masses is accelerated and the temperature in the room is quickly equalized. After that, you can switch to another operating mode of the installation. Such an installation can be done by hand using the developed drawings.
Advantages and disadvantages of bourgeois stoves
A person in extreme conditions needs heating and hot food. It is no coincidence that the design was appreciated by the northern countries. Therefore, it is necessary to consider the stove for use where there are no other heat sources. And then the advantages include:
The disadvantages are:
- rapid cooling when burning stops;
- strong heating of the outer parts;
- local use.
However, the stoves served their purpose. They saved many people from death during the hard years, and are in demand now. They are even used in modern design country houses.
A stove-stove is the simplest and most reliable source of heat, if necessary, quickly, efficiently and with minimal financial costs to heat technical premises, be it a warehouse, workshop or greenhouse. A hand-made potbelly stove heats probably half of all garages in the vastness of our country.
Thanks to its simple design, it is possible to build a potbelly stove with your own hands in just one day, and an unnecessary gas cylinder, a metal barrel, trimmings can serve as the material water pipes and pieces of reinforcement.
Advantages and disadvantages of using stoves
Despite the primitive design, the potbelly stove is a fairly popular heating unit, its use is many advantages :
- ease of manufacture do-it-yourself stove stoves;
- quick installation anywhere in the room;
- homemade potbelly stove in the manufacture does not require expensive materials and special tools ;
- runs on any available fuel ;
- has increased heat transfer , as a result of which it warms up the air in a matter of minutes.
However, it will be correct mention the disadvantages this type of heating, inherent in almost all models:
- low heat capacity (heating lasts exactly as long as the fuel burns);
- frequent fuel filling (this statement refers to simple models, since there are currently several more complex structures that can work for days);
- very low efficiency ;
- chimney maintenance ;
- high fire hazard this type of heating devices.
Still, a potbelly stove in a garage is the cheapest solution, so this one advantage more than covers some of the disadvantages and inconvenience in maintenance.
Diy potbelly stove
Currently, craftsmen have developed countless designs of such stoves, the most different forms and sizes. We will try to classify them and describe the methods of making the most popular copies.
Simple constructions
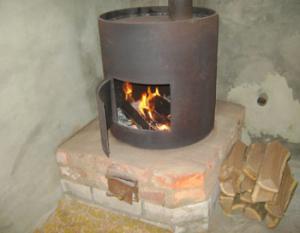
A stove stove for a summer residence is, as a rule, a kind of elementary fireplace stove. The simplest do-it-yourself stove stove is obtained from a metal barrel. To do this, you need to use some locksmith skills.
- On the side surface of the barrel, just below the middle, we cut it out with a grinder or cut a rectangular hole with a chisel. This will be a firebox. We weld the cut-out sheet of metal onto the sheds and add the simplest locking mechanism - the firebox door is not difficult at all to manufacture.
- Cut out a smaller window below the furnace hole. This opening is a blower. We do the same operations as for furnace doorto obtain a closable design. Subsequently, by opening or closing the blower door, it will be possible to adjust the draft.
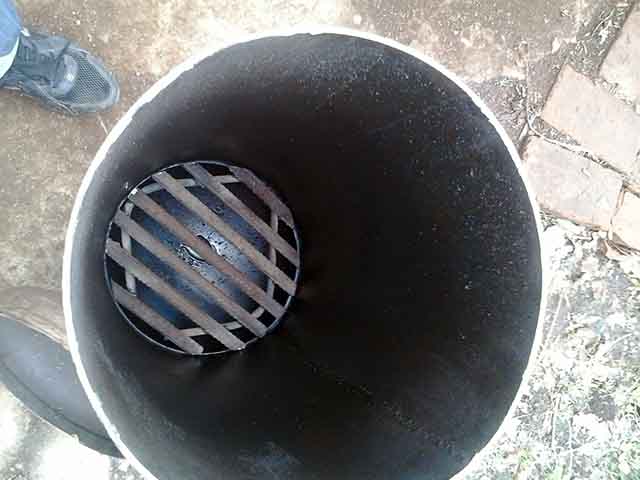
- Inside the barrel, above the upper opening of the blower, we construct grates. For this, you can use metal fittings. To make a grate out of it, drill the barrel from opposite sides and thread the reinforcement bar into the hole so as to leave about 1 cm outside on each side. Welding is used to weld the bar. This process is repeated to form a grate inside the barrel. The grates can be made removable by welding the stops inside the barrel for their installation. The best are factory-made cast iron grates.
- A hole is cut out on the upper edge of the container and a chimney is welded in (a pipe of 4-5 inches is needed), and pipe cuttings are installed on the lower edge as legs.
Potbelly stove scheme - Photo 04
It is possible to increase the efficiency of such a potbelly stove by installing an obstacle in the path of hot gases in the form of sheet metal sections welded onto the walls. The sections are installed in such a way that the heated gases pass through a serpentine path, giving off heat to the walls of the device more fully.
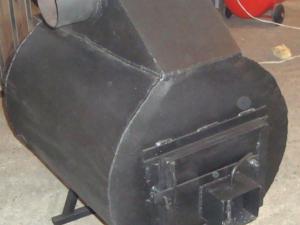
A good wood-burning stove is obtained from an old gas cylinder. The wall thickness allows such a stove to work for a long time. When positioned vertically, the construction is the same as with the barrel. However, by placing the cylinder horizontally, you can slightly increase the efficiency, creating a more difficult path for the exit of combustion products and increasing heat transfer.
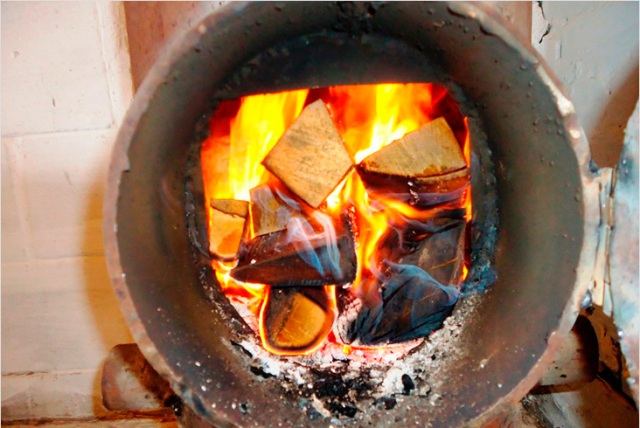
Potbelly stove from an old gas cylinder - Photo 06
With a horizontal arrangement, several rows of holes with a diameter of 10-12 mm are drilled at the bottom of the cylinder. They will act as a grate. These holes are closed with a metal box with a blower door. The box will act as an ash pan. The end of the cylinder is carefully cut off with a grinder, getting an original round door. On the other edge of the container, a hole is cut perpendicular to the surface and the chimney is welded in. You can build a potbelly stove from a cylinder with your own hands in a few hours, and it will serve for many years.
Long burning ovens
Despite the disdain for this kind heating devices as temporary solutions, efficient potbelly stoveself-built, can use such innovative solutions as afterburning of waste gases or pyrolysis combustion. As is known, these techniques allow the most complete use of the heat released during fuel combustion. At the same time, the frequency of laying firewood is reduced several times. There are designs for long-term combustion with a water circuit, used as heating boilers.
Moreover, well-known world manufacturers produce such boilers in mass production (the Stropuva furnace is produced by more than 20 companies, or the Russian Tverdotop of the Medved concern). The well-known Russian "Bubafonya" by the inventor Afanasy Bubyakin, who lives in Kolyma, is built on the same principle. This is a unique oven. Potbelly stove, which was built by more than one hundred craftsmen with their own hands.
We are building "Bubafonya"
"Bubafonya" is simple and can be made from any metal container and several iron pipes... The volume of the furnace has the most direct effect on its burning time. Such a potbelly stove, built with your own hands from a barrel from fuel and lubricants, works on one fuel tab for a day.
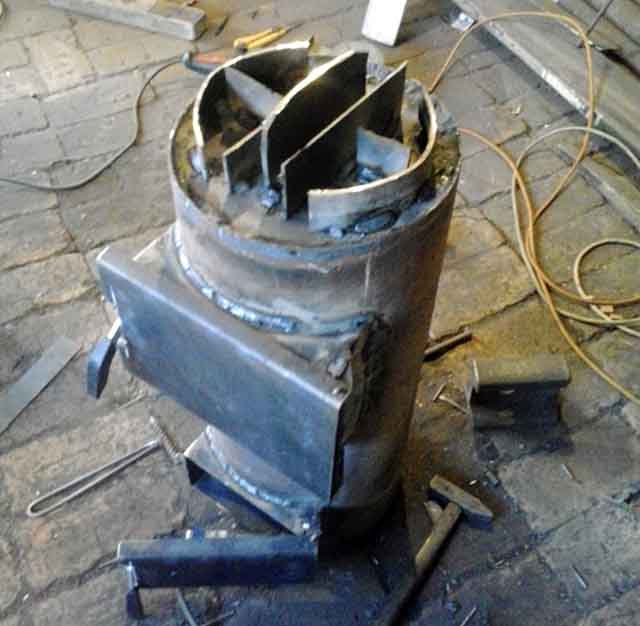
- From a suitable cylindrical container we construct a cylindrical body in which firewood will be laid.
- From a thick (at least 10 mm) metal we cut out a round piece with a diameter 10-20 mm smaller than the body. This will be the piston.
- In the center of the piston we cut a hole with a diameter of 100-120 mm and weld on a pipe, with a length greater than the height of the body by 100-150 mm.
- On the lower plane of the piston, by welding, we carry out the installation of spiral ribs up to 50 mm high. When the fuel burns under the piston, a pyrolysis process takes place, the wood burns with the release of combustible gas, which is burned out above the piston, near the walls of the stove. As the wood burns out, the piston descends under its own weight. Thus, a constant, long burning occurs.
We build a stove for working on spent fuel
The use of used car oil as a fuel is justified in garages and at a hundred, where there is always an excess of used lubricating fluid. Such devices are easy to maintain and produce high temperatures, quickly heating the room. A do-it-yourself potbelly stove for mining can work continuously, with proper care and maintenance. However, the increased fire hazard can be considered a huge disadvantage of these structures.
To build such a stove, you will need sheet metal and pieces of metal pipe.
Here step-by-step instruction for its manufacture:
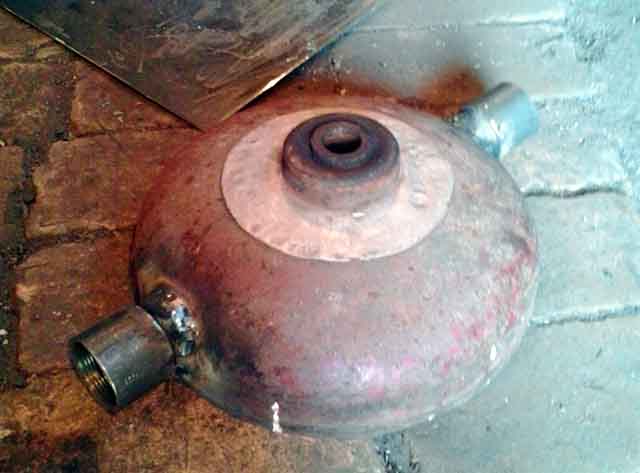
- A fuel tank is welded from sheet metal - a hollow cylinder with a diameter of 350 mm. It is the primary combustion chamber.
- A hole is cut in its top cover closer to the edge. Oil will be filled through it, as well as the air necessary for the primary combustion of the fuel will pass. A cover is made according to the diameter of this hole.
- An upper chamber is built about the size of the fuel tank - a mixture of air with evaporating oil will burn in it.
- Rows of 10mm holes are drilled in a pipe about 100mm in diameter. This perforation will allow air to enter the secondary combustion chamber.
- A perforated pipe connects the first chamber to the second. The required pipe length is at least 300mm.
Oil is poured into the lower chamber and ignited. The fuel burns and generates heat. At the same time, the evaporated oil is afterburned in the secondary chamber, which has been mixed with air through a perforated pipe. This gives an excellent thermal effect and improves efficiency. If you decide to repeat this design of a potbelly stove with your own hands, a drawing and a detailed description can be found on the open spaces of the network
.Furnaces with a design of increased heat capacity and heat transfer
In potbelly stoves of increased heat capacity, the combustion chamber is lined with refractory from the inside or the outer walls of the furnace are lined with bricks. Heated brick cools down much longer than metal surfaces. When building a stove in a bathhouse, a metal box with stones or bricks is installed in its upper part.
Furnaces with increased heat transfer (so-called bullers) have a round shape. Welded around the body metal pipes... When the pipes are heated, cold air is drawn from the bottom, warmed up inside the pipe and the hot coolant escapes from the pipe upwards. Thus, the heating of the room is much faster and more efficient.
- The advantages of a stove stove
- Nuances to consider when installing the screen
It should be noted that the stove is one of the optimal heat sources. Therefore, many are interested in how to cook a potbelly stove yourself. This design has a long history, but even despite the fact that there are many more modern devices, this stove does not lose its relevance today.
In a private house where you plan to live permanently, you will need to create a heating system with a boiler and a device from various elements. Thus, it will be possible to maintain the optimal temperature in the house during the cold period. However, in country houses where the owners spend a small amount of time, it makes no sense to install such a system. In this case, you need to look for another option.
The advantages of a stove stove
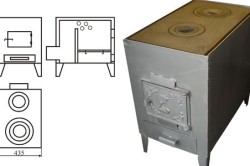
This design is great for heating a small room. It can be used to heat a summer cottage, garage, shed or greenhouse. This device can also be used for temporary heating in a new building until a full-fledged heating system... This stove has simple design... It consists of a firebox with a grate, a blower and a chimney.
![]()
The device can be installed in any room where it is possible to bring the chimney outside. It takes up little space due to its compactness. The stove is able to warm up quickly, so it doesn't take much time to create the required temperature. The simplicity of the design makes it possible to easily build it yourself. In the device, you can additionally make a recess for mounting dishes. In this case, the potbelly stove can be used for cooking or heating water.
The main disadvantage of the device is that it cools down very quickly. Therefore, to maintain the temperature, it will need to be continuously heated. However, it is possible to prepare conditions for long-term heat transfer by using brickwork and installing a multi-level combustion system.
A stove of this type can be bought ready-made in stores. However, it is possible to make it yourself. Materials should be selected based on availability.
Back to the table of contents
How to build a stove from a cylinder?
If there is an unnecessary cylinder available, then it can be used to make a small stove-stove. Additionally, you will need to prepare the following elements:
- metal corners;
- lattice;
- door;
- chimney;
- sheet of metal;
- a hammer.
The upper rim with the tap must be unscrewed or hollowed out with a hammer. Next, you need to draw liquid into the container and make a depression in the upper part of the structure. The hole must match the dimensions of the door. From the corners, you need to weld the frame, and then attach it to the cylinder. In the door and frame, you need to make recesses for the bolts. After that, the door is installed.
At the next stage, you need to cut out in the place where the lower part of the stove will be, a recess for the lattice. Next, the element is welded to the container. You will need to attach walls made of metal strips by welding to the prepared piece from several sides. The result should be a box without a top. It should be tightly welded with the open part to the door so that it is possible to clean the structure from ash.
Next, you need to attach the legs by welding to the container, which can ensure the horizontal position of the structure. On the opposite side of the door, you need to prepare a recess for the tube. Then a cranked chimney is arranged so that the heat does not go away so quickly.
This scheme can also be applied to the manufacture of a stove from a 40 liter milk can.
Back to the table of contents
How to make a steel stove stove?
If you need to heat a house in the country and prepare food, you should definitely know how to weld a potbelly stove yourself from sheet steel. This design will not require much fuel. This is achieved through the installation of partitions in the firebox, reliable fastening of the doors and the ability to adjust the air flow. To make such a device with your own hands, you will need to prepare the following elements:
- a sheet of metal with a thickness of 4 mm or more;
- metal with a thickness of 8-12 mm, from which partitions will be made;
- lattice;
- chimney;
- corners from which the legs will be constructed;
- device for welding.
Back to the table of contents
Manufacturing sequence
First of all, you need to cut out the elements for the body and several partitions from the steel sheet, which will be mounted in the upper part of the firebox. They will be able to make a labyrinth for the smoke, as a result of which the efficiency of the stove will increase. In the upper part, you can make a recess for the chimney structure. The recommended recess diameter is 100 mm. Next, you will need to make a recess for the hob with a diameter of 140 mm.
Using a welding device, you need to attach the side elements to the bottom of the structure. You will need to attach thick metal strips to the side walls. As a result, it will be possible to attach the grate. It can be a sheet of metal with grooves about 20 mm in diameter. The grille can be made of reinforcing bars. In the next step, you need to attach to the side walls support elements from a metal strip. After that, the installation of partitions is performed.
Doors for the firebox and ash pan should be cut out of metal. They can be installed on ordinary hinges. However, a more reliable option is to use curtains made of steel pipes and twigs. They can be attached to wedge latches. The elements are cut from stainless steel sheet and then bolted. In order to be able to adjust the intensity of fuel combustion, a recess must be made on the door that closes the ash pan for mounting the damper.
A 200 mm high sleeve must be attached to the recess for the chimney structure, on which the pipe will be mounted. A damper in the tube will help keep warm. For her, you will need to cut a circle from a metal sheet. One end of the steel rod must be bent. After that, you will need to make several parallel holes in the tube. Next, the rod is mounted, after which a round damper is welded to it.

The flue pipe should be installed at a 45 ° angle. If it passes through a recess in the wall, in this place the part must be wrapped with fiberglass, and then fixed with a cement mixture.
To exclude the appearance of burns from touching the hot stove, it will be necessary to build a screen for protection from steel on several sides and place it at a distance of 50 mm. If there is a desire to increase the heat transfer coefficient, the structure can be overlaid with bricks. After the firebox is over, the brick will heat the house for some time. The laying should be carried out at a distance of 12 cm from the metal body.
An air cushion can act as a heat shield.
For its implementation, holes for ventilation must be made in the masonry above and below.
In order to carry out some work in the garage or in the country during the cold season, you need to organize the simplest heating. Knowing how much electricity costs today, most garage craftsmen prefer to use factory and homemade heaters that operate on wood or oil. The task of our article is to provide drawings and describe in detail how to correctly make a potbelly stove with your own hands for use in a garage or a small country house.
We select the design of the stove
Since there are enough drawings of ordinary stoves on the Internet, we will offer a choice of 4 original designs, one of which will certainly suit your conditions:
- Double pass wood and coal fired oven welded from sheet metal.
- Vertical heater from a gas cylinder with an air or water circuit.
- Long burning pyrolysis stove from a cylinder or pipe installed horizontally.
- Dripper for the development of automotive and other oils.
Unit with two smoke circuits
Note. A heating stove can also be built from ceramic bricks, which is described in this topic. Such a heat source will fit well into the interior of the cottage, but it is inconvenient for a garage due to the size of the brick structure, long warm-up and lack of mobility.
Wood heater with air chamber at the top
- If you spend a little time in the garage (1-3 hours a day), then you will need to quickly heat the room, and it will be provided by a vertical wood-burning stove with an air heat exchanger (option No. 2), shown in the photo. With a fan blowing air through the upper chamber, it acts like a heat gun.
- The same second option is suitable for large boxes (standard garage dimensions are 6 x 3 m). Then the air chamber turns into a water circuit that is connected to the heating registers.
- For constant heating of a standard garage, option No. 1 is suitable - an effective two-way wood-burning stove, or No. 3 - a continuous burning unit. The choice depends on the material you have: the first is made from a propane cylinder, the second is made of sheet iron 4 mm thick.
- Those who plan to burn waste oils for heating are advised to cook from round pipe drip stove (option No. 4). If desired and skillful, it can be upgraded - converted into a boiler by making a water jacket.
Two-chamber pyrolysis oven
Reference. Of the popular garage homemade products, it is worth mentioning 2 more designs: the famous stove - a top-burning Bubafon stove and a small heater made of rims. The manufacture of the first is described in detail, the second is shown in the video:
Assembling an effective potbelly stove
It is common knowledge that the usual iron stoves low efficiency (about 45%) is inherent, since a significant part of the heat goes into the chimney along with the flue gases. Our design implements a modern technical solution used in solid fuel boilers - installation of two partitions on the way of combustion products. Bypassing them, the gases transfer thermal energy to the walls, which makes the efficiency higher (55-60%), and the potbelly stove becomes more economical. The principle of operation of the unit is reflected in the drawing - diagram:
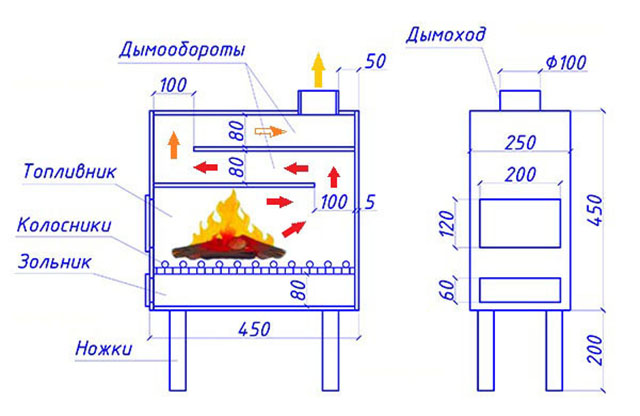
For manufacturing, you will need low-carbon steel sheet 4 mm in thickness, a piece of pipe Ø100 mm and rolled metal for the legs and grate. Now about how to make an economical potbelly stove:
- Cut metal blanks according to the drawing and make openings for the doors of the firebox and ash pan.
- Weld a grate from corners or fittings.
- Make doors with locks from the cut out parts.
- Assemble the unit with tacks, and then weld the seams all over. Install the chimney pipe and legs.
Council. The lower partition, strongly heated by the flame, is best made of thicker iron - 5 or 6 mm.
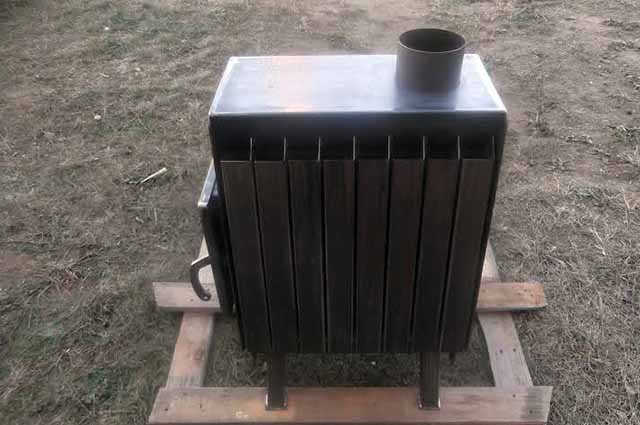
For better heat transfer, craftsmen practice welding additional external ribs to the body, as shown in the photo.
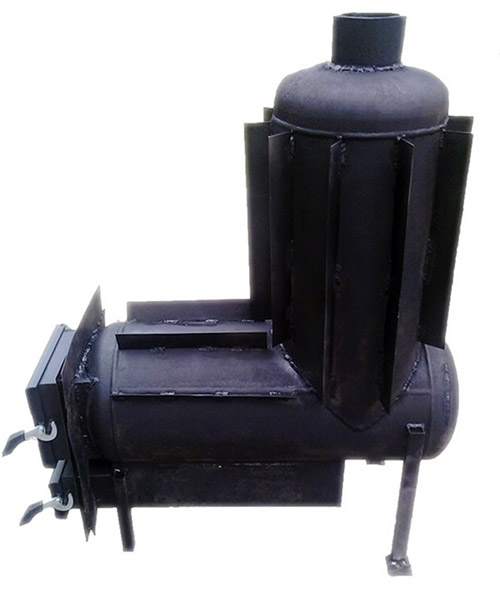
How to weld a vertical oven from a cylinder
This stove-stove differs from similar units by the presence of an air chamber arranged in the upper part and completely isolated from the firebox by a steel partition. Heat exchange fins are installed inside it, through which the heated air is blown by a fan. For supplying a cold stream and ejecting a hot stream, nozzles with a diameter of 40-50 mm are built into the lid, as shown in the drawing.
Note. The arrangement of the air heating chamber in the upper zone of the firebox makes it possible to extract the heat of the combustion products passing by it into the chimney. Since in a vertical stove, the flame covers the entire portion of the wood, an intense heating of the air flow occurs in a separate compartment, due to which the temperature in the garage rises quickly.
The first step is the correct disassembly of a 50 liter propane cylinder. To displace the residual liquefied gas, it is necessary to unscrew the valve and fill the tank to the top with water. After the grinder, you need to cut off the lid (cutting line - factory seam) and proceed in this order:
- In the side wall of the cylinder, make rectangular openings for the ash and loading doors and frame them with a steel strip 3 mm thick, as shown in the drawing. Cut out a Ø100 mm hole for the flue pipe.
- Make a removable grate and install them inside the body on the welded corners.
- Make ash and fuel chamber doors, attach handles and hinges to them, and then install in framed openings.
- Cut a Ø30 cm circle out of 4mm metal to form the bottom of the chamber. Weld to one of its surfaces the ribs from the waste metal roll, and then hermetically join it to the firebox for welding.
- Make 2 holes in the cut-off cover and weld in the air duct connections. When ready, replace the cover in its original place (but now - above the heat exchanger) and carefully weld the joint.
A vertical potbelly stove in a garage is capable of burning wood of various qualities and humidity, including sawdust, as well as supplying heated air to any point in the room, which is important for greenhouses. In addition, it can provide heat to radiators and registers if they are connected to the nozzles in the upper chamber lid and the system is filled with a coolant.
Attention! To avoid boiling water and breaking pipes, you need to create a constant forced circulation from the pump and put an open-type expansion tank. Use antifreeze as a coolant, because the garage is not heated around the clock.
Horizontal heater manufacturing
If a standard propane cylinder is laid horizontally, and a door is arranged at the end, you will get a rather spacious firebox, where meter-long logs will enter. For better heat transfer and afterburning of the resulting pyrolysis gases, you need to make a secondary chamber with partitions, as shown in the drawing.
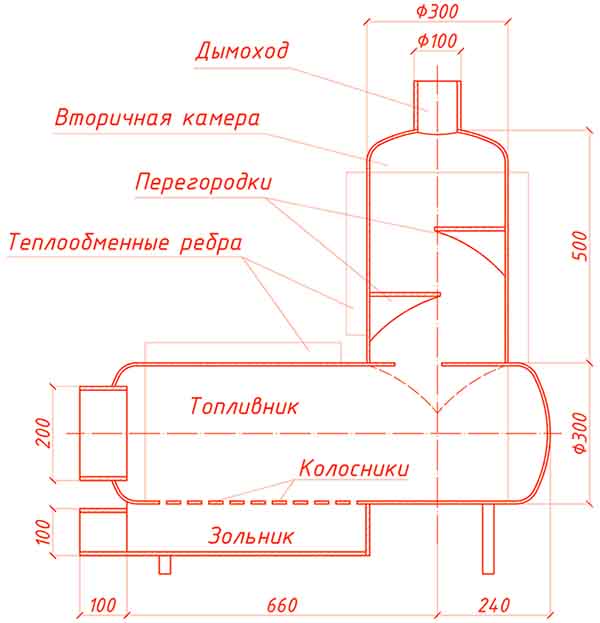
The afterburning of combustible gases in this potbelly stove is combined with the extraction of heat from the combustion products that go around hemispherical partitions (cut from the cylinder body). Well, an indispensable attribute of intense heat transfer - external ribs made of steel strips - are mandatory. Practice shows that such a stove heats a garage with an area of \u200b\u200bup to 50 m² in medium combustion mode, which is described in the next video:
In manufacturing, the heating unit is simple: doors are installed in the front, and a hole is cut in the back, where the secondary chamber is welded from a pipe or a second cylinder. In order not to take away the useful volume of the firebox, the ash pan is made hinged. If necessary, a hob is placed on top of the horizontal part.

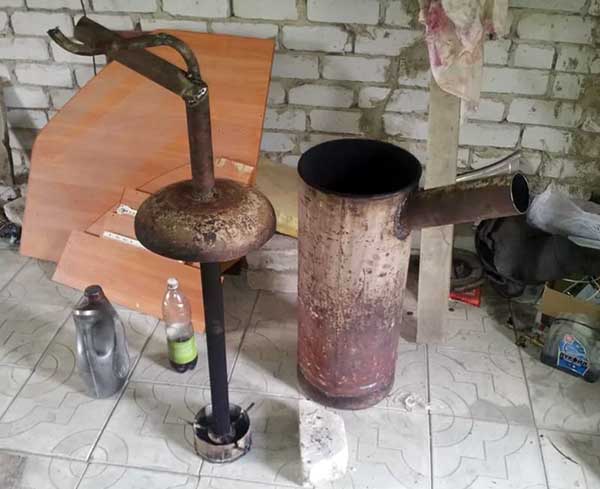
Making a potbelly stove for mining
Diesel fuel and used engine oil are very high-calorie fuels. If you get it inexpensively, then there is no point in messing with wood and coal, it is easier to make a reliable stove - a dropper. Its principle of operation is to incinerate waste, dripping inside a hot bowl. Moreover, on the way, the liquid fuel has time to warm up, as it passes through the oil pipe built into the pipe - the afterburner. The drip-type potbelly stove device is shown in detail in the drawing.
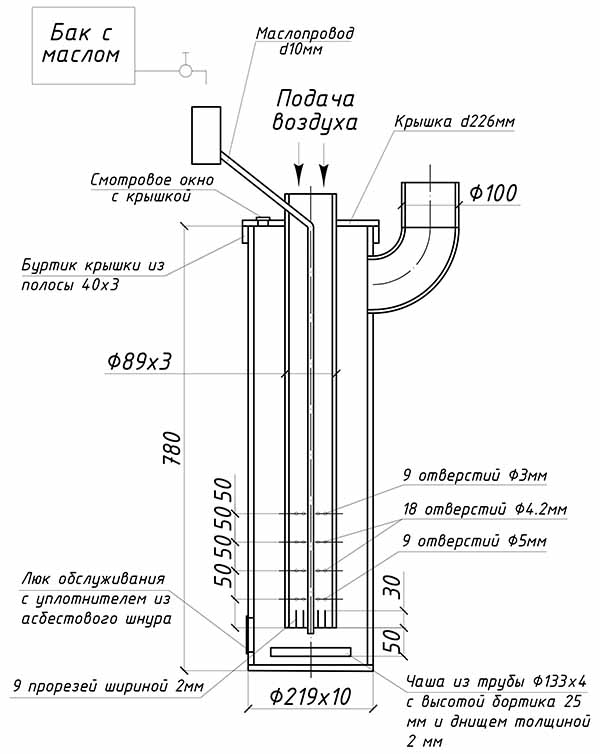
For efficient combustion of oil, air is blown into the stove using a fan, and the mining flows naturally from a tank suspended from the wall next to the heater. Another option is forced fuel supply by pressurizing the fuel tank (for example, with a hand pump).
Both a Ø219 mm pipe and a propane cylinder with a diameter of 30 cm can act as a furnace body. Making an oil stove with your own hands is a simple task, the main thing is to correctly make holes and slots in the afterburner and lay the fuel pipe to the bowl installed at the bottom. For a complete assembly guide, see our other article. You can get a closer look at the heater operation from the video:
Conclusion
You need to understand that the above designs of wood and oil stoves for a garage can be changed and modified by you during operation. That is the beauty of homemade stoves - they are improved at your request. Example: garage craftsmen often make an external water circuit based on a samovar heat exchanger built into the vertical section of the chimney. This makes it possible to use water heating without interfering with the design and alteration of the furnace itself.


