Small country house, a garage or workshop can be heated with a small, compact metal stove called a potbelly stove. It can be made both from an old steel pipe, a gas cylinder, a barrel and even an old flask, or welded from sheets of metal. The most important thing is that the metal for the manufacture of such a furnace is not too thin.


Potbelly stove from a gas cylinder, an old flask, barrels and a stove powered by spent fuel
Materials and tools
To create a potbelly stove you will need:metal with a thickness of 3 ± 0.5 mm: thinner sheets will quickly burn out, in addition, under the influence of high temperature they can be carried away, and the furnace will become shapeless; thick-walled metal will warm up for a very long time;
chimney pipe;
rods 16 mm;
a sheet of metal with a thickness of 0.3 mm for the device of a box for collecting ash;
tape measure, ruler, chalk;
welding machine 140-200A;
grinder for cutting metal; it is more convenient to use a gas cutter to make round holes;
metal brush for cleaning welding spots;
emery wheel for adjusting the doors;
drill and drills.
Burzhuik schemes
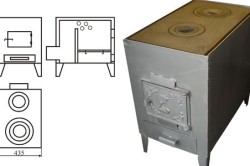
The main advantage of a rectangular stove, unlike oval products made of pipes or gas cylinders, consists in a larger area of \u200b\u200bthe heated surface, so its efficiency will be much higher. Optimal size for a stove stove 800x450x450 mm. A stove of this size does not take up much space and can easily fit even in a small room.
The simplest design is the "Gnome" stove, which consists of a box with a pipe welded to it
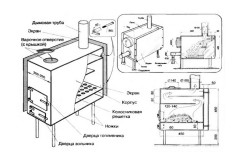
An important difference loginov ovens is the presence of two plates ( reflectors) at the top of the combustion chamber. Because gas path at the same time, it increases, the heat transfer of such a stove is significantly higher than that of a conventional metal stove.
Advice... If it is required to reduce the size of the Loginov oven, then it is desirable to change only its width. With a change in the length and height of the structure, its effectiveness can be significantly reduced.

Detailed diagram of Loginov's stove
The main stages of manufacturing a potbelly stove
1. All the details are marked on a sheet of metal: 6 steel rectangles for the walls of the furnace, 1 rectangle for creating a smoke reflector, a plate for a grate and a latch for a door.2. Cut a sheet of metal is possible at any metal base. The guillotine, in contrast to the grinder, allows you to cut (chop) it more accurately. In this case, straightening (aligning the sheets) will not have to be done.
3. The furnace body is made in the form of a rectangle. Their sides are joined together at an angle of 90 ° and welded together.

Box welding
4. To avoid mistakes, the box for the furnace is first only tacked by welding in several places, and only then, after checking its horizontal and vertical, its seams are welded.
Important! All connections in the housing are carefully welded; to check seams for tightness, you can coat the joints with chalk or kerosene.
5. Welding seams are cleaned with a wire brush.
6. The inner space of the stove is divided into three parts: a firebox, a smoke chamber and an ash pan. To separate the firebox from the ash pan, a grate is laid between them, on which the fuel will be placed. To do this, at a height of 10-15 cm from the bottom of the furnace, on the sides and on the back of the box are welded corners 5x5 cmon which the lattice will be located.
Council. It is better to make a grate from 2-3 detachable parts. Otherwise, when replacing a burnt grate, it will be difficult to get it out of the firebox.
7. The grate is welded from thick steel bars or strips 30 mm wide. They are attached to 2 stiffening ribs - rods with a diameter of 20 mm. Since the grates burn out over time, it is better to make such a grate removable.


Manufacturing grate
8. At a distance of 15 cm from the top of the box, two strong rods are welded, on which it will be stirred one or two removable reflectors - thick-walled metal sheets that will trap the flow of hot gases and send them for afterburning. However, they should not completely cover the oven. To allow hot smoke to enter the chimney, an indent of about 8 cm is made from the front (for the first sheet) and back of the stove.


Diagram of the passage of gases in a simple stove and oven with a reflector installed

Pipe hole
10. The front part of the stove with holes cut in it for the doors of the firebox and ash pan is welded last.
11. The size of the door of the firebox must be large enough to be able to load fuel and change the grate without effort. The hole for the ash pan is made slightly smaller.
12. The hinges are welded first to the door, and then to the stove body. They can be bought ready-made or welded from two tubes of different diameters. Door handles can be made from a strip of metal or a bar.

Welding the door
Important! When attaching the doors, fit them to the body as tightly as possible; for this, they are straightened (leveling) and cleaned with an emery wheel. The wedge latches that close the doors fit as closely as possible to the body.
13. This oven can be used to cook food or warm water. For this, a hole of the required diameter is cut in the upper part of the box. Oven burnerthat will fit into this hole can be purchased at any hardware store.
14. For ease of use, the design installed on legs or a welded pipe stand.
15. The chimney is connected to the stove using a sleeve.
16. For inserting a damperregulating the smoke outlet, two holes are drilled in the pipe. The metal rod is inserted into the holes and bent 90 °. A “penny” made of metal is grabbed to it in the center of the pipe - a gate, the diameter of which should be slightly less than the diameter of the pipe itself by 3-4 mm.

Smoke outlet damper
Chimney device
To prevent precious heat from escaping through the pipe too quickly, it must have a special design. Such a device has two main parts: vertical height from 1.2 m, installed at an angle of 90 ° above the oven and an inclined part, called hog, 2.5-4.5 m long and more, in which the smoke burns out. It is the boar that gives up to 1/4 of the heat of the entire furnace.
Chimney hogs
A tall person can touch a heated pipe, so the hog should have a protective casing in the form of a mesh. To avoid burns, the distance from the floor to this pipe should be 2.2 m. The vertical part of the pipe coming from the oven is additionally wrapped with thermal insulation.
Important! The pipe should be located 1.2 m away from plastered walls. Distance from wooden structures - 1.5 m.
Council. Laying a pipe through a wooden ceiling and roof is a rather laborious process. It is much easier to bring it out through a hole in a wall or window.

Smoke output through the window
Rules for the safe installation of a metal oven
The potbelly stove heats up much stronger than a brick oven, so all flammable objects should be at a sufficient distance from the oven. If the floor in the room is wooden, it is installed only on bricks or metal sheet. The metal, in turn, is laid on a sheet of asbestos with a removal of it 35 cm or more from the edges of the stove. In front of the firebox, it should protrude 5.5 cm. Asbestos can be replaced with felt soaked in clay. It is also possible to install such a screen to reflect heat on concrete.Important! A working oven requires supervision. You should not be away from the room for a long time where the stove is heated.
Installing a stove on a brick base
We increase the efficiency of the furnace
The potbelly stove can heat the room in just a few minutes. Moreover, everything that comes to hand can be thrown into the firebox: since there is no branched network of chimneys in it, and the smoke comes out “directly” in it, there is no need to fear that they will clog up.But if an ordinary heating stove installed in rooms for permanent residence, has an extensive network of chimneys that retain heat, in a stove it goes directly into the pipe, so its efficiency is not too high. That is why it is too "gluttonous" and requires a lot of fuel.
To reduce fuel consumption, you can use the following tips from experienced stove-makers:
the door to the firebox and blew in such a furnace should be as tight as possible; otherwise, the air supply to the stove will increase, and the fuel will burn out too quickly;
to regulate the output of warm smoke in the chimney it is desirable to provide a damper;
next to the oven can be provided side metal screens at a distance of 5-6 cm from the stove, in which case it will heat the room not only by radiation of heat, but also by convection (circulation of warm air);
a potbelly stove, "dressed" in a metal casing, will help keep the heat much longer;

Potbelly stove in a casing

Round furnace with afterburner and casing with heat gun
To retain heat in the room, bends should be built up in the pipe; however, soot will linger in them, so it is advisable to create a collapsible structure;
the pipe can also be given a stepped shape: arrange the elbows in stages, turning 30 ° with each step; in this case, each of the knees must be securely attached to the wall with rods;


Stove with chimney elbows
throughput chimney should be less than the capacity of the furnace itself, in which case the hot gases will not go into the pipe immediately; its diameter should be only 2.7 times larger than the volume of the furnace, for example, with a volume of the furnace of 40 liters, the diameter should be 110 mm;
you can increase the efficiency of the furnace and using chimney blowing with a fan - this will turn the oven into a kind of smoke cannon;
to reduce air circulation firewood in the oven should fit as tightly as possible; if it is heated by coal, stir up the resulting ash as rarely as possible;
to adjust the air flow, the door to the blower can be made adjustable by providing it with vertically arranged slots and latchthat will cover these slots;
to increase the heating area, it can be ribbed, that is, welded onto its body perpendicular to the furnace metal stripes;
if you put steam on the stove buckets or metal box with sand, then they will accumulate heat and store it even after the oven goes out; sand filling or heat accumulator made of stones can be sewn inside the metal body of the furnace;

Diagram of a potbelly stove with sand filling, the furnace is made of a pipe with a diameter of 500 mm, its length is 650 mm
Bake, lined with 1-2 layers of brick, will keep warm for much longer;

Brick screen
The volume of the furnace also matters: the more the area of \u200b\u200bits walls, the more heat they will give into the room;
bricks or sheet metal, on which the stove is installed, will help not only to protect the room from fire, but also to keep warm.
For most people, the word "garage" is simply associated with a box for storing a car. However, there is a fairly large category of car owners for whom the garage is truly a "second home". They are ready to spend all their free time in it - fortunately, there will certainly always be work here. In addition, the stable reputation of a kind of "men's club" is rightly entrenched in garages, where the uninitiated, especially women, are not recommended to enter.
But only winter is trying to make adjustments to an active garage life - it is extremely inconvenient to work in a frozen room and it is very uncomfortable to just talk with friends. However, inventive craftsmen always find a way out - they install home-made stoves, constructing them on their own or using the advice of comrades on how to make a potbelly stove in a garage.
We will also make our contribution to this noble man's cause. The publication will consider several ways how to make a potbelly stove with your own hands.
Principal design the simplest potbelly stoveoperating on solid fuel is very straightforward. In fact, it is a thick-walled metal container, divided into two main compartments.
Firewood or other fuel is placed in the upper furnace, for which a loading door must be provided. The grate separates the firebox from the lower compartment, much smaller - the ash pan, which also often plays the role of a blower. Here it is also recommended to install an appropriate door through which the stove is regularly cleaned from ash. In addition, opening the door a certain width regulates the flow of air into the combustion chamber, and, consequently, the intensity of firewood burning. In the upper combustion chamber, a branch pipe is welded to remove combustion products into the chimney.
Such a scheme gives scope for the independent design of simple stoves, and a wide variety of materials or out-of-date objects and devices are used as blanks. There is probably no need for real masters to learn how to cook a potbelly stove in a garage - perhaps it is better to just give a number of interesting ideas that can be taken as a basis and supplemented with your own modifications, based on the available opportunities and preferences.
1. One of the most simple options - potbelly stove from the old metal barrel.
The design shown in the figure has been simplified to the limit. The master manufacturer decided to abandon the two separate doors, combining them into one common one. A metal frame is welded on top of the barrel, which allows placing a metal sheet on it, which becomes a kind of "hob" - on it, for example, you can warm water.
Potbelly stove from a barrel - the design is simple, but with a lot of disadvantages
The advantage of such a design, perhaps, is only one - the simplicity and speed of manufacture, available to almost everyone. There are many more disadvantages.
- Firstly, the barrel itself is not the best option for a potbelly stove - the walls are thin, their heat capacity is low, and they will not last long - they will quickly burn out.
- Secondly, it is rather difficult to regulate the intensity of combustion.
- Thirdly, the design is bulky and takes up a lot of space. You can, of course, consider a vertical arrangement, but main problem - the subtleties of the walls, thisall equal not will eliminate
- And, fourthly, such a potbelly stove is very unsafe in terms of fire safety.
It is better to have such a stove not in the garage, but somewhere on the street for garbage disposal.
2. Something similar, with the same main disadvantages, but more compact, can be made from a standard 40 liter can.
The scope of work, including welding, is even smaller here. In fact, only the legs (3) and the chimney (2) are welded to the body (1). The door is already ready - it remains standard, only two rows of holes (4) are drilled in it for air access. Inside, a homemade grate made of a metal rod is laid, conventionally dividing the can into two compartments - and the mini-stove is ready.
3. Very wide possibilities in the manufacture of garage stoves-stoves are provided by the use of old gas cylinders... These vessels have thick sebaceous walls that are easy to weld and have a good heat capacity by themselves.
The main difficulty is to properly prepare the cylinder for further work, since even with the neck removed, vapors in an explosive concentration can remain in it. You can find advice to fill the bottle with water overnight, and then, after draining the liquid, start cutting it. However, as practice shows, this does not give a complete guarantee of the safety of work. In this light, the following approach seems optimal:
- Dig a vertically placed cylinder in the ground so that it is securely fixed for cutting with a grinder.
- Fill it with water to the very neck, let stand for 2–3 hours.
- Draw a line around the circumference of the future cut.
- Start cutting along the marked line until a through hole appears. Water will begin to flow out. It is necessary to wait until its level drops to the level of the cut, and then carefully continue working with a grinder and remove the cover completely.
- Now you can drain the water and continue further work - the cylinder will no longer pose any danger.
There are a lot of options for stoves-stoves from cylinders.
- It is often made horizontally. The container capacity itself is, in fact, a finished combustion chamber. To divide it into two with this orientation is irrational, it is better to make it from sheet metal and weld a box-shaped one from below ash pan-blower with its own door.
In this case, the grate can be rows of holes drilled in the cylinder body:
If a real cast-iron grate of the appropriate size was found, then you can do otherwise - cut a window in the wall of the cylinder that will ensure a snug fit of this part:
Another option is a window for installing a conventional cast iron grate
The furnace door can be made independently using a fragment cut out under the firebox window, or you can weld on a finished part that can be purchased at a hardware store:
The structure is installed on their welded pipes or corner legs at a height convenient for operation. At the rear, a branch pipe is cut in for connection to the chimney.
- In order to save garage space, the cylinder can also be placed vertically. In this case, it is divided into two chambers, brackets are welded inside, on which a home-made round grate is placed, made of a steel bar with a diameter of 10 - 12 mm. Two two rts are made - furnace and blower.
The upper cut off part can be drowned out with a metal sheet - in this case, a kind of hob will appear. Another option is to purchase a cast-iron cauldron of the required diameter, which will exactly fit as a "plug" and turn into a container for heating water or even for preparing a variety of dishes.
An original solution - instead of the top cover, a well-fitted cauldron is used
For the outlet of combustion products, a standard 90-degree outlet with a diameter of 100 or 110 mm is welded in from the back, and then the vertical part of the chimney is connected to it.
Another craftsman offers an original design. As a finished part for the stove, he used an air tank-receiver from the brake system of a truck.
The master did not install the usual doors. For the blower, a pipe is welded in, equipped with an adjustable damper that restricts the flow of air. There is also no loading hatch on the side wall of the stove - it uses the principle of top loading of solid fuel. The top cover is hinged, for convenience it is equipped with an arched handle.
The inner space of the cylinder into the firebox and the ash pan is divided by a homemade grate:
The structure itself is simple to manufacture, but during operation it requires caution when laying firewood. In addition, the process of cleaning such a potbelly stove from the accumulated ash will also not be entirely convenient.
Potbelly stoves of similar construction can be made from scraps of thick-walled pipes with a diameter of 300 - 500 mm.
4. Steel sheet - an excellent material, a potbelly stove can be made from it with your own hands, the drawings of which are easy to find on the Internet.
For example, we can give a drawing of an efficient stove in operation on solid fuel, for which you will need sheet metal with a thickness of at least 4 mm (walls from a thinner one will simply burn out quickly).
All dimensions are indicated on the drawing presented to your attention, and it will not be difficult for any master to embed the parts necessary for work. The main "highlight" of this design is the presence of two partitions (1). They create a kind of labyrinth for the exit of combustion products, which do not fly away immediately into the chimney, but provide maximum heat transfer from the stove.
A metal plate (2) with rows of drilled holes with a diameter of 12-15 mm is used as a grate.
It is advisable to "dress" the potbelly stove in a metal casing using sheet metal 2 mm thick. The plates (3) are cut to the dimensions of the side and rear walls and are attached to the stove body either on threaded posts or using 50 mm bushings (4).
Such an addition to the design of the stove will solve three problems at once:
- The likelihood of accidental burns from the hot walls of the stove will decrease.
- The impact of hard infrared radiation from it, which is far from always pleasant and necessary, will decrease.
- The resulting gap of 50 mm between the walls of the stove and the screens will create a powerful convection flow of heated air, due to which rapid and uniform heating of the garage room will occur.
These are far from all possible options for solid fuel garage stoves. and detailed technology of their manufacture can be found on other pages of our portal dedicated to this issue.
Video: homemade metal sheet garage stove
Now, it probably makes sense to get acquainted with the design of the stove, which uses such common in garages, practically "waste" material, like used motor oil.
How to make a potbelly stove for mining
Indeed, it is not always convenient to have a supply of firewood in the garage for a stove stove. But working off is available almost constantly or it is not difficult to find it. This becomes especially important in large garage cooperative partnerships, where, often, special containers are installed for draining old oil, or in auto repair shops. So why not take the opportunity to use virtually free fuel for heating?
The design of such stoves and their layout can also be very diverse - they are compact stoves designed for a small room to large and bulky devices with high heat transfer, capable of heating already significant areas.
Nevertheless, the principle of operation and basic structural elements are similar for all of them. They consist of two containers. The lower one is intended for filling with used oil - there it is superficially ignited and brought to a boil. Oil vapor go up through a pipe with perforation for oxygen access. Here, the process of afterburning of rising vapors begins, and their final oxidation and combustion takes place in the upper chamber, which is already connected to the chimney system.
If you look at a photo of a stove-stove working on the development, then the temperature distribution in this heating device is very clearly visible by the intensity of the infrared radiation spots. The lower container with oil does not heat up very much: a light spot is only a visible area of \u200b\u200ban open flame on the surface of burning oil. The main afterburning begins in the upper third of the vertical perforated pipe, and the temperature reaches peak values \u200b\u200bin the upper chamber - even its thick-walled body literally gets red-hot. It is this part of the stove that gives the maximum heat exchange with the air in the room.
You need to know the principle of operation of such a stove. This will help to correctly determine the materials necessary for its manufacture - it is obvious that the parts of the vertical pipe and the upper chamber should be the most heat-resistant.
Below are the drawings of a do-it-yourself potbelly stove, working according to this scheme. They contain almost all sizes, but still for the manufacture of such heater a number of explanations are required, considering this process in more detail.
So, the work on the manufacture of such a stove begins with the selection of materials. First of all, it is necessary to have two lengths of pipe for the bodies of the lower and upper chambers (pos. 2 and 8). The drawing indicates the diameter of 352 mm and 344 mm, but such a standard simply does not exist. It is easier to change the data a little and apply 355.6 x 6 or 325 x 6 mm pipe trims.
The thickness of the steel sheets used for the manufacture of other parts is 4 mm, with the exception of the top cover (pos. 10) and the baffle (pos. 9), which require 6 mm metal.
For the vertical chamber, a pipe with a diameter of 100 mm with a wall thickness of at least 4 - 5 mm is used. The same pipe is required for the chimney pipe.
The process can begin by making the lower chamber. To do this, a circularly cut bottom (item 1) is welded to the cut of 355 mm pipe with a height of 115 mm (item 2). All seams in the construction of the stove must be absolutely tight.
The top of this container must be removable. Hence, it is necessary to have a cylinder (pos. 3) which would fit tightly, almost without a gap, on the lower one. Pick it up by standard sizes pipes - it will not work, which means you have to make it yourself. A 60 mm wide metal strip is cut out, which, by heating with a gas burner and using clamps, is bent around the body of the lower container, and then welded with a vertical seam.
Now, according to the resulting ring, you can accurately measure and cut the cover for it (pos. 4). Two holes are immediately cut out on it - the central Ø 100 mm (item 4.1) for welding a vertical perforated pipe, and shifted to the edge, Ø 60 mm - it will be used for refueling, igniting and adjusting the flow of primary air for oil combustion. A sliding cover is being prepared (pos. 4.3), which will be fixed in the hole (pos. 4.4) with a rivet or bolt (pos. 4.5).
Then the finished cover is welded to the ring.
A piece of pipe 100 × 5 mm with a length of 360 mm is marked for drilling holes in it. The top row should be 55 mm from the edge, the bottom 20 mm. It is necessary to evenly place 6 rows of 8 holes in each, so that they are staggered. Hole diameter - 9 mm. Both ends of the pipe are immediately chamfered for further welding during assembly.
The next step is to mount the upper chamber. To begin with, two covers are prepared, which have the same dimensions, but differ in metal thickness - the lower (pos. 7) - 4 mm, and the upper (pos. 10) - 6 mm. In each of them, a hole of Ø 100 mm is cut out - so, as shown in the drawing. The diameter of these covers, of course, must exactly match the diameter of the thick-walled pipe used, from which a cylinder with a height of 100 mm is cut (pos. 8).
It is immediately necessary to prepare a jumper (pos. 9), which will serve for a more complete combustion of rising vapors, preventing their rapid release into the chimney, thereby creating an additional afterburner.
Assembly begins by welding the upper, thicker cap to the cylinder.
After the airtight seam is made, a jumper is installed with its maximum displacement to the flue outlet, and boiled on three sides.
Now you can weld on the bottom cover as well. Its hole should be located strictly diametrically to the top.
Very accurately checking the square, achieving perpendicularity in all planes, install, grab, and then scald the perforated pipe to the bottom cover.
Then you can weld the flue pipe (pos. 11) to the corresponding hole in the top cover.
From the opposite end of the perforated pipe, also, observing perpendicularity, the cover of the lower fuel tank is welded.
it sealing ring then welded to the bottom of the "pot".
... and its fixation to the walls of the "pan"
In fact, it remains only to weld the legs (pos. 6) and the stove can be considered ready. For greater stability of the stove, you can weld a stand (in the diagram - III), which will add rigidity to the structure.
You can, if desired, after stripping it, cover it with heat-resistant paint and safely operate it.
It can be refilled through the neck of the lower container, but this can be done safely only when the previously filled oil has completely burned out. To avoid such inconveniences during operation, it is recommended to supplement such a potbelly stove during testing with one more "option" - a device for monitoring the oil level in the combustion chamber and safe refueling during operation.
To do this, you will have to make another open container, about the same height as the lower "pan". The shape of this vessel does not really matter. Both of these containers will be located on a common stand of two parallel metal corners.
Both containers are welded to the guides - corners ...
In the bottom of both containers, holes of the same diameter are cut, which are connected by a curved tube.
... and connected by a tube
So, we got two communicating vessels. According to the laws of physics, the liquid level in both is always the same. Thus, the owner of the stove always sees the level of oil development remaining in the combustion chamber, and can replenish the fuel supply without any problems by pouring it into an open container.
True, in order to ensure greater safety, it is better to provide also a protective screen that will cover the open vessel from the direct heat radiation of the combustion chamber.
Now we can say with complete confidence that the stove is ready for working off. It remains only to install it in place, connect it to the chimney, refuel and carry out a test ignition.
for ignition, liquid is usually used for fireplaces (stoves), I pour about 100 ml over the oil into the filler neck. A lit wick is lowered there with a rag or paper soaked in the same liquid. Surface combustion should begin, which in a few minutes will lead to oil boiling, vapor formation and the transition of the entire potbelly stove to its "normal" mode of operation - this is usually accompanied by a characteristic hum.
In the model under consideration, ready-made parts were used - cuttings of thick-walled pipes. If they could not be found, then quite the same stove can be made from steel sheet, with box-shaped chambers for refueling and afterburning, simply observing certain proportions of their volume in relation to the parallelepiped. The efficiency of the stove will not suffer from this. The thickness of the material used is the same, 4 and 6 mm.
Video: mining oven with box-type chambers
And what about those garage owners who already have a conventional solid-fuel stove stove, but are interested in the possibility of using oil processing as a fuel? It's okay - and there is an acceptable way out for them. You can make a special "attachment" that will make the stove universal.
Such a "attachment" will be able to turn an ordinary potbelly stove into one that runs on waste oil
In fact, this is the lower tank of the stove for mining, also with a perforated pipe, but only bent at an angle of 90 degrees (by welding a standard bend).
She is in a different angle
But instead of the final afterburner chamber, an ordinary wood stove is used, where this curved pipe is connected using an adaptive device. For example, in an ordinary potbelly stove, you can make the firebox door removable and replaceable. One, the usual one, will be installed using firewood, and the other, having the appropriate pipe insertion hole -at the use of a "prefix" during testing.
In this case, the "adapter" is used round plug with a hole for pipe entry. The standard firebox door is simply tilted to the side
Another option is to weld the pipe on the side, into the potbelly stack - then the stove will generally turn out to be universal. You just have to provide a damper so that when using firewood and the flame does not spread, and the ash from the firebox does not fall into the perforated pipe and the container with oil.
Advantages and disadvantages of bourgeois for mining
So that the operation of a potbelly stove during mining does not deliver any special xlots, it is necessary to know its features, advantages and disadvantages, which must be taken into account when using it.
The advantages include the following qualities:
- The stove is unpretentious, does not require intervention in its work - the main thing is to correctly adjust the air gap on the filler neck (usually it is 10 - 15 mm). It has good heat dissipation and is able to quickly heat up an enclosed space.
- With proper operation, such a potbelly stove does not smoke, no burning is emitted from the chimney.
- To a certain extent, the furnace can be considered fire-safe in the sense that the fuel (mining) itself under normal conditions never burns, and only afterburning of the vapors emitted by it occurs in the chamber.
However, this scheme has many disadvantages:
- It has already been mentioned about the noise of the stove. In addition, you cannot get rid of the characteristic odor. However, for garage conditions this should not have of great importance... Sometimes the craftsmen find another solution to the problem. For example, an additional air heat exchanger is installed on the upper chamber, through which air is driven by a fan to heat the adjacent room.
- Both the combustion chamber (perforated pipe) and the chimney quickly become overgrown with deposits of combustion products and require frequent preventive cleaning.
- Burning oil in the lower chamber always leaves a coked layer that is quite difficult to clean.
Video: mining stove with a water heat exchanger
During the operation of the stove, a number of mandatory rules should be observed:
- The use of oil processing with combustible impurities, for example, gasoline, is not allowed. The work must be filtered so that it does not contain solid suspensions.
- Working with water is also dangerous - this can lead to boiling of the liquid and splashing of the oil with possible ignition. The collection of waste for further use in the form of fuel should be carried out in conditions excluding the ingress of water.
- In no case should such a stove be placed in a strong draft - this can cause the flame to spread to surrounding objects. There should never be any flammable substances or materials around the stove. Reliable thermal insulation of the walls of the room must be provided.
- The room must necessarily have reliable ventilation, since the operation of the stove is associated with the intensive absorption of oxygen from the air and the release of carbon monoxide hazardous to health and life.
- It is strictly forbidden to use any other flammable liquids as fuel - this may result in an explosion in the upper chamber or chimney.
- You should never leave such a potbelly stove unattended. It is strictly forbidden to go to bed in a room with a working stove. Before leaving, make sure that the oil has completely burned out, the process of afterburning its vapors has ended.
- It is forbidden to water the stove with water to cool it down, use water to extinguish the fire - this will only aggravate the dangerous situation.
- The stove chimney should not have horizontal sections. An inclined section is allowed to change direction at an angle of 45 degrees. The minimum chimney length should be 4 m, and the recommended length is 5 to 7 m.
- The recommended filling level for the initial filling of the stove is up to ⅔ of the volume of the lower container.
- When using such a stove in the garage, there must be a powder fire extinguisher or a box of sand nearby.
So, probably everyone who has stable welding and plumbing skills can make a potbelly stove in a garage. It is enough to show imagination or use the drawings of ready-made developments - and everything should work out. The main thing, both in the manufacture and in the operation of such stoves, is the constant observance of elementary safety measures so that the heating device does not become the cause of great trouble.
Potbelly stove Is one of the easiest and most convenient ways to heat your garage.
Various options for such ovens are available on the market, but make potbelly stove you can do it yourself.
In contact with
Do-it-yourself wood-fired garage oven: safety rules
DIY potbelly stove c, in the first place must be safe. When using it, the following rules must be observed:
- the floor and walls around the stove must be made of refractory material: tiles, iron, plaster, bricks. It is permissible to sheathe the walls with special drywall;
- should not be near the oven flammable objects or substances;
- it is permissible to build a stove only from proven quality materials;
- the garage must be equipped with a system ventilation.
Wood burning bake for a garage with your own hands - this is compliance with the rules. therefore ventilation a garage equipped with a potbelly stove is extremely important for two reasons:
- with a lack of oxygen, the fire in the furnace will go out or burn weakly;
- too much carbon dioxide in a room can cause poisoning or death.
To remove combustion products from the garage, an arrangement is required chimney, but if problems arise in the pipe, ventilation will prevent the garage from catching fire or poisoning the people in it.
The necessary access of fresh air can be provided by leaving a small (up to 5 cm.) gap under the gate or by making several ventilation holes under.
Do-it-yourself wood-burning stove in the garage: 

Seat selection
Best to install potbelly stove in the corner of the wall opposite the gate. The heat coming from the far corner will warm the room and remain in the garage even when the door is opened. The distance from the wall to the stove may be about 0.5 m. if the walls are made of brick, iron or any non-combustible material. When wooden walls better to move the oven by 1 m., and cover the walls with bricks, tiles or cover with a steel apron.
IMPORTANT: Minimum distance from homemade oven for heating the garage to the car and any objects that can burn - 2-2.5 m... Reducing this distance increases the likelihood of fire and poses a threat to the paintwork of the car.
Place underneath the oven iron sheet with a thickness of about 1 cm. or cement the surface within a radius of 1-1.5 m. Due to this, the coals or flying sparks accidentally dropped out of the furnace will cool down without causing a fire in the garage.
Improve safety and heat dissipation potbelly stoves the brick walls laid out on the sides and from the end of the furnace will help. Slowly cooling bricks will maintain the temperature in the garage for several hours after the end of the furnace.
Self cover brick only a square or rectangular oven is possible. Incorrect stone covering of a cylindrical stove can lead to a reduction in heat transfer into the room and a rapid burnout of the metal walls of the furnace. Enlarge heat transfer from the furnacemade from a part of the pipe, you can weld metal ribs to its sides.
Dimensions potbelly stoves for a garage are:
- height 50 cm (body 30 cm and legs 20 cm);
- width 30 cm.;
- length 50 cm.
When making potbelly stoves from a metal pipe, the diameter of the latter must be at least 30 cm. For any shape of the furnace, the minimum metal thickness is 5 mm.
Do-it-yourself wood-fired oven in the garage - drawings: 
Fuel supply
Firewood Is the most popular fuel for garage-installed ovens. They allow you to quickly warm up the room and stand inexpensive (or harvested independently, i.e. get free).
For potbelly stoves well-dried (better with aging for more than a year) firewood, sawn at 25 cm and stored in a ventilated place protected from precipitation, are suitable. Ideal for storing firewood barn, but you can also fold them under a canopy. When choosing fuel it is worth considering that different wood gives an unequal amount of heat:
- pine, spruce and larch burn out quickly and give little heat;
- oak, birch, acacia, pear, apple, cherry and maple have a higher density, burn more slowly and give more heat.
Also, when burning conifers many sootthat settles on the chimney and creates a fire hazard. Burning birch is no less dangerous - the emitted tar mixes with soot and settles in pipes and on the walls of the furnace.
Most dangerous way furnaces - burning coniferous wood or birch in a smoldering mode. Resins and tar settle on pipes and impregnate the brick, it is impossible to clean them off mechanically.
It is advisable to stock up on firewood for a year or two before use. Delivery can be ordered online or through advertisements in local newspapers. But you can stock up on firewood for free:
- in forest areas, obtain permission to cut trees in a certain area (you will need to collect documents and spend time visiting authorities);
- collect dry and blown down trees and large branches in groves, forest belts and yards;
- contact the nearest sawmillwhere wood waste is incinerated or allowed to be picked up by those who wish (perhaps a small employee benefit will be needed);
- find a plot where furniture factories are cutting down forests - branches, tops and root parts of trees remain in place, which can be sawed and taken away.
Manufacturing
How to make potbelly stove to the garage? Before starting work, you need to prepare drawing stove stoves for a garage, materials and tools for manufacturing:
- sheet metal or a piece of pipe for the body with a thickness of at least 5 mm;
- chimney pipe 12 cm in diameter and 3 mm thick;
- rods for fixing the pipe to the wall with a diameter of 12 mm .;
- iron 3 mm thick. for the manufacture of a box for collecting ash;
- welder;
- electrodes with a diameter of 4 mm;
- bulgarian;
- welding mask, leggings and overalls;
- separator;
- ticks;
- hammer;
- drill.
The most effective potbelly stove for a garage with your own hands - drawings: ![]()

First step - preparation of parts... Having decided on the drawing of a wood-burning garage stove, size and shape, the details are outlined with chalk on metal and cut out. When cutting, it is necessary to take into account the thickness of the walls and the circle.
Assembling a potbelly stove - the second stage of manufacturing - is carried out not necessarily at the installation site. Using tack welding, the three side walls and the bottom of the stove are connected, the perpendicularity of the connection is checked and the front wall is applied to check the dimensions. The subsequent boiling of the seams of the joints of the parts is carried out with a T-seam.
They are installed and welded into the finished case partition between the firebox and the blower, in which holes for ash are pre-made. The holes in the partition are made at a distance of 5 cm from the oven wall and 1.5 cm from the next hole. Height installing a partition - at least 10 cm from the bottom of the furnace - ash will need to be removed from the resulting opening.
A round hole is cut in the back of the oven for chimney... In the front wall - rectangular for the blower and firebox. The side edges of the holes should be 5 cm from the walls, the bottom edge of the blower should be aligned with the bottom of the oven.
The cut rectangles are welded to the awnings, bringing them as close as possible to the upper part of the opening - over time, the doors will sag from the temperature. Both doors must be equipped with simple boltsthat move well even when hot.
Finished front wall welded to the body. All seams are carefully checked and errors corrected. Legs are welded to the body, the length of which is at least 12 cm, and then the top cover.
The last stage in the manufacture of the furnace - installation and assembly chimney... The stove is installed in a place prepared in advance that meets fire safety standards. A pipe is welded to the hole in the back wall.
How to do it right chimney for a potbelly stove in the garage? The simplest chimney option - a straight pipe going through the roof - is not justified in terms of keeping heat. It is advisable to create a 90-degree turn on the pipe (it is optimal if the turn is created in three bends, 30 degrees in each) and bring it through the wall.
The top of the pipe is attached to the wall with rods, the other side of which is mounted into the wall, sinking not less than 10 cm.
During installation chimney for a stove in the garage, it is important to achieve the tightness of all connections, otherwise smoke and soot will get into the room.
Besides the brick walls, the finished potbelly stove can be equipped with a stove top for heating food or a removable water tank to increase heat transfer.
Installation potbelly stoves in the garage will save on the purchase of a ready-made stove and quickly heat the garage in the cold season.
Useful video
What does a do-it-yourself stove for a garage look like:
In contact with
Do you see inaccuracies, incomplete or incorrect information? Do you know how to make your article better?
Do you want to offer photos on a topic for publication?
Please help us make the site better! Leave a message and your contacts in the comments - we will contact you and together we will make the publication better!
- The advantages of a stove stove
- Nuances to consider when installing the screen
It is worth noting that the stove is one of the optimal heat sources. Therefore, many are interested in how to cook a potbelly stove yourself. This design has a long history, but even despite the fact that there are many more modern devices, this stove does not lose its relevance today.
In a private house where you plan to live permanently, you will need to create a heating system with a boiler and a device from various elements. Thus, it will be possible to maintain the optimal temperature in the house during the cold period. However, in country houses where the owners spend a small amount of time, it makes no sense to install such a system. In this case, you need to look for another option.
The advantages of a stove stove
This design is great for heating a small room. It can be used to heat a summer cottage, garage, shed or greenhouse. This device can also be used for temporary heating in a new building until a full-fledged heating system... This stove has simple construction... It consists of a firebox with a grate, a blower and a chimney.
![]()
The device can be installed in any room where it is possible to bring the chimney outside. It takes up little space due to its compactness. The stove is able to warm up quickly, so it doesn't take much time to create the required temperature. The simplicity of the design makes it possible to easily build it yourself. In the device, you can additionally make a recess for mounting dishes. In this case, the stove can also be used for cooking or heating water.
The main disadvantage of the device is that it cools down very quickly. Therefore, to maintain the temperature, it will need to be continuously heated. However, it is possible to prepare conditions for long-term heat transfer by using brickwork and setting up a multi-level combustion system.
A stove of this type can be bought ready-made in stores. However, it is possible to make it yourself. Materials should be selected based on availability.
Back to the table of contents
How to build a stove from a cylinder?
If there is an unnecessary cylinder available, then it can be used to make a small stove-stove. Additionally, you will need to prepare the following elements:
- metal corners;
- lattice;
- door;
- chimney;
- sheet of metal;
- hammer.
The upper rim with the tap must be unscrewed or hollowed out with a hammer. Next, you need to draw liquid into the container and make a depression in the upper part of the structure. The hole must match the dimensions of the door. From the corners it is necessary to weld the frame, and then attach it to the cylinder. In the door and frame, you need to make recesses for the bolts. After that, the door is installed.
At the next stage, you need to cut out in the place where the lower part of the stove will be, a recess for the lattice. Next, the element is welded to the container. You will need to attach walls made of metal strips by welding to the prepared piece from several sides. The result should be a box without a top. It should be tightly welded with the open part to the door so that it is possible to clean the structure from ash.
Next, you need to attach the legs by welding to the container, which can ensure the horizontal position of the structure. On the opposite side of the door, you need to prepare a recess for the tube. Then a cranked chimney is arranged so that the heat does not go away so quickly.
This scheme can also be applied to the manufacture of a stove from a 40 liter milk can.
Back to the table of contents
How to make a steel stove stove?
If you need to heat a house in the country and prepare food, you should definitely know how to weld a potbelly stove yourself from sheet steel. This design will not require a lot of fuel. This is achieved through the installation of partitions in the firebox, reliable fastening of the doors and the ability to adjust the air flow. To make such a device with your own hands, you will need to prepare the following elements:
- metal sheet with a thickness of 4 mm or more;
- metal with a thickness of 8-12 mm, from which partitions will be made;
- lattice;
- chimney;
- corners from which the legs will be constructed;
- welding device.
Back to the table of contents
Manufacturing sequence
First of all, you need to cut out the elements for the body and several partitions from the steel sheet, which will be mounted in the upper part of the firebox. They will be able to make a labyrinth for the smoke, as a result of which the efficiency of the stove will increase. In the upper part, you can make a recess for the chimney structure. The recommended recess diameter is 100 mm. Next, you will need to make a recess for the hob with a diameter of 140 mm.
Using a welding device, you need to attach the side elements to the bottom of the structure. You will need to attach thick metal strips to the side walls. As a result, it will be possible to attach the grate. It can be a sheet of metal with grooves about 20 mm in diameter. The grille can be made of reinforcing bars. In the next step, you need to attach to the side walls support elements from a metal strip. After that, the installation of partitions is carried out.
Doors for the firebox and ash pan should be cut out of metal. They can be installed on ordinary hinges. However, a more reliable option is to use curtains made of steel pipes and twigs. They can be attached to wedge latches. The elements are cut from stainless steel sheet and then bolted. In order to be able to adjust the intensity of fuel combustion, a recess must be made on the door that closes the ash pan for mounting the damper.
A 200 mm high sleeve must be attached to the recess for the chimney structure, on which the pipe will be mounted. A damper in the tube will help keep warm. For her, you will need to cut a circle from a metal sheet. One end of the steel rod must be bent. After that, you will need to make several parallel holes in the tube. Next, the rod is mounted, after which a round damper is welded to it.

The flue pipe should be installed at a 45 ° angle. If it passes through a recess in the wall, in this place the part must be wrapped with fiberglass, and then fixed with a cement mixture.
To exclude the appearance of burns from touching a hot stove, it will be necessary to build a screen for protection from steel on several sides and place it at a distance of 50 mm. If there is a desire to increase the heat transfer coefficient, the structure can be overlaid with bricks. After the firebox is over, the brick will heat the house for some time. The laying should be carried out at a distance of 12 cm from the metal body.
The air cushion can act as a heat shield.
For its implementation, holes for ventilation must be made in the masonry above and below.
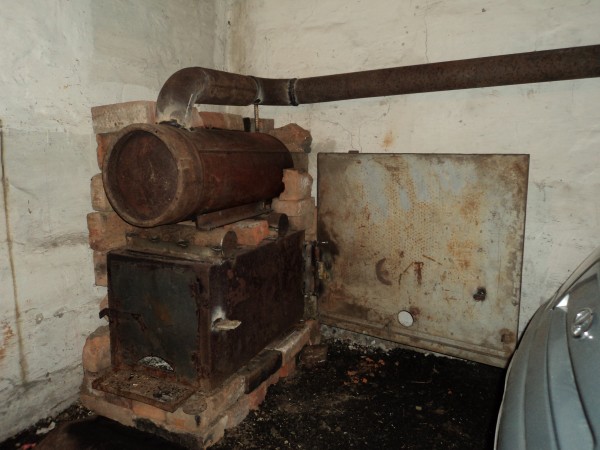
The stove-stove is a faithful companion of summer residents, security guards, and those who like to repair cars in their own garage. Owners of small private houses also often use this heating option as the most economical and mobile.
Such a stove is quite capable of heating a small room in a matter of minutes, and thanks to modern design solutions, it will not spoil the interior at all country house... Almost everyone who sets themselves such a goal can make a potbelly stove with their own hands. We will look at how to do this in this article.
Tools for work
In order for the manufacture of the heater to take you a minimum amount of time, you need to prepare the following tools:
Welding machine (not less than 200A)
Welding electrodes and protective mask
Bulgarian
Cut-off and grinding wheels for metal
Slag hammer
Metal brush
Pliers, simple hammer, chisel
Drill with drills
Measuring device (tape measure, meter)
What are homemade potbelly stoves?
Appearance and specifications stove stoves can be different. Each room will have its own stove, which can both heat it and harmoniously fit into the interior. The future of the stove can be based on sheets of metal or applied already ready product: metal pipe medium sized barrel, gas cylinder or tank. In any case, the wall thickness should not be less than 3-5 mm.
If you need to heat the garage, then almost any option will do, since such a stove only requires heating a small room. For the potbelly stove, which will be in the house, the aesthetic side is also important - the appearance of the unit, therefore it is better to refuse some options right away. An important point is also the type of fuel that is used
Do-it-yourself potbelly stove
This is an option that is just not suitable for heating residential premises. Due to the pungent odor that is emitted during the combustion of oil waste, it is not very pleasant to be in such a room for a long time. Even if it works good hood, all things in the house will be saturated with this specific "aroma". This stove is perfect for heating a garage and other non-residential premises.
To make it, you will need a 4-5 mm metal sheet, which will be cut into pieces, and a chimney pipe. All elements of the stove are cut out with a grinder. The edges of the pieces are trimmed. Before cutting, it is necessary to make the correct marking of all parts, according to the drawing.
Round holes are made in the pipe of the required length. This pipe is designed to connect the upper and lower potbelly stove tanks. Two round holes must also be drilled in the upper tank: one for the chimney pipe (top left), the other for the connecting pipe (bottom right). The lower tank of the stove is done in the same way, only a cutout for the pipe is made in the center of the container. For filling fuel, it is necessary to provide a filler neck, which is equipped with a sliding cover.
The lower part of the tank is made flat, four or three legs are welded onto it. In order to prevent the lower and upper parts from loosening, they are reinforced with additional stiffening brackets. Welds it is necessary to thoroughly clean and cover the oven with high-temperature enamel, which will protect the metal from rust.
How does such an oven work?
The potbelly stove produces heat in the following way: a long thin stick or curled paper ignites used oil in the lower container. When the mining has caught fire, the filler cap should be closed. Combustion air will flow through a pipe that is connected to the top tank. Rising upward, hot air heats the top of the stove to a high temperature. It gets so hot that you can even heat the kettle on it.
Such a stove is an ideal option for a garage, as it successfully heats a small area, and car owners will always find used materials for the firebox.
Stove stove from a pipe or barrel
If you are planning to construct a heater from a pipe or barrel, you need to choose a suitable diameter. It directly depends on the size of the room that needs to be provided with heat.
A potbelly stove from a barrel can also be used in a living room, provided that it is made accurately and correctly. This type is most popular for heating country houses.
 Two rectangular holes are cut in the barrel, which will be connected to the firebox and ash pan. The cut pieces are used for the doors. They are cut to the desired size, framed with strips of metal and attached to such improvised doors with handles and a latch.
Inside the barrel (pipe), two angle-shaped brackets are welded. These are the grate holders, which are located just below the doors. As a grate, you can use welded fittings or buy a ready-made one in a store.
A piece of pipe is welded tightly, and supports are welded to its lower part. A hole for the chimney is cut out on top of the pipe, into which the pipe is inserted and welded.
Only then are the doors installed. They are attached to door hinges and a latch hook is installed, having measured the required level in advance.
To make the stove aesthetically pleasing, it is necessary to clean well the welding seams and paint the product with heat-resistant enamel. If you do everything carefully, such a heater will look no worse than the factory counterpart. After the paint has dried, the stove is connected to the chimney pipe that enters the street.
This is the easiest and most practical option. Despite the fact that such a potbelly stove takes up quite a lot of space, it is used for heating more often than other models. It is also very convenient that on the surface of the tank you can heat water in a kettle or a saucepan, as well as dry laundry.
Potbelly stove from a gas cylinder
The used gas bottle is very suitable for the stove. This is an almost ready-made form for a potbelly stove, which requires minimal modifications.
 The upper part of the cylinder, where the tap is located, is cut off, and a plug is welded in its place. A square cutout is made in the bottom of the cylinder - this will be a firebox. The cut piece must be turned into the firebox doors. To do this, it is scalded with metal and a handle is attached to it for opening. Subsequently, you will have to weld metal hinges to the hole, on which the door will be put on. It is better to install the door leaf itself at the very end, when the stove is already completely ready.
In order for air to enter the firebox, several holes are drilled in the bottom of the cylinder. They will give thrust and serve as grates. In order to prevent burnt firewood from falling to the floor, a metal box - an ash pan is welded to the bottom of the cylinder. It can be made from thinner sheet metal. The ash pan is also equipped with doors.
After that, legs from a metal corner or pipe scraps are attached to the cylinder.
At the back of the stove there will be a smoke exhaust pipe. To do this, cut a round hole in the upper part that matches the diameter of the pipe and weld it there.
From above, you can equip an impromptu cooking stove. It can be made from a metal grid or reinforcement by welding the frame to the top of the cylinder.
Such a potbelly stove is an excellent option for heating a summer cottage, garage or change house. It is versatile and does not take up much indoor space.
Potbelly stove rectangular
Of all the possible options, such a stove is the most compact and neat look. It is used in residential premises, where, thanks to rectangular shape, the stove is easy to decorate and make it almost invisible.
 The most popular factory model "Gnome". Its structure is quite simple and the heat dissipation is very efficient.
This stove consists of just a few elements: swamp, ash pan and chimney. The stove is installed on four legs. The second figure shows a more complex furnace design that retains heat for a long time.
It is quite possible to build such a structure yourself. Let's take a closer look at how to do this.
To do this, you need the following consumables: a sheet of metal, at least 4 mm thick, a chimney pipe and a steel corner. In addition, you need to purchase a burner cover.
You need to cut out four walls, the bottom and the upper hob. In order for the fuel to completely burn in the furnace, it is necessary to use special plates that are located inside the stove. Thus, more heat will be produced in the combustion chamber.
 The holes for the firebox and blower are cut in the front of the structure. Subsequently, hinged doors with handles and locks will be attached to them.
An opening for the burner is cut out from above, corresponding to the dimensions of the part, and a hole for the pipe through which smoke will come out.
Legs from the prepared corner are welded to the bottom of the stove.
The place where the grate will lie is marked on the side panels. Sections from the corners are welded here, which will serve as supports for the grate. The grate can be made by yourself. To do this, it is necessary to drill a large number of holes in the steel sheet so that it becomes like a sieve, or weld a grid from steel rods.
At a short distance (at least 15 cm) from the hob in the upper part of the potbelly stove, a plate is welded. It should correspond to the size of the stove, but not reach the end of 8-9 cm. The second same plate is placed just below. It should also not reach the end of the container, only in front of it. These plates form additional ribbon-like passages inside the stove. Heat from the burning fuel will enter the formed corridor and heat the plate. This way, more heat will remain inside the tank, rather than flying straight into the pipe.
Safe rules when using a potbelly stove
Fire safety rules are very important when using a homemade heater. In order for the potbelly stove to bring warmth and comfort to the room and not pose a threat to health, you must remember the following safety measures.
It is necessary to place the stove on a fireproof base. It could be tile, sheet metal or brickwork... Walls near the stove must also be protected from overheating. You can paste over them with fireproof material or use non-combustible drywall. In no case should you place furniture and any other flammable objects near the stove.
The slightest spark or too much heat the surface of the stove can cause a fire.
In order to exclude the possibility of accumulation of combustion products in the room, use ventilation. Think in advance where your potbelly stove will be located, and how you can ensure the flow of fresh air into the room, and the outflow of carbon monoxide from it.
Install the stove in a place where there is less traffic, do not allow children to play games near the stove. By following these simple rules, you will provide yourself with inexpensive heat during the cold season.


