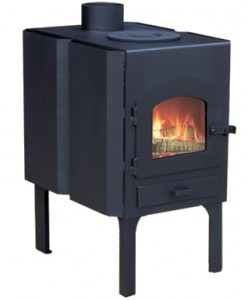
Potbelly stove has a very simple design, but at the same time a sufficiently high heating efficiency for small rooms. Having appeared at the beginning of the 20th century, it still does not lose its relevance in those places where it is not possible or necessary to equip a complex heating system. The potbelly stove is ideal for heating small summer cottages, garages, temporary utility rooms, gatehouses, fishing or hunting camps or tourist camps.
- Wood-burning stove - features / Blueprints
- Potbelly stove from a gas cylinder / Drawings
- Potbelly stove from a barrel / Drawings
- Potbelly stove made of brick - oven "for ages" / Drawings
- Potbelly stove on sawdust / Drawings
Potbelly stoves are of a wide variety of types. Depending on the metal of manufacture, cast iron and steel furnaces... If one of the functions of the stove is cooking, then it would be advisable to make an oven with a hob. The heater-heater is equipped with an additional casing around the body, which contributes to increased heat transfer. There are also gas generating furnaces - steel structures, consisting of two chambers: gasification and afterburner. This stove can be equipped with a regulator, which saves on fuel. In addition, home-made potbelly stoves are also distinguished by the material from which their base is made. Finally, stove stoves are also distinguished by the fuel used for heating. Such stoves can be heated with wood, sawdust, peat or coal.
Potbelly stove on the wood - features, advantages, disadvantages, drawings
The most popular fuel for a potbelly stove is undoubtedly ordinary firewood. As a rule, these stoves are made of metal or brick, and the larger the stove, the more heat it will generate. The shape of such a potbelly stove is cylindrical or rectangular. The only thing that must necessarily meet certain conditions is the diameter of the chimney. It ranges from 80-150 mm.

For additional oven safety can be equipped with protective screens, standing at a distance of 4-6 cm from the walls of the stove.
Any potbelly stove that uses wood as fuel must have a firebox, as well as a blower, which, in addition, is designed to collect ash. Stoves of this type must be equipped with grate, on which firewood is laid, and in addition, it serves to separate ash from burning fuel. The firebox and ash-pan should be covered with a door in order to avoid the smoke of the room and the escape of random sparks from the combustion chamber.
It must be remembered that it makes no sense to fill the firebox with firewood to the eyeballs, because in this case, there will be no room in it for a convection vortex, since oxygen will not get inside the fuel mass.
For the manufacture of the furnace, you can use old gas cylinders, steel barrels, if the thickness of their walls is at least 3 mm., Iron solid-walled pipes of wide diameter. In addition, the potbelly stove can be made of bricks.
Blueprints:

It is necessary to remember about fire safety, by placing the stove as far away from combustible materials as possible, avoid contact of a hot surface with wood. It is recommended to lay a metal sheet at the place where the stove is installed, or place it on a concrete surface.
It is necessary to monitor the tightness of the joints in order to avoid the release of smoke into the room. In addition, such a defect can worsen traction and negatively affect fire safety. It makes sense to take a closer look at the most popular designs of stove-stoves.
Diy potbelly stove from a gas cylinder
This type of stove is perfect for heating infrequently used utility rooms, cabins or garages. The oven will heat up very quickly, providing the required heat, but also cool down quickly.
A potbelly stove of this type is a body made from an old gas cylinder, equipped with a door, a chimney and a blower. Often, the blower (i.e. the gap through which air enters the combustion chamber) is combined with the ash pan. It is better to make a chimney for such a furnace with a broken shape, because if it is straight, most of the heat will go away very quickly. Any combustible material can serve as fuel: wood, coal, carpentry waste. This is the simplest version of a potbelly stove, so such an oven is hardly suitable for cooking.
Before starting work on converting a gas cylinder into a potbelly stove, it is necessary to completely bleed all the gas from it in order to avoid an explosion from a spark when using a grinder. All condensation must also be drained. Then, the cylinder is installed vertically and filled to the top with water, which will finally displace all gas residues from the container. After draining the water, the cylinder is completely ready for cutting.
You can make both a horizontal and a vertical version of such a stove. In any case, first of all it is necessary to cut off the upper part of the cylinder with a grinder. If the furnace is in a horizontal plane, then it is necessary to outline and cut a circle on a separate sheet of metal along the diameter of the outer contour of the cylinder. 2 rectangular holes are cut in the same circle. Fuel will be supplied through one of them, and the other will be used as a blower. A reinforcing grid is welded inside. It is also called the grate. It is necessary to hold the upper solid layer of the fuel, and ash falls down through its slots.
Blueprints:


The curtains are welded to the finished cover and the doors are attached, the resulting structure is fixed to the hole in the upper part of the cylinder. Then you need to cut a hole for the chimney and weld a thick-walled pipe to it.
Potbelly stove from a barrel: Drawings, Photo
Another inexpensive and quick stove-stove to manufacture is a furnace with a steel barrel base. This option is even simpler than a gas cylinder oven, because it is not necessary to carry out a set of preparatory measures (bleeding off gas residues, draining condensate, etc.).
Blueprints:

So, to start work, you need a 200-liter barrel with a wall thickness of at least 3 mm. In it, cuts are made with a grinder in order to remove pieces of metal, which will subsequently be used as doors for the fuel supply and blower openings. The distance between the openings should not be less than 10 cm. Hinges are welded to these grooves and doors are hung on them. It is recommended to equip the doors with locking devices - this will help to avoid smoke in the room and ensure fire safety. You can cut an opening for one door, but in this case it must be large enough and holes must be drilled at the bottom for good air access. Further, a grate of reinforcement is attached inside at a distance of at least 20 cm from the bottom of the future stove. The upper part of the barrel is welded with a steel sheet, in which a hole for a chimney with a diameter of 10-15 cm is cut. This design convenient in that the upper part of the oven turns into a kind of hob, on which a saucepan, frying pan or kettle can easily be placed.

It is recommended to weld the legs to such a stove so that its bottom does not come into contact with the floor surface, especially if such contact can be fire hazardous. Alternatively, put the stove on bricks or a concrete surface.
The disadvantage of this type of potbelly stove can be attributed to its fragility, since the walls of the barrel are rather thin and with intensive use of the stove can quickly wear out.
Brick stove - do-it-yourself stove "for centuries"
The main advantages of this type of potbelly stove are good heat accumulation, high heat transfer, high fire safety. In addition, it is safer for humans in terms of the likelihood of getting a burn on contact. A brick potbelly stove can be folded with or without a special cast-iron hob.
If such a stove will be located on a concrete screed or at least on thick massive boards, then the foundation may not be poured under it. If the floor is made of thin boards, then you cannot do without this structural element.
Blueprints:

In this case, it is necessary to dismantle a part of the floor and dig a small pit about 30 cm deep.The bottom of the pit is covered with sand, crushed stone of the middle fraction is laid on top, on top of which it is installed reinforcing mesh... Mounted wooden formwork, into which the concrete mixture is poured with an admixture of rubble. The surface is leveled and left to dry for at least a week.
Before laying bricks on concrete, it is necessary to put a sheet of roofing material and sprinkle it with sand on top. It is better to lay the first row of bricks dry: this way it will be possible to level it up. The bottom row is not fastened with sand, the solution is laid out only on the end of the brick. On the second row, you need to fix the blower door. It is placed on a layer of thick clay mortar and fixed with wire through special ears. It is necessary to form a blower chamber behind the door. The grate is mounted on the third row. On the fourth, the firebox and chimney are formed. A combustion chamber door is installed above the fourth row. This happens in the same way as in the case of the blower door.

It is advisable to lay the hob on the 9-10th row, then the chimney begins to form. The chimney is laid in 2-3 rows, then docked metal pipe and is displayed outside. Take care of heat-resistant insulation where the pipe will pass through flammable materials.
The finished oven must be dried out, you should not immediately finish it, you need to let it work for at least a season. After that, it can be covered with decorative ceramic tiles or simply plaster and paint.
![]()
It should be noted that such stoves are not mobile, it is extremely difficult to transfer them to another place, therefore it is not recommended to put such a stove in temporary huts. A similar design is suitable for garden houses or long-term utility rooms.
Potbelly stove on sawdust: Features, Drawings
This type is more economical than stoves, which are fueled by wood or coal. In addition, the stove during operation does not require constant supervision and after loading the sawdust and igniting the stove, it is not necessary to add fuel for a long time. Ideal for heating greenhouses, workshops or all sorts of change houses.

The furnace consists of two metal cylinders. One of them, of a smaller diameter, is inserted into the other - it will serve as a chamber for fuel. A hole of about 50 mm is cut into the bottom of the smaller cylinder with a flange of about 10 mm. The flue pipe is located at the bottom of the outer casing. The ash box is welded from 3 mm steel, it must be equipped with a door.
Before starting operation, a cone-shaped wooden core with a height of 50-60 cm is inserted into the opening of the fuel chamber. Sawdust is poured around it and carefully compacted. This is a very important point, since the sawdust should not burn intensively, otherwise the fuel will run out very quickly, and the heat released in this case may be excessive and short-lived. By scrolling, the core is removed, and the fuel compartment is installed in the furnace.
Blueprints:

The ignition is carried out in an ash box. For these purposes, you can use chips, shavings or birch bark. Through the gap, the sawdust will gradually ignite and when the fire reaches the top layer, it is necessary to close the oven with a lid. Further, the process of smoldering sawdust will begin, and the oven will work independently, heating the room evenly and gradually. With an increase in the intensity of combustion, the lid can serve as a hob, a pot or kettle can be placed on it.
In general, it will not be an exaggeration to say that in certain circumstances a stove-stove can be absolutely irreplaceable. It can be heated with almost any combustible solid fuel or just sawdust. A potbelly stove, regardless of its type, has a rather simple design and, with the necessary tools and materials, almost anyone can handle the manufacture of a stove. In addition, it does not take much time, and the oven itself is a very economical, simple and reliable way to quickly heat rooms.
The main feature of the potbelly stove is that it heats up as quickly as it cools down. Therefore, the scope of its use is narrowed mainly to those rooms where it is necessary to provide rapid heating, while the appearance of the device for the user is often completely unimportant. For the sake of austerity, a do-it-yourself stove can be made, and, if desired, modernized to achieve more effective heat transfer.
The choice of furnace design depends on the material used as fuel. Each user himself determines the degree of its availability and economic feasibility. It is the combustible material that has different temperatures and combustion patterns that dictates the principles of creating different modifications of the device.
The shape of a potbelly stove can be different, it often depends on the availability suitable material... It can be an old can, a gas cylinder, a metal container - whatever is at hand. The main thing when choosing it is the thickness of the metal and the shape, which requires a minimum of alterations.
Waste oil stove
Used engine oil is a multi-component, low-flammable substance that must first be broken down into simple components in order to burn. For this, the method of pyrolysis or flame separation is used, in which the fuel is heated and vaporized.
To do this, fire is kindled with a rag dipped in gasoline or kerosene. Fuel, when heated, is split into simpler flammable substances. Further, the pyrolysis combustion process supports itself.
The desire to use used oil as fuel led professionals and craftsmen to the emergence of a special stove. Its design creates conditions for the combustion of low-flammable oils and ensures the safety of the user
Step-by-step description of work
The production of a potbelly stove on waste oil is carried out in the following sequence:
- They take two pieces of pipe 100 and 115 mm high, 350 mm in diameter - they will serve as the basis for creating two chambers.
- A bottom and a cover with holes are welded to a ring with a greater height: the first with a diameter of about 100 mm for a pipe; the second is small for air intake. For the blower, a flap is made from a circle of slightly larger diameter.
- The pipe, which is fixed on top of the fuel compartment, is drilled evenly along the entire length of the hole.
- A second chamber with openings for a chimney and a secondary combustion pipe is made. Inside it, a partition is made of a rectangular sheet of metal.
- A chimney is installed on top, legs are welded to the base.
The design of the cylindrical double-volume boiler during mining ensures high temperature and complete combustion of the fuel. Rectangular cameras can be used instead of cylindrical ones.

Such a potbelly stove device is often found both in homemade structures and in products. industrial production (+)
How the oven works
Fuel is poured into the lower tank of the stove through a small hole. It simultaneously serves as an evaporator and a primary combustion chamber. A small hole on the lid is also designed for ignition, air supply and air flow regulation (using a damper).

The process of refilling fuel can be secured if you use a tube leading from a free-standing tank into which oil will be poured while the stove is burning.
A pipe with holes installed on the first compartment serves as a secondary afterburner chamber - pyrolysis decomposition of fuel occurs in it, which evaporates due to heating in the first chamber.
The next cylindrical container is equipped with an internal baffle to reduce the speed during the movement of combustion products, providing an increase in the oxidation state of nitrogen compounds. At the same time, it serves as both an infrared and convection heater.

The factory scheme of a stove-stove operating on waste oil may include a water jacket or a circuit. Such an improved stove-stove can be used for heating and providing the house with hot water.
It is in the stove stoves for the garage that mining is most often used as fuel. Of all heating devices, it is one of the most dangerous. If someone decides to violate fire safety rules and make a stove on their own, it is better to allocate a separate room for the boiler room or fence it off with a brick wall.
Solid fuel stove device
Firewood, brick, coal are still the most affordable and economical fuel material. Its use is the least safe, and therefore a stove operating on such fuel is the easiest to make. There are a lot of options for various modifications of bourgeois made with your own hands. Let's consider the most common models.
Stove stove from a cylinder and a barrel
An old thick-walled gas cylinder will work with all fuels, including coal. A simple design will cope with the task of quickly warming up the room, but as soon as the flow of fuel stops, it will cool down quickly. A homemade cylinder oven is compact, has a neat look. Such a potbelly stove is used for a summer residence, a makeshift, a garage.

Before cutting the gas cylinder, the gas must be vented from it, the condensate is drained. Then the cylinder is completely filled with water - it will displace the remaining gas, wash the inner walls
To make a stove from a gas cylinder, it is necessary to cut holes in the body for the door and for the chimney. The cut sections of the metal will serve as doors after the curtains and the locking mechanism are welded to them. To get air into the firebox, the door at the bottom is drilled through.
In the lower part of the chamber, a grate is placed from a grate (it can be welded from fittings), under which ash will accumulate. You can also arrange a hob. It is easier to do this on a horizontally located cylinder by welding corners on both sides of it.
![]()
It's good if the barrel initially has legs. If not, you need to weld them on or install the oven on bricks.
A potbelly stove from a gas cylinder can also be used as a basis for the further construction of a water heater, as it is also called "Titan". To do this, a stainless container is installed on top of the stove, through which the chimney pipe passes. The water in a wood-fired boiler heats up quickly, and little firewood is used - in the summer, one tab in a small firebox is enough.

The barrel oven has the same construction as the bottle oven. You need to choose a container made of thick metal
A metal container with walls, at least 3 mm thick, is also suitable for a stove. The open top of the container is closed with a sheet of metal and welded. A hole is cut out in the lid or wall for the chimney. Its diameter must be at least 100-150 mm. The top in such a potbelly stove will heat up so much that it will be possible to cook food on it, heat water.
Features of a potbelly stove on sawdust
If there is no shortage of sawdust on the farm, then this type of fuel will fully justify its use. Such a potbelly stove does not require frequent loading - the compacted sawdust inside does not burn, they smolder slowly, releasing heat energy gradually and providing heat for a long time.
A do-it-yourself potbelly stove on sawdust works according to the principle long burning... The slow combustion process saves resources - heat does not immediately fly out into the chimney, heating the atmosphere
The base of the furnace can be a metal barrel with an open top (if the container is sealed, then the top is cut off) or a pipe with a diameter of 300 to 600 mm. Then a metal circle is cut from a sheet three or more millimeters thick, which should be smaller than the inner diameter of the barrel. A hole with a diameter of 100 mm is cut in its middle for a cone for ramming sawdust.
The workpiece is welded to the sides of the barrel. With the help of this circle, the ash pan is fenced off - in it, with the help of shavings or chips, ignition will be carried out. The height of the ash pan should be 100-200 mm.

To prevent the potbelly stove from letting in smoke, a sand gate is made between the lid and the outer cylinder
A window is cut out below the welded circle, which will serve as a blower. The curtains are welded to the cut out piece of metal, making a door for the same hole. In the lid of the container, an outlet is made to the chimney. The lid should fit tightly on the stove and be made of a fairly thick sheet, otherwise it will quickly burn out.

In order for the sawdust to burn gradually, it is necessary to provide a limited supply of oxygen to the fuel compartment. To do this, a cone-shaped core is inserted into the firebox, sawdust is poured around it and tamped. The cone is carefully removed by scrolling, a lid is put on the barrel
You can improve this model by adding an additional cylinder. In this version, the sawdust will be in the inner chamber, and the space between the two compartments will serve for afterburning gases and increasing the heating area. In this version, the flue gas outlet is arranged at the bottom of the stove.
How can you improve a potbelly stove
An ordinary potbelly stove has a lot of positive qualities, but it also has many significant disadvantages. It is incapable of storing heat and heats the room while the fire is burning. Requires continuous fuel supply, on average - every 30-40 minutes. In addition, a large amount of heat is emitted through the chimney into the atmosphere, without any benefit. That is why the work on improving the stove is carried on without stopping.
The standard design of a stove-stove has many modernized designs that allow:
- save fuel;
- increase the efficiency of the stove;
- increase the heat capacity;
- reduce the frequency of fuel loading.
The most common methods of increasing the efficiency of the stove are creating a slow combustion mode, a gas afterburning system, and installing a heat-resistant lining of the inner walls.
To improve qualitative indicators stoves can also be increased by increasing the heat transfer area using welded pipes and an installed fan, which will drive air flows through them. The industrial model of such a potbelly stove is called "Buleryan", but, in addition to it, there are still many different designs made by handicraft.
You can increase the heat transfer time if you impose a furnace brickwork... Such a potbelly stove will heat up more slowly, but it will also give off heat longer, maintaining the temperature in the room for some time after the fire has died out.
Furnace with increased fuel loading
This model is designed with the aim of increasing efficiency and continuous burning time. A horizontal rectangular potbelly stove on massive, stable legs is taken as a basis and supplemented with a cassette made of a deaf sealed cylinder. Such constructive additions significantly increase its efficiency.
A flange is welded to the cassette cylinder with a height of about 400 mm. After installing the cylinder in the burner hole, its edge should drop 5-10 mm below the oven plate. To make the cylinder easy to install and remove, handles are welded to its body.

The cylinder is filled with wood in such a way that there is some space between them and when installed on the stove, they can immediately sink onto the burning coals
How does a potbelly stove work:
- The lower part of the wood, having sunk on the coals of the preparatory ignition, flares up. In this case, the upper part located in the cassette will not burn due to lack of oxygen, but it will dry out under the influence of hot smoke.
- Under the weight of its own mass and as it burns, the wood gradually sinks into the firebox.
- Hot gas, which is in the cylinder for some time, gives off heat to it, thereby increasing the heat transfer area in the room. In this case, the cylinder cover can serve as a cooking surface.
- At the same time, the temperature of the outgoing smoke decreases, which means that the heat capacity and efficiency of the potbelly stove increase.
As a result of such modernization, the time interval between laying firewood increases and the efficiency of using the stove increases.
Potbelly stove of long burning "Bubafonya"
The low efficiency of an ordinary potbelly stove is a fact that has long been known and verified by many users. One of the methods to increase it is to slow down the combustion process by limiting the flow of air into the combustion chamber. This improvement can be found in stoves such as "Bubafonya", "Filipinka".
They use this model of a potbelly stove in non-residential premises - workshops, greenhouses, other outbuildings. To work for 9-12 hours, one bookmark of small firewood, chips, sawdust is enough. In this model of the heating device, coarsely chopped and damp firewood cannot be used.
Potbelly stove can be created from any metal tank. Most often, they use a barrel of fuels and lubricants or an old cylinder. Manufacturing is carried out in the following sequence:
- A combustion chamber is prepared from the available cylindrical container, in the upper part of which a hole is cut out for the chimney.
- From metal (at least 10 mm in thickness), cut out a circle slightly smaller than the inner diameter of the barrel.
- A hole with a diameter of 100-150 mm is made in the center of the circle (the exact size depends on the diameter of the pipe used for the rod).
- On one of the planes of the circle, ribs up to 50 mm high are welded.
- A pipe is welded to the center of the circle. Its length is calculated so that the piston in the lowered state rises above the reservoir lid by approximately 100 mm. If you leave the pipe longer than necessary, there will be a draft in it, it will start to smoke.
- Next, they construct a cover that will fit tightly on the barrel and cut a hole in it that fits under the piston tube
It is possible to further increase the efficiency of this model by organizing the intake of air from the street into the furnace. Thus, the heated air from the room will not escape into the chimney.
The pyrolysis process takes place in the stove: firewood, burning, emit flammable gas, which rises above the piston, and there it is afterburned
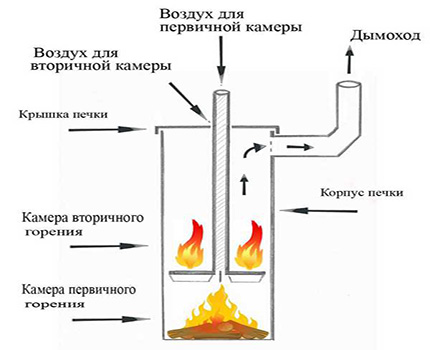
Furnace with secondary combustion "Filipinka"
The furnace uses two methods to increase its efficiency, based on the principles of long-term combustion and pyrolysis. For its manufacture, you will need two gas cylinders, which will serve as chambers for primary and secondary combustion.
The sequence of actions for the manufacture of a potbelly stove is as follows:
- The cylinders are prepared for operation by releasing gas residues from them and filling them with water. It is absolutely impossible to cut them without this procedure, otherwise the sparks that are formed during the operation of the grinder can provoke an explosion of gas, some of which always remains in the cylinder.
- In the first cylinder, which will serve as a chamber for the firebox and ash pan, the tap is removed and the top is cut off (it is used to make the door), a hole is cut out for installing the chimney.
- Opposite the hole for the chimney, a pipe is welded, the other end of which should not rest against the cover of the second chamber, leaving free space for smoke to escape.
- At the exit of the pipe from the first cylinder, a metal ring is welded, it will serve as a support for installing the upper cylinder. Holes are drilled in it.
- A metal ring is also welded to the second cylinder at the point where the top is cut, in which the places for the holes are marked, focusing on the holes already made in the first ring.
- Before finally installing the second cylinder, an air supply pipe is inserted into it.
- The upper chamber is put on the pipe, aligning the holes, a heat-resistant bundle is wound between the rings, the connection is fixed with screws.
- The chimney outlet is made from the bottom of the secondary combustion chamber.
To obtain a stable structure, reliable legs are welded to the lower chamber. Install the door to the awnings. It can be further improved by adding the ability to regulate the air entering the firebox.

The upper cylinder (secondary combustion chamber) can be installed in a horizontal position, but then you need to think over additional fasteners for its reliable fixation
Firewood burns in the first chamber of the stove, releasing flammable gas. Hot flue gases, getting into the second chamber and mixing with air, ignite and completely burn out. With the help of a blower, the draft is regulated, which, after the firewood is well heated, can be reduced to a minimum in order to reduce the speed of gas movement and heat loss.
Video materials on methods of constructing stoves
How to maximize the potential of a potbelly stove on used engine oil:
An improved stove-stove from a gas cylinder with a secondary afterburner:
Design and rules for using the long-burning Bubafonya furnace:
When making a homemade potbelly stove, one should not forget about precautions. Its design should protect as much as possible from the spread of fire. Neglect of fire safety rules can play a cruel joke with those who want to save money on the purchase of an industrial model.
How to make a stove stove
Potbelly stoves appeared almost 100 years ago during civil war, accompanied by devastation and hunger. City dwellers installed small home-made stoves on wood, the drawings of which, of course, no one was doing at that time. However, even without drawings, these stoves saved people in cold and difficult periods of life. Such products of folk craftsmen continue to fulfill their duties today in the absence of the main source of heating in houses and baths, in summer cottages and greenhouses.
You can make potbelly stoves on your own, even without having a drawing in your hands. To get a long burning furnace, old metal barrels are used, as well as pipe cuttings and thick sheets of iron. Such a stove is able to quickly warm up a summer cottage or garage in the autumn period, and in the spring to create the necessary thermal regime in the greenhouse. It is no secret that the heated building must be properly insulated, since even long burning stoves cool down very quickly.
Important! Do not forget about fire safety measures, given the high degree of heating of the walls, as well as the chimney.
Features of a potbelly stove
Manufacturers produce different types of modern long-burning stoves, but potbelly stoves have been and remain:
- ingenuous in design - any drawing will confirm this fact;
- undemanding and easy to use;
- cheap in cost.
Today on sale you can find traditional retro models, which are on a par with artistically made long-burning stoves. In their manufacture, manufacturers use nano- and composite materialsobtained as a result of the development of high-tech industries. The price of such stoves is slightly higher than uncomplicated counterparts, but the traditional drawing of "insides" and the principle of operation remain the same. Furnaces differ only in size and design.

Universal oven
Do not forget that potbelly stoves are a folk brand that arose thanks to artisans. They came up with the first version of universal portable stoves in a harsh period of history, when the central heating did not work, and Russian stoves and fireplaces were not in every apartment. Nowadays, as well as many years ago, the owners, when it is necessary to heat the utility rooms, widely use home-made potbelly stoves, working on wood, sawdust, pellets or other wood fuel.
However, in addition to burning wood waste in stoves, you can also heat the premises with the help of coal. It is filled up after the required level of hot coals is formed in the stove. When using coal, the stove will keep burning longer, and accordingly, the heat in the room will remain longer.
The design of small long-burning furnaces has several advantages:
- low cost - homemade potbelly stoves are often made “from what was”;
- compact dimensions;
- the ability to move to any room;
- fast heating;
- wide choice of wood fuel;
- no need for a foundation;
- economical fuel consumption compared to a Russian stove;
- the spread of thermal radiation in all directions from the metal case.
We should also dwell on the disadvantages of bourgeois:
- rapid cooling after burning firewood;
- low efficiency - heat partially escapes through the pipe;
- a relatively small area of \u200b\u200bthe walls of the body, giving off thermal energy to the environment.
Mobile oven designs

Potbelly stove portable
Drawing simplest design potbelly stoves clearly shows that its main elements, in addition to the body, are:
- combustion chamber, or firebox;
- ash compartment, or blown;
- grate;
- chimney;
- cap.
A more complex option involves the presence of two containers inserted into one another. In this case, hot gases fill the space formed in the gap between the walls of the tanks. B about Most of the thermal energy is transferred to the ambient air. A similar design is called the Bystrov furnace and is the prototype of modern long-burning boilers.
The metal body of the stoves can be round or square. Their design itself is represented by many modifications, and the name of the stove sounds more ironic than its belonging to the bourgeois strata of society.

The simplest stove-potbelly stove
Potbelly stoves are made on legs or stands. In order for the combustion process and draft to be regulated, dampers are additionally installed in the chimney. The top metal sheet or lid serves as a hob to heat water or cook food. The blower door is designed for periodic cleaning of slag and ash formed during prolonged fuel combustion. Furnaces with additional metal sheets installed inside the housing have a higher efficiency and significantly save fuel.
If a coil of hollow pipes is built into a similar stove and connected to pipes located in the room, then you get a kind of water heating. Water will fill the coil and pipes, thus creating a large heating surface. And after the firebox of the stove is over, it will keep warm for a long time. In this case, the potbelly stove will need to be heated much less frequently in order to maintain a comfortable temperature in the house or greenhouse.
Potbelly stove with a brick screen
One of the significant disadvantages of bourgeois is their rapid cooling. But this can be avoided by surrounding the stove with a brick screen. A drawing of such a structure provides for laying bricks at a short distance from the outer walls of the metal body of the stove. Heat flows passing in an artificially formed space rise from the bottom up, warming up and entering the surrounding atmosphere, and cold air is drawn in through the lower ventilation holes in their place.
In the same way, you can surround a chimney with a brick screen, which, although it heats up a little less than the stove itself, can cause a fire. And the heat accumulated by the brickwork around the pipe will not be superfluous.

Oven with screen
In addition to retaining heat, this design serves reliable protection wall material from accidental fire during the heating of the stove. In this case, the brick requires fired clay, but not silicate or facing.
During the operation of the furnace, not only heat flows enter the room, but also the brick heats up, which cools down much more slowly than the metal walls of the body. The brick screen accumulates heat, thereby continuing to warm the room. It is laid at a distance of 10-15 cm from the walls of the potbelly stove, after having made a foundation for it from monolithic reinforced concrete. Above and below the masonry, ventilation holes are made, which serve for the movement of air flows.
It is not recommended to install the screen without gaps. The circulating air acts as a cooler for the metal walls of the furnace, which prevents them from quickly burning out. In the absence of a gap, the room will warm up more slowly, and the excess heat from the firebox will begin to "fly away" out through the chimney.
A potbelly stove with a brick screen has one serious drawback, which is the lack of mobility.
Conclusion
The simplicity and versatility of a potbelly stove allows you to build it in a short period of time from materials that can always be found in a subsidiary farm. These can be boxes or cans, sheets of metal, empty gas cylinders, or pipe cuttings. Furnace designs may differ slightly from each other, but they have the same task - to warm up the room as quickly as possible and with lower costs.
Similar posts
A mini potbelly stove is well suited for heating a dwelling, a shed, a greenhouse. Most often it is made of metal. In addition, this oven can be used on vacation, fishing, hunting or summer cottagewhere there is no power source or gas pipeline. To assemble the heater, it is not required to manufacture capital chimney or foundation.
It is important to note that metal device heats up quickly and almost immediately begins to heat the room. To make a mini potbelly stove, you can use any capacity made of metal:, fire extinguishers and others. The easiest way assemble the unit from the can, with a capacity of approximately forty liters.
Required set for making a furnace
Before you start assembling a heater with your own hands, you need to prepare certain devices:
- A hammer.
- Chisel.
- Welding machine. It is recommended to use an inverter unit.
- Sandpaper.
- Rags.
- Metal container.
- Steel tubes.
- Bricks.
- Door hinges.
- The grate.
- Wire.
- Branch pipe.
Device assembly process
- The potbelly stove will be made from a can. The capacity needs to be carefully clean from dirt and corrosion.
- In the case of the future heating device, holes need to be made for a blower and loading firewood or coal. This can be done with using a chisel with a hammer.
- The door hinges must be attached to the body, and then the doors must be installed in the holes made.
- At the bottom of the container, you need to do chimney hole... It is recommended to install chimney with a 10 cm diameter.
- The next step will be. It can be purchased from a specialist store or do it yourself... This will require a steel wire. It must be bent several times and placed inside the heating tank. Before that, supports must be welded on the inner walls so that the grate does not fall through. The supports can be made from a steel bar.
- Then, to the hole made in the bottom, you need to attach chimney with a welding machine.
- The potbelly stove is installed in the place designated for it. As noted above, the foundation is optional. It is enough to install a brick support or lay a metal sheet, the thickness of which is at least one centimeter.
- Put out around the device. This is necessary to increase the heat transfer from the stove. During the operation of the stove, the brick will also heat up, and give extra heat, even after complete combustion firewood or coal.
How to improve the oven
The metal stove has a significant drawback: it heats up quickly and cools down almost instantly after the fuel is burned. To increase the efficiency, it is recommended to cover the oven with a brick screen. As noted above, this will keep warm for some time, after the potbelly stove has completely cooled down.
It is recommended to lay a brick screen no closer, less than 30 centimeters from the heater... To ensure proper air circulation, small ventilation holes must be left in the masonry.
It is important to note that a stove with a screen will have a large mass, compared to an ordinary mini oven. Therefore, it is recommended to make a foundation with your own hands for installing a heating device.
First you need to decide on place of device installation... It is recommended to place it close to the wall. The surface of the wall must be insulated, for this you can use a metal sheet or asbestos.
- To make the foundation, first you need to dig a hole, the depth of which should be about 50 centimeters... The dimensions depend on the dimensions of the oven and the brickwork.
- Then the pit is covered with sand and carefully rammed... Sprinkle on top with crushed stone and tamp.
- The next layer there will be cement mortar... To prepare it, you need to mix the sand with water. Do not touch the foundation for three days.
- After that, you can start spreading, that is, its halves, since making it thicker does not make sense.
- The initial brick row is laid out on roofing felt. There should be a distance of 5 millimeters between the bricks.
- When laying the second row, it is necessary to leave small holes in the half-brick for ventilation on the sides of the screen.
- Remaining rows must be solid.
- The upper part is laid out depending on the size of the stove and the wishes of the owner.
- After two days, the stove is completely ready for operation.
Disc oven
You can make a small stove with your own hands using wheel disks and a piece of pipe with a large diameter. The pipe height must be about 40 centimeters... The scheme of this option is quite simple, but such a device is suitable only for technical rooms.
- First you need p, discs, chimney, sheet metal.
- All elements except the chimney must be connected and welded to form a single structure. In order for the pipe to come to the discs, the ribs must be cut from the latter.
- In the pipe you need to mark and cut a hole for the furnace... This can be done with a grinder.
- It is also necessary to make a hole to install the blower, otherwise the stove will not be provided with an air flow and it will be impossible to light a fire. Blower size should be 100 × 100 millimeters.
- Cut a hole on the upper disc at the back and weld a chimney pipe to it.
- It is recommended to weld a metal sheet to the edge of the upper disc, which will act as a hob.
Such a stove is more like an ordinary fire, which is fenced with a container. Therefore, the stove is not convenient and economical. But the device is suitable for technical needs.
Stove Gnome
 A hand-made potbelly stove made of metal sheets is the most common. Such the device is neat and compact, therefore, will not spoil the design of the living space. It is used for heating and cooking. To make such an apparatus, you need to prepare sheets from metal with 4mm thickness, steel pipe for chimney, corners.
- First you need to prepare a drawing, and on cut the sheets.
- On the front wall, you need to make a hole for the blower and firebox. You can use cut pieces of metal to make doors.
- From the inside of the front panel at a distance of 155 mm from the top it is necessary to weld a plate, which is necessary to regulate the incoming air.
- 75 centimeters from the top on the back one more plate needs to be welded... As a result, the potbelly stove will warm up from all sides.
- Make a hole on the hob for flue gas outlet and cooking zone.
- Legs made from corners need to be welded to the bottom of the stove.
- You also need to weld the frame to install the grate, and then make in the panel multiple holes staggered.
- During DIY assembly, it is necessary to ensure the tightness of all seams.
- At the last stage, the top cover needs weld the chimney and burner.
- In order for the stove to have an attractive appearance, all seams are necessary clean and paint the case.
If necessary, it is possible to increase heat transfer.
Oven operation
When working with a potbelly stove, it is necessary to follow some recommendations in order to increase the safety and efficiency of the device. It is important to know that heater should be at an optimal distance from the walls, as at least 30 centimeters.
Necessarily displayed outside the room. The flue pipe must not be connected to the ventilation system. Otherwise, it will be, as a result of which the room will a lot of smoke... The pipe is led out through the ceiling or the nearest wall. Points of connection with building materials must be insulated using non-flammable materials.
An ordinary potbelly stove is capable of heating a room with a small area. Therefore, it is recommended to additionally insulate the room. The heat transfer of the heating device will depend on this. Stove cannot be installed on a wooden floor... If a brick screen is provided, then you need to make a foundation. If masonry is not provided, then it is enough to install the stove on thick enough steel sheet
The potbelly stove is an iron, compact-sized stove with a chimney at the top. It consists of a chamber where it falls asleep solid fuel, a grate in the form of a metal grate, a chimney and an ash pan for collecting ash.
With the ability to handle a welding machine, the device is easy to manufacture, while it will serve faithfully in unheated room, in field conditions, with absence district heating more than a dozen years.
How to do it yourself?
Manufacturing options:
Rectangular oven
It is a metal box, you can independently weld a structure from steel sheets. For a rectangular potbelly stove, an old car tank, a box, is quite suitable.

Usually, this form is chosen when it is necessary to cook food on the oven.
On a spacious platform, you can put 2 large pots at once, or containers for heating water.
The manufacturing principle is simple: doors are being built covering the blower and the combustion chamber, a hole is made for the chimney, combustion products must leave the room in a timely manner, otherwise you can inhale carbon monoxide.
From a gas cylinder
The most common type of potbelly stove. The cylinders have thick walls, the oven is durable, mobile, non-combustible.

First, a drawing is drawn, markings are made. The combustion chamber door will be located in the center of the cylinder. The blower was in the same plane, only 10 - 12 cm lower.
Instructions:
- We take a grinder, cut out both doors, draw a closed line between them.
- Along the line we saw the balloon into 2 parts.
- Down below weld on the grate - blower.
- Install lattice, weld both parts again.
- For valve make a hole in a radius of 10 cm.
- For hood insert a hole into the pipe, weld objects by welding.
- Simple stove ready from the cylinder, you can use it, throw in the fuel and check its operation.
For cooking on the top of the stove, the design is slightly different:
- Cut off the top of the balloon.
- Are inserted inside and the rods are welded.
- Side above a hole for the pipe is cut. You can heat and cook food at the same time.
- Brewed hole, the valve is screwed in, the comfortable handle adjusts.
- Out of the pipe, barrels can also be made to bake The barrel or pipe must be selected by diameter.
- At the bottom of the barrel cut out the pipes 2 holes for the firebox and ash pan.
- Make doors.
- Make framing holes made of metal strips.
- Under furnace door at a distance of 10 - 12 cm inside the barrel, weld the brackets in the corners, the grate will lie on them, weld it first from any reinforcement.
When making a stove from a pipe, weld the bottom of it, as well as a part from the top:
- Down to the bottom weld 4 legs.
- On the surface cut a hole, weld a pipe to it, this will be a chimney.
- Weld the hinges to the previously cut holes, install the doors. Also, mark and attach the hook so that the doors lock tightly.
- For design aesthetics clean all weld seams and clean them 10. Paint the outside of the device with heat resistant paint. Whatever the factory product, you can sell or use it yourself.
Working furnace
The variant is distinguished by a specific smell, which, in the process of fuel combustion, will be emitted by oil working, even with a hood.
Instructions:
- To make this model, pick up sheet material with a thickness of at least 4 mm, a chimney pipe, individual small structural elements.
- Make on a sheet accurate markings of all elements, having previously drawn a drawing.
- Embed all elements with a grinder, clean the edges of the parts. Drill round holes in the pipe.
- At the top of the tank cut the pipe hole off-center to the left.
- Offset to the right drill a hole on the circumference for the connecting pipe.
- It turned out 2 circles, weld them to the pipe, the thickness of the upper tank will depend on its section.
- Decorate the bottom of the stove in the same way., but now cut the hole directly in the center of the marked circle.
- Cut beside the second hole, attach the sliding cover to it.
- Weld to the bottom plane 4 legs.
- Clean the seams after welding, paint the surface with high temperature resistant paint.
- Connect the chimney to the stove. The waste will be poured into the lower part of the tank, after the paper is fired, the sliding cover closes, and the waste starts to burn. Oxygen will penetrate through the holes, mining will burn intensively.
Required materials, tools
Before starting work, prepare the tools:
- metal brush;
- chisel, pliers, hammer;
- tape measure, chalk;
- drill with drills for metal;
- grinder;
- circles for metal;
- welding machine;
- protective mask;
For the case, you need a pipe 30 cm in diameter, at least 5 mm thick. You can use sheet metal of the same thickness instead of a pipe.
For the chimney, choose a pipe 12 cm in diameter, at least 3 - 4 mm thick. To avoid burning out, a metal box is suitable for the ash pan, so you need to pick up durable sheet metal.
Step by step guide
First, you need to cut the metal, taking into account the thickness and length of the required blanks.

Chamfer the parts for a safer touch and stronger weld seams:
- Check the correct markings of the parts before starting to cut them. When cutting, take into account the thickness of the walls of the oven, also of the circle.
- Remove chamfers from prepared parts for safety from accidental contact with a hot device.
- Check all part markings.
The structure is installed in the following sequence:
- Connect welding machine to the network.
- Take an electrode with a thickness of 4 - 5 mm, taking into account a sheet or pipe.
- Install current on the device up to 160 A.
- Put on special glasses and overalls, protect your hands with gaiters.
- To the bottom of the oven weld three walls.
- Bottom of the device place it from the floor at least 5 cm.
- Connect parts at right angles. Check their perpendicularity with a level.
- Where you need it, trim the corners of the parts.
- Weld parts and joints relative to the floor level, at an angle of 45 degrees.
- Weld between the blower and the firebox, a partition, having previously cut holes so that ash does not accumulate.
- Withstand the distance between the holes is at least 5 cm from the walls of the stove. The distance between the partition and the bottom of the structure must remain at least 10 cm.
- Last but not least by welding cut the holes for installing the chimney on the rear panel homemade oven.
- Make markups, drill rectangular holes in the places intended for the firebox and blower.
- Combine with a partition all the lower parts of the holes. The distance between the walls of the firebox and the upper side edges should be at least 3 - 5 cm. The opening for the blower is slightly smaller, but no more than 5 cm.
- Grinder cut two holes from the metal, form the doors. Weld them on the awnings, raise the blower to the maximum to the top of the slab opening so that they do not sag in the future under the influence of high temperatures.
- To the doors weld the bolts, they should open and close easily, without obstacles.
After all welding work, check the quality of the seams, tap them. If there are defects, fix them immediately. At the end of the work, weld the top of the device.
How to make a long burning stove?
In order for the stove to radiate heat as long as possible without throwing up another portion of firewood, it does not burn out quickly, it is possible, the fuel will not burn, but smolder, the heating process without laying firewood can be extended for several hours.

The manufacture of a furnace for long-term burning is somewhat different from the usual design.
A cylinder is best suited for the oven:
- Cut the top off it, this will be the cover of the stove.
- Make a hole at the top and side of the stove, this will be the hood.
- Make a hole in the center so that you can easily insert the balloon.
- Weld to the cut out hole of the pancake pipe, in length slightly higher than the cylinder. The pipe will serve as a blower, and oxygen will enter the furnace, the fuel will not smolder, and will not burn.
- Cut part of the cylinder in the center, insert a pipe into the hole as a blower. The principle of operation of a potbelly stove of long burning is to create pressure inside the chamber. After the wood fires up, a heavy metal circle plunges inside, begins to put pressure on the fuel, build up pressure on it, the fuel begins to lack oxygen and slowly smolder. The smoke, heading up, comes out through the chimney, the room will not be smoky.
Pros and cons
Like any other heating device, the stove has both pros and cons.
The undoubted advantages of a homemade stove are:
- Compact dimensions.
- Use of any available fuel, can be heated with peat, wood, sawdust, wood chips, coal.
- Low cost of manufacturing the device, basically you can get by with handy materials.
- Installation of the structure does not require laying of a foundation, chimney.
The disadvantages of the oven include:
- Quite high consumption fuel material, the principle is as follows: while you heat - warm. To prevent the room from cooling down, you need to throw up fuel more often, otherwise you can simply freeze.
- Furnace walls get very hot, contact can cause burns.
- Can't be allowed falling out of coals from the stove, it is fraught with fire.
Where can you apply?
Stoves were popular in the first half of the last century. They warmed the soldiers' dugouts, dugouts, heating cars.
Stoves are still heated today garden houses, garages, warehouses, greenhouses, that is, where there is no gas pipeline, and electrical appliances are ineffective, while burning a lot of electricity.
Types of homemade stoves
The material for the construction is cast iron or stainless steel. The furnace consists of a container, an ash pan, a branch pipe, a chimney, and a furnace door.
The types are distinguished:
- pyrolysis ovens;
- with a cooking platform at the top for cooking;
- jacketed ovens for efficient heat dissipation. For homemade products, you can pick up an old cylinder, barrel, large vat, can. Furnaces can be cylindrical, rectangular;
Installation safety rules
Any home-made heating device is designed to heat the room, making it more comfortable, but along with this, such devices are far from safe, fraught with ignition and fire.

When installing the structure, it is very important to follow the safety rules:
- Bake must be installed on a surface that is resistant to fire, otherwise the floor may burn out. To do this, it is good to lay bricks and tiles on the floor.
- Stove walls should not overheat too much; for this, special drywall, other non-combustible material is used in the manufacture.
- Highly flammable materials do not put it next to the firebox, they can catch fire.
- Take care about ventilation in the room where the potbelly stove will be located. Carbon monoxide should be released to the outside in a timely manner, and not accumulate inside the room.
- Use in production only high quality, refractory material.
- In the presence of panel, wood walls in the house install the oven at a distance of 1 meter from them.
- Be sure to mount chimney, preferably from one section.
- When passing a pipe through a wall install a brick thermal barrier. Do not use concrete for these purposes, it crumbles quickly.
- For garage a potbelly stove is better suited for mining, so do not rush to throw out car rims from the wheels.
- Don't put the oven near flammable materials.
- Pipe section it is above the roof that it is made of non-combustible material, so the stove will cool down much more slowly.
- Think well ventilation system, there should be no burning in the room.
- Lay out the floor and walls near the structure with brick or facing material, the stove is fire hazardous. The same applies to the chimney, the distance to the walls and ceiling must be at least 1.2 meters.
- Put for safety metal fence around the device.
- Grate it is better to make it from cast iron grates in a set, so it will be easier to pull them out of the firebox.
- Install all parts of the chimney only at the top of the structure, they must withstand high temperatures over 300 degrees.
- Treat seams after welding with a durable and high quality sealant.
- Do not brush the pipe, metal objects, the pipe walls can leak quickly.
- Mounting the chimney, make a rain canopy, rain moisture will not get inside the pipe.


