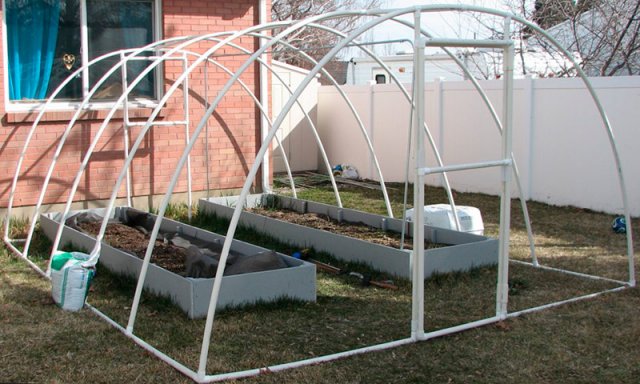
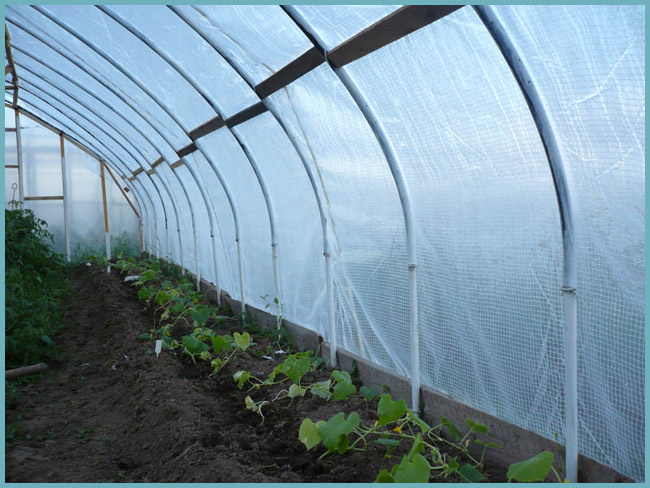
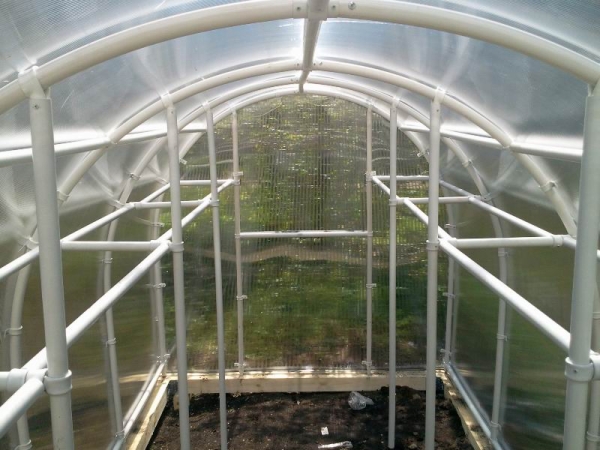
Russian craftsmen have found a very successful application of the usual water pipes from polyvinyl chloride. Since they are strong enough and bend easily, they are used to make frames for stationary or portable greenhouses... The frame can be covered with an ordinary greenhouse film (in which case it will need to be removed for the winter) or sheets can be attached to it cellular polycarbonate (we have already described the creation process), thus obtaining a stationary structure.
Raw materials and tools
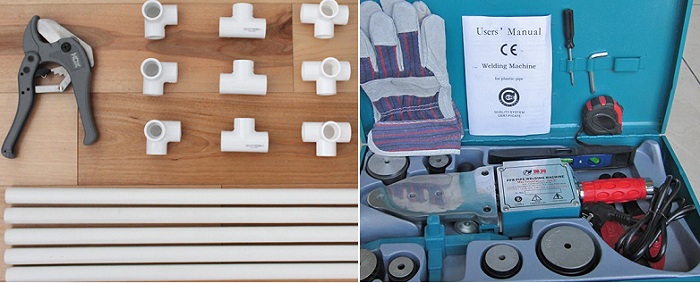
To create a greenhouse made of PVC pipes, you will need:boards or bricks for the foundation;
polyvinyl chloride pipes with a diameter of 25 mm;
a hacksaw for cutting pipes;
roulette;
building level;
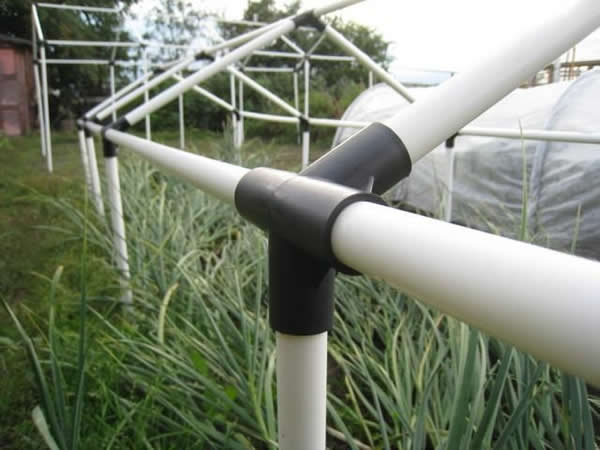
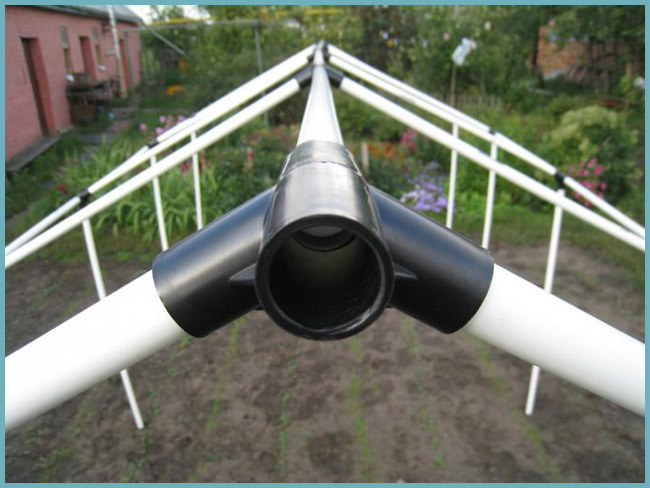
tees, crosses 25 mm and other fitting connections for pipes;
PVC glue;
metal rods 10 mm, length 700-800 mm;
self-tapping screws 20 mm;
thin metal plates made of metal for attaching pipes to the base;
screwdriver;
clips for film (if you plan to cover the structure with film) or thermal washers for attaching polycarbonate.
Tee, oblique tee and PVC cross
Assembling the frame from polypropylene pipes
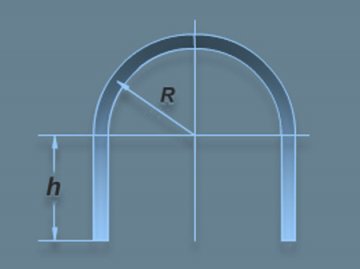
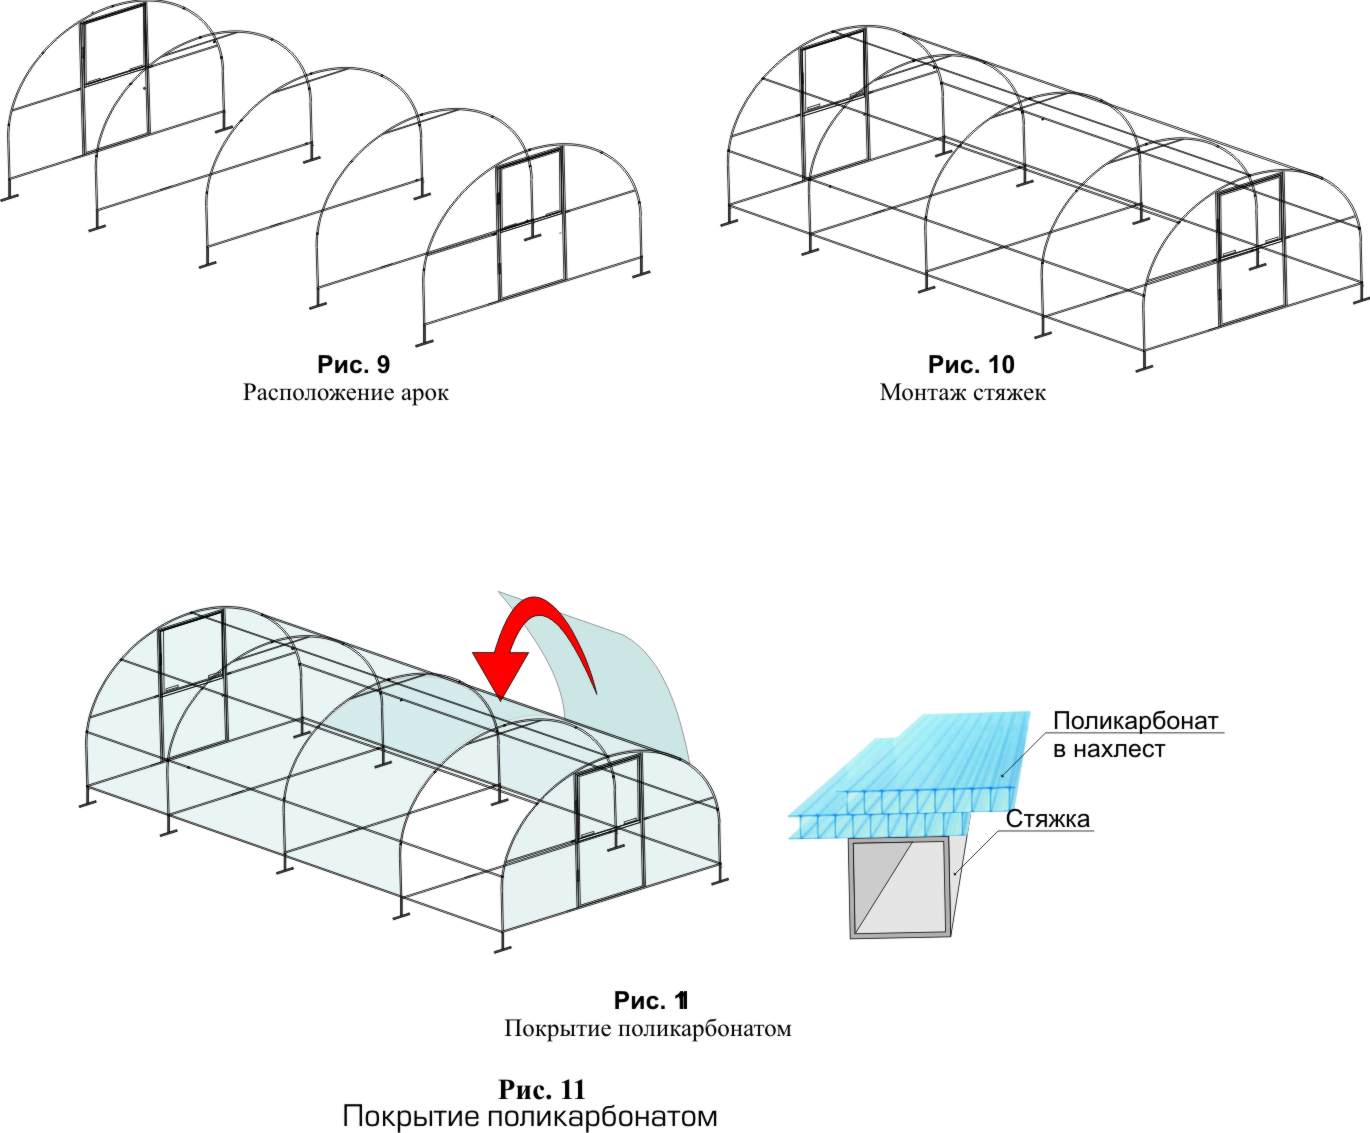
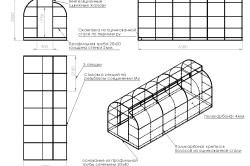
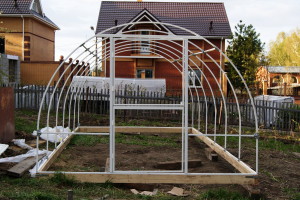
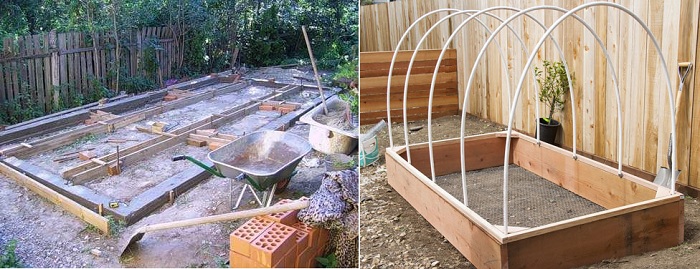
1. If the structure is further covered with polyethylene, the dimensions of the frame can be of any size. When using polycarbonate as a coating, it is more logical to choose a size that is a multiple of the length of the sheet. Its standard sheet has a size of 2100 × 6000 mm. That is, from 3 sheets, you can get a greenhouse frame with a length of 2100 × 3 \u003d 6300 mm (i.e. 6.3 m). A 6000 mm (6 m) long sheet is bent into an arc 1.9 m high, while the width of the greenhouse will be 3.8 m.2. After selecting a suitable site, the land is leveled. Greenhouse base assembled from bricks or boards of a suitable size, treated with an antiseptic, and checked using a building level. The voids under them are subsequently covered with earth and carefully compacted.
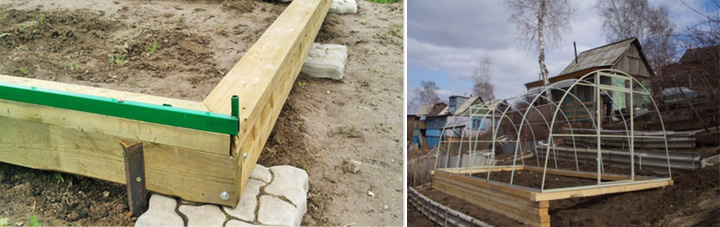
Greenhouse base
3. For strengthening in the corners of the wooden base are installed 4 pegs from rebar... The same stakes on which the pipes will be mounted are driven along the base to a depth of 25-30 cm with a step width of 50 cm.
Metal stakes are driven into the corners of the base. Arcs will be fixed on the same stakes.
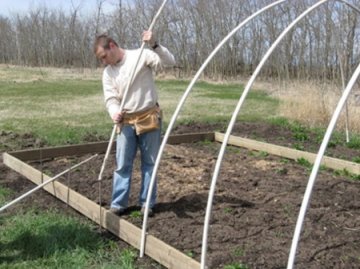
4. It is possible to bend the arc from the PVC pipe without a pipe bender: just warm up the bend construction hairdryer... To prevent the pipe from losing its shape when heated, sand or ordinary table salt is poured into it with a funnel, and then wooden plugs are inserted on both sides of the pipe. If you don't have a building hair dryer at hand, you can heat sand or salt.
5. If you want to get an arch with a large bend angleTo avoid kinks, it is better to assemble the greenhouse frame from small bent pipe sections using connecting fittings.
PVC pipe bending
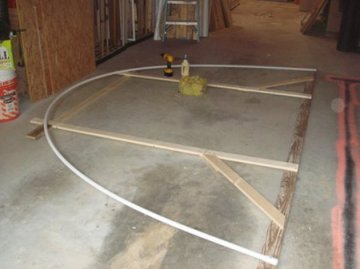
Council. To get a perfectly flat symmetrical arc, you can outline its outline on any flat surface, and then align the pipe along it.
6. So that over time the pipes do not crack in the sun, before installing them it is desirable to glue it with masking tape or cloth.
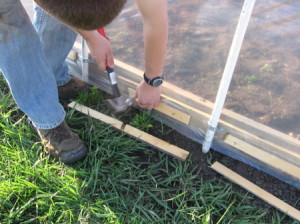
7. Each of the arcs is mounted on a metal rod driven into the ground and additionally attached to a wooden base using a thin metal plate and self-tapping screws.
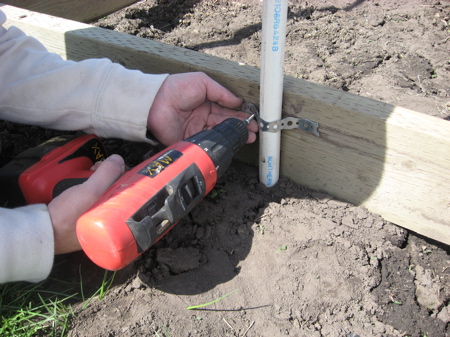
Fastening pipes to the base
8. Along the lower edge of the greenhouse, a PVC pipe is laid as an additional stiffening rib... You can connect the arc and the stiffener to each other using plastic cable bundles (clamps)... It is undesirable to use the wire: it will cling to clothing, and the thin plastic film will break through very quickly.
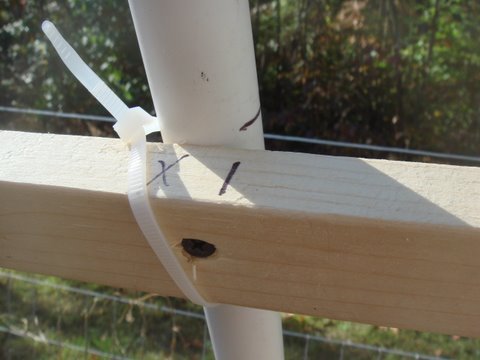
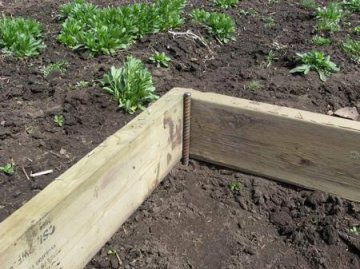
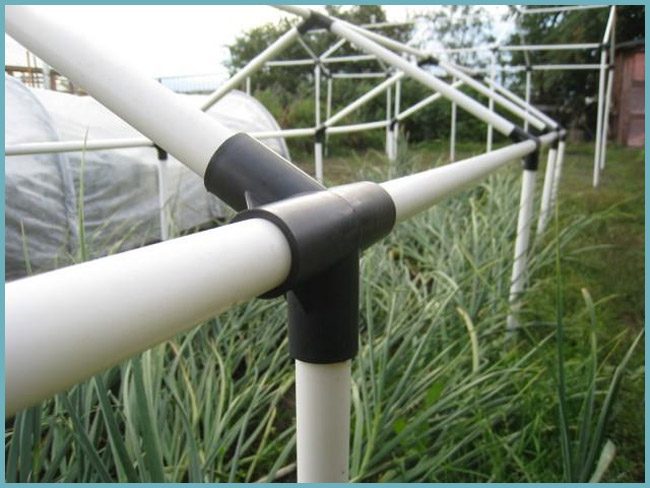
Cross hair connection with plastic cable ties
9. You can fix the arcs not only with metal stakes driven into the ground. It is enough to first collect around the perimeter of the greenhouse lower stiffeners, and then attach the arcs to them using the connecting fittings.
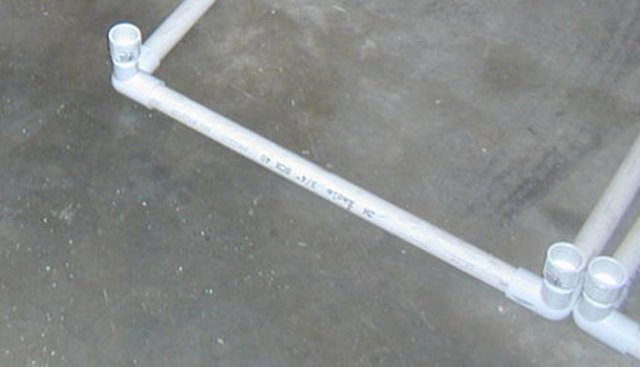
Assembling the lower stiffener
Arcs are attached directly to the bottom stiffeners
Important! All tees should be reworked: cut them so that the pipes pass through them.
10. To strengthen the structure, tees additionally fixed with PVC glue... To get a collapsible greenhouse, self-tapping screws can be used instead of glue.
![]()
Pipe fittings
Council.Perhaps the only drawback of PVC pipes: excessive flexibility, so they can bend under the weight of too much snow. For an arched device, this is not critical, since snow will not linger on its roof. When constructing a greenhouse with straight walls, additional stiffeners should be provided on the ridge of the greenhouse or assembled not from pipes, but from a PVC profile.
Fastening greenhouse pipes with straight walls and sloped roof
11. For fastening the door and vents instead of hinges, you can use Velcro tape. To do this, it should be wrapped around the bearing support and the door.
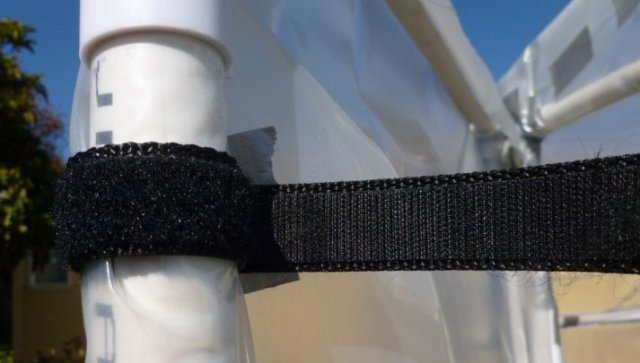
Fastening the door with Velcro
12.Using PVC pipes, you can create not only the frame of the greenhouse, but also equip it racks.
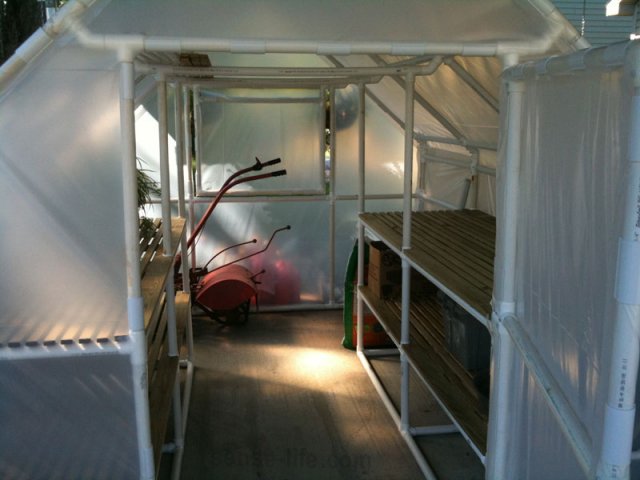
Racks in a greenhouse made of PVC pipes
Greenhouse cover
The following can be used as a covering for the greenhouse frame:ordinary plastic wrap;
air bubble film for greenhouses;
nonwovens;
reinforced polyethylene film;
polycarbonate.
Council. It is very convenient to fix the plastic wrap with the help of "latches" made of a cut along the length and slightly unbent piece of PVC pipe. The diameter of such a pipe should be slightly larger than the pipes of the frame itself.

Fastening of the film using "snaps" from pipes
Sheets cellular polycarbonate fastened to the frame with self-tapping screws and thermal washers. Their fastening starts from the edges of the frame, and then moves to its center. The side side of the center sheet is cut off with a construction knife to the desired size if necessary.
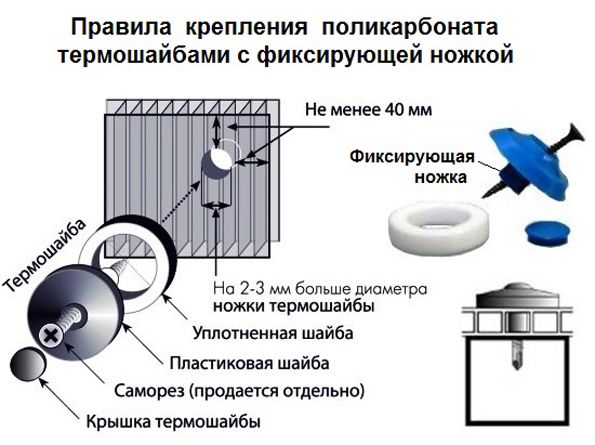
Mounting with thermal washers
Council. Polycarbonate sheets should be positioned so that the honeycomb runs perpendicular to the ground. Otherwise, the resulting condensation will not be able to drain down, and the moisture accumulated in its cells during frost will destroy the honeycomb.
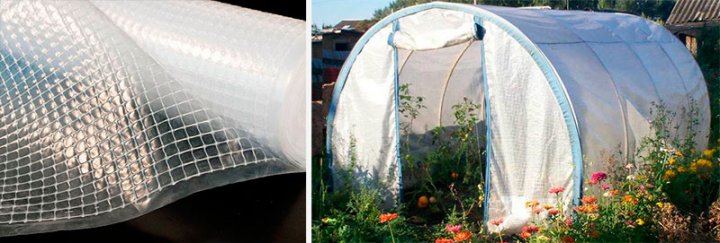
Greenhouse cover made of reinforced polyethylene film
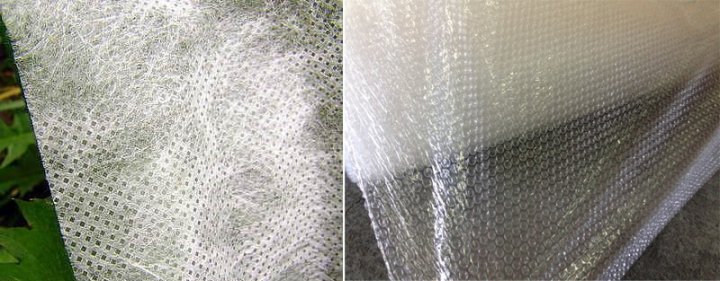
Spunbond (thermally bonded non-woven fabric) and bubble wrap for greenhouses
When the question arises, whether to buy a ready-made greenhouse or build it yourself, many decide in favor of the second option. The case is small: study the topic carefully and decide on the type of greenhouse. The size, shape of the building, materials - all this will have to be thought out in advance. Today we will tell you how a greenhouse is built from polypropylene pipes do it yourself and its main advantages.
The advantages of a polypropylene frame
The frame is one of the most important components affecting the durability of the greenhouse. It is the basis of the entire structure, and the service life of the coating will also depend on it. Indeed, if the frame is unstable or disproportionate, then the coating, no matter how reliable and expensive it may be, will collapse much faster.
Greenhouse frame made of polypropylene pipes
The frame for the greenhouse can be constructed from materials such as wood (timber), metal pipe or profile. Each of them has its own advantages, but they are united by one drawback: to a greater or lesser extent, they all corrode in the humid environment of the greenhouse. That is why pipes made of polypropylene, plastic or PVC can be called the best material for building a frame, since they do not have such a negative property. We list other advantages of polypropylene:
- lasting. A very important quality for frame material, because the greenhouse will have to deal with wind and snow loads;
- flexible. Due to this property, pipes made of polypropylene, plastic or PVC are suitable for the construction of arched greenhouses;
- light. The frame made of such pipes is easy to mount, dismantle, and if necessary, move to another place;
The pipe frame is easy to assemble even for a person without construction experience
- durable. The plastic from which the pipes are made does not change its dense structure for about ten years. And then the parts that begin to deform can be replaced without much difficulty;
- moisture resistant. The material does not absorb moisture at all and does not collapse under its action;
- fire resistant. You can be calm: PVC pipesthey will not cause a fire, since they do not burn at all;
- environmentally friendly material does not emit fumes harmful to humans and plants.
Getting started - making calculations
Before starting construction, you need to choose the right place for the greenhouse and it is advisable to take into account all the details:
- Choose the shape of the greenhouse and determine its size.
- Develop drawings and diagrams with precise distances.
- Calculate the amount and cost of material (pipes, coatings, fixtures).
- Prepare the tools necessary for installation.
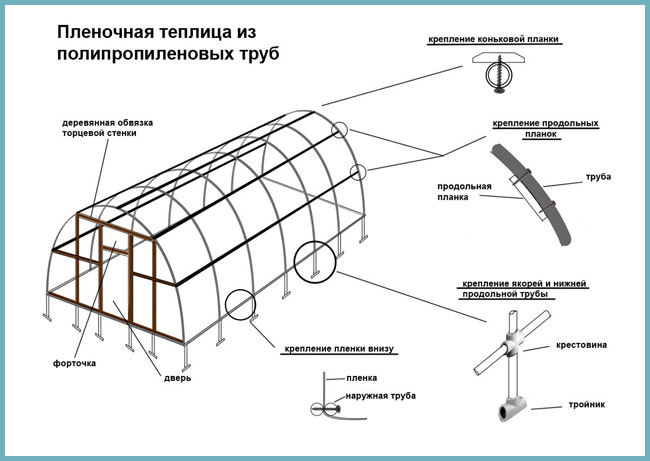
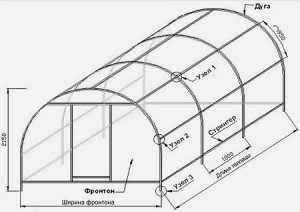
Drawing: greenhouse with a frame made of polypropylene pipes
Only with all this, it will be possible to start with confidence with the first stage of construction - the arrangement of the foundation.
Foundations for a greenhouse made of polypropylene pipes
The frame made of polypropylene pipes, as already mentioned, is lightweight and can do without a solid foundation. Especially if the plans include an annual change in the location of the greenhouse. But you still need to do something. For example, equip the base - a wooden frame made of twenty-centimeter boards.
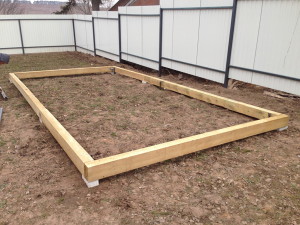
Having chosen a flat, more or less horizontal terrain, well lit by the sun, we proceed to preparatory work... We dig a ditch around the perimeter of our future greenhouse (we already know its size) to a depth of about 10-15 cm. We lay out the bottom with a layer of sand and then with roofing material. The box, which has been knocked down in advance from the boards treated with an antiseptic, is placed in a prepared place, and then we strengthen it with waterproofing material from all sides.
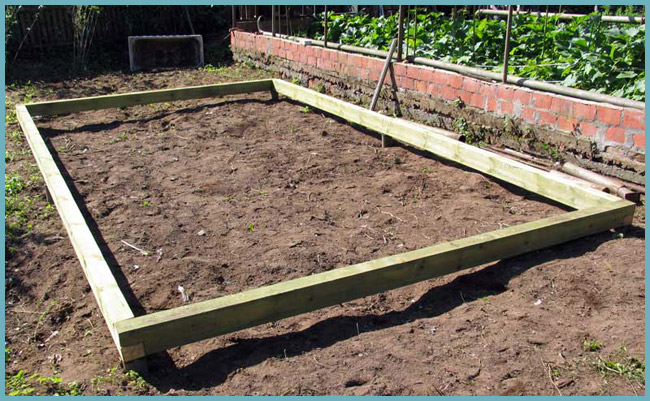
Greenhouse base
After the horizontal is set and right angles are knocked out, you need to strengthen the foundation with four reinforcing rods. They are hammered from the inside of all four corners of the frame and further prevent it from deforming.
Council. You can check if the frame rectangle is correct by measuring both of its diagonals. If they are identical in length, then our foundation is perfect.
Making a base of boards for a frame made of polypropylene pipes is easy, fast and inexpensive. But you cannot count on the service life of a board lying in the ground too long, even with precautions. After a while, it will have to be replaced. Therefore, some owners still prefer to fill in a full strip foundation for centuries.
Frame installation
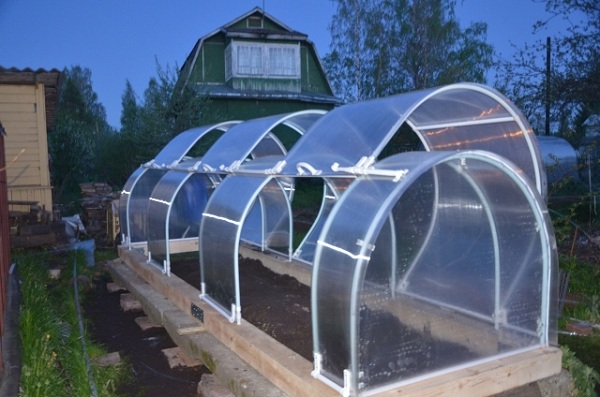
From polypropylene, plastic or PVC pipes, you can make a frame for both arched and gable greenhouses. Naturally, the principles of assembling these two frames are fundamentally different. Do-it-yourself arched greenhouse made of polypropylene pipes - the task is several times easier, and therefore it is recommended that beginners in the construction business try to build it. We bring to your attention ready instructions for assembling an arched polypropylene greenhouse with a size of 10 x 4 m.
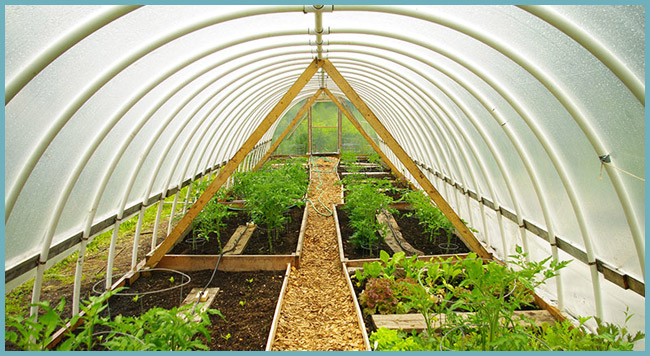
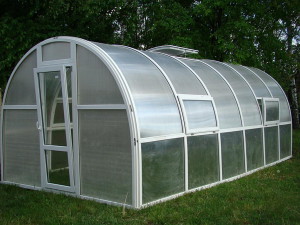
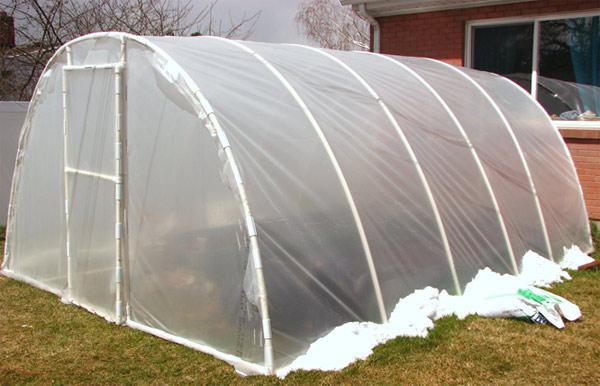
Arched greenhouse made of polypropylene pipes
Arched greenhouse
Council. In warm weather, the material will be more pliable, and the quality of work will be much higher - the film will not sag.
Gable greenhouse
The process of creating a gable greenhouse from polypropylene pipes is not much more complicated than an arched one. To some extent, this is similar to the construction set for adults. The problem may be that to join the pipes, you will need a special soldering iron, which connects two plastic parts at high temperatures.
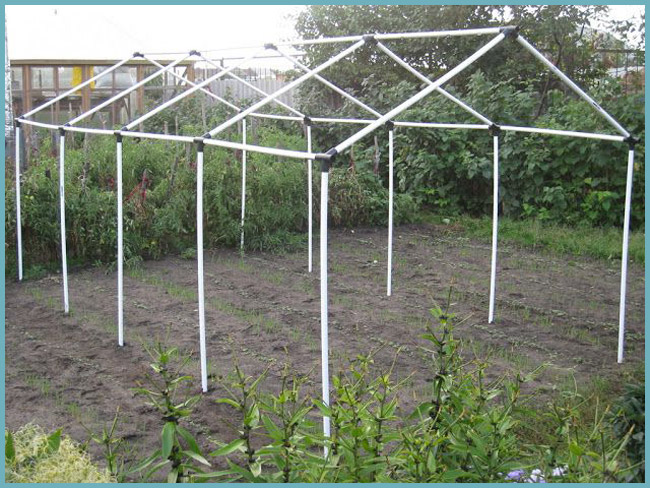
The frame of a gable greenhouse made of polypropylene pipes
To install a gable frame, you will need:
- polypropylene pipes 32 and 25 mm in diameter;
- tee fittings;
- cross fittings;
- welding machine or furniture bolts.
Attention! Furniture bolts can be used as pipe fasteners. In this case, the structure will be collapsible, but less stable and reliable.
The process of erecting the frame of a gable greenhouse begins with the same arrangement of base boards of the required size and fixing the reinforcement, on which polypropylene pipes are installed vertically and fixed with metal brackets. And then the creative work begins on the design of the rectangular frame and roof. Tees are soldered to the top of the pipes, and crosses to the corner ones. The rafters will be attached to them, heading to the ridge of the greenhouse. The rafters on each side of the ridge will need to be additionally reinforced with stiffening pipes.
- Polypropylene greenhouse
- Greenhouse on a wooden base
- Cellular polycarbonate greenhouse
One of the most common options for modern greenhouses is a polypropylene greenhouse. The installation of the structure is mostly reduced to the assembly of the frame, which, in turn, is easy and simple to perform. Therefore, you can easily make such a greenhouse with your own hands, without the involvement of professionals. Moreover, during the construction process, specially designed tools will not be required, and material costs add up to an absolutely real amount.
A greenhouse made of polypropylene pipes with your own hands can be made in many design options. Let's take a look at the three most common ones.
Polypropylene greenhouse
So, a greenhouse based on polypropylene is absolutely easy to build with your own hands.
First, you should prepare (buy and / or manufacture) the necessary components:
- 3.5 m - 2 pcs.
- 3.6 m - 2 pcs.
- 5.58 m - 5 pcs.
- 0.9 m - 4 pcs.
- 1.9 m - 4 pcs.
- 0.68 m - 10 pcs.
- 1.7 m - 2 pcs.
Secondly, you should choose a site for the future greenhouse, level the surface and drive pegs to a depth of 25 cm on all sides around the perimeter - they will prevent the PVC arcs from unbending.
Now you can proceed directly to.
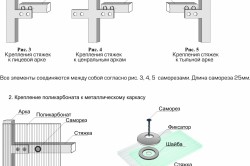
Let's start with tees - pipes should pass freely through them. Before starting the attachment, it is worth deciding which greenhouse you are assembling, collapsible or non-collapsible. In the first case, the tees are fixed with self-tapping screws. In the second version, the pipe is cut into shorter lengths and the tees are attached with glue.
Do-it-yourself hinges, latches and clamps for film. For the hinges, two pieces of PVC pipe, each 10 cm long and 1 - ¼ ”in diameter, are glued together and fixed to the frame with a standard screw. Snaps are also made from a piece of pipe, having previously cut a ¼ part around the circumference and smoothing the edges.
The greenhouse frame made of polypropylene is completed, you can proceed to the final stage - covering with a greenhouse film. It is advisable to carry out work in warm weather, which will prevent the possibility of sagging of the film. Fixation is carried out along the entire perimeter with clamps, thanks to which, if necessary, it will be possible to pull up the film without effort.
Like any design, such a greenhouse has its own advantages and disadvantages. The main advantage of a greenhouse made of polypropylene pipes is non-susceptibility to decay, corrosion, etc. The main disadvantages are the fragility of the service of the film coating and poor thermal insulation. Moreover, you can easily increase the service life - you just need to replace the film, the service life of which reaches 12 years.
The construction of a greenhouse made of polypropylene pipes, especially with your own hands, can be called waste-free production, since, for example, racks for seedlings can be built from the remaining scraps of PVC pipes.
Back to the table of contents
Greenhouse on a wooden base
In this case, it will be located on a base of wooden boards.
The wooden box, on which the frame will subsequently be installed, must have ideal right angles, for which it is recommended to use pieces of reinforcement. At the end construction works they can be removed.
When the base is ready, move on to the arches of the greenhouse. The step between them should be about 0.85 m.Previously, along the perimeter of the base in the places of the calculated position of the arcs, it is necessary to fix 10 mm pieces of reinforcement so that about 30 cm remains on the surface.
PVC pipes are cut into pieces of the required length and fitted onto the fittings. The edges are fixed by fastening to the base with screws or specially designed fasteners.
Frames with vents and doors are mounted from the ends.
To strengthen it, it is recommended to pass another PVC pipe over the assembled structure and fix it plastic ties to the arcs.
So, the frame is complete, you can fasten the film, which is fixed by the standard method - by means of bars. The film is also used for covering vents and doors.
Back to the table of contents
Cellular polycarbonate greenhouse
As noted earlier, the film is not durable, so it is recommended, if possible and if desired, to replace it with cellular polycarbonate. It is also not difficult to mount this. The main thing is to adhere to a certain sequence of installation. Let's look at the process in stages.
- training;
It is necessary to select a site for construction, level the ground.
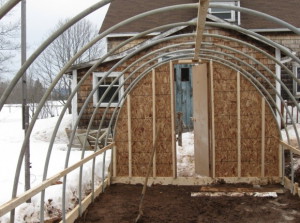
Before you start mounting, you should close the ends with sheets of cellular polycarbonate.
To do this, cut exactly 3 sheets of 2x2.1 m in size (it is recommended to use a construction knife). The end frame is laid horizontally in a position where the door and the vent open upward. A protective film is removed from the inside of the prepared sheet of cellular polycarbonate, and it lies on the surface of the end face up. At the end of the entire process, the honeycomb should be parallel to the axis of the door opening and perpendicular to the base. The first sheet should fully close the door, the window and part of the end.
- fixing cellular polycarbonate;
Mount polycarbonate sheets carried out by self-tapping screws with press washers measuring 3.2x25 mm. If excess is formed along the arc, they are cut off with a construction knife. The second sheet is attached in a similar way to the first one. It is very important not to forget to remove the protective film and align the sheet with respect to the opening axis and the base.
- doors and vents;
Using a ruler and a construction knife, the doors are cut in the middle of the frame so that an overlap is formed when closing. For a better and smooth opening of the door, it is worth cutting out holes for the vents and protrusions of the hinges.
The second end is covered with cellular polycarbonate in the same way.
- direct installation of the frame;
After completing all the previous preparatory steps, you can proceed to direct installation. The ends are installed on a pre-rammed surface and fixed to the base. The arcs are installed using guides and attached to the ends with a longitudinal tie.
The level checks the position of the structure relative to the earth's surface. If the work is done accurately, taking into account all the requirements and comments, then the frame can be fixed with driven pins. Then the greenhouse will not budge during the entire period of operation.
- fastening the cover.
When the frame is fixed, you can start fixing the sheets of cellular polycarbonate, which are recommended to be prepared with a margin of about 100 mm to the determined dimensions.
Sheets are stacked on arcs face up, with the edge protruding 50 mm above the end. Fastening is carried out with self-tapping screws with press washers.
The protective film is removed only after complete installation.
Greenhouses with a frame made of this material have the following advantages:
- low cost of all necessary components for construction;
- simple installation and mobility - if necessary, you can disassemble and move to another place;
- versatility - the frame design can be made in various versions;
- durability - polypropylene is resistant to decay and external factors, so the greenhouse can last at least 20 years.
The disadvantages of frames erected from polypropylene pipes include the fact that the weight of the complete structure is relatively small, and after covering with material, the greenhouse, having a large wind capacity, can be demolished by a strong gust of wind.
2
There are a lot of greenhouses for assembling different schemes... But if you choose the usual classic version, then you can assemble the greenhouse in two days. First of all, it is necessary to make a drawing of the future greenhouse, according to which it is easier to calculate the required footage of pipes. The amount of material will depend on the size of the building.
After drawing up the drawing, it is necessary to purchase polypropylene pipes of a large section, from which the greenhouse frame will be erected. In addition to the main elements of the frame, pipes of a smaller diameter will be required in order to connect the main arcs to each other, thus giving the rigidity of the entire structure.
To fasten the frame to the ground, you will need reinforcing rods 1.2 m long and of such a diameter that the rod freely fits into the polypropylene pipe. The greenhouse assembly scheme includes the device of the enclosing boards, which are made from edged boards. You can choose boards with a section of 150. The number of such elements and their length depends on the size of the greenhouse.
To fasten the transverse elements of the frame, you will need to purchase plastic tees, which are used for distributing the water supply, or galvanized steel wire. To complete the construction, reinforced plastic sheeting for greenhouses and greenhouses or polycarbonate will be needed.
3
After you have chosen the assembly scheme for the future greenhouse and prepared its drawing, you need to mark up on the ground. We drive in pegs in the corners of the future greenhouse and pull a cord between them. Thus, we get the perimeter of the building. It is important to observe the evenness of the marking, for which you will need a building level and a corner. The corners should be 90 degrees. To check that the markings are correct, you can pull the cord from opposite corners. The diagonal distance between the corners must be the same.
As soon as the marking is completed, it is the turn to install the frame from the boards. It is assembled with nails or wood screws. After the boards are fastened, reinforcing bars are driven into the inner corners. They will avoid distortions when assembling the frame.
Now you need to organize a reliable base for attaching polypropylene pipes. To do this, you need fastening reinforcing bars. First you need to make holes with a garden drill. Depth not less than 1 meter. If a drill is not available, then the rods are simply driven into the ground with a sledgehammer, but you need to try to make the protruding parts of the reinforcement as vertical as possible. As a result, they should protrude 25-30 centimeters above the ground. They need to be located on the outside of the wooden frame, and their number is determined by the size of the greenhouse. The rods and main elements of the greenhouse frame are installed in increments of 50–70 cm.
4
The greenhouse frame made of polypropylene pipes is very easy to assemble. We put one end on the reinforcement driven into the ground and, carefully bending it, insert it into the opposite metal rod. The result is a semicircular arch. Thus, the entire frame is assembled.
After that, it will need to be strengthened by installing transverse stiffeners. They are also made from PVC pipes. They can be fixed to the arches with both ordinary steel wire and plastic tees. In this case, fittings are put on arched elements in advance. After that, the tees need to be soldered to the arcs for reliability or fixed with self-tapping screws, which make it possible to disassemble the greenhouse for the winter.
The number of stiffeners is determined by the dimensions of the structure. But in most cases, even if the size of the greenhouse is large, at least two should be used on each vertical side and on the arcs. The installation of a transverse ridge pipe will be mandatory in this design. Without it, the film will simply sag under the weight of rainwater.
5
They will require an edged board with a thickness of at least 4–5 cm or a timber with a section of 5 cm, pre-treated with antiseptics. A door frame is made of wood. The film on the door frame is fastened with self-tapping screws through thin wooden slats so that it is resistant to wind.
On the rest of the space of the end planes, the frame is also arranged from polypropylene pipes, which are attached to the last arcuate arch by attaching short pipe sections.
The option for making ends without using wood is as follows:
- A door frame is arranged from a polypropylene pipe.
- The door itself is made from pipe sections.
- Two or three loops are made from a piece of large diameter pipe and welded to one of the jambs.
- Elements of a smaller diameter are welded to the door as door hinges in the same quantity as on the jamb.
- The door is hung on polypropylene hinges.
6
As mentioned above, the greenhouse is sheathed from polypropylene pipes with reinforced polyethylene. It is attached to the ribs with plastic clips, and to the bottom of the wood with self-tapping screws through the rail. Clamps are made from pieces of PVC pipe with a larger diameter than arcs. Sliced required amount 10-15 cm and each piece is sawn in one place along.
You need to stretch the material one strip at a time, applying it to the bottom and fixing it on two arched pipes. Then, spreading it out over the entire structure and trimming on each side, insert it along the clamp every 15–20 cm until the entire segment is fixed. Then the second overlap is applied, while the pipe latches with the adjacent material are alternately removed and fixed with two sheets of polyethylene.
7
Of course, greenhouses made of polypropylene pipes can be made not only in an arched version. There are many different schemes that you can use. For example, the version of a gable greenhouse is common. The stages of installing the greenhouse frame will be as follows:
- Plank strapping and fixing rods are installed as in the arched version.
- Then the vertical posts are mounted.
- Then, with the help of fittings, the rafters going to the ridge element are attached to them using a tee of the appropriate shape.
- All "rafter" elements must be additionally reinforced with a transverse stiffening pipe on each side.

The covering and fastening of the material is carried out as in an arched greenhouse.
8
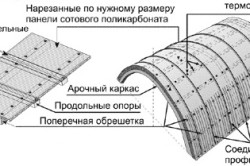
You can often see the greenhouse frame, which is made of polypropylene pipes. This material is much stronger and more durable than film. It will cost more, but it will last much longer. Polycarbonate is attached to the frame with special thermo washers. And the sheets are joined together using a special profile. Polycarbonate should be laid so that its internal channels are strictly vertical.
![]()
You should be aware that polycarbonate can change its size with temperature changes. Therefore, during its installation, it is necessary to leave temperature gaps between the individual sheets. A building sheathed with this material can be used how. But this is in the event that the drawings of the greenhouse and the assembly diagram provide for heating and the corresponding additional insulation.
9
The service life of greenhouses finished with any material can be extended by following certain tips.
The structure of the frame made of PVC pipes can be made collapsible and removed for the winter, thereby extending its service life. In this version, self-tapping fasteners are used. In the fall, after harvest, it can be removed to the garage or shed.

From a non-collapsible greenhouse, you will need to constantly sweep the snow. You can remove the film for the winter and roll it up and put it in a dry place. In this case, it will not crack ahead of time. But when stretching and removing, you need to show maximum attention so as not to tear it.
Also, polycarbonate greenhouses require some features in the care. In autumn or early spring, it must be washed completely, thereby destroying pests and fungal spores hidden in the corners.
In addition, if polycarbonate of insufficient thickness was used, and the frame was made with a large step or from thin elements, then for the winter it is necessary to install vertical retaining posts to prevent the roof from collapsing under the weight of snow.
As you can see, it is quite simple to make a greenhouse frame using PVC pipes and sheathe them with any material. All work takes relatively little time, and the cost will depend on the type of translucent material used.
Growing cucumbers, tomatoes, flowers and other things is a favorite pastime of all summer residents and gardeners. But the construction of a greenhouse, as a rule, is quite costly, laborious and time-consuming. And you always want to be faster, and cheaper.
And there is such a solution. Everyone, even a non-qualified builder, can build a greenhouse from plastic pipes do it yourself.
Content of the article
Features of the frame made of polypropylene pipes
The frame for the greenhouse is the basis of the entire structure. It will depend on him how long the greenhouse will last. If the frame of the greenhouse is unstable, then the coating will deform, tear, and, therefore, will not be able to perform its functions for a long time.
The frame for the greenhouse, in general, can be made of any material: wooden beams, metal pipe or profile fittings. However, all these materials have one serious drawback: in a humid greenhouse environment, they quickly deteriorate due to their susceptibility to corrosion.
Unlike the materials listed above, the greenhouse frame is made of polypropylene pipes, metal-plastic, HDPE or PVC pipes perfectly tolerates humid environment and temperature drops. Consider all the advantages and disadvantages of a PVC pipe greenhouse.
Advantages and disadvantages
- resistance to external factors - a greenhouse made of plastic pipes does not react to climatic and weather conditions, as well as the microclimate features that a greenhouse provides;
- lightness - this design is easy to install and disassemble with your own hands. It will not cause problems if you need to move around the site;
- strength is one of the main requirements for the frame. A greenhouse made of PVC pipes easily withstands the load of winds and precipitation;
- durability - PVC pipes do not change their structure even in extreme conditions. And in the future, if any element is deformed, it will not be difficult to replace it;
- fire resistance - a greenhouse made of plastic pipes is not subject to fire, since the PVC material itself does not burn;
- moisture resistance - plastic does not deform and does not collapse from a humid environment, which must be preserved by the greenhouse;
- environmental friendliness, PVC is an environmentally friendly material. It does not emit fumes harmful to plants and humans;
- affordable price - this factor is important, since everyone who undertakes construction with their own hands wants to finish it with the least financial losses. Greenhouses from a pipe come out much cheaper than similar structures made of wood or profile fittings.
The only drawback of this design is the low weight of the frame. A greenhouse made of, in contrast to a similar structure made of profile fittings, is mandatory needs to lay the foundation and secure attachment to it. Otherwise, with gusts of wind, you may have to catch up with your greenhouse in neighboring areas.
Preparation for work
Before you start laying the foundation and installing the frame with your own hands, you need to make detailed calculations, purchase required material and prepare the tools.
We make calculations:
- First of all, you need to decide on the place where the greenhouse will be installed. The area should be level and free of weeds.
- Based on the chosen location, we choose the shape of the greenhouse (we will talk about possible forms later), calculate the perimeter, draw a plan.
- We calculate the required amount of material, based on the fact that the distance between the pipes should not exceed 90 cm.
- We buy material.
- We prepare tools.
Material and tools
We note right away that you should not try to save money on connecting materials. Exactly stability will depend on their quality and the strength of the frame. And he, in turn, directly affects the durability of the greenhouse itself from the pipe.
To build a greenhouse with our own hands, we need the following materials:
- pVC pipes. Ideally, you should use pipes with an outer diameter of 25 mm, an inner diameter of 16.6 mm and a wall thickness of 4.2 mm;
- strapping wire or plastic tees to connect the frame;
- rods of profile reinforcement with a diameter of 10-12 mm and a length of 600 to 1000 mm for fastening the frame to the foundation;
- materials for the foundation. The set of materials depends on what kind of foundation you plan to lay. We can use either wooden beams with a diameter of 50x50 mm, or cement mortar with profile reinforcement;
- fasteners for fixing the skin;
- film or polycarbonate for covering.
Set of tools:
- garden drill;
- sledgehammer;
- drill;
- hammer;
- pliers.
This is just a rough list necessary tools... In the process of work, there may be a need for a hacksaw, scissors, an ax or something else.
Foundation or frame?
Due to the lightness of construction, greenhouses made of pipes do not need an obligatory solid foundation. But still it is worth remembering that the pipes must be securely fastened to a base that is too strong for the wind. Why is it better to fix the greenhouse?
It goes without saying that making a wooden frame is much easier than pouring a full foundation. However, it is worth remembering that the frame for the greenhouse is made of wooden beams with a diameter of 50x50 mm, to which, with the help of profile fittings, PVC pipes are fixed.
Wood is a material subject to corrosion, fungi and rotting. Therefore, after a short period of time, you will have to change the frame, and, in the worst case, also get rid of mold and fungal contamination of the soil.
This option for fixing the greenhouse is convenient if it is planned to move it around the site every couple of years.
The foundation is a solid structure that can serve for more than a dozen years. Therefore, it is worth erecting it if you decide to deal with greenhouses thoroughly and their position will not change for years.
It is very easy to fix the greenhouse to the foundation. In the process of laying the foundation, at a distance of the pipes of the greenhouse frame (no more than 90 cm), rods from profile reinforcement are installed, on which the greenhouse is subsequently put on and fixed.
Arched greenhouse
A greenhouse of any configuration can be built from PVC pipes. The most common are an arched greenhouse and a gable greenhouse. The arched shape is much easier to install do it yourself, so beginners are advised to start with it.
Consider the technology of installing an arched frame for a greenhouse made of polypropylene pipes using the example of a 10x4 meter greenhouse.
When building a greenhouse of a larger or smaller size, it will be necessary to recalculate the amount of material, respectively, up or down.
- Making the foundation. The width and length of the foundation or frame (depending on what you decide to build) corresponds to the size of the greenhouse itself.
- Next, we need reinforcing bars. We cut them into lengths of 70 cm and set them strictly opposite each other at a distance of no more than 90 cm. If the greenhouse is to be attached to the frame, the rods should be installed on the outside of the wooden base. If the foundation option is chosen, the rods are cemented into the foundation itself.
- Installing arcs. We take PVC pipes of the same length (in our case, the length of the pipes is 6 meters.) The number of arches corresponds to the number of fixing fittings. The pipes are put on the fittings from one side, and then, neatly bent in an arc and put on the pins on the other side of the greenhouse.
- We make a wooden or plastic frame for attaching doors and greenhouse vents from opposite sides of the building.
- Install the central supporting longitudinal beam. Since PVC pipes are not ten-meter long, we take two five-meter pipes and connect them with a clamp. We fasten the stiffener at the very center of the arched structure along the greenhouse. For fastening, you can use clamps or strapping wire.
- We fasten the longitudinal stiffeners in the same way along the slope. Two or three pipes on each side.
- We install a pair of racks under the central stiffener. It is not necessary, because the structure is already quite stable, but it will not be superfluous.
- We fix the cover.
When attached to wooden frame, the frame is tightly fixed, using metal plates and self-tapping screws, to the outside of the wooden beams.
If the greenhouse is installed on a foundation, additional fastening of pipes to fittings is carried out using bolts and nuts. To do this, a through hole is drilled through the pipe and rod, then a bolt is passed and tightened with a nut.
Gable greenhouse
The difference in the construction process, in general, is not big. The only problem is that the gable design provides for corners that are connected by soldering plastic elements. For this you will need a special soldering iron for PVC pipes.
The whole algorithm installation works almost identical to the previous one. Therefore, we will briefly consider the algorithm, with a focus on the features.
- We build the foundation.
- We fix the reinforcing bars.
- We install pieces of plastic pipe of the same length on the reinforcing bars. This will be the height of our greenhouse along the bottom edge of the ramp.
- We attach tees to the upper edges of the pipes. To the corner - crosses.
- Then we begin to show our imagination and remember the children's skills of collecting constructors. Our task is to collect gable roof... The only condition is that all roof elements must be the same length.
- We cover the frame with an awning.
Greenhouse sheathing
There are two main materials that can be used to cover a greenhouse: plastic wrap and polycarbonate. Both of these materials meet the main requirements for a greenhouse cover:
- resistance to climatic and weather conditions;
- passability of light and ultraviolet radiation;
- the ability to maintain the microclimate inside the greenhouse.
Shelter with plastic wrap
For covering the greenhouse, it is better to use reinforced film, since the usual polyethylene quickly deteriorates under the influence of sunlight.
To cover the greenhouse you need:
- Cut the polyethylene. This process is best done directly near the frame in order to accurately calculate the material. The sections of the film should be slightly larger than the walls of the greenhouse, since it will be attached using turns and folds under the structure.
- Any clamping device can be used to attach the film, including clothespins or money clips.
- You can make fasteners yourself. For this, pipe sections of a larger diameter are cut lengthwise, and then put on the frame, thereby pressing the sheathing to the frame.
- At the end of the work, the bottom of the casing is refueled under wooden base or snuggles against the foundation.
DIY plastic pipe greenhouse (video)
Polycarbonate sheathing
Polycarbonate sheathing will cost a little more, but it will last incomparably longer. In addition, such material is a means of thermal insulation, therefore, it will help to preserve the greenhouse in winter and warm up the earth faster and create a microclimate during the sowing period.
Polycarbonate has a special ability to expand and contract with temperature changes.
Therefore, rigid fastening of the sheathing to supporting structure... Such an action can lead to deformation and cracks cladding material.
Fastening of polycarbonate sheets is carried out using self-tapping screws and thermal washers. The holes for fastening are drilled with a slightly larger diameter than the body of the screw itself. A rubber washer is placed under the head. This makes it possible for the skin to play and not deform when the temperature changes.


