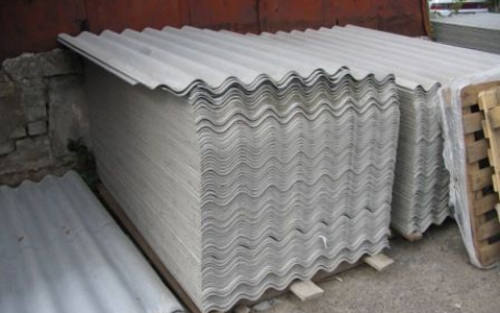
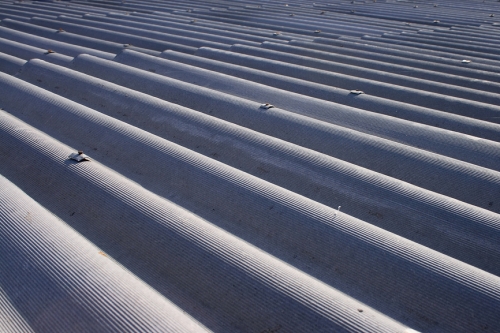
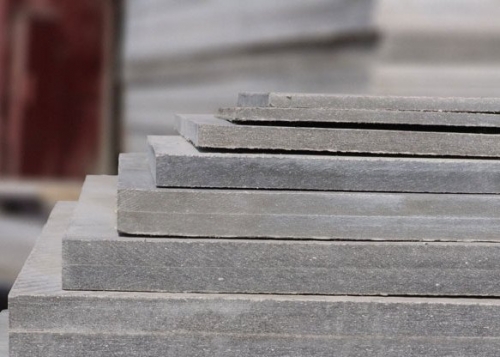
In private construction, roofs covered with asbestos slate are quite popular. There are two types of this material: flat and wavy. For example, corrugated sheets can be used at a slope angle of 12 degrees or more, while flat sheets require at least 25 degrees. That is why corrugated slate is preferred. However, when choosing corrugated slate for the roof, it is also necessary to take into account the climatic features of a particular region and the design standards in force there. So, if a lot of snow falls in the region, it is recommended to use corrugated slate only on roofs with a slope of at least 25 degrees. If these recommendations are not followed, the roof may leak.
Slate production process (components and stages of production).
The popularity of slate is due to its obvious advantages, which include affordable cost, good noise insulation properties, practicality and ease of replacing damaged sheets, durability, anti-corrosion and fire resistance. In addition, the advantage of slate is its simple laying technology. This means that even an inexperienced person in the construction business can do the installation of slate with his own hands.
Along with the advantages, slate has a number of disadvantages that can complicate assembly work... First, they are relatively heavy. Secondly, the transportation and installation of slate requires special care due to its fragility. Thirdly, slate contains asbestos, which is harmful to humans. If you need to cut some sheets, you will need personal protective equipment. In addition, the cutting line must be immediately treated with special acrylic paint.
Instructions for preparing for the installation of slate
Slate installation scheme (laying and lathing).
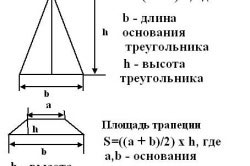
To find out how much slate you need to purchase for installation, you need to determine the roof area. For this, simple calculations are made: the height of the roof slopes is multiplied by their length. Further, the size of the roof area is divided by the area of \u200b\u200bthe slate sheet. The resulting number of slate sheets must be increased by 10%, since the slate installation technology provides for its overlap.
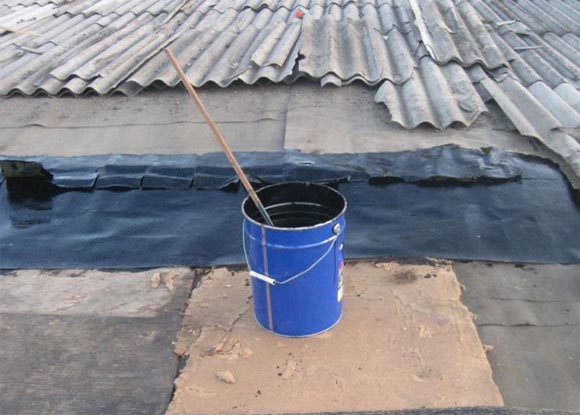
To ensure the tightness of the roof, special waterproofing material, for example, roofing felt or roofing felt, can be laid on the rafters. There is also a better option for waterproofing - a hydro-barrier, which is a subroofing film with the smallest perforation. Such a film will protect the roof structure not only from atmospheric precipitation, but will also prevent the penetration of dust and the formation of condensation.
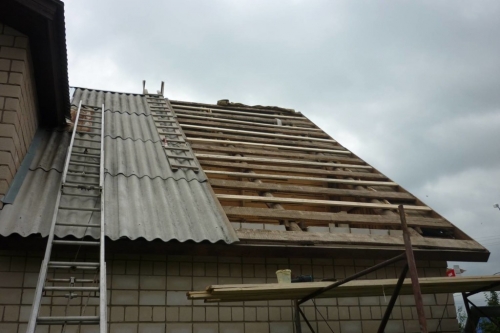
Given that asbestos sheets are relatively heavy, it is necessary to carefully consider the device. do it yourself from dry wood bars of at least grade II. It is impossible to equip a crate made of raw wood, as the fastenings will weaken when it dries. Do not use gnarled blocks, as they may break after installation under light load.
The optimal width for the lathing is considered to be the width of the timber from 50 mm to 75 mm. Place and fasten the bars with a standard pitch of 530 mm from the bottom of the roof to the top parallel to the position of the ridge. If it is used for roofing, then the pitch of the lathing should be much smaller. Quite often, in such cases, a solid crate is made.
After arranging the base of the roof, it is necessary to prepare the slate for installation. Depending on the laying method, the sheets are marked, holes for fastening are drilled and unnecessary longitudinal strips and corners are cut off. It is not recommended to cut the sheet to a length of less than 0.6 m, as the material will lose its strength. In such cases, it is best to remove the excess length of the sheets by increasing the width of the overlap.
The type of roof covering affects how it will be arranged. On sale there are special asbestos-cement fittings that will make it possible to make the ridge of a slate roof with your own hands. Such elements have the configuration of a gutter, which is laid down and attached to the ridge beam.
Slate laying instructions
The main rule for installing slate is laying exclusively from the bottom up. Otherwise, there are options. So, for example, in each case, the question of which side to start work is solved separately. The main direction of the wind blowing in a certain region plays a decisive role here.
There are two most popular ways of laying corrugated slate: stacking sheets with an offset (in space) and laying with a cut of the corners of the sheets. The choice of any method depends primarily on the configuration of the roof. If the roof has a slope wide horizontally and narrow vertically, then the first method of laying slate is optimal. A vertical wide slope is best laid in the second way. To ensure the straightness of the installation of the first sheets, a cord is pulled along the overhang or a rail is nailed.
When using the offset method, the sheets do not need to be cut at their joints. The very first sheet of slate from the side of the pediment is allowed behind the crate at a distance of one wave and fixed with slate self-tapping screws or nails. The next sheets of the first row with one wave overlap are placed on the previous ones. The second row is laid with an overlap on the first row with an offset of one or more waves.
The second method involves the installation of slate sheets without displacement, but you will have to saw off the corners of individual sheets. This is necessary because the four corners of the slate must not be allowed to converge. This will cause looseness and curvature of the sheets. As a result, cracks may appear, into which moisture can easily penetrate and the wind will blow.
When laying the sheets of the first row, except for the first one, the upper corner is cut off from the side from which the laying begins. For sheets of the second and subsequent rows, the lower corner on the opposite side is also cut off. Laying is also done with an overlap.
Holes for screws or nails are drilled with a conventional drill. The number of holes and, accordingly, screws or nails depends on the state of the lathing, but on average it is 2-3 pieces per sheet. Slate sheets located at the edges must be reinforced with additional fasteners.
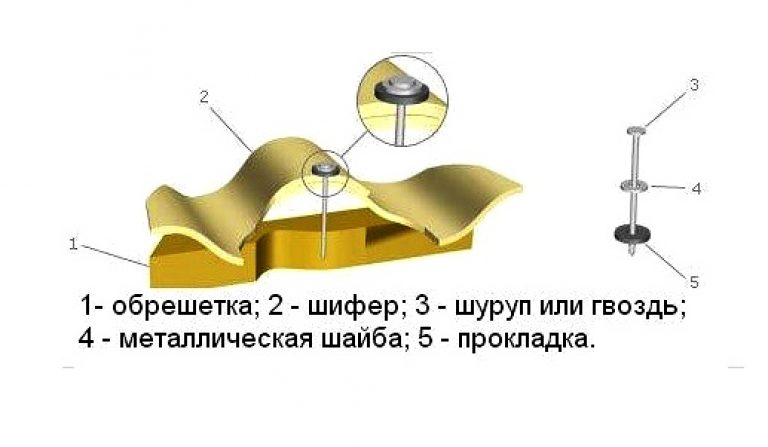
When installing corrugated slate under nails or screws, special washers must be placed to create a tightness of the mounting hole. Slate screws are equipped with such sealing washers. When using nails, sealing washers can be easily made by hand, for which you just need to cut them from a piece of non-thick rubber or roofing material.
It is forbidden to nail slate sheets tightly, but weak fastening is also not allowed. Fastening is considered optimal when a nail or screw only touches the slate surface, without creating pressure.
Slate roof care instructions
If you properly care for the slate coating, then it will last a long time. For example, regular cleaning of the roof from debris will not allow it to get wet and, being on the sheets, destroy the material with a wet layer. It is necessary to regularly inspect the roof and, if necessary, clean it of lichen and moss, which are likely to grow there.
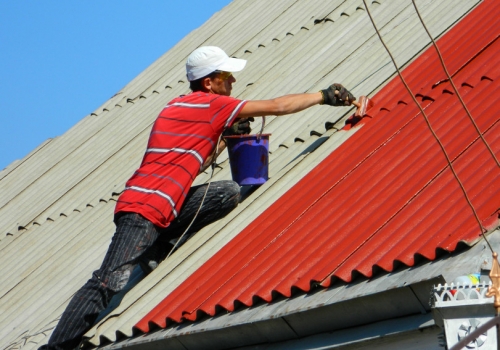
For prophylaxis after installation slate roof can be painted with special paint or primed. In addition, you can first apply an antiseptic solution to prevent the appearance of lichen and moss.
If small defects and cracks are found, it is recommended to treat them with a waterproof sealant. To eliminate more serious damage, it is necessary to dismantle the coating and replace the damaged sheets with new ones.
They begin the construction of a slate roof with a check of the asbestos-cement sheets for compliance with the declared dimensions and see if there are any defective products (for more details: ""). Then the corners or longitudinal stripes are cut.
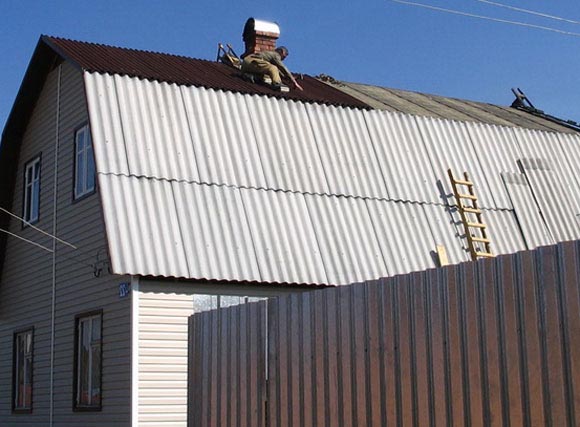
It is necessary to follow the rules on how to raise the slate on the roof. The sheets are transferred one by one to the roof and fixed.
The sequence of actions for installing the roofing is as follows:
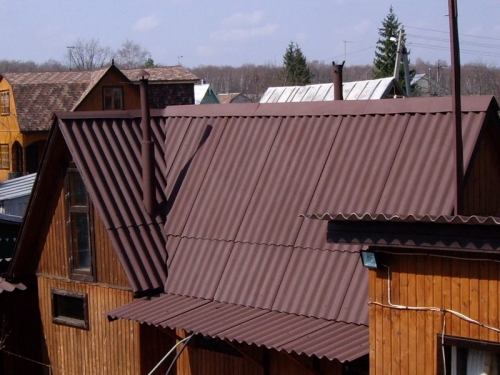
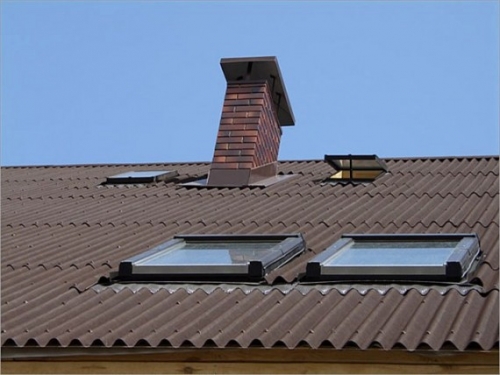
- start laying from the lower right corner of the slope, the rows of sheets follow one after the other with the necessary overlap, as shown in the photo;
- holes for fasteners are drilled before covering the roof with slate using an electric or hand drill, while the diameter of the drill should exceed the diameter of nails or screws by 2 millimeters;
- fastening elements are used together with metal or rubber washers lubricated with a composition based on natural drying oil. They are inserted into the prepared hole, and then hammered into the block with hammer blows. In this case, nails are used with a collection head, the size of which is 4 per 100 millimeters, and washers with a diameter of 18 millimeters. Drive in nails until excess grease appears from under the washer. Experts recommend lubricating the heads of the nails with the same composition, and after drying, paint them to match the color of the slate sheets.
Laying slate on the roof, detailed video:
Slate roof ridge device
The technological process, which provides for how to properly cover the roof with slate, includes work on the arrangement of the roof. A wooden block is mounted on this element and 2 lathing beams are attached on both sides along the entire length.
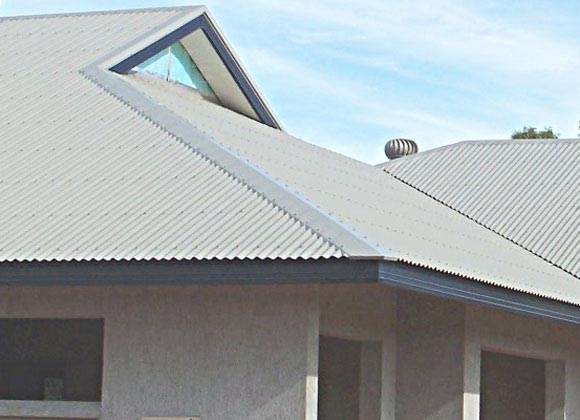
After the covering of the slopes with asbestos-cement sheets is completed, brackets are mounted on the wooden beam installed on the ridge for attaching portable navigation bridges and a ridge bar to them. Its top edge is rounded off before covering the roof with ridge slate. The bar is covered with roll material along its entire length. Only after that do they begin to lay the ridge slate.
Roofing ridge device on pitched roof from slate is a simple matter. First, a KPO1 ridge is installed with a wide bell to the pediment. From the side of the adjoining slope, it is covered with a KPO2 ridge. Then mark the holes for the fasteners. 2 holes are drilled along the longitudinal axis of the wave through both ridge. It is also necessary to make two more holes on the flat lapels of ordinary skates so that they simultaneously pass through the crests of the waves on the slate sheets for the main covering.
You need to know not only how to properly cover the roof with slate, but also how to carry out preventive measures that will ensure a long service life of the coating. Information on troubleshooting and conducting renovation works on a roof made of asbestos-cement sheets.
Slate painting
After staining the slate, it appears protective layerwhich prevents the material from breaking down and prevents it from absorbing water. In addition, the frost resistance of asbestos-cement sheets increases. Also, a layer of paint will protect against the appearance of mosses and lichens on the roof surface.
Slate roof repair
In this case, you can eliminate the damage by putting it up:
- chalk and drying oil are used to prepare the putty solution;
- places with defects are coated with putty and bitumen mastic is applied to the cracks. After it has dried, it is painted over with oil paint.
The above method allows you to eliminate small cracks, but if they are large, then they are recommended to be eliminated by gluing fabric patches. But before repairing a slate roof using a similar method, it is required to clean and prime the places where linseed oil is applied. To stick the patches, use a thick oil paint. They should be slightly larger in size than the damaged areas - by about 2-3 centimeters.
If there are holes in the slate, cement mortar is used to eliminate them, which is made with sand in a ratio of 1: 1. The applied composition is smoothed, primed, and then completely dried and painted.
To install the new element, one worker lifts the weakened roofing components from the side and top of the installation site, while a second person places it on the edge of the sheet located on the side and pushes it towards the ridge. Then the new product is placed under the sheet fixed on top of it. Weakened nails are returned to their original position. Thus, the repair can be considered complete and the roof will no longer leak.
Roofs, for the installation of which asbestos slate is used, for many decades have been highly popular in construction industry, and despite the fact that for last years a lot of modern roofing materials that meet all the requirements have appeared on the market, asbestos-cement sheets still do not lose their relevance. Due to the relatively low cost of the material, its chemical inertness and resistance to static loads, neither roofing iron nor metal tiles have the right to compete with it. Aesthetic properties and technical specifications slate, as well as ease of installation and long operational life are in no way inferior to those for its more expensive counterparts, which also has a significant impact on the popularity of roofing material. The steady popularity of slate, like any material used in the construction industry, has experienced ups and downs, but the use of slate in summer cottage and individual construction revived when multi-colored asbestos-cement sheets went on sale. But their appearance did not affect the popularity of classic slate, which, having stood the test of time, did not lose its consumer. The first question that arises before the master when it comes to slate is how to lay this roofing material... Like anyone construction process, slate laying includes several stages, each of which is characterized by certain nuances. Their observance plays an important role in the effectiveness of the final result, and, accordingly, the duration of the operating life of the roof. In this regard, in this article we will answer the question: "How to cover the roof with slate?"
Slate: basic information about the material
Slate is a traditional roofing material produced on the basis of asbestos cement, and is characterized by high mechanical strength and durability. Today, there are both flat and corrugated slate on sale, as well as models released in multi-colored versions. Asbestos-cement sheets cannot be classified as environmentally friendly materials, since it has been proven that asbestos can harm human health during operation. Given this circumstance, slate can only be used for outdoor work.
Important! Wave slate can only be used for installation of roofs with a slope, the angle of which must be at least 22 degrees. If the roof slope is small, it is necessary to carry out additional sealing of the joints, increase the overlap of the slate and use additional fasteners. To preserve the integrity of the slate sheet, holes for fasteners must not be punched out, but drilled.
Important!Material based on asbestos cement is supplied in packages where slate sheets are laid with polyethylene. They should be kept in this form until they are used in work.
Before laying slate experienced craftsmen it is recommended to cover it with acrylic paint, which helps to extend the service life of the material. The service life of unpainted material is about 20 years, while slate covered with acrylic paint lasts several times longer.
Before we answer the question: “How to lay slate?”, It should be noted that the installation of slate, like any other construction activity, requires preliminary planning. With this in mind, first of all, it is necessary to consider all possible options for the shape of the future roofing, since this is a determining factor in the calculation of slate.
Important! Roofs, for the installation of which sheet materials are used, can be flat, that is, single-slope with a slope of no more than 1-2 degrees, non-attic (single-slope and gable with a slope of no more than 7%), as well as attic, the design of which implies a slope of more than 40 degrees ... It is important to know that experts do not recommend giving preference to intermediate options (for example, roofs with a slope of 25-35 degrees), since it is in this case that the maximum amount of snow accumulates on the roof. Modern development building technologies allows you to equip complex roof structures of any configuration, including those with four slopes, however, it is recommended to choose a simpler geometry for arranging slate roofs.
The advantages and disadvantages of slate: what you need to know about a slate roof?
Features: modern equipment and the development of innovative technologies have significantly improved not only the appearance of the slate, but also its operational characteristics. Among the main advantages of slate are the following:
- Frost resistance and resistance to sudden temperature changes;
- Resistance to high humidity;
- Good UV tolerance;
- The ease of installation activities and the possibility of their own implementation is another reason to pay attention to this roofing material.
Despite a wide range of advantages, slate is also characterized by certain disadvantages that significantly complicate installation activities and are the reason for the refusal to use this roofing material.
Disadvantages of slate:
- Relatively large weight of slate sheets;
- The fragility of slate requires accuracy in the process of transporting material and installation activities;
- The slate is made on the basis of asbestos cement, which includes asbestos, which has a negative effect on human health;
- Taking into account the previous factor, you need to know that during the installation of a slate roof, provided that cutting of the slate is required, personal protective equipment must be used.
How to choose slate: basic rules
In most cases, domestically produced slate is used at construction sites, the dimensions of which are regulated by GOST 30340-95:
- for six-wave slate: sheet thickness is 5, 6 and 7 mm; width - 1125 mm;
- for seven- and eight-wave slate: sheet thickness - 5 and 8 mm; width - 980 and 1130 mm, respectively.
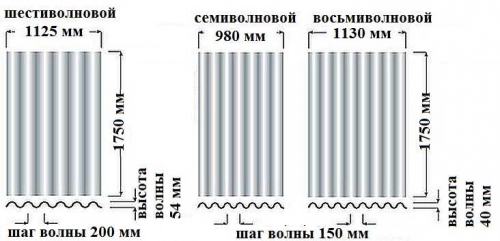
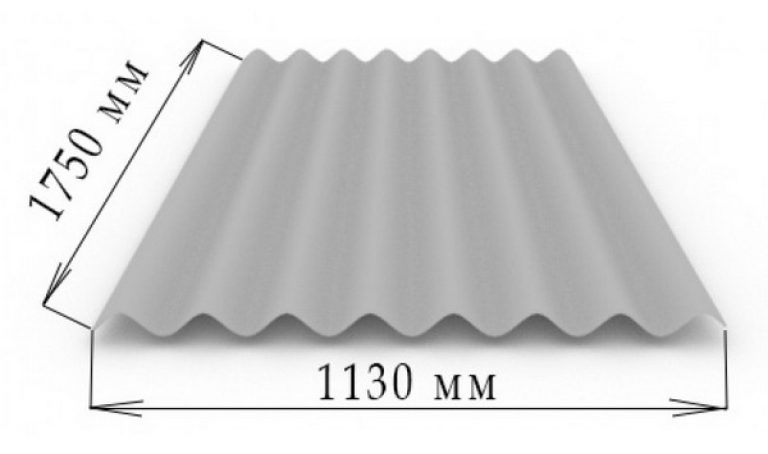
The length of the sheet, regardless of the type of slate, is 1750 mm.
Knowing the brand of slate, you can determine not only the number of waves, but also the height of the wave, which is the distance between the crest and the bottom, as well as the step of the wave, which is equal to the distance between any points of adjacent waves. Let's consider this using the example of 40 / 150-8 slate. 8 in this case means that this slate is eight-wave, 40 mm - wave height, 150 mm - step length. These parameters must be taken into account when calculating slate, since when laying apart, implying the imposition of waves of vertical sheets, the consumption of six-wave slate exceeds the consumption of eight-wave. This is due to the width of the wave step, which in the six-wave slate is somewhat larger than that of the eight-wave slate, and therefore, the area of \u200b\u200bthe material going to the overlap increases.

Sediment collection system is another factor influencing the order of slate roofing. If you plan to equip a gutter under the overhang of the last slate row, it is enough to carry out the installation in such a way that the slate sheets of the last row protrude beyond the facade line by no more than 200-250 mm. If you give preference to a direct-type water discharge system, which provides for the discharge of water from the roof directly to the local area, the dimensions of the protrusion should be at least 400-500 mm.
Slate roof installation technology: main stages
Installation of slate roofing is carried out in several stages.
- Preparatory measures, including the calculation of the required amount of material, as well as its purchase and delivery to the construction site;
- Mounting rafter system and the process of arranging the slate lathing, combined with the laying of waterproofing materials;
- The final stage is the installation of roofing material. He is the most responsible, since the quality and duration of the operating life of the roof depends on him.
How to calculate the required number of slate sheets? Key recommendations
Before you put the slate, you need to calculate the amount of material that will be required for the installation of the slate roof. To find out, it is necessary to carry out simple calculations, the procedure for which will be discussed below:
- First, the length of the roof slopes is multiplied by their height;
- The result obtained, corresponding to the roof area, must be divided by the area of \u200b\u200bthe slate sheet;
- As a result of these calculations, we received the required number of slate sheets, which must be increased by 10%, which is due to the technology of installing the slate roof, which provides for its overlap.

Preparatory stage: arrangement of supporting structures
Preparatory stage includes the installation of the battens, for the arrangement of which it is necessary to prepare material from solid wood species, but it is not necessary to choose oak or larch. This is due to the fact that slate is a fairly light material, and therefore any dense wood can be used for mounting the lathing. Before you install the slate with your own hands at the stage of arranging the lathing, the wood must be processed from rot.
It is important to note that before the start of installation activities, the slate should be stored indoors in its original packaging and in a horizontal position, being laid over with plastic wrap.
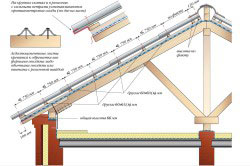
Having decided on the design and slope angle, before installing the slate on the roof, it is necessary to lay the rafters, for the manufacture of which a 50x180 bar is used. Installation of rafters is carried out in such a way that the narrow side is vertical.
Important! If you use boards to make the lathing, the distance between them should be from 200 to 1250 mm. In the case of using bars, they must be laid in such a way that each slate sheet rests on at least three bars, that is, the distance between them must be approximately 400-450 mm.
If you plan to equip a gutter, it must be installed before installing the slate sheets. On the sheets of the last row of the roof, it is necessary to nail a strip of metal to the bottom edge, the width of which is 300 mm and a thickness of 2-3 mm, necessary to prevent chipping of the sheets. On the inside and outside of the metal strip, a layer must be applied waterproofing material... In the places where the slate is attached in the metal, they are drilled required amount fastenings.
Important! To improve the operational characteristics of the attic roof, experts recommend laying a vapor barrier membrane under the slate.
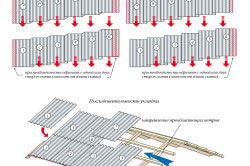
It is important to know that horizontally located adjacent slate sheets must always be laid with an overlap, which can be one or two waves, while the latter option is more expensive, but it is he who guarantees higher strength characteristics of the roof. Due to the fact that when fixing more than two sheets of slate at one point, problems often arise, there are several ways to solve them, and, therefore, methods of laying the roofing material.
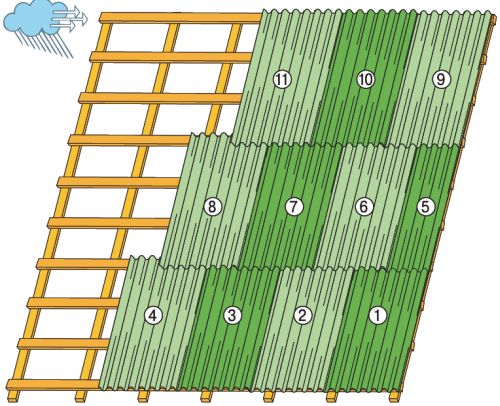
The most popular method of installing a slate roof is "staggering", which implies laying each new row with a shift relative to the previous one. Thanks to the use of such a technique, there is no coincidence of the overlaps of the waves in each of the rows, as a result of which, at each individual point, only two sheets can be joined. To carry out a shift in this case, it is necessary to trim several waves from the outer sheet. The disadvantage of this method is that in the process of installing the last vertical rows of slate, an uneven roofing edge is formed, which needs additional alignment.
As for the eight-wave slate, there is a more practical modification of this installation method for it. In accordance with it, it is necessary to cut in half all the first sheets of odd horizontal rows (i.e. into 4 waves), which will lead to a fairly clear (through a row) repetition of the displacement lines and a more aesthetic appearance of the roof. In addition, using two sawn halves of a slate sheet, you can start installing two rows at once. After you have installed the first sheets, including the halves, you can simply lay the sheets horizontally without worrying about displacement, since the shear formation occurs naturally. However, trimming may be required during the end edge alignment process.
If you are concerned about wasting material, your preferred option, albeit more laborious, may be offset lay. In accordance with this technology, in the case of stacking sheets from left to right, it is necessary to trim the corners of the sheets forming the top row of the roof by at least 100 mm along the wavelength, and no less than 120-140 mm along the wavelength. In this case, the bottom corner is trimmed from the side covering the previous sheet of the horizontally oriented row. Experts say that using this technique, the most optimal overlap of all sheets of material is achieved, not only horizontally, but also vertically.
In the process of laying slate, it is necessary to use nails, self-tapping screws or special screws, characterized by the presence of an enlarged cap and a rubber gasket under it.
Important! To prevent damage to the roofing material during installation, it is necessary to mark the slate in advance and drill holes in it for fasteners. It should be remembered that the diameter of the hole should be 2-3 mm larger than the diameter of the self-tapping screw or nail.

Holes for fasteners should be located as follows: the first hole is in the lower corner of the slate sheet, the second is in the second overlapped wave, the third is symmetrical with respect to the previous one, that is, in the second overlapped wave. The final sheet of the row, located horizontally, must be additionally secured in the area of \u200b\u200bthe sixth (penultimate) wave.
Important!It must be remembered that regardless of the type of fasteners, they must be installed in the crest of the wave, since other placement of screws or nails will cause premature (and rather rapid) destruction of the roofing. In this case, taking into account the magnitude of the vertical overlap between the rows, 120-150 mm recede from the transverse edge of the row.
How to maintain the integrity of the slate: basic safety rules
In the process of laying slate, it is important to observe not only the technology of installation measures, but also safety precautions. In order for the roof to be able to be cleaned during operation, as well as to carry out similar work on top of the slate, it is necessary to install wooden scaffolds, supplementing them with transverse step strips. If the installation of the roof is carried out on a building higher than 6 m, a fence made of metal reinforcement should be provided around it. In order to gently lift the slate sheet to the construction site, experts recommend using a block system and a nylon cable. If the installation of the roof is carried out on a low building, assistants can submit the material.

Important! Moving on the mounted pavement must be done carefully. For free movement on the slate roof during its repair or maintenance, lay wooden ladders on it, thanks to which the load is evenly distributed.
In the process of work, it is necessary to use safety cables and other devices. As for safety measures when working with asbestos-cement materials (cutting and drilling slate), they imply the use of personal respiratory protection (respirators) that will protect the respiratory system from harmful dust.
To equip ridge, cornices, roof joints, pipe joints and similar areas, experienced craftsmen recommend using commercially available special asbestos cement elements, after installing and fixing them with cement and bitumen mastic, you do not have to worry about the strength of the roof being installed. Sometimes wooden boards or galvanized strips are used for these purposes, however, due to the low aesthetics and inefficiency of this method, it has not become widespread.
If all technological stages of laying this roofing material are observed, the operational life of a slate roof without repair (except for emergencies caused by external influences) reaches 50 years or more.
Slate roof care rules: highlights
Slate coating requires simple maintenance, which will significantly extend its operational life.
Its main provisions are as follows:
- Inspection activities and roof cleaning must be carried out twice a year - before and after the precipitation season;
- Despite the fact that even a broom can be used to clean the roof, these activities can be significantly accelerated by using an electric pump;
- In winter, it is recommended not to neglect the need to clean up ice and snow;
- If you are unable to take care of the roof yourself, use the services of specialized teams.
Slate as a roofing material has, of course, lost its share of popularity recently, because many new attractive analogs have appeared on the market: from metal tiles to ondulin. Against their background, it, of course, loses from a visual point of view, but in relation to many technical indicators and, most importantly, cost, it has a number of advantages. The article will focus on laying slate with your own hands.
Slate types
- Slate can be asbestos-cement and cement-fibrous. These two types are not particularly different from each other in technical specifications, but due to the fact that the second does not include asbestos, it has a slightly lower strength, although it is quite sufficient in order to calmly withstand, for example, the weight of an adult.
![]()
Important: slate sheets can be made of pressed and non-pressed material. The latter has lower qualitative indicatorsthan pressed, namely:
- lower density (and, accordingly, strength);
- inferior in resistance to temperature extremes and weather cataclysms.
In shape, both types of slate can be flat and wavy. For corrugated sheets, a thickness of 5.8 to 7.5 mm is characteristic, there is also the following gradation:
- size 1125x980 mm has 6 waves;
- size 1130x980 mm - 7 waves;
- size 1750x980 mm - 8 waves.
Advantages and disadvantages of slate over other roofing materials
Benefits more than many people think, namely:
- enviable strength and durability in all weather conditions, which means a long service life;
- excellent fire resistance;
- high resistance to various chemical influences;
- low thermal conductivity;
- a large selection of color solutions along with a democratic cost;
- ease of installation.
Disadvantages of slate
- High enough weight. And, if a special engineering approach to the process of laying slate is not needed, then physical efforts will have to be made;
- for all its strength and durability, slate can also be called a rather fragile material, which must be taken into account during its installation, transportation and storage. Sheets cannot be thrown (they may crack), but when stacking them, take into account that their number in one should not exceed 165 pieces;
- asbestos-cement slate, as the name implies, includes asbestos, but it is not the most useful substance for human body... Therefore, for the roof of a house, the asbestos-cement option is quite suitable, but for objects that are in the immediate vicinity of people, it is worth using a cement-fiber material;
- over time, moss can appear on any slate, although coating with phosphate and silicate paints solves this problem to some extent, because noticeably reduces the degree of moisture absorption.

Dismantling slate
If before laying the slate there is a need to dismantle the old one, then the main thing here is the human factor (correct distribution of roles) and a convenient tool, because the process does not create any particular difficulties.
- Bearing in mind the fragility of slate and the fact that its sheets will always find use in the courtyard of a private house, it must be removed and lowered from the roof carefully, one sheet at a time, in a sequence opposite to the one in which it was laid.
Laying slate on the roof
Work plan
The actual slate installation process consists of three main stages: preparatory work, creating a lathing and stacking sheets in the chosen way.
- Preparation implies the choice of the type of coverage. If, nevertheless, he fell on slate containing asbestos, then, starting to work with him, all people involved in the process should be protected.
- Determining between flat and wavy sheets, for residential buildings it is still worth dwelling on the latter, because wavy products are much more conducive to the flow of water from the roof.
- Among the wavy types, you will also have to make a choice, depending on the desired density of the slate. This can be an ordinary, unified, medium-wave and reinforced version.
- From what choice will be made, it also depends on what quality indicators are required for the sheathing under slate.
Roof waterproofing for slate
- There are many waterproofing materials for the roof on the market, but if we talk specifically about slate roof, then the best option for it may be a polypropylene film.
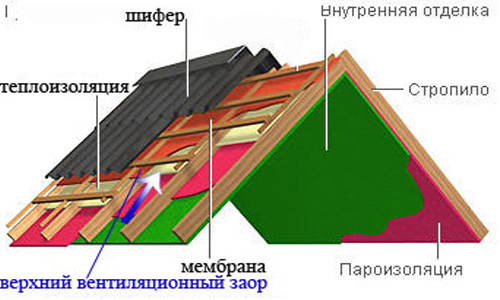
- You need to fasten the film on the rafters with the glossy side up. The pile on the inside serves as an additional barrier to moisture, this is especially important if there is a layer of insulation under it. If desired, you can lay 2 layers of film.
- Fastening is carried out using a construction stapler, to carry out the process you will need at least two pairs of hands (one gradually spreads the roll of film and pulls it, the other fixes it to the rafters). The joints must additionally be strengthened with a sealant or construction tape in more accessible places.
- On top of the insulation layer, battens can be attached.
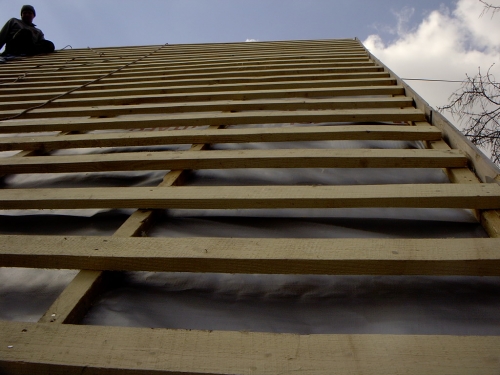
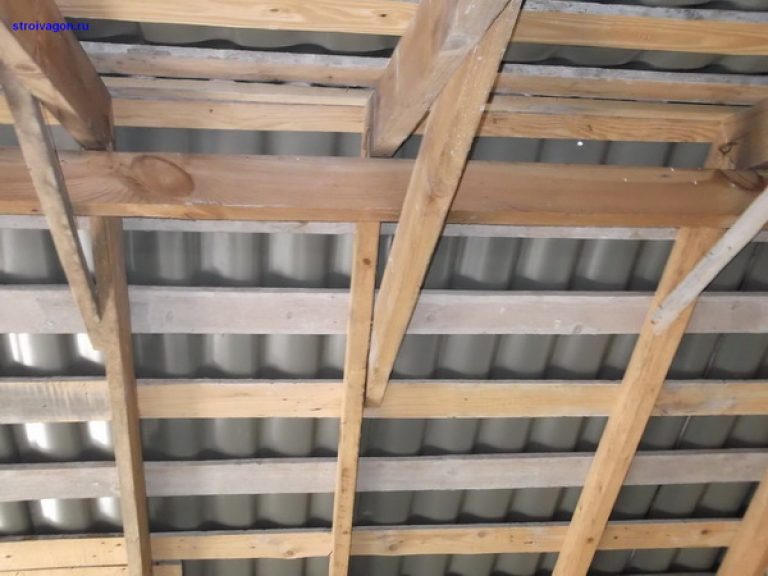
Slate lathing
- Installation of the lathing is a very important stage. The main point here is the use of dry wood only. With a percentage of moisture exceeding 12%, the lathing will "float" and lose stability, because, drying out, the bars will noticeably decrease in size.
- For the frame, wood of 2 and 3 grades is used: spruce, pine, fir, aspen. Before installing, the bars must be treated with an antiseptic, covered with linseed oil or resin, treated with a refractory solution (fire retardant).
- It is necessary to calculate the length of the sheathing beams based on the size and number of slate sheets. It can be either 3.5 m or 6.5. Ideally, it should turn out so that the slate does not have to be cut along the edge of the roof, i.e. whole sheets must fit on the slope, otherwise the roof will look sloppy.
- The size of beams with a square section of 60x60 mm is considered to be universal, although the most correct solution would be to select them depending on the thickness of the slate, which is from 50 to 75 mm.
The distance between the beams also depends on the quality of the slate:
- for an ordinary one it is 50-55 cm;
- for unified - 60-80 cm;
- for medium and reinforced - 75-80 cm.
It is important that this distance is the same throughout the roof.
If bars of different widths are used (which is also permissible), then the widest ones should be placed near the ridge and in those places where the joints of the sheets fall.
- It should also be borne in mind that the beam closest to the ridge should be installed with an edge and rise above the rest by 1-3.5 cm (i.e., by the thickness of the slate), for cornice beams this indicator is from 6 to 10 mm (they should also be edge ).
- It is necessary to start attaching the sheathing beams to the rafters from the bottom, taking into account the overhang of 30-50 cm, during the installation it is necessary to take into account certain construction subtleties, especially the places near the pipe and on the eaves.
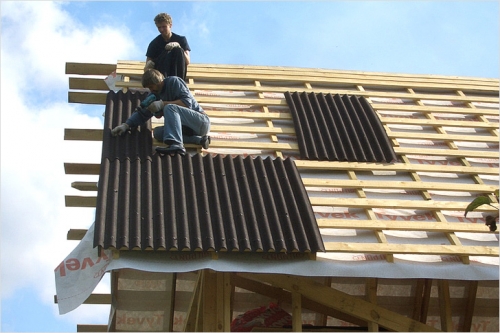
Laying slate sheets
- The slate sheets are attached to the battens with galvanized nails.
- To drill holes, use a drill diameter 2 mm larger than the diameter of the nails. They must be hammered into the crest of the wave (this will protect the roof from leaking) through a rubber gasket and a washer. This must be done carefully enough, and the main thing is not very deep, to the minimum contact with the slate. Otherwise, the material may crack at the slightest temperature difference.
- Installation of slate starts from the bottom and preferably from the more windy side of the roof. The first sheet is a very important element, it "sets the tone" for everyone else, so you need to check the evenness of its laying using a plumb line. The overlap of each subsequent row of sheets is done depending on the angle of inclination of the roof (10 cm is enough for 20-45 degrees).
There are two main ways to install slate:
- with trimming corners, without offset, when each sheet of slate requires a shape correction;
- sprawling, when slate sheets are laid according to the principle of brickwork.
The last option is the most popular because easier to work with.
Laying slate in a "ragged" way
Of course, when purchasing slate in a store, you can always get both detailed instructions the manufacturer and the advice of a knowledgeable manager. They all boil down to the following stages of work:
- plan for the layout of slate on the roof. It is necessary even at the stage of acquisition, since allows you to calculate the amount of material (it is better to take with a margin, then if you have a receipt, you can return the surplus) and understand how many sheets will have to be cut;
- preparation of slate for working with it, which consists in cutting sheets with a grinder. Knowledgeable builders advise before doing this to slightly wet the material in the intended place of the cut. And inspection for chips and cracks (such sheets must be rejected);
- direct installation. It, as already mentioned, must be started from the bottom. The sheet must be attached to the crate at one of the upper corners, docked with the edge of the roof and fixed with three more nails in different corners (necessarily in the crest of the wave);
- the next sheet in the horizontal position is fixed in the same way, with an overlap of 1-2 waves;
- in this way, the bottom row is laid along the entire perimeter of the roof, securing each with four nails;
- the second row must be started from half of the bottom sheet, and go further, making overlaps both on the bottom sheet and on the previous one in the row. This is how the "runaway" effect is achieved;
- thus, one roof slope is filled with slate, the last row in front of the ridge should leave a gap for ventilation. Then proceed to the second ramp. The result is a checkerboard-like roof covering.
Corner trimming method
This method, as already mentioned, is more laborious. But the surface of the roof, laid in this way, turns out to be very even, without unnecessary gaps and, accordingly, its service life will be longer than that created by the "staggering" method. In addition, material consumption will be noticeably less.
Stages of work
- The first, of course, is the roof plan, the construction of which must be approached no less responsibly than when laying with an offset. Indeed, not only the amount of material depends on the correct calculation, but also its correct preparation.
- It is necessary to determine on which side of the slope the laying will begin. There is no one opinion here, someone advises from the left, someone from the right, there is no fundamental difference. Further examples will be indicated for the direction from right to left.
- Preparation of slate sheets. The size of the corner to be cut is 103 mm at the top and 120-140 mm at the side. When trimming, the following points are taken into account:
- the first sheet of the bottom row and the last top one are not cut off (we are talking about one slope);
- the sheets of the lower (first) row are processed depending on the direction. If the slate is laid from right to left, then the upper right corner is cut off from all sheets.
- The second row is laid according to the following scheme:
- the first sheet is the lower left corner;
- middle sheets - bottom left and top right;
- last page - upper right.
- The final row follows the same principle as the middle rows, but the last leaf is not trimmed at all.
The first sheet is fixed in the same way as in the "spreading" method. Further, the sheets are mounted with an overlap equal to the cut size (not less than 120 mm). The top row has exactly the same overlap on the bottom. In this case, the places of cuts of the upper and lower rows of diagonally located sheets should coincide, and the gaps between them should be 3-4 mm.
Slate installation video
Slate roof repair and maintenance
Of course, a slate roof, like any other, must be periodically cleaned. It is especially important to ensure that moss does not appear; antiseptics, which in most cases are part of slate paints, are very helpful in this matter.
- In cases of chips and cracks, of course, minor repairs may be required. If the place of the leak is not very large, then processing with a special putty or installing a patch may well be enough.
- In more serious cases, the damaged part of the roof must be replaced. The slate allows you to do this without any extra effort, because it is not difficult to dismantle individual sheets.
Slate is inexpensive, durable and available material for the roof. Its popularity is also due to the fact that the installation of slate is not difficult and affordable even for a beginner. However, before you start laying it, it will be superfluous to learn how to properly lay the slate on the roof so as not to get into a mess.
Slate is a roofing material in the form of sheets with a wavy or even surface. It is made by molding from asbestos cement. Natural slate light grayhowever, manufacturers can give it any color by adding various pigments. According to GOST, the thickness ranges from 5.8 to 7.5 mm, and the sheets themselves can be six-, seven- or eight-wave.
Slate has the following advantages:
- Simplicity of styling;
- Fire resistance;
- Affordable cost;
- Strength;
- Durability. The service life can be 30-40 years.
- Versatility: Suitable for any home design.
The material is not devoid of flaws, namely:
- Quite a significant weight, which causes the need for stronger rafter structures;
- Fragility. In case of careless transportation or careless handling, the sheet may break.
Before laying slate, it should be noted that this material is best suited for simple roofs. It is preferable that the slope angle is up to 20 or more than 35 degrees to prevent snow accumulation in winter.
Features of the rafter system when laying
Before laying the slate, you need to carefully prepare the rafter system. One sheet weighs 30-35 kg, which leads to a serious load on the frame. 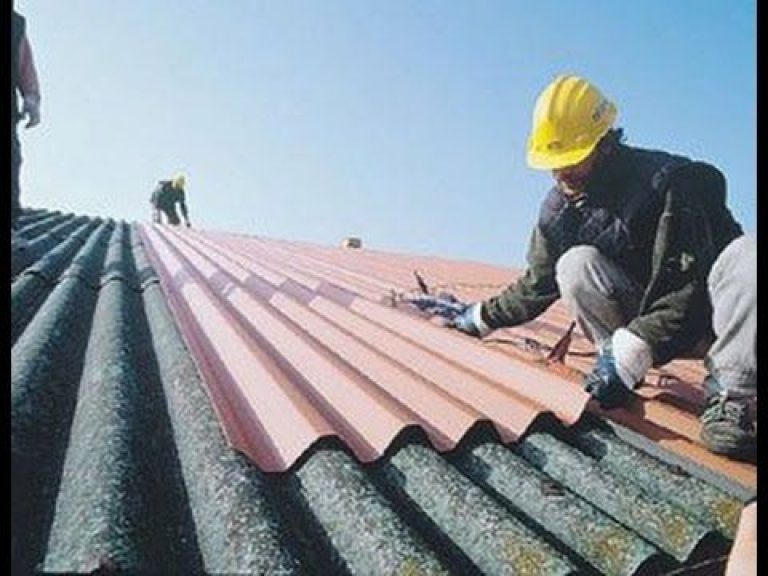
When making a rafter system, you need to follow several rules:
- For rafter legs, you need to use a board with dimensions of 60 * 150 mm or more. The best option are boards with a section of 100 * 150 mm and a moisture content of no more than 16%.
- The lathing should be made from bars conifers, with dimensions 60 * 60 mm. These bars will be able to support the weight of the slate sheet.
- It is necessary to ensure that each slate layer falls on at least two bars.
- The edge of the sheet should not be more than 15 cm from the edge of the sheet.
When laying, it should be remembered that the smaller the angle of inclination, the stronger the crate should be.
How to lay slate
In the event that you have to put slate for the first time, you should remember that you can fasten no more than two layers of material at one point. Based on this, you need to think over the installation scheme well at the roof design stage.
You also need to decide on the required amount of material. For this there is the following scheme:
- Measure the length of the roof over the eaves. You can take this value from the drawing. Divide the length of the overhang by the width of the sheet. Increase this figure by 10%. By rounding the resulting number up, you will receive the required number of sheets for laying one tier.
- Measure the length from the ridge to the edge of the overhang. To determine the number of rows, you need to divide the resulting length by the length of the slate sheet and add 13%. Such a surcharge allows you to compensate for the overlap of the sheets.
- Multiply the number of sheets in a row by the number of tiers. This will determine the required amount of slate to cover the ramp.
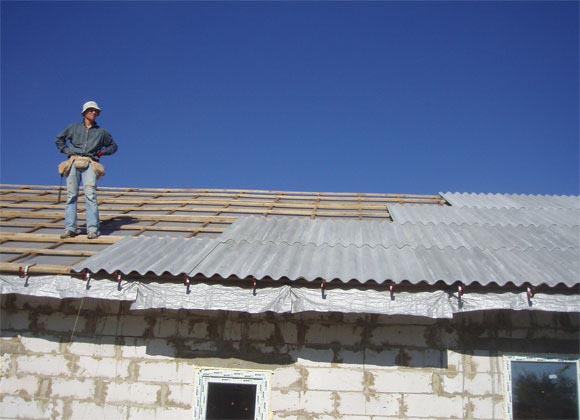
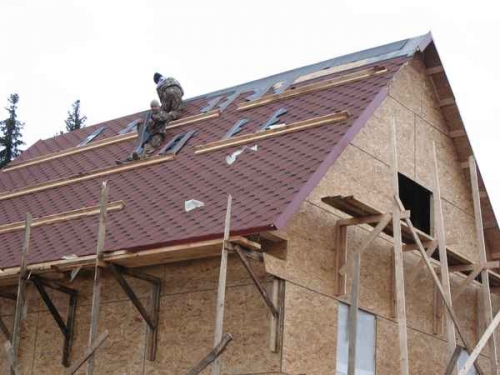
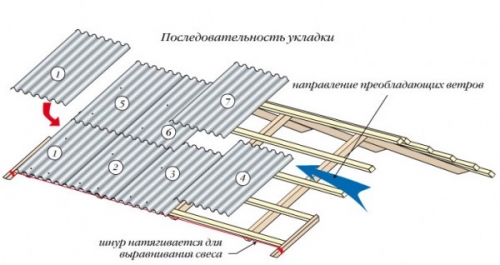
According to the requirements of the laying technology, the installation of the slate should be started from the lower corner of the slope and continued along the eaves. When laying, take into account the wind rose, placing an overlap on the leeward side.
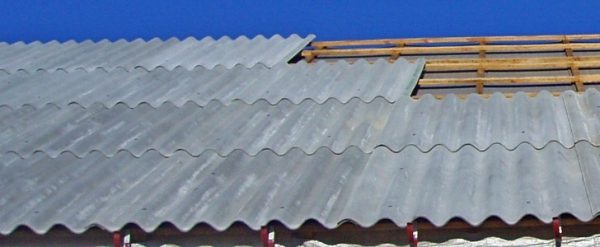
It is advised to lay the first row with a stretched rope, which allows you to achieve an even and neat overhang. To avoid combining several layers of slate at one point, various laying options are used. The most popular of them are staggered and non-offset mounting. Let's consider them in more detail.
The "rambling" installation is very easy to perform. With this method of laying, each new row is laid with an offset in relation to the lower one. This avoids overlapping wave overlaps. Carrying out such an installation, it is necessary to trim the outer sheets and align the upper edge on the last row of the roof slope. The slate laid in this way can serve for a long time. 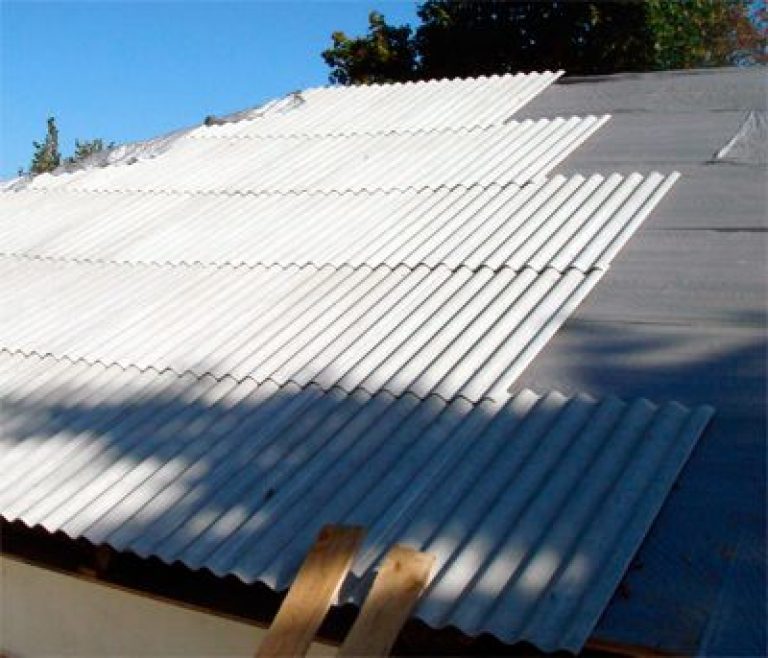
Offset installation saves roofing material, but is more time consuming. With this method of laying slate, the corners should be cut to the width of the wave and 12-14 cm in height. To mount the covering elements from left to right, you need to trim the bottom corner of each sheet of the top row from the side that covers the sheet of the horizontal row.
Fastening slate sheets
Let's take up the selection of fasteners. We advise you to carefully read the description of the correct course of action for fastening the slate. Installation of slate is carried out using slate nails, self-tapping screws and screws that differ in an enlarged head and are installed using a special rubber gasket, which ensures the tightness of the fastening.
Do not fasten all the way to the stop. Pre-marking and drilling holes in the slate will help to avoid damage. The diameter of the holes should be a couple of millimeters larger than the diameter of the fastener.
Fastening is carried out only along the crest of the wave. The attachment point should be located in the lower part on the second overlapping wave, stepping back from the edge 12-15 cm.
The second point should be located diagonally from the first, the fastening in the second wave should be performed only after laying the overlapping roof sheet.
When installing slate sheets, do not forget about safety precautions. Safety cables and ropes should be used. With a significant height of the building, you need to build a fence. When fastening the sheets, you must use protective equipment that protects the respiratory system from asbestos-cement dust.
We hope that our step-by-step instruction will help you to install the slate correctly and safely.


