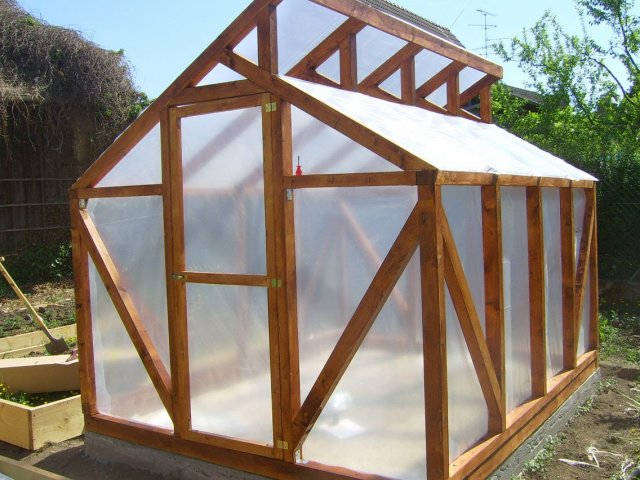
A greenhouse in the country can be made from various materials. The choice will depend on the personal preferences of the site owner and the amount of free money. With the help of wood, you can make a similar structure quickly and without large financial costs.
Timber is a reliable material that can be purchased at almost any large home improvement store. In terms of durability, the bars differ slightly from metal, but if they are treated with a special impregnation, it will turn out to extend the possible period of their service. Wooden greenhouses can last about 5-7 years, and in some cases even longer. Everything will depend on the climate of the area where the structure is installed.
To build a greenhouse, it is not necessary to purchase an expensive tree, since it will not last much longer. It is recommended to choose industrial wood varieties. In the selection process, you should pay attention to the quality of the material, technical specifications and the number of defects. For the manufacture of a greenhouse, it is best to use a knot-free timber that is thoroughly dried.
Foundation for a wooden greenhouse
The base for the greenhouse must be reliable and stable. It is best to make a tape or brick foundation... Such constructions have all the properties that are needed for a greenhouse. In addition, such foundations will not cost too much.
It is most preferable to opt for strip base... You will need to do the following:
- First of all, you need to fill the base with a depth of about 50-60 cm and a height of 20-30 cm above ground level.
- The structure will need to be reinforced to make it strong and to exclude subsidence in the future. A similar base can be used for a greenhouse made of any material, therefore if in the future there is a desire to change the frame, then there will be no problems with this.
- After that, the foundation on the tape will need to be waterproofed to protect it from moisture for a long time and to extend the overall service life.
The width and shape of the structure will depend on the size of the greenhouse and the load of the frame, therefore it will not be possible to make accurate calculations.
How to install a frame for a greenhouse with your own hands?
Wood is much easier to work with than other materials. Therefore, there will be no problems with the installation of the frame. First of all, you need to fix a beam on the base, which will be slightly wider than the rails used for the construction of the frame.
In order to secure the base of the frame, you can use a metal corner, which will need to be installed in the foundation in advance. In this case, you can also use reinforcement, bolts or anchors. Before mounting the carrier rail, it will need to be treated with protective agents - antiseptics, drying oil and paint. This is done in order to ensure a long service life for the base of the greenhouse structure.
When the DIN rail is ready for installation, make the final measurements and start working. To fix the base of the greenhouse structure and carry out the rest of the work, you will need to use the following elements:
- electric drill;
- fasteners;
- hammer;
- bulgarian.
The base of the structure is fixed along the perimeter of the foundation. It is necessary to check that the base is solid, and its sides are connected to each other. The simplicity of the process of installing the frame of the greenhouse structure and its stability will depend on these values.
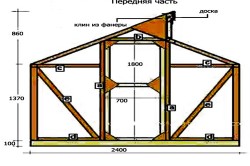
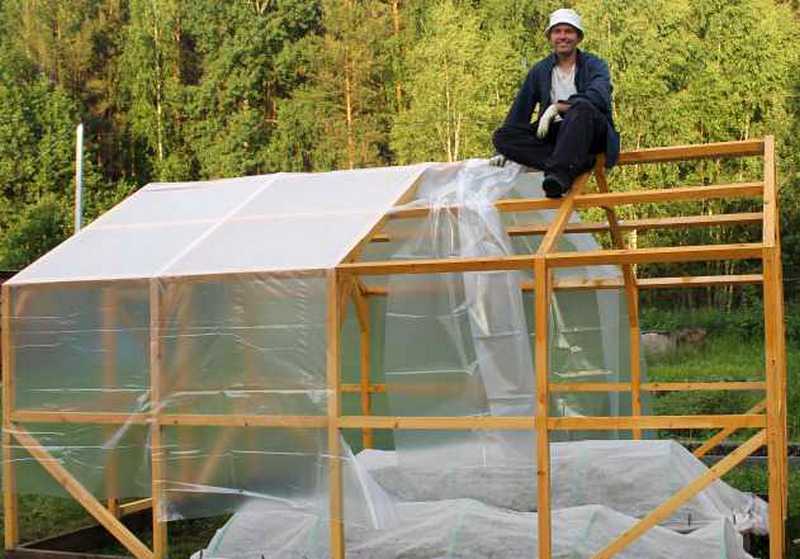
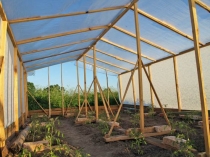
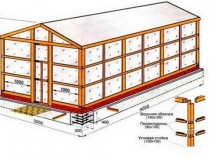
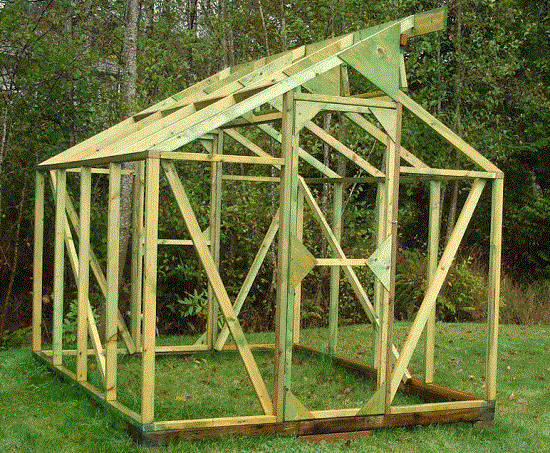
Next, the frame is installed. Installing it is quite simple, since the base has already been mounted on the foundation and is firmly fixed. All that remains is to take measurements and perform installation using the diagrams. The circuit itself can be seen in Fig. one.
All other elements wooden greenhouse, frames and vents, ceiling joists are fixed with self-tapping screws, clamps, corners and metal profiles.
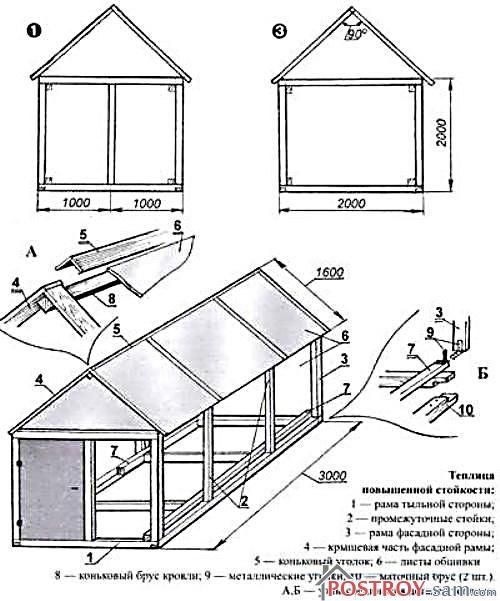
Production of greenhouses of various designs
Before starting the construction of a greenhouse, you should purchase all the necessary elements.
Small standard greenhouse made of wood
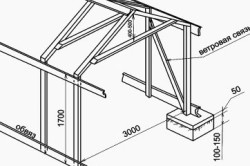
Figure 1. Scheme for timber frame.
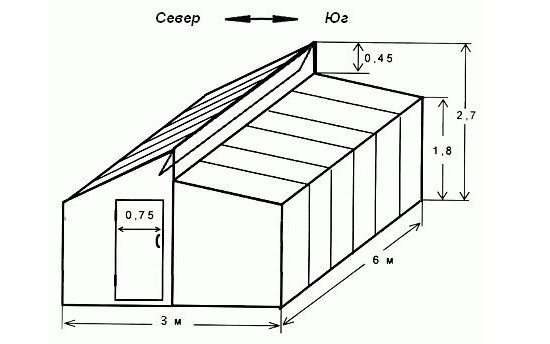
The dimensions of the manufactured structure are 6x4 m. The product is covered with polycarbonate. To make such a greenhouse, you will need to perform the following steps:
- First of all, it will be necessary to build the foundation. To do this, drill the soil 50-60 cm, pour the pillars through the pre-installed studs.
- On the poles, you need to assemble a strapping from a larch bar with dimensions of 1x1 m. The strapping is attracted by nuts and washers to the posts.
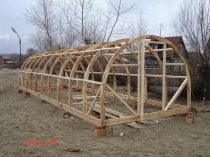
- The frame is erected according to the scheme and covered with studs. A diagram of a similar design with all the necessary steps can be seen in Fig. 2.
Greenhouse made of wood according to Mittlider
The structure to be erected has the following dimensions: width - 4 m, length - 8.4 m, height in the ridge - 3.1 m. The structure will have several slopes of different heights and vents, which are located under the ridge.
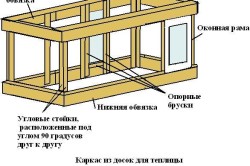
Figure 2. Scheme of the greenhouse frame on a wooden frame-base.
To erect a structure, you will need to use boards 0.5x1 m.The construction process is as follows:
- The first step is to build the foundation. For a greenhouse of this type, a monolithic tape 35x20 cm, which is fixed with 8x4 mm reinforcement, is suitable. Outside, it must be impregnated with a special agent so that the base does not crumble in the future. The structure can be faced with natural stone.
- The frame is installed. Racks should be installed every 70 cm.
- In the upper part of the greenhouse, vents are made. It is possible to provide for the automation to open them.
- Polycarbonate is fixed. In this case, it is important not to leave gaps.
- At the end, you should start a water supply system in the greenhouse, install a large container and spread the pipes into several beds for drip irrigation.
For the manufacture of such a greenhouse structure, you will need to purchase about 2000 boards of 0.5x1 m.To build doors and vents, you will need to purchase more small-sized bars - 30x50 cm and 50x70 cm.
How to make a greenhouse for polycarbonate?
In this case, the frame will be made of wooden blocks 45x45 cm. The length of the greenhouse is 8 m, the width is about 2.8 m. It can be provided for the installation of two doors and several vents.
There should be a distance of no more than 1 m between the posts.
Each truss should be supported by several racks. The exception is the B-pillar.
The sequence of actions will be as follows:
- In this case, the strapping will be made using metal corners 45x45 mm or 50x50 mm. With the help of a grinder, an incision of the shelf of 12 cm should be made at a right angle. Thus, you can get a base on which the harness will be attached.
- After that, you need to paint the corners several times with anti-corrosion paint.
- Next, you need to hammer the bars into the ground, check their location with a building level, and then fix the strapping rails with self-tapping screws, docking them together.
- All joints will need to be reinforced with a metal plate.
- The lower harness along the entire perimeter is sewn up with galvanized steel and buried in the ground.
- Next, it will be necessary to fix the polycarbonate on the roof with self-tapping screws with rubber washers, all other elements are fixed using a press washer.
- The end parts of the polycarbonate should be covered with a plastic corner. The sheets are installed with an overlap, after which they are treated with silicone sealant along the edges.
- The lower harness is treated in several layers with an antiseptic, and then painted.
How to make greenhouses with your own hands under a film?
In this case, the greenhouse will be covered with a light film. The procedure will be as follows:
- Manufactured solid foundation... The structure will be lightweight, so you can weld ordinary homemade piles small size. They can be made of 50x50 mm metal corners. The length of the elements should be 90 cm.
- The piles are primed in several layers and driven into the ground.
- The piles will need to be leveled using a laser level. After that, you can proceed to the assembly of the frame.
- Rafter structures are installed. In this case, you can use plywood with a thickness of 8 mm, which is held together with PVA glue and self-tapping screws.
- The next step is to install the bumpers for the beds. It is best to use 10 mm slate. From the street side, near the slate, you can additionally lay foam plastic.
- After that, the lathing is painted. It should be remembered that the boards will need to be treated with an antiseptic before painting. The paint should be applied in several layers.
- We are assembling frames for vents and doors.
- The whole structure is covered with a light film.
- In the greenhouse itself, you will need to pull the cables in order to be able to tie up the plants.
- Additionally, you can install irrigation and automatic ventilation systems.
- If the greenhouse structure is being built in a cold region, another layer of film can be pulled inside it, securing it to the crate with a construction stapler. Even in the case of using budget films, the effect can be immediately noticed.
How to build a portable greenhouse on foundation blocks?
The structure can be disassembled and carried due to its low weight. If the greenhouse needs to be moved from one place to another, you can build a similar structure. Its base will consist of several 15x15 cm bars.It can be made as follows:
- The first step is to dig a hole to a layer of sand, pour sand and gravel into it, carefully tamp and lay concrete blocks.
- Next, you need to treat the bars with an antiseptic. After the product has dried, the wood must be coated with bitumen on both sides.
- A frame is installed, after which it is treated with the same antiseptic.
- In the corners of the structure, braces with a height of 1 m should be fixed.
- Template rafters are made, with the help of which it will be possible in the future to easily make all the rest.
- Racks are prepared and installed.
- After the roof is built, it will be necessary to paint the end parts of the structure.
- The wooden greenhouse is covered with 5-8 mm thick polycarbonate.
- To insulate the structure, extruded polystyrene foam can be laid inside it. Cement blocks are installed on the outside.
What is the best way to cover the greenhouse?
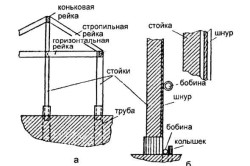
Scheme of fastening a wooden film greenhouse: a - scheme of fastening racks, b - scheme of a device for lifting the film
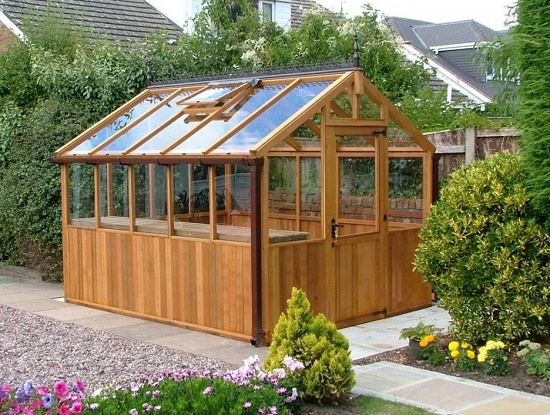
When the greenhouse structure is ready, you will need to decide on the material for covering it. The sturdy frame can support any weight, so you can choose from glass, film or other materials. The choice must be made based on the practicality and quality of the material. The following materials can be used:
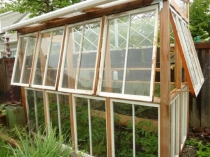
- Film. Covering should be done sequentially, gradually passing through the slope from one side to the other. Step by step, the film is fixed to the frame. It is recommended to cover the corner of the slope of the greenhouse structure with a visor, since the film is often damaged and moisture and cold air enter through defects.
- Glass. If it was decided to cover the greenhouse with glass, you should purchase special stops and glazing beads. It is best to order glass after complete installation of the lathing, when the exact dimensions of the cells are known. The material should be secured firmly. Seams can be sealed with silicone or sealant to seal the structure and prevent drafts.
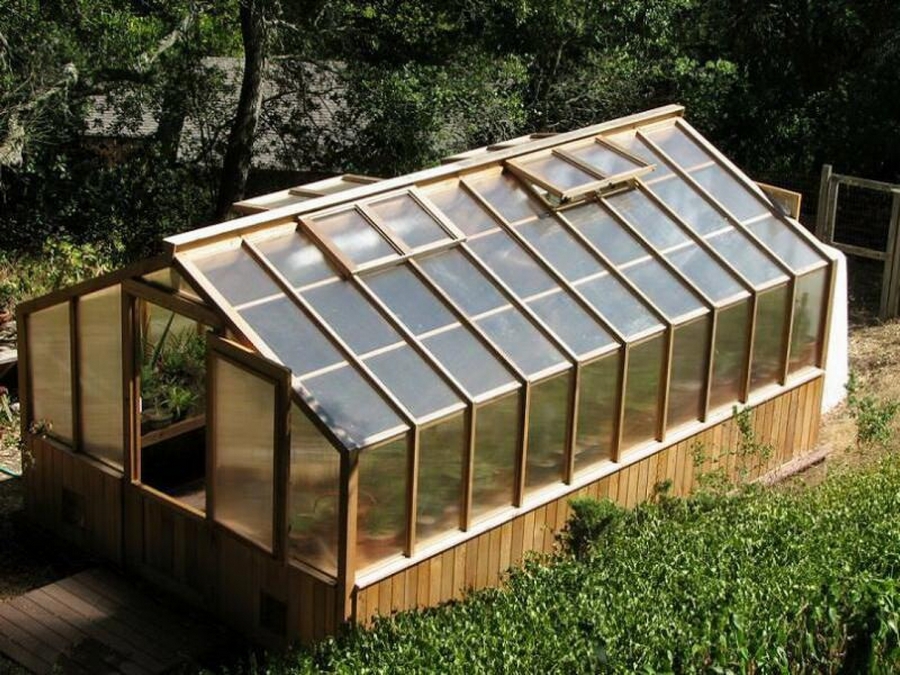
- Polycarbonate. Covering a greenhouse made of wood with polycarbonate is quick and easy. To do this, use special rails and profiles, as well as fasteners that can be supplied with polycarbonate plates. This material is the most practical and modern, therefore it is recommended to cover the structure with it.
After the body of the greenhouse is covered with the selected material, the structure will need to be made airtight, heating and lighting devices installed in it, water for irrigation, and a ventilation system.
Today there are quite a large number of different schemes greenhouses made of wood. You need to choose based on personal preference. Making a greenhouse with your own hands is not difficult if you take into account all the existing nuances, follow the sequence of actions and have the tools and materials necessary for work.
The frame for the greenhouse can be made of metal, wood and even pVC pipes... In this article, we will describe step by step the process of building a greenhouse from wood with our own hands. Such a frame will cost much less than a metal one, and with proper operation it will last much longer than a PVC structure.
Greenhouse size and shape
To place two beds and arrange a path between them, it will be enough to build a greenhouse width 2.4-3 m. Length the structure depends on the area of \u200b\u200bthe land plot and the planned number of plants. The optimal length is 6 m. A greenhouse of this size is quite enough to ensure fresh vegetables families of 4-6 people. Since cucumbers and tomatoes require different humidity and temperature conditions, a separate greenhouse will be required for each of the crops.Most often, a trapezoid shape with a gable roof is used for greenhouses. Wherein height structures for placing racks and climbing vines of plants should be 1.8-2 m.
Do you need a foundation?
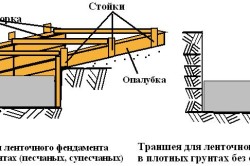
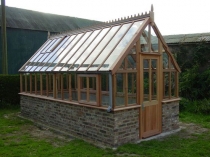
It is better to install a stationary glazed greenhouse or a structure made of heavy window frames on shallow or pile foundation 40-60 cm high made of brick or concrete with sand pillow... It should rise 30 centimeters above the soil level. The lower load-bearing bars of the greenhouse in it are attached to metal corners poured into the base of the foundation. A greenhouse on such a foundation will be warmer and more suitable even for the earliest planting of vegetables. If necessary, a stove heating with a chimney passing under the shelves is installed in it.When building a lightweight greenhouse sheathed with foil, the foundation can be replaced timber strapping... Such a structure can be easily moved to another place or even transported to another site.
It is not worth laying the timber strapping directly on the ground - the tree will rot too quickly. Therefore, the distance from the soil to the timber should be equal to 4-5 cm.To fasten the strapping along the perimeter of the frame, pointed scraps are hammered into the tightly rammed earth metal corners length 800-900 mm. To prevent the metal in the ground from rusting, it is advisable to cover the corners with a primer. A layer of roofing material can be laid under the timber to protect against moisture.

Lumber foundation
Then the wooden strapping is screwed to the metal corners on anchor bolts, and the structure is driven into the ground. In the future, the gap between it and the soil is covered with earth and compacted. You can also install the strapping on bricks, but such a structure will be less durable.
The harness should be located strictly horizontally. Indeed, in the event of a skewed structure, there is a high probability of its collapse. Therefore, we check the horizontal laying of the strapping using a building level.
Required materials
For the construction of a greenhouse, it is better to use pine or larch. These tree species are the most resistant to moisture and fungi. Birch or aspen bars will warp in a couple of years. In order for the structure to stand as long as possible, and the tree does not rot, it is better to cover the bars with used engine oil, antiseptic or primer before assembling the frame.For the frame, we need:
Bar for strapping (greenhouse base) with a section of 100x100;
Beam 50x100: we will use it for racks;
Film or glass for cladding;
Boards or slate for arranging the sides of the beds.
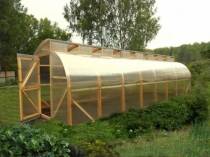
It is also advisable to sheathe the greenhouse itself at the level of the beds with boards - this will make it stronger and allow you to save on glass or film. Polycarbonate greenhouses are made arched. It is irrational to make a trapezoidal structure from this material - too many scraps will remain.
Advice. When using dry wood, the greenhouse can lead. This can be avoided by replacing a 100x100 bar with paired 100x50 beams fastened together with self-tapping screws. This option will be more durable.
Assembling the frame. Step-by-step instruction
For a large greenhouse, it is better to prepare a detailed drawing (see photo).
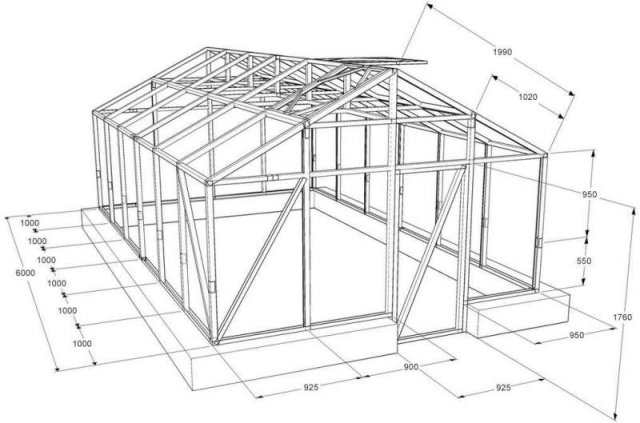
Greenhouse drawing
1. The minimum pitch of the greenhouse roof is 30 °. In areas where there is a lot of snow, the roof slope should be steeper. Of course, this will require more material consumption, but the likelihood that the snow coat will push through the roof will be minimal.
2. The greenhouse can also be assembled from separate frames. In this case, it will be easier to repair it. And the frames from the roof can be removed for the winter.
3. We make markings: we stick 4 pegs into the ground and stretch the strings between them. We align all sides with a building level. You can also check the horizontal and vertical position of the bars with the help of diagonal strings stretched between the corners.
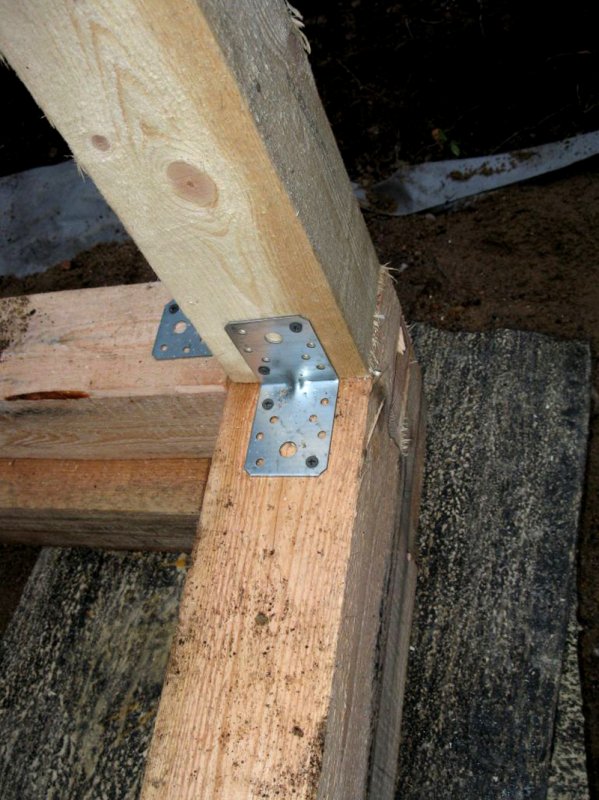
4. Corner posts are fastened to the base with metal corners or pins (wooden pins).
Fastening the bars
5. Vertical cross braces are located with a pitch of 50-70 cm. They are also attached to the strapping with the help of metal corners. If you are familiar with carpentry firsthand, you can also use a cutter to connect.

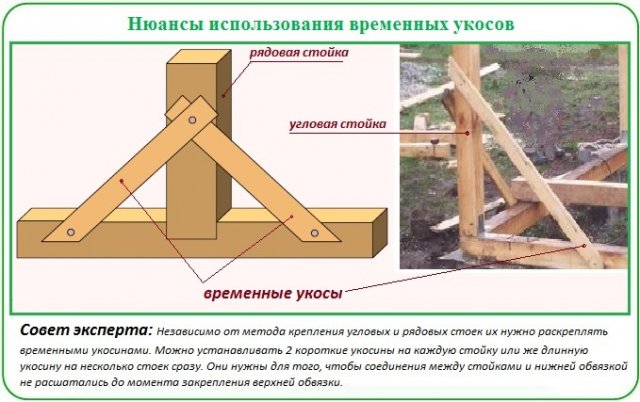
6. To prevent the frame from loosening during assembly, all struts are additionally reinforced with slopes (see photo). After complete installation of the greenhouse, they are removed.
7. For a greenhouse with a length of 6 m in the center of the structure, it is necessary to provide two intermediate posts at a distance of 2 m from each other. Spacers will fit on them under the upper joists.
Intermediate posts in the center of the greenhouse
8. To give the greenhouse strength, it is better to provide stiffening ribs (diagonal beams) between the side posts.
You can strengthen the structure using diagonal beams
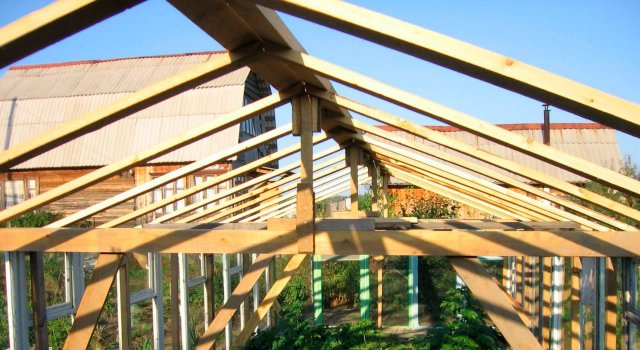
9. Rafters - a system of inclined beams (legs), struts and struts for the roof - are assembled on the ground on a flat base. In order to collect them perfectly evenly, a cord is pulled between the extreme rafters. For strengthening, it is better to immediately connect the trusses with transverse beams. (Farms are called supports assembled from bars on which the rafter legs are laid).
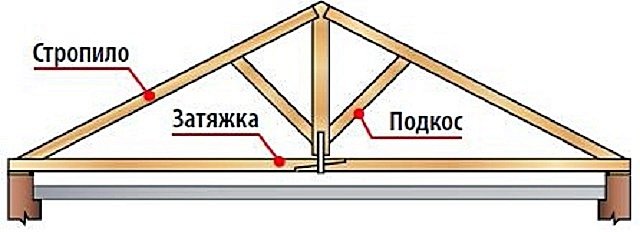
Rafter system
10. With the help of metal corners, the finished truss structure is attached to the racks.
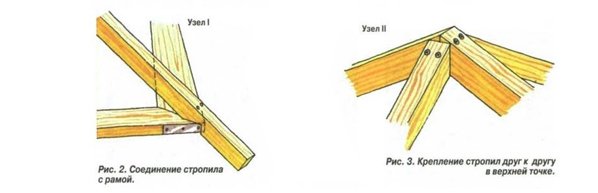
Fastening the rafters to the frame
Rafter connection
11. Install in the greenhouse 2 doors in the end walls. The distance between the door supports is 80 cm. They are reinforced with additional strips. It is better to attach the door handle to an additional board attached to the main bar.
12. Ceiling lath and vents are mounted on clamps or self-tapping screws.
Polycarbonate greenhouses are attractive for their ease of installation, ease of construction and the fact that there is no need to change the coating every year. However, industrial models are quite expensive, and they do not always meet the individual requirements of summer residents and gardeners.
A greenhouse made of polycarbonate with your own hands is made "for yourself" while you can still save a little. It is in no way inferior to the factory one in terms of strength and aesthetics. But it will contain all the elements that you need. Polycarbonate sheets serve for quite a long time, are easy to care for and, when properly installed, reliably cover plants, protecting them from frost and drought.
Polycarbonate greenhouse with timber frame
Polycarbonate sheet is produced standard sizes 2.1 x 12 m. Based on these data, calculations can be made. For example, if the width of the greenhouse base is 3.5 m, then it can be covered with one sheet.
Training
Polycarbonate has hollow channels inside it. They can be used for solar collectors. However, if solar systems are not provided, the open cut of the channels must be covered. Otherwise, moisture, spores of fungi and mold, dust will get into them. This leads to blooming of the channels, impairs the transparency and hygiene of the material.
To avoid these troubles, it is enough at the very beginning, even during installation, to close the edges with a special U-shaped plastic profile. It is sold in the same retail outlets as. This will also significantly improve the aesthetic perception of the structure. In the case when it is required to make a curly edge, the cavities are closed with silicone sealant. It should also be taken into account that the air in the cavities still contains a certain amount of air. Condensation may occur in the event of a temperature drop. Therefore, below it is necessary to ensure the drain of moisture. It is best to use a profile and a specialized protective film.
The sheets should be arranged in such a way that the stiffeners go along the stress line. On the walls - vertical orientation, on the roof - radial or along the rafters. In addition, it is worth remembering about condensation. It is necessary to ensure its drainage and drainage.
All this must be taken into account when calculating the number of sheets and cutting.
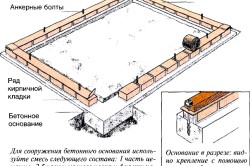
Greenhouse base
First of all, you need to determine the location of the greenhouse. For marking, you will need pegs, a rope and a measuring tape. Having marked the contour of the future structure, using a garden drill, you need to make 4 holes for the upright supports. Their depth is 1.2 m. There are two holes in the corners of the greenhouse and two more for the racks under the doors. There are 4 holes in total on each side.
Sections of asbestos-cement pipe, 1.3 m long, are installed vertically into the prepared holes. The gaps between the pipe walls and the soil are filled with sand, which should be carefully tamped.
Racks are made of planed timber one and a half meters long. Each of them is adjusted at the bottom to fit the pipe diameter. The wood is treated with protective agents against rot and insects. To prevent the fibers from being absorbed by moisture, the racks are treated with melted bitumen. Now you can install them in their place.
Bottom frame
To make the frame, you will need planed boards. A rectangular base is made of them, which holds together the installed wooden supports.
Frame
Side posts and corner beams are installed on top of the lower frame. For greater stability, they are additionally fastened from the inside with a strapping made of a bar or board. Fastening to the harness is done with steel straps and self-tapping screws. Mounting brackets can be used for greater strength. Additional racks are installed for doors. The top is pulled together by a bar. The walls are ready.
Roof
The rafter system is manufactured according to the configuration. For a gable roof, rafters are attached from each pillar on top of the upper frame. The construction is completed by a ridge bar. Fastening is done with steel straps.
By the way, if all the elements are treated with protective agents and painted over before installation, then the service life of the greenhouse can be significantly extended. Thus, minor installation errors will not cause rot and pests to penetrate into the wood.
It is advisable to protect the wooden ridge beam with a plastic or tin ridge, which will divert precipitation and protect the frame.
If there is a lot of snow in your area in winter, it makes sense to increase the rafter system additional bandages from a bar. They can be installed both under the ridge and on the side, additionally fixing the angle of inclination of the rafters.
Fastening polycarbonate
Fastening can be done in two ways: tape and point.
First of all, you need to take into account that polycarbonate is a material that has a large linear expansion. Therefore, it cannot be rigidly fixed. Otherwise, it will either swell in the heat, or crack in the cold season.
Fasteners can be chosen from a fairly wide range.
The most inconvenient way is to cut galvanized metal strips. Their length is selected in such a way that they can cover the wooden rack plus 5 cm for the overlap. In this case, the sheets are not attached to the frame elements, but to these tapes with screws.
A more modern and convenient way is to use special profiles. They can be solid and collapsible. The joint of the sheets is made using a specialized profile. It sets the technological gap for thermal expansion polycarbonate and provides hydro and wind protection of the greenhouse, and at the same time beautifully shapes the joints, improving the aesthetic perception of the structure.
Point fastening is made to transverse wooden slats with special thermo washers. For them, holes of a slightly larger diameter are drilled in the sheets to ensure free movement of the sheet. Alternatively, longitudinal holes are made to ensure proper fit of the polycarbonate. The inner part of the washer provides thermal insulation, while the outer part protects the mount from moisture and wind. The plug masks the self-tapping screw.
When attaching polycarbonate sheets, you must not:
- rigidly fasten the sheets;
- place stiffeners horizontally;
- tightly close the ends of the channels;
- push through the surface of the material.
It is rather difficult to fix the sheets on the roof. And this difficulty lies in not accidentally pushing through the sheets, say, with an elbow. A device in the form of a large "T", which is attached to the ridge, will help to get out of the position.
Ends
The ends are sewn up with polycarbonate, leaving room for doors and window frames. We already have door pillars, to which a transverse strip is attached, which separates the door from the window. In the resulting two cells, frames are hung, covered polycarbonate sheet... Large frame with diagonal straps - door. The smaller one is.
Fittings are hung on the doors and vents; if necessary and desired, automatic equipment is installed.
For winter use, polycarbonate double walls can be made. A do-it-yourself polycarbonate greenhouse is ready. Working with wood is easier and therefore given view greenhouses are popular with novice summer residents.
Galvanized profile polycarbonate greenhouse
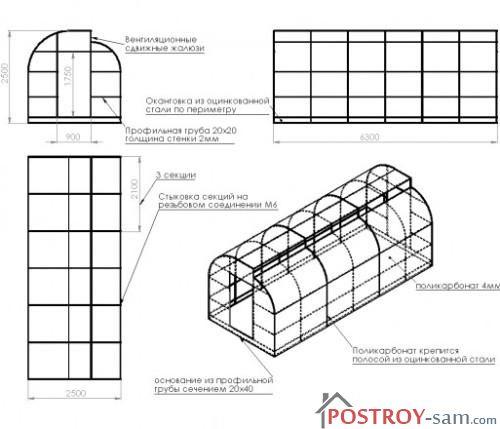
Since wood is most often attacked by all kinds of fungi and rodents, recently metal frames from a profile pipe. As a basis for calculations, the same polycarbonate sheet of standard dimensions is taken: 2.1 x 6 m. It is advisable to arrange the frame elements in such a way as to use the sheets to the maximum, i.e. no waste.
The arched structure of the greenhouse allows you to increase the internal space. The single-gable design better withstands snow loads. Pointer designs combine the positive qualities of pitched and arched models.
Frame
The width of the greenhouse is calculated based on the length of the polycarbonate sheets. The 6-meter sheet, bent in an arc, provides 3-3.5 m of the inner width of the greenhouse, depending on its height.
The frame must be made of materials that can withstand heavy snowfall, wind load and the weight of the plants along with the fruits. In addition, you may want to attach water heat accumulators, automation, lighting or fog generators. It depends on the extent to which you want to engage in greenhouse farming. The weight of the equipment must also be taken into account when calculating the loads that the greenhouse frame must withstand. The fans will require separate frames that are attached to a reinforced frame to stabilize possible vibration.
When using a profiled pipe, you will need to calculate the bend radius for the radial structure. At metal depots, a pipe bender service is usually offered. With the available calculations, it is quite possible to use it. If the flow rate for the pipe bender is not provided for in the greenhouse budget, you can try to bend them using a template cut from a sheet of plywood or thick OSB.
Before assembly, structural elements must be cleaned, coated with a primer and a layer of paint. If you lubricate the inner cavity of the pipes with used oil, the frame will last much longer, because it will protect the walls from corrosion.
By the way, if fasteners are allowed to the wooden frame using self-tapping screws, then metal support it is undesirable to drill. This deteriorates their strength characteristics and opens up access to moisture.
Stationary greenhouses can be welded. You can fix the elements with hardware. Each method has its own pros and cons. The collapsible design will allow you to move the greenhouse from place to place in order to improve the soil. If the frame is installed once and for all, then provide a convenient way to replace the greenhouse soil.
Polycarbonate cutting
The sheets can be cut with a sharp knife or a jigsaw with frequent undisturbed teeth. In any case, when using a cutting tool, it is necessary to ensure a flat underlying surface and a clear fixation of the sheet so that there is no vibration of the material during operation. After the cut is made, the edges should be cleaned from chips and put on protective profile strips.
How to fix polycarbonate to a metal profile
The sheets are fastened using special profiles and thermal washers. The profiles allow you to reliably join the segments and provide high-quality insulation of the connection. When they want to keep the integrity shaped pipes, use metal bands that cover the pipe, forming an overlap, and a sheet is already screwed to them.
A do-it-yourself polycarbonate greenhouse is a laborious, but cheaper way to arrange a greenhouse on your site. Therefore, it is up to you to either do everything yourself, or order a ready-made greenhouse design and perform only assembly.
With your own hands, drawings and the choice of materials depend on the personal preferences of the owner. If a greenhouse made of wood is treated with special means, its service is 5-7 years. But in order for the building to last so much time, you need to choose a beam intended for construction (industrial types) and clearly follow the instructions.
Construction of greenhouses made of wood: why this particular material
Currently, a tree is considered the most suitable option for self-building a greenhouse.
The construction made of timber is characterized by positive characteristics:
- Even a beginner in construction will not be difficult to work with the material;
- Wooden beams are well suited for fastening;
- If the structure is damaged, there will be no problems with replacing the damaged part;
- Such a greenhouse is lightweight, but has excellent stability;
- The bar greenhouse does not require special care;
- Inside the structure, you can install the necessary devices, as well as automation designed for irrigation.
A wooden structure is not only a useful and functional structure, it always fits well into the surrounding landscape.
DIY wooden greenhouse: drawings and types of designs
Often, manufacturers do not use wooden beams for the production of frames. Therefore, the owners often build them with their own hands.
Moreover, wood can differ in shape:
- With a gable roof.The structure has rectangular shape and looks like a house. The slope angle of the slope depends on the terrain. When creating it in mid-latitudes, it is necessary to ensure that it does not exceed 30 o.
- Circular greenhouse.The structure is similar to a pavilion with six or more corners. To provide the necessary air access to the structure, vents or tear-off windows are installed.
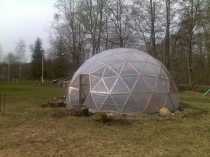
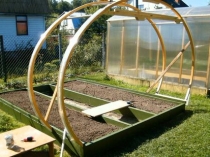
- Arched greenhouse.It looks good on the plot and, in addition, helps to provide favorable conditions for growing. To cover such a structure, it is better to choose polycarbonate.
- The greenhouse is wall-mounted.As a rule, it is used if there is not enough space for the construction of another type of structure. Masters advise during construction works use blueprints and select the south side of the building.
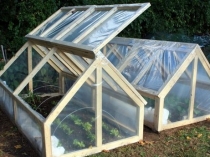
- Recessed or ground structure. These self-made greenhouses are designed for growing plants that require low temperatures for normal growth.
When building any kind of greenhouse made of wood, a foundation is required. With its help, it is possible to extend the "life" of the structure.
How to make a foundation and a wooden frame for a greenhouse
Some owners do without a foundation at all. However, this part of the structure is considered necessary if the greenhouse is large, as well as when the greenhouse is wall-mounted or recessed. In addition, you cannot do without a foundation if the structure is located on a slope. As a rule, the foundation of the structure is columnar, brick, and also screw.
The assembly of the frame is carried out after the manufacture of the foundation. The first step is to cut the bars (8 pieces - 1 meter each and 12 pieces - 1.2 meters each). And after that, you should take care of the blank racks.
- First you need to take care of the joints at the edges of the bars, they are cut at an angle (45 o);
- Further, the assembly is carried out by twisting two bars with self-tapping screws;
- After that, you should make the connection of the racks, which are fastened together with a timber bar of 1 meter in size.
- The resulting structure is attached to the base;
- Then the resulting four frames are installed at a distance of 1.5 meters, and they are fastened together with the help of bars;
- It remains to attach 2 bars from the inside (in width, as well as over the transverse beams);
- And the last stage of work will be the choice of a place under the doorway.
When the base is installed, the posts are attached to it, located vertically (1.5 m high each). After that, strapping is performed around the entire perimeter. To make a gable roof experienced craftsmen it is advised to use bars of 1.2 m. Construction involves the creation of sticks intended for screwing to the strapping (at an angle of 45 o).
The frame is considered ready after installing the rafters and attaching the ridge wooden beam.
Oak, larch, and pine are the most suitable trees for building frames.
Do-it-yourself greenhouse made of wood under a film: description of the coating
Not only wooden greenhouses, but also other types of greenhouses need to be covered. The most economical option is film. But you should be prepared for the fact that this material lasts no more than a year, so the film coating is stretched annually. It is recommended to take care of its cutting on paper in advance.
Some attach the film on both sides. This will reduce light transmission, but provide additional airflow.
As a rule, the material is stretched with a single piece. First you need to attach its bottom edge, after which the film is well stretched and fixed in the middle.
The final stage of fastening is the fastening of the film in the upper part of the structure body.
To make the film last longer and not tear, it is recommended to use it when attaching the rail. If the greenhouse is not used in winter, it is recommended to dismantle the film. This gives a guarantee of extending its service life.
Production of a greenhouse made of wood for polycarbonate
To make for polycarbonate, you need wood bars (45x45 cm in size). The length of the structure will be 8 m, and the width - 2.8 m. It is important that the distance between the posts does not exceed 1 meter.
For polycarbonate coverings, experienced craftsmen advise using metal corners (not exceeding 50x50 mm). It is necessary to cut the shelf at a right angle (12 cm). This will create a base to which the harness is subsequently attached.
The next step will be to hammer the bars into the ground and fasten the strapping rails with self-tapping screws, while taking care of their joining. It is better to use a metal plate to reinforce the joints.
Sewing of the lower harness is carried out along the entire perimeter of the structure, with a deepening into the ground.
After that, you need to attach the polycarbonate to the roof. This will require self-tapping screws and rubber washers. Further, with the help of a plastic corner, the end parts of the structure are closed. The installation of polycarbonate sheets is always carried out with an overlap and after that the edges are treated with a sealant. The last stage of wood with such a coating is its treatment with an antiseptic and staining.
Do-it-yourself greenhouse from a bar (video)
Today, there are many who help you choose the right option for self-fabrication of the structure. To obtain a high-quality structure, you should strictly follow the instructions and take care of the availability of all the materials necessary for the construction.
Attention, only TODAY!
Until recently, the wooden greenhouse was a kind of classic, and the metal for greenhouses was not used very actively. This is not surprising: there was lumber waste in almost every yard. Why pay for metal when you have free consumables at your fingertips? Today, of course, the situation has changed, but not critical.
This article contains the necessary information about building a greenhouse from wood with your own hands - step by step instructions on installation plus advice on the advantages of the material and its choice.
Wooden greenhouse: advantages, choice of wood, construction
If you are planning to build a wooden greenhouse with your own hands from polycarbonate, then the following information will be very useful.
Benefits of wood greenhouses
The most important advantage of home-made greenhouses made of wood is their low thermal conductivity compared to metal greenhouses. These words may seem frivolous - the total area of \u200b\u200bthe tree adjacent to the polycarbonate coating is not so large. Here's the thing: the metal quickly solidifies, cooling from the polycarbonate or film adjacent to it, then gives off the cold inside the greenhouse. With a tree, this process is slower.
It is worth mentioning the availability of materials for installation: boards and beams / logs are sold in all stores dealing with goods for construction and repair. You can also use sawn timber waste from carpentry work, or take timber / planks after dismantling something.

Even having basic skills in carpentry, you can make a beautiful greenhouse with your own hands
Choosing a wood species
Most the best way the wooden frame of the greenhouse, assembled by hand - of course, larch. It is highly resistant to moisture and fungus, so rot or mold is unlikely to occur. In addition, the greenhouse will turn out to be practically eternal - the larch from time to time only becomes stronger, as it were, stone. This breed has no drawbacks, except perhaps for one thing: a very high price.
Oak is very similar in performance to larch. Depending on the variety, the wood can be a little harder or softer, the biostability is about the same. The price tag for oak and larch lumber bites, so the mentioned species are rarely used for the construction of greenhouses made of wood.
Beautiful wooden greenhouses are built from oak and larch with their own hands, the photo shows an example of a glazed structure
The best option for a greenhouse made of wood, built with your own hands - pine. It is strong enough, resistant to moisture and fungi. Of course, for long-term, problem-free operation, constant care of the frame will be required: periodic treatment with hydrophobic, antiseptic compounds or painting. The price tag here cannot be called very low, but the construction of a greenhouse will not hit the pocket.
Note: spruce is very similar in performance to pine, only its wood is rather soft. This makes it impossible to use spruce for the construction of large-scale greenhouses. But a small greenhouse with an area of \u200b\u200bup to 7 m2 is possible if desired. In no case do we use birch or aspen for manufacturing - they are not resistant to decay, they warp strongly from moisture.
DIY pine frame
Designing a greenhouse made of wood
Before you build a greenhouse with your own hands from wood, you need to design it correctly. First, we decide what kind of greenhouse is needed - we look at photos in available sources, choose the designs we like. We are guided by the following:
- The location of the building plot in the village.
- The width and length of the site that will be occupied by the greenhouse made of wood.
- Wind and snow loads in the area - the design of the roof depends on this.
It is clear that the photos may not fully correspond to your requests. Therefore, the next step will be drawing a sketch, where the construction of a greenhouse made of wood will be reflected with the necessary amendments. Also here you can note the approximate dimensions and characteristics building materials... For example, let's take a small village greenhouse that does not require serious calculations.
Do-it-yourself greenhouse made of wood, in the photo a frame taken away with a film
We continue to make a wooden greenhouse with our own hands, the drawings will be the next step. According to the finished sketch, we make drawings of the greenhouse. Here we operate with exact numbers, we carefully calculate everything. On each projection, we set the sizes of all elements, even if they are identical. Be sure to put down the points of the fasteners. Additionally, the drawing notes:
- Quality, section of lumber.
- Quality, dimensions of fasteners, separately for each type.
- Quality, quantity of other hardware.
- If we are making a foundation, then we enter the grade of concrete, the fraction of sand, gravel, the section of the reinforcement.
DIY project of a wooden greenhouse made of polycarbonate, drawings are made with exact dimensions
For your information: we always start making drawings with a projection of a completely finished building. Further, we "undress" the greenhouse, disassemble it into separate parts. We draw the whole frame from different angles, then we draw individual nodes and elements. The larger the structure, the more detailed the drawings should be.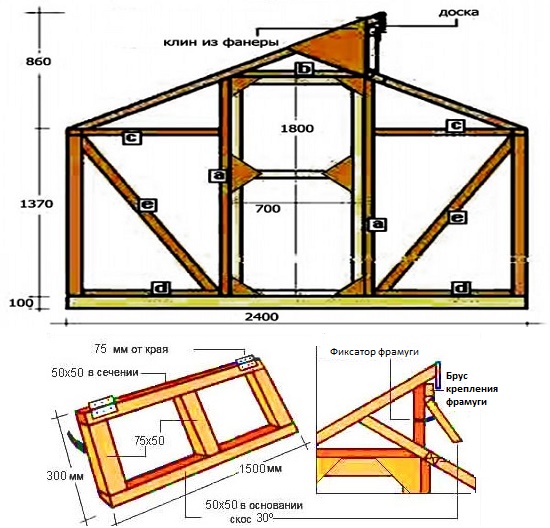
To design a greenhouse made of wood with your own hands, the drawings should be as detailed as possible.
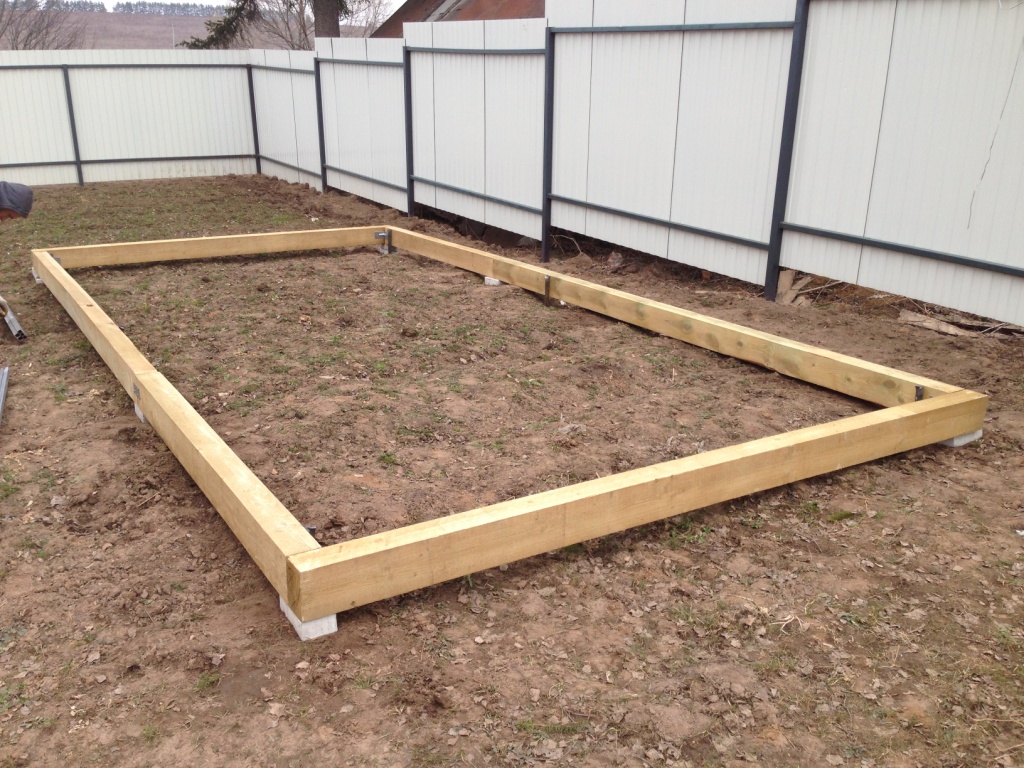
Construction of a greenhouse made of wood: frame of the lower part
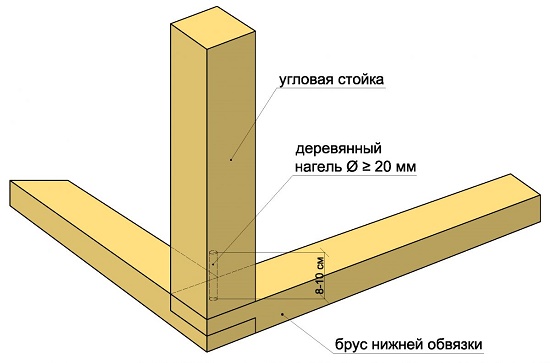
We will make a simplified version, without a foundation. The basis will be a timber strapping 8 x 15 cm. We will not lay it on the ground - along the perimeter of the frame, at a distance of 60 x 80 cm from each other, we fasten the pointed scraps of the metal corner. Turn over the fully assembled harness so that the corners are facing the ground.
We recessed the entire structure made of wood so that a gap of 5 cm remains from the soil to the timber. We periodically apply a building level, making sure that there are no distortions. This point should be taken very carefully, since a deviation of several degrees can cause a skew of the entire building.

At the first stage of building a greenhouse with our own hands from wood, we collect the lower harness
Next, we proceed to the installation of the corner posts. They are set at the building level, fastened with dowels, as in the picture below, or with steel corners. We fix each rack with temporary supports until the upper harness is mounted. By the way, in this figure you can consider the method of joining the elements of the lower strapping - here it is a half cut.
Advice on how to make a greenhouse out of wood with your own hands: corner posts are installed using steel corners or dowels
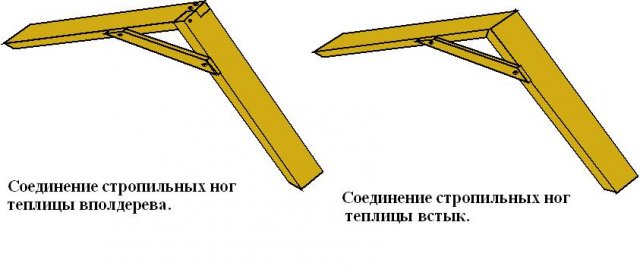
Now we install the intermediate racks. They are joined with the lower strapping using a full or incomplete half cut, the final fastening is done with a steel corner. As corner posts, we supply intermediate posts with temporary fixation. What a complete and incomplete cut looks like is clearly visible in the figure:
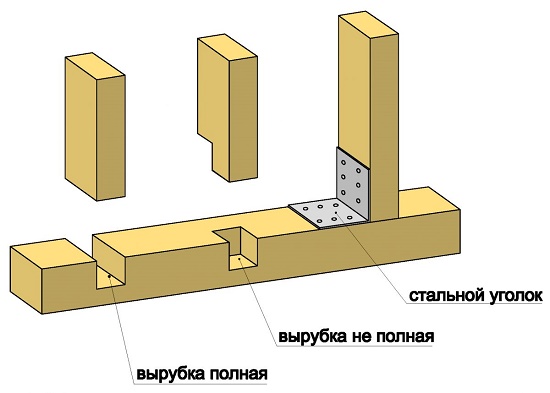
Two options for cutting intermediate props made of wood
The final stage of assembling the frame of the lower part is the installation of the upper strapping. It is performed with the same bar as the lower one, only the elements are not joined by a cut - they simply adjoin each other. After the upper harness is done, remove the temporary fixation.
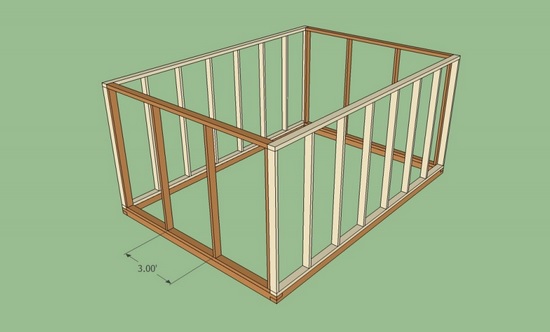
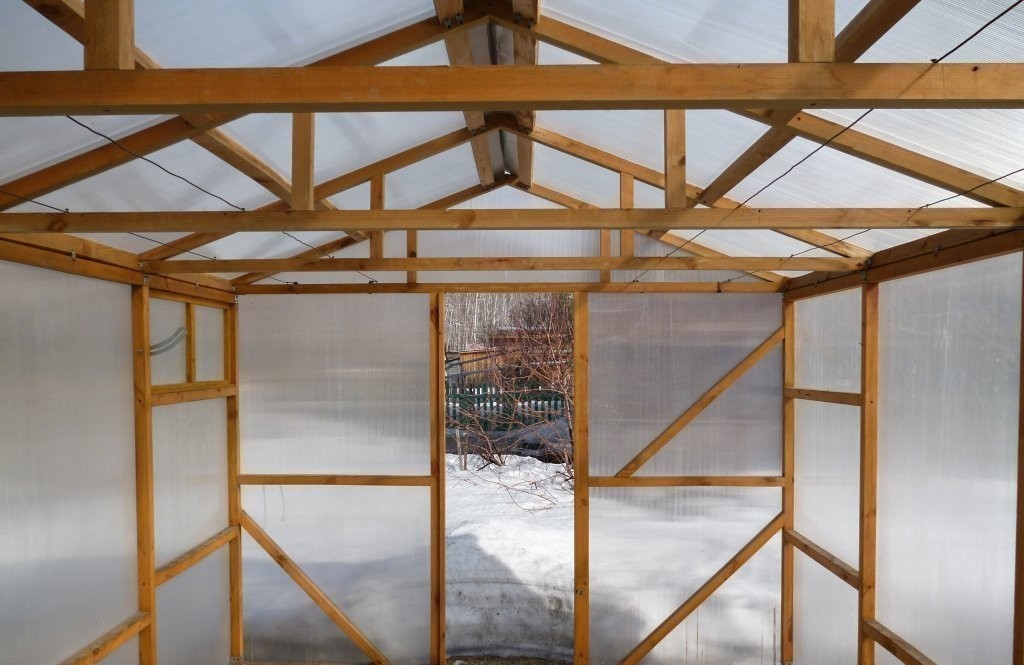
Frame without a roof
Installation of roofs, doors and vents
First, we assemble roof trusses on the ground. Then, using a steel corner, you need to fix them on top harness, supplying, like racks, with a temporary fixation, which we will remove only after the frames for the transoms are mounted.
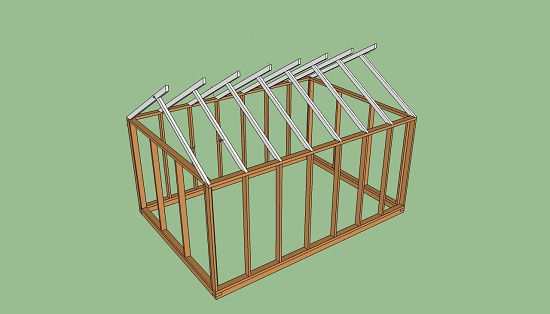
Roof trusses installed on the top rail
Note: we make the door the simplest: a lumber rectangle with several stiffeners inside. We hang on two or three pairs of loops. If necessary, we sheathe the lower part of the frame around the entire perimeter with a board to get a kind of base.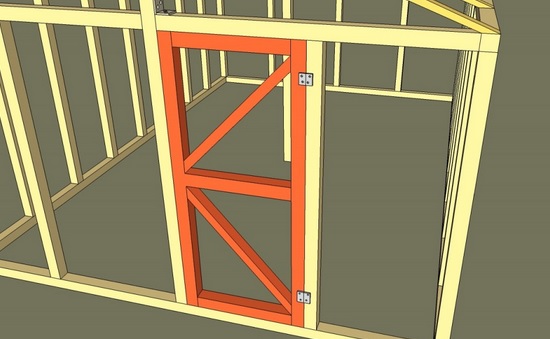
Door installation
We return to the roof: it is necessary to install the frames for the transom. They are not assembled entirely, but are assembled from separate parts directly on the rafters. The following figure clearly shows how this is done. We hang transoms on the finished frames - each on two loops.
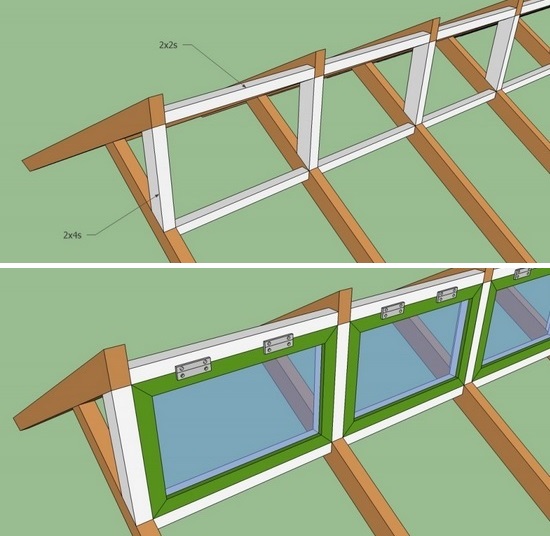
Transom mounting scheme
It remains to modify the frame a little. The assembled structure will turn out to be very strong, but additional rigidity will not hurt. We provide it by installing plank triangles. They are fixed at key nodes - approximately as in the photo below. We treat the finished frame with hydrophobic and antiseptic compounds, let it dry well.
Strengthening the frame with triangles from the board
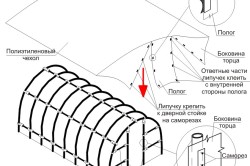
Installation of polycarbonate
The final stage is to cover the greenhouse made of wood with polycarbonate. When cutting the material, we start with the largest parts, then move on to the smallest ones. We take into account that the joints of the sheets must necessarily fall on the rafter legs or support posts. On the roof, if the distance between the rafters is very large, we will organize the crate, as in the figure. We remove the protective film from the material immediately before its installation, and not after or long before.
For your information: polycarbonate sheets must not be overlapped. Firstly, a tight connection will not work, and secondly, the appearance of the entire structure will suffer. Therefore, we work strictly in a joint.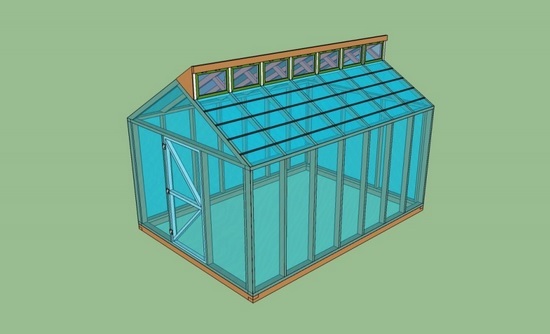
Such a greenhouse made of wood and polycarbonate with your own hands is assembled in one working day.
And now a little about the features of polycarbonate installation. It should be made only with special thermal washers, which ensure the tight entry of the screws into the material. The following figure shows the design of thermal washers and their correct entry into the timber and polycarbonate. It can also be seen here that the edges of the elements are closed with a special profile - it must be present, as a protection of the air ducts from moisture and dirt entering them.
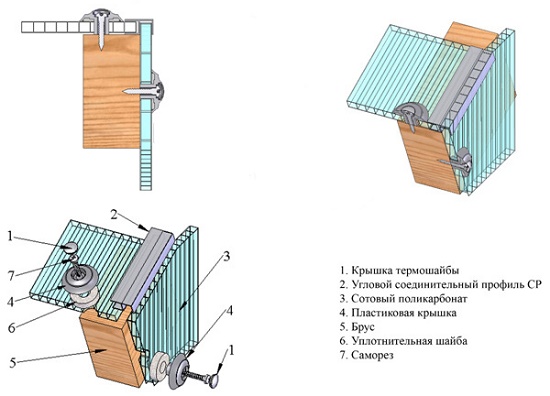
Thermal washer installation example
Another example of building a greenhouse with your own hands from wood, the video covers some of the features of assembling a frame different from what is described in this article.


