- Simple greenhouse with your own hands
- DIY polycarbonate and wood greenhouse
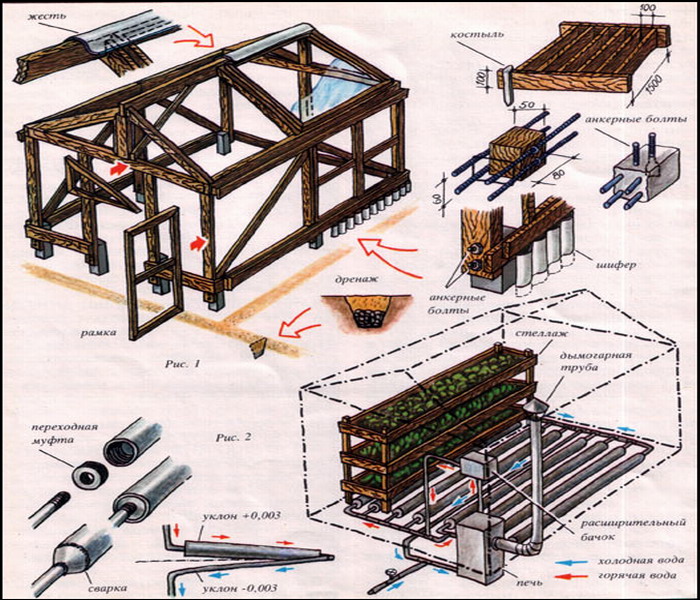
- DIY portable wooden film greenhouse
- DIY greenhouse with a brick foundation
There are a large number of materials for, so you can freely choose based on your preferences. Another thing is that often the main criterion is the economy of the planned construction.
The most profitable option is a greenhouse made of wood.
It is much more stable than a greenhouse made of a profile, and cheaper than a metal one. Therefore, it is worthwhile to dwell in more detail on how a wooden greenhouse is built with your own hands. As a rule, such designs are not very difficult to implement.
Simple greenhouse with your own hands
This option is cheap and simple. Such wooden greenhouses are made collapsible, so it is worth marking all the nodes so that assembly is not difficult for the next year.
To, prepare the following materials:

- Wooden bars with a cross section of 40 × 60 mm and 30 × 40 mm.
- Screws, screws for connections.
- Greenhouse film 0.3 mm thick.
- Roulette, twine, pegs.
- Water pipes with a diameter of 38 mm and a length of about 40 cm.
- Thin lath, short nails.
Working process:
- It is necessary to calculate the size of the greenhouse. These will depend on the width of the film web; if it is 2 m, then the length of the greenhouse will need to be covered with two such segments, and with a slope of 30 °, the structure will be approximately 1.7 m in width and 1.4 m in height.
- Now you need to break the site. For this purpose, use a tape measure, pegs and twine.
- Along the perimeter and corners of the greenhouse, retreating 80 cm, pieces are driven into the ground water pipes, so that there is a segment of 5 cm above the ground.
- In the indicated pipes, you need to insert racks from prepared wooden blocks.
- Then all the bars from the outside are cut off by about a quarter and longitudinal side rails are attached to them. When installing them, make sure that the joint falls on the rack.
- Following the example of the side racks, you need to install two central ones. Their tops are aligned and a ridge rail is attached to them.
- Now it's the turn of the rafters, they are fixed and sawn down in place.
- Horizontal cross bars must be installed from the ends of the frame. If the length of the greenhouse is more than 3 m, in the middle it is necessary to put another vertical stand and a horizontal transverse rail.
- It's time to stretch the film. To do this, two sheets of film are nailed to the ridge rail using a thin rail and small nails. On the north side of the greenhouse made of wood, the film is attached to all adjacent slats and bars. The bottom of the film is buried with earth. So that from the south side the film can be lifted, on the side edges of the panel, welding the film, make pockets and pass the twine into them. A bar (30 × 30 mm) with rounded ribs is attached to the bottom of the film web. It will serve as a film reel when opening the greenhouse. On the extreme rafter slats and bars, a cord is fixed with small nails, which serves to seal the windows. As a result, it turns out that when the greenhouse is closed, the film sheet, wrapped from the ends with twine in the pockets, fits the bars and rafters covered with a cord, very tightly. At the bottom, three pegs are used to fix the bobbin, which are hammered at the extreme and middle rack. The ends of the greenhouse are also upholstered with foil.

Diagram of a wooden greenhouse covered with polycarbonate.
Back to the table of contents
DIY polycarbonate and wood greenhouse
Polycarbonate greenhouses are very popular nowadays, they look great, assemble quickly and serve for a very long time. The only drawback is the price, but if you build one using a wooden frame, it will cost much less. In addition, if the tree is impregnated with a special protective compound, such a greenhouse will serve you up to 20 years, without the cost of repairs and the purchase of film.
To build this one, you will need:
- Polycarbonate sheets (2.1 x 12 m).
- Asbestos-cement pipes.
- Rounded beams.
- Boards.
- Galvanized iron.
Working process:

- The first step is marking with a cord and pegs, then four holes 1.2 m deep and two holes from the ends at a distance of the width of the doorway are made with a garden drill along the length of the greenhouse.
- Now you need to cut the asbestos-cement pipes into 1.3 m pieces and insert them vertically into the prepared holes. The resulting cracks are covered with sand and tamped.
- Cut the bars into 1.5 m long. One end of each beam must be rounded off with an ax to the inner diameter of the asbestos-cement pipes. It is recommended to impregnate the posts with a protective impregnation and insert vertically into the pipes.
- Knock down a rectangular frame from smooth boards. It will hold the support posts together at the bottom.
- Pull out the roof truss and saturate.
- To fasten the pillars at the base, a lower strapping is nailed, consisting of sheets of galvanized iron, the width of which is 25 cm.They should overlap, overlapping by 5 cm.
- Now it's time to sew up the side walls with polycarbonate. To do this, holes are drilled in it and the sheets are cut with a sharp knife in accordance with the size of the roof, then they are screwed to the rafters with self-tapping screws.
- For the ridge of the roof, ribbons of iron are cut into 15 cm long and the strips are bent with a mallet at an angle of 120 °. It is necessary to leave a small gap between the sheets for thermal expansion.
- Then the end walls can be sewn up with polycarbonate sheets, leaving only openings for the doors.
- A door is made of boards and hinges are attached to it. After that, it is placed on a sheet of polycarbonate, which is cut to the size of the door. The resulting pieces are screwed to the doors. Then they can be hung, handles, locks and fixing hooks installed.
A specialized company is engaged in the manufacture and installation of various canopy designs using polycarbonate sheets. This material is twice as light as glass, but provides the same illumination of the area. In the area near country house or a cottage looks great with a wooden shed covered with polycarbonate sheets. We have extensive experience in the installation of such structures of any size and shape. Our professional specialists will quickly and efficiently install closed wooden sheds in any area of \u200b\u200bMoscow and the region. We provide qualified free advice on the choice of the optimal design, taking into account your wishes.
What do we offer
Our company has extensive experience in installing various canopy designs. Therefore, there are standard developed designs for various purposes. Our professional specialists will visit you free of charge and help you develop the design and construction. Extensive experience, taking into account your wishes, will ensure the creation of an original and individual canopy design. We install a polycarbonate wooden canopy on site country houses and cottages, kindergartens. For the frame of such a structure, we use only environmentally friendly wood species. We provide a long service life of this design by treating the wood with special solutions that prevent it from rotting.

Why we cover with polycarbonate
Polycarbonate sheets provide excellent illumination of the area under the canopy. These sheets are two times lighter than glass and many times stronger. This material allows you to create light, graceful awnings of any size. The light weight of the coating does not require the installation of powerful frames. Therefore, such awnings have light graceful frames, regardless of their area. The installed support pillars made of wood give the structure an original exotic appearance. polycarbonate has good flexibility, so you can create closed canopies with a covering of any complexity configuration.
If you think that a greenhouse made of wood with your own hands is a relic of the past, and the future belongs entirely to “universal” metal Lego structures, then you are wrong. As a living and absolutely environmentally friendly material, wood will never go out of fashion, and even if it is not most protected from moisture, heat and time, wonderful designs are obtained from it! A striking example of this is the strong Finnish structures made of glued pine - their frames are simply soaked with an antiseptic and dried well before use. And there are such greenhouses for more than 20 years! This is what technology and the right approach mean - what we will tell you about in this article.
What can be the advantage of wooden frames?
Here are the advantages of wood as a material for building a frame:
- Cheapness. Agree, getting high-quality bars is not so difficult.
- Simplicity. Even a person who is very far from construction can work with such material.
- Easy replacement possible... Is the part broken or rotten? You can easily replace it with another one.
- Ease of fastening any material, be it glass or polycarbonate.
- Absolute environmental friendliness - wood is also a "breathable" material.
- Ease of assembly and disassembly of the frame.
- Light weight and at the same time stability.
- Internal organization: in such a structure, you can easily attach shelves and special devices, install automation and everything else. Try the same thing in an industrial model with its strictly fixed width, height and curved arcs - it's not as easy as it seems at first glance!
- Undemanding in care.
- The ability to build construction of the height, width and structure that only your heart desires.
And finally, greenhouses are quite aesthetic and fit perfectly into the surrounding landscape design - these are not arched iron tunnels of mass production for you.

How to build a truly durable structure?
The main rule of durability and strength is the correct preparation of the wood itself for use. And therefore, wherever you get the bars and no matter how good they look, be sure to first clean them with a brush from dirt and sand, rinse and let dry enough time. After that, clean sandpaper medium grit or some wet abrasive.
The main thing is to make sure that the painted greenhouse made of wood does not become covered with cracks - if there are any, paint them right there, otherwise the material will instantly absorb moisture and rot from the inside. The same goes for bubbles on the paint - clean the layer in such a place and prime the surface again. If, due to some mechanical damage, part of the frame is completely exposed, then use an aluminum primer for processing it: apply the first layer of paint and after a while - two more layers. Pay also attention to what kind of wood you are building a greenhouse - if it is soft wood, then it will need to be painted twice a year.
Also, an antiseptic significantly prolongs the life of a structure - it protects it from the damaging effects of moisture.
Ready? Look for yourself some drawing among the proposed ones - and off you go!

Project # 1

Project # 2

Project No. 3

5 most popular models of wooden greenhouses
Before you build your structure, buy quality material, everything necessary tools, and carefully consider what the frame will be. All modern drawings of the best wooden structures are simple and accessible, and not much more complicated in nature than children's Lego. And believe me, building such a greenhouse is much easier than assembling some kind of team based on a thick volume of crookedly translated instructions.
Option 1. Small standard design
Dimensions - 6x4 m. Covering - polycarbonate, foundation - any. So, here is the construction process itself step by step:
- Step 1. Building the foundation. To do this, drill the soil about 60 cm - up to the sandwich layer (usually, first there is a fertile layer, then sand and only then dense layers). We fill the posts through the previously inserted pins.
- Step 2. On the posts, we assemble a strapping from a larch bar with dimensions of 100x100. We pull the strapping itself with a nut and washer to the posts.
- Step 3. We erect the frame and cover it with a film - that's all!

Option 2. Wooden greenhouse according to Mittlider
The structure you see in the photo has the following dimensions: 4 m wide, 8.40 m long, and the height in the ridge is just over 3 meters. According to the famous one, on which it was built, it has two slopes of different height and several vents under the very ridge.

For the construction boards 50x100 were used. So, now the building itself:
- Step 1. Building the foundation. For this greenhouse - a monolithic tape 20x35 cm with reinforcement 4x8 mm. Outside, we saturate with Penetron so that it does not crumble later, but for aesthetics, you can overlay it with natural stone.
- Step 2. Install the frame and saturate Senezh-Bio. The racks should be in 72 cm increments.
- Step 3. We organize the vents in the upper part of the structure - as in the drawing. In this structure, there will be four of them, each with an area of \u200b\u200b16 m2. If possible, we set up automation to open them.
- Step 4. We fix polycarbonate - always without gaps.
- Step 5. We are engaged in watering - we start a water supply system, put a large container and place pipes in three beds for drip irrigation.
In terms of building material, you will need about 2 cubic meters of 50x100 boards for such a greenhouse. And the knitting of doors and vents will also take piece bars of 30x50 and 50x70 - that's all the expenses!

Option 3. Wooden greenhouse for polycarbonate
In this design, the frame is built from a 45x45 mm bar. Length - 8 meters, width - 2.7 m. Two doors and eight vents can be installed in it. Make the distance between the posts no more than a meter, and each truss should not be supported by two posts at once - with the exception of the central one.
Work order:
- Step 1. The base of the strapping is a metal corner 45x45 or 50x50 mm. Make a 12 cm incision along the shelf with a grinder, bend it at a right angle and get the base on which to fasten the harness.
- Step 2. Paint the corner two times with anti-corrosion paint.
- Step 3. Drive into the ground, check everything according to the level and fasten the strapping bars to the self-tapping screws, while joining them in half a tree.
- Step 4. Reinforce all joints with a metal plate.
- Step 5. Sew up the lower strapping along the perimeter with galvanized steel and buried in the ground.
- Step 6. Fix the polycarbonate on the roof with self-tapping screws with a rubber washer, and everything else with a press washer.
- Step 7. Close the ends of the polycarbonate with a plastic corner - at the corners of the greenhouse. Lay the sheets themselves with an overlap, processing them around the edges with silicone sealant.
- Step 8. We treat the lower harness in two layers with an antiseptic and paint.
Detailed video for this option:
Option 4. Foil design
Take Svetlitsa film as a coating. Work order:
- Step 1. Making the foundation. Since the structure will not be heavy, weld the usual small homemade piles - such as you see in the photo. They can be made from corners of 50x50 mm, their length is 900 mm, cover them with a primer in two layers and drive them into the ground.
- Step 2. Align the piles with the laser and proceed to the base assembly.
- Step 3. Now install the truss structures - take 8 mm FC plywood, connect with PVA D4 and 4x45 self-tapping screws.
- Step 4. Place bumpers for the beds - it is good to use 10 mm slate for this. And next to it from the side of the street we put foam plastic.
- Step 5. Now paint the frame. Just remember that the boards must be treated with Neomid, a non-washable antiseptic, even before construction begins. And it is better to paint with Pinotektom - two base layers, and then two more - superficial.
- Step 6. Assembling the frames for the vents and doors.
- Step 7. We cover the entire structure with Svetlitsa film.
- Step 8. In the greenhouse itself we pull the ropes for the garter of the plants.
- Step 9. Install the systems and.
In such a greenhouse, if it is in a sufficiently cold area, you can also pull a second film inside, attaching it to the frame with a stapler. Even the cheapest - but the effect will please, believe me.

Option 5. Portable greenhouse on foundation blocks
One of the main advantages wooden structure, as you know, this is the ability to disassemble and even carry it due to its light weight. Perhaps you have just such a site where a similar need in the future is not excluded. But this does not mean that you will have to completely abandon any foundation - in view of the need for concreting - you just think about one that can still be disassembled. As, for example, in the variant, the basis of which is 2 bars of 150x150 mm each:
- Step 1. We dig a ditch to the sand, 60 centimeters, pour ASG there, ram it well and lay concrete blocks, three on each side.
- Step 2. We treat the timber with Neomid non-washable antiseptic and after drying we coat the lower and outer sides with bitumen. It is not necessary from all sides - after all, bitumen can heat up from the sun and give an unpleasant smell, but it is not needed in the structure.
- Step 3. We put the frame and treat it with the same antiseptic.
- Step 4. At the corners of the greenhouse, we attach one-meter braces.
- Step 5. We prepare a template rafter, along which all the rest will be done.
- Step 6. We cut the racks and install them.
- Step 7. After finishing the construction of the roof, paint the ends with paint.
- Step 8. We cover the structure with 4-8 mm polycarbonate.
When on summer cottage there is a greenhouse, it is definitely nice, and especially if you built a wooden greenhouse with your own hands. And the point here is not at all about the opportunity to save well. It's just that such buildings are being built for themselves. Therefore, all work is done with the highest quality, with love.
But when the question of building a greenhouse arises, immediately there are a lot of others accompanying it. For example, where to install a greenhouse, what material to choose, which of the designs is the best?
Greenhouse structures
A greenhouse or greenhouse comes in a variety of designs. Let's consider each of them separately, define the advantages and disadvantages.
Arched homemade greenhouses
Here the roof is made in the form of an arc. This allows plants to receive large amounts of light. This comes out due to the fact that the sun's rays seem to be scattered over the surface. In this case, the plants receive the necessary heat and light. In winter, such an arched greenhouse does not suffer from snowfalls, therefore such a structure does not carry the risk of collapse or deformation.
Single slope type
Such greenhouses are usually attached to one of the sides to a capital structure. For example, against the wall of a house. Some of the amateur gardeners attach these structures to the southern walls. Such a greenhouse is inexpensive, and also allows you to significantly save space on the site.
If the room, which will be adjoined by a shed wooden greenhouse, made by hand, is equipped with heating, this is a huge plus for the gardener. So you can significantly save on resources for heating the greenhouse. However, the disadvantage is that in the winter season, snow will not roll off the roof of such a structure. Therefore, you need to regularly clean the roof of this building.
Gable structure
This is probably the most widespread and popular type of such buildings. Here the roof is decorated in the usual way. One of the maximum advantages that such greenhouses have is space and freedom for plants and directly for the gardener.
Many lovers of summer cottages equip the heifers for giving with some recreation areas. So you can combine the useful and the pleasant while relaxing on a suburban area.
Winter summer
If greenhouses are actively used in the winter period of time, then be sure to think over a way to heat this useful structure. It is possible to arrange a place for a greenhouse near pipes and radiators. However, some people prefer to equip the structures with a separate one. But in most cases these are unnecessary worries and troubles. You need to constantly monitor the stove, because the plants do not like temperature changes too much.
If winter is needed then you need a reliable base for them. The greenhouse should be installed on solid foundation, and it is also good to strengthen the roof of such a building. Indeed, in winter, under the snow, the structure can easily wrinkle. And more often and simply the roof is easily destroyed.
Some also build so-called thermoses. Such a building is buried about two meters in the ground. Naturally, for such a greenhouse it is necessary to dig a pit, to make a reliable foundation. Many people make special walls from a thermoblock, insulate such buildings, then organize heating. This process is quite time consuming and also costly. Therefore, a wooden greenhouse, made by hand according to this principle, is a rather rare structure. Much more common than greenhouses for summer.
Summer option
While the winter option is laborious and expensive, the summer option is a cheaper, yet reliable and practical solution. This is one of the simplest and most inexpensive greenhouses. The frame can be made without special skills from wood or timber. If you use such a structure carefully, then the building can stand for several seasons.
Ordinary plastic foil for greenhouses is used as cladding. You can find it at most hardware stores or markets in your city. In winter, it is removed, and in the spring it is again easily and naturally pulled on wooden frame... You can fix the film with ordinary nails. 
If for some reason you are not able to make a frame for such a building made of wood, then you can use plastic
The construction work of this structure does not require any serious skills.
Wood as the main building material
It has a lot of advantages. The wooden frame for the greenhouse is easy to assemble from This material has high strength rates. It is also the most environmentally friendly among all the others. The timber can be purchased at any workshop or on the market. Wood is less durable than metal, however, provided it is properly processed, it can last a very serious period.
In order to build a greenhouse, an expensive timber is not needed. One of the main requirements is quality, drying, absence of any defects and knots.
The only drawback is that the material must be treated with special compounds to protect it from mold, fungi, and decay.
How to build wooden greenhouse yourself? The process of building a summer cottage will not take much of your time. With a certain amount of desire, as well as with minimal skills in working with wood, you can build a high-quality greenhouse in an extremely short time. So, our structure will be built in several stages.
Preparing the place
First of all, decide on the place where the building will be located in the future. It should be as flat as possible. It is desirable that it be located in an open space. You also need to choose a place in the sun.
After you have decided on a place, you need to do the leveling of the earth. After a while, check the evenness of the soil using a level.
If a greenhouse with heating is planned, then you need to start laying communications for heating now.
Dimensions and shape of the future building
The area that our greenhouse will occupy depends on the size of the land plot, the plants that will be grown, as well as on financial capabilities.
You need to know that, for example, an arched greenhouse of a large area does not provide much benefit. The fact is that it is not recommended to plant plants with very different characteristics in the same greenhouse. Simply put, it will not work to grow tomatoes with cucumbers in the same greenhouse.
A building of about 3 * 6 m is considered to be a comfortable area. So it will not take up too much space on the site. And the harvest that can be harvested is more than enough for the whole family. 
In order for us to get a wooden greenhouse, the drawing must be well studied and all the nuances thought out. There are many different designs, but the most popular is an ordinary greenhouse with such a design is easy to sheathe. You can use both film and other materials. To save on materials, we trim the walls at the planting level with wood panels.
We create the foundation
The main requirements that can be imposed on the foundation for a greenhouse are strength, as well as stability and, of course, reliability. There are many options for arranging it. The cheapest and most practical - strip foundation.
To create it, it is necessary to dig a ditch around the perimeter of the future structure. It should be 15 cm deep. If the ground is soft enough, formwork from the same timber should be used. Then you need to check the site for horizontalness. Next, fill the moat with concrete.
After that, on all sides and at the ends, you need to mount 12 mm anchor bolts... Make sure that they match the frame as much as possible.
Now you can rest for a few days, and at the same time wait until the foundation dries up. When the base is sufficiently frozen, you need to lay out bricks over the site in several rows. Make sure that the seams between the bricks line up with the bolts. Then you need to cover a layer of bricks with some kind of waterproofing agent.
We build a frame
At this stage, our greenhouse will receive a frame. In order for this to happen as quickly as possible, it is necessary to cut a pre-prepared bar and fasten it with a bracket for corners. So we got the foundation. Now we are installing on the finished base. The greenhouse will be ready soon.
Before mounting the frame on the base, it is advisable to attach a wide supporting beam to our foundation or base. The board will be attached to it. Elements must be fixed with corners or some kind of bolts. Reinforcement can also be applied here. Before installing the support bar, it is advisable to process it with protective equipment. 
After these works, you can proceed to fixing our base for the frame around the entire perimeter. So, you need to check that the base is as solid as possible. The places where the elements will be connected must fit snugly together.
The base has already been mounted. Now it's time to move on to the rest of the frame. Here you need to connect the cut boards according to the drawing.
We sheathe the structure
When the frame is completely ready, you can rest a little more. And after a rest, you can start to trim. For cladding, you can use different materials... Wooden greenhouses under the film are no different from greenhouses under glass or polycarbonate. Let's consider each material separately.
Polyethylene is the most economical option for lining a greenhouse. It has one drawback - it is a rather short service life. Polyethylene will last a maximum of one season. The material is good in summer. In snowy winters, it must be removed, otherwise it will tear under the weight of the snow. Also under it, the material fades and transmits light worse, and this adversely affects the growth of vegetable crops. Polyelite will have to be changed every year. Thus, greenhouse sheathing will prevent early planting of vegetables. In addition to all this, the material does not allow creating and maintaining the correct temperature regime inside the greenhouse. Crops will be very hot in hot weather, and vegetables will freeze on cool nights.
However, if only polyethylene is available to you, then we sew the structure sequentially. You need to start work on one side of the structure, then go to the other through the roof slopes. It is also better to fix on the frame in a certain sequence. Wood slats are perfect for these purposes. To prevent the film from tearing, it is better to make special visors on the corners of the roof. 
Glass is a more durable and reliable option. It perfectly transmits light, is able to maintain the correct temperature regime. The ground in glass greenhouses warms up perfectly. This design will be great for early planting of vegetable crops. But at the same time, sheathing a greenhouse with glass is an expensive solution. Special skills are required here. Also, it should not be used in areas that are not guarded by anyone. Most greenhouses use 4mm glass for windows. There are also special options for use in greenhouses only.
If glass and film are not relevant for you, then there is a modern way out of this situation. This is polycarbonate. A wooden greenhouse for polycarbonate does not have any significant differences from the film version. It is a fairly lightweight material that does not require a reinforced frame. It will be much cheaper than glass. The service life of polycarbonate is over 15 years. Therefore, it is optimal. The material perfectly transmits sunlight, and also maintains the correct temperature regime inside. Also, such a sheathing allows you to reliably protect plants from ultraviolet radiation. The material is very light in weight, but also has a fairly high strength. Moreover, it can be perfectly cut with an ordinary knife. 
Polycarbonate does not lose its advantages even in severe Russian frosts. Polycarbonate is easy to install, it is even easier to clean. Greenhouses made of polycarbonate (wooden frame) are sheathed with special screws. If the base of the greenhouse is flat, then there will be no problems. You will be able to use it in no time.
We equip a greenhouse
Now that the construction work has been completed, you can proceed to the arrangement of our greenhouse. To do this, you need to make sure that there are no gaps, and if they are, they need to be removed. Next, you should install heating systems and carry out lighting. It is also necessary to organize a water supply system for watering plants. Supply ventilation is also very important. 
Well, now that the wooden greenhouse is completely made with your own hands, you can decide which vegetable crops grow in it. Perhaps, thanks to this article, someone will build a greenhouse and enjoy juicy greenhouse cucumbers in the spring.
So, we figured out how do-it-yourself greenhouses are made for giving. As you can see, the work is not so difficult - it is enough to have the necessary set of tools and a detailed sketch of the future structure.
Wood like construction material, has high strength and environmental friendliness, excellent for the construction of greenhouses. It will take a lot of work to build a wooden greenhouse in the country with your own hands. A solid structure can stand for more than a dozen years, and the plants will feel great in the created conditions and bring an excellent harvest.
In this article, we will show you how to build a wooden greenhouse and what you need to do.
general information
Some believe that timber frames are a relic of the past, and today there are more progressive materials. Indeed, there are materials, but the wooden frame for the greenhouse was and will be the main one. If you take proper care of it, do not violate the instructions during manufacture and assembly, such a greenhouse will not yield to Finnish counterparts and will stand for at least 15 years.
Let's briefly outline the main advantages of the tree over all other analogues:
|
Sustainability |
The tree is completely harmless to the environment. The porous structure of wood allows air to pass through, which provides high thermal insulation and maintains air exchange, prevents excessive moisture. |
|
Durability |
A structure made of wood, well treated against decay, is capable of standing for at least 10 years, after which the decaying parts are easily renewed. |
|
Saving |
For construction, you can use the cheapest timber or the remains of materials from the previous construction. |
|
Strength |
Correctly assembled frame turns out to be stable and light, it can be additionally strengthened at any time. |
|
Simplicity |
Anyone can build a greenhouse out of wood; you just need a saw, a hammer, fasteners and nails. |
|
Versatility |
The structure is possible of any shape and size, subsequently it can be completed or rebuilt at your discretion. |
|
Convenience |
Hooks, shelves and other devices for the interior arrangement of the greenhouse can be easily nailed onto wooden racks. |
Varieties of designs and drawings
Greenhouse wooden structures differ primarily in their shape.
Arched

During construction, a window beam is used. Arched wooden greenhouses are made by hand according to the drawings:

As an example, here is an arch with three sections. Each section covers 5 sq.m of soil. In the figure below you can see a drawing of the frame for such a frame.
Gable
The most common are classic buildings in the form of a house or a tent. How to make a wooden greenhouse of this shape is shown in the figure:

When building, you can use the dimensions given here or calculate your own. The roof should not be too straight to avoid breaks due to snow accumulation in winter.
Single slope
Such a structure is easy to attach to a house or other buildings on the site. The main thing is that it is not located in the shade. The southeast side will work well.

Domed
It will be difficult to build a decorative structure in the form of a dome on your own. High precision is required to fit all frames. Used to cover a small area.

Pyramidal
A pyramid-shaped frame is much easier to build than a domed one. The dimensions shown in the drawing are calculated by the formula a \u003d 0.66b (a - height, b - base width).

Meatlider model
In addition to the varieties listed above, it is worth highlighting the Meatlider design. Its peculiarity is that the two roof slopes seem to be located at different levels. Their difference serves to accommodate ventilation vents. This structure provides good circulation of air flows, without drafts. The structure of the frame can be seen in the diagram:

Choosing a suitable place for construction
After you have decided on the shape of your future greenhouse, you need to find a suitable site for it. It should be flat and open to the sun. As a last resort, if the space is very limited, you will have to cut down trees or bushes, and level the vacated area.
Construction material
For the construction of the frame, you will need boards and beams made of pine, larch, alder or oak wood. A beam with a section of 10x10 cm is suitable for the base, 5x5 cm for the supports, and 15x15 cm for the foundation.
In advance, you should choose a coating - film, glass or polycarbonate sheets. The covering can be combined, for example, glaze the roof and close the walls with plastic wrap.
The film should be at least 0.05 mm, but it is better to take a thicker one - 0.10-0.15 mm, it will last longer.
Laying the foundation
The foundation for a wooden frame for a greenhouse can be made in different ways. Here are some options:
- Wooden foundation from a bar. Suitable for small buildings, allows you to transfer the structure. Requires careful treatment against decay with antiseptics.
- Concrete pile foundation. The piles go deep into the ground by a meter, and then the base of the frame is installed on them. This is a simple and convenient option.
- Strip foundation on a sand cushion.
- Brick foundation.
The most stable and durable are brick and strip foundations. These 2 options can also be used for winter greenhouses.
How to arrange brick foundation, shown in the figure:

Erection of the frame
Let's take a step-by-step look at how to assemble a frame made of wood using the example of an ordinary gable greenhouse.
- A base from a bar is attached to the foundation. The wood is thoroughly impregnated with an antiseptic.
- Vertical wall posts are attached to the base.
- The upper edges of the racks are interconnected by strapping.
- Next, you need to build the gables of the roof and connect them with a ridge. The ridge board is installed under the rafters in the cut grooves.
- After the roof is ready, we proceed to the manufacture and installation of doors and vents.
- Having collected the entire frame, we treat it with an antiseptic and only then proceed to the coating.
Covering a wooden greenhouse
Glass
For roof glazing, it is necessary to install a glazing bead on the inside of the frames formed by the rafter beams. Then we lay the glass and fix it with glazing bead on the other side. The glasses are installed in the side frames in the same way.

Polycarbonate
Polycarbonate sheets are cut to the width of the frame and screwed on with self-tapping screws. On the roof, a rubber washer must be placed under the self-tapping screw. The joints of the sheets are overlapped. There should be no gaps, so you should additionally go through them with silicone sealant, and attach a plastic corner at the corner joints. A metal corner plate is installed on the roof ridge.

Film
In order to cover the frame with film, you do not need to cut it. Large sheets of film are stretched along the entire length of the frame and attached to the beams using glazing beads or wooden pads. Instead of overlays, you can use thick plastic tape, which is attached with a construction stapler.

It is worth remembering that the film is the most short-lived material, so it is recommended to remove it for the winter.
After graduation construction works we import soil, form beds, equip the internal space, disinfect the soil from pests, and then you can start planting seedlings.
VIDEO: Do-it-yourself greenhouse from a bar 50x50 mm


