Special measures for pouring the foundation are considered the most critical part of construction work carried out during the construction of modern buildings and structures, and must be performed (in accordance with the current building codes) during the construction of even very small buildings. None]]\u003e]]\u003e A modern building cannot be insured against subsidence, distortion or possible destruction if it does not have a pre-calculated, solid and reliable foundation in its foundation.
Before arranging the foundation for any home building (a house, a bathhouse, a shed or a garage, for example), you first of all need to decide on its type.
It is well known that during the construction various objects for household purposes (as well as in the construction of small structures of an industrial profile), the usual strip foundation is most often used today. This type of foundation is a concrete (reinforced concrete) strip poured along the perimeter of the building, which, due to its rigidity, prevents unwanted distortions, subsidence and collapse building structurepossible in unstable soils.
Stages of foundation work
Any owner of a garden plot or an individual developer sooner or later faces the problem of pouring the foundation for a particular structure and must be ready to cope with this on their own. The solution to the question of how to fill the foundation for the house on your own is not as difficult as it might seem at first glance. The decisive factor in favor of choosing such a solution is, first of all, the fact that when making the foundation yourself, you can do without the involvement of hired workers and special contractors. As a result, you will be able to significantly reduce the cost of building a house.
Construction work on the construction of the foundation must necessarily include the following main stages:
Layout on the ground
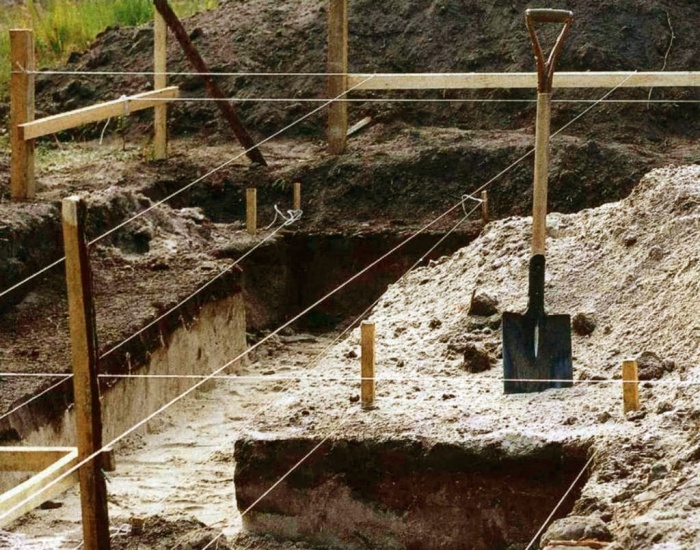
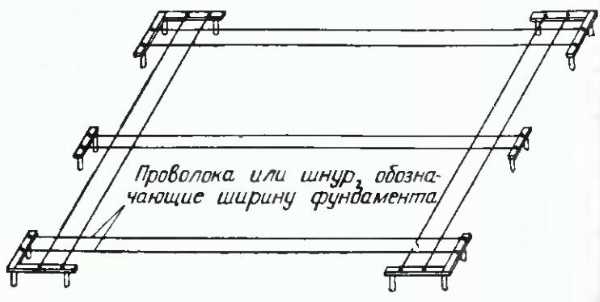
At the initial stage of construction, a breakdown of the site for the future foundation is carried out, which is carried out in accordance with the construction project accepted for execution. In the process of breaking down, the contours of the future structure are indicated on the ground; and this is done with special pegs and a rope. In the course of marking work on the terrain, marks are applied not only to]]\u003e 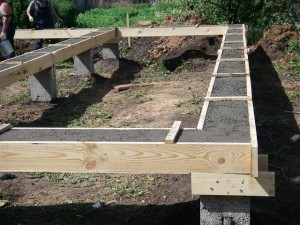 ]]\u003e the overall dimensions of the structure and the location of the elements of its capital structure, but also concerning the required width of the foundation, which, as a rule, corresponds to the thickness of the future walls (adjusted by 10-15 cm in the direction of increase).
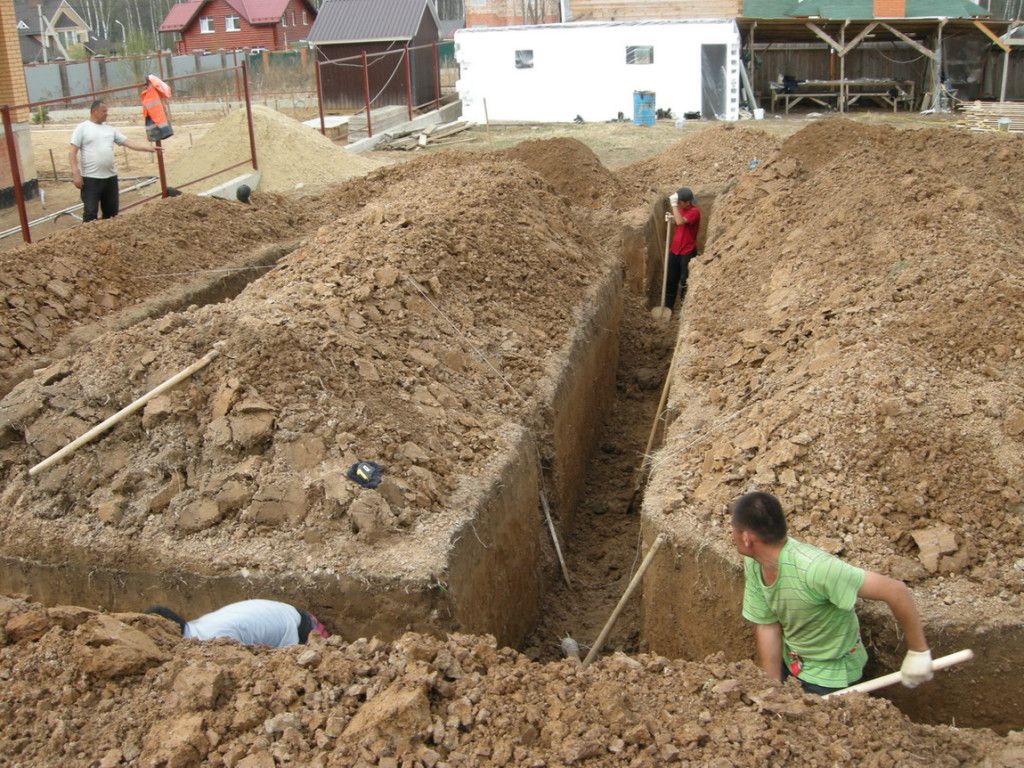
Excavation
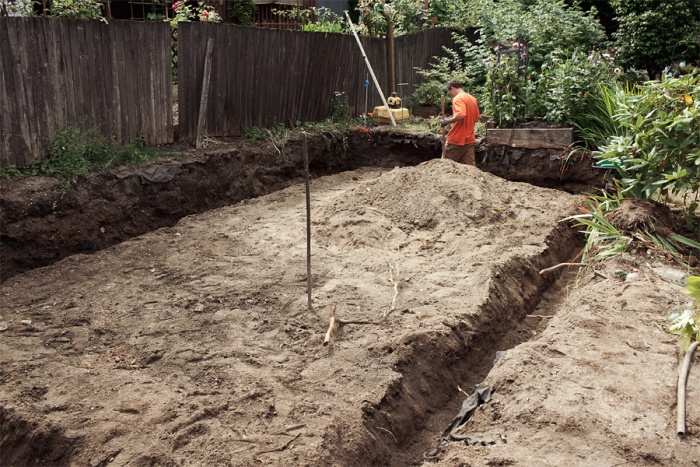
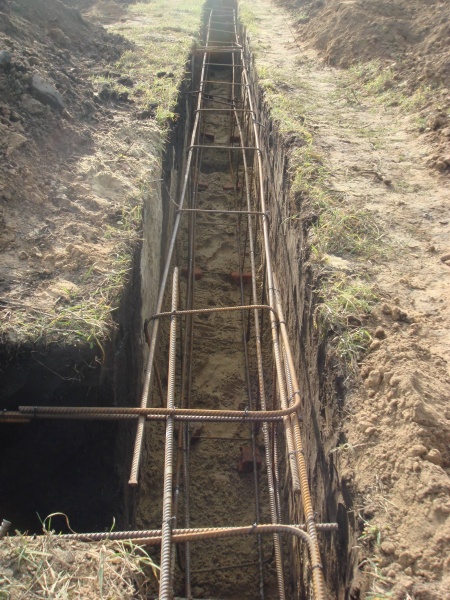
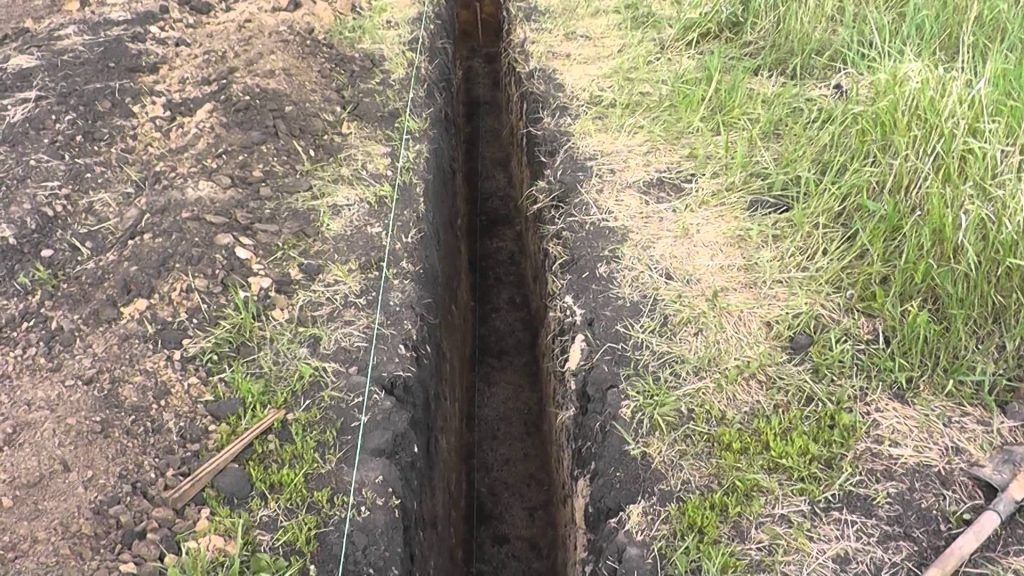
The next stage of work on the preparation of the foundation is excavation... At this stage, a trench is prepared along the width of the foundation, corresponding to the previously applied markings. At the same time, special attention should be paid to the fact that the walls of the trench are even and strictly vertical, and its depth slightly exceeds (by about 20 cm) the depth of soil freezing in a given area.
In order for the shrinkage of the foundation to be uniform, it is necessary to close the bottom of the trench with an even layer of sand (make a so-called sand cushion) 10-20 cm thick and tamp it very well. After this, it is recommended to lay the working surface of the prepared trench with some waterproofing material, which can be used as a conventional plastic film.
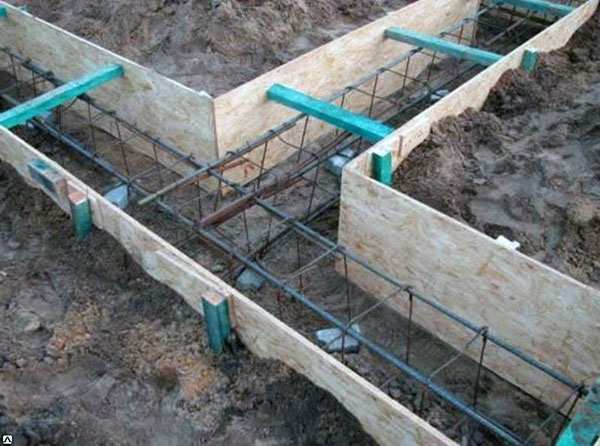
Formwork installation and pouring
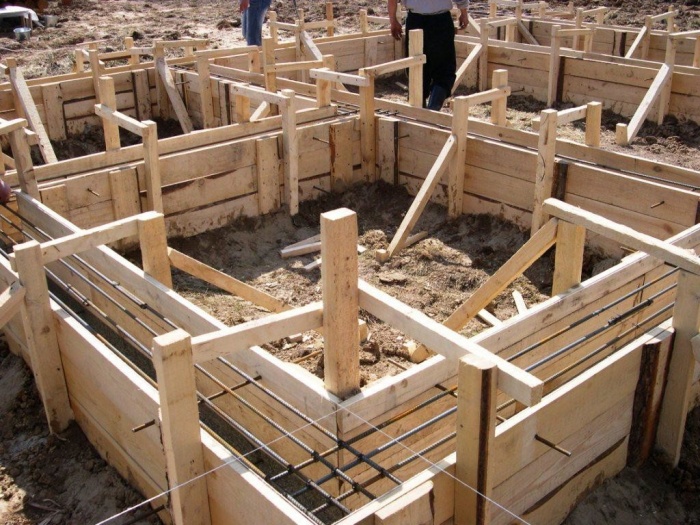
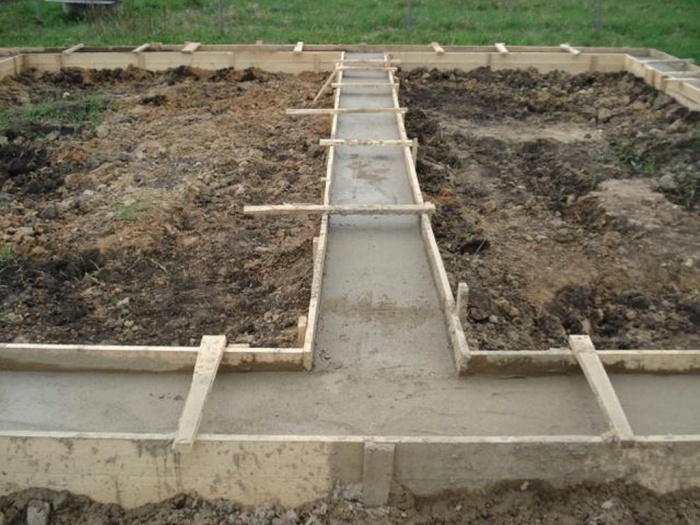
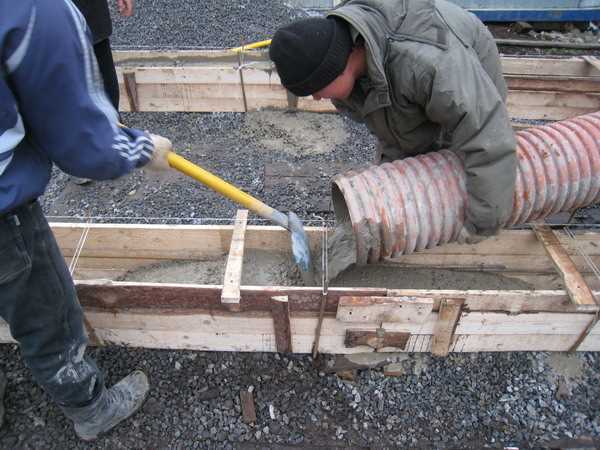
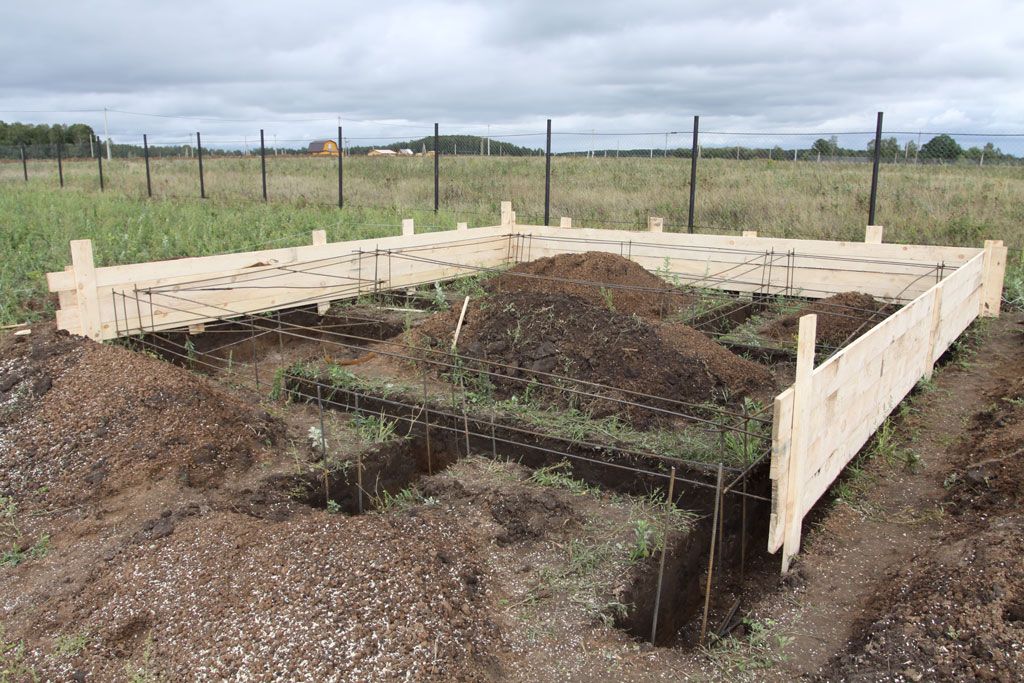
Installation of formwork and pouring After the earthwork is completed, it is necessary to proceed with the construction of the formwork. Currently, collapsible formwork is widespread, prepared from individual wooden panels, which are simple to manufacture and sufficiently reliable and which, if necessary, can always be made by yourself.
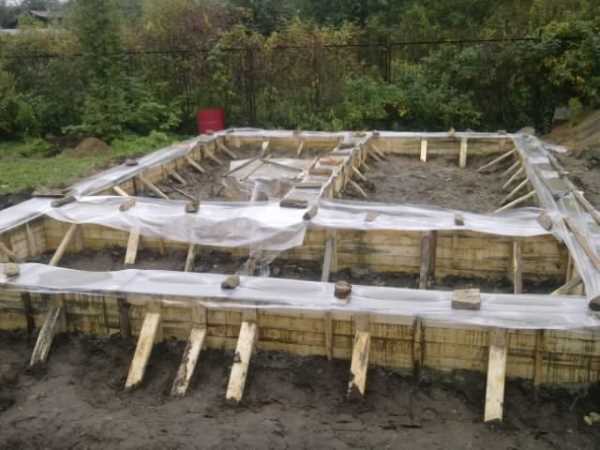
The shields installed in the trench must be fixed on the outside with special props that will not allow the concrete to expand the shields outward. For the same purpose, tightening lintels are arranged along the top of the formwork, which give the panel structure additional stability. In this case, special attention should be paid to the rigidity of fastening the corner units of the resulting formwork structure. When constructing the formwork, one should also remember that the height of the basement (ground part of the foundation) should not be less than 300 mm.
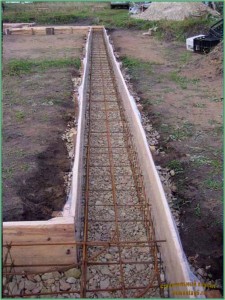
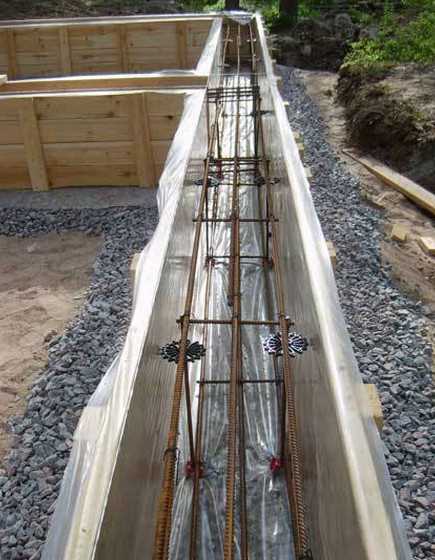
In order to give the strip foundation additional strength (in the case of a high load on the foundation), before pouring it into the trench with formwork, it is necessary to lay a prepared reinforcement mesh... In order for the reinforcement not to "walk" when pouring in the volume of the formwork, it is advisable to fasten its individual sections directly to the shields with the help of pieces of soft wire.
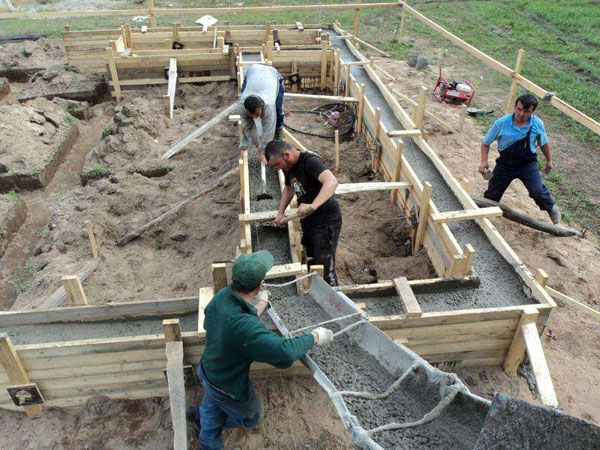
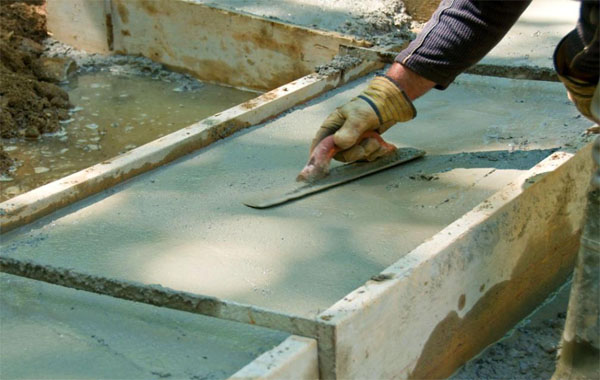
After that, you can safely fill the entire space to be concreted with a pre-prepared concrete mixture; at the same time, during pouring, it must be carefully tamped. The ramming of the concrete mixture is a mandatory procedure carried out in order to prevent unwanted voids from appearing in the structure cavity. From above, the foundation prepared in this way is then covered with shavings and left for some time, during which the material must acquire the necessary technological strength ("stand", so to speak).
The curing period for the most popular cements is, as a rule, from 3 to 5 weeks. The formwork panels can be removed after a week; and this should be done very carefully and try not to damage the texture of the foundation material.
Foundation work cost
Any construction works, including measures for arranging the foundation for the house, must be calculated in advance for the estimated costs. The generally accepted method for calculating the cost of pouring a foundation assumes sufficient simple scheme, depending on the price level set for a given region for one or another of its components.
In the event that you carry out all the preparatory and earthwork on your own, you just need to decide how much concrete is needed to make the foundation. To obtain this figure, it is necessary to multiply the total length of all walls of the building by the estimated width of the foundation and its height, including both underground and above-ground parts.
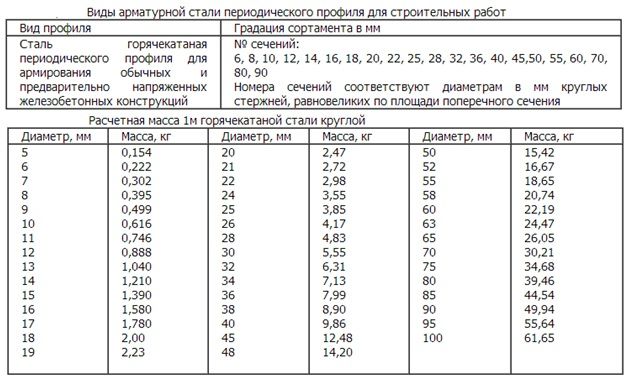
The number and cost of reinforcement can be calculated taking into account the fact that about 6-8 meters of steel mesh is laid on one meter of the foundation.
If you plan to prepare the concrete mixture yourself, then it should be borne in mind that the following components must be available to prepare 1 m3 of 300 grade concrete:
Taking into account the current prices for all of the above components of the concrete mixture and the amount of concrete required for pouring the foundation, you can very simply calculate the cost of the proposed work.
A strip foundation prepared taking into account all of the above will cost you much less in the end than the same work carried out by hired workers.
How the foundation is poured under the house
Before pouring the foundation under the house, you should mark the site. With the help of this event, the places where the base will subsequently be located are indicated. After that, they move on to pulling out a hole. Let's consider this seemingly simple question in a little more detail.
How do I dig a hole for the supporting structure?]]\u003e 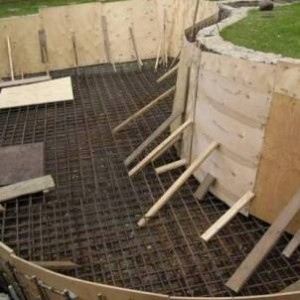 ]]>
]]>
How to pour a foundation under a house Oddly enough, but pouring a foundation is not limited to unloading concrete into the formwork, pouring is a complex process that begins with calculations.
In general, pouring the foundation is the last work that is carried out when arranging the supporting structure. Then it is possible to create waterproofing or thermal protection. But such events directly with the construction have little in common. But the pit is directly connected.
Stage one - marking and digging
Let's start with the fact that in houses with basements, independently, and even right, it is almost impossible to dig a suitable hole. We advise you not to even try. Better hire specialists. We propose to talk about an ordinary building where there are no basements.
Trenches are dug strictly along the perimeter of the ropes stretched during the marking. Choose any place you like, pick up a shovel, and work. But the question arises - where is it better to throw away unnecessary land when you are trying to figure out how to fill the foundation under the house? Look for the answer in the design features of the structure being built.
Will the entry floor floors be made of concrete? Then throw the soil to the side, that is, into the interior, of the structure. No, feel free to throw it out. Thanks to this, you will save a lot of time when you have to clean up the territory for arranging a special air gap.
Stage two - calculation
As far as depth and width are concerned, follow the design documentation clearly. Don't save! It is enough not to fill in only 1.5-2 cubic meters of the mixture, the house may collapse! Think it’s fiction? Not at all. Some people, thinking about the best way to fill the foundation for a house without significant loss of funds, take unnecessary risks. As a result, the walls first crack, then the entire building is completely destroyed! Do not lead to such problems.
The normal depth required for pouring the foundation under the house is approximately 1 m. Sometimes it fluctuates upward. Depends on the rate of freezing of the soil where the object is located.
The deeper the foundation, the more money is needed to build it. But, again, don't save where you don't need to. Always construct to the specified depth.
We continue to consider the topic of how to fill the foundation for a house. It was the turn of the width. The optimal value is 0.5 m. It is explained by three important points. The first is a simple digging, the second is the ability to use any type of masonry, the third is the good strength of the finished system. In addition, everyone is capable of withstanding a half-meter width. The exact indicator for this is such that it does not cause big problems.
Let's do a little calculation. With a base depth of 1 m and a width of 0.5 m for one running meter 0.5 m3 of concrete mixture is required. All this, of course, is a rough estimate, but the essence, hopefully, is clear.
]]>
![]() ]]>
]]>
Digging a hole on your own didn't scare you, and still want to know how to fill the foundation for a house? Then get ready for further activities. First of all, you should take care of the sand pillow. The presence of the interlayer is due to the requirement to reduce the loads exerted on the supporting structures during the change in soil properties. They are observed when the seasons change.
A pillow is made of river sand of a suitable fraction. After laying, it is watered with plain water. Wet sand is compacted. As a result, we have at our disposal a reliable layer, where the base is placed without any problems.
The pillow is done, we are starting to create the so-called "reinforcement belt". Such an element is needed to evenly distribute a variety of foundation loads. Place reinforcing products in two rows. Distance - 15-20 cm. Tie together with a wire.
Having made the armopoyas, with a calm soul, you have the right to proceed to pouring the concrete mixture. This also has its own peculiarity. Complete all necessary activities in one go. It is advisable to fill the base in a day or less, but not more. Another important point - in the example considered in the article, concrete is placed directly into the ground. How so? This allows the soil. The creation of the formwork, the upper reinforcing belt and the new fill are the topic of other publications on our site. You have already received the initial knowledge.
The foundation for the house. Building a foundation for a house. How to fill the foundation.
Today we will talk about the foundation for the house. This topic includes: construction of the foundation, its correct filling. Indeed, many people ask how to fill the foundation. Sometimes, some people use the terms "laying the foundation", so let's discuss this question of how to properly fill the foundation for a house.
Every beginner "DIY" should know one simple truth. It lies in the fact that "Zero cycle operations require precise and verified actions of professionals, since the quality of the work performed determines how long and reliably the future construction will serve."
But not every novice builder tries to adhere to this truth. And this is in vain, because the foundation laid never forgives even the smallest mistakes.
Balance, stability, as well as compensation of power loads - all this, as the foundation of any building. It is impossible to say that pouring the foundation is difficult, but it is worth knowing some of the nuances that will help you do all the work wisely.
Home foundation
Facing these nuances in the process of pouring the foundation, a beginner can easily get confused, but the decision must be made quickly, which will affect the quality of all subsequent work.
Foundation construction rules
So, let's try to talk about the rules for building a foundation, because the construction of a building from ready-made reinforced concrete blocks can and can speed up the work process, but it entails significant costs.
The poured monolith has always been considered the standard of reliability and strength, which is why such a foundation method for any building is quite often practiced in construction.
To pour quality foundation, a novice builder should tune in to a very serious preparation in theory. In turn, we will try to equip everyone with an interesting and very useful information, or rather:
First of all, we will tell you how to prepare, because the very scrupulousness will determine how strong and reliable the foundation of the building will be.
Where to start pouring the foundation?
Before starting land work, it is worth carrying out a number of preparatory mandatory measures. Preparation for pouring a garage foundation includes:
Exquisite work
Thanks to such work, the master determines how to fill the foundation for the garage in order to avoid washing the foundation with water in the future. There is no need to try to guess on your own and decide whether drainage is needed or not, since groundwater is an unpredictable thing. Deciding to fill the foundation on your own without geological exploration, you can bring severe damage to the building in the future.
We calculate the loads on the future foundation and develop its scheme
Once you have decided on all the parameters of the building and calculated the weight of the finished structure, it will be necessary to determine how best and more practical to fill the foundation for the garage.
To do this, first of all, we select the type of base. This stage is considered the most reverent, since various options for pouring the foundation differ in their cost. Remember that by choosing the most suitable option, you can even predict all future construction costs.
We carry out markings for the future foundation
To do this, using wooden pegs and a rope, we outline the exact boundaries under the trench, since they will help to correctly fill the future garage foundation without distortions.
]]>
 ]]\u003e Digging a trench
We dig a trench, and also equip a sand cushion under the foundation.
At the bottom of the finished trench, it is necessary to lay a special filter mat.
This is done as follows: 10 cm - crushed stone, as well as 5 cm - sand, carefully tamping each layer separately.
Installing the reinforcement
This stage is the final one before pouring the foundation. As a rule, for such operations, reinforcement is used, the diameter of which is from 8 to 10 mm. It is necessary to form a grid from it, the density of which is calculated in terms of the garage.
Of course, you can make the foundation in one "sitting" with the help of assistants, especially if they have done it before. It is not recommended to fill the foundation in parts! Since the garage is a fairly small building, it is best to hire assistants who will help lay a solid and solid "foundation".
Since during the pouring of the foundation in parts, that is, without outside help and manually, joint seams are formed, they can then lead to the formation of cracks.
Indeed, this is a weak link in construction, and in general, disputes about the correct orientation of the joints (vertically, horizontally and obliquely) are still being conducted during the pouring of the foundation.
In addition, it is not recommended to pour the foundation in parts, because this can lead to a greater delay in the entire construction process.
Sometimes a prerequisite for many beginners is a week break in order to make sure the strength of each layer, but it is simply forbidden to neglect it!
If you have planned to fill the foundation on your own, then we offer you a simple garage project that will not require large expenses for developing an individual construction plan. But if your land plot requires a compact and original placement of the garage, then you simply cannot do without the advice of a qualified architect.
Filling the strip foundation
Common option for pouring a foundation: pouring a strip foundation
This type of foundation is considered the most popular foundation for those who build a garage with their own hands.
Filling the strip foundation
Other methods of pouring the foundation for a garage are used for such specific situations:
- “posts” for simple prefabricated structures.
Fill columnar foundation most often only suitable for lightweight buildings. This method is considered the cheapest, as well as the fastest in terms of construction time.
Despite the fact that this option is so accessible to many, it is not so easy to fill in such a columnar foundation, since it will be necessary to adjust the levels of each column to one, and this takes a lot of time; - "solid plateau" for heavier buildings.
Pouring a columnar foundation
Monolithic foundation
Filling technology of such monolithic foundation helps to create a truly stable and reliable “foundation”. All this is explained by the fact that such a structure will require: long time, high consumption of materials, as well as a large team of builders who will work continuously. In addition, it is worth noting that such a filling technology is complex and simply cannot be done alone.
To fill the strip foundation, as a rule, you need to use the following principle: the "sole" must support all the walls of the future garage, and also evenly distribute the load on the "box". The concrete tape firmly holds the entire not very large building on the ground, and this significantly saves money, in contrast to the solid "sole".
As a rule, the cost of pouring such a foundation becomes about 20% of the total construction budget. To reduce them, you need to have ideal technical conditions on your land plot, the soils of which allow you to build a not very deep "base".
In order to get a strong, durable and stable foundation structure in the future, it is worth choosing concrete, the technical parameters of which are suitable for such work.
What concrete is the best for casting strip foundations?
The architect for each garage project indicates the grade of concrete that will be required to fill the foundation. As a rule, for such purposes they use construction material, the strength index of which is M-200.
The main components of this classic concrete are:
Naturally, you can purchase a mixture that will be delivered to your land plot, but in order to save money, you can bring it and prepare it yourself.
If you settled on the second option, then it is worth considering that the brand of cement must be 2 times higher than the output characteristic of concrete. For this work, we select crushed stone of medium grain size, that is, from 20 to 40 mm.
So, for example, to prepare concrete with the M-200 brand, you will need cement with the M-400 brand. If the question arises, what kind of concrete to fill the garage foundation, and is there any recipe for preparing such a foundation, then we will try to answer you.
Concrete composition
The composition of concrete for pouring a garage strip foundation is expressed in such a ratio in weight as: cement: sand: crushed stone: - 1: 3: 5.
For example, if you need to get a mixture of 50 kg of cement, then this will require 150 kg of sand, as well as 250 kg of crushed stone. In this case, the required amount of water is calculated from such a ratio as cement: water and is expressed in the amount of 0.68, that is, to get 1 cubic meter. meter of concrete, you need 0.68 cubic meters. meters of water.
But it's worth remembering! The given example of the composition of concrete for pouring a garage foundation is calculated approximately, and its discrepancy with the factory mixture ranges from 10 to 15%. The exact recipe can be calculated independently if you use the comparative tables of all the necessary components (sand, cement and crushed stone).
Fill the foundation manually
So what's the best way to approach an issue like pouring a strip foundation under a garage?
To perform such work, as a rule, use removable formwork... This is a building box that forms concrete "bands", which can be easily dismantled after the sole has hardened. If the land plot on which the foundation is poured has a clayey dense soil, then in this case it is allowed to pour the strip foundation without using formwork. But this decision is very risky, and only a qualified builder can make it.
During the pouring of the foundation without formwork, the concrete can be overdried, which is unfavorable for the further construction of the garage box. This is explained by the fact that without formwork, part of the moisture from the concrete will quickly go into the ground. In this case, the best option is to lay plastic wrap around the entire perimeter of the trench.
All preparatory stages for pouring the foundation, we have already told, so let's proceed to the description important nuances completely of the whole process.
The process of laying the foundation
It is necessary to pour concrete in portions, up to a level of 40-50 cm. It is worth evenly distributing all the poured concrete around the entire perimeter of the trench until it begins to solidify.
With the help of a vibrating press or hoe, the concrete is compacted and air bubbles that have arisen are eliminated. Such works are stopped only when "milk" appears on the surface of the liquid concrete.
Since it is best to fill the entire foundation in one go, it is worth continuing to work to the required "foundation" level. After that, the surface must be carefully leveled, and as soon as the concrete grasps (in 2 - 3 hours), then it should be covered with burlap. If the weather is hot outside, then sometimes it will be necessary to moisten the concrete and cover it again from the sun. Concrete hardening should be waited for 4 to 6 weeks.
In the process of pouring the foundation, the most important thing is to properly organize the work on the entire site. In order to do everything wisely, we advise you to watch a photo or video of how the foundation is being poured by experienced craftsmen.
The choice of soil for the foundation of the house
Before you start building the foundation of a house, you must accurately determine the composition of the soil. This is especially important if you decide to build a building on the basis of a columnar foundation. To determine the composition of the soil at the construction site, they dig a hole with a depth of 0.5 to 1.5 meters, depending on the depth groundwater.
If the soil contains fine gravel, clay, coarse sand, loam, fine-grained sand, quartz or rocky rocks, then you can safely build a columnar foundation.
If the soil consists of garden soil, or liquefied marsh land, then you will have to attend to the construction of a universal strip foundation on a sand cushion.
The depth of soil freezing
When pouring, it is imperative to find out the depth of soil freezing.
The base of the foundation must be below the freezing level, otherwise in winter the structure may rise by the forces of frost heaving of the soil. However, even this measure is often not enough, the foundation can simply be pulled out of the ground, or break off the upper part from the lower one.
In order to avoid this effect, it is necessary to lay a reinforcing cage inside the foundation, and expand the base.
It is recommended to erect buildings in one season on well-freezing grounds.
In just one winter, which the foundation will stand without the pressure of the walls, the structure can be colossally damaged.
Treat the construction of the foundation with all possible attention! After all, this is the base of your building. Repairing illiterately poured foundations is a very difficult and expensive business, and sometimes even impossible.
]]\u003e http://stroysvoimirukami.ru/kak-zalit-fundament-pod-dom/]]\u003e
]]\u003e http: //ves-fundament.ru/opalubka-armatura-beton/kak-zalit-fundament-pod -...]]\u003e
]]\u003e http://www.lobzikov.ru/look_887.html]]\u003e
]]\u003e http://stranamasterov.net/tekhnologii-zalivki-fundamenta]]\u003e
The durability of the created structure depends on the reliability of the foundation. That is why, before creating the foundation, you must carefully prepare for such a process. First, it is worth determining what type of foundation should be used in a particular area. Most often, a tape base is created for the home. To understand how to choose the right foundation, it is worth considering popular options and learning about the features of creating a particular type of foundation.
The preparatory stage of creating the foundation
Strip foundations are the most popular for the following reasons:
- such a foundation can be created on almost any type of soil;
- cheapness;
- simplicity of construction bookmark;
- reliability;
- no need to use heavy equipment and a team of workers.
Before starting to create the base, it is necessary to accurately calculate the required amount of materials. It depends on the weight of the house and the type of soil. On this stage it is worth considering the cost of delivery of materials to the construction site.
During preparation, it is necessary to clear the area of \u200b\u200bdebris and mark the area. Before marking, it is necessary to accurately calculate the load on the foundation. The width and depth of the base will depend on this. For marking, it is enough to drive wedges around the perimeter of the foundation and pull a cord between them. It is important to make sure that both lines are parallel to each other.
The optimal distance between the cords is 40 cm. To be sure that the wedges are positioned accurately, it is necessary to measure the diagonals between opposite corners of the rectangle. If they are equal, it means that the tension is correct. Correctly selected dimensions will avoid unnecessary waste on material and make the base more reliable.
It is worth remembering that you should work with concrete in the summer. It is important to choose a period without rain. Before you properly fill the foundation for the house, it is worth learning about the features of common types of foundations.
Features of the pile foundation
If created pile foundation, after marking the territory, it is necessary to create holes for the foundation. For the foundation to be strong, it is necessary to dig depressions below the freezing level of the soil. It is worth remembering that after pouring, the foundation begins to settle, as a result of which cracks and other deformations may occur. But creation sand pillow avoids such problems. To do this, tamp the soil at the bottom of the hole, and then pour about 15 cm of sand. After that, it must be moistened and tamped.
It is worth remembering that to create a pile foundation, it is necessary to choose a cement grade of at least M200. In order to be sure of the reliability of the foundation, it is better to purchase material of the M400 brand. When choosing materials, special attention should be paid to the quality of the sand. It should be free of debris and large stones.
It is necessary to create a solution only in the amount required to complete the work on a certain day. When creating a pile base, the hole is first filled with a solution of about 15 cm. After that, the reinforcement cage is installed from several metal rods. They allow you to create more solid foundation.
Before choosing a foundation for a house, it is necessary to carry out geological exploration and determine which foundation will be more reliable.
Arrangement of strip foundation
Before creating a strip foundation, the marking of the territory is carried out in the same way as during the installation of piles. During the marking, it is necessary to ensure that the distance between the cords is 50-60 cm. In order to understand how to properly fill the foundation, it is necessary to consult with experienced builders in advance.
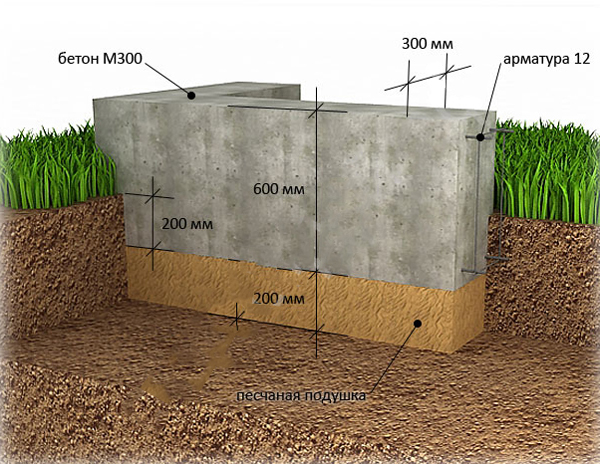
After digging trenches, it is necessary to create a sand cushion with a height of about 20 cm.It is worth remembering that it must be moistened with water and tamped well. After that, it is poured onto the sand concrete mortar... Layer thickness of this material should be approximately 15 cm. A reinforcing cage is laid on the hardened concrete, which is then poured with concrete to the ground surface.
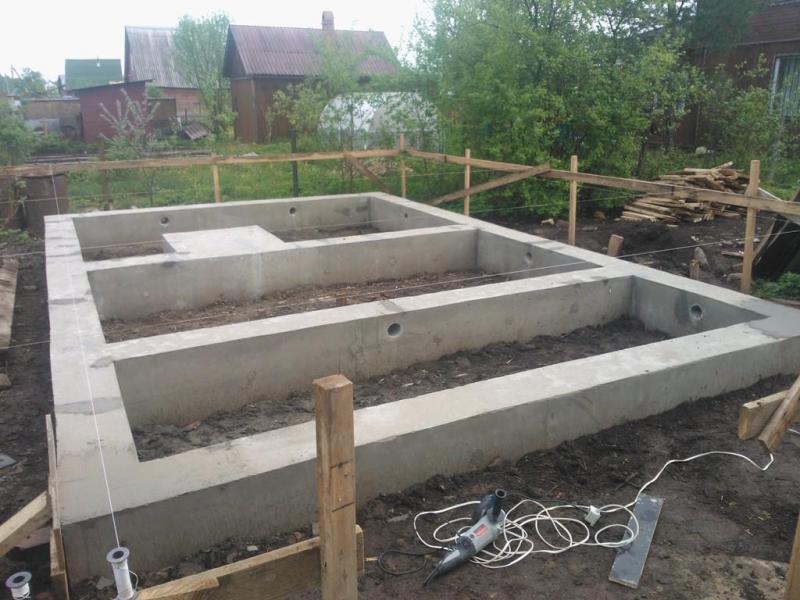
If the foundation is created above the ground, timber formwork is constructed. Removing the boards should only take place after the concrete has completely dried.
Important! Before pouring the foundation under the house, a waterproof material should be attached to the inside of the wooden boards. This will prevent the boards from absorbing moisture.
Formwork creation rules
Before you start creating formwork, you need to know about some of the features of this process. It is worth remembering that the formwork panels must be securely fixed, since they will be exposed to a large load. For this, spacers, struts and pegs are installed. To avoid common mistakes, you should follow a few basic rules:
- To prevent the foundation from skewing, it is necessary to fasten each formwork element using a building level.
- The final result is strongly influenced by the quality of the shield being created. That is why it is important to make the formwork without gaps into which the concrete solution can penetrate.
- In order for the strength of the created frame to be sufficient, you need to use boards with a thickness of at least 50 mm. In this case, spacers and pegs should be made of bars, the thickness of which is at least 50 mm. If the boards are thinner, they will begin to deform after pouring and the foundation will be uneven.
- To make the formwork more rigid, spacers and pegs should be installed at a minimum distance from each other.
- Before starting to create the formwork, you need to carefully level the soil in the trench and make all surfaces smooth.
To create wooden formwork, you do not need to have experience in creating such structures. To do this, you only need boards and nails of the appropriate length.
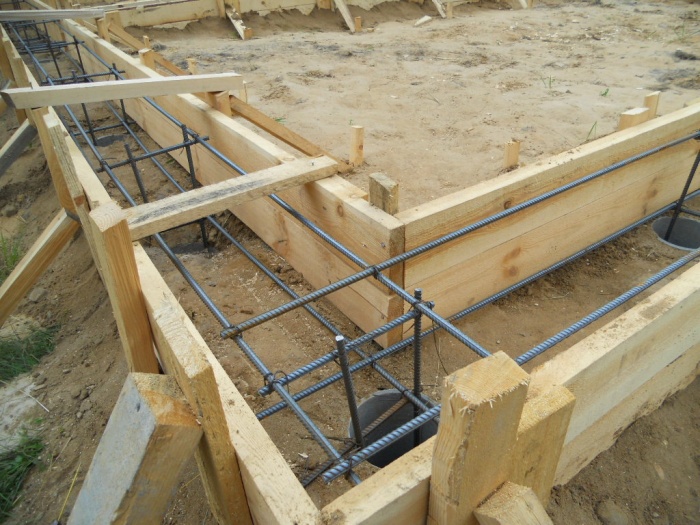
Reinforcement cage creation
The reinforced frame is made of rods of various diameters and serves as a "skeleton" of the foundation. The dimensions of the reinforced frame are created taking into account that there is a layer of concrete around it with a thickness of about 5 cm.
A frame is created by tying the rods with wire. In this case, it is important to install smooth reinforcement vertically, and relief reinforcement horizontally. After tying, the rods should form square or rectangular cells. The creation of a reinforced frame can be done in two ways:
- Inside the created trench. This option is acceptable in the absence of construction equipment. With this method of creating a reinforcing cage, only the inner or outer side of the formwork is mounted. This method is most often used when a strip foundation is created inside a pit.
- Creation of the frame outside the formwork. With this method, the frame is created at the construction site, after which it is placed inside the formwork using a truck crane.
To properly fill the foundation for concrete house, you should first consult with experienced builders. This will allow you to more accurately determine the dimensions of the base.
Concrete placement process
When laying the mortar, it is worth remembering that concreting should be done horizontally without technological breaks. During the creation of the foundation, several rules should be followed:
Conclusion
Even an inexperienced builder, subject to all the described rules, is able to create a reliable foundation for a house. To understand how to lay the foundation for your home, watch the video below. After taking into account all the recommendations described, you can make the foundation with your own hands, without overpaying for the work of experienced builders.
The most common foundation material is reinforced concrete. The structure made of a monolith becomes optimal in terms of labor intensity and cost. This method avoids the need for lifting equipment, but requires strict adherence to technology. Pouring the foundation with your own hands should begin only after a detailed study of the stages of the process.
The design and construction of a building support begins with a study of the characteristics of the soil. There are two options for accomplishing this task:
- contacting a specialized company that will perform a full-fledged geological survey with laboratory tests;
- independent study using pits or hand drilling.
The first option will allow you to determine the strength characteristics of the soil most accurately. Before pouring the foundation multi-storey building such an event is mandatory. For buildings with a low degree of responsibility and private structures, you can study the soil visually using GOST 25100-2011 “Soils. Classification ”” determine its type. Based on which group the base belongs to, its approximate strength is assigned. The method is not very accurate, but it can be used to save money.
Marking the axes and dimensions of the structure
An important stage that affects all other building structures. If you make a mistake in marking the foundation, the distance between the walls will change. This is especially critical if prefabricated elements are used for walls and floors. The markup is competently performed using the following technology:
- removal of the fertile soil layer, which is from 30 cm;
- the designation of the first side of the house (most often it is marked parallel to the front border of the site or fence);
- then mark the points on the first side, which will be the corners of the house;
- right angles are built from the marks using the method of the Egyptian triangle; all walls and corners of the structure are designated using the same technique.
Layout of the foundation using outlines.
The foundation marking can be done using pegs or a full-fledged raffle made of vertical posts and horizontal jumpers. The elements are installed at some distance from the axes of the building so that they do not interfere with the work when cutting trenches or excavations. After the completion of the earthwork, a thread or cord is fixed on the wooden markings, which will indicate the contours of the supporting structure of the house.
It is important to control the following points related to geometry:
- compliance of the design lengths of the sides with the actual ones;
- the equality of the diagonals of structures having a rectangular or square shape in plan (a deviation of no more than 20 mm is allowed), the coincidence of the diagonals means that all the corners of the rectangle are equal to 90 °.
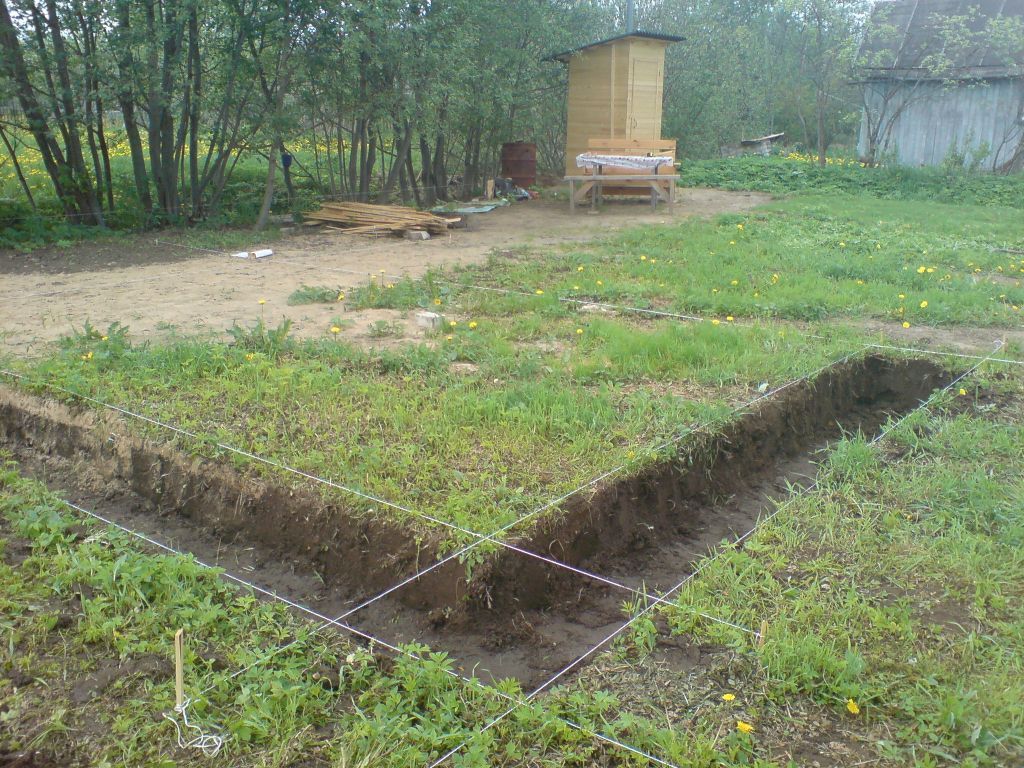
Soil excavation and cushion laying
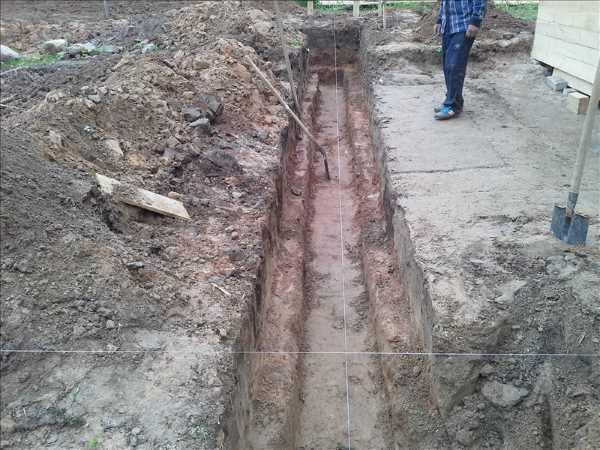
The most difficult earthworks are if the foundation is poured with your own hands using tape technology. In order to dig a trench or foundation pit yourself (if there is a basement), in this case, sufficiently large deepenings into the ground will be required. In this case, the following recommendations should be observed:
- The width of the trench is assigned 0.8-1 meter greater than the width of the foundation to provide access to the structure when performing waterproofing and insulation.
- It is important to correctly unfasten the walls of the pit or trench. If this moment is missed, filling work can become dangerous to life and health. This is especially true when constructing buried foundations. The maximum height of a trench with vertical walls without reinforcement depends on the type of soil. More details are provided in the table below.
- It is also important to consider the angle of internal soil friction (natural slope). When constructing from the bottom of the pit an angle equal to this value, it turns out minimum distance, on which it is allowed to install massive equipment or store materials.
After fragments of a pit or trenches, they consider the need for bedding under the sole. According to SP 50-101-2004, it can be made of sand (medium or coarse), sand and gravel mixture or gravel. Before pouring the foundation, it is worth laying the bedding in the following cases:
- deepening below freezing with heaving soil;
- the presence of a bulk layer (it is replaced with a more durable material).
In other cases, there is no urgent need to lay the substrate. In general, bedding has two functions:
- leveling the base under the base of the foundation;
- prevents the rise of capillary moisture to the structure.
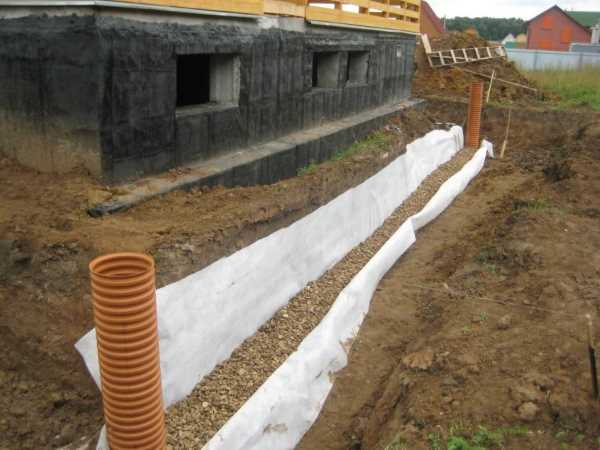
This element is necessary to remove excess moisture from the supporting part of the house. It is carried out even with a low level of groundwater to prevent troubles when raising liquid in the spring or with a large amount of precipitation. Drainage pipes should be laid with the following recommendations:
- deepening relative to the base of the foundation by 30-50 cm;
- the distance from the foundation of the house is not more than 1 m;
- the slope of the pipes in one direction is taken equal to 3-4 degrees in order for the liquid to move by gravity;
- to prevent siltation, crushed stone laid around the pipes is wrapped with a layer of geotextile with an overlap of 30 cm.
Formwork works
Formwork for pouring concrete according to GOST R 52085-2003 is classified according to the following criteria:
- design;
- materials;
- turnover (reusability);
- the ability to use at various ambient temperatures;
- impact on the concrete mix.

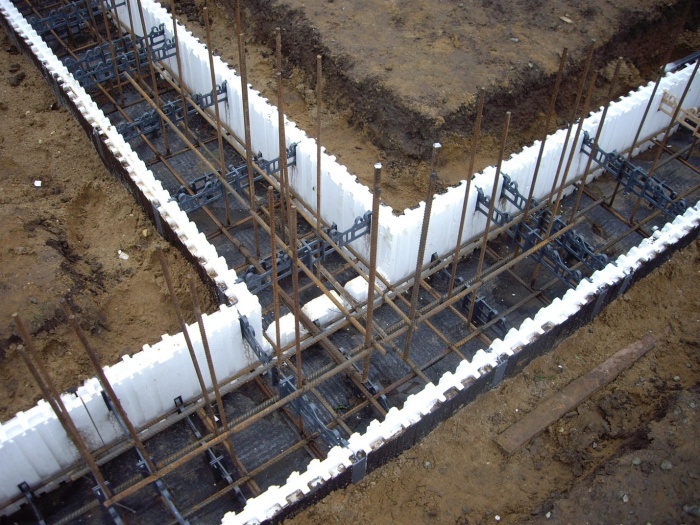
In addition, the pouring mold can be removable and. One of the most common removable options is wooden, of the non-removable, expanded polystyrene is most often used. It is also possible to manufacture from materials such as metal, plastic, foam concrete, moisture resistant plywood.
When installing the formwork, it is required to control:
- accuracy of geometric dimensions and installation;
- the stability of the shields;
- tightness (seams no more than 2 mm).
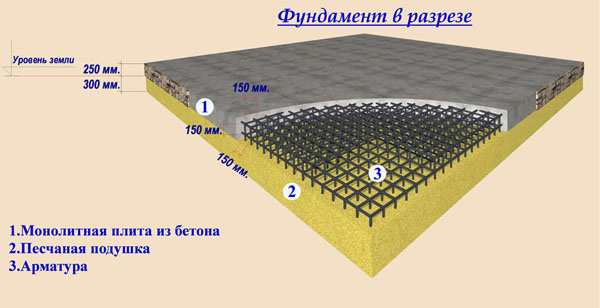
Reinforcement placement is necessary to increase the structure's ability to resist bending loads. Reinforcement of strip and columnar bases is performed with spatial frames. Meshes are used for the slab. With a structure thickness of more than 150 mm, the nets are laid in two layers. The following are the main recommendations for reinforcement:
- calculation for a private house can be performed in a simplified form, assigning the total area of \u200b\u200bthe rods depending on the cross section of the structure, the minimum diameters differ for different types and the size of the foundation, therefore, this issue requires separate consideration;
- for the manufacture of frames and meshes, reinforcement of a strength class of at least A400 can be used, but the use of rods A500 and higher is not economically justified;
- it is important to observe protective layers of concrete, in general it is worth remembering the following numbers: foundations without concrete preparation - 70 mm, with concrete preparation - 40 mm;
- in the corners, reinforcement should be provided, usually the step of the transverse horizontal and vertical reinforcement is halved, and the main reinforcement is reinforced with P or L shaped clamps.
After installing the formwork and reinforcement cage, they begin to fill with concrete. As recommendations on how to properly fill the foundation for a house, the following can be cited:
- Filling is performed in one step. Breaks are allowed only during the setting period of the mortar, which depends on the type of binder and weather conditions. On average, a break is allowed for 1-2 hours.
- It is best to work at a temperature of 20 ° C. At lower values, the material curing period increases. When the temperature rises to 30 ° C, the concrete characteristics may deteriorate. It is important that there is no dry weather during the filling, since a high-quality filling requires an air humidity of about 80%. Also, do not perform work in the rain if it started in the process of work using plastic wrap. It is laid immediately after pouring.
- The formwork is filled so that 2-5 cm remain from the upper edge of its boards to the level of the mortar.
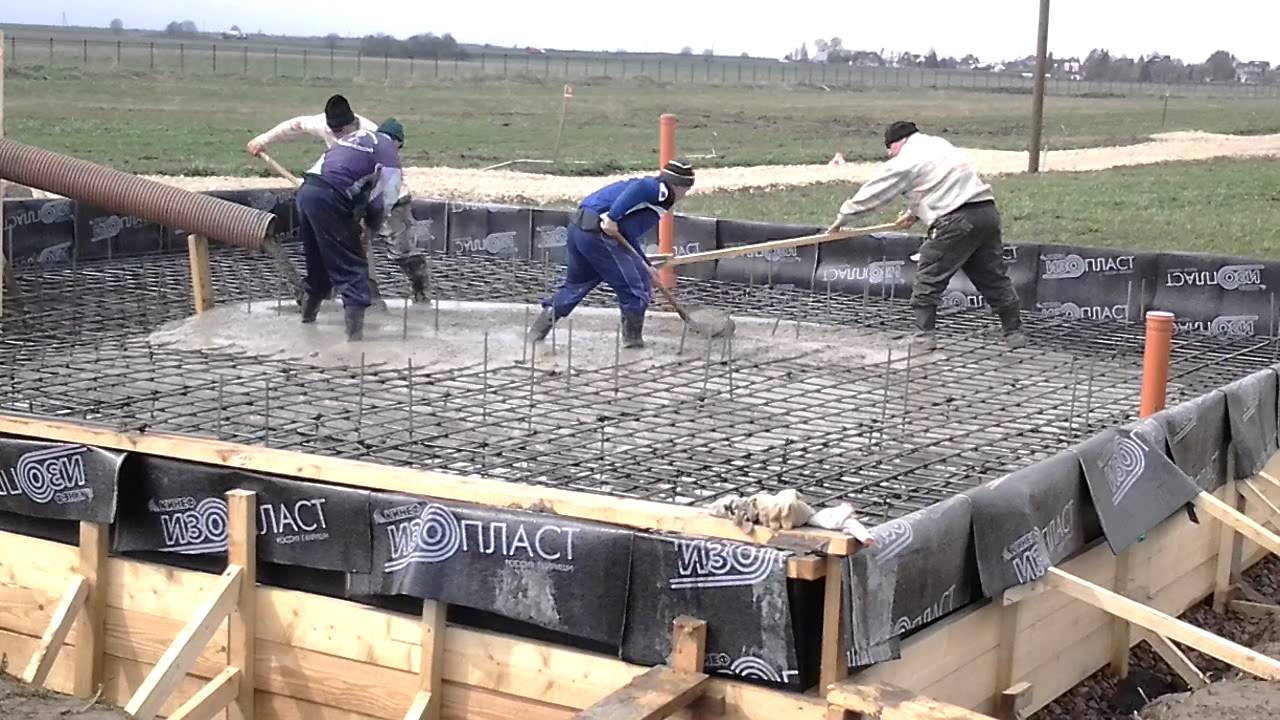
- Liquid concrete is poured by moving the mixer from point to point. Pouring from one point followed by manual movement reduces the quality of the material.
- The concrete mix must not be dropped from a height of more than 2m.
- After pouring, a thorough compaction of the solution is performed using deep vibrators. This tool provides a seal to a depth equal to 1.25 times the length of the tip. It is recommended to first pour the mixture into the formwork to a height of 60 cm, then compact it and pour another 60 cm. The operation is repeated until the design level is reached. In this case, it is important that all stages take place before the end of the setting of the previous layer.
Concrete maintenance and formwork removal
Recommendations on how to properly pour the foundation under the house are not limited to laying the mixture. The process of gaining brand strength will take an average of 28 days. During the first weeks of the structure, maintenance will be required to prevent the appearance of cracks on the surface. The first stage is covering it with plastic wrap, tarpaulin or burlap, which will not allow moisture to evaporate too quickly.
- in the daytime, humidification is carried out every 2-3 hours;
- during the night, it is enough to perform the operation 1-2 times.
Formwork according to SP 70.13330 can be removed only after the concrete has gained 70% strength. When justified, it is allowed to perform work at 50% of the brand value. The time taken for this process depends on the outside temperature. Concrete on a normally hardening binder gains the required strength at a temperature of 20 ° C in 5-7 days, at 10 ° C in 28 days, and at lower temperatures the process slows down significantly.
Read more about demoulding.
backfilling
When manufacturing a strip or columnar foundation, less often a slab foundation, it is required to backfill the sinuses of a pit or trench after removing the formwork. It is important to observe the following principles:
- the start of work is carried out only after the soil reaches optimal moisture content;
- for backfill, soil is used that is denser and with better strength characteristics in comparison with the extracted one (coarse sand is often used);
- the work is performed in layers, the maximum thickness of the material at each stage is 30 cm;
- each layer must be compacted before laying the next;
- backfill material should not contain foreign components, organic inclusions.
Compliance with the technology at all stages of pouring concrete will allow you to get a reliable and durable structure that will last for many years.
Advice! If you need contractors, there is a very convenient service for their selection. Just send in the form below a detailed description of the work that needs to be performed and you will receive offers with prices from construction teams and firms by mail. You can see reviews about each of them and photos with examples of work. It is FREE and non-binding.
Self-pouring the foundation for the house does not present any difficulties, even someone who has never encountered construction before can handle it. To do this, it is enough to observe the order and sequence of all stages of laying any foundation, which we will talk about in this article.
Everyone has probably heard the phrase “They don’t save money on the foundation!”. So I will say with great confidence that you can save money on pouring the foundation for a house, of course, within reasonable limits, and later in this article I will tell you how.
The very process of laying any foundation involves several stages:
In this article, I will tell you in detail and step by step about pouring the most popular today - strip foundation and about the distinctive features of the stages of pouring other types.
Filling the foundation with your own hands
There are several types strip foundations, but the do-it-yourself pouring technology is almost the same for everyone.
Sand bed-pillow under the foundation.
 Sand cushion under the base of the foundation.
 The foundation pillow is made of washed sand, without various admixtures of clay, etc.
Sand, in contrast to the soil in which the foundation is laid, is much less prone to heaving and will evenly distribute water under the foundation, which will eliminate uneven shrinkage of the foundation.
Sand is poured into a trench and rammed. The layer of such a sand cushion should be at least 20 cm.
If you do not have special devices for tamping sand, then you must at least spill it well with water before pouring it.
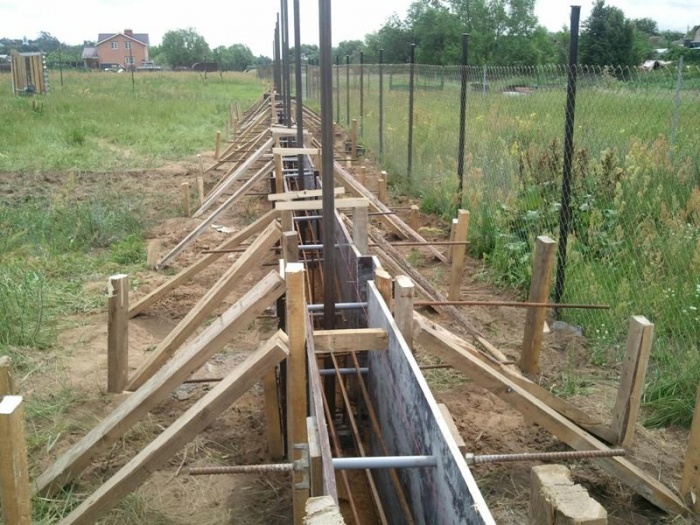
We construct the formwork and reinforce the future foundation.
 We construct formwork under the foundation and reinforce the future foundation.
 For the reinforcement cage, reinforcement with a diameter of 8-14 mm is used, and in order to more accurately determine the diameter and amount of reinforcement, you can use the calculation of reinforcement for a strip foundation. With it, you will select the correct diameter and amount of reinforcement for your foundation.
As a rule, vertically laid rods with a diameter of 8-10 mm, and horizontal longitudinal rods 12-14 mm. The rods along the trench are always thicker, because they will be subject to a large load, and they, in turn, must cope with it.
In what way to knit the reinforcing cage, in a trench or next to a trench, and then lower the finished frame into it, you must decide for yourself how it will be more convenient for you. The disadvantage of knitting reinforcement in a trench is that if the trench is not wide enough, you will sprinkle it with your body.
Use a thick knitting wire to connect a one-piece rebar. For good softness, the steel wire can be kept on fire for about 30 minutes and allowed to cool. After that, it will become softer.
Formwork for the foundation, if necessary, is constructed using boards, 10-20 cm wide, and 2.5-4.0 cm thick.
When constructing the formwork, it is necessary to exclude large holes in the formwork, and rigidly fix it. Opposite formwork panels must be tied together with studs, thus preventing the formwork from expanding when pouring concrete.
The corners of the formwork must also be rigidly fixed, because these are the weakest points.
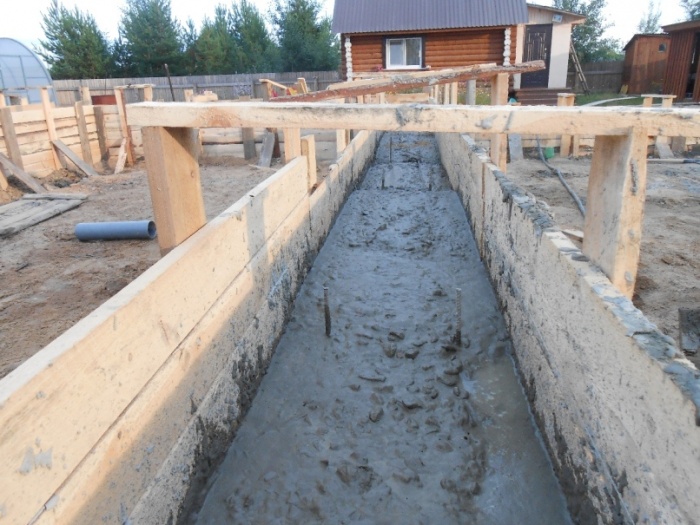
We fill the future foundation with concrete.
 We fill the foundation with high-quality concrete.
 Pouring concrete for any type of foundation is the same. As a rule, for large volumes, purchased concrete is poured, since a monolithic reinforced concrete tape can be achieved only if the foundation is poured at a time.
And so, everyone preparatory work spent, now it is necessary to pour concrete into the future foundation for the house.
For pouring, concrete of the M200 - M400 brand is used, which depends on the composition of the concrete.
Pouring concrete into a trench always starts from the corners, and then the rest of the voids are filled.
The ideal conditions for pouring the foundation under the house is the automatic mixer access to all corners of the house.
The mixer drives up to the corner and the pouring process begins. At this time, one person should hold the gutter, guiding it, and the other (preferably two) - help the concrete evenly spread over the trench using a shovel, for example.
In order to expel air from the concrete, it is necessary to use a deep vibrator, if there is none, then it is necessary to vibrate using improvised methods. You can vibrate with a bayonet shovel, this vibration is called the bayonet method. A good result can be obtained by tapping with a hammer on the reinforcement frame, or on the formwork (not much!).
After the trench is filled with concrete, it is necessary to trim the concrete in the right places before the concrete has “set”. After the concrete began to "crumble", it is not advisable to touch it.
As I said, it will not be difficult to pour the foundation under the house, at this stage we examined in detail the filling of the strip foundation, the stages of which in most cases are suitable for filling any type of foundation.
Important points in building a foundation for a house.
A distinctive feature of the columnar foundation is that the foundation does not consist of a monolithic tape, but of pillars that are connected with a monolithic tape.
In this regard, after the marking, the pillars are drilled using an auto-drill or a manual drill, the pillars are reinforced with reinforcement with a diameter of 10-12 mm, with the release of reinforcement 15-20 cm above the level of the post.
After pouring the pillars, a formwork for the grillage is constructed, connecting all the pillars, a reinforcing cage is created and concrete is poured into the formwork.
It should be recalled that the columnar foundation is constructed for light structures and in "good" soil.
Distinctive feature monolithic slab is that such a slab is located under the entire structure, and not just under the walls of the house.
In general, it's not a complicated process with your own hands, but it requires a responsible approach, and I believe that it can be transferred to a separate article.
One of the types of a monolithic slab is a slab foundation with stiffeners; the technology of pouring this type of foundation is not much different from the usual one.
The markings are made around the perimeter of the house, then the soil is removed under the future house, to the depth of the future slab + the thickness of the sand cushion.
Then you need to build a sand or sand and gravel cushion, followed by tamping.
The reinforcing frame is knitted in two rows in the form of a mesh.
Filling occurs in much the same way as with any other type of foundation.
Depending on the use of your own labor, you can fill the foundation in three ways:
- Lay the foundation yourself, using only your own labor. This, of course, is a laborious process, but not so much that you cannot cope with it yourself. Ideally, 2-3 people will handle all stages without much effort.
- Use partially someone else's labor for some stages of pouring the foundation. This method is most common when building houses on your own, it involves the use of hired workers at especially difficult stages of work. This will save on your own labor, but in financial terms it will be a little more expensive.
- Entrust the pouring of the foundation for the house to professional workers. This is the most expensive method of pouring, but in this case, you will not have to do anything except come to the site and control the process of laying the foundation, because even professionals sometimes do not adhere to a strict technology for their own benefit.
- If you hire workers to perform certain stages of pouring the foundation for a house, then you should take into account that the most expensive stage is digging the soil and pouring concrete. If we talk about digging, then it's up to you, this is a laborious process and whether it is worth saving on it. Well, on filling the foundation, you can save a decent amount if you invite a friend to help. In fact, pouring concrete is a messy, but not very complicated process, which two or three people can easily cope with in half a day, saving about 500 rubles on this. with a cube of concrete.
- On a strip foundation, you can save on deepening, if you do not have a heavy and small house (for example, a wooden one), then you can make a shallow strip foundation instead of a recessed one.
- On slab foundation you can save money by making it thinner, but with stiffening ribs. I talked about the slab foundation with stiffeners in my previous articles.
- When laying a columnar foundation, you can only save on labor, because it is already the least stable in comparison with its counterparts.
- In some cases, fiberglass reinforcement and its use will save a little on the foundation.
Independent foundation construction is subject to even novice builders. The key to success is the strict observance of all basic requirements, from the creation of the project to the arrangement of the blind area.
The base for the structure is one of the most important structural elements, the quality of which will ensure a fairly long service life of the structure. You can often hear that saving is not worth it. Today we'll talk about how to make the right foundation for a house and at the same time reduce costs, of course, within reasonable limits.
 Exists different types grounds, but any of them has certain stages of arrangement.
We note that the construction of foundations can be performed according to the following algorithm:
- Preliminary preparation of the site and drawing markings on it.
- Arrangement of trenches or recesses for supports.
- Providing a pillow for the base of the house
- Carrying out the reinforcement process.
- Pouring with concrete mixture.
Each type of foundation is good in its own way in certain conditions. When deciding which foundation to choose for your house, we pay attention to the geological conditions and the expected load.
Today we will focus on the most common type - strip concrete foundations.
They are suitable for almost any type of soil and are capable of withstanding considerable loads.
Technology of arranging the foundation for the house
 It is easier to fill an unburied foundation than a shallow one
Strip foundations are buried and shallow. The first is laid to a depth below the level of soil freezing. The technology for pouring an unburied foundation is a little simpler, but the algorithm for performing the work is similar.
Preparatory work
- clearing the site from all kinds of debris and excess vegetation;
- leveling the construction site by removing part of the fertile soil;
- marking in accordance with the project.
To make accurate markings, we stock up on such devices as a measuring tape, stakes and a rope.
 Drive the first stakes into the corners of the house.
 We start by marking the outer wall. First of all, we hammer the stakes in the outer corners of the future house. As a result, we get a shape - a rectangle.
To make sure that the process is carried out correctly, we check the lengths of its opposite sides and diagonals. They must be equal in pairs. Otherwise, by moving the stakes, we achieve the desired result.
It must be remembered that the more accurately it is done, the less difficulties will arise when performing further work.
Trench arrangement
 It is cheaper and easier to dig a trench by hand
 There are two ways to prepare a trench for a strip foundation: using technology and manually. Of course, using an excavator, the trench can be prepared faster and cheaper. But some nuances should be taken into account: the boundaries of the trench will be uneven, and much more concrete will be needed during pouring. It is clear that there is no need to talk about saving.
Arranging the trench manually with your own hands or with the help of hired workers will provide its clear boundaries and the required width. In the future, the amount of concrete mix will be consumed according to the project. This will help to accurately determine the volume of ready-made concrete when purchasing it.
We provide a sand pillow
 For a sand cushion, use sifted clean sand
 The sand cushion helps to more evenly distribute the load of the structure on the ground, therefore, experts do not recommend excluding this process from the general sequence of actions.
It is best if the pillow is made of clean sand that does not contain excess clay impurities. The sand does not have the property of heaving, which allows to reduce the soil pressure on the sole of the base. Also, water does not stagnate in it, but is equally distributed over its entire surface. All of this will provide a more uniform.
When arranging a sand cushion, a layer of sand is poured into a trench 20 cm thick and compacted simultaneously with pouring.
Reinforcement process
 Bar diameter depends on the planned loads
 We make a solid foundation for the house. This property can be ensured by the process of reinforcing the tape with reinforcing rods. For reinforcing the strip base, steel reinforcing bars of various diametrical sections are used.
The cross-sectional dimensions of the bars depend on the expected load. Typically, fittings are purchased by weight. Understand the required amount purchase of rods depending on their cross-section will help this table.
Usually, rods that are installed vertically are used with a smaller section than those that are laid horizontally. So, for example, if the vertical rods have a diametrical section of 8 - 10 mm, then the horizontal ones are 12 - 14 mm. For more information on reinforcement, see this video:
This feature is explained by the fact that more load is applied to the horizontal part of the reinforcing cage.
It is better to knit a reinforcing cage on the surface, and not in the trench itself. This will make the process much easier and prevent the trench from shattering.
Experts recommend knitting rods using a special soft wire. The use of welding is not encouraged, since the joints are not strong due to the burning of the crystal lattices, and during the subsidence of the soil, they may be disturbed.
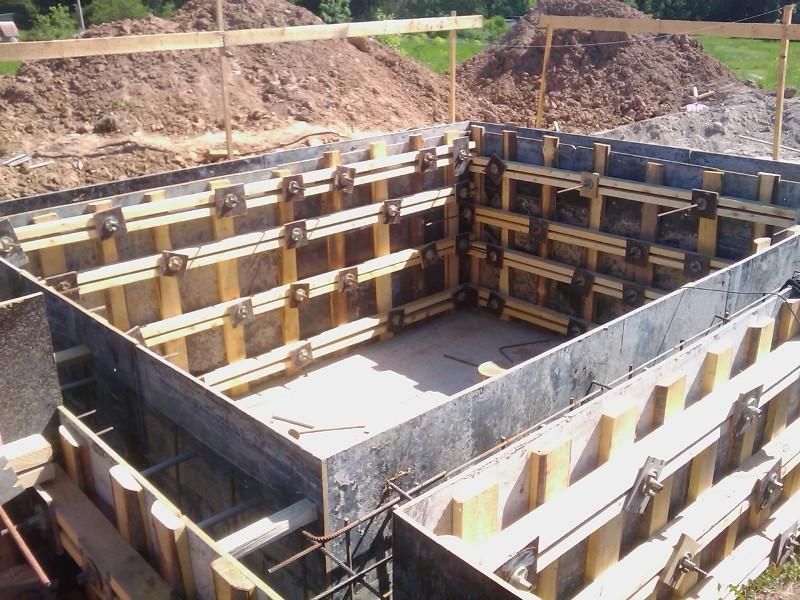 To give the strip foundation the correct shape and ensure its elevation at a certain height above the ground, formwork must be installed.
Most often, it is assembled from wooden boards, the width of which is up to 20 cm, and the thickness is from 2.5 cm to 4 cm, depending on the height at which the concrete foundation will be built.
 When installing the formwork, we follow the following nuances:
- The boards should fit together as tightly as possible.
- The opposite walls of the formwork are connected with each other by special crossbars.
- From the outside, the walls are supported by supports, which ensure the rigidity of the structure.
It should be remembered that the most problematic places in the formwork are the corners, therefore we pay special attention to the corner fixings of the base.
Pouring with concrete
Pouring the foundation under the house with concrete is a very crucial moment. It is best to purchase ready-made concrete for this purpose. It has a uniform consistency and is less time-consuming, which prevents the formation of concrete joints. Only in this case, the installation of a monolithic foundation will be at a high level. But for this it is necessary to provide free access of transport to construction site... For all the details of the process, see this video:
If you decide to prepare concrete yourself, then we will try to tell you in detail how to fill the foundation under the house correctly. We start by determining the grade of concrete. For this, concrete mix M-200 - M-400 is suitable.
It is necessary to start pouring the concrete foundation from the corners and only then fill the rest of the resulting voids.
In order for the work to be argued, and the strip foundation for the future house was poured in the shortest possible time, it is necessary to ensure the free movement of the concrete mixer to any point on the construction site.
When pouring, the concrete is spread in parallel using a shovel, and then, using a deep vibrator, we compact the concrete mixture.
How to fill the foundation for a house in private construction in the absence of a vibrator? Its functions can be performed using a bayonet shovel. It is necessary to constantly carry out bayonetting and gently tap on the reinforcing frame. These simple steps will also help spread the concrete evenly. For information on how concrete is poured into a trench without formwork, see this useful video:
As you can see, pouring a concrete foundation is not difficult, but nevertheless, special attention should be paid to the method of distributing concrete along the foundation trench for the house. Concreting the base is completed by carefully leveling the surface.
 The concrete should be poured into the trench continuously
 After that, let the foundation settle. This will take at least a month. Unforgettable watering it constantly. This will prevent cracking of its surface.
So, how to make a foundation for a house is clear from the recommendations presented in this article. It is only necessary to correctly assess the situation, decide on the project and strictly adhere to the order of the stages.


