In our time, with the advent of new building materials, there are many opportunities for the repair and construction of apartments and houses. Most citizens are faced with many materials and methods of construction and repair for the first time. And if some types of work do not correspond to their name at all, for example, "floating floors" are not floating, unlike them, self-leveling floors are in fact self-leveling.
They got their name from the way they were constructed. Initially, the liquid mass is poured on the basis of the future floor and leveled. What is the advantage of this type of flooring and is it possible to arrange self-leveling floor?
The use of self-leveling floors
First of all, you need to figure out why we need it and what we expect from the self-leveling floor? Naturally, from the bulk, like any other floor, we first of all expect strength and evenness. With regard to this, self-leveling floors are the absolute record holder. It's all about the ordinary laws of physics. Any liquid tends to fill the hollow holes and, if sufficient, forms a completely flat and smooth surface. This is achieved even without the use of special measuring devices, this method is called self-leveling.
Types of self-leveling floors
Let's try to arrange self-leveling floor... If you thought that it is possible to arrange a self-leveling floor with your own hands by simply pouring liquid onto the surface, then this is not so. First of all, you need to prepare. To do this, you need to understand that there are several types of self-leveling floors. The first self-leveling floors perform the function of leveling and are subsequently covered with additional decorative materials (linoleum, laminate, etc.). Others, in addition to alignment, also perform a decorative function.

As in any work, the first step is to prepare the appropriate tool:
- We need a container for the solution. The volume of the container can be approximately calculated based on the area of \u200b\u200bthe filled space. We make an approximate calculation based on two liters of solution per one square meter area. Well, this calculation is approximate, everything will depend on the quality of the poured surface. For one, a couple of millimeters will be enough, while for the other it will take much more. A capacity of 30 liters is enough for 15 m2.
- Electric drill with a special nozzle for stirring the solution. Of course, you can do this manually, but the quality of the solution will deteriorate from this and it will take much more time.
- Large trowel for leveling mortar.
- A special roller with a long handle for rolling the surface of the mortar in order to level and remove air bubbles.
- Special footwear (paint shoes). This shoe has a special sole with protruding high spikes. It is convenient to walk in it on the flooded surface, without fear of disrupting its structure. In principle, you can do without it, but in this case, if necessary, you will not be able to walk along the flooded surface in order to get to a certain place for additional refinement, this is worth remembering.
Surface preparation
Let's start with leveling floors. The first step is to prepare the surface. If there is already a decorative coating on the floor, remove it. The next step is surface cleaning. It is necessary to remove all existing greasy stains, as they contribute to the flaking of the self-leveling floor. You can apply special cleaning compounds. We carefully inspect the surface and, if necessary, clean out all protruding large irregularities. Now you need to clean the surface from dust. A regular brush will not be enough; a vacuum cleaner is required. After that, we carefully inspect the surface again and, if required, smooth out the irregularities. The floor is ready for pouring.
Surface priming
The next step is surface treatment with a primer. A special primer can be purchased at hardware stores. If our surface is concrete base, the soil composition must correspond to it. Treatment with a primer will provide additional adhesion of the self-leveling floor to the surface and prevent flaking in certain areas.
Solution preparation. Start filling
If the floor has large depressions and potholes, a special mortar based on cement and additives for leveling will be required. With this composition, large irregularities can be smoothed out. When choosing it, read the manufacturer's instructions for the maximum thickness of the mortar used. We pour the solution into a container and dilute it with water in the proportions indicated in the instructions. Using a drill equipped with a special nozzle, stir the solution. Now all the resulting mass must be poured onto the filled area. You need to start from the farthest wall from the exit from the room.

You can use special beacons, but if they are not there, we do the work without them. We level the resulting solution with a special spatula. When the entire area in the room is filled, we proceed to work with the roller. This is where the long handle of the roller will come in handy. Rolling the resulting surface with a roller, we will achieve alignment. A simple law of physics. Secondly, this will get rid of air bubbles formed in the solution. You need to roll the entire surface very carefully.
Using a "leveling" solution
The surface is ready and it takes time to set. Here we will also use the recommendations of the manufacturer. Before pouring, the entire perimeter of the room can be pasted over with a special damper gasket, like the one used to fill the floor cement screed... But you can do without it. After the self-leveling floor has dried you can make additional filling using a self-leveling floor. This self-leveling floor is a very liquid mass capable of completely removing the slightest errors without the use of special measuring instruments... Typically, the thickness of such a coating is from one to four millimeters. When pouring such a mixture, you just have to roll it with a roller to remove air, and it will even out itself, under the influence of gravity.
Drying time of a self-leveling floor depends on its composition, layer thickness and ambient temperature. All this can be found out by reading the instructions attached to this mixture. The only thing that is required of you is to prevent self-leveling floors from sudden temperature fluctuations and drafts at the time of their solidification.
Final finishing
Our floor is ready. You can be sure of its absolute evenness. The next stage is the installation of the decorative coating of your choice.
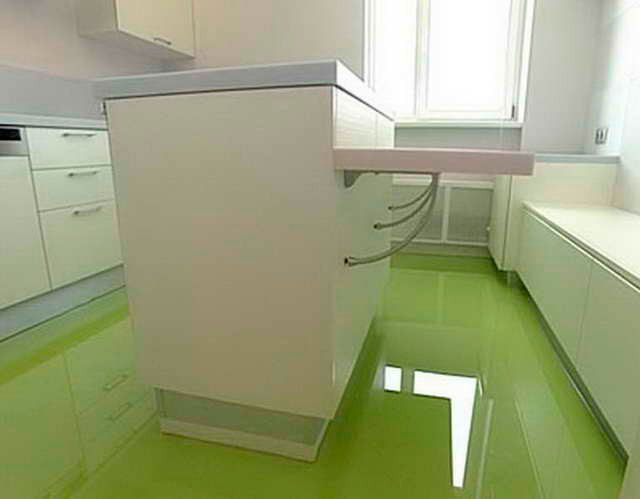
Self-leveling floors, performing both leveling and decorative properties, have become increasingly popular. By using special lighting, amazing results can be achieved.

How it's done? For this, special liquid mixtures are used. The work starts with the same cleaning of the poured surface. Everything should be done exactly as mentioned earlier. The main thing is to decide right away what gender we need. Here you can show all the riot of imagination. The possibilities are truly endless.
Self-leveling floors with a pattern
For example, we want a floor of a certain color. To do this, you need to purchase the appropriate coloring color. Since it is difficult to dilute a solution of the same shade every time, it is required to make the entire batch completely. We carry out all the filling work as in the first case. Our floor is dry, for example, it is white. Now it can be easily painted according to our idea. You can simply apply a stencil with a specific pattern. With the right artistic skills, you can achieve truly amazing results. You can paint the floor, to match the pattern or shade of your furniture. The possibilities are endless. After completing the artistic part of the work, the entire surface is covered with a special protective coating. The covering principle is identical to the self-leveling floor. Usually such compositions are included. Protective composition is transparent and your drawings and patterns will be clearly visible.
Using a printed image. Water surface
Another way is to use a printed image. For example, we need a view of the water surface. We measure the room and order the image we like from the nearest printing house. The image size should be slightly larger than the room size. We can always cut off the extra parts, but we will hardly be able to join the missing fragments without losing the quality of the view. The image is placed on a flooded base, sticking it is no more difficult than wallpaper, after which it is filled with a protective coating. Thus, we get a floor that mimics water surface... The shine of the protective coating will enhance the effect of the aquatic environment, and the appropriate decoration of the room and the lighting will give it a unique and memorable look.

Application of the material. Oriental tale
Have you dreamed of having a 1000-style room with a floor decorated with unthinkable colorful patterns and one night? It's not very difficult. Just purchase material painted with different patterns. You can combine and create compositions as you like. The main thing is that the material is well smoothed and lies flat on the base. By filling it with a protective coating you will get all your dreams. Be sure that your floor is the only one of its kind and there is simply no other such in the world.
Using various materials at hand for self-leveling floor
Other materials can be used. For example, small pebbles, pebbles, grainy river sand and just ordinary hay or straw. Properly laid out, they will create a unique look and atmosphere in the room. You can use a mosaic made of broken ceramic tiles of different colors. With skill and imagination, you can create various pictures, types or just patterns. Using a high quality image of the seashore with the sea and the beach, add real sand. You will simply be amazed at the effect you get. If you use the continuation of the picture on the wall, with appropriate lighting, the 3D effect is ensured.
Of course, it will take a lot of imagination and patience to achieve the desired effect. But everything will more than pay off with the beauty and originality of the self-leveling floor with your own hands.
Correct mixture selection
By choosing mixtures for self-leveling floor, read the instructions carefully. After all, there are mixtures capable of hardening in a matter of minutes. Mixtures are also divided by the type of application to a certain type of surface. One mixture is used on a concrete base, and another on wooden floors. As mentioned earlier, there are mixes for different fill thicknesses. There are mixtures designed for filling with a two mm layer, and there are mixtures for filling with a 40 mm layer. All this must be taken into account in order to purchase one or another type of mixture.
It is also required to calculate your own strength and this is why, for example, you use a fast-setting coating. If the area of \u200b\u200bthe room is large enough and it is impossible for you to immediately dilute the entire solution at once, you will need an assistant. While you level the first batch, he will prepare the second. Thus, working on the principle of a conveyor, you can easily cope with such work as a self-leveling floor.
(foto - zalivka)
Caution! Fakes
Also consider your own capabilities. There are mixtures that will be very difficult for a beginner to cope with. Consult with experts, in large trading companies there are sure to be competent sellers - consultants. Another important fact is the large presence of counterfeit building mixtures. Therefore, beware of purchasing materials from random or untrustworthy locations. The desire will save money, it can turn into a rework of all the work performed with a loss of time and wasted funds.
Using the above recommendations, personal experience, imagination, patience and the main desire, we can say with confidence that such work as self-leveling floor on the shoulder. The reward for your efforts will be the gratitude of the household and the genuine delight, amazement of your guests.
Online video on how to make self-leveling floors with your own hands
The self-leveling floor in the apartment is a relatively young development, which has already found many fans and has become very popular. Particular attention is drawn to three-dimensional self-leveling floors, which can contain a 3D image with an interesting effect. In short, polymer self-leveling floors for the home are a group of materials that are applied to the concrete base of the floor, thereby becoming not only protective, but also decorative layer the floor itself. Surely you are interested in this technology and have already thought about how to equip a bulk polymer floor in your home. This guide will help you understand what self-leveling floors for a home are and how they are made.
Classification of self-leveling floors for the home
The well-known variety of self-leveling floors for houses and apartments can be classified by the number of components:
- One-component floors. Such polymer floors for an apartment are a one-color coating, used in most cases as a basis for laying a layer of decorative material - it can be stone, parquet board or linoleum. One-component self-leveling floor is thin enough and dries quickly without bumps, seams and cracks. Sometimes these breakwaters can act as a separate cover.
- Two-component floors. More interesting polymer floors in the apartment, which contain not only the layer on which they are laid decorative elements, but also a layer with a picture - it acquires the properties of a three-dimensional image at a certain angle. Such floors are expensive, but they look very nice and stylish.
In the event that the floor surface during the arrangement has large protrusions and differences in height, thicker layers of polymer floor can be used to level the base - for this, a certain amount of quartz sand is added to the liquid components of the floor. This intervention increases the drying time of the floor to 5 - 7 days.
What is the composition of polymer self-leveling floors?
The above classification of polymer floors is not the only one. They can also be divided by material:
- Polyurethane. Such floors have a good impact resistance. Visually, the composition of such a floor resembles a thick oil paint. As a rule, a polyurethane self-leveling floor is installed in corridors, halls and other rooms in which there is an increased load and intense friction of the coating.
- Epoxy. Organic two-component floors, which are perfect for rooms with high levels of humidity - often such decorative floors in an apartment are installed in the bathroom and in the kitchen. Such floors are the most common of all polymeric coatings and are characterized by low cost.
- Methyl methacrylate. The best solution for rooms without heating in winter.
- Epoxy-urethane. Due to their high strength and wear resistance, they are well suited for crowded places.
The material for the self-leveling floor should be selected not by cost, but primarily by the type of task being performed. Obviously, for crowded places, it is better to choose polyurethane and epoxy-urethane floors, which can withstand long-term stress perfectly. For specific conditions of use, you should choose your material.
Also, the polymer floor in the house may differ in surface properties. It can be smooth or rough. What else should you know about self-leveling floors before making the final decision before purchasing them?
What are the advantages of liquid polymer floors?
Obviously, the high demand and popularity that distinguish self-leveling floors at home did not come from a void. This technology boasts a wide range of such positive benefits:
- Excellent indicators of strength and resistance to various kinds of influences, including chemical ones.
- High resistance to wear, thanks to which the self-leveling floor will serve for many years and in difficult conditions.
- Antistatic - the self-leveling floor of the house does not collect dust and other particles, it is easy to sweep and clean.
- Complete hygiene and safety for human health, no substances hazardous for allergy sufferers.
- High rate of fire resistance, excellent heat and sound insulation qualities of the self-leveling floor.
- A wide range of colors, designs and styles - the choice of floor is limited by imagination.
It should be noted that polymer floors for the home are made using seamless technology - this greatly facilitates the process of machine cleaning. In addition, the absence of seams prevents dust from clogging in them, and thereby causing allergies and other troubles. This is another significant advantage in the piggy bank of the advantages of self-leveling floor.
Self-arrangement of the self-leveling floor in the apartment
Of course, it is better to trust such a thing as the installation of self-leveling polymer floors in an apartment to professionals. They know exactly how to apply all the layers so that the end result is durable and attractive. However, the installation of polymer floors can be done on your own. To do this, you first need to prepare the following tools:
- Capacity for solution preparation. Its volume can be roughly calculated as follows - for one square meter of the area of \u200b\u200bthe filled space, 2 liters of the mixture are needed. Thus, for a room of 40 sq. meters, it is enough to prepare a container with a volume of about 80 liters.
- Electric drill with mixer attachment. You can stir the solution with your hands, but this will not only lead to an increase in the time spent, but also negatively affect the quality of the floor solution.
- Large trowel required for thoroughly leveling mortar.
- Needle roller or other device suitable for removing bubbles from the floor surface.
Also, before you make self-leveling floors in the house with your own hands, you need to prepare clothes for yourself. You should find protective gloves and a face mask, as well as special shoes - paint shoes. It is necessary to walk on the treated surface without breaking the layer. When all the tools and materials for the mixture are ready, we begin.
Surface preparation
If the floor has not yet been dismantled, it must be dismantled and completely cleaned of debris. Use the solution to erase greasy stains - if you ignore this step, polymer coating will lie badly. After cleaning, you must carefully inspect the floor for any drops. If there are any, they will need to be repaired. When this stage is completed, the floor must be cleaned again, now with a powerful vacuum cleaner.
After preparing the floor, its surface must be carefully primed. Treatment with a primer will significantly increase the adhesion of the floor to the future polymer floor, as well as prevent flaking of the finished coating.

Filling the polymer layer
The self-leveling floor in the house begins with the preparation of a special solution. The solution must be transferred to a container prepared in advance, and then diluted with water in the proportion indicated on the instructions for the floor. Next, a drill (or a construction mixer) is connected and the mixture is thoroughly stirred until a homogeneous solution. After that, the resulting mixture must be carefully poured onto the floor surface - the self-leveling floor for the apartment begins to settle down from the far corner of the room towards the exit, just like when painting coatings.
The next stage after applying the mortar is leveling with a spatula and removing air bubbles. To do this, carefully roll the self-leveling floor of the apartment, trying not to imbalance the thickness of the polymer coating.

Completion of the bulk floor
The applied polymer floor solution must dry completely, which will take several hours. But that's not all - after the layer has dried, it is necessary to apply "Level" to it. This mortar allows you to completely smooth out all unevenness and make the floor perfectly even. The thickness of the coating should be between 1 and 4 mm. As in the case with polymer solution, the "Level" must be carefully rolled out with a roller to remove bubbles.
After the leveling layer has dried, the matte self-leveling floor in the apartment is almost ready. You can leave it as it is, or you can use it as a base for laying parquet, stone or tiles. Even a "bare" polymer floor will look very attractive and can withstand any impact!
Self-leveling polymer floors for home are a great alternative to parquet, linoleum, ceramic tiles and other types of flooring. Self-leveling floors in a private house from the "MPM" company have high adhesion and are characterized by resistance to cracking. Living rooms, utility rooms, recreational areas - we have perfect solution taking into account your requirements and anticipated operational loads.
Advantages of self-leveling floors for a private house
- High strength
Self-leveling polymer floors in a private house are resistant to mechanical stress and household chemicals. This type of flooring can withstand even heavy natural wood furniture. - Durability
Self-leveling floors are quite durable and designed for a long period of operation. Moisture and dirt do not penetrate into the structure of the material, since there are no gaps and crevices - Easy to install and operate
Installation of self-leveling floors in a private house is carried out in a short time, and the care of the coating is simplified as much as possible - Sustainability
When choosing self-leveling polymer floors for your home, you don't have to worry about your health and the health of family members. Floor mixes are prepared from harmless components. In addition, no hazardous substances are released during operation. - Availability
The cost of self-leveling floors for a home is quite affordable, therefore, even in the case of a limited budget for interior decoration, you can safely give preference to floor coverings of this type - Fast hardening
Depending on the type of self-leveling floor, after a couple of hours, the floor covering can be easily used. What is especially important if the deadlines for putting the object into operation are tight - Aesthetic perfection
The seamless flooring looks very organic. Customers have the opportunity to choose the desired color, taking into account the peculiarities of the interior design
If you want to install reliable, high quality, durable and aesthetically perfect floor coverings, the correct solution would be to fill the self-leveling floor in the apartment. The range of colors is practically unlimited, which significantly expands the possibilities of design. You will be able to bring to life the most daring and original ideas.


PRICES:
|
Types of decorative coatings |
|||||||
|
1. Monochrome polymer floor, glossy or matt |
70000 rub. for the entire volume |
Price negotiable |
|||||
|
2. Polymer marble floors |
75000 rub. for the entire volume |
Price negotiable |
|||||
|
3. Polymer floors with a stencil (depends on the occupied area of \u200b\u200bthe stencil and the complexity of the pattern) |
80000 rub for the whole volume |
Price negotiable |
|||||
|
80000 RUR for the entire volume |
Negotiated price |
||||||
|
5. Micro concrete floors (Loft style) |
RUR 50,000 for the entire volume |
Negotiated price |
|||||
|
6. Floors with colored quartz sands |
90000 RUR for the entire volume |
Negotiated price |
|||||
|
7. Floors with Abstraction (customer's fantasy) |
Negotiated price |
||||||
You can get a perfectly flat horizontal surface using bulk (leveling) mixtures. Alignment in such cases occurs due to their own weight: when spreading, the liquid formulations lie perfectly flat. Self-leveling floors can be applied both on a concrete screed and on wooden base or even ceramic tiles... During the repair, the question may arise: how to make a self-leveling floor with your own hands? In this article, we tried to answer it in detail.
Screeds and self-leveling floors. The main differences
All self-leveling liquid mixtures can be divided into two main groups:Self-leveling screeds for rough finishing the floor in front of the flooring of tiles, linoleum, laminate, finished self-leveling floors, etc.; are made on a conventional cement base with the addition of plasticizers to prevent cracking; are used to level significant differences in height and eliminate large floor defects;
Rough floor finish with self-leveling screed
gypsum self-leveling floors to create a base before finishing; applied in a thin layer up to 30 mm; less moisture resistant; without additional coating, especially in rooms with high humidity, it is not recommended to use them;
Translucent, transparent and colored finishing polymer mixtures.

Finishing self-leveling floors
The most common finishing self-leveling floors are:
Epoxy mixtures: their shiny surface resembles glass; outwardly attractive and very durable;
High-strength and flexible polyurethane-based mixtures;
Self-leveling 3D floors: imitating volumetric surfaces.

Self-leveling 3D floors
Surface preparation
The requirement for the base for self-leveling floors is indicated on the package. It must be strong, dry, clean and free from significant defects (cracks and chips) that can be seen through the coating. In order to avoid swelling and peeling of the polymer surface, the presence of dust, greasy stains and contamination with chemicals is also not allowed.Concrete base before pouring the bulk mixture, if necessary, it is restored. If there are small defects, they should be expanded with a grinder or any other suitable tool, cleaned of small debris and smoothed with a solution. Too big bumps on cement floor better to break with a puncher. If too thick layers are applied, they can be reinforced with a metal mesh.

Preparation of the concrete base
It is not allowed to work on damp concrete. The topcoat should be poured no earlier than 4 weeks after the application of the rough sand-cement mixture.
The concrete base is thoroughly cleaned of dust with a construction vacuum cleaner or washed with water. After rinsing, it must be thoroughly dried. Before pouring the topcoat, the concrete base is treated twice with a two-component epoxy primer.
From the wooden floor all skirting boards are removed. Remove old paint or varnish with a sander or scraper. Greasy stains are removed with a solvent. Any cracks must be opened as much as possible and processed for better adhesion with the mixture sandpaper or with a brush with iron teeth and then pour building mixture or adhesive.

Wood floor preparation
When pouring the mixture on ceramic tiles the reliability of its fastening is checked. Poorly fixed elements are removed, and the resulting voids are poured with concrete or sealed with putty. The joints between the tiles should be degreased with a solvent and primed twice to close the pores.
Placement of beacons
It is rather difficult to determine the required amount of self-leveling floor solution "by eye", therefore it is better to use beacons for these purposes:1. To mark the line of the future floor using a level at an arbitrary distance from the floor using a building level, the first horizontal line is first drawn along the walls. Parallel to it, using measurements from the first line (see photo), a second line is drawn along which the self-leveling floor will be poured.

Determination of the level of the finished floor
2. The beacons are placed along the lower second line. The first beacon is set at the highest point of the base.
3. Lighthouses made of conventional self-tapping screws, screwed into the floor to the required depth every meter. The distance between such a lighthouse and the wall is 20-30 mm. A cord or fishing line is pulled between the screws, along which they are guided when pouring. After processing part of the floor, they should be unscrewed without waiting for the mixture to dry.

Arrangement of beacons
4. Pin beacons (benchmarks), which look like a small tripod with a pin in the center and a thread, are supplied with a millimeter scale. Arrange them in a checkerboard pattern or along one line. For relatively flat surfaces, you can also use plastic beacons with adhesive tape at the bottom for fixing to the floor.

Leveling the surface using pin marks
The main stages of pouring a self-leveling floor
1. To compensate for expansion and prevent future cracks, the floor along the walls must be fixed self-adhesive damper tape... Adjacent stripes overlap 15-20 centimeters.

Installing a damper tape
2. When preparing the mixture, strictly follow the manufacturer's instructions. Too thick a solution will not spread freely over the surface, and an excess of liquid will lead to peeling of the "milk", settling of fillers to the bottom of the poured floor, and, as a result, cracking after drying.
3. Pouring begins in stages, in small portions. In order not to have to step on the quickly drying floor once again, they start it from the wall opposite the exit.

Self-leveling floor filling
4. In a small room, filling can be done in one go. The larger rooms are divided into sectors separated by boards.
5. The thickness of the self-leveling compound can vary from 1 to 10 mm and depends on the curvature of the surface. The most optimal thickness is considered to be 1.5-2 mm.
Council. It is not very practical to use a larger layer: it will require extra costs. Therefore, if the slope of the floors is too great or if there are many defects, the floors are first leveled with ordinary concrete.
6. The thickness of the coating is adjustable with wide spatula (squeegee) or rules... The more the tool is pressed against the floor surface, the thinner the coating. For convenience, you can use a special shoes with needle soles.
7. Air bubbles can negatively affect the strength of future floors. To remove them, you can use with a brush or construction needle roller.


Leveling self-leveling floors with a needle roller and brush
Council. The self-leveling floor dries quickly enough. Therefore, you should not return to the already treated surfaces and try to roll them with a roller again: the drying mixture will begin to rise in bumps.
8. Consumption of bulk mixture per 1 sq. m depends on the type of coating and the selected brand. On average, it will need 1.3-1.7 kg per square meter.
9. Drying time of self-leveling floors depends on their thickness, temperature and humidity of the room and can vary from 2 hours to a day. During the drying process, the coating should not be exposed to direct sunlight and excessive temperature changes.
Council. If, over time, small cracks appear on the surface of self-leveling floors, it can be easily and quickly update... The only condition: when choosing a composition for work, the compatibility of the mixture with the old composition should be taken into account. Before applying a new coating, the floors are treated with an abrasive disc or sandpaper to roughen and increase adhesion.
DIY 3D self-leveling floors
Such surfaces look very attractive. You can achieve this effect as follows. First, a layer of special paint, an image on a vinyl film, marble chips, colored sand, etc. are applied to the base layer, which are then covered with a self-leveling floor. The depth of the image depends on the thickness of the filled layer.Used as a base layer and the so-called "chips": multi-colored particles from pieces of acrylic. They can be painted in vibrant colors or imitate shades of marble or granite.


3D self-leveling floors
Watch a video on how to make a self-leveling floor with your own hands:


