Of all the existing slab bases, individual developers often make their own hands a floating monolithic slab of a shallow or non-recessed type. The only drawback is unsuitability for projects with a basement level, compensated by a low construction budget, the possibility of construction on moving / problematic soils, small volumes earthworks, low specific pressure, high-quality distribution of prefabricated loads from the building to the soil.
To fill a foundation slab with a maximum operational resource, it is necessary to take into account the requirements:
- - classification of soils;
- - foundations of structures, buildings;
- - fencing and supporting structures;
- GOST R; - formwork (technical conditions, definitions);
- - reinforced concrete, concrete structures;
- - anti-corrosion protection building structures;
- - design, manufacture of shallow foundations.
Preparatory work
The technology of pouring a slab base is different from the construction of other foundations. At the initial stage, it is necessary to fulfill the conditions:
- conduct geological surveys;
- remove the fertile layer in the building spot;
- lay the pipes of communications;
- to make;
- backfill the pillow;
- install the formwork;
- run with two meshes, welded or tied from reinforcement with a periodic section of 12 - 16 mm.
Additional work is carried out if necessary. For example, several layers of insulation are laid under the "Swedish slab"; in the upper part of the structure there are contours of a warm water floor. To increase the strength of the monolithic structure, stabilize the geometry, stiffeners can be made, directed downward from the base of the slab.
Laying the concrete mixture into the formwork
Before filling the formwork, it is necessary to properly prepare the concrete or order delivery by mixers from a reliable manufacturer. For monolithic foundation slab the concrete mix must meet the following parameters:
- density - 1.8 - 2.5 t / m³;
- brand - M100 and above;
- class - from B7.5.
For these purposes, ready-mixed concrete with characteristics of 196 kg / cm², W4, F100, P3 is excellent. It has sufficient mobility for distribution in the formwork, withstands 100 seasonal cycles, does not let water through at a pressure of 4 bar.
When freezing, water droplets inside the mixture increase by 9%, internal stresses exceed the strength of the board many times. The frost resistance of the material depends entirely on the presence of reserve pores in the concrete structure. When frozen, part of the moisture fills them, preventing cracking.
Therefore, when making a mixture with your own hands, it is necessary to ensure frost resistance F75 - F150 for regions with winter temperatures below -20 - -40 degrees, respectively. The technology for preparing ready-mixed concrete BGS B20 (M250), BGS B15 (M200) corresponds to these conditions. For an economical consumption of cement, taking into account soil conditions, construction technologies should be chosen:
- M350 - M400 - for monolithic, brick buildings on heaving, slightly heaving soils, respectively;
- M300 - M350 - for buildings made of expanded clay, foam, aerated concrete;
- M250 - M300 - for log, squared log cabins;
- M200 - M250 - for panel, frame houses.
For concrete preparation (unreinforced cushion under the slab), the recommended proportions are 6/3/1 (crushed stone, sand, cement, respectively). To fill the slab, the proportions change 3 / 1.5 / 1.
Before placing concrete in the formwork, the reinforcement must be free of peeling rust, dirt, oil stains.
Key points
When concreting slab bases with their own hands, standard technology is used. However, there are nuances due to which you can maximize the service life of the structure:
- supply of the mixture - from the mixer tray or from the concrete mixer, the recommended dumping height is 0.5 - 1 m, it is forbidden to move concrete inside the formwork further than 2 m, the machine must move around the perimeter, feeding concrete in small portions, or a concrete pump must be used;
- layer thickness - depends on the type of compaction tool (usually 125% of the length of the vibrator nozzle), slab formwork is usually filled entirely;
- pouring height - the sides of the formwork panels must be at least 5 cm higher than the design level.
To strengthen foundation slab, the following techniques are used:
- ribbing - stiffeners are made under the sole along the perimeter of the monolithic structure + several pieces along the short wall of the building
- installation of piles - bored or screw in the corners fundamentalslabs at the junctions
The latter structure was called slab-pile grillage, the slab can be deepened by 0.4 m, lie on the ground, hang over it. Stiffeners are by default present in "Swedish" slabs, they are created with a different layer of expanded polystyrene.
When reinforcing monolithic slab metal elements must be recessed into the concrete by at least 15 mm. To provide the specified protective layer under the lower mesh, concrete crackers are laid - plates 10 x 10 cm thick 1.5 - 2.5 cm. Wooden bars, crushed stone, pieces of reinforcement are prohibited.
The upper mesh is laid on frames (welded structure of a triangular section), assembly tables (cubes from reinforcement) or attached to vertical posts with knitting wire. It is not advisable to use separate rods in areas of complex configuration; they should be bent, overlapped with meshes.
When distributing the concrete mixture inside the formwork, you must not move along the reinforcement mesh. To distribute the load, boards are laid on them, boards, which are moved as the space is filled.
In winter, the construction budget increases, monolithic the structure must be heated for three days. For this, a heating cable is laid inside the armopoyas, which remains embedded in the structure at the end of the work. In addition to this method, technologies of a thermos, warm formwork, adding hydration (hardening) accelerators to concrete are used.
In the first case, the surface is covered with a plastic wrap, the heat released as a result of the chemical reaction of cement with water is stored under it. In the second version, voltage is applied to the steel panels. Hardening accelerators are cheaper and are used more often.
Concrete consolidation

To ensure the design strength of concrete, it is not enough to correctly install the formwork, fill it with a mixture. When the solution is supplied with a concrete pump, mixer or buckets, it inevitably contains air, which, after hardening, turns into caverns, pores that reduce the characteristics of the slab. When pouring a slab base with your own hands for these purposes, you can use:
- manual rammers - corrugated reinforcement bars;
- deep vibrators - the tip is lowered to the full depth for 20 - 30 seconds, moved 30 - 40 cm to the side throughout the entire volume of concrete;
- surface vibrating plates - used for leveling concrete mirrors, smoothing irregularities after using deep vibrators.
At large objects, vibratory packs, mounted vibrators or compaction with a concrete pump manipulator are used when pouring the foundation slab. The complete removal of air, high-quality mixing of the mixture inside the formwork is evidenced by the absence of bubbles, cement milk, the absence of large filler-crushed stone protruding from the solution.
Curing
![]()
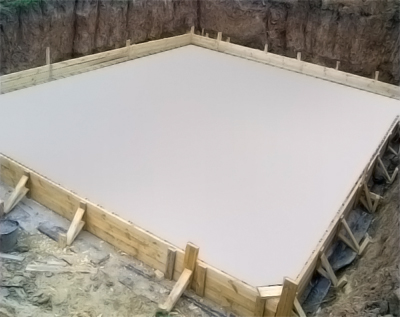
The pouring of the foundation slab must be accompanied by measures for the care of the concrete mixture. Most often, this base of the building is a finished floor on the ground, to reduce the budget finishing works the surface should be leveled as much as possible, to prevent the formation of cracks, shrinkage funnels. The main care activities are:
- control of the geometry of the formwork - it is unacceptable to distribute the boards outward (it is eliminated within an hour with subsequent vibration compaction of the defective area);
- protection from impacts - covering with plastic wrap from quick drying, rain, other precipitation (burlap, tarpaulin can be used);
- humidity control - 90 - 100% is considered a normal parameter, after 50% strength (approximately 8 hours), the surface of the plate is watered with watering cans or hoses with similar nozzles for 3 - 5 days;
- protection against freezing - in winter, the surface and perimeter of the formwork are covered with mineral wool, expanded polystyrene, sawdust or hay;
- bottom heating - in winter, a heating cable is passed under the stove before pouring.
Work on the foundation before the start of demoulding (5 - 7 days) can be carried out every other day at 30 degrees heat, on the 5th day at an air temperature of 10 degrees, or in a week at +5 degrees. In winter, the temperature regime of the concrete mixture inside the formwork is +10 degrees for at least three days.
Subject to the specified technologies for the manufacture of formwork, pouring the foundation slab, and maintenance of concrete, it is possible to ensure the maximum service life of the structure, the necessary characteristics of the base.
Advice! If you need contractors, there is a very convenient service for their selection. Just send in the form below a detailed description of the work that needs to be done and you will receive offers with prices from construction teams and firms by mail. You can see reviews about each of them and photos with examples of work. It is FREE and non-binding.step-by-step instruction"data-essbishovercontainer \u003d" "\u003e
Among all types of foundations chosen by private developers for the construction of their country houses and outbuildings, the undisputed leader in terms of frequency of use are belt-type bases. However, quite often, the specifics of soils at the construction site, the climate in the region, the location and dynamics of changes in underground aquifers require an excessively deep foundation of the strip foundation, which makes it an unprofitable solution, especially when it comes to the construction of a relatively small size and its total mass building. We have to look for other, more economically justified, but at the same time options that are not inferior in terms of carrying capabilities.
One of such solutions can be a monolithic slab, poured under the entire future building. The uniform distribution of the load falling on such a foundation over the entire considerable area makes it possible to use such a scheme on soils with a low bearing capacity. And the relative simplicity of the construction of such a base makes it quite feasible on its own. So, the topic of this publication is a do-it-yourself foundation plate, step-by-step instructions, from calculations to practical implementation.
Typical scheme of a monolithic slab foundation
A slab foundation does not require deep burial; rather, on the contrary, its bearing capacity and "floating" features will manifest itself precisely when it is sufficiently close to the earth's surface. In this case, even frosty swelling of soils will not have a destructive effect on the stability of the building - the slab itself, with its high-quality construction, together with the building erected on it, seems to "float" on the surface of the soil.
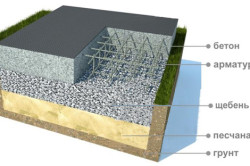
A schematic diagram of a monolithic foundation slab is shown in the illustration below:
1 - Compacted soil - the bottom of the excavation dug under the foundation.
2 - A carefully compacted "cushion" of sand, sand and gravel mixture, crushed stone, which contributes to the uniform distribution of loads, becomes a kind of damper that softens the effect of ground vibrations. Layer-by-layer backfilling and ramming of such a "pillow" is practiced, with one or another alternation of materials, or uniform, using ASG.
3 - A layer of geotextile (dornite), which will give the sandy “cushion” a kind of “reinforcement”, prevent its siltation or erosion on waterlogged soils. This illustration shows only one of the options for placing a geotextile layer, however, their number and position may vary, depending on specific conditions. So, quite often such a layer is placed between the surface of the compacted bottom of the excavation and the first layer of sand "cushion" - to exclude the penetration of soil particles into it. The layer of geotextile is also separated by sand and gravel interlayers of backfill - again for reasons of reinforcement and exclusion of interpenetration. At the same time, the location of the gravel or crushed stone layer above the sandy one seems to be more optimal - because capillary "suction" of ground moisture from below is almost completely excluded.
4 - A layer of so-called concrete preparation. This element of the overall “pie” of slab foundations is often neglected for reasons of material savings and reducing the overall duration of work. Meanwhile, such concrete preparation plays a significant role - it allows you to reach a "clear geometry" of the base for further pouring the foundation or laying insulation materials, makes it possible to very efficiently mount the compulsory for the slab hermetic waterproofing.
5 - The already mentioned layer is a layer of waterproofing, which is mandatory for such a foundation slab, which protects the base of the building from moisture from below. The optimal solution is at least two layers of roll waterproofing materials on a polymer-bitumen basis.
6 - The monolithic slab itself with an estimated thickness.
7 - a reinforcing belt of a concrete slab. Its classic design is two levels of reinforcement grids, interconnected to give the structure volumetricness with special clamps. The arrangement of the reinforcement is planned in such a way that a layer of concrete of about 50 mm is created between the rods and the edges of the slab from above, below and from the ends - in order to exclude the start of metal corrosion processes.
This is a general scheme, but there are several varieties of monolithic foundation slabs, which are used depending on certain specific construction features.
The simplest in execution and, probably, the most common option is a solid slab, the uniform thickness of which is observed throughout its entire area.
It is this scheme that is chosen most often when erecting houses and outbuildings on a fairly stable ground. However, it has an obvious drawback - the thickness of the slab is usually small, and is partially located below ground level, that is, the upper edge is located close to the ground surface, which is not very good for wall structures. Because of this, it is economically impractical to increase the thickness of the slab, which means that another option can be considered - pouring the foundation with reinforcing stiffeners, which have some similarities with strip foundation... Moreover, these ribs can be located both above the slab and below it.
So, a kind of base-grillage can be obtained if, simultaneously with the slab, stiffeners are poured, protruding above the surface of the slab, which is obtained as a "bowl". Such grillages are placed along the lines of erection of the bearing walls of the house structure - after waterproofing their horizontal surfaces, it is from here that the laying begins.
A similar scheme is still often practiced in cases where the useful use of the basement or basement floor is planned - the slab simultaneously becomes the floor of these rooms. And from the grillages, they begin to lay the basement.
If there is no desire to deepen the slab into the ground too much, and at the same time achieve its maximum bearing capacity without thickening, you can apply a scheme in which the stiffeners are located downward.
When preparing the surface, installing the formwork and the reinforcing frame, deepened "channels" are immediately provided, which, after pouring the slab, will turn into stiffeners facing the ground.
This also turns out to be a kind of "symbiosis" of slab and strip foundations. Stiffeners are planned under the external walls and internal solid partitions. Well, if no internal partitions are provided, then the ribs should be located parallel to each other and to the shorter side of the house perimeter, with a step not exceeding 3000 mm.
This scheme allows you to achieve serious savings in concrete, since in the presence of correctly planned stiffeners, the thickness of the slab can be significantly reduced, by 100 ÷ 150 mm, without losing its bearing potential, and this is, after all, 1.0 ÷ 1.5 cubic meters of mortar for every ten square meters area.
In addition, there are ample opportunities for warming the foundation slab - the same height difference on the main surface and on the stiffeners is often performed by laying a durable thermal insulation material, for example, extruded polystyrene foam. By the way, this approach is the key condition for the construction of one of the improved varieties of slab foundations - the so-called "insulated Swedish slab".
In addition, such a foundation, with careful calculations and design, can become a very reliable basis for multi-storey construction... An even distribution of loads over a large base area gives very low ground pressure values \u200b\u200beven when erecting massive buildings and engineering structures. True, this applies more to construction workscarried out on an industrial scale.
There is a lot of controversy about the advantages and disadvantages of the slab foundation, by the way, both real and, frankly, contrived. Let's try to list them and understand a little about this issue.
What they say about merits ?
- There is a widespread belief that monolithic slab foundation - this is an absolute "panacea" for all cases, that is, it can be erected in general on any soil. Allegedly, such a slab of a house, even in a swampy area, will be a reliable basis for a heavy building, since due to its "buoyancy" it will vibrate along with the movement of the ground, without being subjected to deformations.
It is certainly impossible to agree with this statement. Most likely, it would be more correct to say only that the slab foundation opens up expanded possibilities for construction in areas with complex soils, with insufficient bearing capacity for the strip base, with average heaving rates.
But on clearly swampy, waterlogged soils, with the likelihood of subsidence, especially in regions with a harsh winter climate, probably only pile foundation, the piles are driven (screwed) into dense, bearing rocks located well below the freezing level.
And the slab foundation, located almost on the surface, can indeed move within certain limits along with ground vibrations, that is, "float". But the trouble is that in areas with pronounced soil instability, these vibrations can have a very high amplitude, and apply unevenly to the surface of the slab from below. Even if the soil is absolutely homogeneous throughout the entire area, this unevenness is explained by banal reasons - from the south side, almost always freezing goes to a shallower depth, and thawing in spring occurs much faster. This means that the plate willy-nilly will experience colossal internal bending stresses.
As a rule, slab foundations have a very significant margin of safety, and it is possible that the slab itself will withstand such loads, will not crack, but small linear deformations are quite likely. They will certainly be transferred to the walls, and in addition, the inclination of the entire building from the vertical axis is not excluded. For wooden buildings, it is perhaps not so critical, due to a certain mobility of the structure. But the stresses on rigid stone (block) walls increase with height, that is, the lever of application of force. And it is possible that somewhere in the upper area of \u200b\u200bthe wall a crack will suddenly appear and begin to expand.
So, if you think objectively, you should not overestimate the versatility of the slab foundation too much - it would be rash. In any case, if there is no confidence in absolute success, it would be more expedient to invite specialists to conduct a geological analysis of the site. In addition, it is always useful to familiarize yourself with the "history" of the use of slab foundations in the surrounding area - what and how long ago were houses built on them, what is the depth and thickness of the slab, are there any complaints about the operation, how the buildings survived seasonal ground fluctuations - these and other questions help you make the right choice.
- Slab monolithic foundations allow you to build large, even multi-level houses, built of heavy materials.
This is true, and many high-rise buildings in large cities are built on a similar basis. In terms of its ability to evenly distribute the load over a large area, such a foundation is unmatched. Of course, all this is true for professionally carried out calculations, taking into account the characteristics of the building site, and high-quality performance.
So the conventional wisdom that a slab foundation is suitable only for small compact houses, and that "its age is short-lived" is limited to 35-50 years - this is nothing more than fiction. We repeat - it all depends on competent professional calculations and on the quality of execution in accordance with the project.
- The construction of a slab foundation minimizes the work of digging a foundation pit - no strong deepening into the ground is required.
If we talk about a slab located on the surface of the soil or with a slight deepening, then this is really so - only the upper fertile soil layer is removed, and the depth of the pit is largely determined by the estimated height of the sand and gravel cushion. True, if this depth is also multiplied by the entire area (and the slab must be laid wider than the future building, and even more insulated blind areas), then the volume of the selected soil can still turn out to be considerable. So this dignity is very unobvious - with a shallow strip foundation, sometimes it is easier in this regard.
Well, if you plan to use a deep-laid monolithic slab, that is, create a house with a full-fledged basement on its basis, then you will have to dig the corresponding pit, that is, it is very difficult to do without the involvement of special equipment.
- The use of a slab foundation automatically solves the problem of a reliable foundation for the floors of the first (or basement) floor.
This is a really important benefit. And if, simultaneously with the preparation of the slab for pouring, a high-quality thermal insulation belt is provided, then the floors will also be pre-insulated. In addition to this, water floor heating circuits are immediately installed in the "insulated Swedish slab".
- Work on the slab foundation can in no way be attributed to tasks of a higher category of complexity.
An ambiguous statement, with which, nevertheless, one can agree to a certain extent. Indeed, the work on the stove itself does not involve operations that require the highest qualifications of workers. Digging a pit and tamping a sand and gravel cushion, tying a reinforcing cage, installing formwork, pouring and distributing concrete, caring for a slab that is gaining strength and other stages - all this is either initially understandable, or a novice craftsman can “fill his hand” in a very short time.
Another thing is that a number of operations require the involvement of special tools and equipment. So, for high-quality ramming, one cannot do without a vibrating plate, for a quick and uniform production of reinforcement clamps, it will be necessary to build an appropriate device, waterproofing with roll materials involves the use of a gas burner with a cylinder. And given the fact that the volume of concrete to be poured can turn out to be considerable, and it is advisable to pour the slab in one day, it is hardly worth relying on the independent production of the solution - you will have to order it with delivery.
It can be said that, provided that forces and resources are attracted from outside for some operations, the owner, who has enlisted the help of friends or relatives, can easily cope with the bulk of the work. True, one must be prepared for the fact that the work is going to be quite long, physically difficult, and sometimes even tediously monotonous. But for a small team of several strong men - doable. Of course, if all technological recommendations are strictly followed.
It is interesting that in some publications on slab foundations, this is presented not as a virtue, but as a disadvantage - they say, working on such a slab is an extremely difficult matter. It is possible that it is simply a matter of different evaluation criteria - from what point of view this problem should be considered.
Now let's pay attention to limitations slab foundation:
- It is quite obvious that this type of house foundation is suitable for building on a relatively flat area. If a significant height difference is observed in a building spot, then such a scheme either becomes extremely complicated, becomes inappropriate, or is recognized as completely impossible.
- The slab must completely, with its entire area, rest on the ground - this is precisely its increased bearing capacity even on not completely stable soils. And this, in turn, means that there can be no question of any basement or cellar under the stove itself.
The only exception can be the scheme already mentioned above, in which the slab itself becomes the floor of a full-fledged basement, semi-basement or basement room. It, as a rule, has upwardly directed stiffening ribs, grillages, or well-thought-out reinforcing tabs, from which the further construction of the deepened part of the walls is already underway, by analogy with a deep strip foundation. But this type of foundations is a very expensive "pleasure" that requires highly qualified calculations and practical execution.
- The construction of a slab foundation will require advance planning and laying of the necessary utilities, for example, sewers, water pipes, and sometimes a power cable.
It is unlikely that such requirements can be attributed to shortcomings - it is rather assessed only as a specific technological feature, and with well-planned work will not particularly complicate the entire construction process.
- There is a lot of talk about the high cost of such a foundation, which can reach almost half of the entire construction estimate.
Such frightening indicators, most likely, will be valid only for the already mentioned deep plate. If the foundation is practically not deepened, the picture is certainly not so “frightening”.
Of course, even with a small slab thickness, but with its considerable total area, centimeters very quickly develop into cubic meters of concrete solution. Two-tier reinforcement will require a significant consumption of reinforcement, of course, more than when pouring a strip base. However, we must not forget that together with the foundation slab, the developer immediately receives a finished base - in fact, a rough floor of the first floor, with its already high-quality waterproofing, and sometimes with insulation. That is, these stages of work are already falling out of the general estimate.
So the excessively high cost is not always an obvious drawback, and the simplicity of the construction of the slab also largely compensates for the increased consumption of building materials.
How a monolithic slab foundation is calculated
Any foundation requires calculations, and the slab in this matter is no exception. True, it should be especially stipulated that the design of such structures is still the lot of professionals, especially if it is planned to build a full-fledged country mansion.
Nevertheless, sometimes you can resort to calculations on your own, for example, when erecting non-residential structures - a garage, a barn, a bathhouse, and utility buildings. And one of the key calculation parameters is always the thickness of the monolithic slab. Too small thickness may not cope with bending loads, excessive thickening is a waste of effort and money.
How is the optimal slab thickness calculated?
The calculations should ideally be preceded by the analysis of the soil at the building spot, since it is necessary to have an idea in advance about the bearing capacity of the layer on which the foundation slab will rest. Usually for this, specialists with a drilling rig are invited, who make several holes, for example, in the corners and in the center of the site.
This makes it possible to assess the composition and thickness of the layers, the presence of "top water", the location of the aquifers, on the basis of which further calculations can be carried out.
Any of the soils is characterized by its resistance to load, that is, in fact, by its bearing capacity. This parameter can be expressed in kilopascals (kPa), but for calculations in the metric system it is more convenient to use the kilogram-force per square centimeter (kgf / cm²).
Soil type Design soil resistance kPa kgf / cm² Coarse soils, gravel, crushed stone 500 ÷ 600 5.0 ÷ 6.0 Sands are large and gravelly 350 ÷ 450 3.5 ÷ 4.5 Medium sands 250 ÷ 350 2.5 ÷ 3.5 Fine or dusty dense sands 200 ÷ 300 2.0 ÷ 3.0 The same sands, but of medium density 100 ÷ 200 1.0 ÷ 2.0 Sandy loam, hard and plastic 200 ÷ 300 2.0 ÷ 3.0 Loams, hard and plastic 100 ÷ 300 1.0 ÷ 3.0 Hard clay 300 ÷ 600 3.0 ÷ 6.0 Plastic clays 100 ÷ 300 1.0 ÷ 3.0 It is clear that the distributed pressure created by the mass of the planned house (taking into account also the external loads on it) and the mass of the slab itself should not go beyond the specified limits. However, such a calculation will still not be objective enough.
When calculating the required slab thickness, it is better to operate with the values \u200b\u200bof the optimal specific pressure on a particular soil - these indicators are determined specifically for slab foundations. The calculated value of the load from the entire structure, including the weight of the slab, should be as close as possible to the optimal one, with a possible deviation not exceeding 20 ÷ 25%.
Why is this done? It is important not to go to two extremes. When the optimal load value is exceeded, it is likely that the slab will eventually sink into the ground. However, a significant decrease in ground pressure is no less dangerous - a structure that is too light for specific conditions becomes too "floating", that is, it can skew even with the smallest seasonal ground movements.
Please note the following:
- Not all soil types are shown in the second table. The fact is that on soils with a high bearing capacity, the construction of a slab foundation itself simply does not make much sense - you can get by with much cheaper options.
- In addition, two rows are highlighted in the table. In both of these cases, it is recommended to conduct an in-depth analysis of the technical and economic feasibility of building a slab foundation.
- In the case of sandy loam, it is possible that the construction of a conventional strip foundation can be much more profitable.
- Hard clays are highlighted because the density of their structure is sometimes deceiving. If there is a likelihood of waterlogging of these layers, for example, by closely located aquifers with seasonal fluctuations in their filling, then a sharp loss of the bearing capacity of the soil cannot be ruled out. The slab, together with the construction, will gradually "sink". It is worth considering the question of the greater, perhaps, the feasibility of using a pile-type foundation.
So, in order to calculate the required slab thickness, you will have to determine what distributed load the building itself will exert on the base, then find the difference with the optimal pressure value, and cover the remaining "deficit" by the mass of the reinforced concrete slab. Knowing the specific gravity of reinforced concrete, it is not difficult to calculate the volume, and having the slab area as the initial data, determine its optimal thickness. At the same time, do not forget to take into account the fact that the slab should protrude beyond the perimeter of all walls outward at least by the value of its design thickness or even more - this already depends on the features of the project.
Below, the reader will be offered a calculator that implements this calculation algorithm. Of course, this application cannot compete with professional programs in the accuracy of calculations, but for "estimating" in the field of self-construction it can provide a useful service.
The calculator assumes that the developer has in his hands the design blueprints for the future building, that is, it will not be difficult for him to decide on the initial data. You will need to know the material and area of \u200b\u200bthe walls (excluding window and door openings), the area and type of floors, the area of \u200b\u200bthe roof and the angle of steepness of its slopes (to take into account the snow load). The calculation program has already included the average values \u200b\u200bof the specific gravity of materials for building structures, the approximate operational loads (weight of finishing, furniture, large household appliances, dynamic loads from people living in the house, etc.) are taken into account.
The grids are tied at all points of intersection of the longitudinal and transverse rods (item 1) with steel wire (welding in such operations is not recommended), and among themselves - using U-shaped clamps (item 2) in marginal zone, and supports-"spiders" (item 3) - over the area of \u200b\u200bthe plate. For the manufacture of these clamps and supports, a reinforcing bar is also used, but already with a diameter of 8 ÷ 10 mm.
Below are calculators that will help you to correctly determine the diameter and amount of reinforcement for knitting the frame.
Calculator for calculating the diameter of the main reinforcement rods and the step of their installation
For the calculation, they proceed from the established norm that the total area of \u200b\u200breinforcement should be at least 0.3% of the cross-sectional area reinforced concrete structure... We know the linear dimensions of the slab, which means that by trying to vary the pitch of laying reinforcing rods (within certain limits, of course, from 150 to 300 mm, and the step should not be more than 1.5 of the thickness of the slab), we can decide: with the reinforcement of what diameter it will be more profitable and faster to assemble the frame.
The calculation can be carried out on either side of a rectangular foundation slab.
Comments:
The foundation slab is poured if a solid foundation of high strength is required for the future structure. The slab foundation is a reinforced concrete massif laid on a mixture of sand and crushed stone and belongs to shallow foundations. Under it is an artificially leveled and tightly compacted soil surface. When pouring a slab foundation, a cement or concrete screed is used.
The foundation slab is poured when a solid foundation with high strength is required for the future structure.
Installation and concreting of slab base
The main advantage of a slab-type foundation is that it can be used on any soil. The material for it is usually reinforced concrete slabs 20-40 cm thick. Monolithic slabs are often used. Any such structures have high reliability characteristics and a long service life.
If, when pouring the foundation slab, strictly adhere to the established rules of the technological process, then the foundation will be rigid, of high quality and capable of withstanding any deformation.
Do-it-yourself installation of a slab foundation is much more economical financially with respect to laying ready-made slabs, for the delivery of which you will need special equipment and transport. In addition, cement mortar screed may be required after the finished slabs have been laid, which again affects the cost.
The area of \u200b\u200bthe slab reinforced concrete foundation and its reinforcement throughout the entire involved space allows you to correctly distribute the pressure on the ground up to an optimal indicator of 0.1 kg per 1 cm2. In turn, this will make it possible to perceive the alternating loads arising during the movement of soils.
Since the area of \u200b\u200bthe slab foundation covers the base of the entire building, in private construction this type is usually used for the construction of small structures.
Back to the table of contents
Distinctive properties of a monolithic foundation with your own hands
Among technical characteristics and the peculiarities of the production process, such positive properties of the filling can be distinguished monolithic foundation:
- The laying process is not laborious and the price of the material is relatively low. In addition, pouring a monolithic slab does not require the use of special equipment.
- Pouring is usually carried out directly from the discharge chutes on concrete mixer trucks. With close control of the workflow, you can do without paid specialist services. To fill a monolithic foundation, it will be enough to have the help of several people who correctly follow the instructions.
- The large area of \u200b\u200bbearing on the ground provides high load-bearing factors. The same characteristic guarantees the integrity and strength of the walls of the structure. This effect is achieved due to the rigidity and immobility of the base structure.
- It is known that the soil rises during winter freezing, and in the warm season, thawing and drying out, it sinks, thereby changing the level. The monolithic foundation moves entirely, so dips and bulging in the foundation are excluded.
- In some cases, slab foundations are used as sub-floors, eliminating the need to install floor slabs on the ground floor.
Pouring a monolithic foundation slab with your own hands is distinguished by reliability and ease of installation, which is especially important on soils with a complex composition. When using this method, it is not required to build a large-scale pit and take into account seasonal ground fluctuations in order to fill the slab foundation.
Back to the table of contents
Building materials required for pouring the foundation slab
First of all, before pouring the foundation under the house, you should choose the right type of concrete that will be used when installing the slab. The optimal concrete should have the following characteristics and parameters:
- concrete grade that determines the strength class - at least M-300 or B22.5;
- coefficient of water resistance - from W8 and above;
- resistance to low temperatures and freezing - F200 and higher;
- the mobility and elasticity of the mixture - from P-3;
- resistance to sulfates.
The latter parameter is very important if the construction is carried out on an area with a high level of groundwater.
When choosing a reinforcing material, you should pay attention to the compliance of the rods with certain requirements, which depend on how the reinforcement is attached to the frame structure.
Any class of reinforcement is suitable for wire bonding. But if electric welding is used in the assembly of the structure, then you need to use reinforcement made of steel of the A500c class with a thickness of 12 mm, where the letter "C" denotes the characteristic of the yield strength.
When pouring a monolithic foundation slab, it is usually recommended to use a concrete pump. This method is the most effective, although it is expensive. Concrete grades containing additives that increase the flowability of the material should be used.
Another common method is a concrete mixer with a drain hole in the bottom of the bowl (bell). The container is filled with solution and placed above the unloading point. Concrete flowing out of an open hole must be leveled with special tools.
Before proceeding with the installation of the structure, it is filled up and compacted sand pillow... After that, a screed with a height of 10 cm is poured. It is better to prepare a screed solution from M-100 cement or M-300 sand concrete.
After drying, a waterproofing roll material is laid on the surface of the screed, fastened at the seams by soldering. Its area should be larger than the base, since the excess is subsequently wrapped up and soldered to the foundation.
Insulation made of extruded polystyrene foam is laid on the waterproofing layer and covered with polyethylene. Thanks to this, the floors in the building will be warmer, which will help save heating costs.

Thank you for your feedback
The most important part of any building is the foundation, which ensures the stability of the structure. Despite the possibility of building a building on different types bases, many developers prefer a slab base, which compensates for the reaction of heaving soils and ensures the reliability of the building. You can prepare a solid foundation yourself, knowing how to fill the slab under the foundation. When constructing a base for a house, a solid foundation slab reinforced with a steel frame is formed up to 40 cm high on a compacted crushed stone-sand cushion. Possessing increased spatial rigidity, the monolithic base surpasses the belt version and the prefabricated structure in performance characteristics.
Let us dwell in detail on the advantages of the slab base and design features. Consider how to cook properly concrete mortarto fill the foundation. Let's figure out the technology for performing work.
Every structure needs a high-quality and solid foundation
Advantages and features of monolithic slabs
Solid reinforced concrete slabs are widely used in the construction of the foundations of construction projects due to a set of advantages:
- simplicity of design. A solid reinforced concrete base is placed over the entire area of \u200b\u200bthe building at the ground level or with a slight deepening into the soil. Does not require increased volumes of earthworks, it is carried out in a limited time;
- acceptable cost level. Reducing the estimated cost of concreting is achieved by feeding significant volumes of concrete from vehicles using trays. At the same time, the labor of low-skilled workers is used for tying reinforcement, pouring and vibration compaction of concrete;
- increased bearing capacity. The increased support surface area and the rigid spatial reinforcement frame allow maximum loading of the monolithic foundation slab. The design guarantees the stability of the erected building during soil movements;
- ensuring the integrity of the walls of the building. The monolithic platform for the house is not subject to local deformations, evenly transfers the weight of the structure to the ground, compensates for the swelling of the soil in winter;
- combining the base of the building with the subfloor. The monolithic base serves as a subfloor. It allows you to equip the floor of the lower floor without using reinforced concrete slabs and pouring screed for the floor covering;
Before starting work, soil analysis is carried out
- the possibility of constructing a slab base on difficult soils. The absence of the need to deepen into the ground reduces the labor intensity of earthwork in areas with closely located aquifers, as well as in zones of deep soil freezing;
- versatility. The solid foundation slab can be used for light structures as well as buildings with heavy walls of brick or concrete blocks.
The slab design, along with the advantages, has a number of disadvantages:
- The problematic arrangement in sloping areas, where there is a high probability of soil shifts. The problem is solved by pouring in one piece with the base of the ribs at the bottom of the inclined section, which fix the site.
- Increased estimated cost associated with the involvement of construction firms to perform work on a contractual basis. Self-construction can significantly reduce costs.
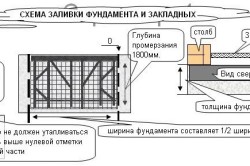
- Increase in the volume of work on excavation and concreting during the construction of the basement. This is due to the need to pour the concrete base below the zero mark at the bottom of the pit.
The features of the slab base are associated with the different location of the site relative to the zero mark. One-piece basis can be performed:
- not buried. Set up without excavation on a pre-planned soil surface;
The standard monolithic slab is most in demand in buildings with a basement
- shallow. The base of the building is immersed in the soil to a depth of 30–40 cm until the supporting surface coincides with the zero mark;
- buried. It is used in the construction of buildings with basements and basements. Construction is associated with the implementation of significant volumes of earthworks, a sharp increase in costs.
The slab foundation differs in design and method of formation:
- Monolithic is poured into the formwork with the reinforcement cage installed. The whole structure is cast in one step, forming a solid base. The design is characterized by increased strength.
- The prefab consists of individual reinforced concrete slabs, which are laid on a crushed stone pillow. The gaps between them are concreted, and the surface is leveled with a small layer of mortar. The prefabricated version of the base loses to the monolithic one in terms of strength characteristics.
To build a solid foundation requires:
A stronger base is a plate that has stiffeners
Compliance with these requirements will allow you to form solid foundation buildings, to avoid the appearance of cracks on the walls.
Preparation of concrete mix for a monolithic foundation slab
The foundation slab is poured with a concrete solution with the following characteristics:
- Grade M300 and higher, corresponding to the strength class B22.5.
- The degree of water resistance is not less than W8.
- Resistance to negative temperatures at F200 level.
- The plasticity of the P-3 mixture.
To prepare a concrete mixture you will need:
- portland cement, which is a binder;
- fine sand and medium gravel used as aggregate;
- water introduced to provide the required consistency.
The concrete recipe is characterized by the ratio of ingredients. The proportions of sand, Portland cement and gravel are different for different grades of concrete. For example, a 3: 1: 5 ratio involves mixing 3 tons of sand with a ton of cement and 5 tons of gravel.
In this way, you can pour a monolithic slab in the shortest possible time.
The preparation and supply of concrete solution, depending on the amount of work, is carried out by various methods:
- using a ready-made solution delivered in mixers. The volume of the mixer allows you to deliver up to 8 cubic meters of concrete to the construction site. The solution is supplied to different parts of the site along a gutter 1.5–2 meters long. A small team of five workers is able to fill a monolithic foundation slab in 3-4 hours;
- with the help of a special concrete pump, the call of which significantly increases the volume of costs. The installation is completed with a sliding metal structure with a concrete pipeline, the length of which allows the solution to be supplied at a distance of up to 50 meters. This allows concreting without going directly to the place of work;
- by self-cooking solution in electric concrete mixer volume from 0.05 to 0.2 tons. The use of the mixer greatly facilitates the work, improves the quality of the solution. Manual mixing in a container with a shovel is possible, however, the cycle time and a small volume of prepared concrete significantly increase the complexity of work and the timing of concreting.
How the slab is poured under the foundation
Let's consider how to properly fill the stove. Carry out the work, observing the sequence of operations:
- Make a markup, plan the site for the future building.
You can fill the slab under the foundation with your own hands
- Dig out the soil for a shallow basement.
- Install drain pipes, plan the bottom of the sump.
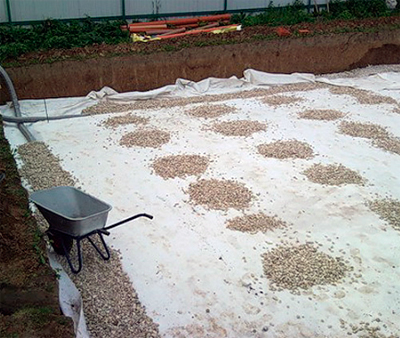
- Fill the base with fine gravel, compact and cover with textiles.
- Install the formwork around the perimeter of the foundation using boards or ready-made panels.
- Secure the outside wooden structure stops.
- Spread the gravel-sand mixture evenly in a layer 30 cm thick.
- Thoroughly tamp the bedding bed necessary to wick moisture away and cushion soil reaction.
- Waterproof the backfill by pouring a 4–5 cm layer of cement-sand mortar.
- Assemble the reinforcement cages using knitting wire and steel rods 12-14 mm in diameter.
- Place special pads under the reinforcement mesh, providing a distance to the base of 4–5 cm.
- Fill the foundation slab with concrete mortar (preferably in one step).
- Perform vibration compaction of the concrete mass in order to eliminate air pockets.
With an increased area of \u200b\u200bthe foundation, the option of sectional pouring is possible. In this case, the poured concrete mass is limited by vertical partitions installed at the entire height of the base being erected. It is not recommended to carry out layer-by-layer concreting, as pouring fresh mortar onto hardened concrete significantly reduces the strength of the foundation.
conclusions
Knowing how to fill the slab correctly, you can form a solid foundation, which is an excellent solution for the construction various objects... The increased operational characteristics allow the foundation to absorb significant forces, ensuring the stability of buildings on all types of soil. Concreting the slab base is not difficult. It is important to follow the technology and use high-quality concrete mortar. By entrusting the pouring to professionals, you can guarantee the quality of the slab foundation.
The foundation is the most important part of any building. This is the base that bears the main load, the weight of the entire building. That is why it is necessary to approach the laying of the foundation with all responsibility and not try to save on something.
Remember: the further fate of the entire structure and your own safety depend on this.
There are many types and types of foundations. In this article, we will consider a monolithic slab foundation. What is it and how to do it correctly. In conclusion, let's talk about its price and whether it can be built on our own.
How the slab foundation works
This foundation feed is a monolithic reinforced concrete slab slightly buried in the ground. She lies on a cushion of sand, rubble, which, in turn, lies on the ground.In some cases, it is assembled from several ready-made reinforced concrete slabs, and then it is poured with an ordinary cement screed.
The depth of such a foundation does not exceed 20-50 cm. The thickness and structure of the slab itself depends on the weight of the future structure, but in practice it should not be thinner than 20 cm. Most often it is not more than 40 cm for ordinary, not multi-storey buildings.
Such a foundation applied on difficult soils, in places with a high level of groundwater, heaving and weak soils.
Him pros consist in the fact that due to its area and monolithic construction, it better resists heaving forces and has good stability on complex, heterogeneous soils.
The foundation moves entirely, it seems to "float". And the whole house moves with it. This protects the building from distortions, which means from destruction. This type of foundation is used for buildings without basements and often itself the slab serves as a base for the floor buildings.
How to make a foundation slab with your own hands?
The principle is as follows: the foundation pit is pulled out, the bottom is leveled, a cushion of sand and gravel is poured, all this is rammed, formwork is placed, reinforcement is tied, concrete is poured, after solidification, the formwork is removed - that's it, the foundation is ready. Now in more detail: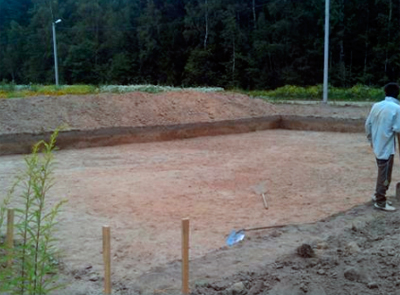
 Sometimes, stiffeners are made on the underside of the slab. They make the slab more durable and prevent it from shifting horizontally.
 There are also so-called Swedish plates. This is a heat-insulated plate with energy-saving properties. When filling it, use latest materials and innovative technologies.
The principle is that all communications and underfloor heating systems are built into the slab during the installation process.
It is more expensive in production, but pays off later in the process of using the house. In Russia, the popularity of this technology is growing, but still very little construction companieswith sufficient experience in this area.
Calculation of the parameters of the slab for the foundation
When calculating the foundation, the following parameters must be taken into account:- plate thickness;
- slab area;
- the depth of the slab.
For conventional suburban buildings, the formula is: slab area refers to the weight of the building and the weight of the foundation. Moreover, it is necessary take into account the bearing capacity of the soil... On dry soils, this figure is 2 kg per 1 cm2.
When calculating the weight of a building, everything is taken into account: the weight of walls, ceilings, roofs, furniture, residents and even snow that can fall in winter. Therefore, we add 150 kg per 1 m2 to the result. After carrying out all the calculations, we divide the resulting figure by the area of \u200b\u200bthe structure and correlate it to the bearing capacity of the soil.
For example, we can say that two-storey house an area of \u200b\u200b10x10 m with a slab thickness of 20 cm and a wall thickness of two bricks creates a pressure of 300 grams per 1 cm2.
 M 510 concrete can withstand a pressure of 150 kg per 1 cm2. Conclusions: this is a very good foundation.
When calculating the amount of concrete for the foundation, you need to multiply the length, width and thickness of the future slab. Then you can subtract the volume of the reinforcement and get the coveted figure. In fact, it is best not to subtract the volume of the reinforcement. So, you will have a small margin just in case. Everything seems simple, but there is a little trick here.
When calculating the volume of concrete that is required for pouring the foundation, it is necessary to take into account the fact that small (several centimeters) irregularities in the formwork or cushion of the base of the future slab can lead to the fact that you have either there is not enough concrete, or it will remain.
As an example, irregularities of 1 cm here and there for a foundation measuring 6 * 10 m and 25 cm thick can lead to a discrepancy with the calculations of 0.5 cubic meters of concrete. By the way, this is often used by unscrupulous developers.
For to avoid it it is necessary to calculate as follows. You will need: a sheet of paper, a pencil, thread (about the size of a foundation), two nails, a hammer and a tape measure. On a sheet of paper, draw the outlines of the future foundation. We line it up into squares so that each square corresponds to 1m2 of the foundation. We begin to froze.
We retreat from the edge of the formwork 1m and drive a nail into it from the side (not from above). We tie a thread (rope) to it and go with it to the opposite end of the foundation, where, also stepping back from the edge of the meter, we drive in a nail from the side and pull the thread. This thread shows the level of the floor throughout the entire pouring of the foundation. Shows absolutely exactly. The thread must be pulled as tight as possible so that there are no deflections.
Then you need to measure the distance between the thread and the bottom of the foundation with a tape measure. This will be its real thickness. Measure every meter. If you suspect frequent bottom irregularities, you can more often. Enter the results obtained in the appropriate squares on your plan. As a result, you will have a plan divided into squares with the exact thickness of each section. Then, adding these data, you can calculate the real volume of concrete that is needed for your foundation.
Digging a pit and installing formwork
Basically, there is nothing difficult in digging a foundation pit. It is necessary to remove the soil to a certain depth. The main thing is not to allow deepening in any part of the pit.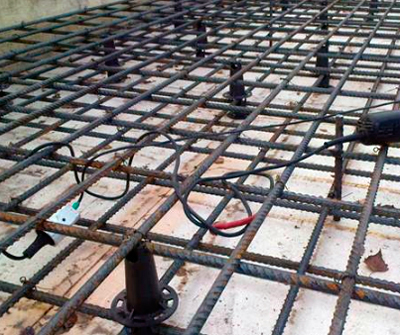 If this suddenly happened, then in no case need to add soil or sand. In this case, it is necessary to deepen the foundation pit by this amount. The bottom is leveled.
The formwork is made from durable building boards. The frame is knocked out of it. The corners are strengthened. From the inside, it is covered with a film or roofing material and is often insulated with expanded polystyrene.
The sides are reinforced with spacers every 50-70 cm. On the one hand, they are abutted against the formwork, on the other, against the bottom or wall of the pit. It is also necessary to leave a working gap between the pit wall and the formwork.
The formwork must be assembled evenly, without gaps. There should be no drops in it. Otherwise, there may be an overconsumption of concrete when pouring the foundation. This was discussed above.
Choice of fittings
When erecting a monolithic foundation, it is very important to reinforce the foundation with high-quality materials. Huge pressure will be transmitted to the armature. Reinforcement of the foundation occurs in two layers.The first layer is a 20x20 or 25x25 cm mesh. Bar thickness nets usually 12-14-16 mm... Further, pieces of this mesh are laid 5 cm from the bottom layer (waterproofing or thermal insulation) on horizontal or vertical overlapping guides. Then they are tied with a wire to each other and tied to vertical guides. Their height depends on the thickness of the slab.
The second layer is put in the same way. reinforcement mesh... It is attached to vertical rails 3 to 5 cm below the top edge of the slab by hand or using a special tool.
Thicker reinforcing bars can be used at the corners and ends of the slab.
The laying of communications (water, sewage, electricity) can be carried out up to this stage. The wiring of communications is isolated, insulated and brought out. This is followed by pouring concrete.
Pouring the foundation slab
The highest quality concrete must be used for concreting the foundation. As mentioned at the beginning: you should not save here. Can come out sideways. Usually either B15 concrete, also known under the brand name M200but it is better to use high-strength concrete of class B 22.5, known as M300 and higher... It is guaranteed to ensure the reliability and durability of the entire structure.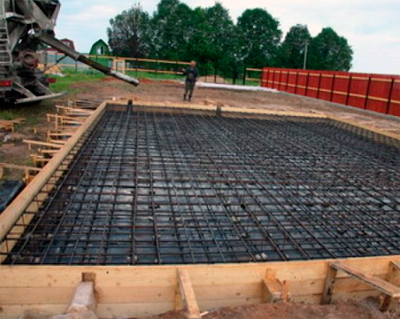 The foundation is poured in several ways. It all depends on the availability of the site for the construction mixer, in the common people "concrete mixer".
The easiest way to supply concrete is to pour it directly from a concrete mixer through a tray or through a special hose directly into the formwork.
This is if there is an opportunity to drive close to the construction site. If this is not possible, then the concrete is fed along a long gutter from the boards, pushing it with a shovel, through each meter until the mixture reaches the formwork.
After unloading concrete must be tampedso that it fills all cavities evenly. To do this, use a vibrator, immersing it in concrete every meter. In principle, in the absence of a vibrator, concrete can be compacted with a shovel.
Next, the slab is leveled. The level is set with special beacons even at the stage of laying the reinforcement. If the top edge is the edge of the formwork, the process is simplified. Otherwise, you can use a stretched rope or pieces of reinforcement. To align, use a long piece of board or an aluminum ruler, starting from one edge and smoothly leading to the opposite end along the beacons.
After pouring, sealing and leveling concrete needs to mature... In this case, it is necessary to observe some rules:
- the concrete must not dry out. In the early days, it must be moistened with water. It is also necessary to do this in the summer heat.
- the concrete should not freeze. If work takes place in winter, the stove must be heated either from a heat gun or by electric heating elements immersed in concrete. At temperatures above + 5 °, it will be enough to cover it with a film or roofing material.
- concrete should not be exposed to atmospheric precipitation during the setting period.
When buying concrete, you need to seriously consider the choice of the supplier. There is a risk that instead of the concrete grade you ordered and paid for, you will be brought a lower, and therefore cheaper grade. It is almost impossible to distinguish this for a non-professional.
It is not recommended to contact intermediaries. The best thing order concrete at large precast concrete factorieswho supply concrete for the construction of monolithic high-rise buildings. In this case, the risk of running into an unscrupulous supplier is much lower or, at all, absent. Prices there may be slightly above average, but you will have some quality assurance.
What makes up the price of a monolithic slab foundation
Now let's discuss the cost of concrete and the cost of pouring the foundation.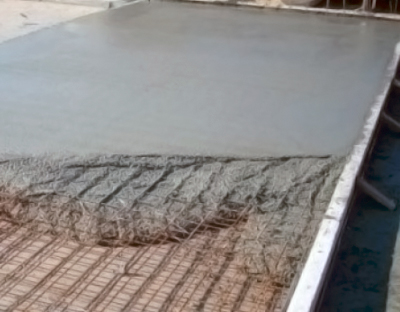 The price of concrete will be from 2500 to 3800 rubles per cubic meter without delivery. For delivery, you need to take another 300-500 rubles per cubic meter, but not less than 3500 rubles for leaving the car.
For a house with a foundation size of 10x10 m and a slab of 20 cm thick, we need, roughly speaking, 20 cubes plus delivery. From here comes (on average): 20 * 3000 \u003d 60,000 rubles for concrete and 400 * 20 \u003d 8000 rubles. Pouring 100 m2 of foundation will cost us 68,000 rubles if we do everything ourselves.
Construction companies offer the following prices: pouring 100 m2 of "turnkey" foundation in central cities will cost on average 4000 rubles per 1 m2... Total 400,000 rubles for your foundation. Yes, this includes rebar, crushed stone, sand, insulation and work. But even if the price of all these materials will cost the same, it is much more profitable and cheaper to do everything yourself.
From all this, we can conclude that a monolithic slab foundation is the best option for the construction of buildings on difficult soils and in hard-to-reach places.
Also, it is quite possible to fill it yourself, without much experience. This does not require special equipment, except perhaps a concrete mixer. The soil can be removed with shovels. It will be much cheaper than contacting a construction company. You can save on labor, extra charges and the risk of being deceived by unscrupulous builders. (if you suddenly come across just such). To do this, you just need to study the necessary information, find helpers and get a job.
We offer you to visually familiarize yourself with all the stages of pouring a monolithic foundation slab by watching the following video material:


