AT own home - pleasure is not cheap. Like other types of engineering equipment, the heating system is installed seriously and for a long time. The heating boiler, its piping, control automation can be improved or replaced over time. Utilities located hidden, including pipelines, will last at least half a century. You need to do this work in the best way.
At a minimum, the homeowner needs to understand what the equipment supplier is offering and what the invited plumbers are doing. As a maximum, he can do the work himself, saving a considerable amount. Without skill, you should not undertake the installation of a boiler room, but you can figure out how to lay a warm water floor yourself.
Project - why is it needed?
Heat engineering is an exact science. The right solution is to order a project of a water heating system from a specialist... If you buy most of the equipment in one place, a decent company will do it for free. If you order the project separately, it will cost from 2000 rubles and higher.
The designer will accurately calculate all the heat losses of your home, draw up a rational communication scheme, and select the appropriate equipment. The scheme will include all the necessary solutions to create the necessary thermal comfort and economical fuel consumption. A qualified engineer will be able to provide the best combination of comfort / economy / price indicators.
In the part of the warm floor in the project, you don't have to think how to install a warm water floor: will be reflected in detail layouts and connections of pipelines with an indication of the required geometric dimensions, specification of materials.
If you still work without a project, you should understand a few basic points.
How to install a warm water floor in the house yourself?
Device
A water-heated floor has the following structure:
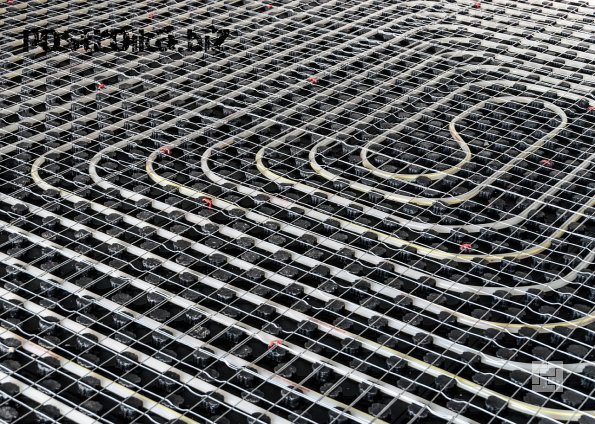
- Contours... Heating of individual zones is provided by separate pipelines through which the coolant circulates. They are located in a layer of concrete or cement-sand mortar with a thickness of about 5 cm. In order for heat energy to be transferred into the room, and not to go into the ground or floor, a layer of insulation is placed below. The pipe in each of the circuits must be solid; connections are not allowed.
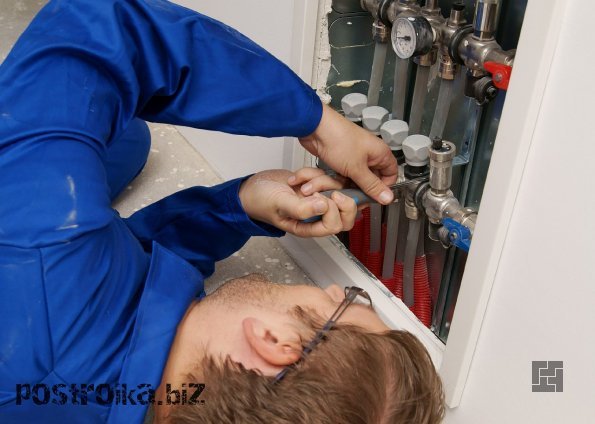
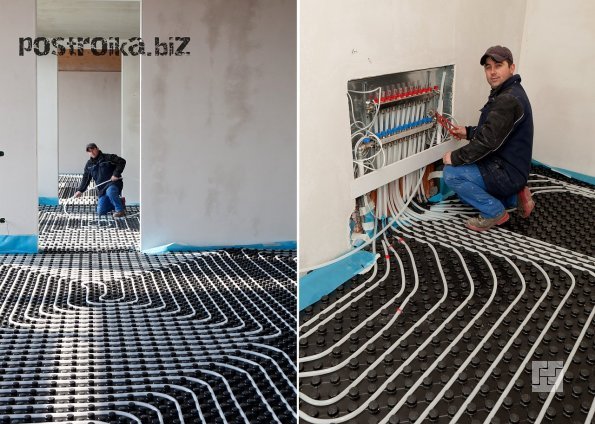
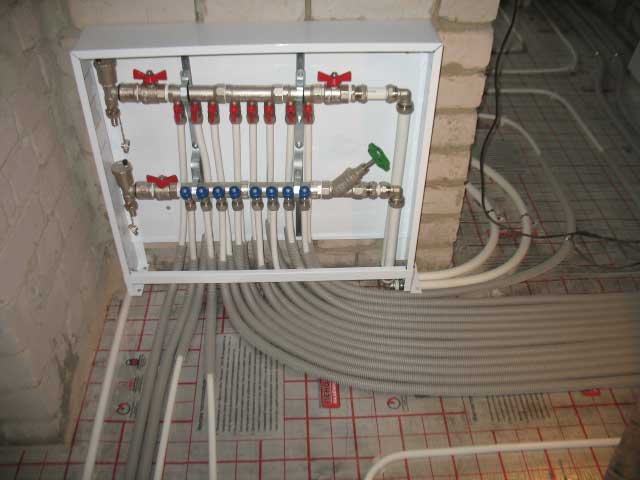
- Collector (comb)... All circuits on the floor are connected to one collector. It has two distributor combs: supply and return.
- ... Since the temperature of the coolant should not rise above 40 ° C (in batteries it is often higher), a mixing unit is located at the inlet to the collector, which mixes the cooled liquid from the return to the hot liquid from the supply line.
- To ensure the proper circulation rate of the coolant, set on the collector pump.
- Control... Automatic or manual regulators are installed on the mixing unit and each of the circuits.
Pressure drop and circuit length
Hydraulic resistancearising from the flow of the coolant through the pipes should not be too high, otherwise standard pumping equipment will not be able to effectively "push" the liquid. The longer the pipe length, the higher the resistance. It is recommended not to exceed the value of 120 m. Making the contour too short is also unprofitable, the costs unnecessarily increase.
The optimal (economical and efficient) loop length is 80 m.
Different circuits located on the same manifold must have similar hydraulic resistance. Otherwise, it will be difficult or impossible to balance them.
The difference in the length of pipes of individual circuits should not exceed 20% and exceed 15 m.
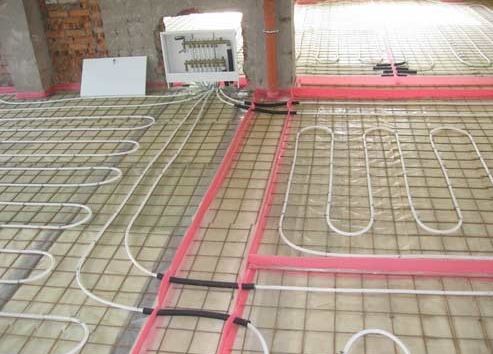
Laying schemes
It is possible to lay the warm water floor in a separate circuit in two ways: snake and spiral
When laying snake pipe is located series-parallel, like stripes on a vest... The disadvantage of this scheme is the uneven distribution of temperature: where the coolant enters the circuit, there is heat. Closer to the exit, the floor cools down noticeably. The improved double snake partly solves this problem..
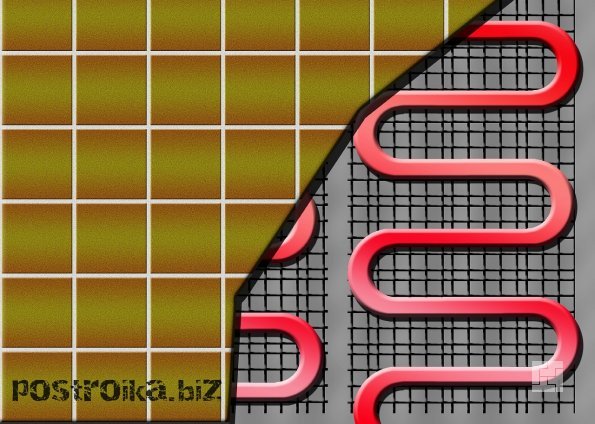
When laying spiral (meander) the issue of uneven heat distribution is not worth it: the supply and return pipes, alternating, are in each loop side by side, mutually balancing the temperature difference. In rooms with large windows, a double snake is used to compensate for heat loss. First, the first spiral is laid out closer to the stained-glass window, which will be warmer due to the fact that the supply is connected to it. Then, without interrupting the contour, a second meander is laid, which will heat up to a lesser extent. Spiral pipe laying is more time consuming, but allows for higher thermal comfort and is used more often.

Distance between pipes
The step between the pipes is determined by the heat engineering calculation. The distance to the outer walls is reduced, and further from cold areas it is increased. 15 cm is considered optimal, it is not recommended to place pipes closer than 10 cm. When cornering, the bending radius should not be less than 5 diameters.
In practice, for central Russia, the pipe spacing for fully underfloor heating in a house is on average 10-15 cm, when combined with radiators - 15-20.
Pipes
Widespread two options: metal-plastic and polyethylene PE-X pipes. Metalloplast is more plastic and therefore more convenient when laying out. However, when pouring concrete, it will have to be handled with care, unlike polyethylene. There is no significant difference in properties, durability and price between them.
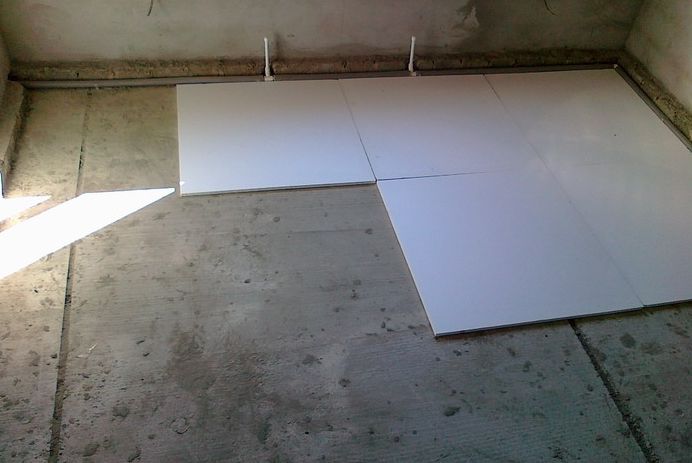
Insulation
It is necessary to insulate the heating floor structure from below. When choosing a heater, there are two restrictions: it must be hydrophobic (do not absorb moisture) and hard... Application gives excellent results foam glass and extruded polystyrene foam... Also use high density foams PSB-35 and PSB-50... Above the first one, it is necessary to reinforce the concrete screed with a metal mesh, the second one is desirable.
The minimum thickness of insulation for floors on the ground should be 10 cm, on floors - 50 cm. Better - more, fuel will be more economical.
We mount a building structure and lay pipelines: how to lay a warm water floor correctly
- We order a project or draw up a scheme ourselves, determining the location of the contours and the location for the collector. All supply and discharge pipes, supplies from main risers should come to it. It is also necessary to connect the power supply to it. The manifold can be housed in a standard sanitary cabinet.
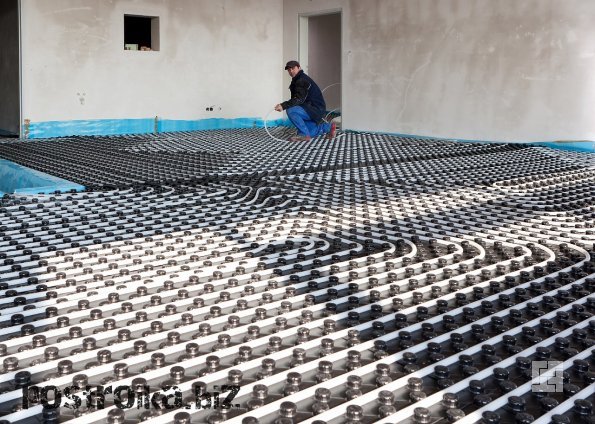
- Preparing the base, if necessary, we do. We lay the insulation. In addition to flat, polystyrene foam plates are sold with one side on the entire surface protrusions - "navels"... It is much easier to lay pipes between them than on a flat base. If a cheaper insulation with a flat surface is chosen, it should be additionally closed on top foil or foil foamed polyethylene... Be sure to lay along the perimeter of the room damper tape, more often it is a strip of foamed polyethylene.
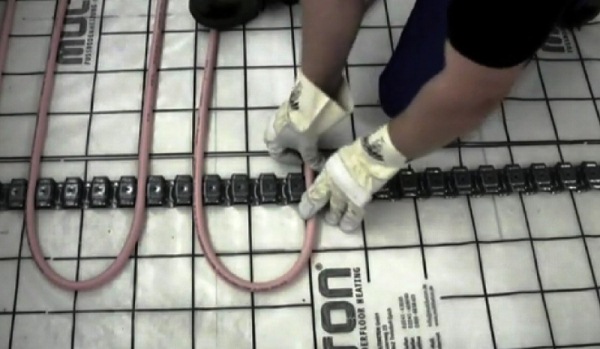
- Expand the contours. How to properly lay a warm water floor on a flat insulation? We'll have to fix it. In extruded polystyrene foam with anchor clips. Into the foam glass with dowels and plastic (not wire) clamps. When mounted on foam, it is convenient to tie the pipes to the reinforcing mesh. We collect the collector.
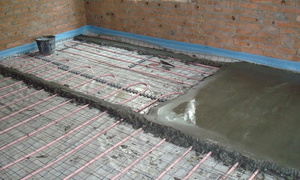
- Have we lay the concrete part of the floor... You should try to complete the concreting in one shift so that there are no seams left. The optimal layer of concrete or mortar above the pipes is 35 mm... In order to avoid cracks, the screed must be divided by its full height with expansion joints that coincide with the boundaries of the contours. The maximum distance between the seams is 9 m, the maximum allowable area of \u200b\u200bthe "one-piece" site is 40 m2... The seams are cut in the ready-made concrete or are formed when laying the mixture by inserting a damper tape at least 6 mm wide into them. During the placement of concrete, the pipes must be filled with liquid or compressed air under operating pressure.
- We finish the screed material with high heat transfer: ceramic or stone tiles.
It is possible to turn on the heating (supply a coolant with a temperature of over 25 ° C) only three weeks after the screed is made, not earlier.
Now we know how to lay a warm water floor yourself... The task as a whole is not very difficult, especially if there is a project. Being neat and observing the basic rules, even a “kettle” can handle it. With a lack of experience to assemble the collector and, even more so, the boiler room and control systems, it is better to invite specialists.
A water-heated floor can be used as an independent heat source and in combination with other types of heating. Errors in the installation of such a heating system can lead to serious consequences, for example, flooding of neighbors from below. But knowing the basic principles of styling, you can cope with this work yourself.
Types of flooring for warm floors
Not all floor coverings conduct heat equally well. The best indicators of thermal conductivity are possessed by ceramic tiles, this parameter is worse for parquet and laminate, and carpet conducts heat least of all.
Wood floors dry out as a result of heating, so they are used in systems with temperatures no higher than 27 ° C. Floor boards should be no wider than 150 mm and no thicker than 16 mm. When choosing a parquet board, preference should be given to the material not with varnish, but with an oil coating.
The instructions for most brands of laminate indicate that it should not be heated above 30 ° C. And if the temperature of the electric and infrared floor is regulated quickly enough, then the hot water in the pipes cannot cool down instantly and can ruin the flooring. As flooring for underfloor heating systems, it is allowed to use a specialized laminate with good thermal conductivity. The layer thickness should not exceed 7 mm, otherwise it will poorly transmit heat.
Laying a water-heated floor under the screed
Before you start laying, you need to prepare the surface. It is necessary to carefully align subfloor: patch up depressions and eliminate protrusions or use for this purpose self-leveling floor ... In this case, the deviation from the horizontal should not exceed 5 mm over the entire area of \u200b\u200bthe rough surface. Otherwise, the distribution of water in the pipes will be uneven, and due to air congestion and increased hydraulic resistance, the system will work intermittently, or even completely fail.
The system requires a waterproofing layer, especially if there is soil under the floor or unheated room... Waterproofing will prevent the penetration of condensate into the thermal insulation material, reducing heat loss.
The most common and inexpensive type of insulation material is roll film or roofing felt ... They stick to the surface construction hairdryer or a burner. This method is used for waterproofing large rooms. It is more convenient to use in small rooms mastic water-based - this type of waterproofing provides better moisture protection and is easier to install on your own. To prevent leaks at the intersection of the damper seam in the screed and the connection of the pipe to the manifold, these sections of the water circuit are placed in an insulating corrugation.
To compensate for thermal expansion and pressure of the screed on the wall as a result of heating, as well as to isolate the wall from heat, use damper tape ... This material is laid around the perimeter of the room, without missing doorways, columns and other structural elements. With the help of a damper tape, expansion joints are also created between screed sections - they are necessary when laying a floor in a room with a large area or a complex, elongated shape. In this case, several water circuits are used for individual sections into which the room is divided.
The insulation layer will prevent heat loss and migration to the underlying surfaces, as well as create an additional sound insulation effect. Today on the market there are insulation based on mineral fibers or foam materials, which are available in rolls or plates. For each type of thermal insulation, there are certain installation schemes.
The most commonly used thermal insulation material is expanded polystyrene which has the properties of foam, but is more practical. Polystyrene foam insulation can be smooth, or have grooves or bosses to facilitate the process of laying and fixing pipes. Convenient to install insulating material in plates with already applied markings for the installation of the water circuit. This option is ideal with a sufficient ceiling height, if you want to keep the maximum height of the room, it is better to choose foil insulation.
Mineral wool Available in rolls, hard slabs or flexible mats. The advantages of this material: fire safety and high heat transfer of the system. The flexible mat is a mineral wool, the surface of which is coated on one side with a layer of non-combustible perforated paper. This form of insulation is used for floor insulation in an apartment. Mineral wool slabs are more rigid and are used for thermal insulation of floors adjacent to the ground. Today, among the heat-insulating materials of this type, the most demanded is basalt insulation ... It is durable, non-combustible and has good sound insulation properties.
For thermal insulation of the warm floor is used and cork insulation , which has high strength and sound insulation characteristics.
Laying methods
There are several popular styling methods water floor : spiral, "snake" and "double snake". Spiral pipe laying is most effective - with this arrangement, the warm floor heats up evenly due to the alternation of pipe turns with hot and cold water. In the “snake”, as the distance from the collector increases, the coolant temperature becomes lower. The double "snake" is able to slightly compensate for the temperature difference, but it is very laborious to install.
When laying water circuit Remember that the temperature difference between the inlet and outlet should not exceed 5 ° C. If this is not taken into account, the floor will remain cold in areas far from the collector. To monitor the temperature, it is recommended to install sensors: one after the pump at the inlet to the system, the other before the pump at the outlet. The efficiency and operability of the system are checked before the screed is poured - during the test run, it is possible to reveal the defects made during the installation.
A small gap is required between the pipe and the floor surface. The water circuit is attached to reinforcement mesh with help clamps , clips or fixing strips. Many manufacturers offer convenient mounting solutions, such as a stapler with staples that securely fix pipes to a base plate.
Using embossed mats with grooves and latches greatly facilitates installation; installation of a warm floor on such a base does not require the use of special devices and tools.
The distance between the pipes should be 10 - 30 cm. If the warm floor is the only source of heating, select the minimum value. The laying step is reduced at the outer walls.
It is important to make the correct calculation of the number of water circuits and their length: each of them must remain integral and have no joints inside the floor. The maximum length of one pipe must not exceed the calculated values. This parameter depends on its diameter: the thicker the pipe, the lower the hydraulic resistance in it, therefore, the length of the circuit can be greater.
Choice of coolant
To fill the underfloor heating system, the same coolants are used as for radiator heating - water and aqueous solutions based on propylene glycol and ethylene glycol with additives.
What are the advantages of plain or distilled water as a heat transfer medium? First, the price. Secondly, environmental safety. Thirdly, a sufficiently high heat capacity and the possibility of using it in heating systems of any type. One of the most serious disadvantages of water as a coolant is the possibility of freezing at low temperatures, when the entire system can fail. The second significant minus is the corrosive effect on the metal parts of the system. This problem is solved by using materials with low oxygen permeability. For example, XLPE pipes with an oxygen barrier are resistant to corrosion and deposits, as well as abrasion and mechanical wear. Unlike antifreeze, which requires replacement every 3 to 5 years, the water in the underfloor heating system must be changed at least once a year.
Low price and ability to freeze only at very low temperatures are the main advantages of ethylene glycol-based antifreeze. Additives can compensate for the disadvantages of this fluid: corrosiveness, fluidity, high degree of foaming. Ethylene glycol is extremely toxic and can cause severe poisoning. It is approved for use only because a water heat-insulated floor is closed system.
Propylene glycol based fluids have a low freezing point and low corrosiveness. This option is more expensive than the others, but also more environmentally friendly and safer. The use of ethylene glycol antifreeze is justified if it is very cold in winter.
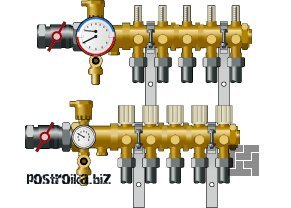
Collector for water floor
Collector connected to the underfloor heating system in order to distribute the coolant at a constant temperature to each water circuit and collect the cooled liquid. The simplest type of collector is a pipe with several threaded connection holes. To use this option for a warm floor, you will have to buy many additional parts.
Collectors with ball valves at the outlets have a significant drawback - they can begin to flow some time after the start of operation. In addition, such models cannot be supplemented with automatic devices for regulating the temperature in the system.
There are also manifolds with control valves, to which you can connect servo drives to control the amount of coolant in the pipes.
Collectors with flow meters on the supply manifold and sockets for servo drives on the reverse are also available. Such devices are designed for systems with different lengths of water circuits: using a flow meter, it is easy to adjust the flow of the coolant that is supplied to each circuit.
Underfloor heating temperature control
The temperature of the warm floor and, accordingly, the air in the room is set thermostat with a remote sensor, which is mounted inside before pouring the concrete screed. The sensor is connected to a thermostat, which in turn instructs the servo to turn the valve to increase or decrease the supply of the coolant to a specific water circuit.
Manual and automatic control of the underfloor heating system is possible. A manual thermostat is a thermostatic head, by turning which the required temperature is set. Such devices are inexpensive, easy to install, but in the process require constant human intervention. The presence of an automatic control device greatly facilitates the control of the underfloor heating system.
Electronic thermostat is a control unit with a built-in air temperature sensor, with which you can set the required temperature. Its simplest type is a box with a handle for selecting the temperature, devices are more complicated - radio-controlled, touch-sensitive and programmable thermostats. Using a programmable device, you can not only set the room temperature, but also select the modes of energy saving or increased heating, set the temperature maintenance time, its maximum value and other parameters.
Reference article based on the expert opinion of the author.
Warm floors today do not surprise anyone, because almost everyone a private house has its own autonomous system heat supply, and the owners plan to install a water-heated floor with their own hands - this, as a rule, is already provided for by the project. Of course, this is also possible in an apartment, but it's a little problematic. Not every company will allow the reconstruction of the general heating system of the house for the sake of your whims, and the installation of another autonomous boiler may turn out to be too expensive as a result.
Warm floors are of several types: infrared, film, electric and water. Most an inexpensive option is water, both in terms of maintenance costs and installation.
Electric underfloor heating is a more expensive pleasure due to the high energy consumption. As for the installation, laying the heating material - the cable - is very simple. Negative trait - low level safety action on the health of residents of the house of electromagnetic radiation.
When deciding to install a water-heated floor, you will achieve considerable financial savings due to the fact that the room heats up more efficiently, faster and more evenly.
The system of water floors is made of metal-plastic or polypropylene pipes, which are laid along the contour in accordance with the scheme of the previously developed project; hot water flows along them with a given property and corresponding parameters. The temperature of the water, as well as the air in the room, is controlled independently using a room thermostat - this is perhaps the most important charm of warm water floors.
DIY installation of a warm water floor
The next advantage of the water floor will be its low energy consumption. Unlike electric or infrared heating, water system significantly reduces the cost of maintaining the system. Here its cons are revealed: possible leak (this can happen if the system was not installed correctly), complex installation work (especially for those who make a warm floor on their own), and more ... in order to lay the system, the floors will have to be raised by about 100 mm.
In addition to the boiler, control valves and pipe circuit, the underfloor heating system includes a distribution manifold cabinet - it is located on the wall of the room where you plan to install heating warm floors... A return and supply pipeline is brought into such a cabinet, which are connected through shut-off valves to the manifold, as well as pipes for the heating system, which are connected to the corresponding outlets.
Important! The presence of valves for exhaust from the general air system is mandatory!
Some points of instruction that must be taken into account before starting pipe-laying:
- Pipes are laid on a pre-prepared floor surface. Its base must be even; for this it is allowed to use self-leveling construction mixtures. If the surface is not even, the floor heating will be uneven.
- After completing the alignment, a waterproofing layer must be laid on the subfloor.
- The most optimal diameter metal-plastic pipes - section 20 mm.
- Each laying loop is made with a single pipe to avoid possible leakage at the joints.
- The thickness of the thermal insulation layer is selected according to the size of the thermal load: the greater the load (temperature), the greater the thickness of the thermal insulation.
- Do not start running the underfloor heating system until the mortar is completely dry (the approximate drying time of the concrete solution is 28 days). Only then can you turn on heating system, gradually increasing the temperature of the coolant. An absolutely ready-made system of water-heated floors will be ready to start working with the selected parameters only after 3 days.
Underfloor heating installation options
There are two options for installing a warm floor: grazing and concrete... In the latter case, warm floors will have concrete surface, that is, a screed, and in the first - polystyrene or wood flooring. The “wet process” is not typical for the flat installation of the underfloor heating system; thanks to this, all installation work is carried out much faster.
However, not everyone has the means and ability to install a water floor, so in this case it is better to hire professional craftsmen. And those who save every penny will have to do everything with their own hands. So, let's begin.
Concrete floor heating installation system
On this moment concrete water floor mounting system – the most popular because of its simplicity. Heating pipes that are laid along the contour are covered with a concrete screed without any heat separators. How is the process carried out?
First you need to divide the entire area of \u200b\u200bthe heated room into small areas; their number depends on the size of the room (keep the ratio of all sides of the divided areas in a 1: 2 ratio). This is due to the further expansion of the screed when the floor heating is connected - under the influence of an increase or decrease in temperature in the general system, the screed will begin to deform, and this must be avoided so that the floor does not begin to crack.
Rough surface must be covered with a layer of insulation... First you need to clean the surface of the floors, then lay a thermal insulation material to avoid heat loss into the floors. Correctly selected and correctly installed thermal insulation material will provide you high-quality floor heating, and the heat will go up. Foam plastic can be used as a heat-insulating material - its layer should be 30-150 mm thick, and the density 35 kg / m3.
Read on how to choose, taking into account the whole variety of types, textures and colors of modern wallpaper for walls.
Find out how to lay laminate flooring on wood floors - complete instructions for installing laminate flooring.
The technology of waterproofing a wooden floor in a bathroom is described in the article:
The thickness is selected depending on the characteristics of the room - how much it needs to be heated. And lay an ordinary plastic wrap on top of the insulation, as a waterproofing layer... Then, over the entire area of \u200b\u200bthe heated room lay the damper tape... It is needed to compensate thermal expansion screeds.
Reinforce the insulating layer, and then lay along the contour of the pipe. The usual reinforcement is a 150x150 mesh, the cross-section of rods is up to 5 mm. If you decide to reinforce the screed, then you can lay additional layer nets already at the end of the laying of heating pipes.
DIY pipe installation
Fixing water heating with your own hands is not a complicated process at all. The project is developed according to a preliminary calculation, according to the scheme of which the pipes are laid. The pitch of the tubes should lie within 75-300 mm, and depending on the geometrical arrangement of the divided sections, a stacking scheme is selected: a regular spiral or with an offset center, a standard or double snake.
Heating elements of pipes are fixed with clamps to the reinforcement mesh, and in the place of the expansion joint, corrugated pipes are put on the pipes in order to provide the pipe with protection from possible damage.
Remember! The length of the pipes should not exceed 90 meters, otherwise the heat loss will be much greater, and the pressure of the coolant will drop in the system.
On average, for each square meter there are 5 running / m of pipes, provided that the pitch between the pipes is 200 mm. The final stage of pipe-laying is crimping... With it, you can identify the existing mechanical damage. Pressure testing is carried out under a pressure of 0.4 MPa for at least a day.
At the end of the pressure test, pouring concrete floor screed... The thickness of the concrete layer should be about 40-70 mm, as a solution, use sand concrete M300 or a special mixture designed for warm floors.
As for the final finishing of the floor, it is performed after complete hardening of concrete... As finishing material try to choose one that has good thermal conductivity, for example, linoleum, ceramic tiles or laminate.
Read about and learn the secrets of choosing this flooring and the subtleties worthy of attention when buying.
A video about wall cladding with MDF panels can be viewed - for those who repair walls and prefer a video format of training.
Warm water floor
If you decide to lay the water floor with your own hands, let's say right away, this task is not an easy one, but in any case, you can cope with absolutely any task set for yourself, just be aware of how to implement it. If you have enough funds to order the installation from specialists, we recommend using their professional services. But in times of crisis, when every penny counts, it will be more expedient to use your strength. In this regard, the topic of the possibility of creating a warm water floor with your own hands becomes very relevant.
It should be noted right away that warm water floors are best installed in a country or private house. In an apartment it is quite problematic to connect a floor heating system to a riser, and the very opportunity for apartment owners in high-rise buildings appeared only with the beginning of the construction of the so-called "elite housing", where the project provides for a system of underfloor heating.
In an ordinary "Khrushchev" or panel house, you most likely will not receive permission to install, you can find out everything by contacting your ZhKO. It is quite a different matter if you are already using heating system and decide for yourself how and to what extent you need to heat your apartment.
Floor device
The warm floor by the type of installation can be divided into 2 types:
- grazing;
- concrete.
Floor mounting is divided into wood system installation and polystyrene, and concrete paving implies that the floor surface will be poured with a concrete screed. The flat view differs from the concrete one in that it completely eliminates all wet processes, due to which the speed of work on the installation of warm floors increases several times.
Underfloor heating installation
Before you start installing a warm floor yourself, you need to familiarize yourself with as much information as possible. First, let's look at the possible installation systems for such a floor in a little more detail.
Underfloor heating concrete system
In modern construction, such a system is the most common installation system, the pipelines of the circuits are closed with concrete and no additional heat separators are required.
Installation technology is guided by the following steps, which must be followed:
- Coating the rough surface with insulating material;
- Installation of reinforcement mesh and installation of pipeline contours;
- Carrying out pressure testing of the system;
- Pouring concrete solution;
- Finishing floor covering.
Dividing a room into sections
The room is divided into sections. The number of such areas will depend on the geometry and area of \u200b\u200bthe room. The limiting area of \u200b\u200bone heated area should not be more than 40 m 2, in addition, the ratio of all sides of the room should be at least 1: 2. For marking, such requirements are associated with the fact that the screed will expand significantly under the influence of temperature and, in order to get rid of cracking of the concrete screed, this must be compensated.
Coating the surface with an insulating layer
A heat-insulating layer must be placed on the previously cleaned base. Thanks to this thermal insulation layer, heat loss from the floor is prevented. The heat will only go up in the heated room. When installing thermal insulation in construction, a variety of materials can be used that are allowed for use for these purposes. The most common building insulation material is foam. Such a heat-insulating layer must have a density of up to 15 cm, depending on the thermal regime of the rooms and the amount of heat loss.
A damper tape must be placed between the sectors and around the entire perimeter of the room, which serves to compensate for the thermal expansion of the concrete screed used. From above thermal insulation material plastic wrap is placed.
Reinforcement mesh and pipeline installation
Reinforcement mesh is laid with a bar section of 0.4-0.5 cm, with a cell size of 15 × 15 cm. There is a possibility of double reinforcement, in which the second layer of mesh is installed over the mounted pipeline.
Next, we begin the installation of the warm water floor pipeline. Depending on the project used, the pipeline is installed in increments of no more than 30 cm, and a scheme for installing the pipeline contours is selected. With the help of special plastic clamps, we fasten the pipeline to the reinforcing mesh, a corrugated pipe is put on the expansion joints on the pipeline to protect it from damage.

Several standard contour layouts are acceptable: double snake, off-center spiral, snake and ordinary spiral. When laying the pipeline along outer wall, it is necessary to reduce the distance between the pipes in order to avoid temperature drops on the surface, the main part of the circuit must pass along the wall, since there is higher heat loss. The approximate flow rate of the pipeline for 1m 2 installed on the surface with a step of 20 cm will be approximately 5 running meters.

Pressure testing of water floors
Upon completion of installation work, it is necessary to pressurize the system under operating pressure to detect mechanical damage.
Pouring concrete mortar
After pressure testing, the concrete screed is poured, while the system must be under operating pressure for at least 24 hours.
During all the rest installation works when pouring concrete, the system must also be under pressure.
The mortar is poured up to 70 mm thick, using special mixtures for water-heated floors or sand-concrete M-300.
Finishing floor covering
After dry concrete mortar you can start laying the final floor covering with linoleum, laminate or ceramic tileswith excellent thermal conductivity.
System pressure testing
Hydraulic testing of underfloor heating pipes is carried out in accordance with existing requirements.
Before carrying out such tests, the pipelines must be filled with water and the air must be completely displaced. The tests must be carried out before starting the pouring of the concrete solution.
During pouring with concrete, the pipeline must be under a pressure of at least 3 bar. The tightness test must be carried out with a pressure 1.5 times the operating pressure.
A preliminary visual inspection of all existing connections takes place, while it is necessary to fully make sure that all shut-off elements are closed behind and in front of the collectors. When testing with air, time is required, which will be sufficient for the compressed air temperature to return to ambient temperature. All pressure gauges used in the system must provide reliable readings with an accuracy of 0.1 bar.
System connection
To connect the pipe to a common hot water supply pipe or to a boiler, you need to install distribution units for each room or one large unit for several rooms. Of course, it is necessary to make sure that this unit does not interfere with the arrangement of furniture and movement. One way to hide such a knot is to drown it in the wall.
In order to install a warm water floor with your own hands to the collector, you need to make a niche in the wall directly for the collector itself or place a collector cabinet in the same niche. This cabinet accommodates two combs and all circuits used for heating the premises are supplied. The combs are different. Some are sold with existing cranes. The most important requirement for the manifold is its compactness.
Do not forget that a crane must stand in front of each pipeline at the inlet on the comb.
These cranes serve two purposes. The first goal: complete coverage of any particular circuit of the system; second purpose: to regulate the supply of hot water, which makes it possible to change the temperature in each heated room.
The temperature in the sectors does not have to be changed manually. The automatic regulation of the temperature in the sector is allowed to make special regulating thermostatic valves. The way they work is pretty simple. The valve sets the required temperature mode, and the thermal head determines the required degrees. This is done thanks to the use of a paraffin wax bottle. Paraffin wax expands and contracts under the influence of temperature, increasing or decreasing the flow at the faucet.
Filling the screed
When a water-heated floor is installed, the top screed can be installed. Before filling the pipeline, it is not necessary to fill it with water. It is quite tough due to its excellent characteristics, but it is imperative to apply pressure to the entire system before filling. For the second concrete screed, special beacons must be installed.
If the layer of concrete screed, which is poured over the pipeline, does not exceed 7 cm, then you can install the beacons on a cement mortar. If it is higher than this value, then it will be very difficult to install beacons on such a concrete solution, since the concrete solution will "float".
Comparative characteristics of warm floors and a radiator heating system
Everything is quite simple with radiators - with a heat source located on the wall, a rather noticeable and not very pleasant temperature difference forms in the room. Let's see why. As we learned in school, warm air rises upward, while cold air rapidly descends downward.
The lateral location of the heating elements leads to the fact that the warmest place in the room is only close to the heat source, then the heated air goes upstairs, and the cooled air goes down to the base of the floor.
So it turns out that the legs are freezing, and there is nothing to breathe upstairs, and even the constant air circulation throughout the room carries dust and forms nasty drafts. All of this leads to countless health problems.
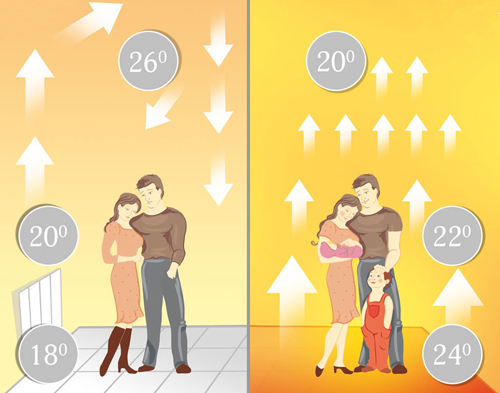
If you install water heated floors with your own hands, warm air will be successfully distributed throughout the room, starting from the lower layers. The legs are wrapped in the most comfortable warmth - 25-30 degrees. In addition, such a constant flow of warm air from the floor saves us from strong and sudden air movements.


