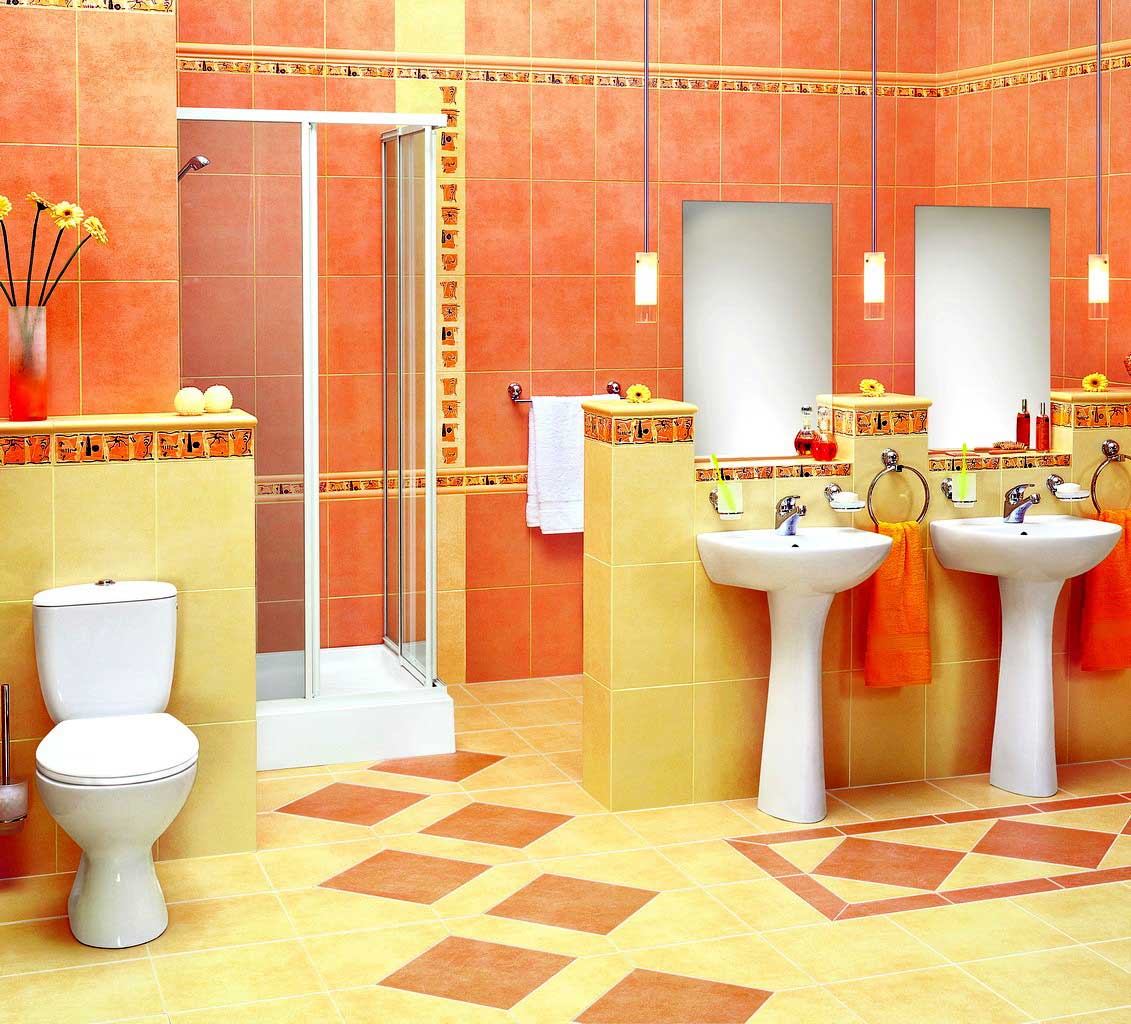
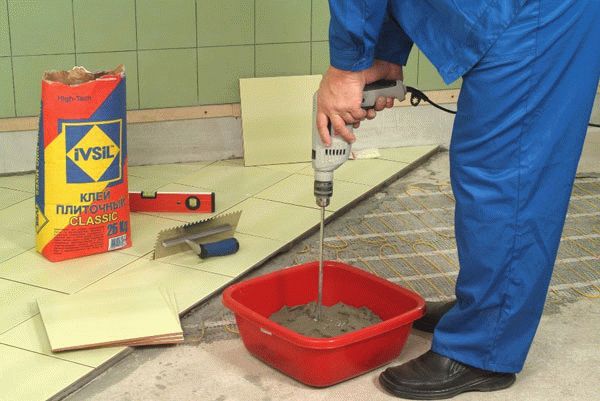
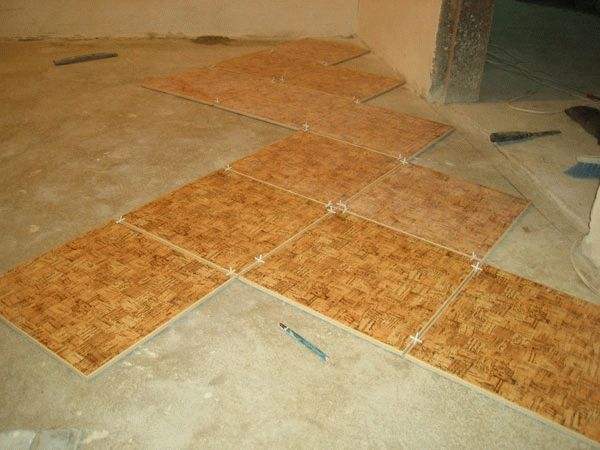
The most popular material for wall cladding is ceramic tiles. It has a waterproof surface, resistant to many mechanical damages. Ceramics competes well with other popular materials such as plastic panels, plywood, decorative plaster and others. About how wall cladding is performed ceramic tiles we will discuss further.
The tile has a number of advantages, namely:
Usually, when facing work, it is assumed that the tile will not change for several years. Therefore, the choice of this material should be approached very responsibly. Today, there is a fairly large assortment of tiles on sale. It differs in the type of surface, color, pattern, etc. Most choose it based only on their color preferences. Although, you still need to take into account specifications and scope. So, there is a tile that has a heat-resistant outer surface. Such material will be required for facing the apron near the stove. In rooms with high humidity, moisture-resistant tiles are most suitable. Calculation of materials
After determining the required amount of work, you should calculate the required amount of materials. This will require a tape measure, pencil and paper. Use a tape measure to measure the area under the masonry. In this case, it is imperative to take into account what corners are in the room. So, for right angles, you will need to provide a stock of tiles. To understand right angles or not, it is enough to measure their diagonals with a tape measure. For measurement accuracy, it is recommended to apply the tape strictly horizontally or vertically.
Cladding technologiesToday there are several types and technologies of wall cladding with ceramic tiles. Namely:
The type of installation method affects how many tiles are required for work. Let's take a closer look at each of these styling options. Diagonal method
This is perhaps the most difficult method to implement, but thanks to it, you can create the effect of distorting space when using tiles of different textures and shades. To begin with, you should correctly draw the diagonal along which the installation will be carried out, and prepare the tool for cutting the tiles. In this case, the required amount of material is calculated in two stages. At the first, you need to provide for how many whole tiles are required with marked diagonals. On the second, determine how much of the cut material will be needed. This value is calculated using the following formula: (DPV) / (1.44 * DP + 2 * RSh), where:
The result should be rounded up. "Seam to seam"
Due to its simplicity, this styling option is most often used. In this case, the tiles are placed in a row. Therefore, you need to ensure that there are no irregularities on the surface. Otherwise, they will be visible. This method is good in that it allows you to minimize the amount of tiles cut. This, in turn, helps to save money on work. You should end up with long horizontal and vertical seams.
In this case, you must always round up. It should be said that this option does not require any additional costs for materials.
"Spaced seam"With this installation method, each subsequent row is lined with an offset of half the tile. It can be performed both vertically and horizontally. If you carry out high-quality cutting of the tiles, then you can achieve cost-effectiveness when laying it. When using materials of different colors and textures, you can create a surface of any configuration. "Herringbone seam"This installation option can only be used with rectangular tiles. In this case, the consumption of material increases by 5-10% than when using a stitching seam. This method is often used for mounting paving slabs... When calculating the amount of material, it is recommended to take 5% more, in case of chips during transportation or during laying. Most often, in this way, the walls are clad with ceramic tiles "Snip". Preparatory workBefore tackling cladding yourself interior walls ceramic tiles, you should study the order of the main work and what difficulties may arise in this case. Fortunately, modern tools make this process easier. The first thing to do is decide on the required amount of work. Perhaps, in addition to the cladding itself, auxiliary measures will be needed, which will ultimately increase the repair time. For example, often before cladding it is required to dismantle old tiles and level the walls. This is preparatory work before facing the walls with ceramic tiles. The price for their implementation is quite reasonable. The cladding of external surfaces is practically no different from the internal work. Ceramics are used to decorate external walls to give the home an attractive look. Porcelain stoneware is popular for this purpose and is considered a cheaper alternative. natural stone... Exterior wall cladding should only be carried out at air temperatures above 5 degrees. Otherwise, microstrains are possible. ToolsTo work, you need the following tools:
Wall cladding methodsWall cladding with ceramic tiles: photo
There are three ways of wall cladding:
Method 1Let's consider in more detail the option of facing with a cement solution:
Method 2
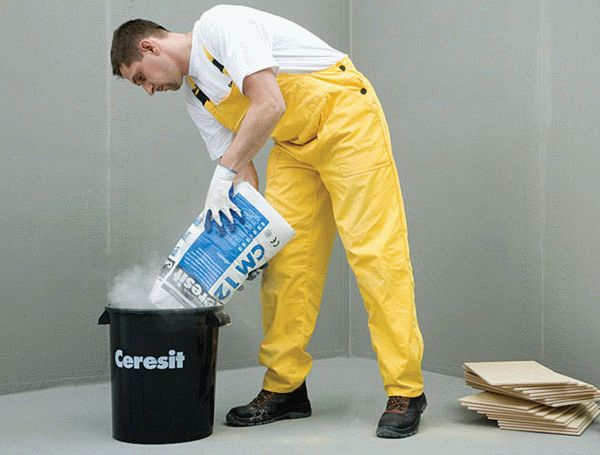
Now consider the option of cladding with adhesive solutions:
Method 3
Liquid nails represent a new way of attaching material. Work order:
Otherwise, this method of facing is practically no different from the methods using special solutions. Wall cladding with ceramic tiles: video |
Household heating and heating and cooking appliances for solid fuel (fireplaces, stoves, stoves) are bulky, and their shape is completely determined by the technical design features. Therefore, to fit a fireplace or stove into the interior, their external decorative finish is of particular importance. The material in this article is intended to help both those who intend to decorate their stove or fireplace on their own, and those who want to order their finishing and accept the work competently.
- This publication discusses one of the ways to improve the appearance of stoves and fireplaces - cladding, i.e. surface finish. She has to work in rather specific conditions, therefore, the cladding of household heating and cooking appliances must meet the following requirements:
- Do not in any way increase the fire hazard of the premises;
- Be durable because any repair of a stove or fireplace is a complicated, expensive and properly feasible business only outside the heating season;
- Hold firmly on the base surface, withstanding as many (ideally infinitely large) thermal cycles (TC) of heating-cooling as possible;
- Facing the fireplace should create aesthetically, as it were, a transition from its purely functional form to an interior of any style;
- Do not undergo noticeable physical and chemical changes under the influence of TC;
- Do not emit harmful and / or hazardous substances into the environment and do not create other dangerous factors;
- To be hygienic, withstand intensive care with the use of cleaning agents;
- The lining of the furnace, in addition, should not worsen its heat engineering and operational parameters, first of all, efficiency, heat capacity, nature and duration of heat transfer. On the contrary, it is desirable that the external decoration of the stove improves them;
- Also, the facing of stoves and fireplaces should not violate their structure (body, structure). Education as a result finishing works hotbeds of thermal and mechanical stresses, cracks and fistulas, through which flue gases can leak into the room, or vice versa, cold outside air to get where it is not needed, should be excluded;
- At the same time, the lining of the stove or fireplace should not be very heavy, because heating devices themselves put a heavy load on building structures.
To fulfill clause 2, it is necessary to agree on the coefficients of thermal expansion (TCR) of the materials of the structure of the stove / fireplace and the cladding, but it would be too difficult and expensive to achieve equality of their TCR. Usually, an astringent base is introduced into the lining structure, which firmly adheres to both the furnace body and the actual finishing material... The binder is selected with a TKR intermediate between the two, and the TKR of the lining so that no mechanical stresses arise in the entire facing cake at the maximum TC amplitude, causing fatigue of materials or exceeding their plasticity limits.
Note: hence the important conclusion - improperly executed cladding can damage the structure of the stove / fireplace not only with metal fasteners, anchors, etc. It can simply "pull" the building material until it cracks. Let's keep this in mind.
The condition of item 3 for fireplaces is determined by the fact that they heat the room mainly with thermal (infrared, IR) radiation from the mouth of the firebox, while the stove is essentially a massive heat accumulator. Modern fireplaces are mostly decorative; they are most often auxiliary heat sources. The fireplace can be heated irregularly, little by little, and its emergency stop will not lead to a threatening situation. As a result of these factors, the conditions of clause 2 for stoves and fireplaces are significantly different: if the finishing of the stove must be counted on a "thermal swing" up to 500 degrees Celsius, then for the fireplace you can put the upper threshold of the shopping center at 150 degrees.
Clause 8 is fundamentally quite simple to perform - it is necessary that the heat capacity and thermal conductivity of the facing materials exceed the same parameters of the furnace structure. Technically, this task has been worked out well over the centuries, and modern facing materials for heating appliances are designed according to these requirements. Everything stated below also takes them into account.
External finishing of metal stoves on the one hand is easier, because the metal is plastic, elastic, and the exfoliated cladding can often be corrected on the go. On the other hand, it is more difficult due to the large TCR of the metal and high temperature furnace body. Therefore, metal ovens are most often painted with heat-resistant enamels; one, but a significant exception will be considered below, but we will deal mainly with brick heating and cooking appliances. It is not easy to fulfill all the above conditions, but the furnace business has existed and developed for millennia. Stove makers, like all high-class craftsmen, are sensible people, so achievements suitable for their work modern technologies usually not rejected. Therefore, for amateurs, the choice of methods for facing a fireplace and / or stove with their own hands is quite wide, see fig. and the list is below:
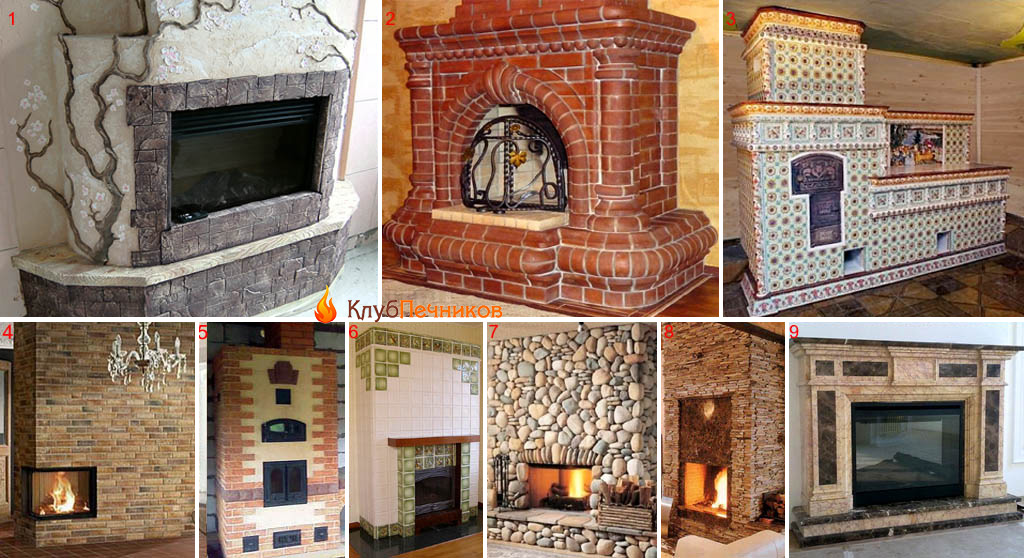
- Plastering with simple or decorative plaster;
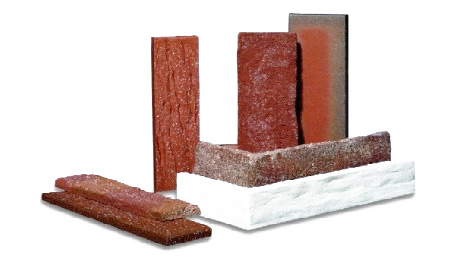
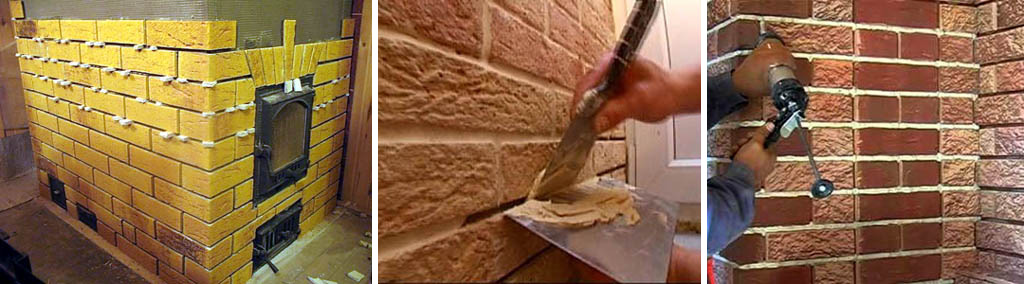
- Finishing with facing bricks;
- Facing with tiles;
- Clinker tiles;
- Facing with ceramic terracotta tiles;
- Facing with majolica;
- Facing with natural stone;
- Finishing artificial stone;
- Facing with marble and other ornamental minerals.
Tile and kerogranite
Often, fireplaces with stoves are faced with tiles and porcelain stoneware. The reason is the relative cheapness of materials, the simplicity and availability of the technology for their installation. But, generally speaking, tiles and porcelain stoneware are not the best facing materials for heating devices, it is difficult to match them according to TCR in a given temperature range, and the values \u200b\u200bof their heat capacity and thermal conductivity in this case are far from the required ones.
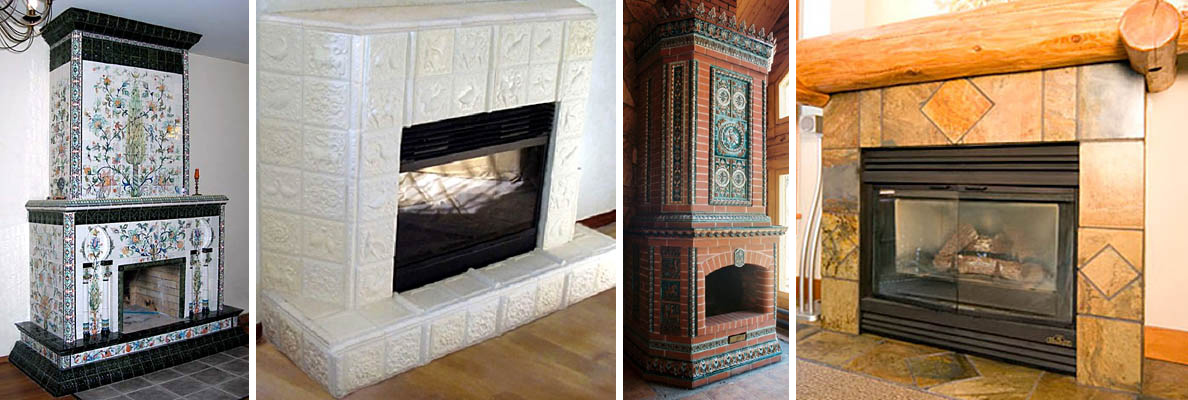
Calibrated white kaolin tiles from the inside can be used for decoration decorative fireplaces, installing it in the same way as terracotta tiles, see below. If the stove is finished with tiles, additional metal supporting elements are required, see eg. video below. But this is not entirely good - parts with a large TKR appear in the structure of the cladding, therefore, the furnace must be previously heated many times.
Video: decorating the stove with tiles on homemade corners
Porcelain stoneware is suitable for cladding heating appliances of the same kind in the same ways, but the tiles must be taken from it of zero caliber. There are other publications on the properties of porcelain stoneware, but in this case it is important that the initial mass was deformed minimally during firing, which means that the shopping center at the place of operation will withstand.
Traditional ways
The first 3 points and positions in Fig. and in the list above - traditional ways of facing fireplaces and stoves. The best of them, but the most expensive and complex, is tile trim, which increases the efficiency of the stove by 15-17 percentage points. For example, if the initial furnace efficiency is 60%, then after facing with tiles it will reach 70%; for this we will return to the facing with tiles.
Furnishing the furnace with a dry-formed facing brick gives an increase in efficiency of 7-9 pp. provided that it is completed at the same time with the construction of the furnace, i.e. decorative brick cladding was included in its order at the design stage. Otherwise, when facing an already standing sinking (running) furnace, an increase in efficiency is possible, as when facing with terracotta, up to 5 pp. the facing brick is then mounted on the fireplace / stove structure in the same way as a stone (see below), but the laborious procedure of its preliminary laying out is much easier.
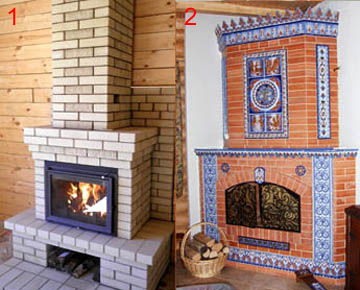
When using a modern insulated fireplace insert with glass and a standard chimney for it, a small fireplace can be entirely made of facing brick, pos. 1 in fig. on right. Only not silicate, in fig. just light! A stove or stove-fireplace with a facing of red facing brick for a simple worker is in good agreement with majolica, pos. 2. However, these and other types of "brick" decor can be achieved more easily and cheaper by facing with terracotta and clinker. But before moving on to them, let's dwell a little on the plaster.
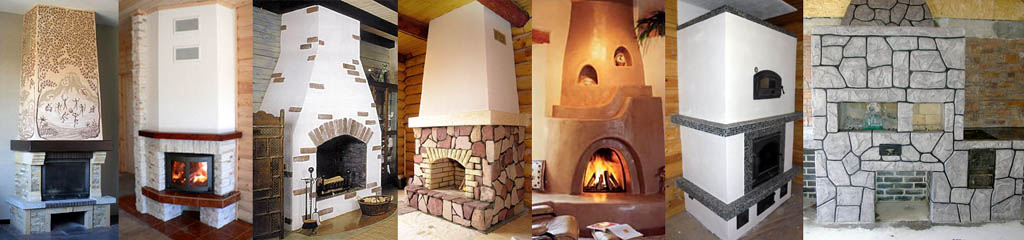
Stove / fireplace plaster
Plastering a fireplace or stove allows you to achieve a good aesthetics of the device in different kinds of interiors, see fig., But it is very time consuming even for simple white plaster. Decorative plasters, for example. Venetian or polished stucco, here you will have to leave it altogether, this is a separate complex topic. In any case, the main obstacle when plastering a stove / fireplace is cutting the seams. If the device is a running and masonry mortar in the seams sintered into a stone, the preparation of its surface for plaster becomes not only long, but exhausting, requiring utmost attention and experience so that a crack does not go in the seam.
Further, the plaster mass needs lime. Gypsum and in the conditions of a fireplace mall soon begins to lose crystallization water, which causes the plaster to dry out. The addition of vermiculite does not save, it only worsens the heat transfer. In general, the procedure for plastering a fireplace or stove is as follows:
- The parts of the furnace structure to be lined are cleaned from the previous finish until there are no traces of it; the last residues are removed with a steel brush.
- The surface under the plaster is moistened by imposing not abundantly moistened burlap or technical waste for 1-1.5 hours.
- The masonry seams are cut to a depth of 9-10 mm with a narrow chisel for cutting grooves - a cross-cutter - and light hammer blows.
- If the device was previously on the move (heated), it will not work right away to cut the seams to the required depth: it is unacceptable to pick a dry clay mortar! In this case, wetting and cutting is repeated several times.
- The surface with cut seams is carefully swept with a brush from dust and crumbs, then moistened with a plastering brush.
- Preparing a primary (starting) plaster mortar consistency of medium thick sour cream.
- The cut seams and the base surface are filled with a starting solution to a thickness of 4-5 mm.
- After the primary plaster dries, the same finishing solution or decorative plaster of the consistency of very thick sour cream or soft plasticine is prepared.
- The finishing plaster is applied with a layer of the same thickness.
- After the plaster has completely dried, a full cycle of putting the furnace into operation (setting on the move) is carried out: drying, a number of accelerating furnaces, a test furnace.
Tile
Currently, traditional methods of finishing furnaces are increasingly giving way to facing with special tile materials; plaster is sometimes used to fill gaps in lined surfaces. Furnace cladding with tiles has a number of advantages:
- Furnace tiles are safe and environmentally friendly.
- There is a wide range of binders on sale (adhesives and primers, see below) for facing heating devices, which makes all the work no more difficult than laying tiles or porcelain stoneware on the floor or walls.
- Facing stove tiles and adhesives for it are fully coordinated according to TKR with brickwork on clay mortar, which ensures the strength and durability of the finish.
- The heating parameters of a tiled stove either improve slightly or remain unchanged. Their slight deterioration takes place in some cases.
- The cost of facing a fireplace / stove with tiles with your own hands and to order is an order of magnitude less than other types of its decorative finishes.
Furnace tiles are made on the basis of annealed aluminosilicate (clay) ceramics; as a rule - dry or semi-dry molding. Ceramic tiles for facing ovens are mainly used in the following types: clinker, terracotta and majolica. Produced flat, L-shaped profile for corners and shaped (figured) - curved, with rounded edges, complex shape.
Clinker and terracotta
Clinker tiles are in some way analogous clinker brick and paving slabs: this is a highly burnt ceramic mass, i.e. fired at 1200 degrees and above. For decorative cladding, a cheaper single-fired clinker is used; molding of the original plastic mass is carried out by the extrusion method, i.e. pushing. The main advantage of clinker tiles is their low cost, approx. RUB 1000 for 1 sq. m, and a small TKR, which allows the facing with seams from 3-4 mm. Disadvantages, firstly, fragility, as a result of which clinker tiles with a thickness of 8 mm or more are required for facing furnaces; fireplaces with their smaller TC can be clad with clinker with a thickness of 6 mm.
The most significant drawback of clinker tiles for cladding heating devices is their rather high thermal resistance; clinker cladding worsens the efficiency of the furnace by 2-3 pp, therefore, fireplaces are mainly clad with clinker tiles. Decorative flaws - rough surface and uneven color - are not fatal. both can be introduced into the overall design, pos. 1 in fig.
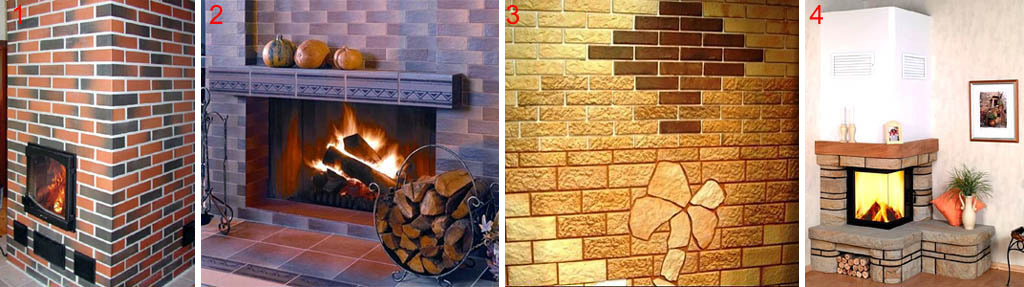
The mass for terracotta tiles is prepared on the basis of pottery clays with the addition of chamotte and mineral pigments, therefore, the color of terracotta tiles for facing fireplaces / stoves is more varied, smoother, you can get smooth color transitions, pos. 2. Forming - semi-dry pressing, firing at 1000 degrees. The increased quality of the initial mass makes it possible to produce tiles up to 40x40 cm in size and more, from the battle of which it is possible to collect figured compositions, pos. 3.
Specific gravity terracotta tiles are smaller than clinker tiles, and they adhere very firmly to glue, which makes it possible to use both design and constructive solutions that are unattainable with other materials. E.g. a cladding belt above the firebox of a compact corner fireplace (pos. 4) can only be made of terracotta; something else from there will soon fall off.
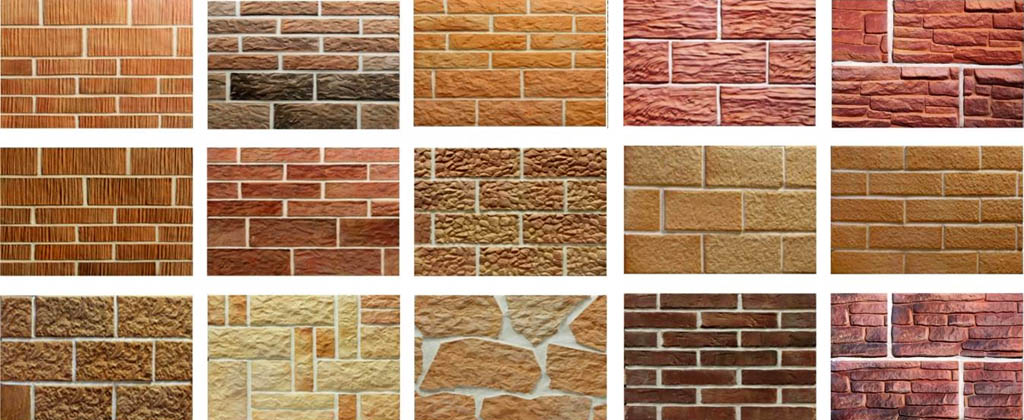
In addition to color, terracotta can be given a texture that imitates many types of brick and masonry, see next. fig. It also has a heat engineering plus: facing the stove with terracotta increases its efficiency by 3-4 pp. Nothing is given for free, so the terracotta is approx. 25% more expensive than clinker of the same thickness. But this pays off with the advantages of terracotta and the fact that the tiles from it for facing under the same conditions can be 1-2 mm thinner.
Majolica
Majolica is a type of terracotta with a glazed surface, on which it is possible to apply a pattern by burning in, see fig. The surface of majolica is smooth and embossed, glossy and matte. Matt majolica in a suitable color is aesthetically pleasing wooden details; this is the only one, apart from very expensive and complex tiles, to inscribe the fireplace into the portal, decorated with wood, on the right in Fig. Majolica in everything, except for heating technology, is equivalent to tiles, but it is worth in comparison with its artistic merits in a divine way: without a drawing, it is 28-29% more expensive than clinker, and decorated with 32-35% more. Majolica is placed on the surface to be faced in the same way as clinker and terracotta, see below.
How to tile
Facing a fireplace or stove with adhesive tiles is carried out with the imposition of a substrate from reinforcement meshthat distributes thermal and mechanical stresses more or less evenly over the area of \u200b\u200bthe lined surface. Without a grid, individual tiles will soon begin to fall off. For this reason, the use of fiberglass mesh is undesirable; a steel one that conducts heat well is needed.
The total thickness of the mesh should not exceed the thickness of the adhesive layer, i.e. 3-4 mm; therefore, the mesh is required from wire no thicker than 1.5-2 mm, with a mesh from 30x30 to 50x50. If the glue instructions indicate a seam thickness of more than 5 mm, you need to use a netting made of wire of the same thickness. It is impossible to use a mesh made of wire thicker than 2 mm, its own thermal deformations can damage the structure of the device.
The cladding itself is possible in 2 ways: with cutting of seams and 2-component glue or without cutting; in this case, the glue can be one-component (for more details on adhesives for oven tiles, see below). In both cases, the tile joints are left 10-12 mm each (thermal deformation!) And are filled with a special one, also for oven works, mineral based grout or silicone filler.
Facing according to the first method is very laborious, because preparation of the surface and cutting of the seams are required, the same as for plaster, but the structure of the furnace is exposed to minimal mechanical stress and there is no metal left in the brick that can cause its cracking by its thermal expansion. In this case:
In the second method, the mesh is attached to brickwork steel hardware without cutting seams. Here is the problem of dowels: cracks can go from steel in the masonry due to the large difference in the TCR of metal and brick, plastic from heating will soften and stop holding the mesh, and with it the entire cladding. For more information on cladding fireplaces with terracotta tiles on glue on a grid, see the video
Video: cladding the oven with terracotta tiles
You can add the following to the video:
- The tile must be glued with belts of no more than 3-4 rows (on the left in the figure below); the next belt is glued when the glue of the previous one is firmly seized. Otherwise, the lower tiles under the weight of the upper ones can crawl and peel off.
- Grouting is started when the glue sets, but does not gain full strength, otherwise, either microcracks will appear in the joints after the grout is completely dry, or individual tiles may peel off.
- The sunken seams are rubbed by hand with mineral grout from a plaster falcon (in the center in the figure). The grout is smoothed with a rubber spatula; its residues smeared on the sides are immediately removed with a damp cloth. Dried grout lends itself only to abrasive, and he will not spare the tile.
- It is more convenient to fill convex seams from the assembly gun, on the right in Fig. For filling joints with silicone, this is the only possible waysince it sticks to the decorative seam tool.
A rock
Stone is used mainly for decorative fireplaces and in some cases (see below) sauna stoves. For facing heating and cooking stoves, its thermal conductivity is too low or, on the contrary, too high, and the increased heat capacity of some rocks / types of stone does not compensate for this.
 The heat balance of a sufficiently efficient and economical furnace must be maintained very precisely throughout the entire heating period. If, for example, a stove is lined with very beautiful labradorite, it will have to be heated for a long time before the heat puffs through the lining. During the heating of the furnace, its efficiency drops, a lot of fuel will be consumed. The heat transfer of the heated stove will be greater than that necessary to maintain a comfortable temperature, the difference between the internal and external temperatures is also greater than the calculated one, and the thermal energy of the excess fuel will somehow go outside, without compensating for its excessive consumption during heating.
Nevertheless, the decorative merits of the stone facing of the fireplace make it very attractive, especially since in the case of the fireplace, the "evil" of the stone facing to some extent turns out to be good. A fireplace is a rather imperfect heating device, its heat balance is not so thin; a lot of heat from the fireplace insert flies into the chimney. Facing a fireplace with a stone allows not only to decorate it, but also to slightly increase the thermal efficiency simply by increasing the thermal inertia of the structure.
Natural
Natural stone for facing the fireplace must first of all meet item 5 of the list of requirements for facing at the beginning. The fact is that many rocks contain crystallization water and tend to lose it rather quickly during cyclic heating. From this, the primary structure of the stone is disturbed, its adhesion to the binder is lost, and decorative qualities fall.
Further, many of the aesthetically acceptable stones for facing are fragments and pellets of brecciated and conglomerate rocks, i.e. granular from components of different composition. For example, granite is a conglomerate of quartz, feldspar and mica. Individual components of a breccia or conglomerate are subject to metamorphic changes, in which the physical structure of the mineral changes, although its chemical composition remains the same. Cyclic temperature fluctuations accelerate metamorphization many times over, and its result is the same as with the loss of crystallization water.
Therefore, such rocks as granite, diorite, gabbro, basalt, diabase, pegmatite, labradorite are not very suitable for facing fireplaces and even more so for stoves. For a long time they will retain their appearance and will not suddenly collapse on the coffee table already metamorphic rocks: sandstones, shale, marble, or requiring special conditions for metamorphization - shell rock and other sedimentary calcareous rocks, or not at all metamorphic, like tuff or travertine. Quartzite is not suitable, quartz is metamorphosed. River pebbles are very good: their base, like sandstone, is feldspar, resistant to "thermal swings". The marine may be from an erupted breccia or conglomerate; it is, so to speak, conditionally suitable for facing a decorative fireplace, fired from time to time.
Note: shell rock in the lining of the furnace will last for 10-15 years, but it significantly increases the time of its heat transfer, without significantly improving the efficiency,
More about granite
Indeed, the radiophone of granite is higher than that of sedimentary rocks. But in many places with a natural radio frequency even higher, strong healthy people live happily from generation to generation. And in any case, the radio phone from industrial emissions, in the words of Mikhail Zhvanetsky, is natural like a bull a sheep.
Fireplace gems
A rosette or insert made of colored semi-precious stone into the fireplace lining is quite affordable for a family with an average income. But - again item 5 comes out of the list of requirements - in physical chemistry, only onyx and rhodonite (orlets, fauerlite) are suitable for this. They give a range of warm colors, from deep cherry to light yellow.
Sauna stove stone
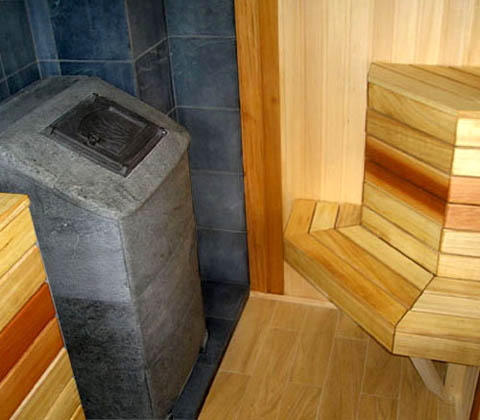
Stone cladding sauna stove permissible, and in some cases simply necessary, but a special stone is needed for it - talcochlorite (talcomagnesite, steatite, wen, soapstone, stove stone, potting stone). It does not wash, but it looks silky smooth, with an oily sheen and micro texture, like a good soap. The color range of talcochlorite is from light gray to almost black, see fig. on right. Sometimes impurities give light shades of all colors of the rainbow.
Talcochlorite does not contain crystallization water and is not subject to metamorphism at all. The thermal conductivity of talcochlorite for stone is very high at a moderate heat capacity, i.e. it almost does not reduce the heat transfer of the furnace and its efficiency. For the flow of thermal radiation, the talcochlorite layer is a semitransparent screen that smoothes the primary IR pulse from the metal furnace.
If your bathhouse turned out to be harsh and with a heavy steam, facing its stove with talcum powder will significantly improve the bathing microclimate. The specific gravity of soapstone is small, and the oven is lined with it in the same way as with tiles, see above and below and with adhesives for oven lining. Unfortunately, talcum chloride is not cheap: there are industrial deposits only in Finland and Karelia.
Note: talcochlorite is unsuitable for decorative facing - its hardness on the Mohs scale is 1-5.5 and varies greatly within one sample, i.e. talcochlorite is scratched with iron, and in some places with a fingernail.
How to glue a stone
Cladding a fireplace / stove with a stone differs from cladding with tiles primarily by its preliminary layout: on the floor with chalk or masking tape, they accurately mark the contour of the base surface and lay out stones on it, trying to keep the amount to be adjusted as small as possible. Then each stone is marked, a sketch of the layout is made and photographed. Adjustable fragments are marked with a different color; them - places for them on the sketch.
Further, for the heaviest stones, hooks are made of 1.5-2 wire, see fig. on right. If the bottom, when installed in place, the surface of the stone is rounded, it needs 2 hooks so that it does not tend to fall out to the side. It is advisable to place stones on hooks not chaotically, but more or less regularly with a step of approx. 500 mm. The upper bends of the hooks are inserted into the groove after the reinforcement mesh is applied; stone lining of the fireplace is carried out only with cutting the seams!
Stones are placed on glue of increased holding capacity (see below) in rows, leaving voids for the fragments to be adjusted. They are adjusted in place and glued in after the glue has completely hardened and it has gained strength, which takes 3-20 days, depending on which glue is used.
Artificial
Artificial stone on cement-sand base, which are paved with garden paths and a blind area around the house, is not suitable for facing heating devices - it will not withstand cyclical temperature fluctuations. For the same reason, an artificial stone on gypsum is unsuitable for interior decoration of heated premises. For facing fireplaces, an artificial stone on a lime or acrylic (polyester) binder is suitable; in particular - artificial marble, see below. The specific gravity of these types of material is not higher than that of ceramics, therefore, the facing of the fireplace with artificial stone is carried out using the same technology as with tiles, but with a preliminary layout, as for natural stone. The layout procedure is laborious and tedious, therefore, if the stone is homemade, it is better to mold it under the surface to be faced during the manufacturing process.
Marble
Lining of stoves and, especially, fireplaces with marble has been used for a long time: natural marble is quite heat-intensive and conducts heat well. Touch it with your hand: it is cold. In terms of heat engineering, marble cladding is even better than steatite, in addition to everything, marble is durable, does not contain crystallization water and is already completely metamorphosed. However, natural marble, especially colored marble, is expensive and its prices only rise and rise. Therefore, at present, fireplaces are faced almost exclusively with artificial marble.
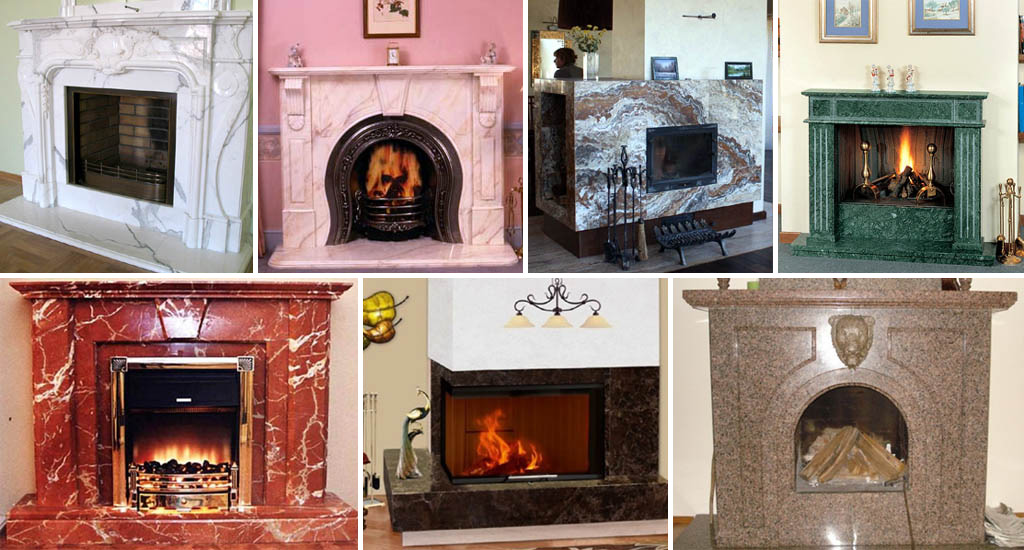
Fireplaces in artificial marble look great, see fig. Produced this material many colors and patterns, even those that do not exist in natural marble or are found as a rare exception. On sale marble parts for facing fireplaces come ready-made, see fig. on the right, or cast according to the designer's sketch. The latter raises the cost of facing not to transcendental heights: facing artificial marble can be made in artisanal conditions and even at home with your own hands.
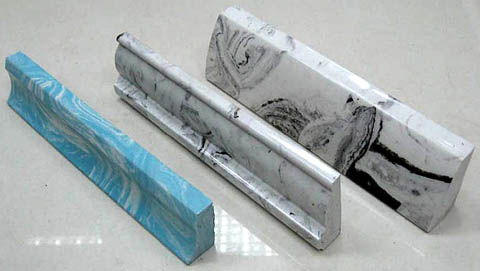
Artificial marble is easy to work with ordinary steel tools and is quite elastic, which makes it possible to fit the finished parts. If you come across a description on the finishing forums of how a team of craftsmen ... folded a front board made of marble, then this is quite possible - the marble was artificial. The disadvantage of artificial marble is poor thermal conductivity, it is warm to the touch. Therefore suitable given view cladding for decorative fireplaces only.

Facing with artificial marble is carried out, as well as natural, by levels (rows): first large boards are glued to the base surface, corners and overlays are glued to them, and convex decor (rosettes, vases, etc.) is mounted last. The adhesive is used special for marble, not gray for natural marble tiles, but white for artistic tiles. The gray marble glue will stain over time.
There is one circumstance that must be taken into account if you are thinking about finishing a fireplace with artificial marble: it, facing, can be cast on a polyester binder and donkey on plaster. The latter is unsuitable for facing heating devices. It is possible to distinguish from cast sedimentary artificial marble by its matte surface and uneven color, which is especially evident on convex parts, see fig. left.
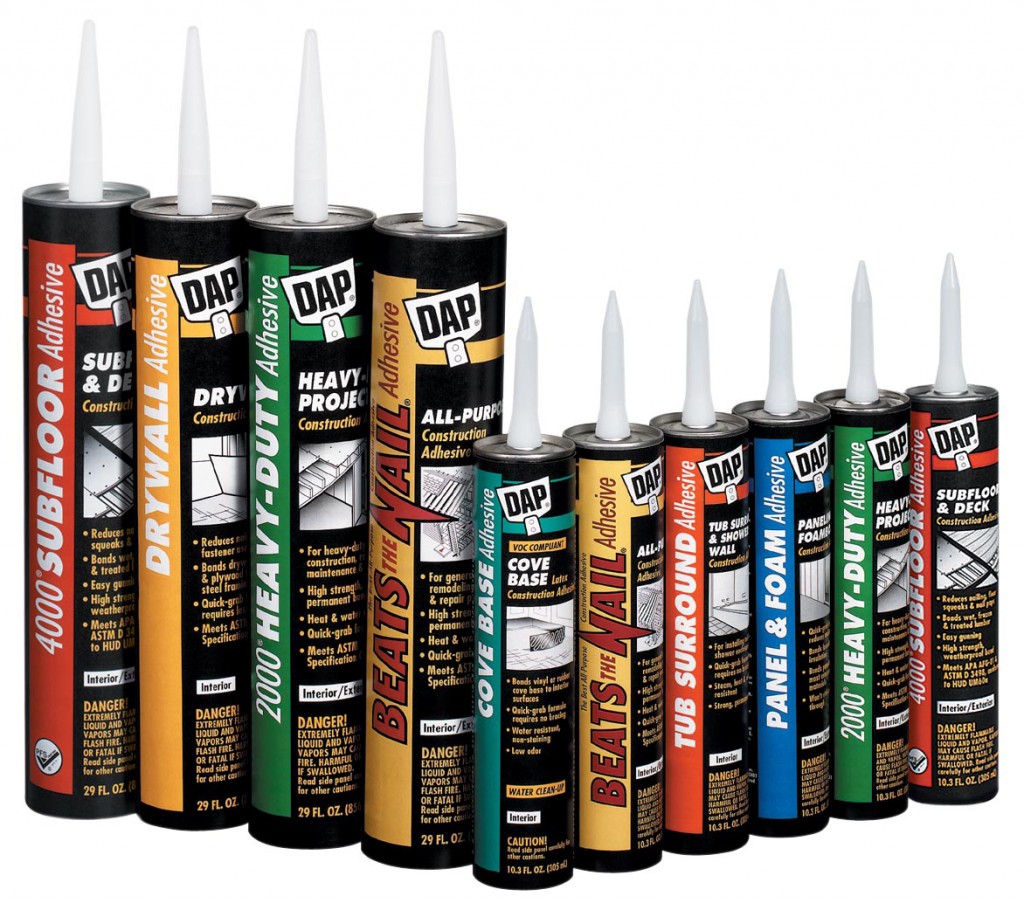
Adhesives and primers for stoves and fireplaces
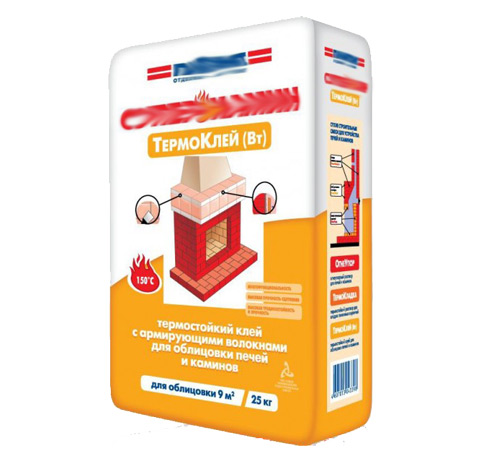
Adhesive for mounting the facing of fireplaces and stoves is produced, as mentioned above, in one- and two-component (glue + primer). Stoves and fireplaces are lined with stone only with 2-component glue. It has also been noted above that for facing with natural stone, an adhesive of increased bearing (holding) capacity is needed. In addition, adhesives for facing oven works are heat-resistant and heat-resistant. The former can withstand a certain number of thermal cycles with heating up to 150 degrees at least, and the latter retain all their properties with prolonged heating to at least 500 degrees.
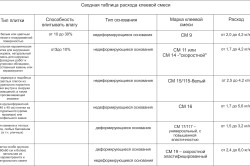
Furnaces are lined only with heat-resistant adhesives. Up to 500 degrees outer surface brick ovens, of course, does not heat up, but at 300 degrees the heat-resistant glue can withstand an almost infinite number of heat cycles. Depending on the type of appliance to be finished and the type of cladding, the following adhesives can be recommended:
- K-77 with primer G-77 - high heat-resistant bearing capacity... Suitable for all types of facing and furnace work. The disadvantage is long, 20-25 days, gaining full strength. All this time, the fireplace or stove must not be heated, and a comfortable temperature must be maintained in the room with them. Relatively inexpensive: 25 kg bag approx. 400 rubles, a G-77 canister for it 200 rubles, a complete grout for joints - 250 rubles. for a 2 kg bucket. All this is enough for a fairly large oven.
- ANSERGLOB BCX 35 - properties are the same as for K-77 / G-77, but more expensive. But it is gaining strength faster.
- Plitonite-Fireplace Fireproof - suitable for tiling not only fireplaces, but also stoves.
- Plitonit-SuperFireplace and SkanfixSuper are heat-resistant adhesives for tiling fireplaces.
- Terracotta glue - specially designed for terracotta tiles. Grabs it on fireplaces with stoves tightly and, judging by the available data, forever. Many have tried to glue them with porcelain stoneware, clinker, majolica; no complaints seem to be found.
- IVSILTermix, Kleos, Weber Vetonit Absolute, Moment Kristall, Ceresit CM-117/5 - are suitable for tiling decorative fireplaces that are not heated regularly.
- BauGut FFK is neither fish nor meat among the tile adhesives for facing fireplaces. Quite expensive, temperature resistance 300 degrees. It can be recommended for a fireplace in a country house not inhabited all the time. For example, if in the fall it completely gets cold, and on a ski trip on weekends and on New Year society drives in there and the fireplace is continuously heated.
About tiles
The tiled stove is a truly luxurious structure, even dilapidated, see fig. However, cladding with tiles is definitely not one of those works that can be performed by studying the technology according to the descriptions; this business is even more delicate, requiring experience and accuracy than facing with natural stone.
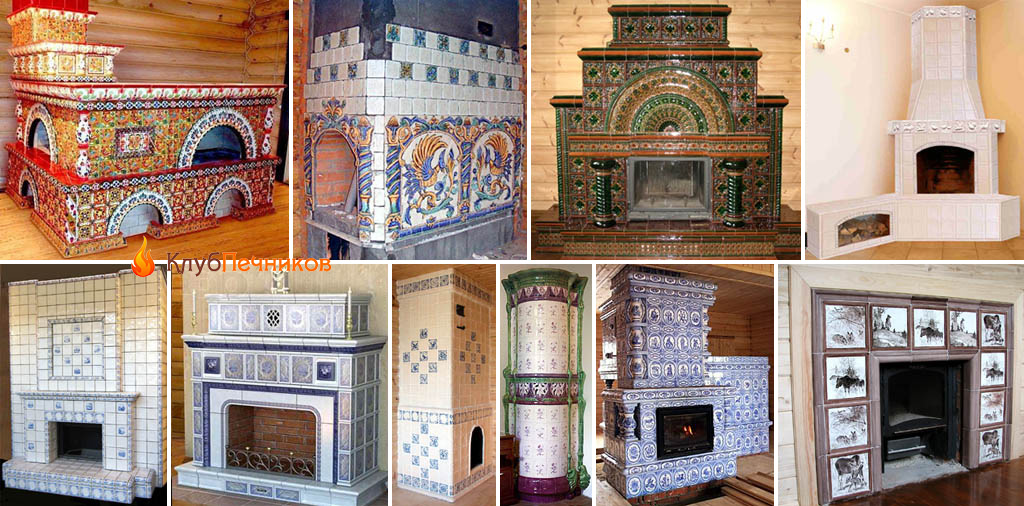
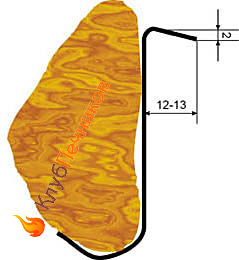
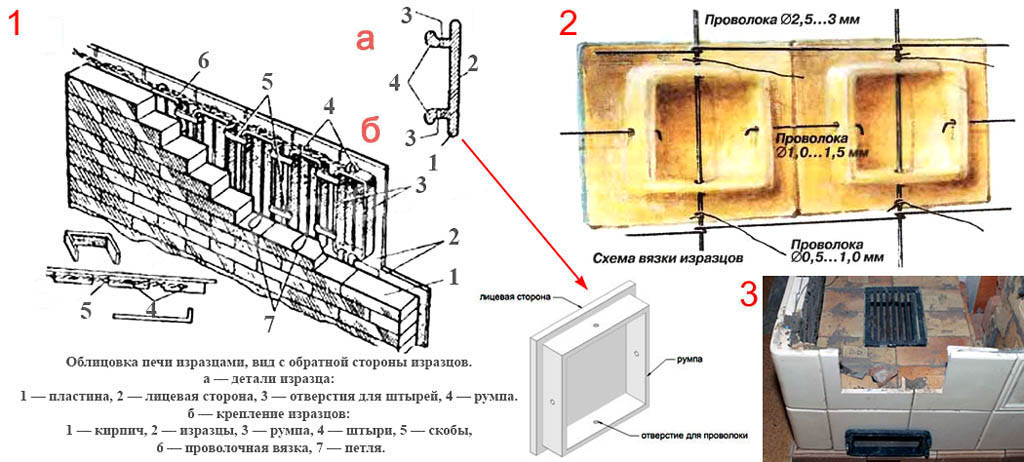
Tiles are generally prepared from the same kaolin mass as high-quality tiles. To agree on the TKR and improve the heating technology of the stove, the tiles are molded box-shaped with a cavity - a rump, pos. 1a on the next. fig. - which is filled with sand during the lining process. Mountain sand is needed with rough grains and a minimum admixture of clay, it does not swell from cyclic heating, does not bake or cakes. Tiles are placed on a greasy clay masonry mortar; clay is used white, sand is the same mountain. Add half a glass-glass of table salt to a bucket of the finished solution.
Before facing, the tiles are laid out and the layout is sorted out, as in the case of a wild stone, achieving evenness of the rows. The sizes of the tiles have been standardized by GOST since 1947, but the tolerance is quite large, approx. 1.5 mm. Less can be achieved due to the properties of the material itself. With a cladding height of 10 rows, the gap of the seams can reach 15 mm, which, you yourself understand, is in no way permissible.
Note: the basis of large art panels on tiles is laid out and adjusted by hand in the factory. Therefore, tiled panels are very expensive, but they are put in place without a layout.
Facing with tiles is carried out in order, tying the tiles with steel pins and wire. As a rule, the stove is lined with tiles in the order of its construction, and the lining must always be ahead of the masonry, as shown in pos. 3. In this case, the tiles are knitted with anchor loops, as in pos. 1b. Some craftsmen (qualitatively - few) know how to tile running ovens with tiles; in this case, the mating is done with anchor pins, pos. 2.
And more about the stone ...
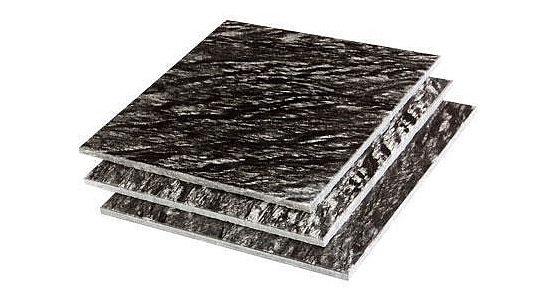
Recently, flexible stone has also been used for facing fireplaces: a textile base impregnated with a polyester binder, on which stone chips are applied “in artistic disorder”. The textures of the first samples were drawn manually, and now the crumb is poured special installations under the control of computers, which allows you to display a wide variety of unique patterns, see Fig., getting generally inexpensive material.
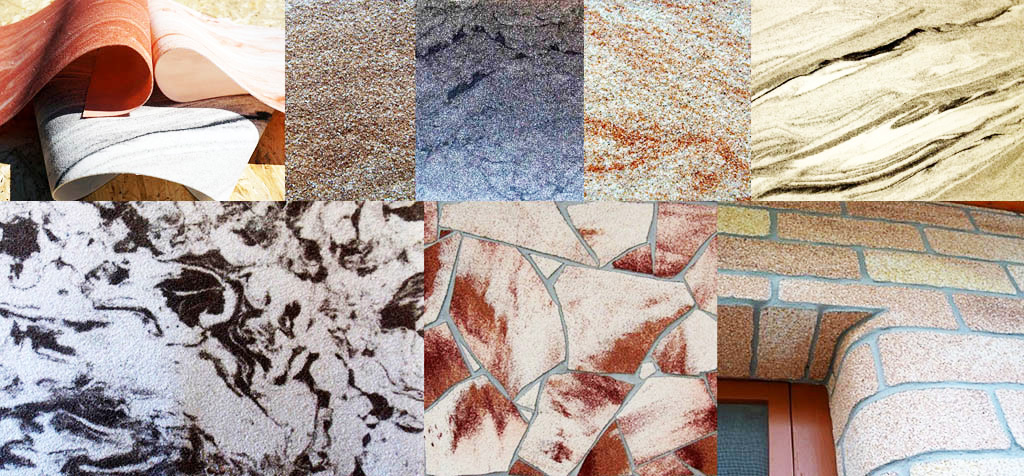
Flexible stone is cut with metal scissors; they can outline curved surfaces (bottom right in the figure). The disadvantage of this material is always a rough surface; No one has yet learned how to get a polished flexible stone. The flexible stone can be mounted on the base surface in different ways, see, for example. track. plot:
Video: flexible stone - how to glue, DIY installation
Laying wall and floor ceramic tiles is not a very difficult job that requires special qualifications and skills. But there are several principles, applying and guided by which, even novice tilers can perfectly cope with the task. It should not be forgotten that wall cladding with tiles is the final stage of work, a kind of make-up. The main part of the work remains invisible, namely the quality hidden works (preparation of the base) and the quality of the finish depends.
When choosing tiles, in addition to colors, you need to pay attention to the physical and chemical properties of the tiles. First of all, you need to check whether they have the same colors, patterns and sizes, paying attention to the geometry of the tiles, whether their edges have a right angle and whether the surface of the tiles is even.
Sequence of work
1. Surface preparation.
The base for the tiles must be solid and correspondingly level, free from dirt, dust, lime, grease and paint residues. All loose plaster elements must be removed. Applying the rule 2 m long, we check all deviations of the wall from the vertical and "through". If the deviations from the vertical and the gaps between the rail and the wall are more than 5 mm, the wall must be leveled.
Wall alignment is done in several ways. Full leveling of the wall is done by replacing the plaster layer with leveling the new plaster along the beacons. Alternatively, the walls can not be plastered, but revetted with waterproof plasterboard (GKLV) or DSP sheets (cement-bonded particle boards). The wall cladding of the cement-bonded particle board is made in the same way as the cladding with plasterboard with the only difference being that it is advisable to additionally attach relatively heavy sheets of cement-bonded particle boards to the wall by dowelling with "fungi" and / or self-tapping screws.
Partial leveling of wall "holes" revealed during the clearance test can be done with tile adhesive, which will be used for gluing the tiles.
Strongly absorbing or dusty substrates such as old lime plasters must be primed. Priming strengthens and stabilizes the base and increases the adhesion of the mortar to the base. Apply the priming emulsion undiluted. Apply the primer evenly to the wall with a brush or paint roller. On highly absorbing substrates, for example, aerated concrete, we perform priming twice. The first time, using an emulsion diluted in half with water, the second - undiluted primer. We priming the walls not only before gluing the tiles, but also before partially leveling the walls with tiled glue. It must be remembered that the tile adhesive gives a slight shrinkage when setting, so you should not try to level the wall "to zero", the main thing is to reduce the gaps. Keep track of the thickness of the applied layer of glue, you do not need to make it thicker than the manufacturer recommends, it is better to apply another layer of glue to the place of the "failure", after waiting for the bottom layer to dry.
If the wall is tiled with firmly held, even tiles, the new tiles can be laid on top of the well-washed (degreased) old tiles. Almost every tile adhesive manufacturer has an adhesive in its product line that is suitable for working on old tiles. Typically, these adhesives have a dual purpose: for lining swimming pools and for working on old tiles. Non-absorbent substrates (old tiles, concrete wall and others) are treated with primers "for non-absorbent surfaces." The most famous primer is Betokontakt. However, before deciding on cladding on the old tile, it will not be superfluous to tap it with a spatula handle or a rubber hammer for "coiling" and peeling. If the tile makes a booming sound, then, most likely, it has peeled off from the base, it must be removed and the "hole" must be repaired with tile glue. Also, it will not be superfluous to glue one test tile over the old one and leave it for half an hour, and then remove it. If the tile is removed only after prying it with a spatula, then it can be glued. And remember that cladding on top of old tiles "steals" the area of \u200b\u200balready small rooms. For example, in a bathroom, cladding over old tiles may not allow a bathtub to be the same dimensions as it was before cladding.
Cladding can be done on walls painted with oil paints, but only if the paint and plaster underneath do not flake off. Otherwise, the paint must be removed with a building hairdryer, remover or mechanically. Before facing walls covered with oil paints, they should be washed with soapy water (degreased) and primed with a primer for non-absorbent surfaces (Betokontaktom).
When cladding walls on plasterboard sheathing in places subject to direct moisture ingress, Knauf-Flähendicht waterproofing must be applied to plasterboard substrates.
2. Marking the rows of facing.
First, it must be said that modern tile adhesives allow you to stick tiles in any way: if you want, glue it from top to bottom, if you want, from bottom to top. The usual gluing of tiles from the bottom up is more a tribute to tradition than a practical necessity, but this method is still recommended for novice tilers, as it is simpler and "forgiving" small mistakes in pasting technology.
Before you start laying the tiles, you need to accurately plan the location of the tiles on a given wall. If the wall size is not a multiple of the tile size, taking into account the joint width, then the tiles will need to be cut. A wall with a symmetrical arrangement of tiles looks better visually (we cut the tiles in both corners). We start laying from the second row of tiles from the center of the wall in any direction. The first, so-called basement row, of wall tiles is best glued after laying the floor tiles. This is done to hide jagged edges. floor tileswhich are less pruned due to their hardness.
Figure: 123. Marking the wall for tiling
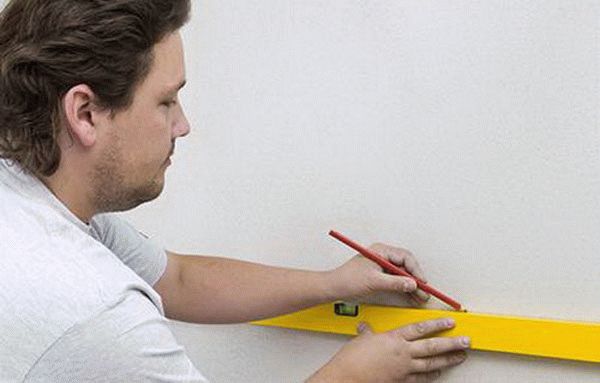
When determining the height of the second row, you need to take into account the height of the basement tile and the size of the two seams (Fig. 123). We start work by marking a horizontal line on the wall and attaching a wooden or aluminum strip in this place. The batten should be smooth and straight, as it determines the level from which to start laying the tiles. Most often, for this purpose, a profile is used for the manufacture of a frame for plasterboard sheathing, for example, a guide ceiling profile PNP 28 × 27.
After removing the horizontal line and securing an even bar or profile, we find the center of the wall and take out the vertical line. By applying tiles to the wall or using a tape measure, we calculate the number of tiles in a row to the corners of the walls. Applying the first tile with its edge to the wall axis or center, we achieve that the tiles in the corners of the walls will be cut by no more than 1/4 of the tile width. Do not forget about the thickness of the tile joint. Seamless installation requires very high quality tiles and high professionalism. The seams "forgive" the small bone of the tile and technological errors.
It is not recommended to place tiles less than 1/4 of the width in the corners - they are difficult to cut. It is better to start laying the tiles from the center of the wall so that cut tiles are obtained in the inner corners of the walls. If a whole number of tiles fit on the wall, then this is very good, but this is an isolated case, therefore the rule of symmetry is observed and the cut tiles "go" into the corners. However, this rule is not a dogma, if the equipment will be located in the room to be tiled and you know in advance where it will be located, then it is better to put a whole tile into the viewed corner, and put the scraps into an unseen one. It is recommended to start the outer corners with whole tiles. Niches and narrow walls are usually made symmetrical cladding, placing cut or, conversely, a whole tile in the center.
Sometimes not the entire height of the wall is tiled, but only part of it, this part is called a panel. In this case, it is more advisable to stick the tiles from top to bottom. With this method of gluing, the top row will consist of whole tiles, and the basement row will be cut tiles. The markings for such laying are done in the same way as described above, with the only difference that the horizontal bar (or outlined line) is installed at a strictly defined height of the cladding panel.
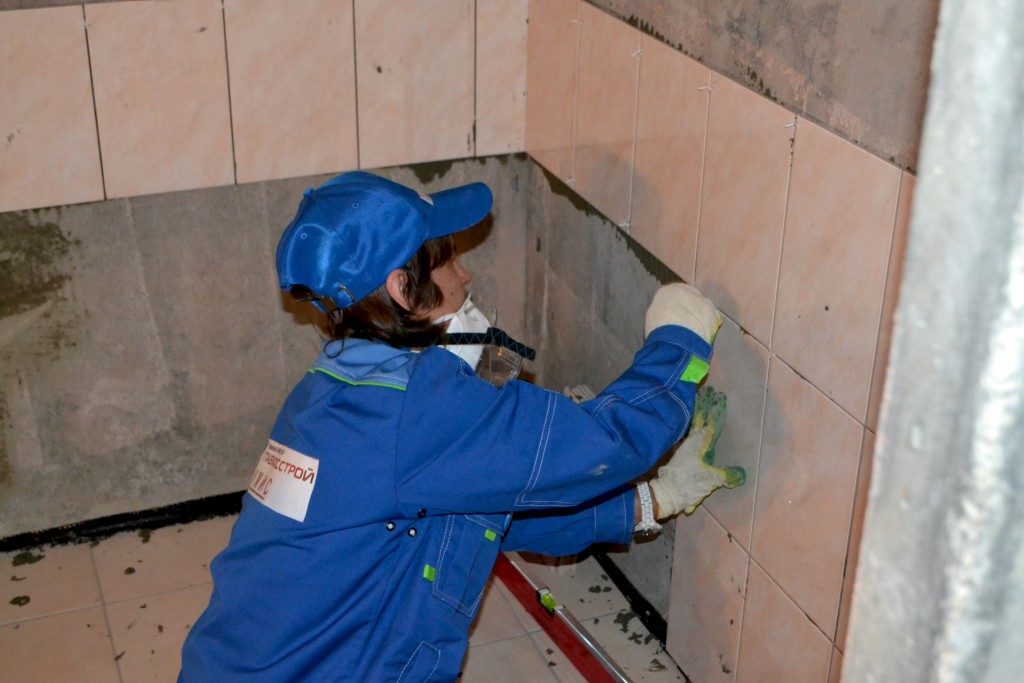
3. Wall cladding with tiles.
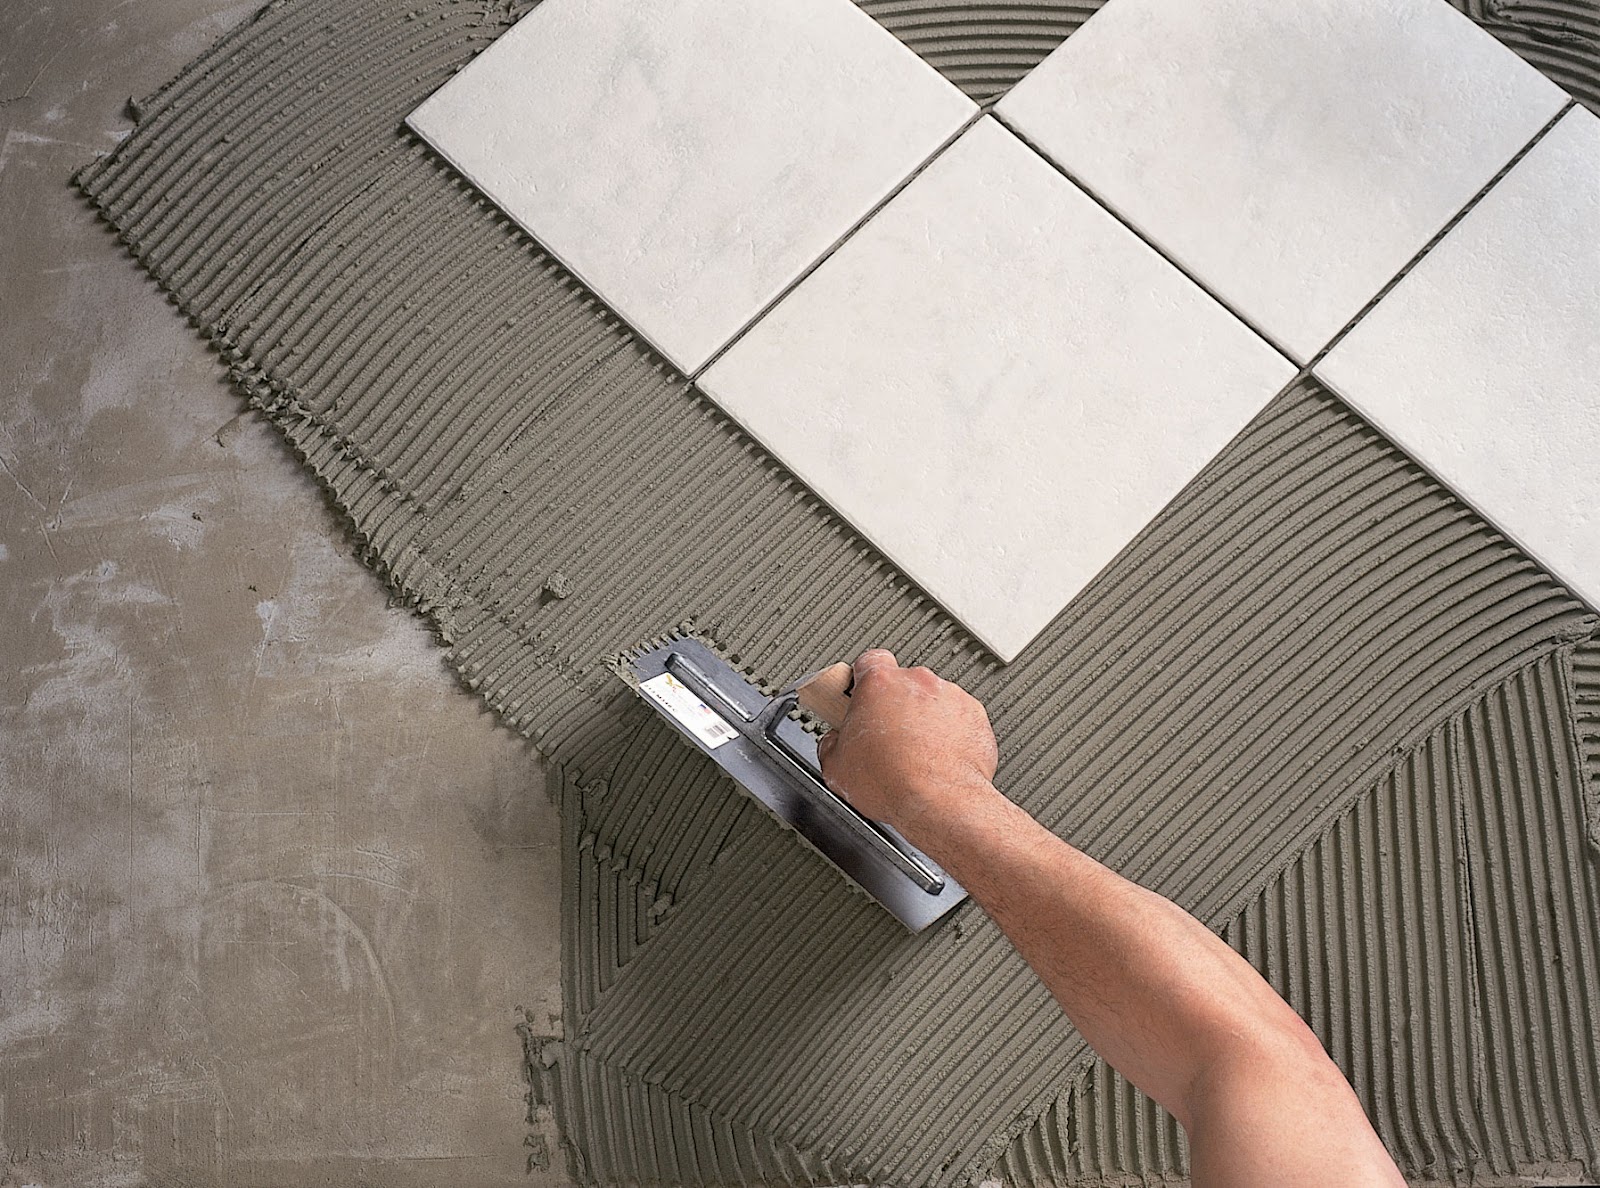
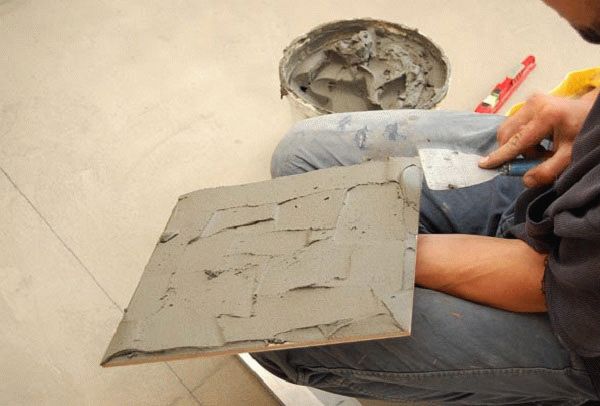
The adhesive solution is prepared according to the instructions on the package. The adhesive solution is evenly applied to the wall with the smooth side of the trowel, and then evenly spread over the wall surface with the serrated side (Fig. 124). We apply the adhesive solution on the surface of no more than 1 m2, since the solution retains its adhesive properties for 10–30 minutes. This time depends on the type of substrate and temperature, as well as air humidity. The mortar, which has already dried on the wall and has lost its adhesive properties, should be removed and a new layer applied. The size of the trowel teeth should be selected depending on the size and depth of the back side profile, as well as the size of the tile. The principle should be adhered to - the larger the tile, the larger the size of the trowel teeth.
Figure: 124. Tile spatula
For thin tiles, use a V-notched trowel with a height of 3–5 mm, for example; for glazed wall tiles, for larger tiles (150-200 mm), square-notched trowels 6 mm high are used, and U-notched trowels are used for large tiles (300 mm and above) and irregular shape, for example, for handmade tiles. The tall ridges that are obtained with a large-toothed trowel will cover the back of large and raised tiles well, but if small tiles are placed on them, excess mortar will be squeezed into the joints between the tiles. Conversely, using a small notched trowel produces ridges that are suitable for small tiles, but not high enough to completely cover the back of large tiles or tiles with ridges.
A small test is performed to determine if the correct notched trowel is selected. The glue is applied to the wall and "combed" with a spatula. After processing the glue with a spatula, glue strips of a certain height are obtained on the wall. Tiles are glued to them. When pressed into the glue, the tile flattens the ridges of the strips, so a layer of glue of uniform thickness is obtained under the tile. Immediately remove the tiles from the wall, turn them over and watch how the glue covers the back of the tiles. If the adhesive covers the entire tile, then the trowel height is correct. If there are places on the tiles that are not covered with glue, you need to replace the trowel with another one with higher teeth.
Handcrafted tiles with very uneven backs, mosaic tilesfixed to sheets and some cut ceramic and stone tiles require additional glue to the back of the tile using a rectangular trowel to achieve full contact between the tile and the substrate. Applying glue to the back of the tiles is additional measure and does not replace its distribution based on. Insufficient or uneven adhesive application will weaken adhesion and cause cracking of tiles and grout joints.
We start laying the tiles from the bottom (fig. 125). Usually, a vertical row is first laid to a height of 3-5 tiles, then a horizontal row (in any direction from the beginning of the facing) to a width of 4–6 tiles. Verticality is checked by level. Then the tiles are laid with a ladder. However, such a sequence of facing, although generally accepted, is not fundamental, you can glue the tiles in a different sequence, it is only important to observe the vertical and horizontal seams. To make the seams the same, we use distance crosses, matching them to the width of the seam.
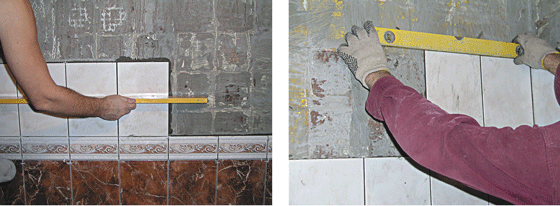
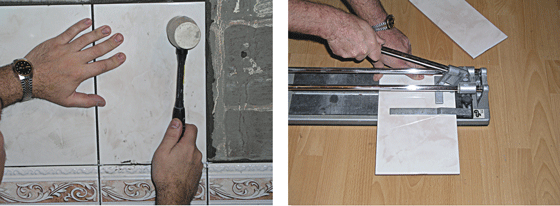
Figure: 126. Wall cladding with tiles
After laying on the wall, we press the tiles by hand, and if the tiles are large, we knock them down with a special rubber hammer (Fig. 126). In the process of work, we constantly check the correctness of the cladding with the level and the rule. If necessary, freshly laid tiles can be siegered with blows of a rubber mallet or shifted, then, when the glue solution sets, it will be more difficult to do this. Let us remind that the life time of the adhesive solution is approximately 30 minutes. We remove excess mortar in the seams until it hardens. During breaks in work, remove excess mortar from the walls.
Trimming the tiles should be done with special tools, keeping in mind that they are of the correct size. Glue the cut tiles separately, last. Remember to observe the appropriate joint width. We finish the lining with seams in all corners. Never space tiles against walls or ceilings (floors). In the future, the building may settle and the tiles placed in the spacer will flake off. Better to have a seam in the places where the tiles adjoin the walls, ceiling and floor, it will partially relieve the tension of the building's settlement.
In the process of work, hard-to-reach places will appear, for example, behind a heating radiator. It is sometimes impossible to apply a solution there and level it with a notched trowel. Therefore, the gluing technology is changed: they do not glue the wall, but the tiles, and level it with a notched trowel. It's easier to reach a hard-to-reach place with a tile than with a spatula.
When wall cladding around pipes, it is necessary to drill the tiles. This is done with a crown drill of the appropriate diameter. However, the availability of the appropriate tool is not always necessary. Holes of any diameter can be drilled in the tiles with one single drill (fig. 127). A circle of the required diameter is drawn on the tile and drilled with a small drill, then the jumpers are cut out with pliers or pliers. When drilling a tile, first place any drill in the place of drilling and pinch the glaze with light hammer blows. Then you can drill with a victory or diamond drill. When drilling with a hammer drill, it must be switched to drilling. Never hammer through the tile - it will crack. Even if you then drill the tiles already on the wall, for example, in order to hang the cabinet, first the glaze is chipped off, then the tile is drilled and as soon as the drill goes through the tile, you can switch the hammer drill to hit and drill the wall.
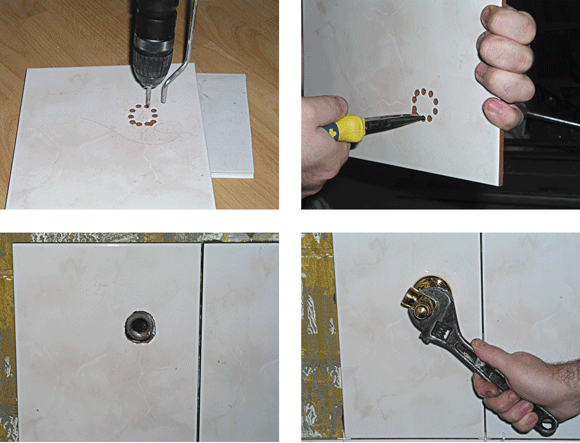 Figure: 127. Device in the tile holes
 At the end of the wall cladding with whole tiles, carefully remove the strip so as not to cause shedding of the lower row of tiles. If there is a layer of mortar under the rail, carefully remove it with a spatula. We tear off the rail by lifting it with a nail puller or screwdriver.
The last stage of laying ceramic wall tiles is the gluing of the lower row. We apply the adhesive solution to the wall surface under the first row of tiles. With this sequence of work, the uneven edges of the floor tiles will be covered by the basement wall tiles.
4. Grouting.
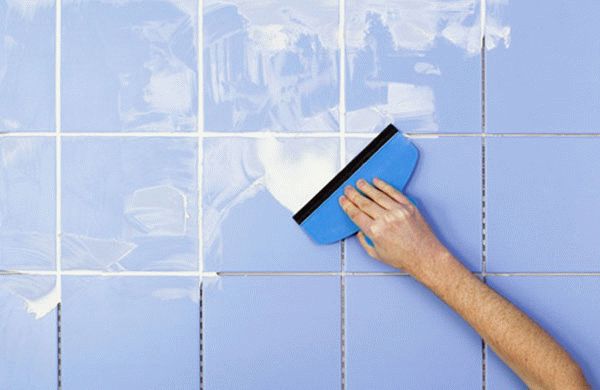
24 hours after the installation of the ceramic wall tiles has been completed, you can start filling the joints using the correct color for the joints. Pour the dry mass of the solution into a clean container with water and knead it manually or mechanically until a homogeneous mass is obtained. After that, leave the solution for 5-10 minutes to obtain better homogeneity, then knead again. Knead the solution again and fill the seams with it using a rubber spatula or a grater with glued rubber. Collect excess mortar with a grater and fill the seams again. When the solution dries a little (after 15–30 minutes), first wash the surface, collecting excess solution and cleaning the tiles. This work is carried out using a sponge or trowel, pasted over with a sponge with large pores, easily moistened with clean water. After the solution has completely dried (1 hour), which is characterized by a lightened surface of the tiles, we proceed to the final cleaning, which is performed with a clean flannel cloth or a hard sponge.
The joint between the wall and the floor in rooms where water is frequently encountered, such as in bathrooms, must be filled with a material that ensures tightness. Silicone is perfect for this. Squeeze the mass out of the tube and apply it in excess to the seam, using a hand sprayer, moisten the silicone mass with water and soap along with the adjacent surface. Collect the remaining silicone with a spatula. Moistening with water prevents the silicone paste from sticking to the tile surface.
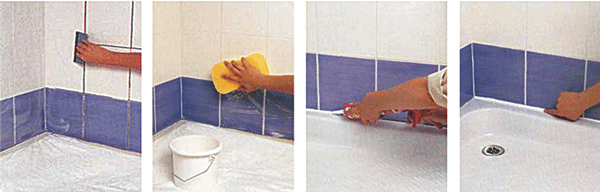 Figure: 128. Grouting the cladding and silicone covering the joint between the shower tray and the cladding
 The seams between the bathtub (shower tray) and the tiled wall (fig. 128) are sealed in the same way.
| back |
Wall cladding with tiles is a rather complicated undertaking that requires adherence to a certain technology to create a truly reliable and beautiful coating. Of course, at present this material is used much less than in the past, but its popularity is steadily returning. This is due to the fact that the tile has many advantages that cannot be underestimated.
Some time ago, this material was used exclusively for cladding bathrooms and shower rooms, as well as the kitchen area. The arrival of new materials on the market pushed the tiles out of their rightful place. In addition, the product was rather dull. decorative view... Now the situation has changed dramatically. What is the reason?
- Wear resistance. What other material can boast that it can maintain its qualities for fifty years.
- Strength. There is a small load on the walls, but it can also spoil any decorative coating. Tiling is a great solution to avoid almost any problem.
- High hygienic performance. This property goes unnoticed when it comes to other, more expensive materials. But human health depends on him. The tile does not absorb foreign odors and dirt, which prevents the emergence of pathogenic microbes.
- Excellent moisture resistance. No wonder it is used in rooms with high humidity.
- Absolute environmental friendliness. Ceramics do not emit substances harmful to health.
- Fire safety. Due to the manufacturing technology of the material used, the product does not burn and does not contribute to the spread of fire.
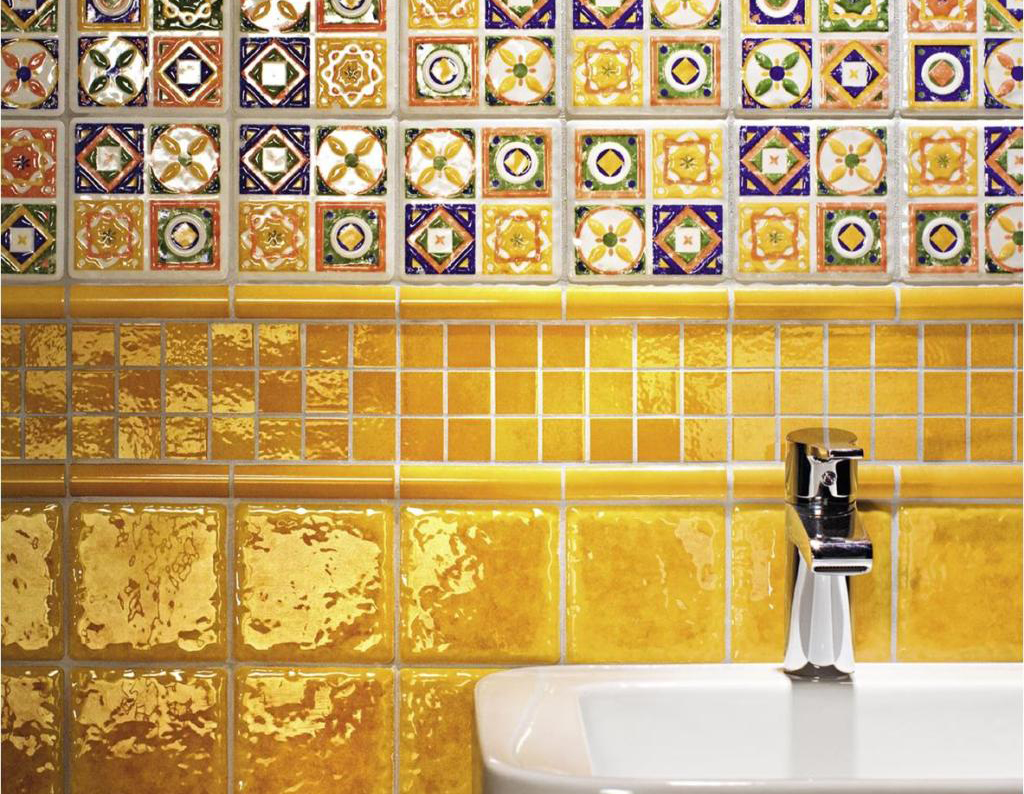
- Wide choose. Exists different kinds wall tiles. But something else pleases, there is a great variety of decorative options that allow you to create real masterpieces.
There are also some disadvantages:
- Poor soundproofing. Indeed, in order to create reliable sound insulation, you will have to use additional materials that are pre-laid on the surface.
- Difficulty working with walls. If you want to hang a cabinet or shelf on the wall, you will have to try. After all, the tile is quite fragile, incorrect reaming will damage it.
- High price. Yes, the cost of the product is quite high. Particularly expensive are printed items that are sold by the piece or square meters... But a tiled area always looks advantageous.
It should be noted that one of the disadvantages is the complexity of the work. It takes some skill to get a really perfect surface. You should not count on the fact that everything will work out the first time. But there is no need to despair, any work can be done independently. The main thing is to make the necessary efforts and some perseverance.
What is required for quality styling
Naturally, you should prepare a tool that should be in perfect order. Required list is standard, but if the need arises, each fixture can be replaced with a suitable option.

For work use:
- Separate water tank. The volume must be more than five liters.
- Container for mixing the solution. It should be convenient for preparing the mixture and for collecting it.
- Master OK. This tool can be replaced with a metal spatula.
- Rubber spatula. Needed for.
- Notched trowel. The mixture is applied to them.
- Various measuring devices - tape measure, level, cord.
- Mallet. Many people use a wooden hammer, but a rubber tool is much better.
- Pliers. Ordinary wire cutters will do.
- Spray.
- Tile cutter. The tool has to be reliable, some cheap options simply fail.
- Dowel set.
A solution (mastic) for gluing and grouting is purchased separately.
Self-preparation of the solution
You can prepare your own tile mix. This does not mean that you cannot trust the purchased options. It just makes it possible to save some money.
The most common compound used for the job is cement. It serves as a base to which sand (sifted) and water are added. The ratio may vary.
There is a standard option that is suitable for almost all types of tile work. For the mixture you will need:
- Cement (m400) - one part is required.
- Sand (fine fraction) - two and a half parts are taken.
- Water - half.
On a note! For one part, a conditional indicator is taken, a container in which a set of ingredients is made. For example, a liter bucket for children.
Mixing starts with dry ingredients. They are poured into one container and mixed. It is required to achieve a homogeneous composition. Next, add water. It is better to do this in parts, kneading each time.
Quality control of the prepared mixture
To make sure that the solution is reliable and of high quality, it is checked. This is done simply:
- a separate ceramic element is moistened with water (it is convenient to use a spray bottle);
- apply the prepared mixture;
- the tile is turned over and shaken;
- on the seamy side, a layer of cement should remain at least three millimeters.
If this result is not achieved, then re-kneading and adding the necessary ingredients (cement or sand).
Carrying out facing work in rooms with high humidity - use a special tile adhesive. This will avoid possible problems, as well as preserve the required material properties longer.
Surface preparation
The correct technology for wall cladding with ceramic tiles requires mandatory preparation. This procedure can only be ignored if the surface has already been subjected to all necessary manipulations.
It is believed that the permissible vertical error is about six millimeters (per two meters of the wall). It is quite simple to check this indicator. A two-meter aluminum rail (level) is applied to the surface. Various gaps can form between the two planes. If they are more than six millimeters, notes are made, these areas should be treated with a plaster mixture.
Advice! When laying tiles, you do not need to bring the walls to perfection. Small roughness that remains after applying the plaster will even be useful. This will provide better adhesion of the material to the surface.
The general preparation procedure is as follows:
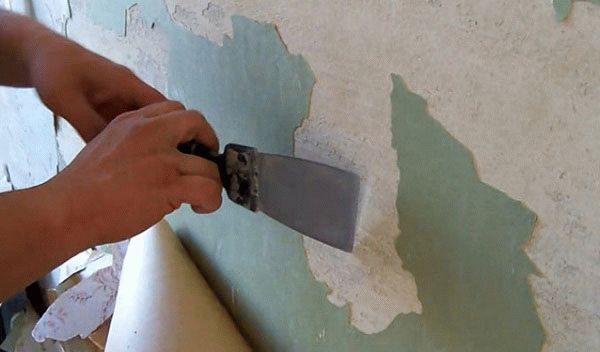
- All old coatings are removed. The paint is peeled off, the wallpaper is removed.
- The work site is carefully tapped. For this, a small hammer is used. It is necessary to determine if there are voids. In such places, the finish will need to be removed and a new layer of gypsum or cement mixture applied.
- Greasy stains are removed. Otherwise, nothing will hold. Degreasing is carried out with a special solution of hydrochloric acid (three percent). It is applied and left for three to four minutes. Next, rinse everything well with water and let dry.
- Bulges that are more than three to four millimeters are knocked down with a chisel.
- If possible, it is better to completely plaster the surface by removing the old layer. Of course, it will be longer and more expensive, but for old houses, this is a guarantee of the reliability of the coating.
- Notches must be made. They are applied in random order to the entire wall. They should be shallow and will serve to properly anchor the mortar.
- When everything is ready, priming is carried out.
On a note! It is not always possible to remove old paint, while the base remains strong enough. This area needs to be covered with many deep scratches. This is the only way to ensure that the mixture will hold.
Laying tiles
Facing with ceramic tiles begins with a preliminary marking of the surface. This is done with a cord. The height of the floor is immediately determined. It is necessary to calculate this indicator in advance. Having calculated all the values, taking into account the size of the seams (it may be different), install dowels with self-tapping screws along the edges of the wall, and pull the cord between them.
Preliminary marking is done when the installation scheme is rather complicated or there are no necessary skills.
The general order of work is as follows:
Advice! It is better to leave the lower section until the very last moment of the finishing process. That is, they begin to deal with it after laying the floor. If required, tiles can be quickly trimmed using a tile cutter.
The final stage is filling the joints
You need to understand that tiling walls are only part of the necessary process. This is followed by grouting.
They do this:
- The tiles are allowed to soak for a day. The putty is selected in the required color.
- Using a rubber spatula - the mixture is transferred to the seams. This must be done confidently, carefully filling all the gaps.
- They immediately pick up the excess and wipe the front side of the material. But you cannot touch the seam itself. If this is the final stage, then a beautiful gap should be formed. To do this, you can slide your finger between the elements. Although, when there is a lot of work, this is not the best option. There is a special tool that allows you to work faster.
On a note! A cut of electrical cable can be used to form the seams. It is important to choose the correct diameter so that it does not remove excess grout. - If work is carried out on objects of high humidity, a sealant is additionally used. It is applied with a pistol. A composition is selected that will be suitable for a specific process.
- When the seams are dry, the excess is removed. This is done with a damp cloth.
Tiling allows you to get a beautiful and reliable surface. The main thing is that everything should be done in compliance with the necessary rules and without undue haste.
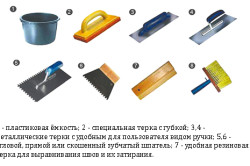
- Materials and tools
- Tile selection
- Surface preparation
- Adhesive selection
- Wall markings
- Cladding technology
- Grinding seams
- Floor cladding
- Pruning methods
The tile has excellent heat resistance, strength, is not afraid of moisture, has good sound insulation properties, and is durable.
And if you add to this a variety of color, structural and artistic solutions for the surface of modern tile materials, then you can be sure that tile cladding as a decoration for a wide variety of rooms will not lose its relevance for a long time.
Technology stickers tile simple enough:
- preparing the surface of the wall or floor for tiles;
- the surface is marked;
- the adhesive mass is applied and leveled;
- tiles are applied to the glue and aligned with the markings;
- the distance between the tiles is “bounced off” with special marking crosses or other devices;
- tile seams are rubbed.
In practice, there are many nuances. Walls and floors to be finished may be uneven. The surfaces have different structures. Premises are different sizes and configurations. All these nuances must be taken into account.
In any case, even a beginner is quite capable of understanding all the basic details of tiling a particular surface.
Materials and tools
For gluing tiles (excluding surface preparation), materials are purchased:
- the tile itself;
- adhesive mass;
- mixture for grouting;
- marking crosses.
In the process of labeling, the use of tools such as:
- building level for marking the surface and controlling the laid tiles;
- rope plumb line;
- chalk and pencil for marking the surface and the tile itself;
- ruler and tape measure;
- brush or roller for priming;
- spatula with toothed side for spreading the adhesive over the surface to be pasted;
- rubber spatula for grinding seams;
- rubber or wooden hammer;
- tile cutter;
- ordinary glass cutter;
- pliers, wire cutters or tongs for breaking off pieces of tiles;
- wooden planks or timber;
- sharpener, emery, file for processing the trimmed tile edge;
- hacksaw or jigsaw for cutting ceramics;
- a container with a capacity of 5 liters for the preparation of an adhesive mass;
- rubber gloves;
- sponge and rags;
- thread or twine.
Back to the table of contents
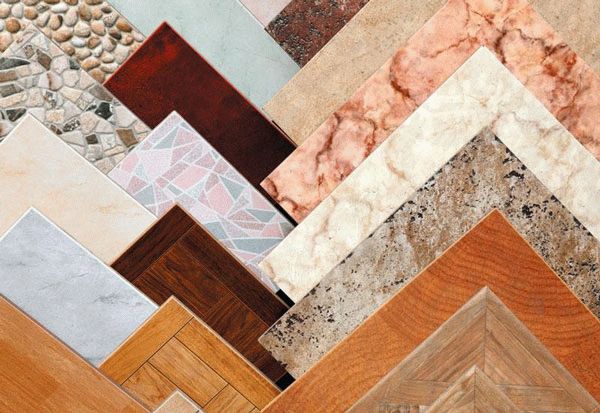
Tile selection
With all the variety of sizes, shapes, colors and configurations of modern tiles, the main selection criterion should be the parameters of the room to be tiled and its purpose.
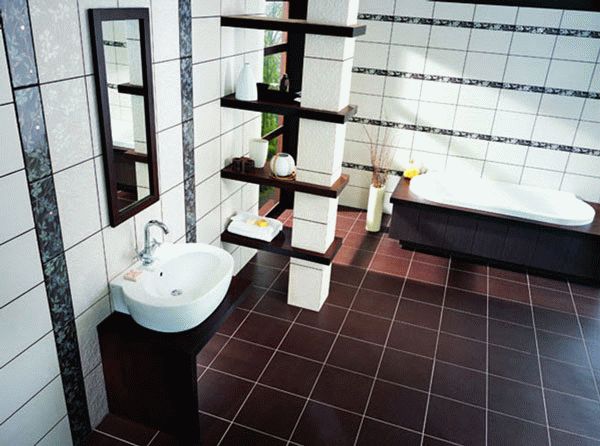
When choosing tiles, it is useful to know that the glossy surface and light colors of the colors visually increase the space of small rooms, such as bathrooms and toilets.
The shape of the tiles will help to enhance this effect. Rectangular, laid horizontally, it will visually expand and lower the room, thereby improving its proportionality. On the contrary, a square or rectangular tile, but placed vertically, will narrow the internal dimensions of the room and visually "raise" the ceiling.
In spacious rooms, it is more advisable to use large-sized tiles, and it fits faster.
When choosing the texture of a tiled surface, you also need to remember that glossy increases the space, and matte, on the contrary, narrows it down.
When choosing a floor tile, the slipperiness of its surface plays an important role.
In terms of strength, tile material is divided into four categories. The most durable tile is Category IV and is used for finishing outside entrance areas, lobbies and hallways.
The first, "lightest" category includes tiles, the purpose of which is wall cladding in bathrooms and kitchens.
When choosing a tile color, it is also necessary to take into account the lighting in the room being finished. Daylight "saturates" the color scheme, giving it a "juicy" look.
Artificial lighting "highlights" the tile in different ways.
Incandescent bulbs give the tiles a warm color. Daylight halogen lamps, on the other hand, "cool" and deplete the color of the material.
Thus, in order to achieve the effect of a bright and spacious room, it is better to use medium-sized light tiles without a pattern or with an unobtrusive neutral image.
To create a cozy and intimate atmosphere, you can choose darker colors of the tiles.
The most practical and unpretentious to maintain is large tiles with a matte surface and a dark grout tone.
Back to the table of contents
Surface preparation
Preliminary preparation for covering the walls with tiles can be reduced to two components: leveling the wall, which has deviations from the vertical plane, and increasing the adhesive properties of the surface.
Alignment of the wall must be carried out if the deviations from the vertical are values \u200b\u200bof 2 cm or more.
Small irregularities are removed with wet plaster, cement or gypsum.
If the unevenness of the wall plane is large enough, but not more than 6 cm, then a metal plaster mesh is used, with cells from 1 to 3 cm.The mesh is firmly fixed on the surface, forming a leveling and supporting frame, and a gypsum or cement plaster layer is already applied to it. The plaster is leveled and processed under the tile adhesive.
In case of critical deviations of the glued surface from the horizontal or vertical planes, from 5 cm or more, the wall is leveled using the "dry plaster" method. In other words, the surface is leveled with plasterboard sheets.
Plasterboard sheets are fixed on the surface of the wall, previously cleaned and primed, using special gypsum mounting glue. When combining sheets, it is necessary to avoid cross-shaped joints.
Plasterboard sheets laid on gypsum glue are leveled by light "tapping". A rubber or wooden mallet is used.
It is necessary to align the drywall sheets rather quickly, since the gypsum-based assembly glue hardens quickly.
The plasterboard wall is primed with a special high penetration primer to improve adhesion.
Only after the entire wall cladding with gypsum plasterboard sheets is completed, the seams are puttyed with a finishing putty.
![]()
To increase the adhesive properties of the glued surface, special primers such as "Betonkontakt" are used. Smooth walls made of bricks or cinder blocks are cleaned of large cement deposits and are subjected to an adhesive primer immediately before pasting in order to bind dust particles that are necessarily present on any cleaned surface.
You need to know that the formwork for the formation reinforced concrete structures pretreated with lubricants (machine oil). This is necessary so that you can easily remove it.
Part of the lubricant remains on the concrete surface and sharply deteriorates adhesion. As a result, the glue “floats” on such a surface and the tile peels off.
Therefore, it is advisable to pre-sheathe the walls made of reinforced concrete obtained by the formwork method with a plaster mesh and glue the tiles along the mesh.
If it is necessary to glue the tile to the painted wall, the paint must be completely removed. If the paint adheres very firmly, the wall is even and the layer of adhesive is meant to be thin, then the painted layer may not be removed. But at the same time, notches must be placed on the surface of the wall for better adhesion of the glue.
Back to the table of contents
Adhesive selection
There are a huge number of options for tile adhesives.
The tile is glued to a cement mortar with the addition of PVA, to a mixture of bitumen and diesel fuel, to "liquid nails", oil paint with cement or silicone. All this is acceptable if the surface is flat and leveling of the tile with an adhesive mass is not required.
If the tile has to be glued on chipboard, chipboard, MDF or plywood, then it is best to use special synthetic adhesive and sealing mixtures. In this situation, ordinary silicone "works" well, but it requires careful surface preparation.
For walls with traditional cement, plaster and putty coatings, it is best to use special synthetic adhesives that can be used with any type of tile.
There are a great variety of such compositions, all of them are designed using the most modern materials. With their help, you can not only glue the tiles with high quality, but also level out small irregularities, remove flaws.
Back to the table of contents
Wall markings
High-quality wall cladding requires marking. The marking of the surface for the finishing of the tile begins with the "beating" of the lower row.
If the flooring is already installed and the tiles will be glued directly from it, then no markings are required.
If the floor is laid after pasting the walls, then the second bottom row becomes the beginning of the wall cladding. The first row tiles will be glued and trimmed later onto the finished floor.
A mark is made on the wall. The distance from the mark to the floor is one tile. Using a level, a strictly horizontal line is marked from this mark along the entire length of the walls to be pasted.
The distance from the floor to the drawn line is measured. The smallest value is revealed and noted. It is this bottom mark that will be the starting point. Another line is drawn from the bottom mark along the entire length of the walls, strictly horizontal. This is the beginning of the cladding - the bottom line of the second row of tiles.
If the line from the first mark turned out to be at the same distance from the entire floor surface, then this means that the floor is perfectly flat and no trimming of the tiles in the first row is required.
With a large room area, using a conventional spirit level to draw a horizontal line is difficult. In this case, it is better to use a hydro level. Several marks are put on the wall to be marked. All marks are connected, and the required line is obtained.
On the lower border, a plank or bar is stuffed, serving as a support for the tile.


