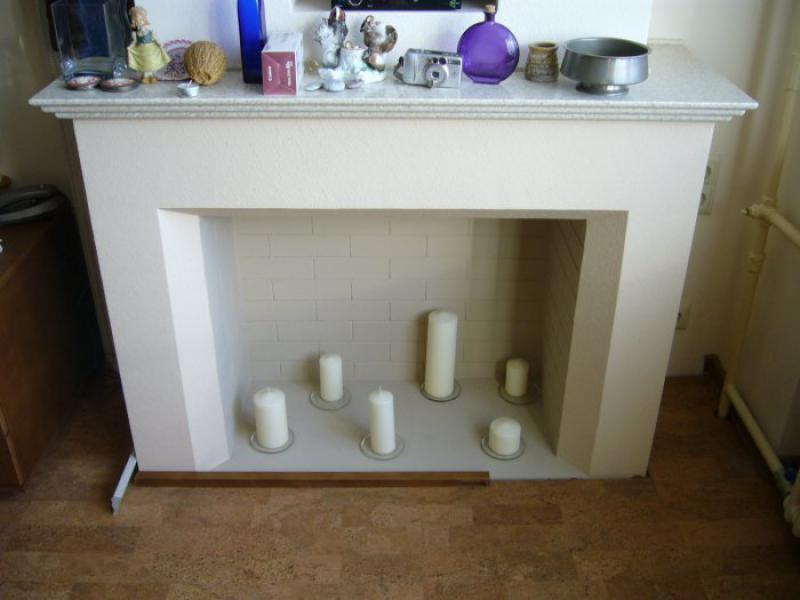
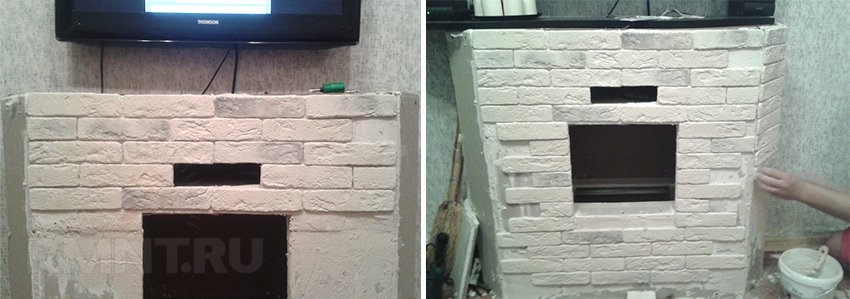
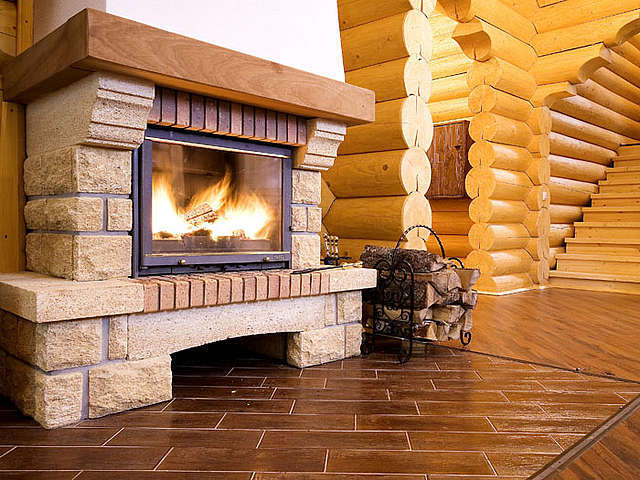
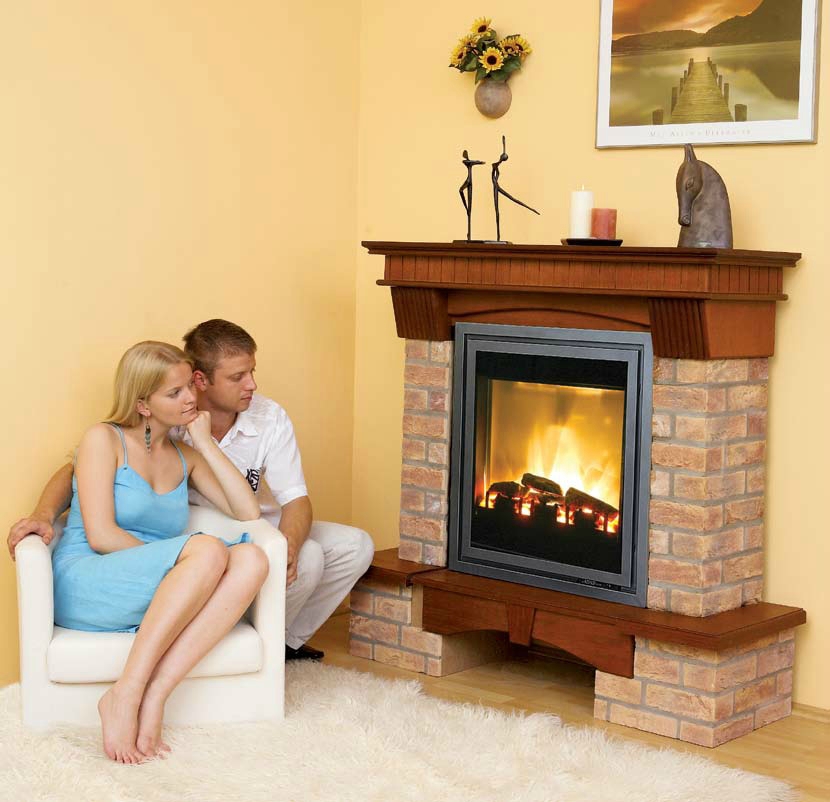
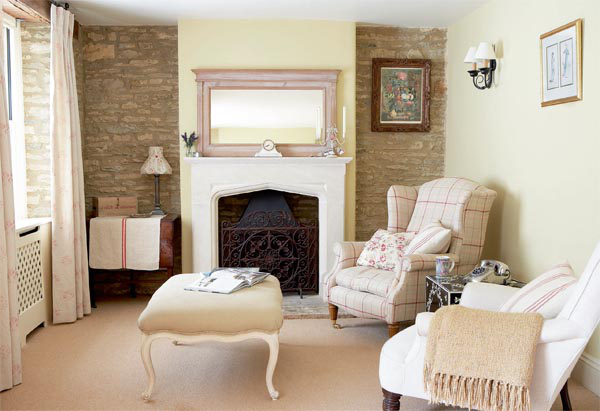
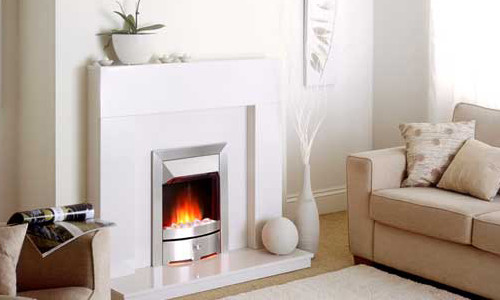
Even if the house has a real fireplace, it is very rarely heated. Most often, it performs only a decorative function. Therefore, such a structure can be easily replaced with a false fireplace, which outwardly will be indistinguishable from the present. You can make it from any available means: wood, drywall, an old cabinet and even an ordinary cardboard box.
False fireplaces made of polyurethane, old cabinet and cardboard
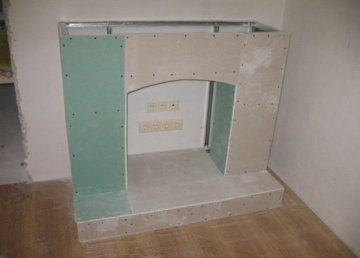
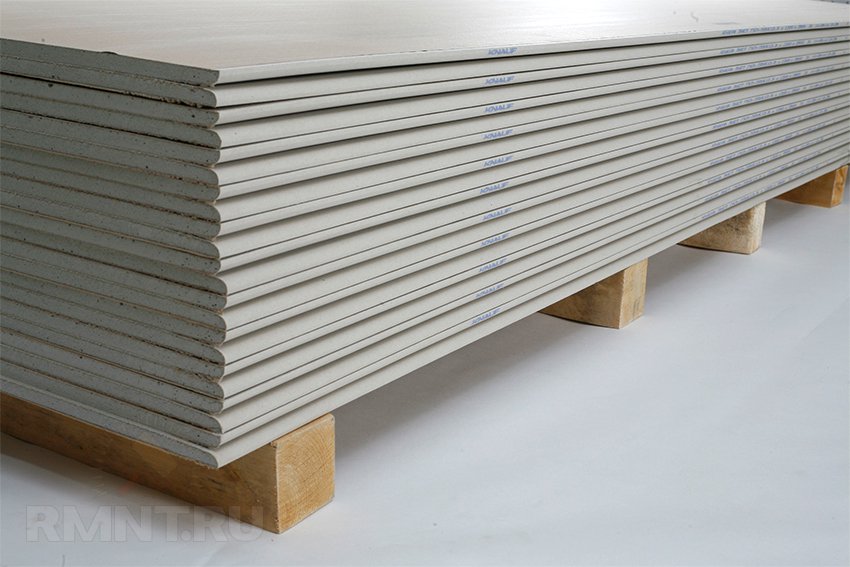
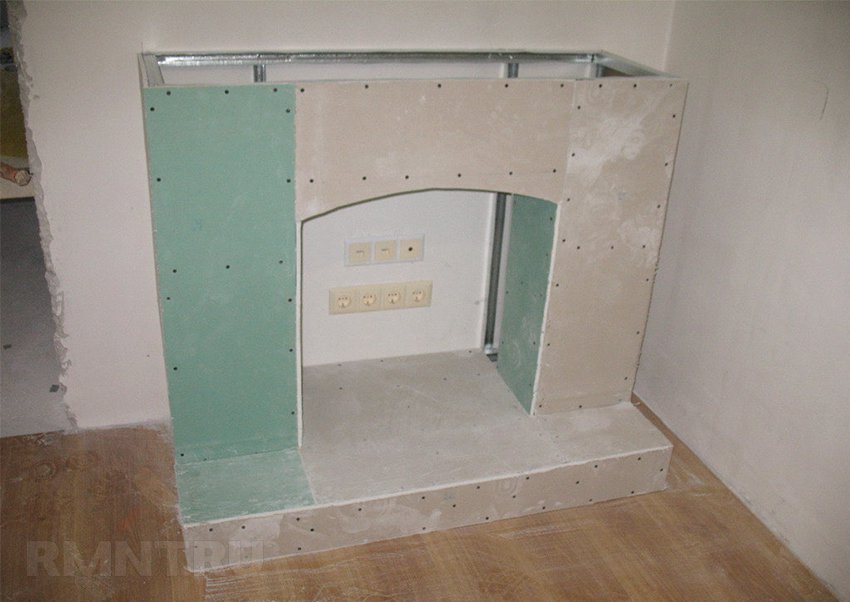
Plasterboard products
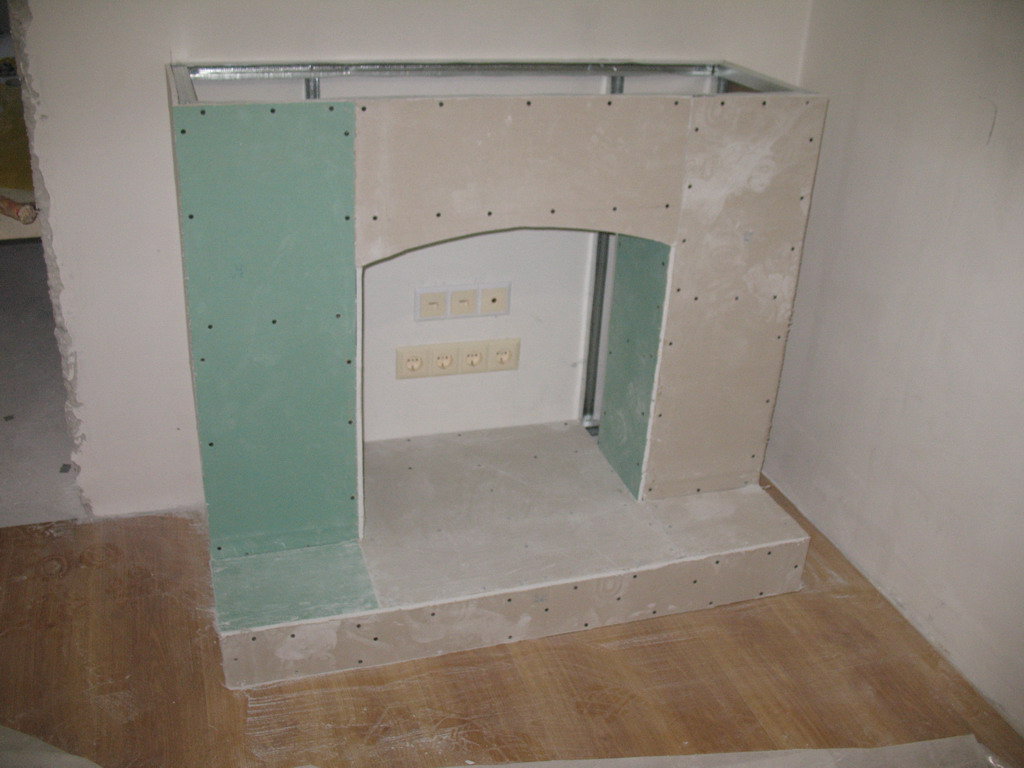
This material bends easily and takes any shape, including curved. When cutting drywall, sawdust and dust remain a minimum amount, and the products are quite durable. To create a decorative fireplace from this material it is only necessary to make a reliable base from a metal profile or wooden bars.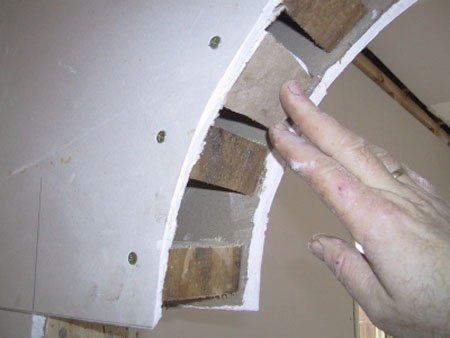
Arched plasterboard construction
Materials and tools
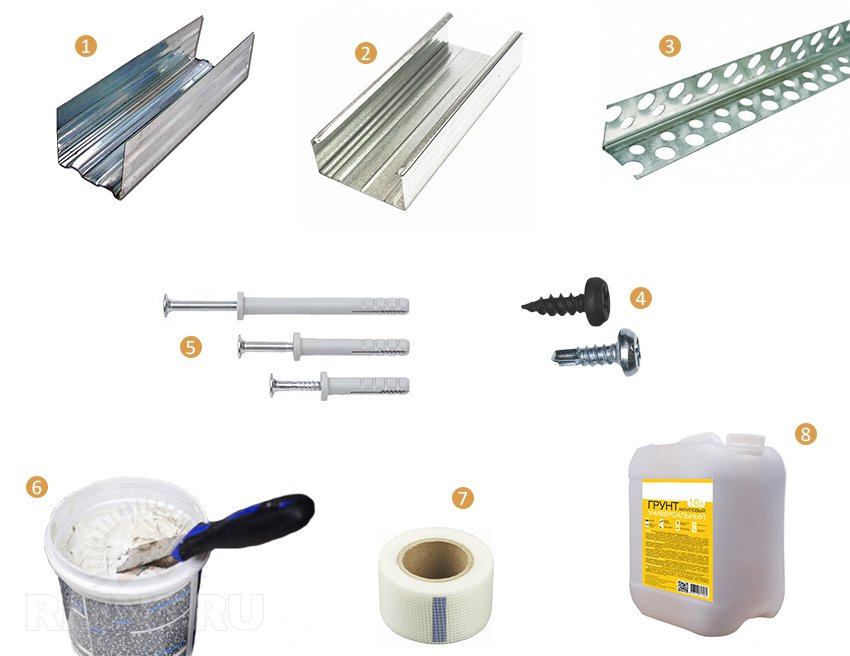
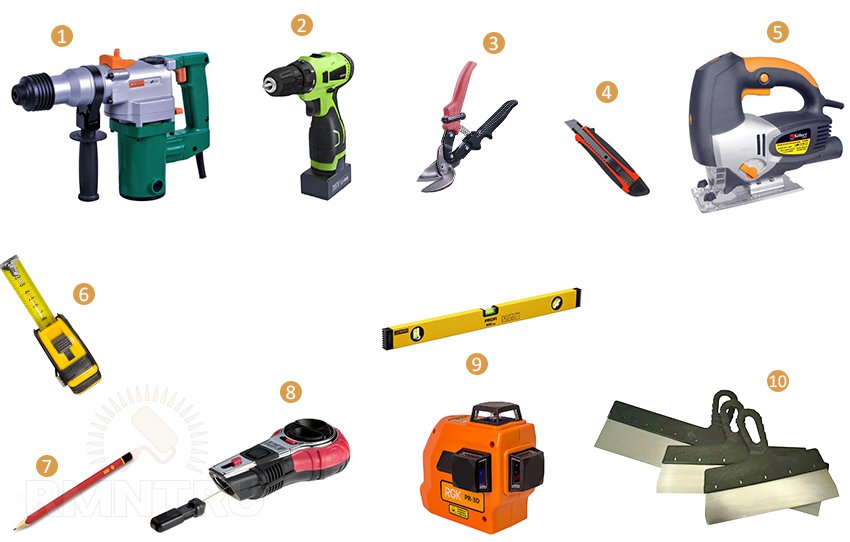
To create a false fireplace you will need:roulette;
Ruler and pencil;
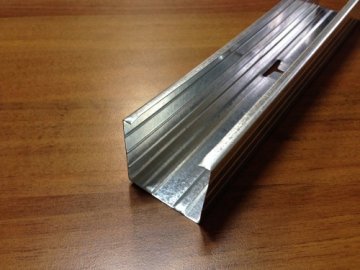
metal post profiles or wooden slats;
scissors for metal;
drywall;
an assembly knife, a hacksaw or a hand-held circular saw for cutting it;
sandpaper for processing drywall cut edges;
self-tapping screws for wood and metal;
screwdriver or screwdriver;
gypsum-based putty for sealing joints;
primer;
finishing materials (decorative tiles or panels, moldings, decorative plaster, etc.).
Sketching
In order not to have to finish and cut something during the assembly of the product, it is pre-drawn sketch of the future fireplace with all partitions and shelves. To do this, using a tape measure, the place where the installation is planned is measured, then all the data is transferred to a sheet of paper.
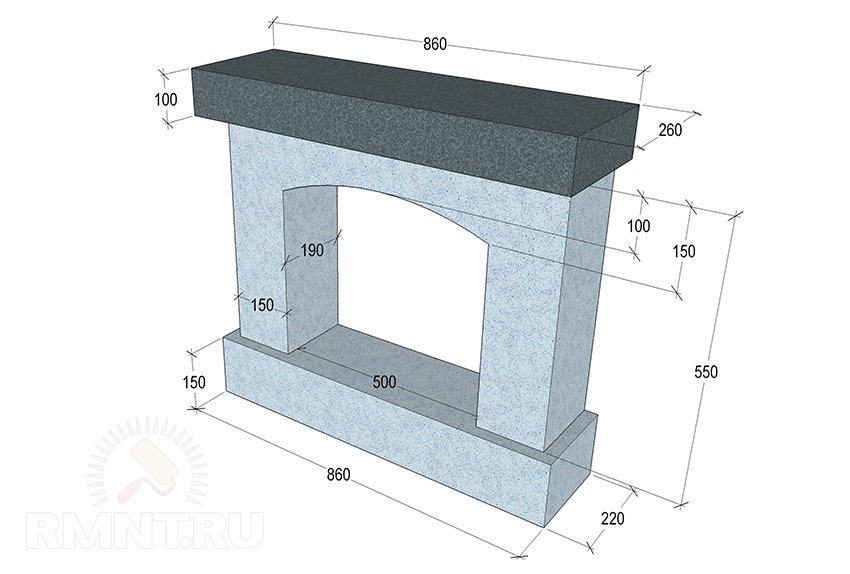
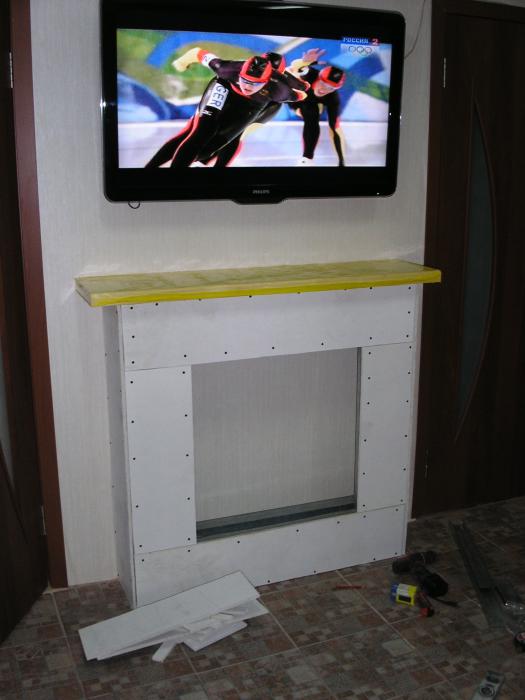
Diagram of the simplest fireplace
The size and shape of a decorative fireplace can be any. However, it must necessarily contain recess for simulating fire and portal (framing the recess above the firebox in the form of a shelf).
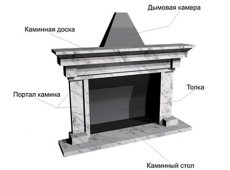
Fireplace scheme
Council. When creating a multi-level structure with shelves and niches, the main frame can be made from a sheet of plywood, and only then trimmed with drywall.
Frame construction
For the stability of the structure, it should be fix on a metal profile... Instead, you can use and wooden slats.If the frame is made of a metal profile, it is preferable to use products measuring 50x25 mm, fastening it with self-tapping screws for metal. Holes for future fasteners and assembly of the structure are best done with a drill-driver.
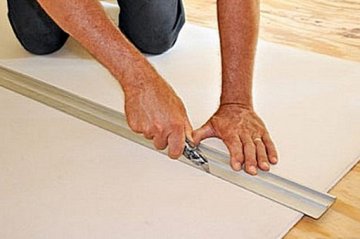
To bend the profile, a line of the desired size is drawn on paper or drywall. Scissors for metal in its lateral part make cuts every 5 cm. Then the profile is applied to the marked line and carefully bent to the desired position.

Regular and arched profiles

The shape of the fireplace can be any
Drywall cutting and bending
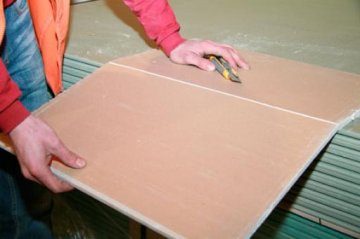
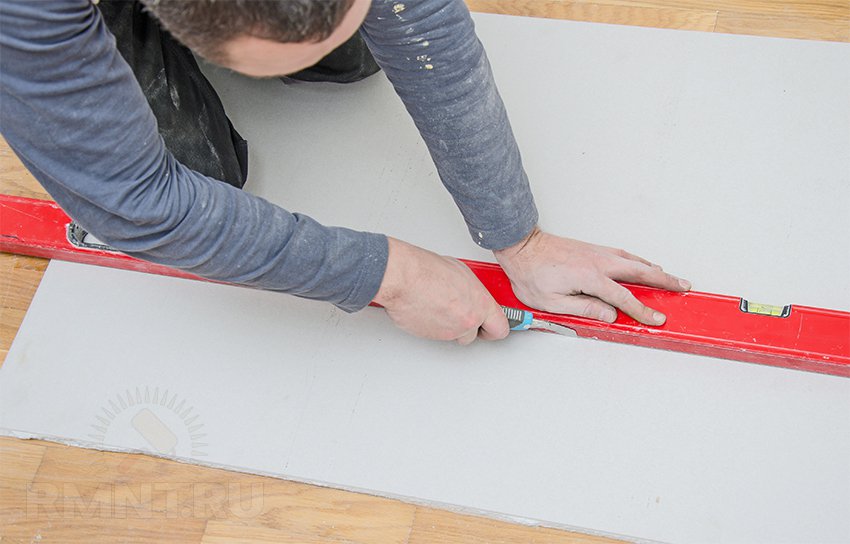
Before starting cutting a line is drawn at the site of the cut with a simple pencil (traces of a ballpoint pen and even more so a marker are very difficult to close up even with putty). If a hacksaw is used for work, it is better to take a hacksaw for metal - its blade is thinner and it will not deform the edges. When using a mounting knife, you can adjust it so that the blade protrudes from the handle to the thickness of the sheet.In case of careless handling, the sheets of this material break easily, so work should be carried out on a flat surface: a table, bedside table, etc. Initially, only the surface layer is cut. For a perfectly straight line cutting should be carried out without removing the ruler... Then the drywall is slightly bent and a couple more times is carried out with a knife to deepen the cut.
Now the sheet must be placed on the edge. After a couple of small blows at the cut, the gypsum core will break off exactly along the line. Only now the reverse side of the sheet is cut.
Drywall cutting
Council. The edges of even a neatly cut sheet will necessarily have jags - they are removed with sandpaper.
There are two ways to bend drywall:
On one side of the sheet, punctures are made by 1/3 of its thickness at a distance of 1.5-2 cm from each other.Then, from the same side the sheet is wetted with a sponge or brush so that moisture is no longer absorbed. We bend the drywall and fix it in this position until it dries completely (12-20 hours).
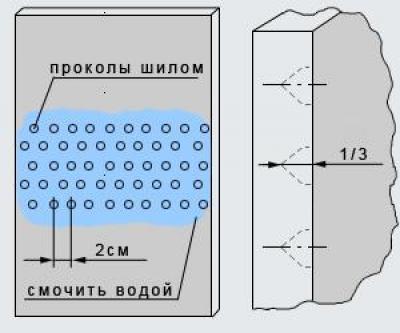
Wet bending drywall
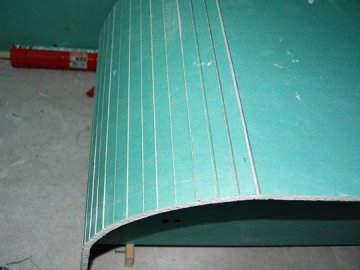
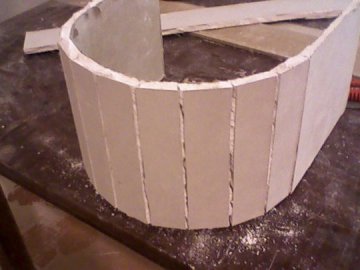
With dry bending, cuts are made along the sheet to the cardboard, and then chamfers are carefully removed from these seams with a knife. The drywall is fixed to the template, and each slot is cleaned of dust and putty.
Dry bending
Important! You can bend drywall up to 6 mm thick. Thicker material may break.
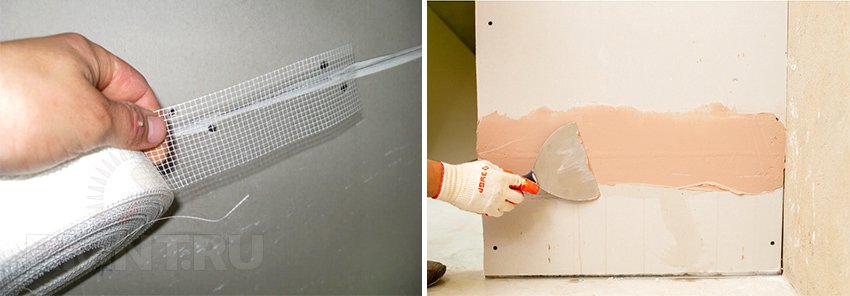
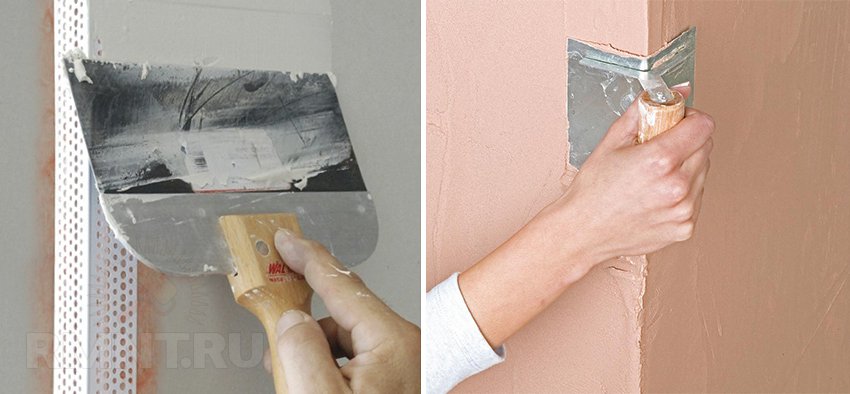
If the artificial fireplace is finished not with tiles, but with decorative plaster, then after fixing the drywall sheets to the frame, everything joints are sealed with gypsum-based putty... In this case, the design will be more uniform and even. The joints are closed with a reinforcing mesh and again covered with putty.
To create perfectly even corners, use plastic, zinc or aluminum corner profile... They are seated on a primer and then putty. In order for the decorative tiles or panels to stick to the drywall more reliably, before finishing it is treated with a primer to increase adhesion (adhesion).

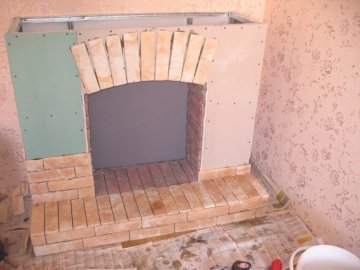
Stages of creating a decorative plasterboard fireplace
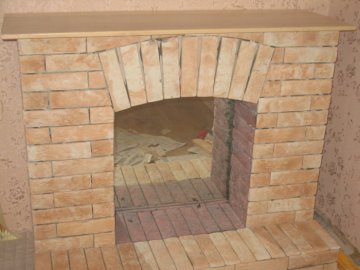
Decorating a false fireplace
When decorating a decorative fireplace, you can show maximum imagination. Hardware stores offer a huge amount of all kinds of finishing materials.In order for a decorative fireplace to harmoniously fit into the surrounding environment, the general style of the room should be taken into account when decorating it. An audio device can also be connected to it, which will reproduce a variety of sounds: crackling fire, noise of rain or singing birds.
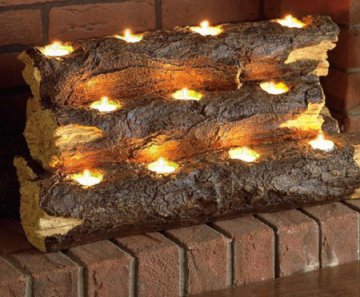
You can simulate fire with the help of bulbs, candles, a combination of red, orange and yellow fabrics, print it on a transparent film in a photo studio, etc. You can simply put firewood in the fireplace and cover it with decorative glass. If you plan to install an electronic frame or light bulbs, an electric cable is provided in the structure box.

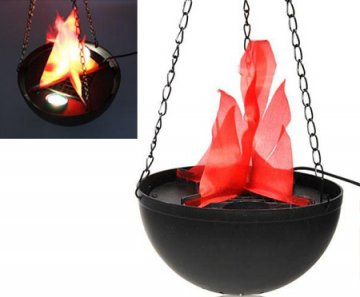
Cloth bonfire, imitation of fire on transparent film and the use of LED lamps
For a long time, fireplaces have ceased to be bulky brick structures that are used to heat homes. Now they are more and more often used for decorative purposes, and heating occurs due to electricity. More and more people live in city apartments, where it is impossible to install a real fireplace, and it is not necessary. Therefore, electrical analogs are installed or simulations are created from various materials. In the latter case, the most popular material for creating such a decorative element is drywall.
They make a decorative fireplace with their own hands from drywall for two reasons:
- Protect the premises from heat sources and increase their efficiency. In this case, a special device is bought that is powered from the mains and simulates a flame, but gives off heat. In this case, fireproof drywall is used for the fireplace.
- For decorating an interior with a fake fireplace without a heat source. Any gypsum board is suitable for cladding.
Regardless of the reason, you can create a fireplace from hl with your own hands, because the order of work will be the same. The creation of such a structure has a number of advantages:
- safety. The absence of open fire and the use of GKLO reduce the risks of fire to a minimum;
- homemade plasterboard fireplace has simple design... Although it is possible to create projects so complex that they can take up huge areas;
- the use of GKL allows you to create any shape of the fireplace, even the most bizarre. You can even create a structure with a chimney;
- the size of the room does not play a big role, because the installation of the structure can be carried out anywhere, even in a corner;
- cladding can be carried out using any materials.
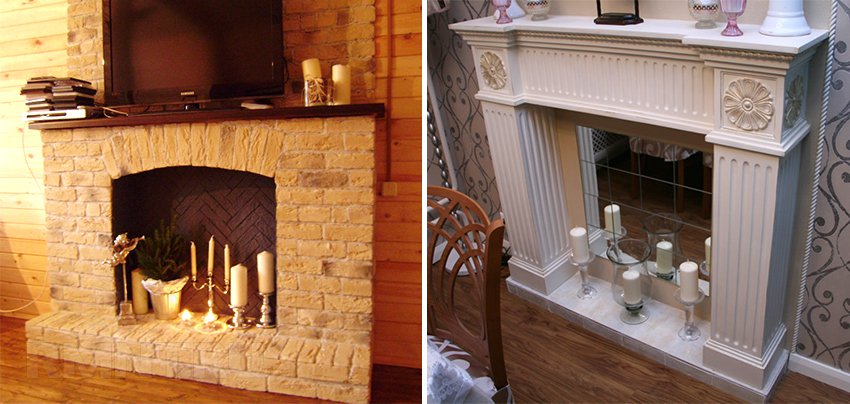
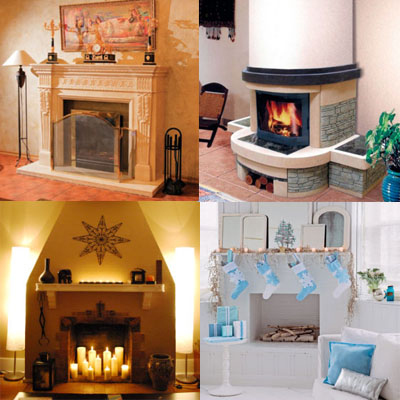
Varieties of false fireplaces
All fireplace mantels can be roughly divided into three categories: authentic, conventional and symbolic. Having understood which of the options is interesting to you, you can begin to implement it.
 The decorative chimney adds more credibility to the entire structure
 Authentic fireplaces are made to be exact replicas original designs ... If this option is used outside the apartment, then you will never think that this is an imitation. A characteristic feature of such structures is the use of furnaces where combustion is carried out different types fuel. The imitation comes out so good that it has the appropriate dimensions and design principles. Such a drywall fireplace in the interior can look very massive, and it is rational to install it in a cottage, where there are large rooms.
 A very popular design of a false fireplace
 Do-it-yourself fireplace portal made of drywall can be attributed to the conditional form... Such a design always deliberately protrudes significantly from the wall, and is created with a furnace hole, where firewood or other decorative elements are usually placed. Most often, this type is combined with conventional electric fireplaces.
 By itself, such a design will not look beautiful.
 Symbolic structures are used only for decorative purposes and do not carry the function of heating the room... Such a decorative fireplace with your own hands from drywall is made only for beauty.
Do not forget about your imagination. Nothing prevents you from taking a regular battery as a basis and sheathe it with GCR. Such an imitation of a plasterboard fireplace will carry a decorative and heating function. You can even put stones on the battery, hiding it from your eyes. In this version, the radiator should not be under the window. But the point is, after all, to include your imagination, and not just mindlessly follow the instructions found.
Design and sizing
Before you make a drywall fireplace with your own hands, you need to prepare well. First you need to decide on a place. In fact, there are only two options, the front of the wall or the corner. Next, we will consider the classic structure against the wall, and we will consider the corner option a little later.
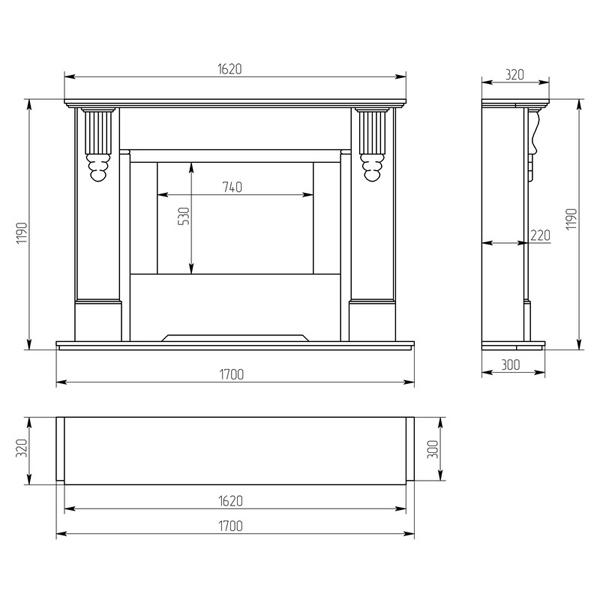
Only when a place has been chosen can one approach the measurement. Since there are ready-made drawings and measurements made, you can work according to the sample, without doing routine calculations. If you do everything yourself, then you need to know the size of the electric fireplace (if it will be used). In addition, you should think about what the width, height and depth of the future product will be. Perhaps a niche for decorative firewood or a decorative chimney should be provided. Possible sizes of a false plasterboard fireplace:
Having the dimensions of the future structure, you can calculate how much profile, fasteners and gypsum boards are required. Once again, we recall that you need heat-resistant drywall for a fireplace only if there is a heating element inside the structure being created. Otherwise, the material for finishing the metal frame is suitable.
To make it easier to work, you need to make a drawing of a drywall fireplace with dimensions. After that, the dimensions can be transferred to the wall so that you can see exactly where to attach the frame. At this stage, you will need a level (ideally a laser level) so that the finished structure does not turn out to be skewed. By the way, the following tools and fasteners are required for work:
- level to create a flat structure;
- metal guide profile for creating a frame;
- metal shears for profile cutting;
- tape measure for performing various measurements;
- electric drill and dowels for fixing the frame to the wall;
- drywall for frame sheathing;
- knife for cutting gypsum board according to the specified dimensions;
- screwdriver and self-tapping screws for attaching frame elements to each other and drywall to the profile.
Additionally, you will need materials for the finishing (putty knife, putty, joint tape and facing material). At the very end, we will consider the question of how to decorate a plasterboard fireplace.
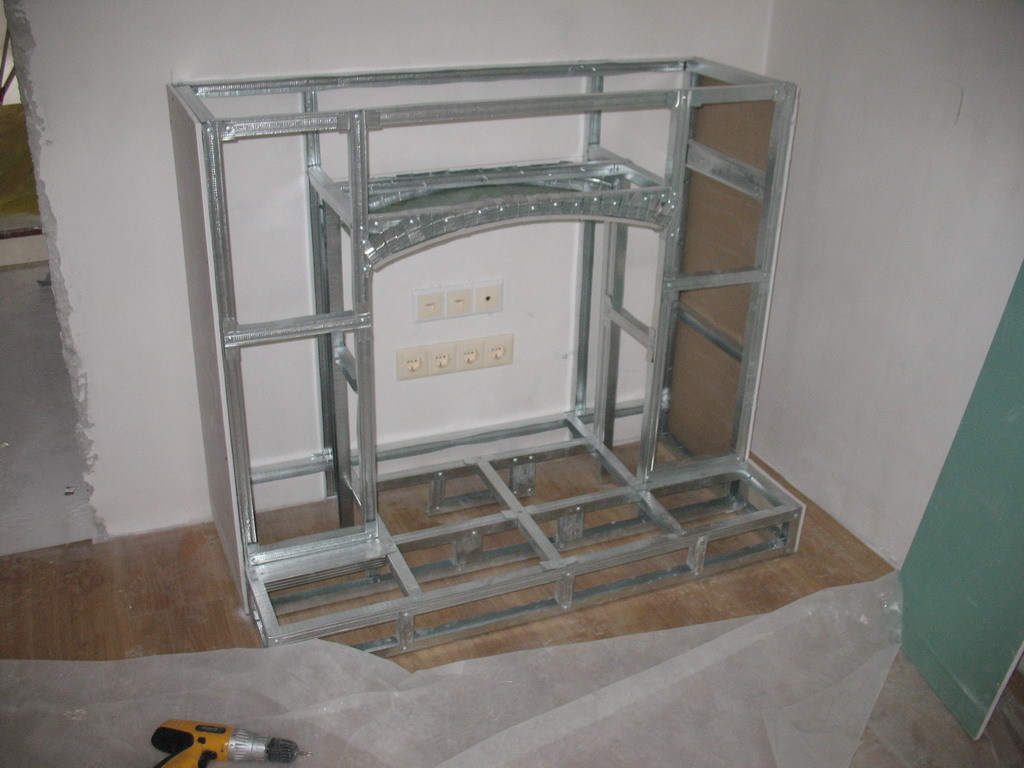
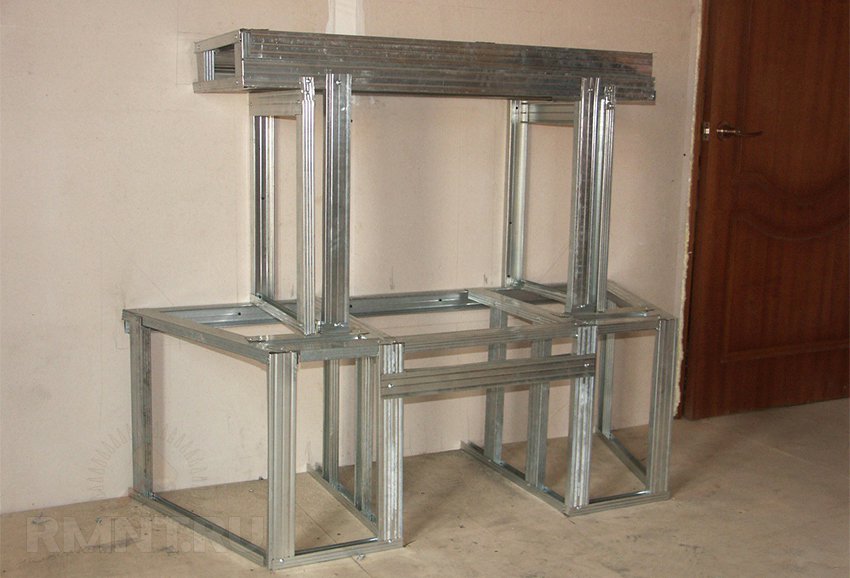
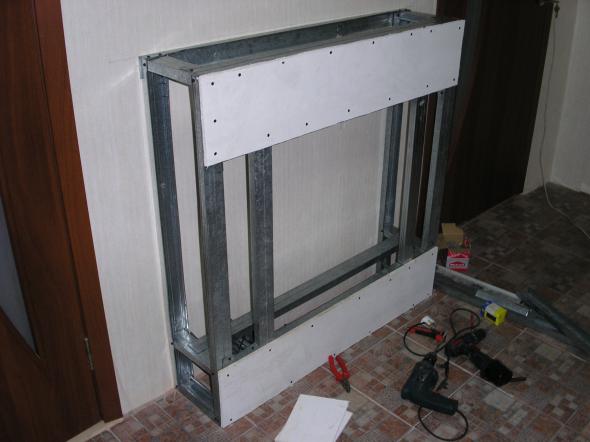
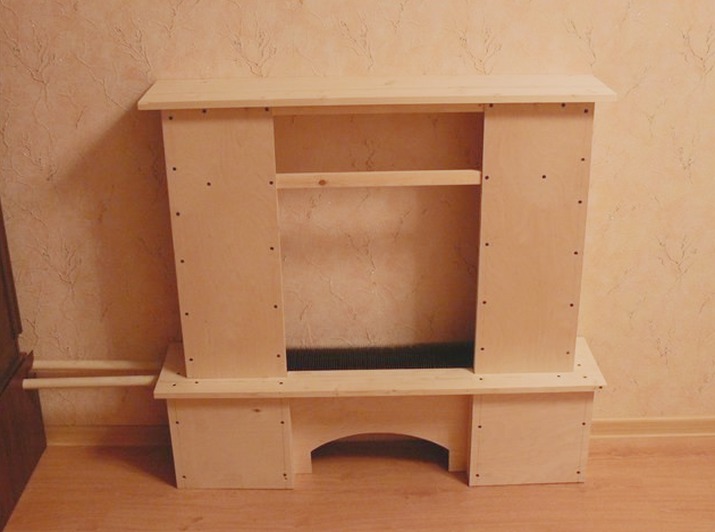
Assembling and fixing the frame
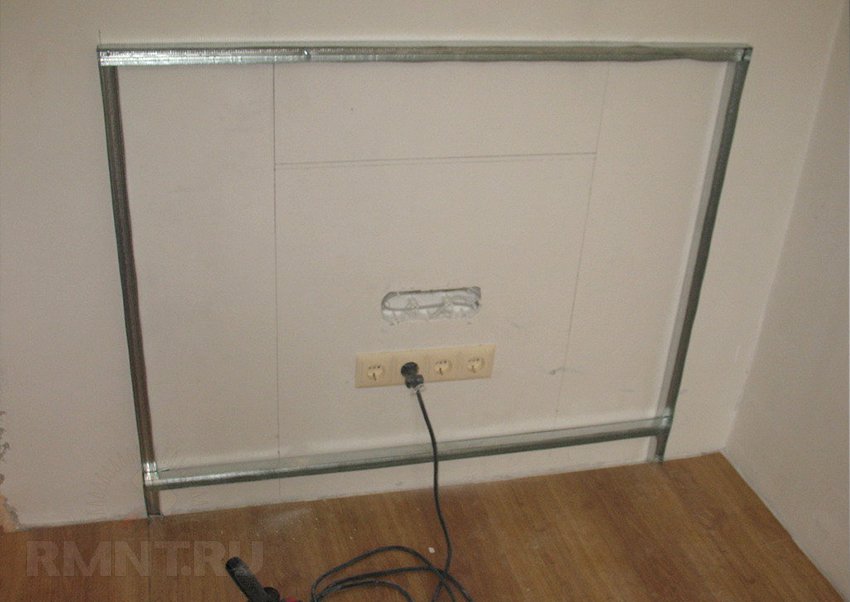
There should be markings on the wall and on the floor so that it is clear where the do-it-yourself drywall fireplace frame will be installed. To assemble it, you can use rack or guide profiles. You can assemble the frame separately, and then attach it to the wall, but it is better not to resort to this method. You can miss with hitting the markings, and it is inconvenient to fix the entire bulky structure. Better to do everything consistently. You need to make fireplaces with your own hands from drywall step by step, and not try to combine several stages into one or skip them.
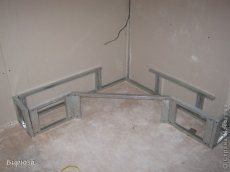
 It is advisable to provide a stand in the frame
 First of all, the guides are attached to the wall and to the floor. To do this, you need to outline the places for their fixation, after which holes are drilled with a drill, and the profiles are attached to the wall and to the floor with dowels. It is not necessary to cut the profile into many pieces, because it can be trimmed with scissors and then simply bent at right angles. In this case, the guide on the floor and on the wall will be the same, and there will be no need to worry about keeping everything in line.
The vertical guides are checked with a plumb line so that they are fixed straight. Ideally use a laser level.
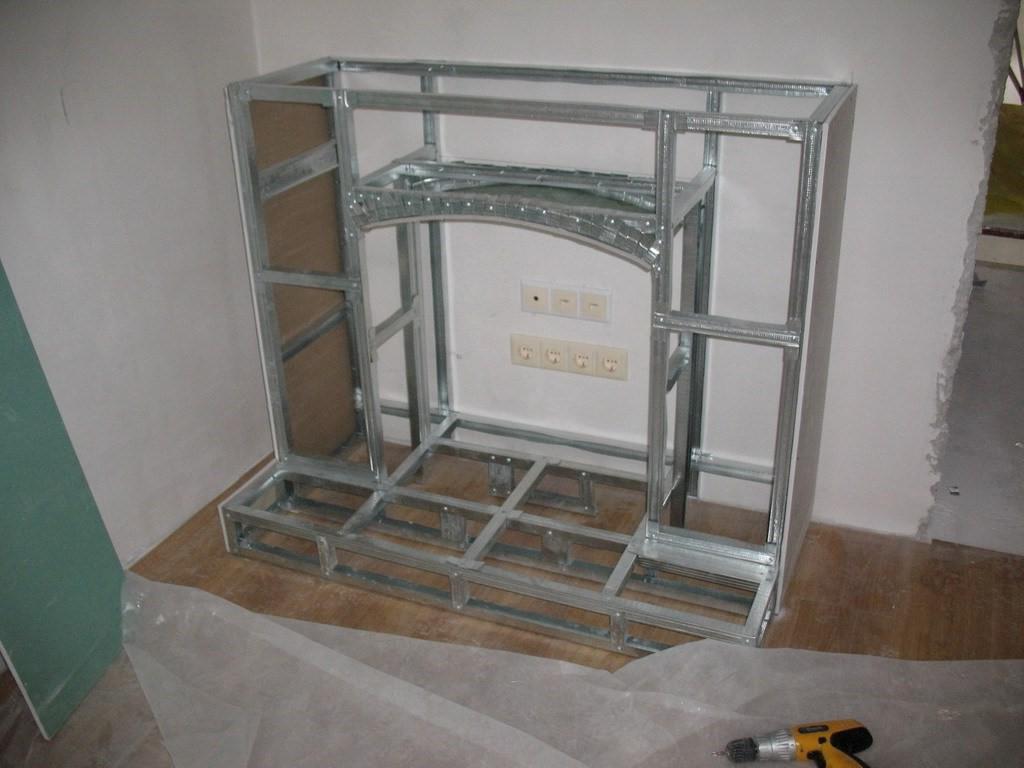
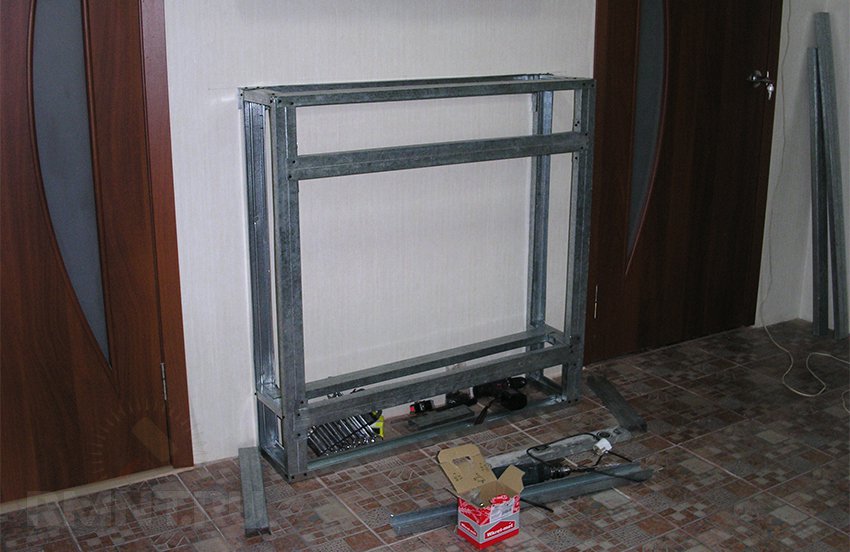
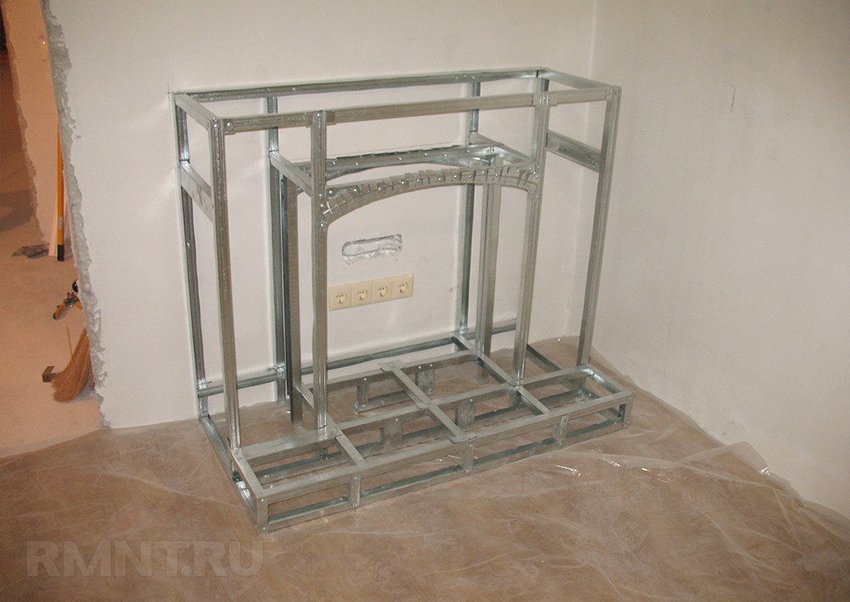
Racks are inserted into the guide profiles on the floor, which are fastened with metal screws. These racks run from the bottom profiles to the top, where they will be fixed in rails that are fixed parallel to the profile on the floor. You should get a kind of parallelepiped, if you assemble the simplest structure. This will be the main frame, in which you will still need to make a place for inserting the heater. A drawing of a false plasterboard fireplace will help with this.
 Frame option without anchoring to the floor
 The jumpers between the posts are installed at the height at which the electric fireplace will be installed. One of the guide profiles is attached to the wall at this height. It turns out a quadrangle, which will be the bottom of the niche. For greater reliability, you can add a few more jumpers inside this rectangle (important for heavy heating appliances). All other elements of the frame are assembled in a similar way. For example, you can create a plasterboard fireplace box that simulates a chimney.
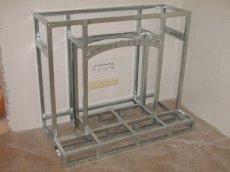
Plasterboard cladding
 Above the fireplace, you can install a wooden countertop for decor
 GKL must be cut so that it can be used for sheathing assembled frame... It is not difficult to guess how to sheathe the structure with drywall. Just take drywall sheets and fasten them with self-tapping screws. Facing a fireplace with plasterboard with your own hands begins with a niche for an electric fireplace, into which it is then inserted. If mistakes were made, then part of the structure may have to be rebuilt. If the fireplace went in perfectly, then we take it out and continue working.
| The main characteristics of wall (GKL) and refractory (GKLO) gypsum board | ||||
| Name | Size in mm. | Leaf area in sq.m. | Sheet weight in kg. | Colour |
| GKL | 1200х2000х12.5 | 2,4 | 23 | Grey |
| 1200х2500х12.5 | 3 | 29 | ||
| 1200x3000x12.5 | 3,6 | 35 | ||
| GKL | 1200х2000х12.5 | 2,4 | 26 | Pink |
| 1200х2500х12.5 | 3 | 31 | ||
| 1200x3000x12.5 | 3,6 | 37 | ||
After sheathing the internal space of the structure, you need to move on to the external. We fix everything with small self-tapping screws with a pitch of 15 cm. The procedure is quite standard and usual. Do not forget that the caps of the self-tapping screws must be flush (do not protrude or be too strongly depressed). Now you know how to make a false plasterboard fireplace, but that's not all.
It is possible to provide specially double walls for the combustion hole (if it will be used for its intended purpose). Non-combustible insulation is laid between these walls for more efficient heating of the room.
Features of corner fireplaces
I would like to dwell on the option of installing a fireplace in a corner. This method has both advantages and disadvantages. Let's talk about the benefits:
- You can save space as there is less space in the corner.
- The corner space of the room is used, and usually the corners are empty.
- Less material consumption and lower cost of the whole structure.
- Looks original and stylish.
Unfortunately, a do-it-yourself corner fireplace made of drywall will also have drawbacks. There is not always a free corner of a sufficient size so that there is no window with a radiator. Even if the window is far away, there are curtains that will get in the way. Therefore, always two corners in a room cannot be used.
 Imitation of a chimney will not steal space and will look stylish
 The other two corners are usually formed by the part of the wall where the doors are located. For some people, if a do-it-yourself corner decorative fireplace made of plasterboard is located in such a place, then this is unacceptable from the point of view of room design.
Step-by-step instruction
Mostly creation corner false fireplaces from plasterboard differs little from the above procedure for frontal structures. The main difference is in the shape of the frame.
Diy plasterboard corner fireplace - step-by-step instruction:
- Calculation of sizes. You need to take into account everything. For example, a heating pipe running along the corner of a wall that needs to be hidden. It may interfere with the assembly of a solid frame. If the battery is hiding, then you should definitely provide for a design feature that will make it easy to get to it if necessary. When is going corner fireplace from drywall, the dimensions of all elements must be carefully considered.
- We mount the frame. For this, the cheapest profile or the one with which it is most convenient to work will fit. There are no special requirements for guides.
- We provide electrical wiring. These can be sockets or wiring for lighting the finished structure. The additional lighting is especially relevant if the work is carried out with a large frame.
- The frame is sheathed with drywall sheets.
- Finishing is carried out.
Here's how to make your own plasterboard fireplace. You just need to follow the sequence of work in the instructions.
Finishing - the last stage
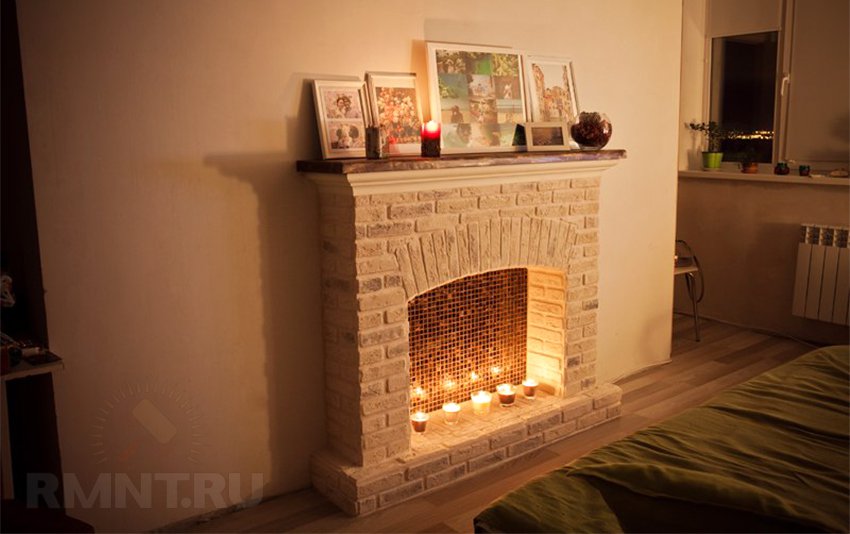
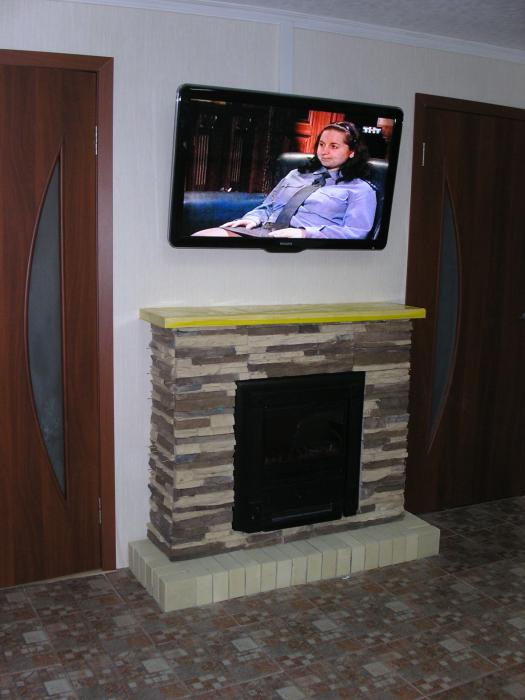
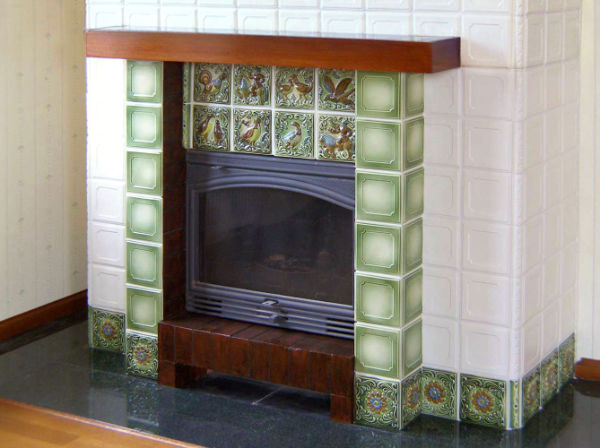
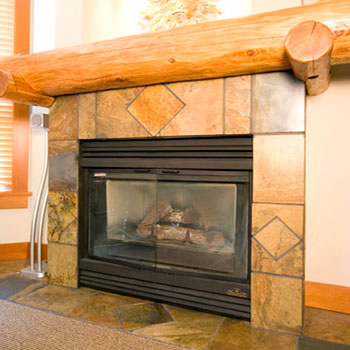
The fireplace must fit harmoniously into the interior of the room where it is installed. Therefore, it is so important to choose the right topcoat. The most popular materials for such works are decorative bricks, ceramic tiles and fake diamond... However, ordinary paint is often used for these purposes.
 With the right finish, no one will guess about the use of drywall
 Before painting a drywall fireplace, putty it, making all surfaces smooth. Then everything is painted twice with water-based paint with a brush. For other types of finishes, you will have to use plaster compounds so that nothing falls off. All this significantly increases the weight of the structure. So you need to know in advance whether the drywall will be faced with ceramic tiles (stone) or not.
It is not so difficult to make a fireplace in an apartment with your own hands from drywall, as it might seem. The main thing is to correctly calculate and use the level, do not forget about jumpers and finishing.
Fireplace in own home is the dream of many families. Unfortunately, in a city apartment with central heating, it is not always possible to build a full-fledged stone fireplace. In addition, the danger of exploiting a hearth with living fire stops many on the way to their cherished dream. For such cases, an excellent solution would be to install a plasterboard fireplace. It is not too different from the real one in design, and almost everyone can assemble it at home.
Plasterboard fireplaces: types and finishes
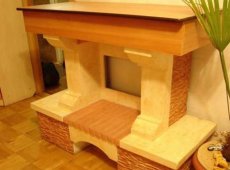
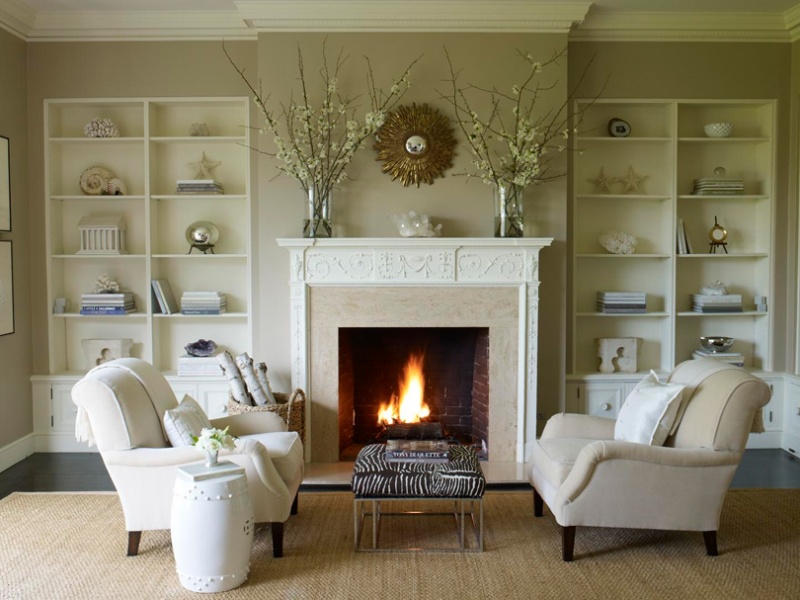
A drywall home hearth only at first glance seems to be a purely decorative idea. Assembled on durable metal profile frame and sheathed with plasterboard, it is able not only to please the eye and inspire thoughts of evening gatherings by the fire, but also serve as a comfortable object or bedroom. For example, on the protruding portal of such a fireplace, you can equip a spacious bookshelf, display a collection on it, if you are fond of collecting, or simply use it to store the necessary household items.
Plasterboard fireplaces can be made in a variety of styles and fit into the interior of both a classic baroque apartment and an ultra-modern high-tech, and it is absolutely natural for any fireplace to look in the interiors of Art Nouveau, Provence, rustic, eco-style and their mixtures.
![]()
A drywall fireplace can be not only traditional in shape. A compact corner fireplace is suitable for a small room, and a large space can be easily zoned using a protruding portal and a fireplace podium.
According to the manufacturing method, all artificial plasterboard fireplaces can be divided into three groups: real ones, in which you can mount a real firebox for a biofireplace; conditional - the portal of which can serve as a place for placing an electric fireplace or plasma screen; and symbolic, which in their essence perform only a decorative function.
The advantages of plasterboard fireplaces are as follows:
- The cheapness of the material and the minimum set of tools: to create, you will need the same set of materials and equipment as for any;
- Various options for decoration and decoration: artificial fireplaces can be tiled or natural stone, decorate with plaster columns or sheathed with clapboard - depending on the general style of the space;
- Plasterboard fireplaces can take any shape at the request of the customer, they can be easily mounted and dismantled, and if necessary, the structure can be simply moved to another place;
- If you do not plan to install a false fireplace for a biofuel inside the portal, the fireplace will be absolutely safe for others. In the case of decoration with electrical equipment, candles or a bio fireplace, you just need to follow basic safety precautions.
A plasterboard fireplace is an excellent and very inexpensive decor option that will equally decorate both a spacious living room and a cozy one. And if you decide to decorate the interior of your home using such a design, you should start by drawing up a step-by-step action plan.
Step-by-step action plan: how to make a drywall fireplace
Without a clear understanding of what the sequence of actions should be in preparation for arranging a false fireplace in the house and in the direct execution of work, it is very difficult to achieve a reliable and beautiful result in a short time. Therefore, you need to start with the most important thing: choose the style of the fireplace, its location and "filling".
Location: In a spacious room, it is best to place a fireplace in the middle of a long wall. In this case, you can at the same time issue a false chimney for greater reliability. In a small room, choose a corner structure. You definitely shouldn't install an artificial fireplace in a hard-to-reach place where it will be difficult to get to it.
The style of design can be thought up by yourself, or you can be guided by photos of similar designs, which can be found in large numbers on the Internet.
If you want to achieve maximum reliability, you can equip a small bio fireplace inside the false fireplace. But in this case it will be necessary to use special and additional insulation of the inner walls of the portal with non-combustible materials, for example, asbestos or refractory bricks. It is advisable to install a biofireplace in conjunction with a specialist.
Anything can become a filling for a fireplace: candles installed in the portal; stacks of books; electronic photo frame on which the image of the flame will be displayed; plasma screen or electric fireplace disguised as a real hearth.
A step-by-step plan for creating a drywall fireplace:
- We select the appropriate option and transfer it to the drawing;
- We create a layout;
- We make a calculation necessary materials and make their purchase;
- We mount the frame from the profile;
- We sheathe the frame;
- We carry out finishing work on the box;
- We design the portal from the inside;
- We carry out work on the decor of the fireplace.
The first step in building a drywall fireplace is a blueprint. It will allow you to see exactly how to place the structure, understand its overall dimensions and detail the project.
Creating a layout and drawing of a plasterboard fireplace
It is advisable to produce both the drawing and the model of the fireplace in full size. Stock up on a drawing paper, ruler, protractor and pencils, and remember the basics of school drawing. Draw a sketch of the future hearth, draw details and size each element of the future structure.
Try to depict not only a frontal view, but also an isometric projection of the fireplace. After that, you need to try on the drawing for the future installation site.
If you don't have any questions, you can transfer the drawing to the fireplace model.
The layout can be quickly and easily made from available tools:
- Styrofoam sheet;
- PVA glue;
- Painting knife;
Cut out the mock-up of the fireplace portal to the overall dimensions and attach it to the wall at the installation site. You will clearly see whether it is necessary to arrange a podium or a chimney above the fireplace under the hearth, whether the parts of the structure look organic, whether it is necessary to modify the mantelpiece or adjust the dimensions of the inner part.
Choosing tools and materials
After all the calculations have been made, you can start making the fireplace itself. To do this, we need basic tools for and a standard set of materials.
Tools and materials for creating a plasterboard fireplace box:
- Screwdriver;
- Bulgarian or painting knife;
- Scissors for metal;
- Hammer drill;
- Metal wall profiles and guides;
- Gypsum plasterboard (gypsum plasterboard or, preferably, fireproof gypsum plasterboard);
- 6 x 60 screws and dowel nails.
If it is not possible to buy whole strips of a profile, you can use the leftovers, or even completely assemble the frame from slats or wooden bars. For finishing works Reinforcing tape-serpyanka, painting net, putty and spatulas for working with it, sandpaper grater, reinforcing corners will definitely come in handy.
DIY plasterboard fireplace: step-by-step instructions for the master
After all the materials are purchased, the model is built and tested in the place of the proposed installation of the fireplace, and the equipment is prepared for work, the manufacturing process can begin.
In order for the walls of the fireplace to be perfectly flat and perpendicular to the floor, do not forget to use a level and a plumb line during installation. It will not be superfluous to check the coincidence of the lengths of the diagonals in the finished structure - they must be equal.
Work order:
- We make a support frame from wall and guide profiles (PS and PN), fix it on dowels to the wall at the installation site. On the frame, we collect the portal frame from the same profile.
- From drywall and profiles, we separately assemble the fireplace podium and cut out the shelf. We mount the podium and shelf to the fireplace box, sew the inner part of the portal with plasterboard, forming a firebox.
- We carefully trim the corners of the structure with the help of corners, glue the serpyanka tape at the joints of the sheets, primer and cover with putty on top. After drying the putty, we wipe the surface. Now you can start decorative work.
- We paint the firebox from the inside in a suitable color; if desired, before that, you can cover it with asbestos or other heat-resistant material. We cover the fireplace portal and shelf with the selected finishing materials, decorate and decorate. We install the "filling" inside the firebox.
After carrying out the main work, the fireplace needs to be given individuality, that is, to arrange its decor. There are many ways to decorate a fireplace or decorate it for a certain style of interior. Let's consider just a few of them.
Plasterboard fireplace: finishing and decoration methods
You can decorate a fireplace not only with plaster columns or rosettes. For its decoration, you can safely use almost any kind finishing material, even, at first glance, completely unsuitable for such a design.
Examples of plasterboard fireplace decor:
- Facing with glazed tiles "a la russe" or tiles will look good;
- Glass or ceramic mosaics will also stylishly complement the decor of the fireplace;
- You can give the fireplace a "primitive" look and decorate it with stones of irregular shape;
- Brickwork will also complement the look of the fireplace, including if you veneer the firebox from the inside with refractory red brick.
Any of the options presented can be successfully implemented with little investment in your home.
We make a drywall fireplace with our own hands (video)
Easy to manufacture, but very beautiful plasterboard fireplace will give the house a noble, aristocratic look, create a family atmosphere and make the room much more comfortable.
If you have long dreamed of a fireplace, but for some reason cannot afford to install it, then a decorative drywall hearth is an excellent alternative to the present. And you can do it yourself with a minimum investment of time and finance.
The fireplace in the house is not just a stylish decoration, it is a symbol of warmth, comfort, family hearth. But if even a hundred years ago it was considered something quite commonplace, then today it is practically a luxury item, not accessible to everyone.
There are a huge number of orders, diagrams and installation instructions, thanks to which any owner can independently fold a fireplace made of stone or brick. However, there are situations when this is not possible.
In particular:
- You live in an apartment where, according to SNIP standards, the permissible load on the floors is only 150 kg / m 2, and it is hardly really possible to install an independent direct chimney.
- You don't feel like messing with regular cleaning of combustion products.
- You do not have the opportunity to pay for the work of experienced stove-makers, and you doubt your abilities.
- Installation of a foundation or a chimney is unrealistic due to the design features of the room.
But all this is not a reason to part with the dream of getting your own fireplace, because you can make a false construction with your own hands from gypsum board and frame elements - bars and metal profiles. Outwardly, such a fireplace differs from a real one only in that there is no living fire in it, and besides, it also has undoubted advantages:
- Ease and speed of installation.
- Low material costs.
- No need for foundation arrangement.
- Light weight.
- The reality of installation in any room of an apartment or house.
- Possibility of facing with any finishing material.
- In addition, it does not need to be cleaned of ash and ash.
Phased installation of a wall-mounted fireplace made of gypsum plasterboard
As already mentioned, it is easy to create such a structure. This requires only a minimal set of tools, care and accuracy, and you can do without professional skills in working with the material.
Stage 1. We create a drawing and layout of the structure
First of all, you need to prepare a drawing of the future design. It is not necessary to draw it, you can find a huge number of different schemes decorative fireplaces... It will also be very convenient if you draw the diagram directly on the base wall, so it will be easier for you to check with it throughout the installation.
Examine the room again. Make sure that the decoration will fit into the interior, that you have chosen a good location for it.
Stage 2. Preparation of tools and materials
You will need the following materials:
Drywall. If installation is carried out in a room with high humidity, take GKLV. And although many advise to buy GKLVO, that is, GKL fire-resistant / moisture-resistant, it is inappropriate to overpay for fire-resistant impregnation. Even if you put candles in it, of course, you will additionally protect the portal from fire. So resistance to open fire will not be of particular importance here. GKL should preferably be at least 12.5 mm thick.
Metal profile:
- Wall guides PN (UD) 27x28 mm.
- Rack PS (CD) 60x27 mm.
- Corner PU.
- Self-tapping screws for metal for the frame, for wood for attaching guides to wooden surfaces and on gypsum board.
- Dowels (if necessary).
- Putty.
- Serpyanka.
- Primer.
And prepare the tools:
- A hammer drill (if you will attach the guides to concrete or brick surfaces).
- A screwdriver or electric drill with a carrier.
- Metal scissors.
- Construction stationery knife.
- Jigsaw (optional).
- Roulette.
- Pencil.
- Beating.
- Spirit level (spirit level) or level.
- Putty spatulas.
Stage 3. Surface preparation
It is advisable to level the wall to which the fireplace structure will be attached. In the area where the fireplace is located, clean all loose and crumbling elements such as plaster, old paint, etc. Cracks and gaps in the supporting structures should also be repaired.
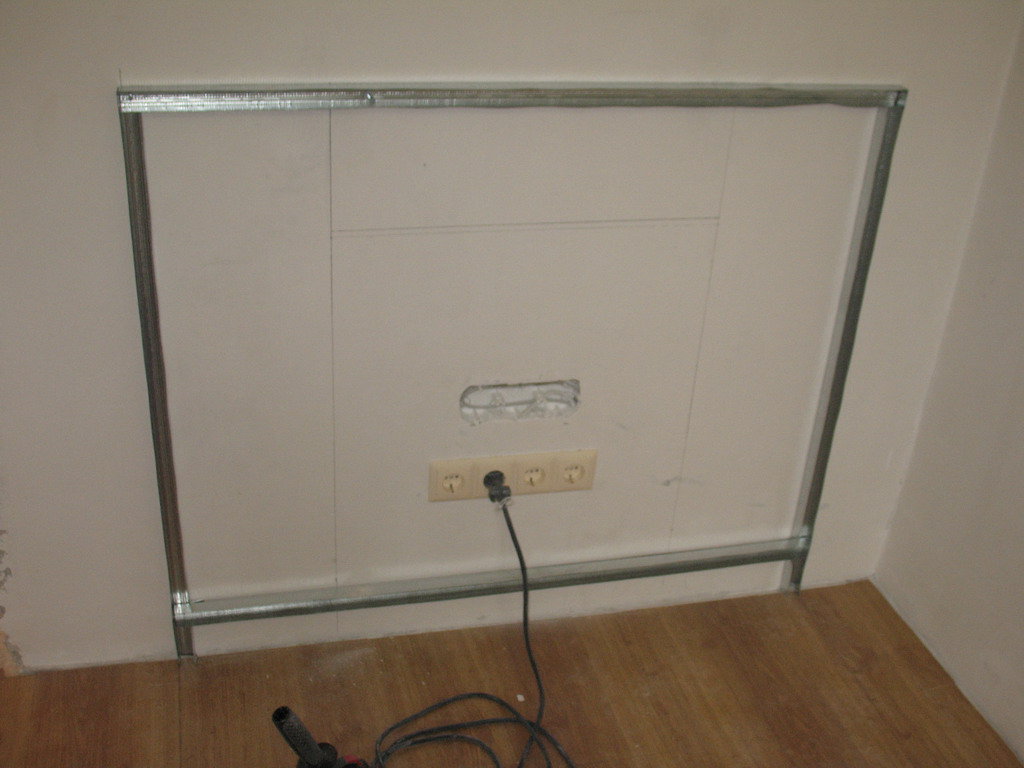
Stage 4. Surface marking and installation of guides
Using a level and a puncture mark the surface according to the preliminary drawing.
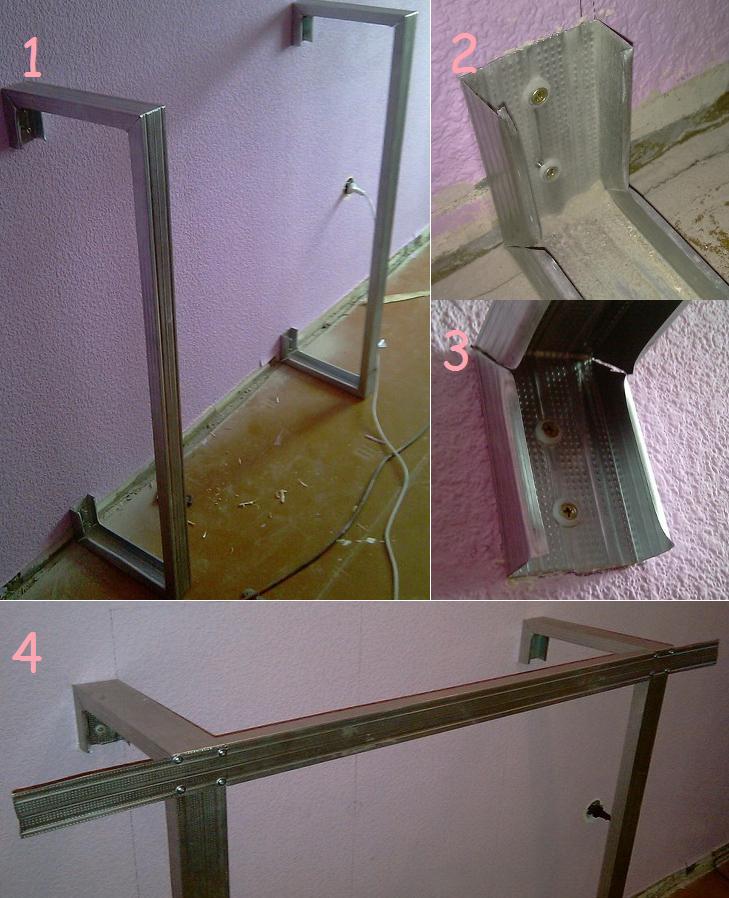
First of all, fix the guides, which will create a general wall contour of the structure.
You need to fix the starter strips on dowels and / or self-tapping screws, it depends on the material of the base surface. Step between fasteners: 30-40 cm.
When fixing with dowels, pre-drill holes for fasteners in the profile.
Remember to use a bubble spirit level during operation to check the horizontal and vertical installation. In places where the surface drops, fix the level of passage of the profiles using shims at the smallest points of the plane.
Stage 5. Cross members - side guides
At this stage, you need to fix the guiding cross members around the perimeter. The distance between them is from 20 to 40 cm.
![]()
Stage 6. Outer contour
Now you need to assemble the outer contour that creates the volume of the structure. It is fixed to the crossbars in place in detail, or assembled separately and then fixed immediately as a whole, as it is more convenient for anyone.
Stage 7. Portal formation
To create a portal (firebox), install post profiles from the outer, side and upper contours at the required distance (depending on the desired dimensions of the firebox).
If you have an arched vault as planned, use an arched profile to form it.
Stage 8. Installation of gypsum board
On sheets of drywall, make a drawing of future elements, exactly according to the dimensions of the individual parts of the frame.
The parts should be cut with a special construction knife, it is also called a clerical or jigsaw.
Then the blanks must be fixed to the frame with self-tapping screws. In this case, the heads of the screws should be flush with the surface of the gypsum board, not sink into it and not protrude.
Twist should be at least 2 cm from the edge.
Cover the fireplace portal with heat-resistant elements (for example, asbestos or DSP), if required by its subsequent operation, for example, if you light candles in it.
Stage 9. Rough cladding - puttying
Puttying is carried out in several construction stages:
- First of all, remove the chamfers and edges from the gypsum board joints, if they are not of a thinned type.
- Apply a primer to the surface of the gypsum board and wait until it dries completely.
- Stick the serpentine evenly on the joints and inner corners.
- At the outer corners, fix the corner profiles with a construction stapler.
- Then make the mortar according to the instructions on the package of the putty mixture.
- Use 12-15 cm and 30-35 cm spatulas to seal the joints.
- First, putty is applied in a thin layer to the corners, joints and grooves of the screws. This should be done carefully, trying to avoid sagging.
- After the mortar has dried, apply the mixture to the “body” of the fireplace with smooth undulating movements with a wide spatula.
- After drying with a special abrasive mesh, sand the surface and prime it again to apply a finishing layer of putty.
Stage 10. Mantel
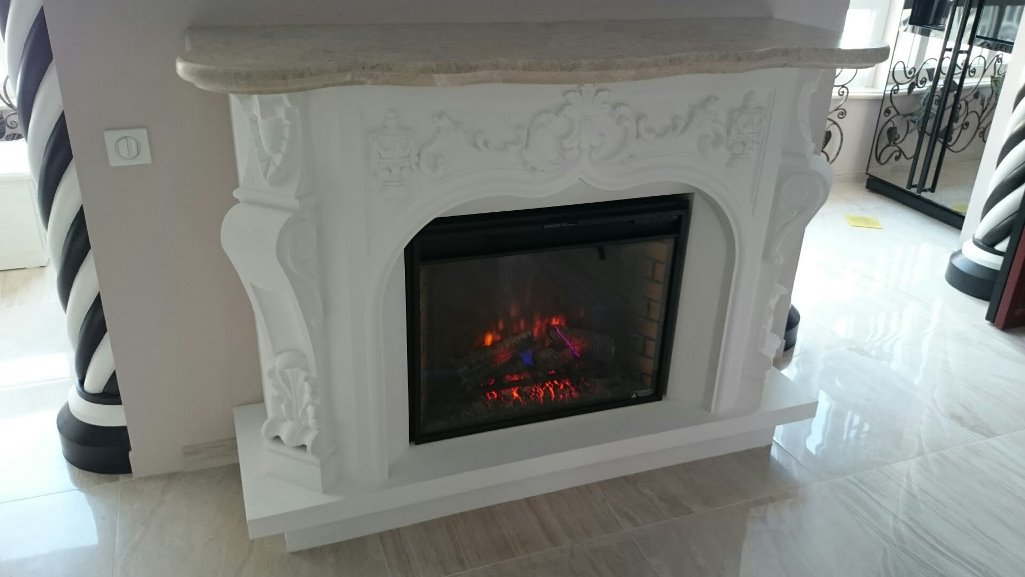
Before applying the finishing material, the fireplace must be primed again. The choice of cladding depends on your preference. It can be ordinary paint, tiles, natural or artificial stone, wooden elements, stucco molding and much more to your taste.
As an element depicting fire, you can insert a special screen into the portal, put candles, just put logs as decoration, or place an electric fireplace with an imitation of fire.
That's all. A hand-made wall fireplace will be an excellent decoration for any interior.
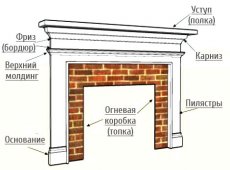
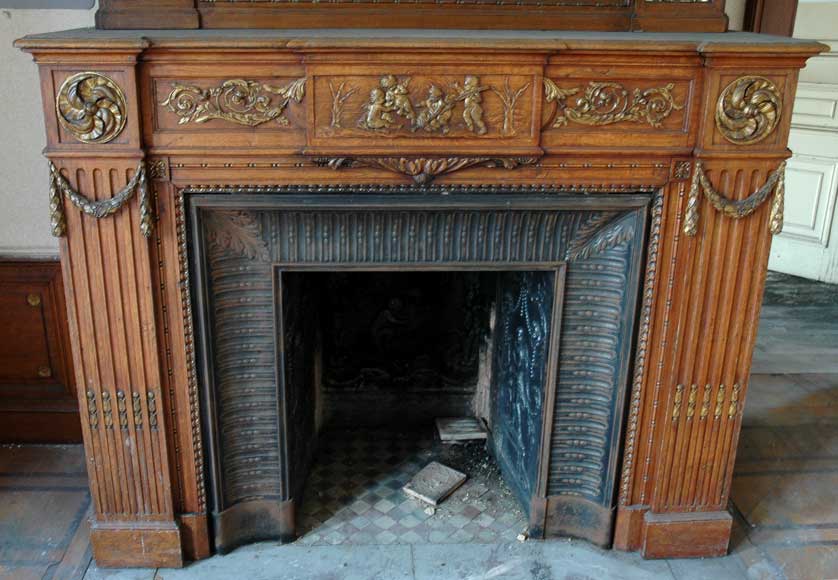
A fireplace is not only a source of heat, but also a wonderful decorative element. In order for the fireplace to fit well into the surrounding interior, you need to thoroughly think over the procedure for its external design and equip a beautiful portal.
The fireplace portal is an external frame with a recess for installing the fireplace itself. A wide variety of materials can be used to craft a portal. Most often, decorative finishing is carried out using drywall, wood, ceramic tiles and other materials.
In order for the finished structure to fit well into the interior of the room, study the following recommendations and follow them in the process of doing the work.
Combination of styles

The fireplace should go well with the style of the portal. The hearth is best placed at the level of the floor line. If you want to place the hearth higher, choose a wide model. A wide fireplace will look good when installed at any distance from the floor.
Do not hide the frame of the fireplace behind the portal
The main function of the portal is to emphasize the design of the fireplace. It is recommended to place the framing of the hearth flush with the surface of the fireplace portal.
If you are planning on creating a completely unique design and do not want to take into account the design of the fireplace, purchase a special option known as a fireplace insert. Such models do not have their own design, so the design of the finished structure will depend solely on the preferences of the owner.
The ratio of the proportions of structural elements
Find the best size for your fireplace. For example, a floor model needs some free space in front of it. If there is a shortage of space, choose a beautiful wall model of the hearth. Such a fireplace does not require free space in front of itself and fits perfectly into any interior.
It is important that the dimensions of the fireplace correlate well with the dimensions of the portal. Traditionally, the dimensions of the structures are selected so that the fireplace occupies about 75% of the height and about 50% of the width of the decorative portal.
In the case of using wide models of fireplaces, they can take up more space.
Buy a fireplace before building a portal
As a rule, the main overall dimensions of the foci are given in catalogs or are reported by the manufacturer. That is, you can look at the model of the fireplace that suits you, make a portal, buy the model of the hearth you like and install it in a ready-made decorative frame. But it's better not to do that.
Even knowing the exact dimensions of the fireplace, you can forget about some important points, for example, such as the placement of the cord for connecting to the mains, the presence of protruding fasteners, holes for air exchange, etc.
In order not to waste time on changing the design of the finished portal in the future, start equipping it only after you buy a fireplace and deliver it home. In such a situation, you will be able to "adjust" the dimensions of the decorative structure in accordance with the dimensions of the fireplace directly during operation. This will allow you to fully match the configuration and dimensions of structural elements, eliminating the risk of blocking access to the necessary elements.
Portal design guide
When choosing materials for decorating a fireplace portal, be guided by your preferences, available budget and design features of the room.
As a rule, fireplaces installed in conjunction with portals practically do not heat up during operation and weigh a maximum of several kilograms, therefore there are no special requirements for the heat resistance of materials and their strength.

To decorate the portal, you can use decorative brick, stone, glass, metal, wood boards, drywall, plastic panels and so on. Experts recommend to refuse except from the use of plywood and solid wood, because such materials dry out very quickly and deform under the influence of hot air.
Also, polyurethane and gypsum are widely used for finishing fireplace portals.
Otherwise, be guided by your preferences. Below are guidelines for arranging portals using the most popular and easy-to-install materials.
The simplest and most budgetary option for a fireplace portal is a plasterboard construction. The disadvantage of this option is the fact that it needs to be planned even at the stage of creating a room plan. In the future, you will not be able to make any significant changes and adjustments to such a system.
Therefore, prepare in advance a carefully verified project with full coordination of all dimensions. Do not forget to foresee the placement of ventilation holes and electrical wires in the portal. Thanks to the holes in the structure, air will circulate, which will avoid overheating of the fireplace, the formation of condensation and other troubles.
Corner plasterboard portals look very beautiful. The arrangement technology is the same as any other drywall structures.
First step

Assemble and fix the frame from the profiles for fixing the drywall sheets. Select the dimensions and configuration of the frame in accordance with the characteristics of your situation.

Second step
Attach sheets of finishing material to the frame. Before final fixing, try the fireplace again to the portal to be equipped and, if necessary, make the required changes to the design.
Fasten any required drywall sheets.
Third step
Plaster the structure. Use a gypsum-based compound. Prepare the plaster according to the manufacturer's instructions. If you wish, you can prepare a slightly thicker composition and make with it an imitation of stone, masonry, modeling, etc.
Fourth step
Cover the plaster with varnish or facade paint. This coating will provide additional protection for the material and prevent cracking.
If you wish, you can refuse to plaster and paint by finishing the plasterboard structure with any suitable materials.
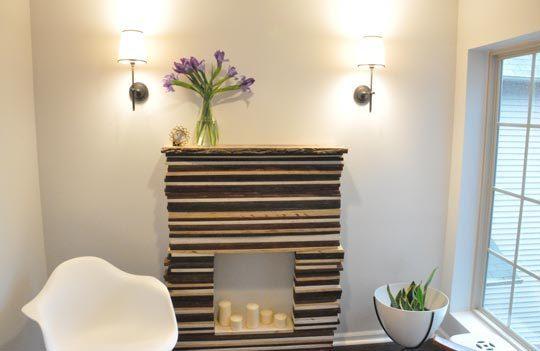
A beautiful decorative frame for a fireplace can be made from scraps of parquet boards. Depending on your personal preferences and the characteristics of the interior of the room, the portal can be assembled from multi-colored scraps of the board, or you can paint the elements with wood stain or other suitable composition.
First step
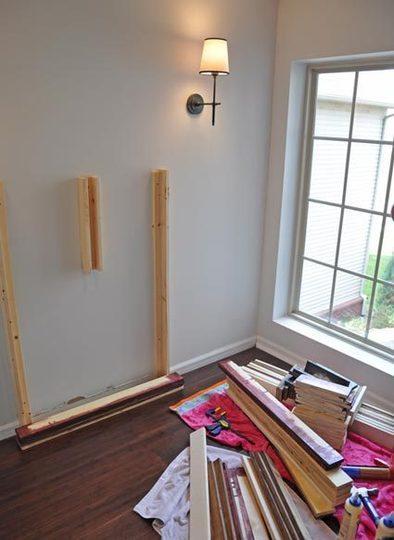
Fasten a timber frame to the wall.
Second step
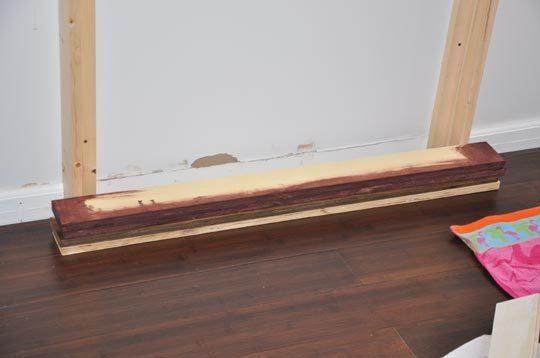
Sequentially glue the pieces of parquet board to the frame. Additionally, all elements need to be glued to each other. Press the trims to the frame with spacers. After the glue has dried (the required time is indicated in the instructions), remove the spacers.
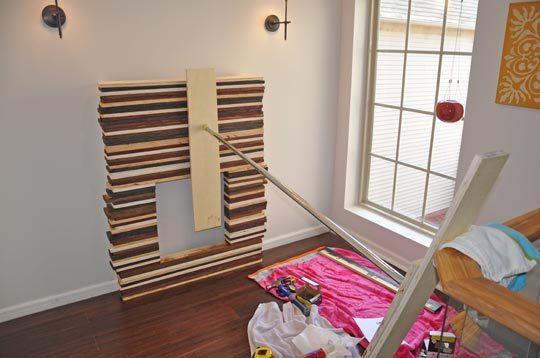
Third step
Complete the finishing decoration of the portal at your discretion. For example, decorative candles go very well with a portal made of parquet boards.
Solid wood portal
To successfully cope with the arrangement of such a portal for a fireplace, you must have the skills to work with tools for woodworking. Experienced master can independently create a portal project from this material and cope with its arrangement without third-party recommendations.
The tips are as follows:
- the portal can only be assembled from thoroughly dried material. All boards and beams must be made of the same wood;
- gluing structural elements is best done using modern synthetic adhesive mixtures. Refrain from using water-based glue - such a composition will make the material more moist, which is highly undesirable;
- the structure must be covered with a double layer of varnish on both sides. Thanks to such a finish, the risk of moisture changes and further deformation of the wood will be minimized.
Array - not best material for arranging fireplace portals. The problem with wood is that it can dry out and crack when exposed to the hot air from the fireplace.
Therefore, if possible, give preference to other materials.
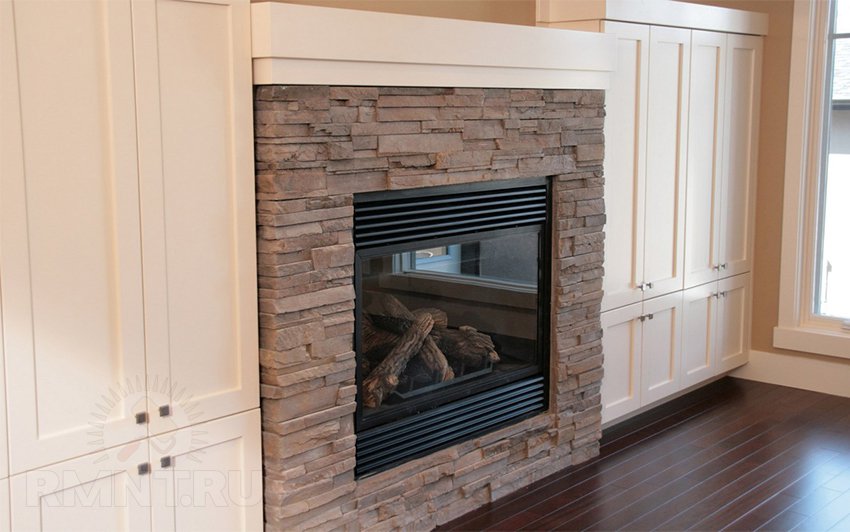
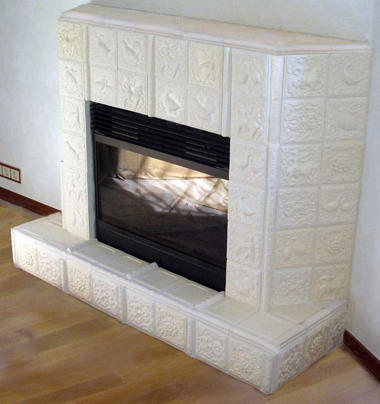
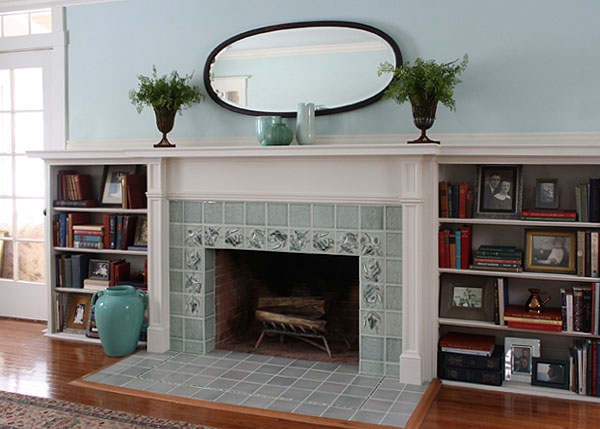
Fireplace portals faced with ceramic tiles look very good.
First step
Assemble the base structure from chipboard and a 20x20 mounting rail. Use a parquet board to make a mantel. Cover the sides of the shield with a plinth.
Use any suitable fasteners to connect the base elements.
Second step
Sand all joints thoroughly and cover the countertop with several layers of parquet lacquer.
Third step
Cover the portal walls with ceramic tiles of your choice. Liquid nails are well suited for fixing cladding elements.
Fourth step
Cover the tile with the parquet lacquer used to finish the countertop. Thanks to this processing, the fireplace portal will have a complete, thoughtful and organic look.
Particular attention should be paid to additional accessories and various decorative elements... In this moment, be guided by your taste. For example, all sorts of figurines, coated with black varnish and slightly crushed with bronze powder, look very good.
Portal with plaster finish
Decorative plaster allows you to embody a wide variety of design ideas into reality. With its help, the surface of the fireplace portal can be finished with wood, brick and other materials.
First step
Assemble the base of the structure. The technology is extremely simple - first, a support bar is installed, after which it is sheathed with chipboard plates.
Second step
Prepare the slabs for finishing and decorate them.
It is best to finish the slabs before their installation, so that all elements can dry out qualitatively, lying on a horizontal surface. During drying, the parts must be covered with polyethylene.
Before finishing, carefully sand the slabs, putty them and cover with several layers of parquet varnish.
For additional decoration, apply neat grooves to the walls to simulate brickwork.

Third step
Complete the decoration of the fireplace portal of your choice. For this use decorative plaster... You can simply cover the surfaces of the portal with it, or you can make an unusual finish using special decorative elements, modeling, imitation of masonry, etc.
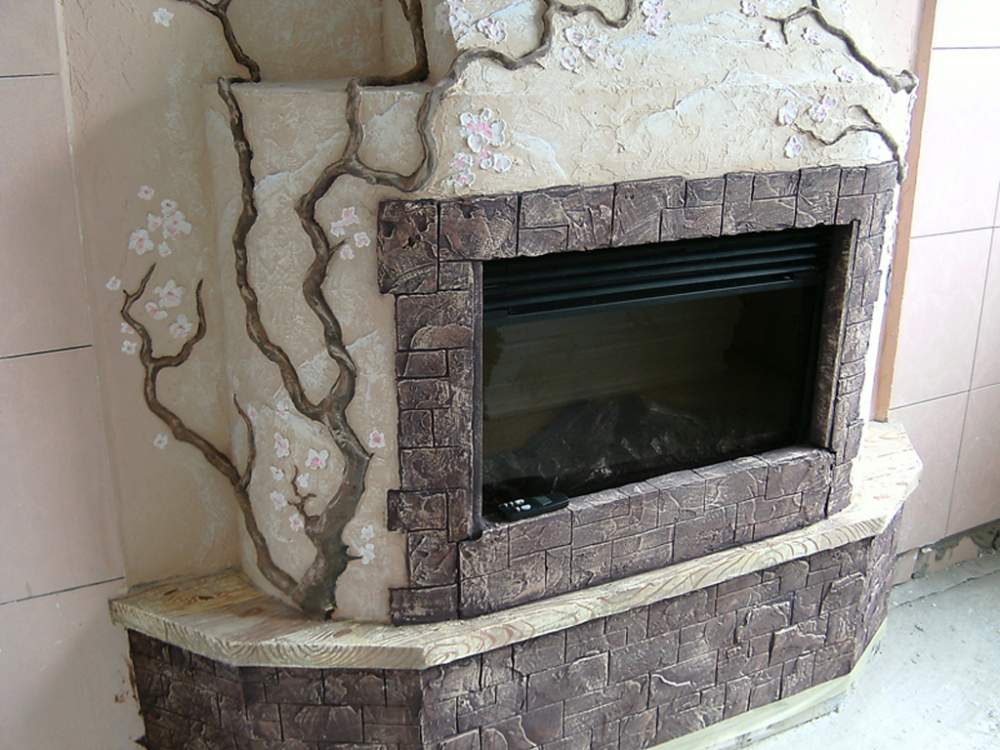
The consistency of the mixture should resemble plastic pottery clay. With the help of previously prepared forms, you can make a wide variety of figures from such plaster and decorate your fireplace with them.
The result is a very original and elegant design with only one drawback - the plaster decor is rather fragile, so you need to handle such a fireplace portal with extreme caution.
This is only a small part of the existing design options for fireplace portals. If you wish, you can make your own changes to the proposed instructions or even create original author's designs - the flight of imagination in the case of fireplace portals is practically unlimited.
Happy work!
Video - Do-it-yourself fireplace portal


