Laying the floor during the construction of a private house is an extremely important and crucial stage, since the humidity and temperature in the room, which should be comfortable, depend on it. A properly arranged wooden floor in a private house will retain heat and withstand any daily load, therefore, one should not save much on floor materials, it is considered normal to spend 20-25% of the total budget.
Types of floor structures
With all the variety of projects, not very many flooring options are offered in private houses:
- Wooden floors;
- Floors on concrete base;
- Combined wood flooring on a concrete pad.
Often, the owners of a private building try to make a basement that performs several functions at once:
- ventilation under the floor in the living area;
- increasing the usable area in the basement, which can be used for technical purposes for installing a heating boiler or water pumping station;
- creation of conditions for storing seasonal harvests and vegetables due to the constant cool air temperature in the basement.
Many people try to make a carpentry workshop or a sports department in the basement with the installation of horizontal bars and exercise equipment. The quality of the floors in the basement will provide a warm, dry microclimate, which will have a beneficial effect on the well-being of the inhabitants of the house. Before starting laying the foundation on black soil, level measurements should be taken groundwaterto avoid spring drips in the basement.
Wooden floors are mounted in a single or two-layer form, when at first it is customary to make a rough insulated base, and cover finishing boards on top. Single floors are suitable only for use in warm weather, so it is better to do them in summer cottages where it is not provided year-round residence... In order for wooden floors to serve for a long time and without complaints, it is necessary to make a high-quality base. To begin with, level the ground area and, at a certain interval, raise the support columns made of bricks and fastened with cement mortar. Brick columns are covered with a waterproofing agent in several layers, for example, roofing material, and beams are laid on them, and then logs (transverse beams), on which the boards are laid.
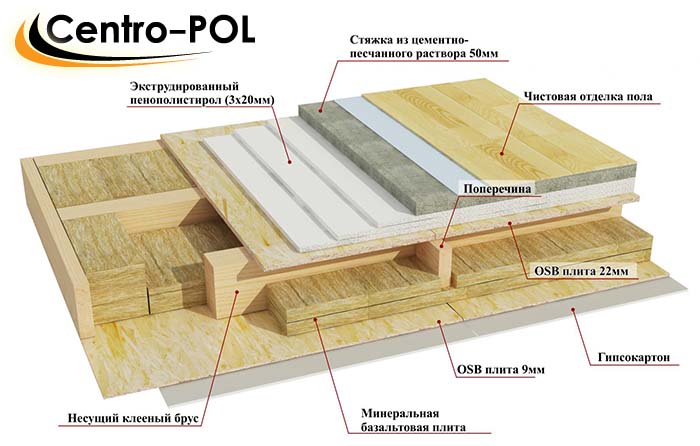
Double-layer floors with insulation can be made using the following technology, shown in the video:
- lay the beams on brick supports and secure them with corners and self-tapping screws;
- to lay rough floors on the beams, for which off-grade softwood boards, which are fixed with self-tapping screws, are useful;
- it is possible to isolate the subfloors from moisture penetration with a plastic wrap, the canvas of which is overlapped and the edges are glued with tape;
- lay the beams and fill the space between them with insulation (expanded clay, mineral wool);
- install final floors and final floor coverings, including parquet, laminate, linoleum, carpet, ceramic tiles.
For laying the floor, you can use tongue-and-groove boards, which adhere tightly and leave almost no gaps. The finishing floorboards should be laid perpendicular to the subfloor boards. A shortened grooved board is called a massive parquet board, which can be laid diagonally diagonally, giving the room a catchy, individual character.
Important! All wooden elements must be impregnated with antifungal antiseptics and fire retardants (fire retardants). This should be done to protect the tree and extend its life.
Concrete floor device
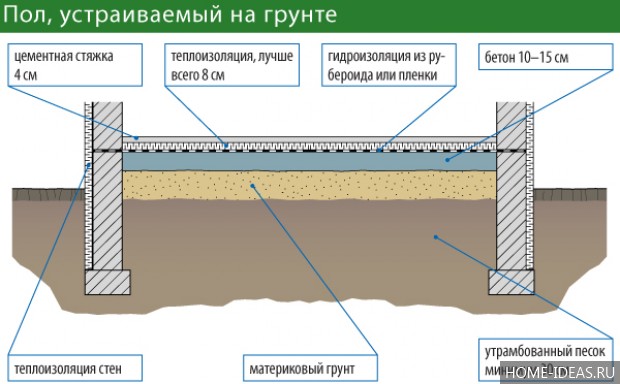
Concrete floors without wooden flooring in private houses are practically not made; in the southern climatic zone, the concrete base is covered with wooden flooring without insulation. As shown in the video, it is recommended to make floors on a concrete base by following these steps:
- level the soil and pour a layer of sand 10-15 cm high, which must be shed with water and tamped;
- pour 10 cm high crushed stone of medium fraction on top of the soil with sand and also tamp;
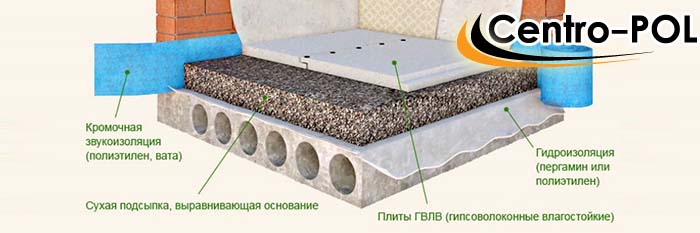
- make a rough concrete screed, it is possible with the addition of expanded clay or foam crumbs;
- lay a layer of waterproofing, for which you can use plastic wrap or roofing material;
- distribute a layer of insulation - expanded clay or extruded polystyrene foam;
- decompose metal reinforcement mesh, which is filled with a clean screed;
- make wood floors using beams and planks;
- lay down flooring.
It is much longer and more expensive to make concrete floors with a wooden covering, but it pays for itself with a long service life without repair. Instead of a clean concrete screed and laying the floorboards, you can use the dry screed technology, for which you need to make guide bars sprinkled with insulation and plywood sheets, fiberboard (fiberboard), chipboard (particleboard), gypsum fiber board (gypsum fiber sheets), GKL (gypsum-cardboard sheets), MDF, OSB. All of these materials are durable, easy to saw and hold the fasteners well; any floor covering can be laid on top of them. This technique can significantly reduce the cost of building materials and the time spent on finishing the floor.
When installing floors in the basement, the owners are especially concerned about how to protect it from the effects of freezing soil and high humidity. The best solution might be fill monolithic slab at the stage of building the foundation from scratch, which is described in detail in the video.
A monolithic slab foundation is an indispensable option when building a private house on a site with "complex" soils, prone to flowability and displacement. These factors do not affect the position of the monolithic slab foundation at all, and, therefore, the walls of the house will not deform either. When laying such a foundation, it immediately turns out to make a reliable floor base, on which you can lay beams with insulation and boards or any sheet material.
An even more promising way to do monolithic foundation - order the laying of a factory reinforced concrete hollow core slab, which will give the entire structure indestructible strength. These slabs are made of concrete with embedded iron reinforcement and longitudinal round voids run through them.
Important! Reinforced concrete slabs are adapted to withstand almost any load and are combined with a variety of materials for the construction of walls near a private house.
Before placing the reinforced concrete slab at the base of the basement or basement, it is necessary to level the ground and make a low formwork for a thin concrete screed in order to obtain a flat horizontal surface. The seams between the slabs are filled with cement mortar and wooden floors can be laid on the surface of reinforced concrete slabs.
It is better to carry out all the calculations not by yourself, but to entrust it to a design specialist, since even a slight bias or non-compliance with technological standards can lead to irreparable consequences. For example, when installing floors in a private house with an area of \u200b\u200bmore than 100 sq. m. ordinary pouring will take a lot of time and the financial costs will significantly exceed the cost of delivery of reinforced concrete slabs.
Floating floor system
Device interfloor overlap must necessarily meet increased sound insulation requirements so that music or laughter on the second floor does not interfere with the inhabitants of the house on the first. Both airborne and shock noises (jumps and falls) are transmitted through the ceiling to adjacent rooms and can cause discomfort. In order to avoid this, it is possible to make the structure according to the system of "floating floors", which have a multi-layer structure, but do not touch the walls, therefore they absorb sound waves better.
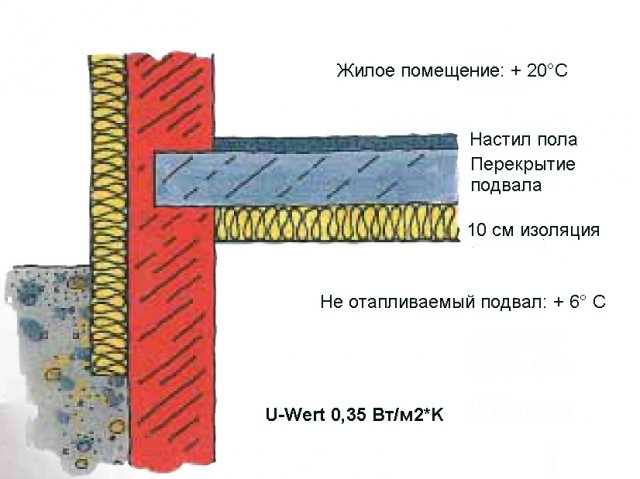
Creating a cozy and comfortable atmosphere in your home is much more difficult than it seems. Low temperatures, cold floors and drafts are problems that many private home owners face. The better the thermal insulation, the lower the heating costs - this rule has been known for a long time. But how can you make your home more protected and warm? First of all, you need to take care of the floors. Remember how unpleasant it is to step on an ice cold one, how your feet freeze when you sit in a chair in the living room for a long time ... All these symptoms of insufficient floor insulation can be eliminated in just a few hours. At the same time, you do not need to seek professional help. Even the most inexperienced "home master" can handle such work.
How and how to insulate floors?
Choice suitable material - the process is not easy. We recommend that you initially compose list of requirements for insulation... For example, thickness, the need for waterproofing, the complexity of installation, etc. It is also necessary to consider and purpose of the premises: for kitchen, bathroom and bedroom you can choose different materialsto achieve perfect insulation. But what are the properties of insulation? What are their similarities and differences?

Extruded expanded polystyrene
One of the best options for floor insulation in a private house. This modified type of expanded polystyrene differs from its predecessor in a more closed structure. This dense and durable material is suitable for insulating floors on the ground, moreover, it does not require a special concrete base. Extruded polystyrene foam can be laid directly on gravel or expanded clay.
The advantages of this material:
- minimal moisture absorption,
- high level of thermal insulation,
- strength,
- soundproofing,
- reliability,
- resistance to various biological organisms,
- stability of size and shape,
- ease of installation.
And yet there is one clear disadvantage, because of which this type of expanded polystyrene is not very popular, - high price.

Expanded polystyrene
But the price for this "simple" type is much lower. At the same time, almost all the advantages of the previous copy have been preserved. Thermal conductivity is practically the same, hygroscopicity too. The only explicit " minus» polystyrene foam is low strength... Sheets can break during delivery and installation and can be affected by extreme stress (heavy furniture in the room). We do not recommend that you use a similar insulation for the garage and other premises with a high load on the floor.

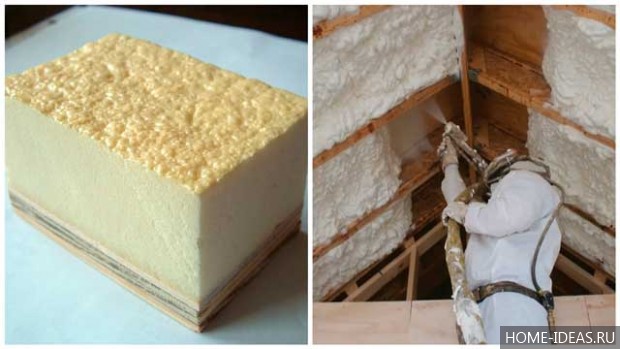
Polyurethane foam
Modern technologies make it possible to obtain insulation with the required qualities right at the construction site. To do this, it is enough to mix only two liquid components. The end result is a solid polymer.
Properties of polyurethane foam:
- low thermal conductivity (both expanded clay and mineral wool are inferior to it),
- high resistance to chemicals,
- excellent sound insulation,
- low flammability,
- low moisture absorption (depends on the density of the material).
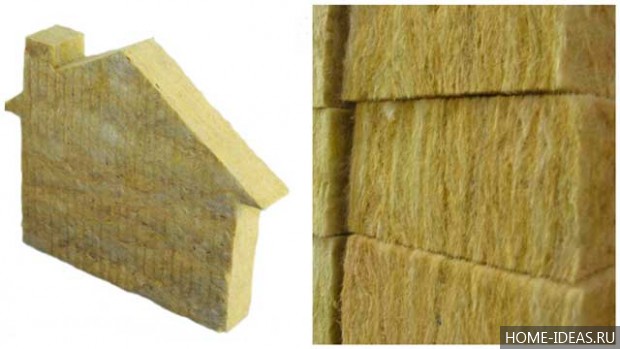
Mineral wool
This material considered the most popular type of insulation... There are many reasons for this:
- low thermal conductivity,
- good sound insulation,
- resistance to moisture and fire,
- relatively low cost,
- long life time,
- compliance (relevant for strong mechanical stress).
The lack of mineral wool is only in installation: not very difficult, but rather troublesome. In addition, this material will require a suitable base.
Expanded clay
An excellent choice for those who want to insulate the floor once and for many years. Among advantages of expanded clay especially stand out:
- durability,
- resistance to high and low temperatures (does not lose its qualities and does not collapse),
- fire resistance,
- excellent sound insulation,
- low thermal conductivity.

Do-it-yourself floor insulation in a private house: step by step instructions
Modern technology of floor insulation involves the sequential execution of the following actions: preparation of the base, laying waterproofing, creating and laying insulation, as well as finishing. This work will take time, take your time, and do not change the order of actions.
Preparation
It is necessary to determine the surface relief and the required height of the future floor. The easiest way to do this is with an optical or laser level. Then you can start compacting the soil.
A sandy layer forms on top. It must necessarily be slightly higher than required (the permissible rate is up to 25%). The sand is tamped, then moistened and tamped again. The durability of the floor and its appearance will depend on the quality of this work, so we recommend that you approach this stage with special care.
And then the last layer is laid - expanded clay or gravel.
Waterproofing layer
With the help of waterproofing materials, the future floor is protected from moisture. It will also help make a solid rough screed. There will be no special problems with this stage. The material is overlapped to avoid gaps. All connections must be fastened with construction tape. Be careful, cuts, holes and other damages in the material are unacceptable.
Also remember that the insulation should be placed with a small margin. The edges should rise 20-25 centimeters along the walls. You can remove the excess at the final stage.
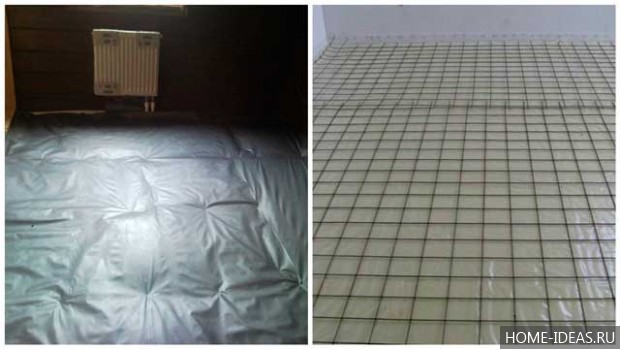
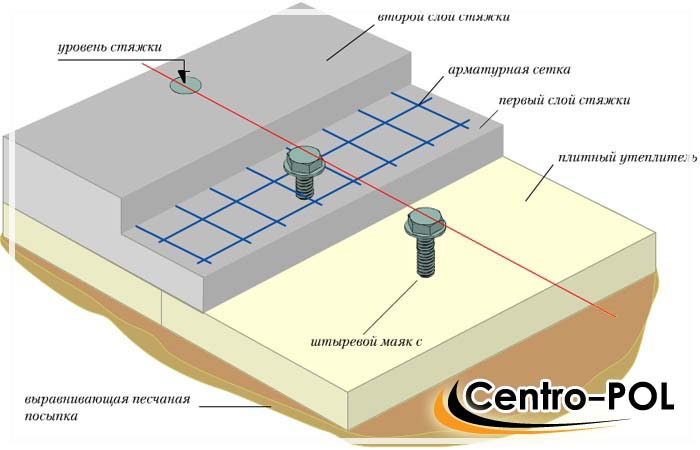
Rough screed and laying of insulation
A mixture of concrete and crushed stone will serve as another layer that is laid on the waterproofing layer. It should be low (about 50 mm) and relatively flat (the permissible height difference is no more than 4 mm). Low requirements make it possible to make this layer quickly, but still it must dry completely by the time the insulation is laid.
The method depends on the specific material. Remember that some heaters may require additional vapor barrier.
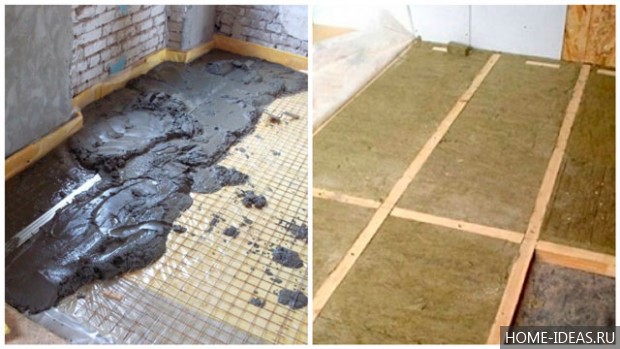
Fine finishing
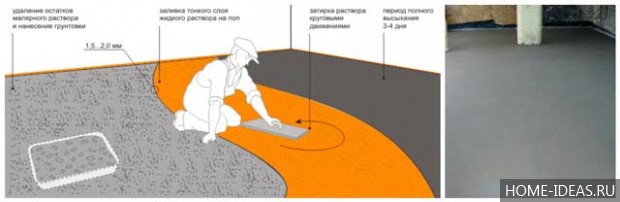
Then comes the turn finishing screed... It is already necessary to treat it carefully. You can use both the usual monolithic filler and dry or semi-dry screed.
In the classic version, horizontal guides are installed on the floor, which mark the desired floor height. The lighthouses are aligned using the building level. Sand-cement mixture it is laid on the floor and aligned with the “beacons” rule.
Do-it-yourself floor insulation in a private house: video
In private houses or on the ground floors of apartments, the floors are always cold. It is not difficult to insulate the floor in a private house with your own hands. Check out this article and you can do it yourself.
There are several technologies for insulating floors:
With the help of wooden flooring, between which a layer of thermal insulation is laid;
Expanded clay screed;
Heating systems laying.
In this article, we will look at one of the most simple options: floor insulation with mineral wool, laid between the logs.
Foundation preparation
The base for laying the thermal insulation can be any: concrete or wooden sub-floor. Before starting work, the old coating is completely dismantled. If the wood floor is not rotten, it is treated antiseptic and laid as a sub-floor. Bearing beams and logs are also treated with an antiseptic. Roofing material or another layer of waterproofing is placed under them.Antiseptic treatment
If there is a lot of moisture in the space between the floor and the subfloor or basement, check all ventilation openings. You should start laying the thermal insulation only after the basements have completely dried: otherwise, it will quickly "pull" the water.
Installation of a lag for the installation of insulation
To dampen the noise of steps before laying, it is better to lay the log along the walls edge stripes from strips of mineral wool 2-3 cm. Lags, antiseptic soaked, are exposed using a level with a step along the width of the insulation 60-90 cm.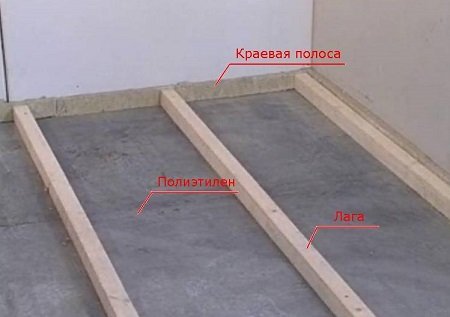
Setting lag

Lathing
To strengthen the lag and elimination of squeaks and sags when walking, a crate is attached to them in increments of up to 50 cm.
Important! To ensure natural ventilation, an air gap must be made between the thermal insulation layer and the plank floor. To do this, you can use high logs or lay on them counterracks.
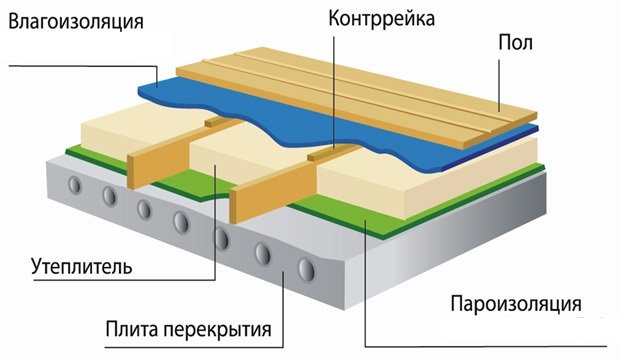
Thermal insulation laying scheme

Ventilation gap
Waterproofing
So that the layer of insulation does not become a place of accumulation of condensate and does not harm the structure, it should be protected from moisture. Polyethylene film, roofing felt, waxed paper, membrane material, etc. can be used as waterproofing. They are laid with an approach to the walls to the height of the future floor no tension, free. The waterproofing material is laid with an overlap of 10 cm; to ensure tightness, the joints are fixed with a stapler or construction tape.
Waterproofing thermal insulation material
Laying insulation material
There are special requirements for home insulation. In addition to high protective thermal insulation properties, they must have a low degree of fire hazard. Mineral wool - fireproof and a relatively inexpensive material with low thermal conductivity and high strength. Mineral wool slabs for floor insulation should be of sufficient thickness from 5 cm.When installing insulation over heated basements, this figure can be reduced to 3 cm.Important! When laying mineral wool, protective clothing and a respirator should be used. Rubber gloves are used to protect hands. Work is prohibited near food or drinking water.
The insulation is laid as tightly as possible, without voids and breaks. It is most convenient for picking up mineral wool in the form of slabs. When using rolls, they are stacked overlap... At the joints with the crate, the sheets are cut. To ensure the minimum number of seams, it is necessary that there are few such incisions.
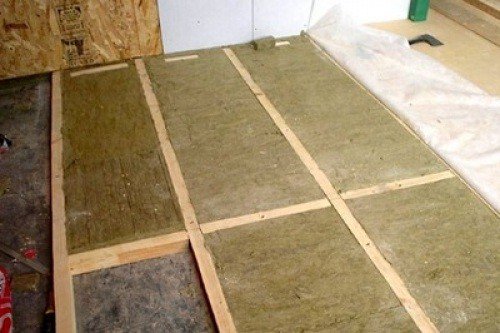
Laying mineral wool
Vapor barrier
It, like waterproofing, is laid with an approach to the walls. To reflect heat from the home, you can use additional layer foil. Diffuse ("breathing") membranes - more expensive waterproofing material, capable of not only retaining moisture, but also allowing air to pass through. It fits membranes to insulation.Plank floor
The plank floor can be anything: fiberboard, OSB, gypsum boards, special drywall for the floor or floorboards. The finish can be any. If laminate is used as it, moisture-resistant plywood is laid under it.Advice! To damp noise, the finishing floor is laid on logs with an indent from the wall by 2-3 cm.

Plank flooring
Basement side insulation
If you do not plan to disassemble the floor, you can also insulate it from the side of the basement floor. Work begins with sealing cracks and cracks in the ceiling.To protect the insulation from getting wet and the formation of mold, a vapor barrier with an overlap of 10 mm is attached to the ceiling cladding with wooden slats, and then the bars are mounted with a step according to the size of the insulation. It is mounted between the crate with slats or wire mesh. The last layer is the vapor barrier.
Important! When closing the log with a film, 10-15 cm are left on each side for ventilation. So that cold bridges do not appear at the junction of the ceiling with the wall, insulation winds up on the wall at a distance of about 5 cm.

Installation of thermal insulation from the basement side
Watch the video: how to insulate the floor in a private house


