The process of cooking barbecue on an ordinary iron grill is well known to everyone. But in windy weather or during a sudden onset of rain, frying meat becomes problematic, if not impossible. It is much more convenient to make a shish kebab or barbecue on a stationary brick grill located under a canopy. In this case, sudden vagaries of the weather will not spoil your plans. IN this material it will tell you how to make a brick street grill with your own hands.
Schemes of stationary brick grills
Differences between hearths located in the open air and traditional brick ovens are as follows:
- a brazier or barbecue is built in order to create comfortable conditions for preparing various dishes in the open air;
- the design of a street barbecue is much simpler, and the requirements for materials are not so high;
- a simple brick street stove can be folded at home or in the country by almost every homeowner;
- the dimensions and arrangement of the barbecue are selected arbitrarily depending on the wishes and capabilities of the owners of the house.
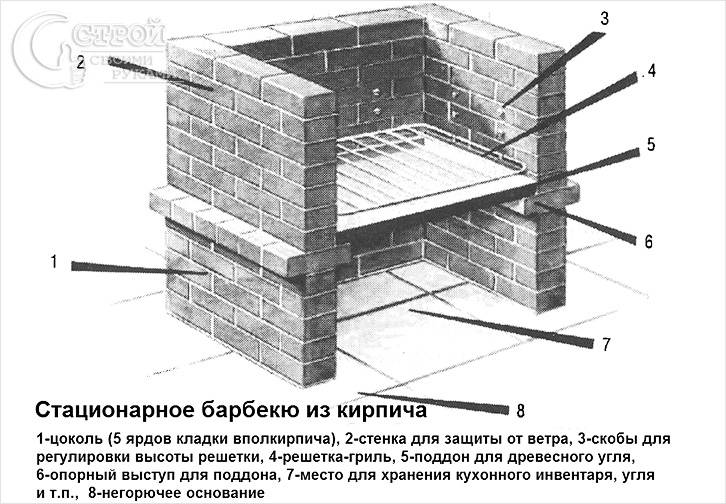
All these features, and even the arrangement of the foundation in the yard, somewhat simplify the work on laying barbecues, it is a little more difficult to build outdoor garden ovens. The latter are small oven complexes where you can not only fry a barbecue, but also cook a variety of foods. But first, we will consider the simplest version of a stationary barbecue, which does not even require a solution.
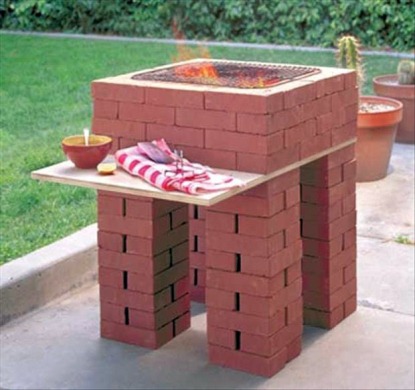
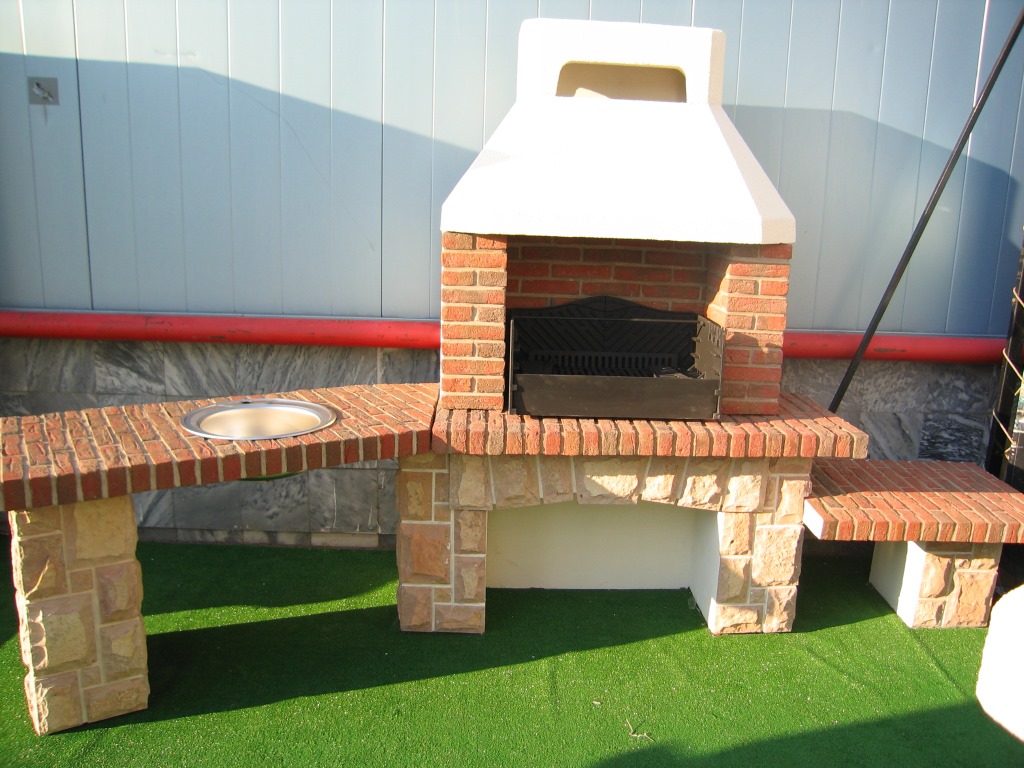
The structure shown in the photo is being erected in literally half an hour on any flat area. To fold 4 supports, any brick will do, as long as it is even. The height of the supports is arbitrary, according to your height, so that it is convenient to cook. Then a slab is placed on top, preferably made of a fire-resistant material such as concrete or minerite. Further, the bottom of red brick is laid (it can be hollow), and then the walls are erected according to the usual technology with dressing.
This design is good in that it does not require mortar, it is quickly erected and transferred from place to place. In addition, the height and size of the barbecue is at your discretion, but within reasonable limits so that the structure is stable. Do not forget to install a metal brazier on the brick bottom, and make small cracks in the masonry for air access.
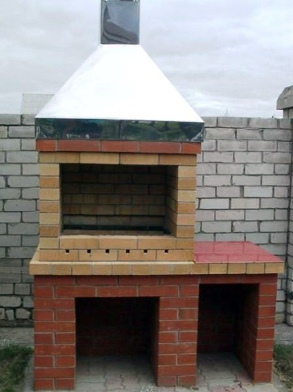
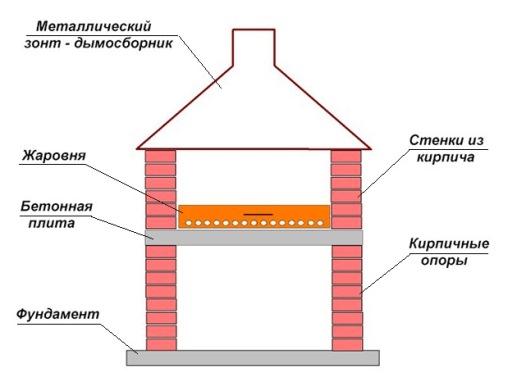
This kind of small brazier can be built on a solution by attaching a metal smoke collector on top in the form of an umbrella. Thanks to this, the smoke during cooking will not fly in different directions and get into your face. Below is a diagram of a brick barbecue with a concrete slab overlapping and an exhaust hood:
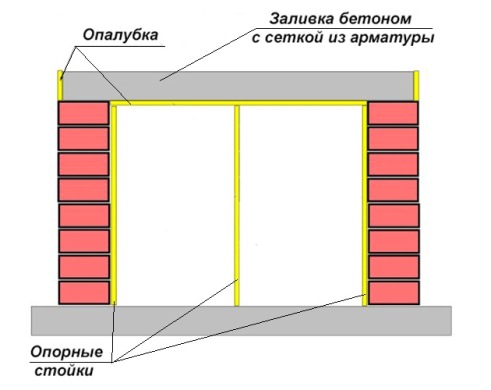
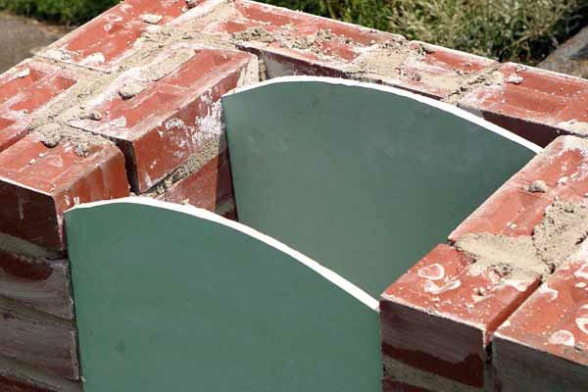
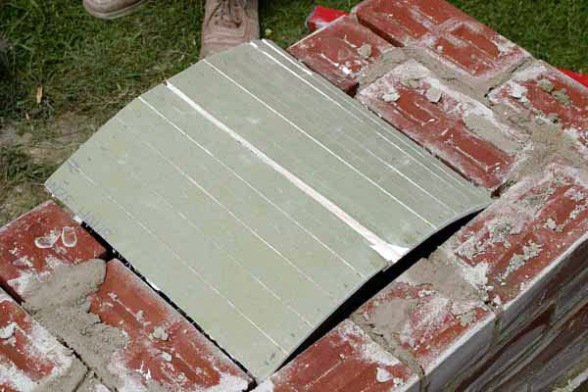
There is only one difficulty in erecting this structure - pouring a concrete slab. But if there are small scraps of plywood or OSB in the household, and wooden blocks, the issue is resolved quickly enough. Racks are made of bars, and formwork panels are made of plywood. So that milk does not flow out of the concrete and the plywood does not get wet, the inside of the formwork must be covered with plastic wrap before pouring. It is also necessary to place a mesh of reinforcement with a diameter of 10-12 mm there. The figure shows a diagram of the formwork device and the order of the barbecue:
The smoke collector is made of galvanized steel roofing and is mounted on top of the barbecue. It is not recommended to light a fire directly on a concrete slab; it is better to adapt a metal brazier for this purpose.
Street oven complexes
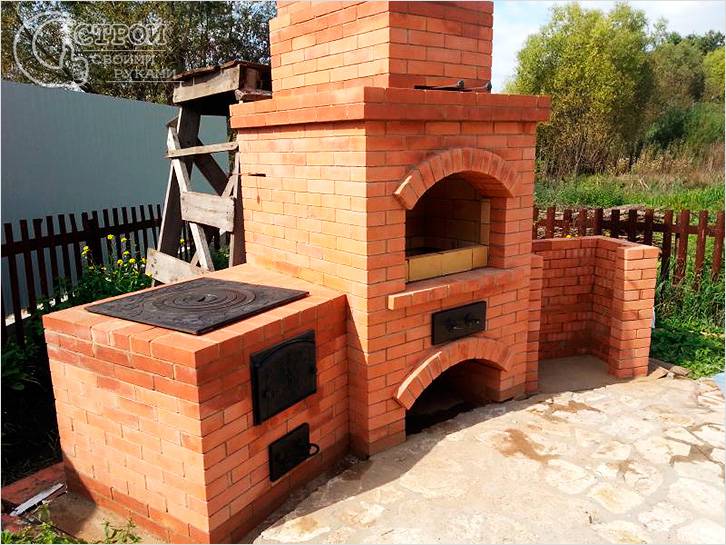
The next option is a barbecue oven with a chimney and additional cupboards for kitchen utensils. The mouth of the firebox and the openings for the lockers are conceived with arched vaults, the niche-firebox - with the usual ceiling made of bricks laid on steel corners. Below are the drawings for a brick barbecue and ordering for its construction:
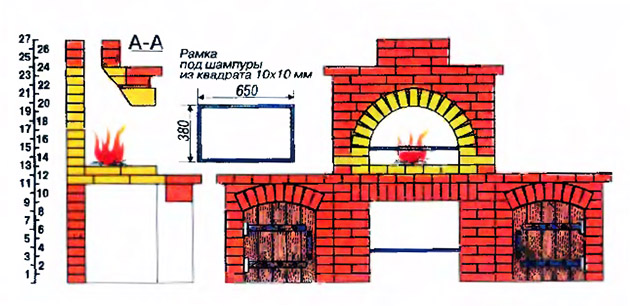
As can be seen from the procedures, the inside of the firebox is made of fireclay bricks, which means it does not require a separate brazier. The chimney height is arbitrary, depending on the location of the stove and the height of the canopy above it.
![]()
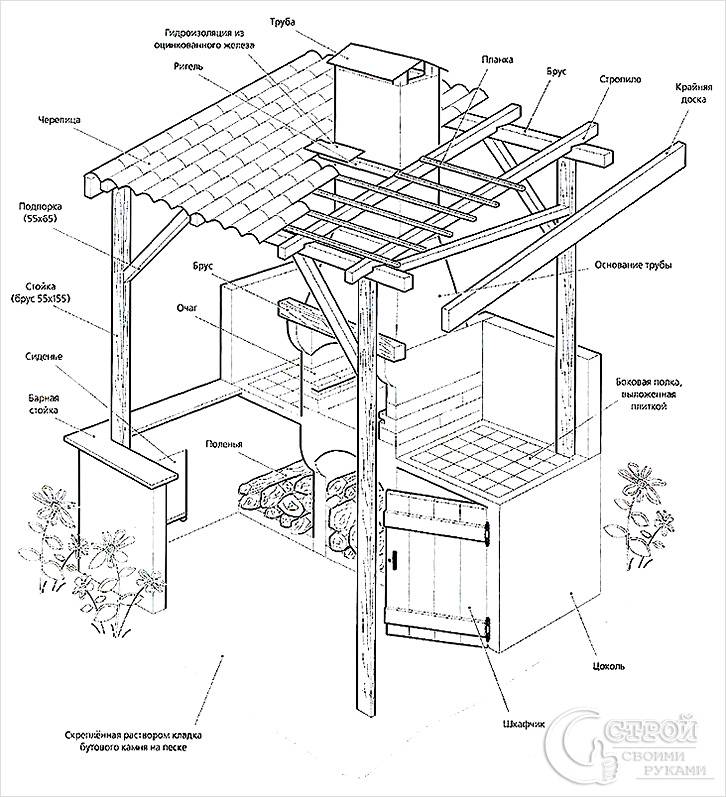
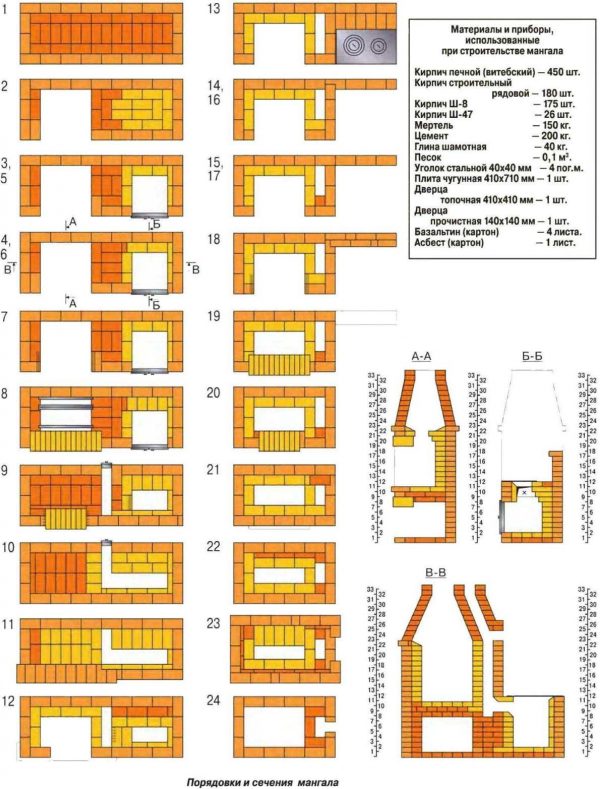
The last option that we want to present is a more complex outdoor stove for summer cottages. This will require some experience and knowledge of stove business. The oven is designed not only for cooking kebabs, but also for cooking food, since it is equipped with a hob. In this case, the device of an outdoor stove provides for the presence of smoke circulation and requires more materials and accessories:
- solid ceramic bricks - 450 pcs.;
- hollow red brick - 180 pcs.;
- fireclay brick - 201 pcs.;
- cement grade 400 - 200 kg;
- fireclay clay - 40 kg;
- sand - 0.1 m3;
- corner 40 x 40 mm - 4 m;
- cast iron plate 710 x 410 mm;
- firebox door 410 x 410 mm - 1 pc .;
- gate valve - 1 pc .;
- door for cleaning 140 x 140 mm - 1 pc.
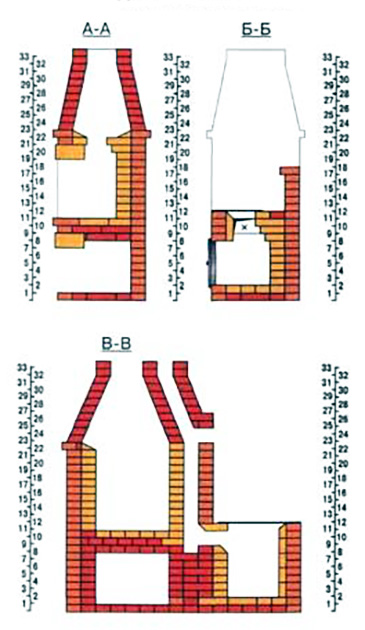
Here, the internal parts of the furnace, exposed to an open flame or high temperature, are laid out with fireclay bricks. It is necessary to start preparation and construction by examining the drawing of a brick barbecue, which shows the sections of the furnace and its orders:
Required materials for construction
In our case, the main building material is a brick. When building simple barbecues, the requirements for it are low. The chamber where it is planned to place the brazier should be made of red ceramic bricks, maybe even hollow. As for the lower support part, here the choice of material is entirely at your discretion and capabilities. The task of this part is to maintain the structure, it is not exposed to high temperatures, which means that it can be made of any suitable material.
If a simple street grill made of bricks, made with your own hands, has an unprepossessing appearance, then it can always be plastered or overlaid with inexpensive porcelain stoneware, but only after the masonry mortar has dried completely.
Brick street ovens are another matter. Here you have to follow all the rules of stove art and use high-quality material. For construction, you will need a solid red brick without cracks and damage, the same applies to fireclay stone. The mortar should be used only sandy-clay in proportions 1: 1, and for refractory masonry - a solution of fireclay clay. Such building mixtures dry are commercially available.
Council. For laying simple barbecues, 20% M400 cement can be added to the sand-clay mortar for strength.
Any garden stove or barbecue is installed on a solid foundation, so you need to stock up on sand, cement and gravel for the foundation. Do not forget about the tools necessary for masonry work, and for the arched vaults you will need special templates - circled. They can be cut from drywall.
Laying the foundation
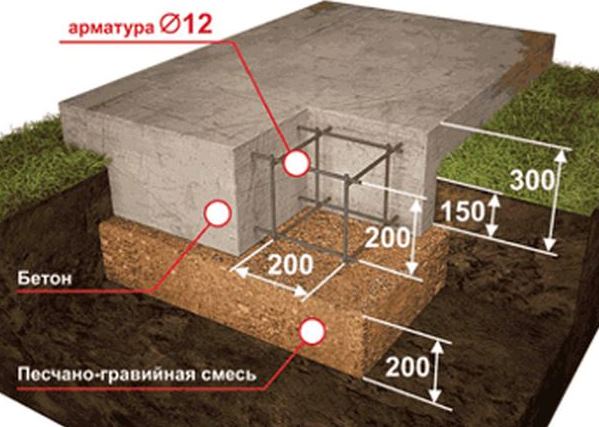
The foundation device is a rather complicated matter and requires geological exploration of the composition of the soil. But the construction of a hearth in the courtyard should be approached a little easier and at a lower cost. The universal recipe is a reinforced concrete slab. Its filling is performed in the following sequence:
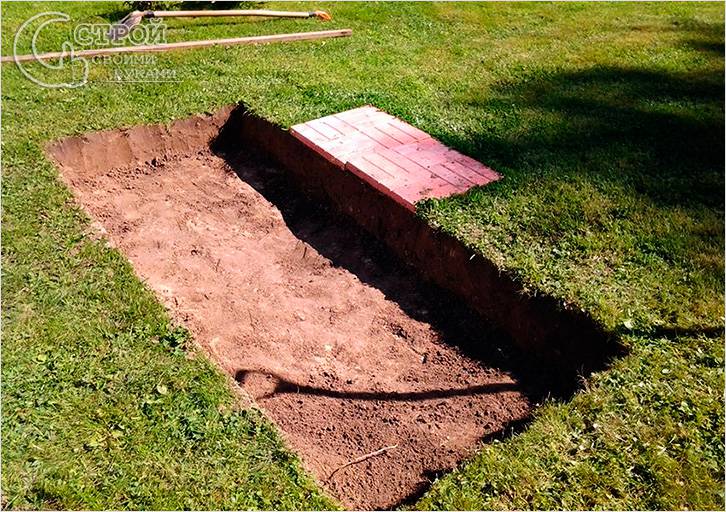
- dig a hole 30 cm deep and 10-20 cm larger than the future stationary barbecue;
- tamp the bottom and cover with rubble 15 cm;
- install the formwork, protruding 10 cm above the ground level;
- cover the pit along with the formwork with plastic wrap;
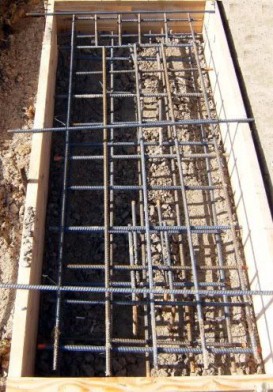
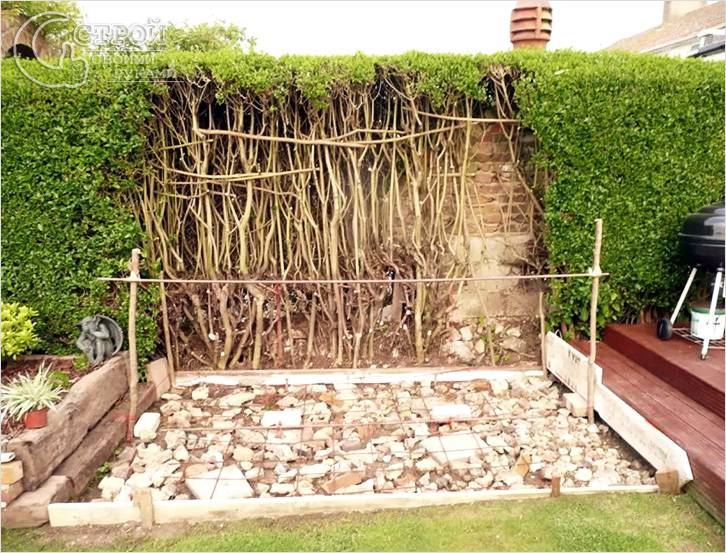
- tie a mesh of reinforcement with a diameter of 12-14 mm with cells of 150 x 150 mm. Lay it on the bottom of the pit on top of the film, placing supports;
- prepare concrete in proportions of 1 part of cement / 3 parts of sand / 7 parts of crushed stone of medium or small size and lay it in the formwork;
- after setting, cover the board with foil and wait 28 days until it hardens completely.
Before making a brazier, the surface of the foundation must be covered with 2 layers of roofing material, ensuring the waterproofing of the structure.
The simplest brick barbecues for summer cottages are built in compliance with the usual rules for laying stones with dressing and alignment in level and plumb line. Here it is important to prepare a good solution of sifted sand and clay so that no pebbles come into it. The thickness of the masonry joint on clay mortar is kept within 5 mm, on cement - up to 10 mm.
Council. The lower support parts of the barbecue can be laid on a cement-sand mortar with a small addition of clay for plasticity.
More stringent rules apply if you need to build a brick brazier in the form of a yard oven complex:
- each brick is soaked for 2-3 minutes in a bucket of water;
- fireclay and ordinary masonry are not tied together;
- bricks are fitted and trimmed as a result of fitting. For this, the row must first be laid out without mortar;
- the horizontal and vertical lines of the structure are checked after each row of stones has been laid.
Council. If you want to build a brazier of bricks with a decorative slit seam, you must not reach the front of the stone with the mortar during laying.
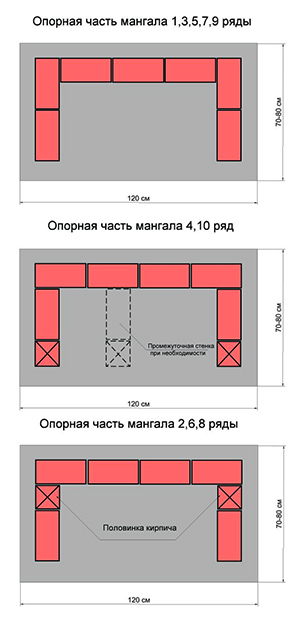
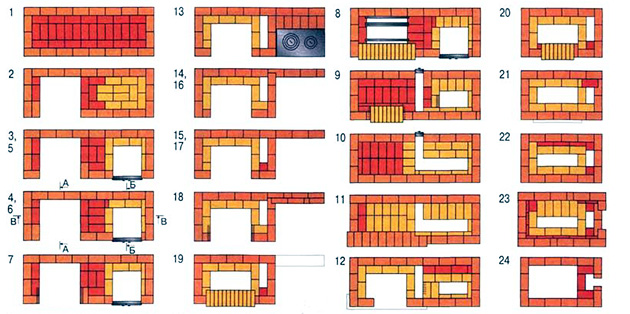
In order to better understand the sequence of actions, an example is offered step-by-step instruction for laying a brick barbecue grill with cabinets for kitchen utensils. The previous section shows its orders (Option 3), which must be followed. So, the order of masonry execution is as follows:
- from the 1st row to the 8th, the walls of the lockers and the wood niche are being erected;
- 9th row: using templates, the arches of red brick lockers are laid out, steel corners are placed above the firebox;
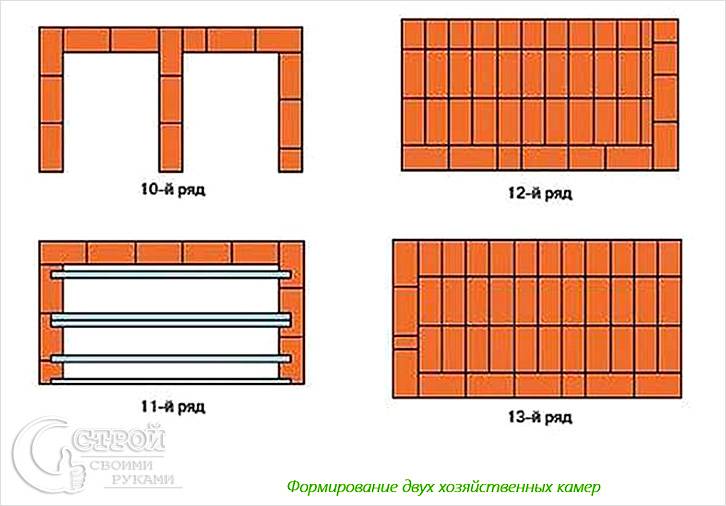
- 10th row: the overlap of the wood-burning niche is formed from refractory stones, cut to 18 cm and placed on the edge;
- 11th and 12th rows: all niches overlap, while bricks are released outside by a quarter around the entire perimeter;
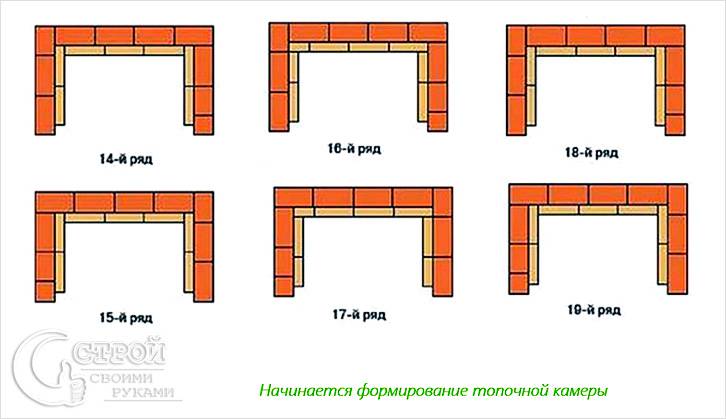
- on the 15th row, a firebox of fireclay bricks is laid out. A circle is cut and installed to form a vault;
- on the 20th row, external walls and a firebox are being erected. An arched vault is laid out from chamotte stones, cut "under a wedge";
- from the 20th to the 24th row, the bricks are trimmed so as to gradually move to the section of the chimney;
- all stones of the 24th row are released outward by a quarter, then the chimney is erected.
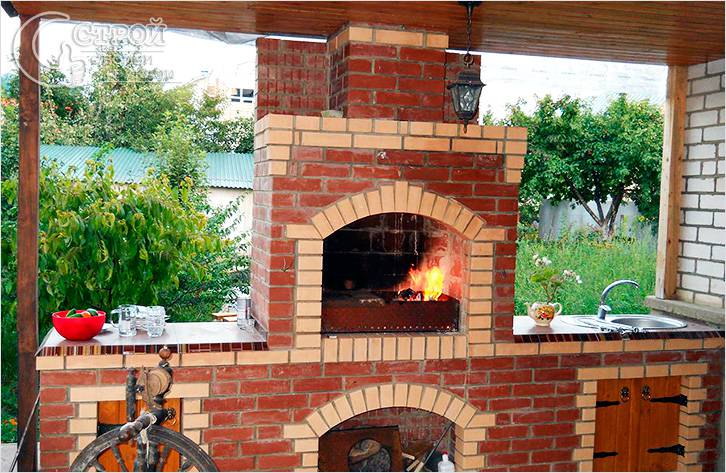
As a result, we get such a nice structure:
With the onset of warm days, the owners of summer cottages are in a hurry to leave stuffy apartments and get out into the fresh air. And not only gardening concerns invite us to the country. Kebabs with friends in the evenings are a favorite pastime for many. Therefore, you will probably want to build a brazier with your own hands from bricks, reliable and functional.
Choosing a suitable place
When you decide how to build a brick brazier, first of all, you should think about its location on the ground. It is from the place where the structure will be delivered that its size and appearance depend.
There are several general requirements to the picnic area where the barbecue is planned to be located:
- choose an absolutely flat surface;
- take into account the direction of the wind, since smoke should not enter the recreation area, the house or neighbors;
- it is advisable to place a brazier near the house so that there are no difficulties with water and power supply, carrying dishes and food.
Now plan your picnic area. Do not overload it with many items or structures. A table, bench, barbecue and food stands are enough.
The brazier should be on a flat surface
Unlike a barbecue, where the design necessarily provides for the presence of a pipe, the brazier is a simple open-type structure. There are also more complex buildings, with two working surfaces on the sides of the brazier. You can build a combined brazier, which will include a smokehouse, grill and oven. Washing may be required, in which case it will be correct to supply water.
Most often, brick braziers look like a skeleton with a brazier, a grate for meat, stops for skewers. But the presence of a work surface will make your barbecue more convenient: you will have a place to arrange dishes, products and spices used in the barbecue.
Materials you will need for construction
A brazier is a fairly simple structure that does not require many schemes. But in order to simplify construction and correctly calculate the materials for it, you will need to create a drawing. On it, you will mark the height and width of the building, and the location of all its parts.
For construction you will need:
- slaked lime;
- reinforcing mesh (reinforcement bars);
- cement;
- sand;
- crushed stone or gravel;
- formwork boards;
- wire for fastening brickwork;
- refractory brick;
- metal corners.
Please note: refractory bricks are a rather expensive material. Therefore, in places where the heating will not be intense, use a simple red brick.
For a brazier, you will also need a metal tray and grate, and also a plate used as a table top.
Brick is considered the best material for the construction of the barbecue
Brick is the most suitable material for a barbecue if you are planning a simple, functional and inexpensive stationary building. You can use iron or stone for this. But iron is susceptible to corrosion, and over time, such a grill will become unusable. The stone is expensive, and working with it is fraught with certain difficulties. Therefore, it is the brick that we choose for our construction.
You need to prepare two types of mortar, one for the foundation and one for the masonry. It is much easier to buy a ready-made mix for masonry mortar at a hardware store, this will save you additional hassle.
Several drawings of simple barbecues that will be useful to you
We make the foundation and the first row of masonry
Some site owners believe that for the base under the barbecue, it is enough to tamp the site and cover it with paving slabs. But in this case, any movement of the ground can destroy the structure, and you will waste time and materials. Therefore, it is better to immediately attend to filling a reliable foundation.
We will be building a small structure with several functions. The base for it will measure 120 X 120 cm - this area will be enough. Mark the site where the construction will be carried out with pegs, and pull the string between them. Dig a ditch about 25 cm deep according to the markings, and install the formwork.
Prepare a mortar at the rate of 1 part cement to 3 parts sand. Pour inside the formwork.
The base must be reinforced. In this case, you need mesh or reinforcing bars.
- If you are using a mesh, then run it twice. Pour the solution to a third of the depth of the base, place the first layer of the mesh, repeat again: fill in another third and put the mesh again. After that, you can fill the base completely.
- Reinforcing rods are laid, filling the solution to half the depth of the base. Spread three rods about 100 cm long each evenly and pour the rest of the mortar to the top of the groove.
Make an area with a slight, almost imperceptible slope, about 1 cm. This will help the rainwater to drain from surfaces without stagnation. The poured foundation is left for two weeks to dry completely.
When laying bricks, strictly follow the level
Now you can start building the barbecue. If you want this simple structure to be created quickly and accurately, do the so-called fitting. Lay a row of bricks dry on the finished foundation: this will allow you to calculate the number of whole bricks and their halves used.
Please note: when laying bricks dry during fitting, do not place blocks tightly to each other. During the final installation, there will be a layer of mortar between the bricks, so leave a gap of about 1 cm.
If you have prepared a grate and a pallet in advance, consider their size and location in the future structure. Circle the line of the future masonry and fix it: it will serve as a guide.
Brick is a hygroscopic material that absorbs moisture well. Therefore, it must be prepared in advance, otherwise it will absorb water from the solution, which will lead to the fragility of the structure. About a day before starting construction, wet the bricks properly by dousing with a garden hose or in a container of water. Before work, the bricks must be dry on the outside and damp on the inside.
Now you need to prepare the masonry mortar. Its proportions are as follows:
- 1 part cement;
- 3 pieces of sand;
- ¼ part of slaked lime.
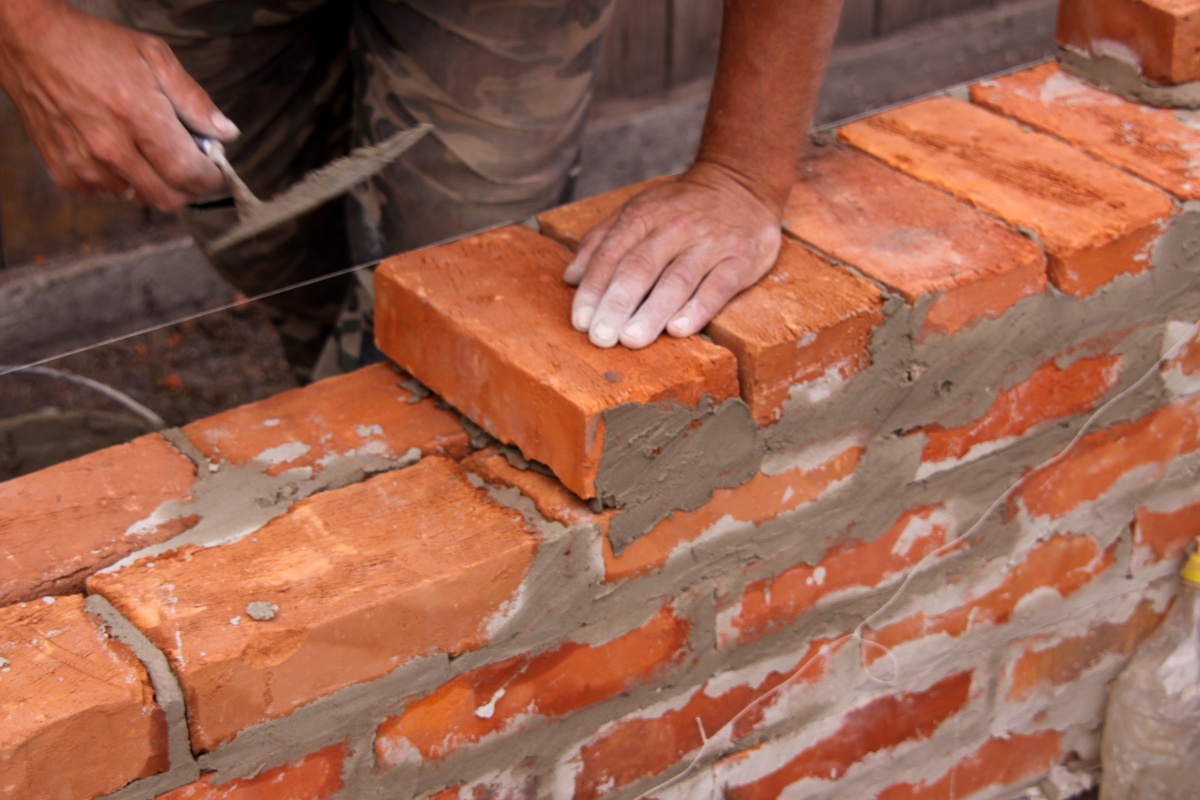
Bring the solution to the consistency of thick sour cream. Recheck the measurements and lay the bricks on the mortar in the order that you outlined when trying on. Tap the blocks with a trowel or a wooden mallet to ensure that they sit securely in the mortar.
Basement construction
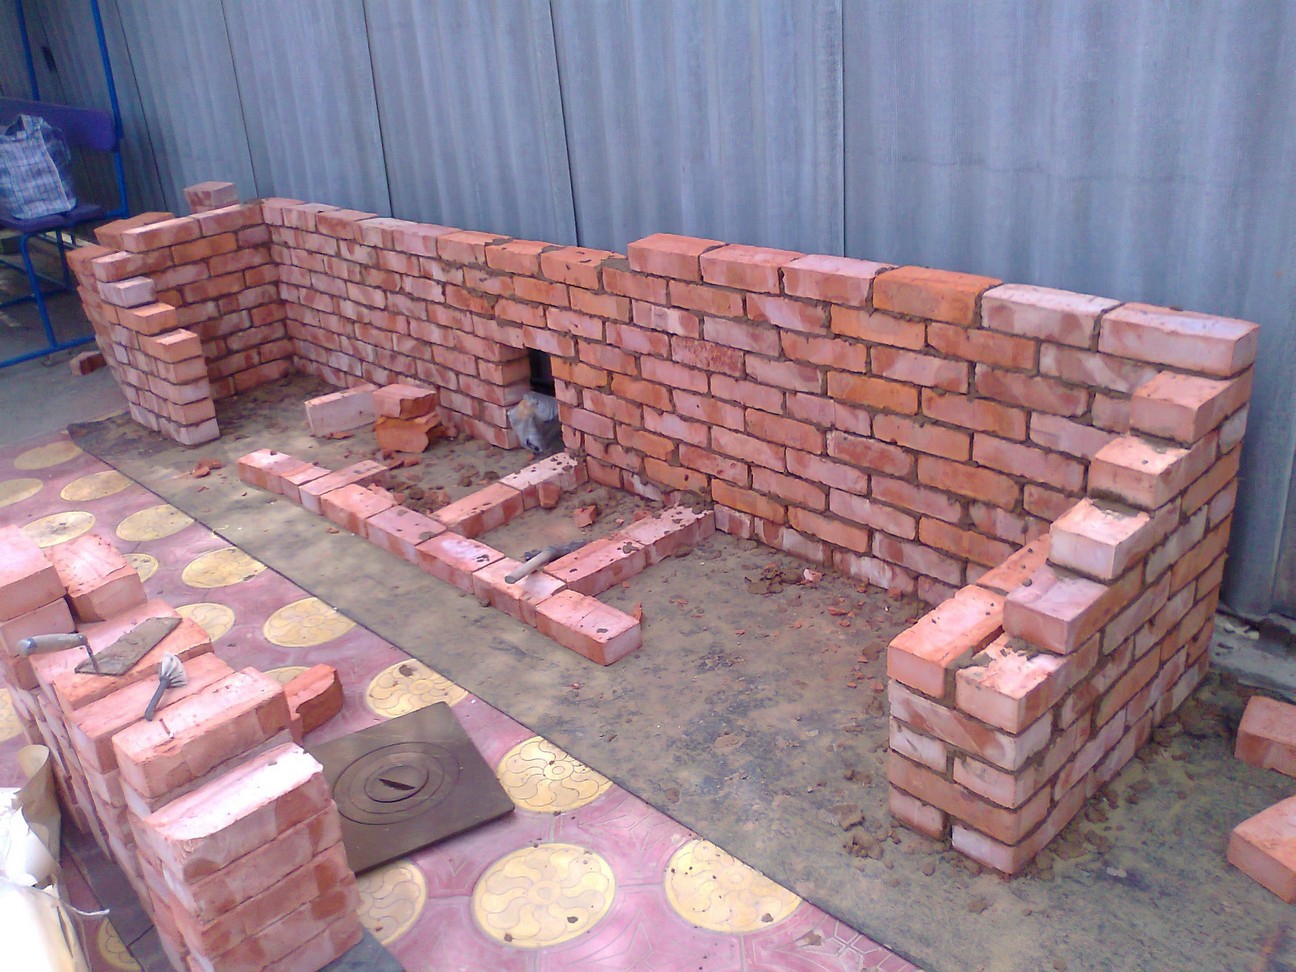
The first row of masonry will be the starting point for the rest. You need to lay the bricks in a checkerboard pattern: relative to the previous row, the next one will be shifted by half a brick.
- Laying the row starts from the corner, and then the side walls are filled. Spread the mortar evenly between the rows and sides of the bricks. Carefully remove the excess solution immediately until it grabs, otherwise it will be problematic to remove it later.
- Recheck the planes of the structure regularly with a building level and a plumb line. Try to do this every three rows so that the building does not turn out to be skewed. At corner joints, reinforce the masonry with metal wire. If you are not planning additional finishing on the barbecue, use a piece of garden hose to keep the masonry seams neat.
- To make a base for the brazier, place reinforcing bars or metal corners between opposite walls. The base of the firebox made of bricks will be laid on them and a metal pallet will be installed. The most important thing is that later the firebox can be easily cleaned of ash.
- Be sure to leave side gaps in the masonry around the firebox to allow air to enter the chamber. Otherwise, it will be very difficult to start a fire.
- Install the grille on metal rods pre-installed in the wall. You can also make protrusions in the brick tab. To do this, bricks at a certain level are laid across the wall so that they evenly protrude inside the brazier.
To prevent the structure from being skewed, check the level every three rows.
Installing the brazier, tray, table top and grate is the finishing touch to the construction. How you do this work will determine the appearance of the entire structure.
We equip the work surface
The tabletop on our grill should be not only easy to use, but also harmonious. For it, you can use sidewalk or floor tiles high strength that can be easily washed.
The work surface is installed on the side of the main stove. An extension of a certain size is made of brick, and a plate prepared in advance is laid on it, which must be carefully attached with mortar or metal holders.
You can equip the grill with a countertop and a sink
In some cases, you can use wood planks rather than stone or ceramic slabs. It will cost less, but remember that wood will not last long. The grill is located in an open space, and the tabletop is exposed to moisture and temperature changes.
If you plan to bring in water and equip a drain at the place where the grill will be located, then take care of this in advance so that it is easier to bring the pipes through the base. If they are invisible, then the overall appearance of the structure will not suffer.
Lighting for the picnic area is also very important. After all, summer vacation is very good in the evening, when the heat has already subsided. Therefore, a lantern or lamp over the barbecue can not only serve your convenience, but also become a real decoration of the site.
Video about the construction of a brick barbecue with your own hands
Now on your summer cottage there is a grill and you can enjoy delicious barbecue every evening with your family and friends. Share with us your experience of building barbecues and ask your questions in the comments. Easy work and pleasant summer days!
In the mind of the builder, a barbecue is a cooking hearth that can be built independently, if necessary. The same word in the understanding of the cook means ready meals cooked on this hearth. Today you will learn how to build a brick barbecue with your own hands. Also, this article will show the difference between barbecue and barbecue.
The main difference is that on the grill, dishes are cooked on skewers, and barbecue is done on the grill. Although both of these cooking methods are easy to implement on a regular fire.
Also, these structures are classified by the presence / absence of a roof. The brazier is an open, smoke-free device. The barbecue woman is a hearth with a brazier and grates above it, set on a small pedestal. Usually a barbecue is built with a chimney.
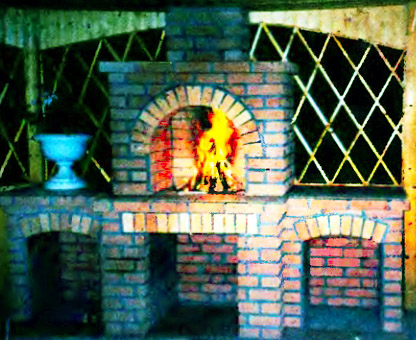
The barbecue woman looks great both on a small piece of land near the house and in a luxurious country house. Rest with barbecue dishes brings a charge of positive mood, cheerfulness and energy. Therefore, the efforts expended on its construction are justified.
If you have already decided on the construction site, then it's time to develop a barbecue drawing. However, before that, decide on the style of the building, it should be combined with the style of the house and outbuildings. Sample construction drawings will be provided at the end of this article. Perhaps one of the options will suit you. Also in the article there will be photos of the ordering of a building made of bricks, which will allow you to accurately lay a barbecue.
Note! The drawing should indicate the dimensions of the structure necessary for the effective implementation of the main tasks of a barbecue - cooking vegetables and meat on charcoal.
Decide on the design features of the barbecue oven. Will there be shelves, firewood niches, dish racks, a roof, a washbasin or a gazebo? It is important to determine all these points even before drawing up the drawing. The level of the grate above the brazier should be level with the table. In this case, it will be convenient for the chef to cook.
The optimal dimensions of the barbecue oven:
- The total height is no more than 1.8 m.
- The pedestal is up to 0.8–0.9 m.
- The brazier should be at the level of 0.5–0.7 m, and under it you can make a niche for drying firewood.
- The inner width of the oven should not be more than 0.5 m.
Note! The compact dimensions of the brazier will help you maintain heat and save firewood during operation.
Without availability supplies and tools corresponding to the type of construction it is impossible to build anything. Therefore, before starting work, it is important to purchase material and prepare a tool. To build a barbecue, you need the following set of materials:
- Red brick (the amount depends on the size of the furnace and the presence / absence of additional elements).
- Fireclay bricks for the furnace (the quantity is also determined according to the project).
- Furnace casting, that is, grates, barbecue grids, blowers, doors, dampers and more.
- Dry mixes or clay.
- Armature.
- Cement is needed when pouring the foundation.
- River sand and gravel for solution preparation.
- Formwork boards.
- Metal sheet (size depends on the parameters of the brazier).
- Waterproofing material (for example, roofing material or tar).
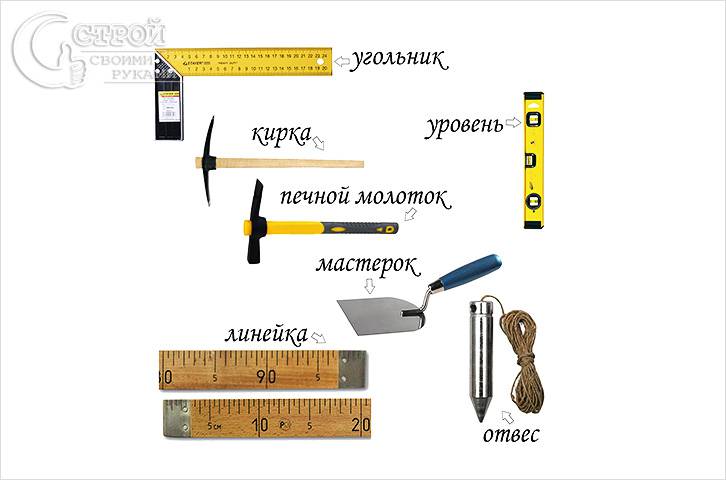
Tools:
- Grout application tools.
- Rubber mallet.
- Level / plumb.
- Grinder with grinding wheels.
- Saw for wet cutting of bricks with matching diamond cutting discs.
- If a semicircular arch is provided, then a template is needed for it.
Before building a barbecue, you should prepare the site and pour the foundation. For a stove structure such as a barbecue, a shallow U-shaped monolithic foundation, poured into a pre-prepared trench 30-50 cm deep.
If the oven is built on open ground, then the foundation must be deepened, and if on a concreted site, then the base must simply be additionally reinforced with metal piles.
So, after removing the soil layer by about 40 cm, sand, crushed stone should be laid on the bottom and tamped down, with a layer of 7 cm. reinforcement mesh and concrete is poured, which is made of cement grade 300, crushed stone, sand and water. Also, if desired, you can add a plasticizer, for example, slaked lime. In our case, you need to fill in a monolithic reinforced base with a reinforcement step of 15 cm.
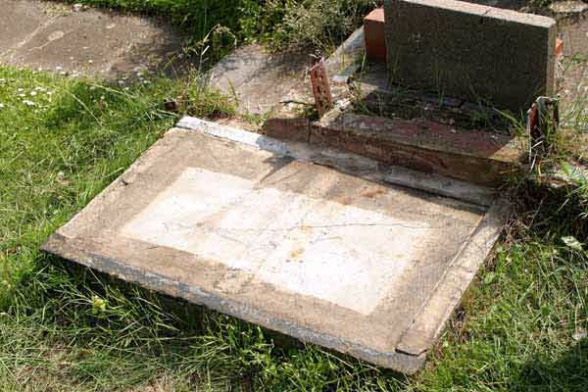
The surface of the poured foundation must be leveled. This can be done as a rule. Then the finished base is covered with a film. Work can only be continued after the base has dried. This can take up to two weeks.
Note! Instead of pouring the foundation into the ground, you can dig in a reinforced concrete slab.
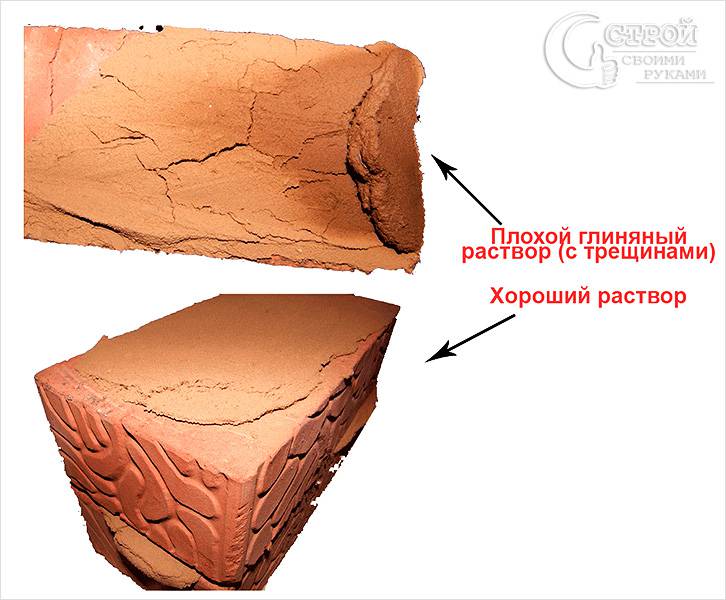
Barbecue laying involves the use of clay mortar. And just the same, the strength and durability of the entire structure will depend on the quality of this mixture. So, it is unacceptable that the clay solution crumbles and cracks after drying. Therefore, it should be relatively plastic and relatively thick.
Clay mortar is divided into 2 types:
- Skinny. This is a non-plastic mortar that does not shrink after firing. But it will crack and fall out of the seams. Therefore, it is not suitable for masonry.
- Fatty. This refers to the plasticity of the solution. Due to this property, the solution is evenly distributed over the entire area of \u200b\u200bthe brick. However, there is sediment during firing. As a result, barbecue and barbecue are not used for laying.
To prepare a good clay mortar, you will need the following list of materials:
- Water.
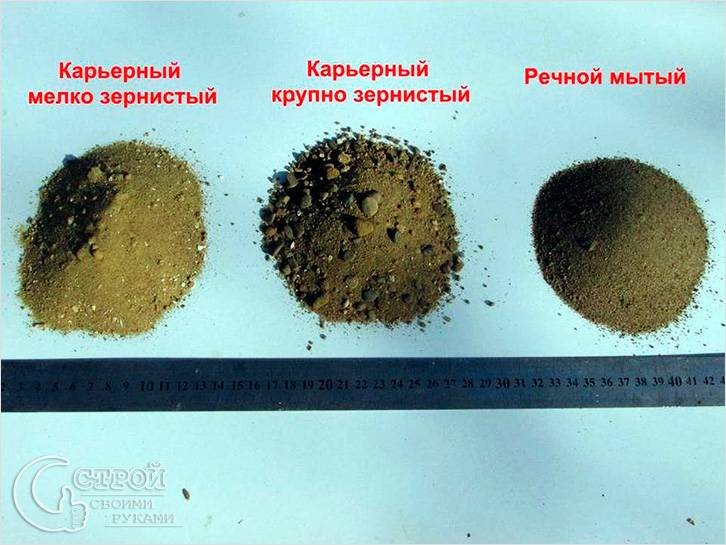
- River or fine mountain sand.
- Greasy clay is desirable.
- Cement.
- Salt.
- Sliced \u200b\u200bboard.
- 10 l bucket and 1 l can.
- Sieve sieve with a mesh size of 1.5 × 1.5 mm.
- Sieve with wide meshes 3 × 3 mm.
- Raw brick.
So, for the preparation of a high-quality mixture, it is recommended to take a raw brick. Thanks to him, a sufficient amount of clay and sand can be added to the solution. Plus, it matches perfectly with brick for masonry, as it has almost a similar structure. Considering that it can be difficult to find a raw brick, and the process of preparing a solution from it is laborious, it is best to use clay and fine mountain sand as a basis.
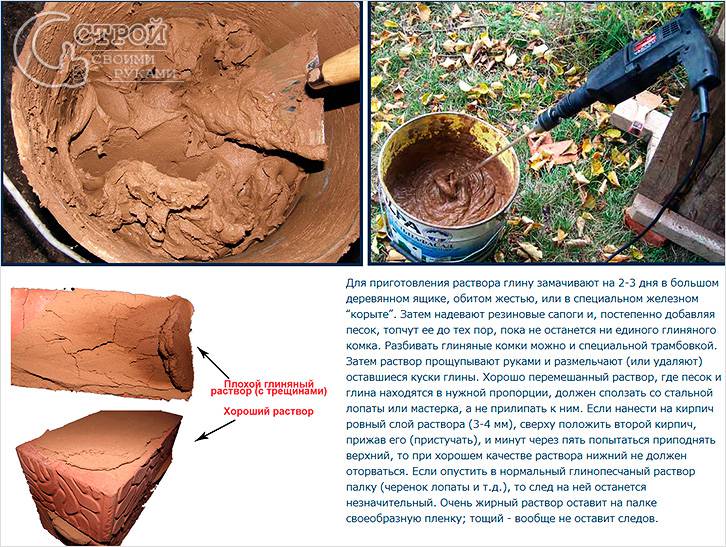
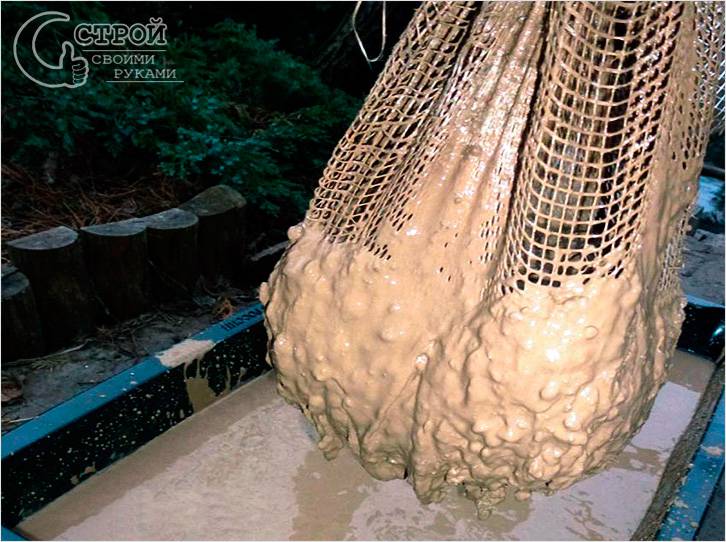
Previously, using a sieve (with cells of 1.5 × 1.5 mm), you clean the sand from gravel and other contaminants. Thanks to this cleaning, you can create a thin layer of the seam when laying the barbecue. Based on the quality of the clay, it is added required amount sand.
Note! A good solution to the touch should not have lumps, clots, it should be homogeneous. The mixture should slide off the shovel without spreading over it.
To increase the strength of the resulting solution, table salt is added to the mixture. For a bucket of mortar, 200 g of salt or cement, 3-4 kg also per bucket. If the salt dissolves in water, then the cement should be thickened in water until it becomes sour cream. After that, such additives are added to the clay solution.

The ordering of a brick barbecue is the most difficult thing, since each row must be laid out exactly according to the scheme. In our case, the combustion chamber has a straight roof. In the diagrams, the brick brazier is raised 90 cm, but you can make it lower if necessary. For this, the ordering scheme will have to be slightly changed. The total height to the start of the chimney is 217.5 cm according to the drawing.
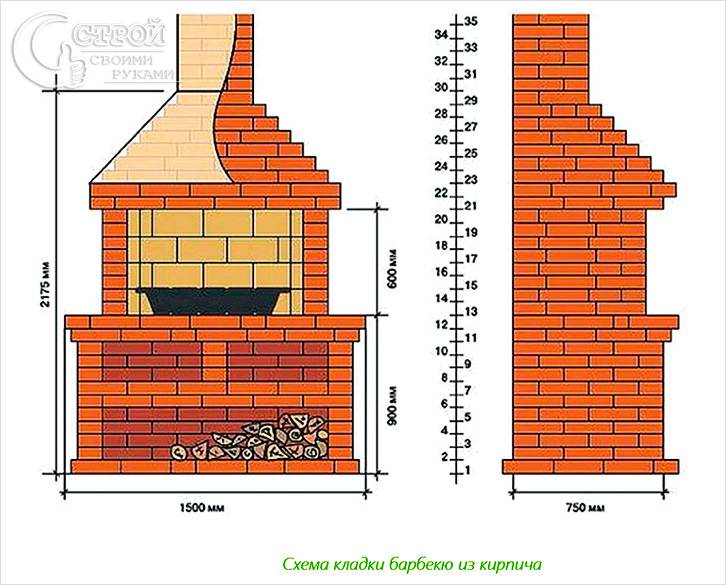
A waterproofing layer is laid on the dried foundation. Then you can start laying bricks. If the barbecue is being built in a gazebo, then the first row of the stove should be laid out at floor level. If the foundation for the barbecue is below the floor level in the gazebo, then lay out an additional row of bricks. After that, the laying is performed strictly according to the given scheme.
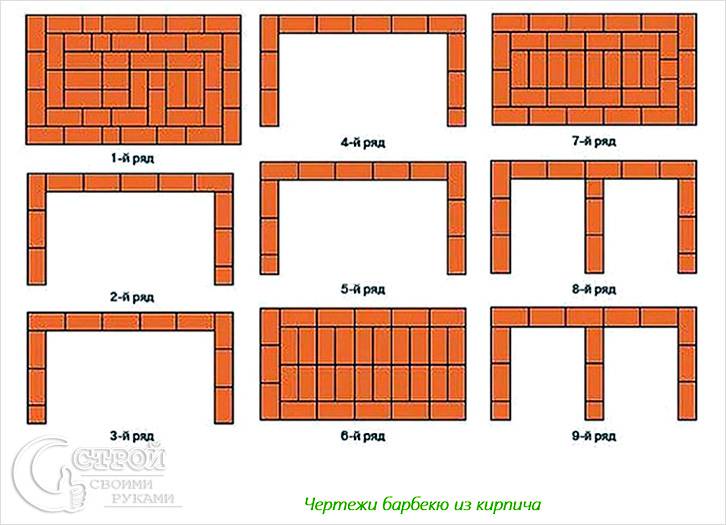
The first nine rows are self-explanatory. The laying is done according to the scheme. In this case, it is important to check the vertical and horizontal of the walls, as well as to control the thickness of the mortar (8-10 mm). To make the seam between the bricks perfectly even, you can use a rebar with a diameter of 8 or 10 mm. Lay it on the edge, fill the surface with mortar. You can remove the remainder protruding from the bar using a trowel. The bar can be removed after laying and tapping the bricks, transferring it to the next row.
To lay the sixth continuous row, after laying the previous one, lay a strip of metal 40 mm wide and 4–5 mm thick. There should be 4 such strips - two in the center of each row of bricks and 1 from two edges. It might look something like the diagram for the eleventh row.
Fireclay brick is laid on a composition of clay and sand, you can also add a little cement here. It is not worth using mixtures based on chamotte, since they need more high temperaturesunattainable in street barbecues.
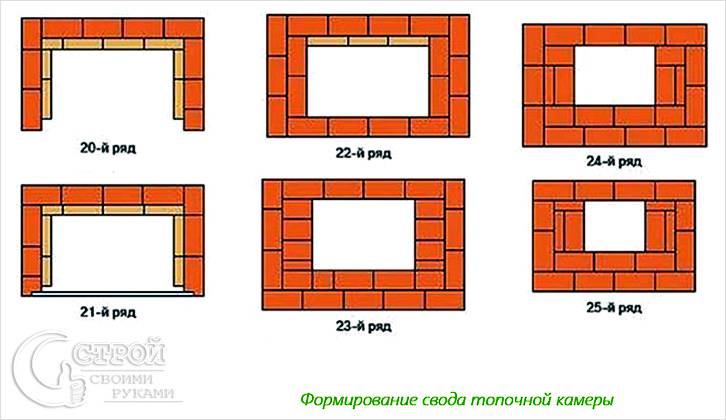
Now the roof of the firebox should be formed. It begins to overlap with the 22nd row of the order, where, according to the scheme, the narrowing begins.
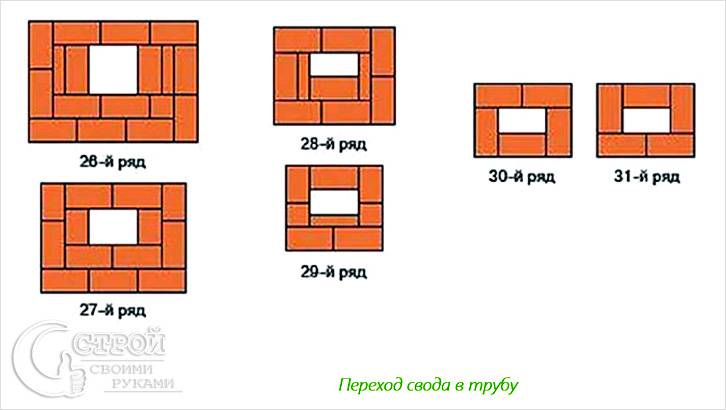
In the 30th row, the vault passes into the chimney. Then the shape of the pipe is laid out until the required chimney height is reached.
To improve the aesthetic properties of the barbecue maker, it can be decorated. For this, you can use any materials that can withstand high temperatures. Beforehand, it is worth making sure of their safety and the presence / absence of harmful impurities in them.
For lining the barbecue oven, a solution prepared on the basis of cement and sand is used. The cladding design will look more original if you combine different materials... By connecting your imagination, you can beautifully decorate the barbecue.
The first design testing can be carried out one month after finishing. If all stages of construction were carried out correctly, then the heat will be even, and the smoke will flow into the chimney, as a result of which your stay will be pleasant and comfortable.
Multi-tiered barbecue Barbecue drawing
Brick grill will be a worthy decoration of any site. Such a hearth allows you to cook delicious meat and fish dishes, vegetables, poultry and a variety of other foods. The food is prepared using the heat of a fire or hot smoke from smoldering fuel. If desired, you can build a brick brazier with your own hands.
This is a rather complex event, in the process of preparing for which you need to decide on the location and dimensions of the future structure, its configuration, design and other parameters. Read the basic instructions and get started.
Start by choosing a suitable place for arranging a brick barbecue. In this case, be sure to take into account the design of the future building so that it fits well into the overall design of the site. Consider the terrain and prevailing wind direction.
The construction site should be located not very far from the house (summer kitchen, gazebo, etc.) and, at the same time, the distance should be as safe as possible. Usually, barbecues are set up next to the recreation area - it will simply be more convenient to serve ready-made meals to the table.
Barbecues are often built in large arbors. In the case of building a structure outside, it is recommended to erect a protective canopy over it.
It is convenient if the barbecue is located next to any source of water.
You can come up with a design design yourself or turn to the services of a professional designer. You can also choose a brazier corresponding to your preferences and design features of the site from open sources.
Barbecue dimensions
After choosing a suitable place, proceed with the selection of the optimal dimensions of the future building. At the same stage, draw up (order, find) a barbecue project indicating all significant sizes. Drawings will allow you to pre-calculate the required amount of materials for construction and decoration.
Mark in the drawings a compartment for air intake (blower), ash collection (ash pan) and fuel storage. If the brazier will be equipped with a protective canopy, make embedded elements for it at the initial stages of construction.
When choosing the height of the barbecue, be guided by the peculiarities of your situation. First of all, you should be comfortable using the design. Take a position as if you are already cooking on the grill and measure the distance between your wrist and the ground. This will determine the optimum construction height.
The internal firebox of brick braziers is usually one meter long. A firebox of this size can comfortably accommodate a lot of skewers.
The optimal dimensions of a barbecue with a meter-long firebox are 59x140 cm. The construction of such a structure will take about 300 bricks. In general, you can change the dimensions of the barbecue at your discretion.
Construction kit
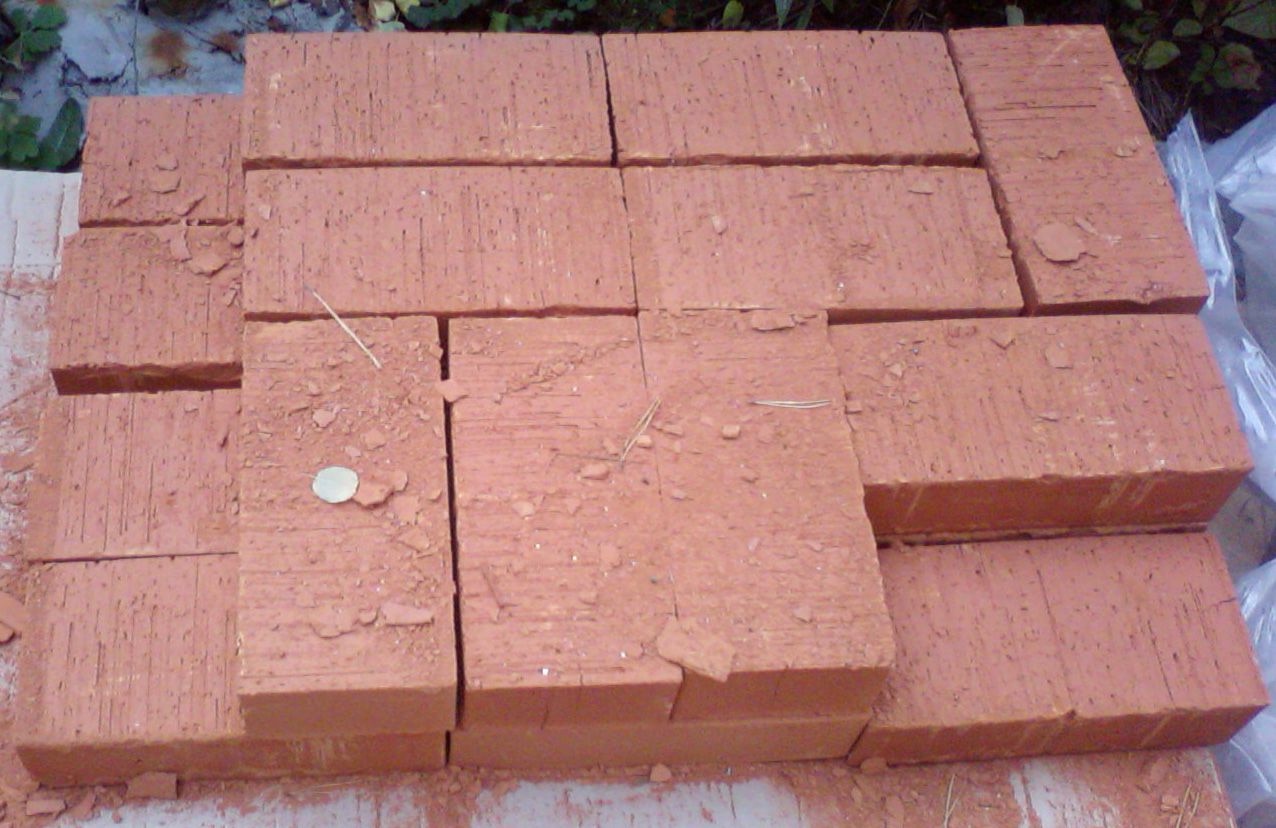
Prepare all the necessary accessories for the construction of a brick structure. First, you need quality material. Try not to save too much on the purchase of bricks, since the service life and overall reliability of the finished structure directly depend on its quality.
For laying the barbecue, it is best to use oven brick... Such material can withstand temperature extremes.
For brickwork, use a mortar of clay, water and sand. Soak the clay in water for two days.
You will need the following tools:
- concrete mixer. In its absence, you can get by with a shovel and a trough. The brazier is a relatively small structure and you can handle the preparation of the necessary solutions (for the foundation and laying of the hearth) manually;
- clean sand;
- gravel (crushed stone);
- cement (M400-M500);
- refractory brick;
- boards for lathing;
- reinforcing bars or ready-made reinforcing mesh;
- corners;
- bolts and other fasteners;
- level;
- shovels;
- pick;
- a hammer;
- plumb line;
- buckets;
- jointing;
- wooden ordering (needed to mark rows of brickwork);
- welding machine (needed if a canopy is planned).
Barbecue laying guide
When all the necessary devices are prepared, get to work. Clear the construction site of debris and any interfering objects, and then proceed with the arrangement of the foundation.
Foundation
A brick grill will have a fairly large weight, so a foundation is required. In this instruction, a rubble foundation is used. If you wish, you can use a different type of structure, but the rubble base is extremely simple to arrange and is perfect for placing such garden structures.
First step. Dig a hole in accordance with the size of the future barbecue. Select the depth individually, taking into account the characteristics of the soil on the site. Usually a depth of 50-80 cm is sufficient.
Step two. Install the formwork along the pit walls. From the inside, sheathe the formwork boards with roofing felt. Also, the formwork can be installed after laying the foundation stones. Formwork with waterproofing is needed only so that the cement does not leak.
Step three. Start laying stones. Lay out a layer of roughly equal stones about 150 mm in diameter. Fill in the gaps between the elements with gravel. Fill the layer with cement mortar. Allow the cement to harden and add the next layer. Follow this pattern until you fill the entire hole.
Fourth step. Level the last layer and cover it with waterproofing. For waterproofing, you can use a polyethylene film, pre-folded in 5-6 layers, or a simple roofing material.
Leave the foundation to gain strength for a few days.
Bricklaying
Start laying bricks. At this stage, be guided by the selected order. Pre-soak the brick in water so that later it does not absorb moisture from the solution.
First step. Lay out the first row of bricks without mortar. This will allow you to orientate yourself in the order of the laying. It is important that the laying of the first row is carried out using only whole elements, and not halves. Mark out the masonry and adhere to the created markup as you do further work.
![]()
![]()
Your own stationary brick grill is a cherished dream of almost every owner of a private house or summer cottage. Having built one with your own hands, you will not need to look longingly at an old rusty structure that you want to hide away immediately after making a barbecue. Barbecues made of brick have a presentable appearance, being an independent functional structure that unites around itself various elements of a recreation area in landscape design.
A brick brazier is a capital structure that has a brazier with a side, a hood and niches for storing accessories for cooking, storing firewood and collecting waste. The order of this structure can be very varied depending on its width and height. To fold the brazier so that it will regularly serve for more than one decade, you need to correctly plan its design and slowly, step by step through the construction process.
First you need to choose a place where a do-it-yourself brick brazier will be built. The best option would be to place it next to the summer gazebo. Being a continuation of this structure of a brick barbecue, a photo of which is presented in the gallery (in the last part of the article), it allows the most convenient and comfortable delivery of ready-made meals to the table.
You should not install brick stationary barbecues under trees, next to wooden buildings and other objects that easily catch fire. Even if you lay around them paving slabs, in strong winds, an accidental spark could cause a fire. You need to build a brazier with your own hands at a sufficient distance from the fence so that dust from passing vehicles does not fly onto the products.
Design should start with drawing up a plot diagram. With its help, you can choose the best place for construction. The figure indicates such auxiliary structures as cutting and dining tables, awnings and canopies, woodsheds and barbecues.
Click to enlarge the diagram
When planning the dimensions of the firebox, one should not chase record dimensions. A length of 60-80 cm and a width of 45-50 cm is quite enough. This is quite enough to stack a dozen meat skewers or a couple of barbecue grills. A large furnace volume will result in unnecessary fuel consumption and extreme heat, which will complicate the cooking process. The optimal format for a stationary hearth is a ratio of 4 bricks in width, 2 in depth and 8-10 (before the firebox) in height.
After a place for a barbecue has been chosen, the design documentation for this structure is drawn up.
It is necessary to prepare the following calculations:
Here's another diagram for you 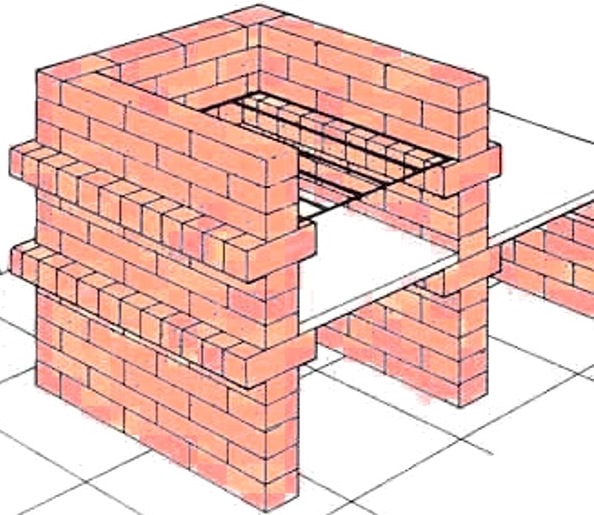 .
.
After checking all the technical and design documentation, a step-by-step instruction is drawn up, which you will need to adhere to when building a brazier from a brick with your own hands, a video lesson will help a lot in this.
Tools and materials for construction
To lay out such a specific structure as a stationary barbecue, you will need an impressive set of construction property.
As for the tools, you must have:
- master OK;
- bayonet and shovel;
- grinder;
- perforator with a set of drills and a mixer;
- roulette;
- riveter;
- screwdriver;
- building level;
- welding machine;
- pliers.
Brick masonry is made of the following materials:
- refractory red brick;
- pottery clay;
- fireclay brick;
- crushed stone;
- sand;
- cement;
- paving slabs;
- galvanized iron;
- reinforcing rods;
- steel corner;
- river pebbles.
It is advisable to carry out in the warm season in dry weather, when the soil is static and not subject to movement and shrinkage.
Arrangement of a reliable foundation
Even a small hearth can weigh over a ton. This involves the arrangement of a solid and reliable base in order to exclude subsidence and deformation of the barbecue. You need to be especially careful about this issue in areas with a cold climate, where the depth of soil freezing is from 1 m or more. The construction guidelines in such conditions involve laying the foundation below the freezing point.
The base is equipped with the following sequence:
It is recommended to cover the foundation with polyethylene and wet it daily to prevent cracking. According to the concrete placement technology, it must stand alone for at least 3 weeks. Only after this is it allowed to remove the formwork and start laying out the hearth.
Laying out a brick barbecue with a photo gallery and video
Do-it-yourself brick barbecues are built in two ways: assembly "dry" and using cement mortar.
In the first case, a support is first made, on top of which a cement slab is laid. Next, the side is laid. Since small gaps remain between the stones, they will play the role of a blower. A completely logical question arises about the arrangement of the chimney. It is necessary in order to save the cook and guests from acrid smoke when cooking roasts. This problem can be solved simply - by making a removable box. It is made of sheet metal and is riveted to the frame of a steel corner without rigid fixation with a brick. However, this arrangement is not reliable and durable. 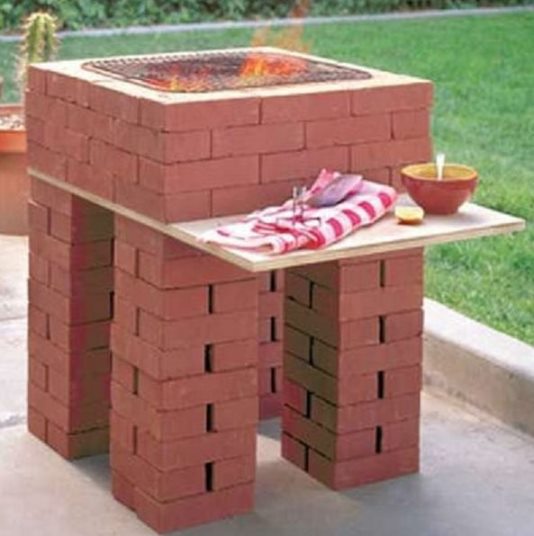 It is advisable to build a capital structure that will serve several generations of property owners.
The construction of permanent barbecues is carried out in the following sequence:
In order to make beautiful and durable brick barbecues, the video will be a good help in the upcoming work, it has step-by-step instructions and a lot important recommendations from the master. Erase carefully, as there are a lot of nuances that must be taken into account and seen immediately.
Well, and photo galleries with completely different designs. Each photo is enlarged on click.
The dried hearth is covered with river pebbles or torn stone... Fastening of the cladding is carried out with a mortar made of clay and washed sand. While the grill is drying (this requires 2-3 weeks), you can lay paving slabs around it. To protect the cook from rain and sunlight over the hearth, it is advisable to build from steel pipes and metal profile.


