As part of this publication, we will consider a rather interesting modern finishing material... It will be about a torn stone: what it is, where it is used, what types of this material are, how to work with a torn stone, etc.
What is Ragged Stone
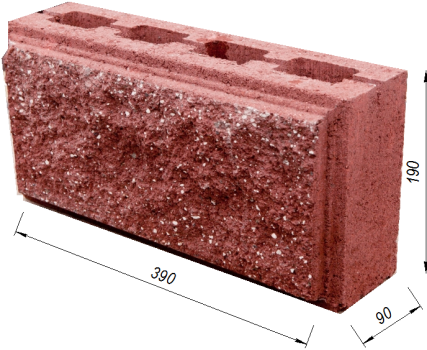
Torn, or, as it is also called, wild or rough stone is a material intended for interior and exterior decoration country houses, cottages, fences, etc. The front side of the material imitates a natural, "wild" raw stone with an uneven rough texture. The reverse side of the torn stone has a flat and smooth surface, which makes the installation process easier and more convenient.
Blocks and slabs of torn stone are not sanded or grinded. As a result, the surface finished with this material looks like an old wall of a medieval castle or part of a real granite rock.
To give the surface the most natural look, the torn stone tiles are selected different sizes... As a result, the seams between the individual stones look like cracks in the rock. Antique finishing is very popular in modern interiors. Today, outdoor and indoor decorative cladding with torn stone can often be found in a variety of places: in an office, restaurant, store, in the living room or in the kitchen of a city apartment.

But most often, torn stone decoration is used in country private houses when decorating a living room, kitchen, bathroom, or bedroom. Torn stone cladding matches perfectly with parquet, oak flooring, artificially aged wooden furniture and decorative wrought iron elements.
An important point: if you decide to use ragged stone in the decoration of the room, do not forget to take care of sufficient lighting. Otherwise, the interior will look gloomy.
Ragged Stone: Benefits

Let's start with the main thing - versatility. The material, as mentioned above, can be used for both external and internal cladding.
But this is not the only advantage of a torn stone, it has a number of positive qualities:
- Cladding made of this material significantly increases the sound insulation of the room.
- The material is lightweight, compared to natural stone, it is easier and easier to work with.
- Torn stone can be used to veneer plasterboard surfaces.
- Decorative stone is a fire-resistant material, it can be used in rooms with increased fire safety requirements: in hospitals, cinemas, airports, etc.
- Torn stone does not corrode.
- A wide range of colors, shades and textures.
- The decorative stone does not need constant maintenance and is durable.
Varieties of torn stone and their use
Most manufacturers produce several types of torn stone cladding. It can be:


Torn stone panels and tiles are most often used for cladding elements of the interior of a building, as well as the facade and basement. This material adheres perfectly to almost any surface using ordinary glue used for installation. ceramic tiles.
An important point: if you need to tile a surface that is constantly exposed to moisture, for example: a basement of a house, a pool, a bathroom, then a torn stone must be impregnated with a special waterproofing compound before starting work.
Facing brick torn stone is used for facing the facades of buildings, from which they are built interior partitions, brick is also used for decorating walls inside a building, decorating columns, fireplaces, fences, etc.

A wide variety of colors, shapes and textures makes it possible to choose the most suitable option for decorating the interior of any residential building or room - be it an office, private house, or apartment. Ragged stone is also often used to build fences and fences.
For convenience, manufacturers produce special elements for fences and fences:
- Facing facade block.
- Half facing block.
- Corner block.

- Blocks torn stone for posts - "ring".
If you use different types decorative stone masonry, alternate rows of smooth and torn surfaces, use material of different colors and shades, then you can get an exclusive design - beautiful and durable.
Torn Stone: Laying Methods
When carrying out external facing work, torn stone can be laid in several ways: dry and wet. At the same time, the dry method is considered to be more reliable, but at the same time, more laborious and expensive than the wet method. The technology of dry torn stone laying includes the following works:
- Installation of heat insulation and vapor barrier material.
- Sheathing device.
- Horizontal marking device.
- Fastening material.
- Sealing gaps with special dry building mixtures.
The dry method is advisable to use for the construction of small fences, with its help, for example, a torn stone is laid for a fence, or when laying a curb stone.
The wet method of laying torn stone is most often used when finishing overall and high concrete monolithic structures... This installation method is considered to be simpler, since in this case it is not necessary to carefully adjust the cladding elements located next to each other. Wet laying is done in the following sequence:
- Substrate preparation: leveling, dust removal, priming.
- Applying a small layer of glue to the back of the tile and the base.
- Fastening tiles to the surface.
- Grouting joints between tiles.
How to stack ragged stone: a step-by-step guide
Below we will consider the technology of laying decorative stone in more detail.
First you need to prepare materials and tools:

- A grinder or a hacksaw for wood to cut tiles.
- Joiner's miter box - needed for cutting tiles at the desired angle.
- Putty knife. Needed for applying adhesive. It is recommended to prepare three spatulas of different sizes: small (7 cm), medium notched (15 cm) and medium flat (15 cm).
- Putty mixture. Needed for sealing corners and joints.
- Decorative paint. It is needed in order to mask possible tile chips and to paint white joints after grouting with putty.
- Varnish for finishing seams (applied after paint).
- Sponge (you can use a regular kitchen sponge). With its help, it is convenient to handle joints and corners.
- Several paint brushes of different sizes.
- File, sandpaper, chisel - useful for precise fit of the elements to each other.
- Tile adhesive.
- Building level.
- Construction pencil.
- Liquid Nails.
- Electric drill or mixer for mixing glue and putty.
preparation of the base before laying the finishing material
The surface under the cladding must also be clean. If tiling work is carried out in hot weather, before laying the tiles, the base should be slightly moistened by spraying the wall with water. If the surface is highly absorbent, it must be primed.

After the cladding material is unpacked, it is recommended to lay out a preliminary pattern from the tiles on a flat surface before laying. Thanks to this simple operation, you can significantly simplify the selection of different elements in thickness, color and texture. If the need arises, you can fit the elements together for a more tight fit.

The area to be tiled must be divided into several small sections - approximately - 5 rows each. When calculating the area of \u200b\u200bthe plots, do not forget to take into account the distance between the seams (approximately 1-1.2 cm).
Before you start laying the material, consider the material, since very often the visual perception of the finished lined surface strongly depends on which side the material was laid on. Therefore, when buying a torn stone, be sure to ask the seller how to properly lay it.

After that, dilute the glue mixture with water and stir with an electric drill or mixer until a homogeneous consistency is obtained. In the process of laying, make sure that there is no coincidence of the joints of the tiles. Facade cladding must be done under the level. If you need to leave free space, for example, under the switch, make markings on the tiles, and carefully cut off the excess with a grinder or saw. It is best to cut along the contour of the texture, since in this place the thickness of the material is less.
When the tile is finished, all joints, corners and cut points are filled with putty, after which the putty is painted to match the torn stone. The paint is applied only after the putty is completely dry. All painted areas must be opened with water-based varnish. This will help increase the resistance of the ragged stone to moisture.

The tips below will be helpful if you decide to do the torn stone cladding yourself and do not have the relevant experience.
- Do not make the seam between the tiles too wide.
- If you have to work with cladding panels, be sure to apply a primer to the base for a more reliable and durable fastening of the material.
- Laying must be done from the bottom up.
- It is best to lay torn stone indoors at a temperature not exceeding 25 degrees Celsius.
- It is not necessary to observe the rows during the laying process. However, laying tiles in a chaotic manner is also not worth it - observing a certain order will give the finished surface more harmony and beauty.
- Do not attach the torn stone facade stone to the surface with silicone, as the tiles will begin to fall off due to the temperature drop.
- If facing work is carried out in a basement, bathroom or kitchen, the finished surface must be treated with an antiseptic compound to avoid the growth of fungus and mold.
Use fake diamond for indoor decoration is a great way to create a unique interior. It looks original in rooms of large areas, especially if the decoration is made in fragments, for example, only niches, fireplaces, alcoves, columns are highlighted. In the article, we will consider the types of artificial stones and the way they are lined with walls.
Often, artificial stone is used for the walls at the front door, and here the stone has 2 functions - practical and decorative. After all, these surfaces are more often exposed to dirt, moreover, the material must be durable in order to "resist" the mechanical damage that is inherent in the hallway.

Tip: designers do not advise gluing wallpaper with geometric shapes or floral patterns in rooms where this facing material is laid out.
How to choose an artificial stone
To attain desired result, namely, to endow the atmosphere with a respectable look, while spending a minimum of funds, you need to have a good imagination and observe the technology of installing an artificial stone.
In addition to its main purpose, the stone must be "endowed" with certain properties and characteristics. And when choosing, it is better to rely on the following criteria:
- appearance... You should carefully inspect the front of the product for defects such as: unnatural mechanical abrasions, pores, scratches, cracks or chips. In nature, it is impossible to find two identical stones, therefore, if you want the final result to be as similar as possible to the masonry from natural stone, then make sure that there are no repeating elements in 1 m²;

- backside... A relatively flat, but rough surface on the back of the product is responsible for a strong bond of the adhesive to the wall;
- material. Gypsum-based stone is light but fragile. As a rule, such a product is intended for interior work, its low weight allows installation even on drywall sheets. Such elements are easy to process, so it will not be difficult to fit the required parameters. The concrete (cement) version is heavier and stronger, but it is considered a completely universal material, since it is used both for outdoor work and indoor decorations;
- corner elements. They greatly simplify the installation of stone, moreover, their use brings a certain zest to the overall picture of the interior and allows you to carry out interesting and original masonry. Such items are sold running meters and the cost is almost equal to the price for 1 m² of stone;

- color. Undoubtedly, the selection should be based on personal preferences or, based on a general idea of \u200b\u200b\\ u200b \\ u200bthe setting. But the higher performance characteristics are possessed by the mass-dyed stone, that is, when the pigment is added during the production process at the stage of mixing the solution. Products with surface coloration are susceptible to fading, moisture and abrasion. This method is mainly used for processing gypsum stones. In addition, if a chip is formed during operation from mechanical action, then this defect will be visible to the naked eye;
- packaging... The basic rule applies here - the packaging must not be damaged. Facing tiles are delivered in ordinary boxes, and for large volumes, for convenience, they are transported in plywood boxes. In any case, damage during transport of the material must be excluded. But, as a rule, a poor-quality gypsum stone suffers more;
- versatility. Of course, purchasing a quality product, you can be sure of its long-term use. The stone has great convenience, which is suitable for indoor and outdoor work. So, for example, if part of the material remains when facing the facade, then you can use it to decorate the wall or highlight an element inside the room. The safety margin of the material will never be superfluous;
- additional materials and services... It is better to purchase it where there is a related product: stone, grout, glue, and so on. And where, if necessary, you can order the delivery or installation of the purchased material and where they can provide the required information regarding the correct laying, competent operation of the artificial stone;
- real purchase... It is recommended to choose the material live, since the shade is often reflected incorrectly in the catalog or on the website of the online store. Therefore, the purchased product can cause only two emotions - either disappointment or joy. Tiles and corners should be purchased from the same manufacturer and from the same batch, this will guarantee an exact color match.
Artificial stone production
The production technology makes it possible to obtain a decorative material at the output that imitates any texture. Indicators such as shape, size, color or style are not limited by anything. There are 2 manufacturing options, the choice of which depends on the source material.
Free fill
- This method is only suitable if gypsum or gypsum-cement mixture is taken as the main component. The entire production cycle is shortened due to a shorter period (about 10 times) of holding the solution in the matrices.

- The natural color of the product of the required shade depends entirely on the accuracy of the dosing device used on the line. The rich color of artificial stone is achieved through a complex method, where a whole palette of colors is used.
- Convey all the nuances of a natural stone, its smallest cracks, a unique relief under the power of polyurethane matrices. Of course, there are a lot of forms made from cheaper materials, but with their help it is impossible to give the finished product a look as close as possible to a natural analogue.
Vibration casting
- The principle of making a facing stone based on cement is similar to the previous method - the same pouring the prepared mixture into special forms. But in this case concrete mortar is compacted by vibration, which makes the structure more homogeneous and dense.

- Expanded clay sand is used as a filler, and modifying additives bind all components and give the stone high strength properties. A mineral pigment that is resistant to alkaline conditions and sunlight, will give the material the desired shade.
- The quality of the form is of great importance, because it is with the help of it that it is possible to achieve an ideal similarity with natural stone. Matrices made of polyurethane or silicone are suitable for these purposes; they are capable of transforming concrete into wild stone, ceramics, into tree bark, and so on with the smallest details.
What makes up the price of wall cladding with artificial stone
Considering the facing stone at the stands of stores or on the pages of construction sites, the buyer pays attention to the performance and cost of the product. The price is influenced by the quality components used in production, adherence to technology and some other factors.
- Cement is the main component of the composition. Imported raw materials can be used, which are much more expensive than their Russian counterparts. In principle, there is not much difference in whose production this material is, if all stages of production are strictly followed. The cost also depends on the color of Portland cement, white is about 3 times more expensive, which is why the cost of light and dark collections differs this way.
- Excipients also affect the price of the product. If expanded clay sand is used, then the stone turns out to be light, while its strength characteristics do not deteriorate, but the cost of such products is more expensive. Expanded clay with a fraction of 10x25 mm is used to reduce the cost of production, but for the consumer, such savings "go sideways". The fact is that after a while the quicklime inside the expanded clay begins to "shoot" under the influence of moisture and air and pieces break off the stone. Perlite is also used as a filler, which has high strength. Its presence in the mixture significantly increases the cost of the finished product.
- Pigments that give the product an attractive look can be of Russian, German and Chinese production, which undoubtedly affects not only the cost, but also the quality of the coating. After a certain period of time, the stone, for the manufacture of which a cheap dye was used, becomes faded, inexpressive. An ordinary person will not be able to immediately "by eye" determine the quality of the pigment, therefore only one thing will save here - a careful study of the certificate, especially the place where it is about dyes.

Advice: when choosing, you should pay attention to other criteria, for example, the uniformity of the thickness of the product, which can be 1-5 cm. Sometimes, during the drying process, the forms can stand unevenly, and the stone turns out to be of unequal thickness - this can be called a marriage. Remember, you should not buy too thick stone if the walls are made of plasterboard.
- It is important to know the purpose of the artificial stone and, if the collection is purchased for exterior decoration, this does not mean at all that it is possible to revet the fireplace portal with them. Of no small importance is such a property as strength, and the higher this coefficient, the longer the stone will last.
- Appearance can tell a lot. The surface must be homogeneous, but if it is porous, it means that the manufacturing technology is violated. There is a possibility - study carefully the samples presented in the showcase. The presence of numerous chips indicates the low quality of the product.
DIY artificial stone
Many may ask the question, why do you need to make the mold yourself, pour it into the mixture, when you can simply purchase an artificial stone, and order delivery and installation along the way. But, for most, it turns out to be a matter of honor to do all the relevant work on their own. In addition, with a large volume, it is also economically beneficial.
The matrix
- Undoubtedly, a matrix for artificial stone can be purchased at almost any hardware store, but it is usually offered in a standard form.
- And by completing the form according to individual sketches, you can get a unique and interesting design of this facing material.
- The form made of wood, of course, is not the most successful example, but it has a right to exist. To create it requires a minimum of investment and effort. Here you need a board with maximum defects, flaws and several straight and even rails, which will play the role of sides and additional partitions inside the matrix.
- A more modern material is silicone. These works will require some effort and financial investment.

- The funds spent on the implementation of their own "project" will approach the cost of finished forms. But on the other hand, no one will find such an original stone.
Stages of work:
- The most enjoyable task will be the selection of the stones you like the most to create an artificial prototype. One side must be flat, and the other must have a complex relief.
- Further, the box is assembled, the prepared samples are placed in it with the flat side up, observing a certain distance between them.

- It is advisable to seal all joints with plasticine, this is done so that the silicone does not flow under the stones and does not spoil the intended result.
- The stones are lubricated with grease and filled with silicone, which is constantly rammed for even distribution in the box.
- After drying, the samples are carefully removed and the mold is ready for use.
Mixture
For the manufacture of plaster elements at home, you need white gypsum, putty (1: 4) and, if desired, a color scheme is selected. (Finished products can be painted later, applying color with a brush or spray gun.)
- Water is added in portions until the mixture becomes a soft paste. Mix everything thoroughly and now you can start laying the prepared solution in the matrix.
- The solution is laid out to the middle of the mold, then a propylene mesh is laid for strength and only then the entire matrix is \u200b\u200bfilled. At room temperature, the product will be ready in about two days.
- It is also made from a mixture of gypsum and water, then it will take no more than half an hour to solidify, after which the finished stone is taken out of the mold. But it will not be possible to use it earlier than in a week, until it gains sufficient strength.

Cement based stone is made of such basic components as sand and water, cement M250 or higher, with a ratio of 3: 1: 1, serves as a binder. For these purposes, it is better to use white Portland cement, since when adding color (but not more than 25% of the total mass), the shade will be more saturated. The presence of a plasticizer in the mixture is required.
- All components are mixed and laid out in prepared forms. At the stages of pouring, the solution must be leveled or tapped on the matrices. This is done to evenly distribute the mixture, thereby preventing the formation of voids in finished product... Of course, a vibrating table will serve as an ideal option for these manipulations.
- As a rule, the stone is easily removed from the matrix, but if there are any difficulties, then it is necessary to lower the form for 10 minutes in hot water, gently tap it from all sides. After that, the product can be freely removed.

- Cladding interior walls artificial stone is not much different from the laying of ceramic tiles. It is also possible to carry out work both by the seamless method and to carry out masonry with jointing. Many people choose the latter option, as it saves on the original product.
- Seams between elements should be repaired with the utmost care, since once the grout dries it will not be easy to remove it from the stone. You can use an impromptu "dispenser", which is made from an ordinary, but dense plastic bag with a small cut of one corner.

- Wall cladding with artificial stone is possible on any surface, if it is concrete or brick wall, then the installation is done immediately. Metal or wood surfaces should first be reinforced with a special mesh.
- For fasteners, use a cement mixture, mastic, acrylic sealant or liquid nails. If the facing elements are made on the basis of cement, then the dry mixture should be purchased from the same material. Gypsum products can be installed using drywall adhesive.
- Sawing parts or adjusting them to the desired size is easily carried out using a hacksaw or a grinder with a diamond disc.
- There are only a couple of requirements for the surface on which it is planned to lay artificial stone, because the quality and speed of the work carried out depends on this: the wall must be flat and must be primed.
- Sometimes the elements in different boxes may have a different shade, therefore, in order for the color transition not to be so striking, it is recommended to take stones from different packages alternately during installation.
- In order for the result to be natural and harmonious, several dozen elements should be laid out on a horizontal surface in advance to evaluate the resulting pattern. And only after that they start masonry work. This rule is especially true for collections where items have asymmetric shapes.
- It is necessary to purchase an artificial stone with a certain margin of about 10%, in case of mechanical damage or other unforeseen situations. It should be noted that it can be covered protective layer, when buying, you need to clarify this nuance. If there is no coating, then it is applied independently, the stone is wiped with a damp cloth to remove dust and then a primer solution is applied with a brush.
Do-it-yourself wall cladding with artificial stone
- The laying is done from the bottom up onto the prepared surface, which means that the wall must be flat, clean, free of traces of the old coating and treated with a primer.
- The horizontal line is determined using a laser or normal level. This stage works is very important, since the rest of the stone laying depends on this series. Regardless of the type of facing material, the adhesive is applied with a notched trowel and spread over the back surface of the stone.

- The surface of the wall is processed in the same way, defining a small area for this so that the glue does not have time to dry out.

- As a rule, the stone is mounted in the same way as ceramic tiles, but there are collections that should be installed in a seamless way, that is, the elements are adjacent to each other.
- The element is slightly pressed against the surface and, if necessary, its location is corrected, the excess glue is removed with a trowel. The next rows are laid according to the dressing principle, that is, the seams should not coincide, thereby imitating a brick wall.

- The recommended joint width should be at least 15 mm, so that the upper elements will not rest against the previous tiles. In turn, this will prevent them from shifting. You can use plastic crosses that are inserted between the elements, forming even and identical seams.
- The dressing at the corners can be done according to the principle brickwork, that is, with spurs, but this method looks quite "heavy" in indoor areas... Therefore, it is better to cut the ends of the tiles at an angle of 45 °, in this case the transition will be more harmonious.
- If in the process of fitting the element to the required size there was a flaw, then you should not be upset. Such errors can be easily eliminated with a putty painted with a dye of a suitable shade.
- The pattern or structure of the stone on cement base can be restored with an adhesive, which is used for installation with a solution, here the dye for water-dispersed paints is also useful, where all errors are carefully painted over with a brush.
- To fill the joints, you can purchase special mixtures, or use ordinary sand-cement mortar. Ordinary gray cement or white Portland cement is also suitable, which will more accurately convey the color of the dye used.
Artificial stone wall cladding video
Artificial stone is an ideal option for making a variety of surfaces aesthetically pleasing in a short time at a reasonable cost. Here you can always find a collection for every taste. This material is distinguished by a variety of shapes and textures, as well as a wide range of colors, which allows it to be used to solve design problems of any complexity. Below are photos of interiors in which there is wall cladding with artificial stone.


Laying artificial stone with your own hands is much easier than similar work using natural material... Such a stone can be placed on any wall, the main thing is to take care of special glue and necessary tools... Well, if something went wrong in the process of laying a decorative artificial stone, the material is always easy to replace, since its cost, in accordance with the natural one, is incomparably lower.
Laying technology for decorative artificial stone (with photo)
One of the main advantages of artificial stone is its ease of installation. It is worth emphasizing that 2-3 masters can glue a surface of about 360 square meters with this material in one to two weeks. m. Despite the seeming simplicity of the process, without experience, it is still not worth undertaking such work - after all, every business has its own professional subtleties. In addition, the design of the masonry can be difficult, even for an experienced professional.
This material fits well on almost any surface and is attached to it with the help of special adhesives. How to lay out an artificial stone with your own hands so that the walls are not only beautiful, but also durable?
Before placing the artificial stone on the wall, you should take care of the tools, equipment and containers for mixing adhesives and grout. You will need: plastic, easily washable buckets with a capacity of 7-10 liters - 3-4 pcs., simple and notched spatulas, trowel, mixing drill with attachments. Level, twine and edged board or timber when laying artificial stone will be needed for the construction of support formwork around the perimeter of the house. The lower horizontal row of cladding elements is laid out and rests on it. In addition, it is desirable to have a mobile or portable stone-cutting machine (in the extreme case, an angle grinder, referred to by the common people as a "grinder") with discs for dry cutting of concrete and a portable emery machine with two circles (with coarse and medium grain) for precise adjustment of the stone. The latter is especially important if the openings of windows and / or doors have an arched contour. When laying artificial stone on a wall, polyethylene film is needed for preliminary layout of the facing elements, which are laid face up to protect the lower planes from dirt and moisture.
See what tools are required for laying artificial stone in the photo below:
![]()
There are two ways to lay artificial stone - with jointing and seamless. The first option is more common, since with this method, the facing material is significantly saved due to the fact that the stones are attached at a distance of 1-1.5 cm from each other. At the same time, some types of material are made from the calculation of laying artificial stones only in a seamless way, so that they fit tightly to each other with their end parts. Therefore, for the case when it is necessary to make jointing joints, prepare in advance plywood strips with a thickness of 15 mm or MDF with different lengths (from 5 to 60 cm), corresponding to the width of the jointing joints. According to the technology of laying artificial stone, the universal joint size is 0.9-1.2 cm.
This video demonstrates how to lay artificial stone on the wall of a house:
The best collections of artificial stone for masonry walls (with video)


Collections "Glinit" and "Klavit" (imitating different bricks), and "Ellinit" (imitation of sawn Rustovanny dolomite) and "Tsokolit" (designed by its size and texture for cladding the basement jaws of facades) are easy to install and are designed for tap joints with a width of 9 to 12 mm, and elements, for example, from the Gorihriz collection, require seamless installation.


Artificial stone collection "Sea breeze" seems quite simple to install, however, when installing its elements, you should take into account some of the features of 3.7 sq. m of stones with a unique texture have only the same width of 4 cm. They are all different in length and have vertical cuts located at different angles. Therefore, when laying artificial stone on a wall, jointing inserts are needed only for horizontal rows. The vertical distance between the stones should be done "by eye". In addition, one should take into account the visual alternation of stones with three textures, passing into each other, since the surface of the collection elements imitates stones made from blocks. Their structure was formed as a result of various layers, and the surface was repeatedly subjected to erosional effects from temporary immersion in the sea, the effects of rain and wind, sun and ice.
Before laying the artificial stone correctly, it will not be useless to know that there are curly inserts in the collection (they are equal in height to the height of two stones plus the width of the joining seam). Inserts are mounted with a frequency of not less than 1 piece and not more than three per 1 sq. m of the surface of the cladding "randomly".
![]()

Masonry collection "Bravur" is also simple, but nevertheless requires knowledge of some of the subtleties associated with it. "Bravur" imitates the walls of ancient castles and is perfect for edging windows, columns, protruding details in the architectural design of facades, as well as for interior work, for example, for facing fireplaces.


The collection is combined with natural stone and light wood. This artificial stone is also often used when decorating the basements of country cottages.


Many architects use this stone as an interior stone, since the thickness of the stones does not exceed 2.5 cm. It also looks great on the facades of buildings when facing corners, in the frame of windows and doors.
An indisputable fact was its use for facing small houses (for example, bungalows), light landscape architectural structures (landscape flower girls of rectangular shapes).
All the material from this collection, intended for laying artificial stone with your own hands, is uniform in height - 195 cm, which causes its installation in the classical horizontal-tape method with a jointing 1-1.2 cm wide.
Based on the height, the collection includes stones of the same length (square), double length (two squares), two and a half squares long (2.5 squares) and half length (1/2 squares). Therefore, before correctly placing an artificial stone on the wall, it should be borne in mind that in a row the material should be placed strictly in a row and only in height.
In addition to the aforementioned stones, in order to avoid the monotony of single-height tape masonry, the collection also includes stones that in pairs are 195 cm high, but taking into account the minus of the jointing seam between them. This is the first pair of stones, which is 2 squares long, and the second pair of stones, which are 1/2 squares long. When installing stones from the second pair, be careful, as their length is 5-6 mm longer than the height.
How to properly lay an artificial stone on the wall with your own hands (with video)
Now that the dimensional subtleties of the stones of the collections are clarified, read the instructions on how to properly lay out the artificial stone.
The most important thing to remember is that in the stacking row you should:
- alternate stones of different lengths;
- avoid combining the jointing seam of adjacent rows vertically (lower and upper);
- before laying, always lay out several rows of stone on the ground, spreading polyethylene film. The last point is also important in order to avoid the proximity of stones with the same textured pattern of the surface and so that the color spots of the color of the stones are evenly distributed over the entire lined surface.
Before laying out an artificial stone, take care of the supply of running water and electricity to the work site, strictly observing all safety measures. Protect yourself from electric shock, and the power tool from moisture and short circuits.
Make sure you have scaffolding on site if you need it for cladding work.
Check again that the substrate is properly prepared for the adhesive of the veneer of your choice and that there are measuring containers available for mixing with water of the required amount of adhesive.
Ensure the quality of the facing material and its availability in the right quantity or, if necessary, the delivery schedule in accordance with the planned tiling schedule. This also applies to the presence of glue and grout.
As for the choice of the tile elements themselves, it is recommended that you first lay them on the ground in the right order, taking them out of the boxes. Otherwise, you risk not only getting contrasting color spots on the wall, but also disrupting the masonry pattern itself.
While one member of the team is making and mixing the glue mixture with water, the other two lay out 1.5-2 square meters. m of facing elements on pre-spread polyethylene.


The mortar is applied with a notched trowel to the back flat surface of the stone, and the excess is removed with a trowel and the stone is set in place. By lightly pressing on it and swinging it slightly clockwise and counterclockwise, we ensure a reliable adhesion to the base, "squeezing" excess glue into the voids formed by the trowel teeth. The stone itself rests on the bottom of the formwork. The sticker starts from the corner element and leads from it in small sections of 50-70 cm in the direction from the bottom horizontally and upward.
However, it should be remembered that if the project provides edging of doors and windows, corners of buildings, columns, etc. special elements, then they are installed in the first place.If you need joining seams, then you should not forget about the slats prepared for this and insert them between the cladding elements, both horizontally and vertically. After the glue has set, these inserts are removed, wiped off with a damp cloth and used again.
The video "Laying artificial stone with your own hands" demonstrates the steps described above:
Each element from the previously laid out masonry pattern, starting from the extreme in the bottom row, is transferred one by one to the base. The last stones that form the edges of the laid out pattern remain in place, supplemented with new ones in the course of work. If necessary, some stones are adjusted to size using a stone cutting machine or grinder. You can also use an emery machine if necessary.

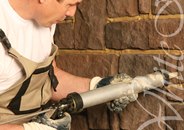
Upon completion of the cladding gluing procedure, but not earlier than 48 hours later, you can start filling the joint joints with grout. This can be done using a special pistol with a nozzle or a plastic bag in the form of a cone with a hole of the required diameter at the sharp end, which the master cuts independently. It resembles culinary bags, and they act on the same principle: the diluted grout is poured into the bag in portions from its wide part and squeezed into the seam gap through the hole made. Hands with the package move along the seam, gradually filling it with squeezed grout. This is reminiscent of the job of a pastry chef decorating a cake with cream designs. The grout gun is also similar to a pastry syringe with different attachments and works in the same way.
When filling the joint with grout, you should be careful and hold the gun or bag at the correct angle, moving it smoothly and evenly. Make sure that the grout evenly fills the joint. If it is lacking in some areas, then it will be necessary to report the layer to the desired level, and if there is a lot, it will be removed and transferred to thin areas.
Strictly keep track of the time when it will be possible to shape the grout, compact, etc. This is stated in the instructions for this grout. Do not miss the time when you can start this work and how long you can continue it. There is nothing to do with the hardened grout, and working with completely fresh grout is of no use. If grout has dripped onto the surface of the cladding, wait until it is hardened enough to remove it with a trowel. Never try to remove and / or wash off fresh grout with water: this will only stain the face of the stone.


The grout should fill the seam tightly, reaching the entire plane of the base and the end planes of the glued stones, leaving no voids or cracks. Otherwise, the rain moisture that has got there will destroy it gradually, and after freezing, with the onset of cold weather, it will turn into ice. During a thaw, the ice expands. Under the influence of this, explosive destruction begins not only of the trowel mass, but also of the glue with the lining.


To compact the freshly filled grout and level it in the joint, special jointing trowels are used. They come in different widths, depending on the number. Therefore, always use a trowel whose width, on the one hand, allows it to enter the entire width of the joint without problems, and on the other, without getting stuck, move along it. With the help of a spatula, the outer surface of the grout can be given not only a straight shape - it is enough to walk a second time along the straight surface with a jointing trowel with an end, which is given an arched shape, rolled in relation to its sides. The end result is a convex, arcuate grout joint.
Watch the video "How to Lay Artificial Stone on the Wall" to better understand how this work is done:
Artificial stone is a modern facing materialcombining decorative and utilitarian functions. It can be used to decorate almost any brick, concrete block or even wood building. Today, there are many domestic stone manufacturers on the market, which are actively involved in the import substitution policy, seriously competing with German clinker bricks.


Artificial stone is produced by vibration casting from high quality cement, sand, reinforcing additives, various fillers and pigments. The material appeared on our market several years ago and is now becoming more and more in demand. This is due to its relatively low cost, strength, fire and moisture resistance, frost resistance, ease of installation (it is much lighter than natural stone), as well as wide decorative possibilities.
Finishing work is not too time consuming. Compared to its natural counterpart, artificial stone weighs 1.5, and sometimes 4 times less. The flat reverse side with a slight relief allows for easy and quick installation.
The choice of adhesive
![]()
For a beautiful and durable finish, it is enough to choose the right adhesive composition. Many manufacturers of facing materials produce their own adhesive solutions. In particular, the largest Russian company White hills offers a series of professional adhesives for decorative stone. However, these adhesives have universal properties and are also intended for laying ceramic tiles, porcelain stoneware, natural stone, mosaics, etc.
Very importantso that the cladding material and adhesive composition are as close as possible in their physical and mechanical properties, especially in such an important indicator as the coefficient of linear thermal expansion... Otherwise, the stone will either collapse or move away from the base of the wall. This effect is most often observed in spring, when the temperature of the building base is close to 0 ° C, and the surface of the cladding has already warmed up to + 15 ° C. In order to avoid the destruction of the cladding, it is necessary to use specialized adhesives that are focused on working with decorative stone and have a high adhesion rate - at least 1 MPa.
Installation tools

- tape measure or ruler;
- building level, square, installation cords horizontal beacons;
- metal brush for cleaning surfaces;
- containers for mixing glue and grout;
- electric drill mixer for preparing glue and grouting solutions;
- paint brush for moistening stone and veneered surfaces, trowel, trowel or spatula;
- rubber mallet and wood block to fit and precipitation of elements;
- grinder with a disc for cutting stone;
- a bag or syringe gun for filling joints with grout;
- brush or brush of medium hardness for leveling and stripping seams;
- brushes or spray for applying water repellent.
Start editing with him?
First you need to prepare the surface (base) for laying. It must be strong, even, not subject to shrinkage or deformation and have good adhesion (adhesion) to adhesive composition... Remove from it all dirt, dust, ice, frost, stains from oil products, oils and fats of various origins. If the installation is carried out in hot and dry weather, then the work surface and the back of the stone should be moistened.
Before starting installation remove from different packages at least 2 m 2 of decorative stone, mixing elements in color, size and texture. This will give the masonry the most natural look and give a visual representation of how it will look on the wall. If there is cement laitance on the back of the stone, remove it with a stiff metal brush.
Installation of decorative stone

1. After carefully studying the instructions, prepare an adhesive solution.

2. Apply the adhesive solution to the prepared wall with a smooth trowel. Smooth out the adhesive with a notched trowel.

3. Start installing the stone with the corner elements. Apply glue solution to the back of the stone so that the entire area is evenly covered with glue.

4. Press the stone firmly against the wall and "move" slightly from side to side for the best grip. To mount the stone with jointing, use chopiki to fix the stone.

5. The stone lends itself well to mechanical processing, and if necessary, it is easy to cut it off with a grinder to give the desired size.

6. After the glue is completely dry, you can start to join the joints. Prepare the grout according to the manufacturer's instructions printed on the packaging. Add the desired color to the dry white or gray grout mixture before adding water.
7. Fill the joints with a construction gun or grout bag while slowly squeezing out the grout.

8. After the mortar has hardened a little, smooth it out with a spatula or a curly jointing trowel. For final alignment and sanding of the joints, brush them over with a medium-hard brush.

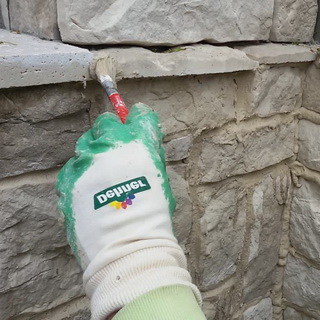
9. After the final drying of the masonry, you can treat it with a special protective hydrophobic compound using a spray or brush. Read the instructions for use carefully before use.
What is a water repellent?
![]()
For additional protection of the facade you can treat the masonry with a special hydrophobic compound. It forms an elastic semi-permeable membrane on the surface. Such a coating will protect the stone from moisture and pollution during temperature extremes, solar radiation, acid rain and other climatic influences.
Worth consideringthat the water repellent agent, after drying, can affect the appearance of the masonry. Therefore, before applying it, try first treating a small and inconspicuous area to check if the appearance of the stone will deteriorate.
Be sure to use a water repellentif the cladding is made in swimming pools, on fireplaces or where it can be exposed to intense pollution, constant contact with water or exposure to an aggressive environment.
Today, artificial stone is increasingly used in home renovation. It is used to decorate fireplaces, walls, corners, as well as on the outer surfaces of various structures.
The process of laying decorative stone consists of several stages.
First you need to choose the stone you need, calculate the amount required for the work. To do this, determine the area on which it is going to be applied. When facing, the following stone elements are most often used: flat (their number is measured in square meters) and angular (measured in running meters). These dimensions will help you calculate the amount of material.
Preparation of a working surface for laying decorative stone.
The geometry and relief of the stone are very different, so you need to think about how they will spread it. You can draw the styling, so you can more accurately represent the future wall. Then thoroughly clean the wall from dust, dirt, various layers.
Decorative stone processing.
The surface is treated with an acrylic primer using a roller or brush. When applying a stone to drywall, such a surface is reinforced with construction mesh and cement mortar.
Preparation of decorative stone.
Artificial stone is made from gypsum mortar, so it must be treated with a special primer on the back side. It will also limit the water-absorbing capacity of the stone, its rapid absorption of moisture from the solution leads to cracks and chipping off of parts of the stone.
Applying glue to the surface
First, you need to decide on the type of solution, depending on the material from which it is, and the surface on which it will lie. Stone from sand materials required cement mixtures, and from gypsum-containing ones - mastic, glue containing PVA. The glue solution is applied with a spatula or trowel to the surface of no more than 1 square meter. m, on a stone - about 3 mm wide.
Laying out decorative stone.
Laying begins from the bottom row from the farthest corner of the room, gradually approaching the exit. It is necessary to leave gaps between the stones: the styling will look more sophisticated. Then these grooves are filled with rustic ones, specially designed for these purposes.
Application of a protective coating of decorative stone.
This is not always done, but protection makes it easier to care for the surface of the stone.


