Complex and multi-level structures of garages are gradually becoming a thing of the past, and they are replaced by simple and lightweight structures made of metal profiles. Profiled sheeting has many advantages over other materials: it is light, practical, inexpensive, durable, quite attractive in appearance, and most importantly, it will allow you to build a garage with your own hands, without resorting to the help of special equipment and additional financial investments.
So, if you have planned to build a garage from a metal profile with your own hands, we will help you carry out all stages of this process quickly and efficiently.
If you have already found a decent place for the construction of a future structure, then at the very beginning you will need to mark this territory. This is done very simply - small wooden stakes or pieces of reinforcement are driven in along the perimeter of the selected area. A rope is pulled between these elements, which will indicate the sides of the future structure. In the middle of the markings, along the perimeter, as well as in the corners, depressions are dug to a depth and width of about 0.5 meters.
During the creation of the drawing, you should not try to save money and limit the size of the room to a minimum, because at least the garage should have space for opening the car door. The smallest parameters of the garage are equal to 3x4 meters, and in the optimal case - 4x6.
To create the foundation, we need some materials and tools:
- U-shaped profile;
- crushed stone;
- sand;
- cement;
- screws for metal;
- plumb line;
- screwdriver;
- level;
- bayonet and shovels;
- bulgarian.
The process of creating a base for a garage from a metal profile differs from building a foundation for ordinary houses:
- After the pits are dug, they are inserted metal pipesthat are poured with concrete;
- Then these pipes are connected by a trench, which should have a depth of about half a meter. If necessary, formwork is added to the structure;
- After all this is concreted and left to dry;
- For greater reliability, the base can be reinforced.
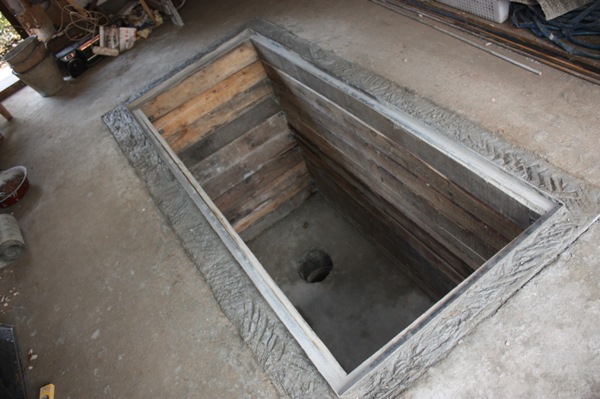
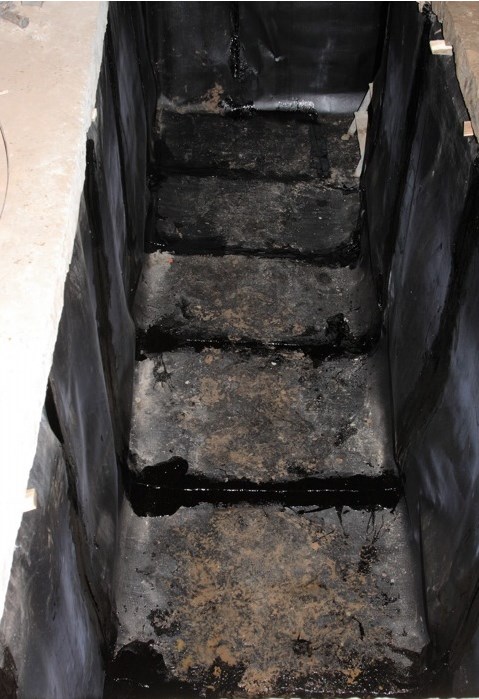
A good solution would be to arrange a viewing hole in the center of the garage. To do this, you must first dig a recess, the edges of which are concreted or laid out with bricks. Ideally, it is desirable to complement it with small steps and lighting. Remember that the creation of a viewing hole is possible only if the level groundwater in your area is low.
Erection of the frame and walls
The frame is erected by welding. If you are new to this type of work, it is best to seek the help of a professional welder.
- The work begins with the fact that the transverse and longitudinal fasteners from the pipes are welded to the concrete pillars. Construction possibilities allow for a combination of metal elements and wooden elements in the design; in this version, some fasteners are replaced with bolts and self-tapping screws;
- The frame body itself is quite simple and consists of vertical and transverse struts, which are fastened with self-tapping screws;
- The distance between the racks must be chosen based on the width of the corrugated board, so that the fastening is sufficiently stable, and there is no need to install additional metal supports;
- The outermost racks of the frame are installed first. Then they are checked for verticality and you can go to the left and right row;
- At the end of this process, a pipe or corner is installed on the racks, which acts as an overlap. When the base is ready, you can assume that half of the work is done.
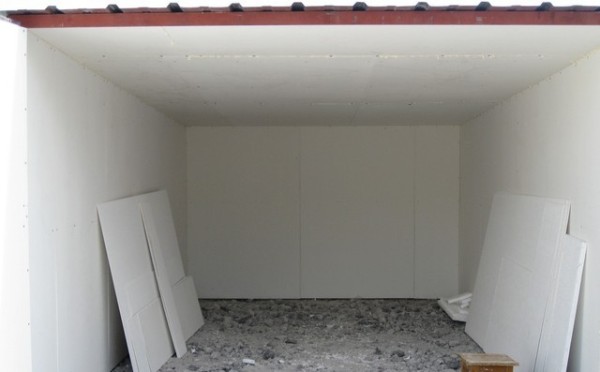
After installing the frame, you should start installing the walls from the metal profile.
Beforehand, it is advisable to check the drawing again, measure everything, and check for even angles and parallelism. Sometimes it becomes necessary to cut the profile, and for such cases it is better to stock up on a jigsaw. Having adjusted the material to the dimensions you need, you can proceed to fastening the sheets.
The walls are erected using self-tapping screws, and the joints between individual sheets must be sealed with special steel rivets. In order for the walls to be stronger, stiffer and more stable, the masters advise the use of sealing gaskets.
The next step in the construction of a garage from a metal profile will be the installation of a roof.
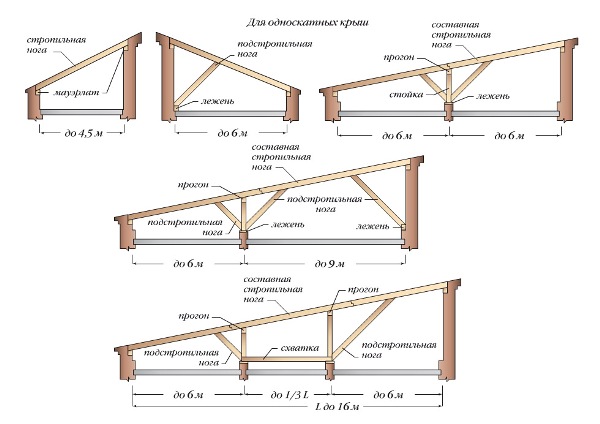
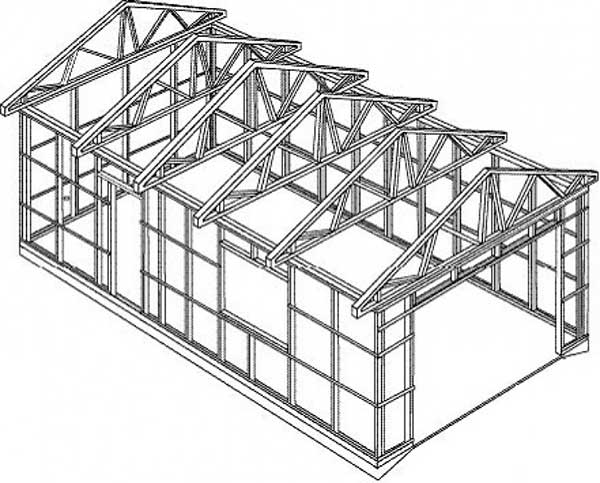
Roof
Buildings of this type, as a rule, are equipped with one or gable roof, with the possibility of insulation. It is recommended to give preference to a single-pitched one, since its installation is easier. As in previous cases, self-tapping screws are used to fasten metal profile sheets, which connect them to the roof frame profile.
It is advisable to choose a sheet wide enough to cover the entire length of the garage in one sitting. From a practical point of view, it will be much easier to cut off the excess part of the sheet than to fix the missing part later.
- First, rafters from a metal corner or pipe are attached. Such an angle of inclination should be observed so that snow does not accumulate on the roof, but also so that the appearance is not too disturbed;
- The design of the lathing also depends on the angle of inclination of the roof - if it is more than 15 degrees, then the lathing must be solid;
- The joints of the sheets must be leveled about 20 centimeters. Laying separate pieces of metal profile, preferably with an overlap;
- After the material is laid, all seams are carefully sealed. For this, it is recommended to use a bitumen-based sealant;
- The parallelism of the sheets with respect to the garage cornice should be strictly observed. The overweight should be approximately 40 centimeters;
- If you plan to install insulating materials, then there should be a distance of about 30 centimeters between them and the roof.
For a better result, it is advisable to find drawings of a pitched roof on the Internet, and strictly follow the markings.
After the main part of the work has been done, you need to take care of protecting the new structure from moisture penetration, as well as freezing. To do this, you will need to select and install high-quality hydro and thermal insulation.
Warming
Those who refuse to insulate the garage should know that thermal insulation is needed not for the car owner, but for the car itself, so that sudden temperature changes do not damage its "insides".
Heaters for the garage are very different:
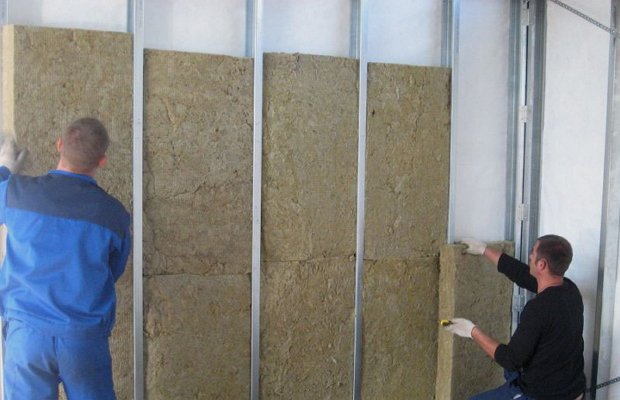
- mineral wool in the form of slabs or rolls;
- liquid polyurethane foam;
- expanded polystyrene plates.
Insulation with the help of the last material is the easiest to do - you just need to attach the plates to the walls of the building, and level the surface building mixture... True, expanded polystyrene is quite sensitive to mechanical stress and, moreover, begins to decompose when high temperature... But if you are not going to melt it or knock on it with heavy objects - this option is just for you.
The metal profile is one of the leading building materials used in the construction of small buildings and structures. It has a number of indisputable advantages:
- Speed. The construction of a garage space from this material takes only a few days.
- Ease of installation. Even a novice builder can handle the installation of metal-profile sheets.
- Low cost. If you build a garage yourself, you only have to pay for the materials. If you hire trained people, the cost of their work will be much lower than building a brick building.
- Durability. The supporting metal profile can be used for 30 years or more.
- Mobility. If necessary, the garage structure can be easily disassembled and moved to another place.
- High temperature resistant.
- Refractoriness.
The metal profile is a lightweight material. It can be used even in places where the construction of capital buildings is officially prohibited. However, it is not devoid of certain disadvantages:
- Under strong mechanical stress, the sheet may deform. It cannot be returned to its original state, but it can be replaced.
- Weak thermal conductivity. The temperature in an uninsulated garage building made of metal profiles will be the same as outside. This disadvantage is eliminated with the help of internal insulation of the building.
We can conclude that the metal profile is an ideal building material for the construction of lightweight buildings. Capital structures are best made of stone or brick.
Preparation for work
The construction of any building requires careful preparation. In the process, tools and materials are calculated and purchased, and a place for future development is cleared.
Selection of building material
To erect the walls of the garage, you will need a metal profile marked with the letters "C" or "PS". The letter "C" means that the material is of the wall type.
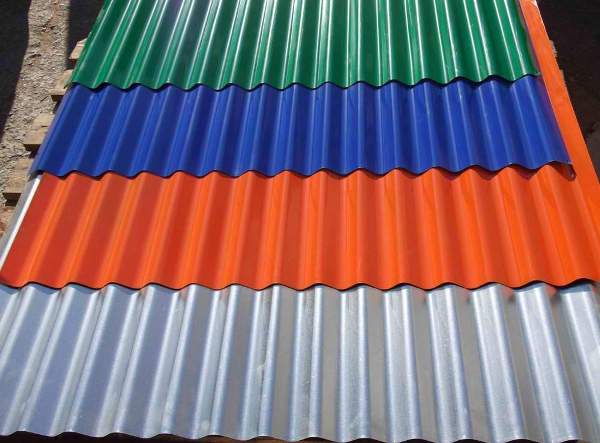
Varieties and scope of use of corrugated board
You also need to pay attention to the size of the wave. First of all, this concerns the independent choice of material. If the offered corrugated board is marked C-20, this means that the wave height is 20 mm. This indicator affects the stiffness of the metal profile sheet and, as a result, the entire building. However, he will also make it much more expensive.
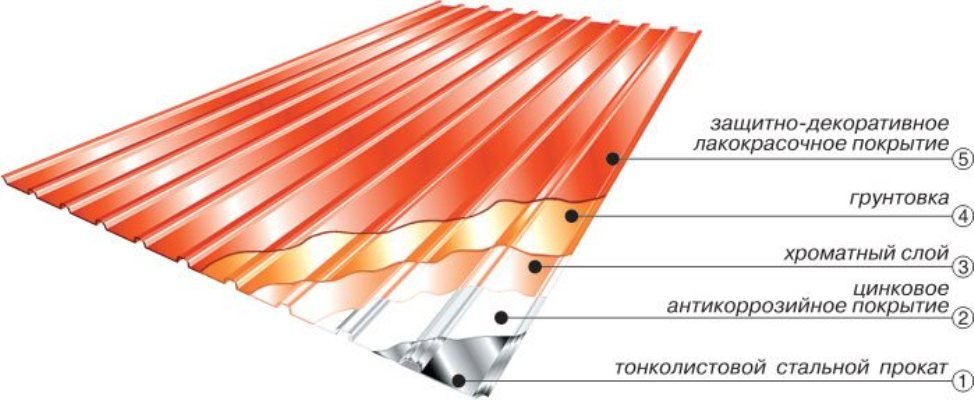
A standard sheet consists of several layers
The cheapest is a metal profile marked C-8 or C-10, with a wave height of 8 or 10 mm. However, if you use this material for construction, you will have to fasten it to the profile more often. This will reduce the tightness of the building. It should also be borne in mind that thin sheets will "walk" during strong winds. The result will be a loosening of the corrugated board and a peculiar sound. If you plan to build a garage in a windy area, it is better to use a material with a high wave.
Another important indicator is sheet thickness. On sale there is a corrugated board with a thickness of 0.4 - 1 mm. For the construction of a garage building, you can limit yourself to 0.5 mm.
Calculation of materials
A standard garage for one car has the following dimensions:
- Length - from 4.5 m to freely accommodate any passenger car or GAZelle.
- Width - 3.5 m.
- The height of the structure is 2 m or more, depending on the vehicle.
To create such a structure, you will need a set of materials:
- For foundation construction - 4–5 bags of cement and sifted sand.
- For the construction of the metal frame of the garage - about 70 m of a 40 * 20 mm profile pipe.
- For the manufacture of additional stiffening ribs - about 50 m of a shaped pipe 20 * 20 mm.
- For cladding the structure, 23-25 \u200b\u200bsheets of metal profile will be required.
Standard figures are indicated per vehicle
If it is planned to build a garage for two cars, its width approximately doubles, the rest of the indicators remain at the same level.
Tools
In addition to pipes, cement mortar and metal profiles, the following set of tools will be required to build a garage:
- Bulgarian. With its help, metal structures are cut, therefore, a cutting wheel for metal must be included in the package.
- Electric jigsaw and specialized scissors for cutting metal.
- Welding machine
- Screwdriver and a set of screws. Fasteners for metal will do.
- Armature
- Building level
DIY instructions for building a garage from corrugated board
The construction of a garage from corrugated board is carried out in several stages:
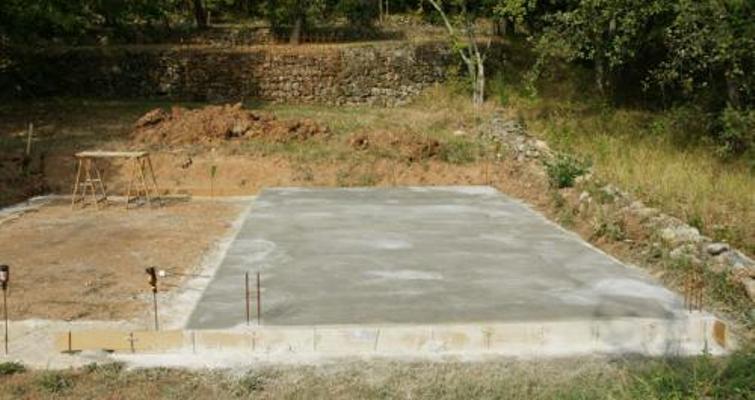
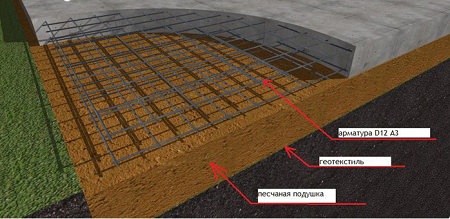
- Foundation construction. More often - monolithic slab made of concrete, which also serves as a floor. The foundation itself is built within a couple of days, however, it will take several weeks for the final maturation of the solution.
- Frame fabrication. Vertical posts are installed during the construction phase of the foundation, other structural elements are welded to them.
- Installation of corrugated board. The material is cut to size (if necessary), then installed on the walls and fastened with self-tapping screws with rubber gaskets.
- Gate installation.
Let's take a closer look at each stage.
Site preparation and foundation erection
At the very beginning, a site is prepared for further construction. The place is cleared of plants, etc. and is carefully aligned. When choosing a place for construction, several factors are taken into account: the convenience of the entrance, the possibility of using swing gates, location relative to neighboring buildings.
The construction of the foundation is as follows:
Modifying components can be added to the concrete screed to increase water resistance and plasticity. Such additives are water glass and some other mixtures.
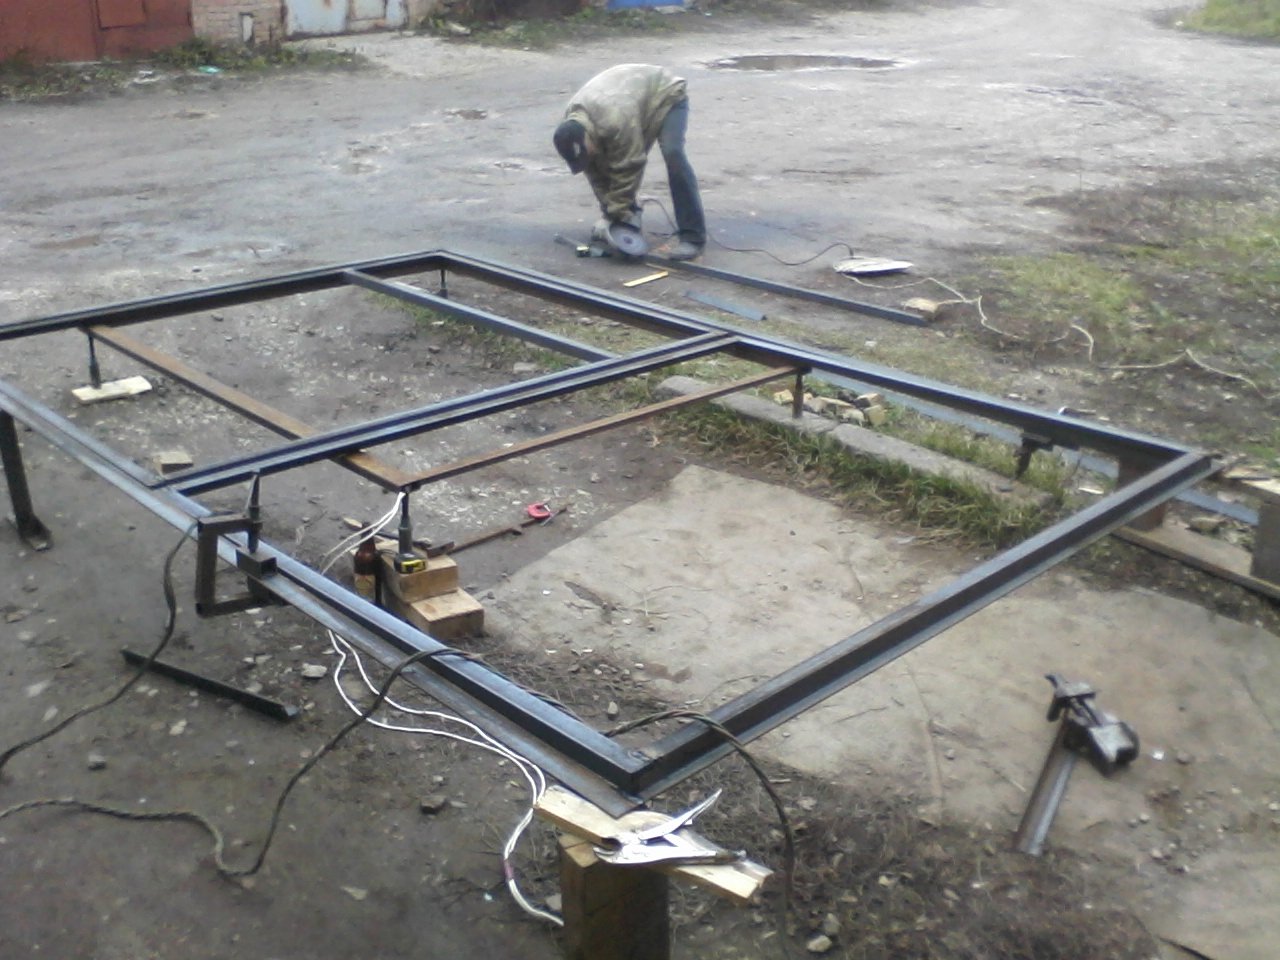
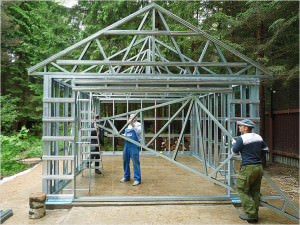
Erection of the frame
The garage frame is assembled from a regular profiled pipe. This is done as follows:
The finished frame is mounted on a frozen foundation. First, the walls are mounted, with the help of a building level, they are set vertically and fastened together by welding. Additional fastening of the frame on the base can be done using dowels and metal corners.
How to make a gate
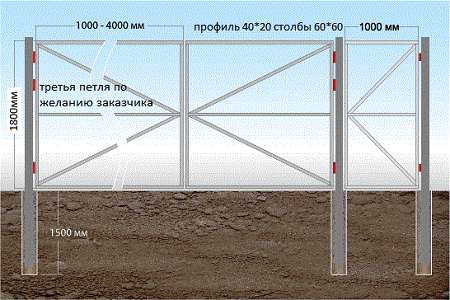
At home, the easiest way is to make a swing structure from a metal profile. Garage Doors this type consists of a metal frame and two sashes.
The supporting structure is made of metal bars. Height - about two meters, width - 2.8-3 m, exact dimensions are strictly individual. The frame is assembled as follows:
- The dimensions of the opening are measured. The installation of the frame will also depend on the accuracy of measurements.
- Workpieces are cut from a steel corner with a square section.
- Finished racks are laid out on a perfectly flat surface, leveled and leveled. You can use special shims to align the structure horizontally. By measuring and comparing the diagonals, right angles are checked and adjusted.
- The finished frame is welded. For the best fit of the door leaves, the outer side is made as smooth and even as possible. The seams left over from welding are sanded with a grinder.
The next stage is the assembly of the sash frame. In the process of work is used standard profile 60x20 mm. The assembly takes place in the same way: the frame elements are cut, laid out on a flat surface, exposed, adjusted and welded together. On the inside of each sash, 1–2 metal beams are attached to ensure the rigidity of the structure.
The sashes can be attached to the frame and then the entire structure can be built into the overall frame
The next step is cladding. It can be made with standard metal-profile sheets, with an overlap of 1–2 cm. For fastening the sheets to the frame, welding or self-tapping screws are used for metal, the fastening step is through a wave.
The doors are fastened to the frame using construction brackets and hinges. With a standard gate size, it is enough to weld two hinges for each leaf. After installation works joints are treated with paint or degreaser. Last of all, the garage lock is cut. Alternatively, you can install a latch.
Roof manufacturing
First of all, the rafters are mounted. For this, a profiled pipe is used. The size of the line is equal to the distance between opposite sides of the garage. The step is determined individually and depends on the climate (in snowy regions it is less) and the weight of the corrugated board.
If you are making a cold roof, the roof will consist of the following elements:
- Waterproofing layer.
- Sheathing.
- Top covering made of corrugated board.
TO rafter system insulation is attached. In this capacity, a standard roofing material is often used. A crate made of wood or metal is attached on top. For a shed or flat roof, a metal profile structure is suitable. The connection of individual elements of the battens is carried out by welding, all connections are covered with enamel or primer. This will avoid corrosion.
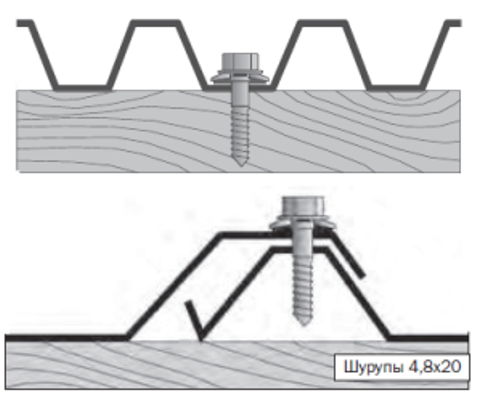
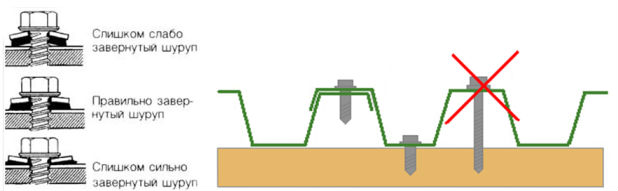
Methods of fastening the metal profile to the crate and to each other are shown
Profiled sheeting is attached to the crate. For this, zinc-coated self-tapping screws are used. In order not to scratch the coating, rubber washers are put on them.
Garage cladding
Sheathing of the garage building with corrugated board is carried out only after the concrete mixture has completely solidified. This will eliminate the possible movement of the frame with the subsequent deformation of the metal-profile sheets.
- The fastening starts from the edge of one of the side walls. The first sheet of corrugated board is set in level so that all edges fit snugly to the frame. Fastening is carried out using self-tapping screws for metal with a hex head. The use of a rubber gasket will provide additional waterproofing and protect the metal profile from rust at the joints. First of all, the extreme upper corner is grasped, after which the sheet is carefully leveled and fastened over the entire area, excluding the overlap with the next one.
- The second sheet is overlapped by one wave and placed on the same level with the first. At several points, both elements are fastened together and attached to the frame. Then the second sheet is also attached to the base over the entire area, excluding the last wave, which will overlap with the third. In this way, all other cladding elements are installed.
- Roof sheathing begins with the installation of the gutter and wind bars. First, hooks for the drain are attached, then the pipe is laid in them. Then wind bars are installed around the perimeter, which are bent sheets of iron. They are necessary so that precipitation does not fall under the roof. One of the edges of the plank should be connected to the gutter.
- Further, sheets of a metal profile are laid on the roof and attached to the crate. Laying takes place from the bottom up, with a slight overlap on top. This will prevent precipitation from entering under the roof.
Insulation and inner lining
A garage made of a metal profile is rarely insulated. If you do not plan to heat the room, there will be no special sense from installing a heater. If desired, this can be done in a few hours.
Insulation can be sheet or roll. The main difference is in the installation method.
- Connect metal-profile sheets with screws. If necessary, this will allow you to disassemble or repair the garage.
- With the help of corrugated board, you can strengthen wooden structure... To do this, it is enough to cover it with sheets. You can pre-install a layer of thermal insulation.
- From a metal profile, you can make not only a garage, but also an outbuilding, for example, a small shed or workshop.
- The theoretical service life of a garage building made of corrugated board reaches 70 years. Practical - a little less. To make the structure last longer, you should periodically check the connections and joints. In addition, the walls of the premises must be painted annually. This will prevent the appearance of rust and keep the building presentable for years.
Video: Do-it-yourself garage from a metal profile
When self-building a garage from a metal profile, it is important to remember: joints and chips are painted or treated with degreasing compounds. This will extend the life of the building.
Building a garage is quick and easy. You just need to use the right materials for this. Recently, the attention of motorists in this regard has been attracted by the metal profile. It has a number of useful advantages that make it possible to use it not only for roofing or building fences. In this article, we will consider the option of building a garage from it with drawings and calculations.
Metal profile for garage
Another name for the metal profile is corrugated board. It is a thin steel sheet coated with a protective polymer layer or galvanized. By rolling, the sheets are given a different profile.
Pros and cons of the material (table)
It is better to build a garage from a metal profile on your own site in a temperate climate. If you decide to build it in cold regions, you will need some solid insulation.
Preparation for construction
Example drawing
The size of the garage must be calculated based on the size of the car. The figure below is a sample. Taking into account the free space required to store tools and other accessories in the garage, the following plan is obtained:
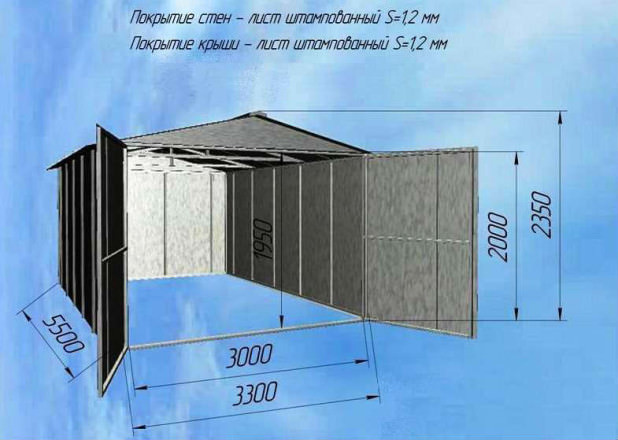
Metal garage: draw a drawing
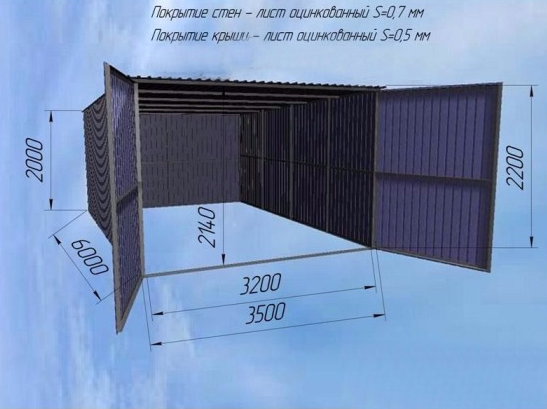
Garage height with shed roof to the ceiling must be at least 2140 mm.
Selection of quality material
It all depends on the specific manufacturer. Sometimes, by running your hand over the surface of the sheet, you can see how the paint and coating remain on your fingers. In order not to face this, you need to know how to choose the right corrugated board:
- To build a garage, you will need wall sheeting. It is designated as PS or S. The numbers in the marking indicate the wave height. The larger it is, the stiffer the sheets of material. Accordingly, its price is higher. However, in the case of a garage, it is better not to save money and not to buy a metal profile of grade C 10 or lower. It is better to buy material with a higher wave height.
- As for the thickness of the metal itself, it is optimal to choose 0.5 mm sheets for a garage. They can be thicker - up to 1 mm. However, then their weight will also increase.
- It is worth choosing corrugated board of proven manufacturers. Cheap options can be a pig in a poke.
- The coating of the metal profile can be simple paint and varnish, galvanized or polymer. It is preferable to choose the last two options. They are resistant to corrosion and last longer.
What materials do we need and how much
We need material for:
- foundation,
- walls,
- roofs,
- gate,
- frame,
- insulation,
- floor (screed).
We use metal profiles for walls, roofs and gates. How to calculate the required amount? It depends on the total area of \u200b\u200bthe walls and roof and the size of the sheet. Standard sizes wall sheeting - length 2 m, working width 1.1 m. Knowing the parameters of your garage, you can easily count the number of sheets.
The optimal type of foundation for a garage from a metal profile is a pile foundation. It has excellent load bearing capacity and is easy to create. It will be enough for you screw piles section 108 mm. They need to be screwed into the ground, then the heads must be welded onto them and the supporting frame is mounted. To do this, use a channel and profile rails of the required dimensions.
The frame of the walls and gates of the garage door will also be assembled from metal profile rails. For a concrete floor screed, you will need cement mortar.
Insulation of the garage can be done with mineral wool or foam. Styrofoam is an inexpensive and therefore attractive option. However, it should be taken into account that it has low mechanical strength, easily ignites, and can release toxic substances in summer when heated. Mineral wool retains heat very well and does not burn. However, its use requires mandatory vapor and waterproofing on both sides so that it does not accumulate moisture. We'll use Styrofoam as the easiest option.
You will need self-tapping screws for metal, rolled metal - corners, shaped pipes, wooden bars.
Tool List
- Grinder and circles for cutting metal.
- Screwdriver.
- Welding machine.
- Metal scissors.
Step-by-step instruction
Foundation
For our garage we will do pile foundation... We screw in the piles around the perimeter of the future garage. This can be done manually:
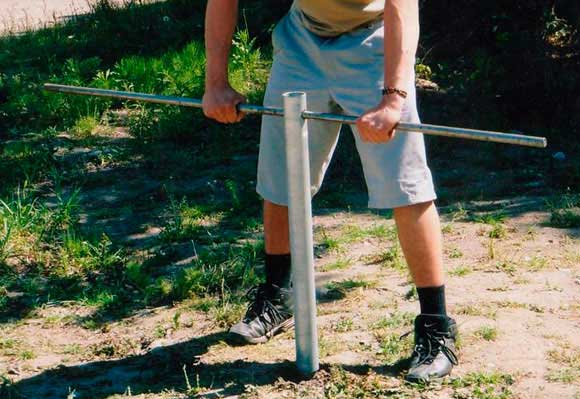
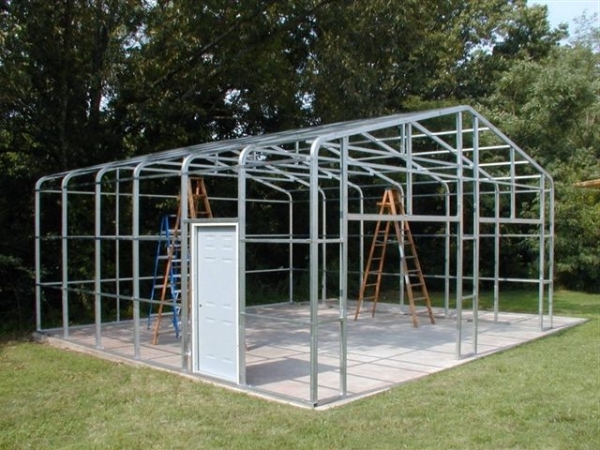
The garage frame is assembled from shaped pipes... The main carriers are vertical and horizontal pipes should be of a larger section - 40 mm. Pipes for walls and roof fixings can be taken with a section of 20 mm. If we are building a garage with a pitched roof, we weld the frame in the shape of the letter "P". We install U-shaped structures on the foundation.
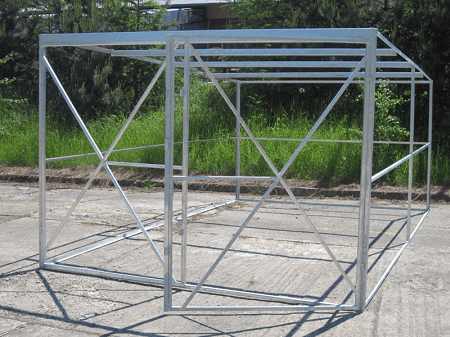
Garage frame
Video: how to build a frame
Sheathing
When the frame is ready, you can start attaching the corrugated sheets. Sheets are attached to the frame roofing screws for metal with a rubber gasket. To do this, you need a screwdriver or drill. The sheets are attached with an overlap of one or two waves in a row and 10–20 cm between rows. This ensures reliable protection from leaks.
Fastening the metal profile to the garage frame
That is, fastening with self-tapping screws is carried out in the lower wave. Joining the sheets together with the help of the upper wave is done with rivets or short self-tapping screws.
How to make a concrete floor screed
If there is an inspection pit in the garage, then first it is equipped, and then the screed is poured.
Goal
For the gates, hinges are welded on the front pillars of the frame. After that, on the gate frame, you need to mark the places for the return loops. The gate will turn out to be fixed if the hinges are welded in the opposite direction so that they cannot be removed. The gate frame is sheathed with corrugated sheets.
Observation pit
The creation of a viewing hole in the garage must be done before pouring the concrete screed.
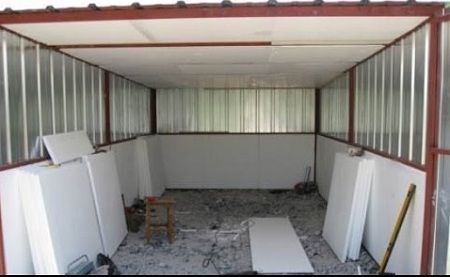
Insulation of the garage with foam
We will insulate the garage with foam. It is an inexpensive, simple and effective option. Foam sheets are attached directly to the metal profile from inside the garage using silicone glue or foam. Then they can be plastered.
Video: how to fix foam blocks
Video: do-it-yourself garage insulation from corrugated board with mineral wool
Following the above tips, you can independently build a garage from a metal profile on your site.
The garage is durable metal carcassassembled according to the dimensions of the drawing. The area should be optimal for car maintenance.
The frame is sheathed on both sides with profiled metal sheets. Insulation is laid between them. The presence of a viewing hole will make it possible to carry out minor repairs of the machine with your own hands. To perform a floor screed, it is more appropriate to use moisture-resistant concrete.
Among the advantages of buildings on a metal-profile basis are:
- Erection speed (less than a month will be required to complete the work).
- Profitability (relatively small construction costs).
- Ease of assembly technology.
- Light weight material facilitates construction.
- Long service life (provided by the quality of the covering of the corrugated board).
- Doesn't require serious fundamental work.
- Strength and the rigidity of the structure.
- Aesthetic look.
- Disassembly possibility to transfer to another location at minimal cost.
The disadvantages include low level security. Penetration will not be difficult, the metal lends itself well to sawing. Poor sound insulation is also typical for profiled sheets.
The insulating material will partially help eliminate this flaw. A poor-quality coating of corrugated board can corrode, so when buying it is necessary to inspect the sheets well.
Site selection and dimensions
The building site must be level. The close location to the access road will facilitate snow removal in winter. The simplest study of the soil will make it possible to determine further work on the foundation and inspection pit.
On a site with high rates of groundwater, it is necessary to make drainage with pipes leading to the sewer.
The main indicator when choosing a place - the possibility of free entry and exit.
Universal sizes 3 × 6 include car parking and minimal operator comfort when servicing the vehicle. The minimum height is 2.3 meters including roofing. If the area of \u200b\u200bthe site allows, the dimensions are determined at the request of the owner.
Garage drawing
After determining the location and boundaries of the site, you can draw the dimensions of the structure on paper. The main elements of the drawing will consist of a frame and corrugated sheets.
When creating a project, the following factors are taken into account:
- The presence of a viewing hole, its dimensions and stairs.
- Floor structure and its height.
- Features of the soil.
- The presence of a foundation and its type.
- Gate sliding system, sizes.
- Fasteners and their location.
- Roof and its variety.
- Ventilation system.
- Communications.
It is quite possible to draw a garage project yourself on a sheet. But to facilitate the work and correct calculation, it is better to use special programs: Solitworks, AutoCAD.
How to design correctly?
Dimensions
As a basis for the project, you can take the average dimensions of the garage, but it is better to make an individual layout. To do this, you need to park the car on the building site and visually add the required distance on each side with the doors open. Take measurements for the control points, which will form the basis of the project.
The design documents include a set of drawings in three sections:
- Assembling the frame, wall and roof sheathing.
- Gate and door fastening system (if provided).
- Calculations and foundation diagram, inspection pit and floor.
Where can I find a finished garage?
The affordable price of prefabricated structures allows you to purchase a ready-made garage of standard sizes or to order. Firms that are manufacturers of related products deserve special attention. building materials.
The price of their products will be even more tempting. The installation service will be a bonus to your purchase. It is worth paying attention to the qualifications of workers. Masters of their craft are guaranteed to make the correct installation. Amateurs can deliver unpleasant surprises.
Ready-made kits will simplify self-assembly. Prudent sellers will complete all the necessary parts and elements.
Used collapsible structures can be purchased through private advertisements, but before buying, you must carefully examine all the details and assess the condition. It is almost impossible to stop the destruction of metal that has begun, so it is better to refuse such a purchase.
DIY construction
Foundation
Simple technology and uncomplicated work allow you to build a garage yourself. By adhering to the tips and tricks, you can get a universal room in three weeks. On flat terrain with solid ground, it is not necessary to make a foundation and floor screed.
A crushed stone bed will be enough. It is not worth dwelling on the typical dimensions of the garage. A 3 × 4 room can only provide parking. It will be difficult to place tools and fixtures.
The optimal size of 4 × 6 will allow for minor repairs if necessary. It is possible to equip the room with a viewing hole only if the occurrence of groundwater is below 2.5 meters.
Freehand drawings will help you navigate the assembly.
Required tools to perform work:
- grinder with a disc for metal;
- welding machine;
- screwdriver;
- level;
- plumb line;
- shovel;
- keys set;
List of materials for making a garage:
- sand (river);
- cement grade 400;
- reinforced mesh;
- crushed stone (fractions 2.5);
- U-shaped steel profile 50 × 50 mm;
- profiled metal sheets;
- metal corner for the gate;
- screws for metal;
Frame installation
Step by step guide:
- Construction should begin with design work. The presence of drawings will make it possible to determine the amount of required materials, make a purchase according to the list. Initial data for management:
- size 4 × 6 m;
- strip foundation;
- inspection pit 80 cm wide, + 1 meter long from the length of the car, depth + 15 cm from the height of the motorist;
- gable roof;
- ventilation;
- double-leaf swing gates;
- self-tapping screws with a sealing washer (as fasteners);
- Prepare the site:
- clear and plan the place;
- dig a pit 30 cm wide, 20-30 cm deep; recess for a viewing pit;
- Concreting:
- Pour the foundation with concrete and reinforced mesh.
- Cover the inspection pit with a brick, having previously made drainage of the bottom.
- Give a few days to the foundation sludge.
- Cover the borders of the repair pit with a metal corner.
- Lay a 10 cm thick sand pillow on the floor.
- Lay waterproofing around the perimeter (with a slight approach for the walls).
- The next layer of reinforced mesh will prevent cracks and gouges.
- Pour concrete into the floor. Allow the cement to dry completely within 10-14 days.
- Installation of the frame. The profile is easily cut and fastened with self-tapping screws with gaskets for sealing.
- The assembly of the walls starts from the sides. It is imperative to fasten the sheets with an overlap.
- Installation of gables to the back and front of the garage. Gables are defined.
- Roofing produced in the form of rafter pairsthat match the number of racks. To increase strength, iron slopes are used. The rough floor is covered with an overlapping corrugated board.
- Gate installation. A frame for a gate is made from metal corners using a welding machine. The hinges are fastened with self-tapping screws to the frame and the door frame or simply welded. Insulation and interior decoration.
To avoid the negative influence of temperature differences on vehicle, you need to insulate the garage. To do this, you can use mineral wool, foam or liquid polyurethane foam.
Each material has advantages and disadvantages. In terms of heat-shielding properties, it has approximately the same indicators. Mineral wool is considered fire-resistant. In addition to the walls, it is necessary to insulate the roof and gates. Air circulation is imperative. The presence of ventilation will solve this issue.
Warming process:
- Blow out all the cracks polyurethane foam.
- Styrofoam sheets glue to the corrugated board over the entire area.
When using mineral wool, it is necessary to use waterproofingyu, since this type of insulation tends to take on moisture. A rack frame is constructed for installation.
The best option for using liquid polyurethane foam in the final calculations will not be so expensive. There is no need for polyurethane foam and special glue required for other types of insulation. A dense and reliable layer will provide a good sound insulation of the room.
Interior decoration can be made of corrugated board or other material.
Price
Self-assembly will save on installation. In general, the garage will cost from 50,000 rubles. Taking into account the insulation, inspection pit, communications - the average cost will be around 70,000 rubles. If you purchase a ready-made kit from, the price will be within 150,000 rubles.
Tips for building a garage from a metal profile:
- Don't skimp on the quality of materials.
- Connect the structure with screws for the possibility of future disassembly.
- Gate opening system can be changed due to site restrictions.
- The roof can have a shed structure. In this case, miscalculations are necessary. bearing capacity in winter.
- Instead of concrete, ready-made concrete blocks can be used. This will speed up the work on laying the foundation and equipping the inspection pit.
Leaving your car at night on the street is not the safest solution. It is fraught not only with theft or vandalism, but also with other troubles, for example, corrosion on the body due to moisture and temperature extremes. Every car owner knows that outdoor parking is bad for the condition of the car. Therefore, each of them dreams of having a garage. However, building a garage today, especially right after buying a car, is not so easy.
A brick building, like a block building, is not cheap. But in any situation you can find optimal solution... In this case, such a solution will be a garage from a metal profile with your own hands. The advantages of this option are obvious: the metal profile is simple and easy to use, you can work with one or a couple of craftsmen without using equipment. If you have a welding machine and a grinder, and also know how to handle these tools, then building such a garage will be quite a feasible task for you.
The metal profile can be used for the construction of the frame and for the sheathing of the building. Like any other material, it has its own advantages and disadvantages, which must be taken into account when starting to work with a metal profile. Among the strengths of this material are:
- Versatility. The fields of application of the metal profile are wide and varied. These are roof sheathing, and the creation of partitions, and the construction of fences. And they also sheathe the walls. The metal profile allows you to make elements of almost any shape;
- High strength, relatively low weight, easy handling and application. A structure made from this material will not have too impressive weight, and therefore will not require the formation of a serious foundation. It is simple, convenient and easy to work with it. All work is carried out in the shortest possible time;
- The processing of the metal profile is carried out using metal scissors. They can safely cut sheets and give them the desired shape;
- High decorative properties. Metal profile sheets do a good job of masking defects on various surfaces;
- When covering the roof with this material, there is no need to create a powerful beam base and a serious rafter system;
- High resistance to negative influences. The upper polymer layer protects the material from the harmful effects of water and precipitation. Mold does not form on it, the material tolerates harsh climatic conditions and temperature fluctuations well. Therefore, its service life is very long. The metal profile retains its remarkable properties and aesthetic appearance for 50 years;
- Ecological cleanliness. The material does not harm humans and the environment;
- The top layer is not subject to the destructive influence of temperature; when heated, it does not change either color or structure;
- High fire safety characteristics.
Despite the extensive list of advantages, the metal profile also has weaknesses. These include:
- When raindrops, hailstones, etc. hit the metal profile, noise and rumbling are emitted. This can be frustrating and annoying. But this problem is solved by the use of soundproof materials. For example, mineral wool is often used. Foam sheets can also be used;
- If the top protective layer is damaged, then the inner layers of the material will be defenseless against corrosion;
- The thermal conductivity of the metal profile is quite high, therefore, when a temperature difference occurs, condensation forms on it.
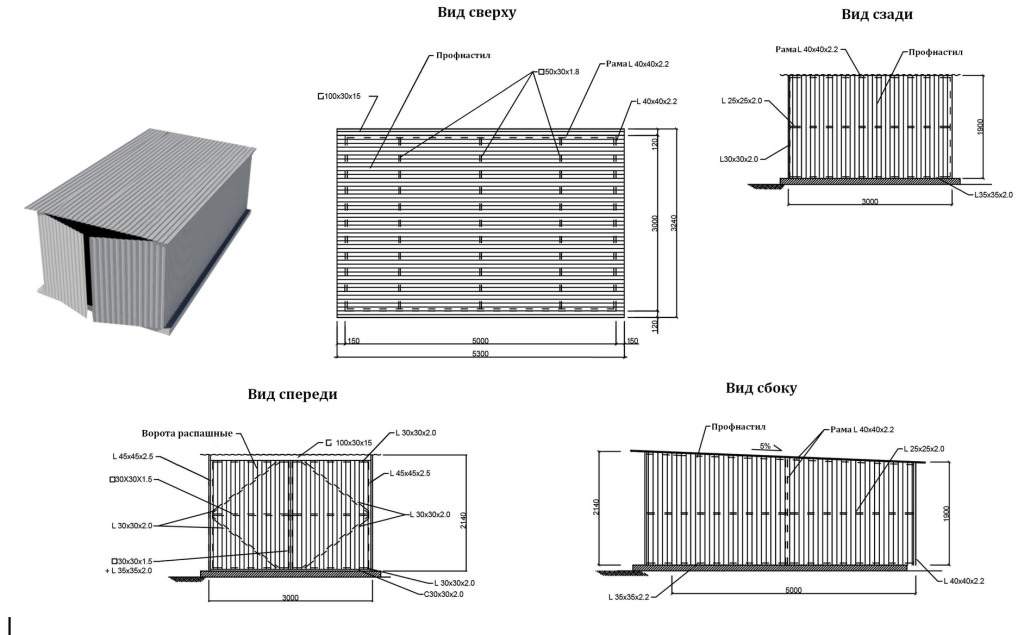
Careful analysis and planning is the basis for a successful start of any construction. First of all, you need to decide what your garage will be like. It is recommended to develop a full-fledged project, or at least draw a drawing by hand. If you are not good at sketching, then at least sketch out a sketch or diagram by hand. Do not give up this stage, even if you think that building a metal-profile garage is the simplest task. In the future, the presence of a drawing can greatly facilitate the solution of some tasks. Think over optimal sizes for your building, taking into account the dimensions of your car and other nuances.
Average values \u200b\u200bsuitable for a garage for one car are as follows:
- Maximum height - 2.14 m;
- The minimum height is 1.9 m;
- Width - 3 m;
- Roof width - 3.24 m;
- Length - 5 m;
- Roof length - 5.3 m;
- Gate height - 2, 12 m.
These values \u200b\u200bare given for single-slope design... The roof protrudes evenly from all sides to form canopies.
The modern market offers you the widest selection of metal profiles. Among such a variety, it is easy and confusing when choosing a material to solve the problem of building a garage. Different brands differ in thickness, color, type of protective layer, purpose, shape, etc. Of course, each type of material has its own marking, which helps to make right choice... Let's take a closer look at the rules for marking a metal profile.
Strength is one of the most important characteristics of this material. After all, walls are erected from it, a roof is laid on it decoration Materials, it is affected by winds, precipitation, frost, heat. therefore modern manufacturers offer metal profiles for various purposes. This is the first parameter that needs to be assessed when selecting material for a garage. Marking "C", "N", "HC" quite clearly reflects the purpose of a particular brand: wall, load-bearing, universal, respectively.
Not only letters are involved in marking, but also digital designations... Let's analyze the values \u200b\u200bof the markers on the profile sheet H, 18, 0-80, 750, 10000:
- H - bearing, for the roof;
- 18 - ridge height;
- 0.80 - thickness;
- 750 - width for mounting, mm;
- 10000 - maximum length, mm.
This marking makes it possible to establish that this material used for roofing. The height of the ridges on it is 18 mm, and the thickness of the sheet is 0.80 mm. It is realized in the form of sheets with dimensions of 0.75x10 m. In other words, the marking allows you to find out everything that the master needs.
Protective layer marking
Mass is offered today different types protective coating. Each of them also has its own designation:
- Standardized polyester coating - PE;
- Polyester coating or matte sheets - PEMA;
- Plastisol coating - PVC;
- Polyurethane coating - PU.
The most popular types of protective layer are PE and PEMA. The former are distinguished by a glossy surface, while the latter are matte.
When choosing a material, you need to pay attention not only to the marking, but also to the sheets themselves. They must be intact, without deformations, scratches, chips. The presence of such defects after plating can cause rapid material failure. Chips, scratches and other damage to the protective layer will lead to quick rusting. In places of damage, the metal profile darkens, its appearance deteriorates significantly.
Thickness classification
The thickness of the material is an equally important parameter that also determines its characteristics. Many buyers make a choice based on the color, relief, dimensions and shape of the material and forgetting about such an important aspect as sheet thickness. And some deliberately save on thickness. But this approach is completely wrong. The thickness of the metal profile must be chosen carefully and thoughtfully, taking into account all the features of the future construction.
First, you need to analyze the surface that will be created from the metal profile. Imagine you have used thin material for your roof. It will take a little time, and it will bend under the weight of snow or under the influence of water, precipitation, etc. As a result, the roof will have to be repaired, which will cause new impressive costs. But if you choose a metal profile of sufficient thickness, then such a problem simply will not arise.
In order to make the right choice, you must remember that you can cover the roof with a metal profile, not thinner than 0.5 mm. This choice will prevent possible mistakes. If you plan to make a metal-profile fence, then choose a material with a thickness of 0.4 mm for this purpose. Thinner grades are recommended only for the formation of temporary structures and temporary decoration.
We advise you to verify with your own eyes the specified material thickness. To do this, you can use a caliper or micrometer. Everyone knows how to use these tools. And the data they provide is reliable and reliable.
Zinc content classification
An important parameter that requires utmost attention when choosing a material is the percentage of zinc. Why is this so important? Because it is zinc that makes the material durable, corrosion resistant. Zinc extends the service life of the metal profile. That is why its volume in a sheet of material is very important. The higher the content of this trace element, the better the material, the longer and better it will serve.
While on the marketplace, you are unlikely to be able to accurately assess the level of presence of this important trace element in the sheets presented in the windows. But the marking of the material and the thickness of its sheets will help you evaluate this parameter. Of course, in this case, the data will be approximate, but they will also allow you to make the best choice or refuse to purchase a low-quality metal profile.
Most zinc is contained in sheets with a thickness of 0.5 mm. The indicator of the presence of a trace element in such a material is from 220 to 270 g / m².
Standard sheets typically contain 135 to 175 g / m² zinc. This corresponds to a thickness of 0.45 mm.
Thin sheets contain the least zinc. They are the least durable and reliable, the fastest to fail. With a thickness of 0.3-0.4 mm, they contain from 75 to 100 g / m² of zinc.
The thickness and quality of the metal profile directly determine its cost. Thicker sheets with a high zinc content are more expensive than thinner ones. Therefore, you can easily determine the degree of quality of the material, focusing on its thickness. If you want to build a reliable and durable building, then you should not use a cheap thin metal profile for it.
Today, building materials can be purchased most different ways... You can personally bypass all the markets and shops, consider all possible options with your own eyes. Or, you can choose everything you need, sitting at the monitor screen, in online stores. Of course, everyone chooses a purchase method in accordance with their own capabilities and preferences. For example, online shopping is no doubt convenient, practical, and economical. There is no need to rush anywhere, no one pushes or stands over the soul. You can easily choose everything you need, evaluate your cart, complete the payment securely and choose convenient delivery terms. The only disadvantage of this method of purchasing building materials is that you never know exactly what you bought. Indeed, in the picture, the product may look great, but in reality it may not be of very high quality. No one is immune from counterfeits and low quality. But to a greater extent, this still applies to online purchases.
Therefore, we recommend choosing building materials directly from the supplier's warehouse. This will allow you to inspect the batch, make sure that the material is of high quality and that there are no defects. And also you can demand from the seller the appropriate licenses and certificates. All this significantly minimizes the risk of purchasing a low-quality product. And also a simple conversation with consultants and sellers will allow you to appreciate the professionalism of this company.
In order to build a garage from a metal profile with your own hands, you need to carefully calculate how much and what kind of material you need. Competent counting will allow you to eliminate the lack of material, and will also allow you not to acquire excess and unnecessary volume.
The first thing to think about is the foundation for the building. It will require concrete. Since the weight of a building made of a metal profile is relatively small, a strip-columnar base will be acceptable for it. This means that you need to calculate the material for the concrete tape and for the pillars.
Pillars of 30x40 cm are suitable as piles. To erect a building, the parameters of which are given above, suitable for a single passenger car, you need to arrange 10 piles.
It is very simple to calculate the volume of concrete required for one column: V \u003d πr²h, where V is the volume of the column; π - mathematical constant 3.14; r is the radius of the base of the column; h - height. By simple calculations, we get that 0, 02826 m³ of concrete will go to one table. It is easy to calculate that 10 pillars will take 0.2826 m³ of concrete.
Now let's calculate how much mortar is required for the base tape. To make it easier to count, we will start the calculations from the long sides, then we will do the calculations in width. To get the volume, you need to find the product of all sides of the planned structure. So, 0.4x0.5x5 \u003d 0.6 m³. This is the meaning for one side. This means that for two sides it will be 0.6x2 \u003d 1.2 m³. Exactly enough concrete is needed to form the foundation along the long sides of the future building. In a similar way, it is necessary to calculate the required volume on the narrow sides: (0.4x0.3x3) x2 \u003d 0.72 m³. Now calculates the total volume of concrete required for both the posts and the tape: 0.2826 + 1.2 + 0.72 \u003d 2.202 m³. This is exactly how much concrete is needed to build a columnar-strip foundation for a metal-profile garage.
Now you need to calculate how much metal profile is required to solve the problem. For this we count required amount material for each side, and then add the resulting numbers to determine the total.
If you have a garage with a shed roof structure in your plans, then its side walls will have different heights along the entire length. Since it is difficult to calculate the area of \u200b\u200birregular shapes, we recommend that you divide the walls into regular shapes, the area of \u200b\u200bwhich is easy to calculate. These are rectangles and triangles.
To determine the area of \u200b\u200ba right-angled triangle formed on the side walls, if you draw a straight line parallel to the bottom from the top of the lower part of the side wall, you need to find the product of the legs, that is, the sides forming a right angle, and divide it by 2. So, (5x0.24) / 2 \u003d 0.6 m².
The rest of the side walls is a rectangle. To calculate its area, it is enough to find the product of length and width: 5x1.9 \u003d 9.5 m².
Since there are two sides, and they are the same, the obtained value must be doubled and folded: 0.6x2 + 9.5x2 \u003d 19.12 m². so much metal profile is needed for the side walls.
Now let's calculate how much material is needed for back wall: 3x1.9 \u003d 5.7 m². also we must not forget about the gate: 3x2.12 \u003d 6.36 m².
The dimensions of the roof are 530x324 cm. Accordingly, it will require 5.3x3.24 \u003d 17.17 m² of material.
Finally, we add all the values \u200b\u200bobtained to calculate the total volume required material: 19.12 + 5.7 + 6.36 + 17.17 \u003d 48.35 m².
The basis for a metal garage is a frame made of square and rectangular profiles. Suitable material 40x40 mm and 40x25 mm. Special fasteners for profiled pipes will play the role of connecting fragments.
For the construction of a 5000x3000 m structure, 130 m of pipes will be required.
- Electric drill;
- Solution containers;
- A hammer;
- Concrete hose;
- Roulette;
- Level;
- Welding machine;
- Various fasteners;
- Marking stakes and twine;
- Shovel;
- Concrete mixer;
- Pliers, pliers;
- Square;
- Plumb line;
- Screwdriver;
- Pencil or marker.
- The first thing to do is build a solid foundation. The initial stage in performing this task is the marking of the construction site and the preparation of a trench, 30 cm wide;
- The trench must be dug strictly according to the markings, its depth should be 40 cm. Try to make its walls even and smooth, strictly perpendicular. The land left over from digging the trench can be folded in the middle of the site. There it will not get in the way under your feet, and will also be useful for leveling the floor;
- The bottom of the finished trench is compacted. It is best to do this with a special tamping machine. If you don't have one, you can make a simple mechanism with your own hands: take a log 1.2 m long and 20-30 cm in diameter.Attach a bar to it from the end, which will play the role of a handle. Lift the log by the bar and lower it into the trench. So you tamp the bottom.
- Now you can proceed to preparing the holes for the posts. They are dug inside the trench. For a standard garage for one car, you need 10 holes with a pitch of 1.05 mm in width and 1.266 m in length. Their depth should be 40 cm, width - 30. The bottom of the holes is also compacted. They start digging from the corners, and then move on to other parts.
- Now you need to form a layer of sand. It fits at the bottom of each hole under the post. Sand is poured in a layer of 10 cm and compacted. To do this, you need to moisten it a little;
- Now the pits are ready, and asbestos-cement pipes can be installed in them. They will perform the function of formwork. The pipes should rise several cm above the foundation.
- Then the reinforcement cage is prepared: 12-mm rods, 50 cm long, are stacked in each pipe, four rods in each. They are fastened together with wire so that a cubic structure is obtained with a distance of 15 cm between the rods. The finished structures are lowered into pipes.
- After that, you can start pouring the piles. For this purpose, it is recommended to purchase concrete grade M200. To achieve maximum strength the foundation can be as follows: the solution is poured into the pipe in a small amount. Then it rises so that from below the solution flows out a little to the bottom of the pit. Then the pipe is lowered back into place. After the solution has solidified from below, it will be securely fixed by the leaked part of it. After this manipulation of the pipe, it can be completely filled with mortar. The upper parts of the reinforcement, which stick out above the surface of the pillars, will securely fasten them to the strip foundation.
- Poured concrete must be eliminated from air bubbles that may form in it. To do this, you need to pierce the poured volume, you can use fittings or a simple stick. After that, you can leave the concrete to harden. This will take about 2-3 weeks. At this time, the concrete must be sheltered from the sun, otherwise it will dry out and begin to dry unevenly, as a result of which cracks may appear. Cover the base with waterproofing and water it periodically, especially in the first couple of days.
- When yours are completely frozen, you can continue to work on the foundation device. Now you need to build the tape. It requires formwork. It can be done from plywood sheets. The formwork should rise 5-10 cm above the future concrete layer. The wooden parts of the formwork can be displaced under the influence of the mortar, so they must be reinforced with spacers.
- If there are gaps between the pile pipes and the pit walls, they must be filled up.
- Now waterproofing is spread over the sand cushion. Optimal choice - roofing material or polyethylene. It is necessary to lay on the bottom and walls of the trench, up to the formwork itself. The waterproofing is attached to it with a construction stapler.
- The tape also requires additional reinforcement. For this, a frame is formed from 12 mm rods. The method of joining and laying is approximately the same as for piles. For tape only, the frame should have a height of 35 cm and a width of 25 cm. The length of the frame coincides with the foundation. It is impossible to lay the frame directly on the waterproofing. Therefore, first, wooden blocks are placed on it, and the frame is already laid on them. Where the framework touches the bar, a wire connection is created.
- After that, you can start preparing for pouring. It is carried out with concrete of the M200 brand. The initial stage of pouring is carried out in the same way as in the case of piles. The tape hardens for 3-6 weeks. After that, the formwork is removed, the base is cleared of debris and the construction of the garage begins.
- The next task is to build a frame from pipes. You can collect it in separate elements or from the bottom up. Each part is connected to adjacent bolts, self-tapping screws or by welding. It is convenient and practical to use special fasteners for profile pipes, especially for corner, cruciform and butt joints;
- The number of vertical posts is determined in accordance with the dimensions of the metal profile sheets, as well as the design parameters. As a rule, 2-3 racks are placed on the width with a step of 60-80 cm;
- Strengthening of uprights is carried out using struts;
- After assembling and connecting the walls, they begin to form the roof. From a constructive point of view, the garage roof is a metal profile frame with additional stiffening ribs, located in increments of 60-80 cm. It is easier to assemble it separately, on the ground, and then completely attach it to the walls;
- After creating the frame, you can safely begin to sheathe it. But before that, you need to check that all elements are installed strictly vertically or strictly horizontally. walls are sheathed with material marked "НС";
- You need to start the sheathing from the edge, attaching the sheet with rivets or self-tapping screws with a rubber washer. First, the top of the sheet is attached, and then all other parts. The step between the mounts is 30 cm;
- Laying the sheets must be overlapped, which is quite simple to do, given the ribbed relief of metal-profile sheets. The joints are sealed. In a similar way, work continues over the entire surface of the structure;
- For the roof, you need to purchase sheets marked "H". The sheets should protrude at least 5 cm beyond the edge of the building.
- After building the roof, it's time to tackle the gate. We recommend a double-leaf structure with a frame. Make a frame from a metal profile, separate for each sash. Reinforce it with additional stiffening ribs. Weld the hinges to the frame and sheathe it with profiled sheets.
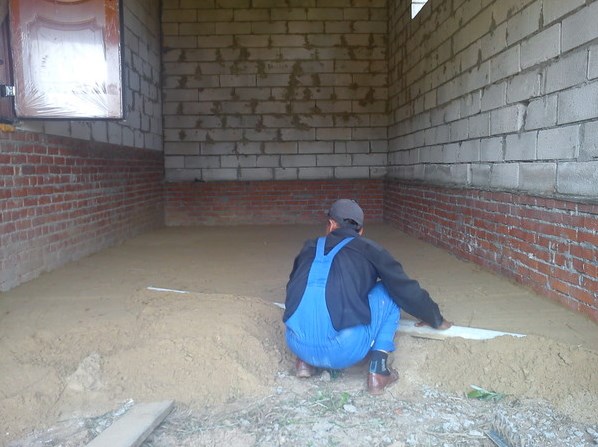
The garage floor is exposed to high loads. Therefore, it must be solid, thorough, reliable. The strongest base is a concrete screed. It's easy to make:
- The site is leveled, cleaned of debris, compacted;
- A dense layer of sand of 20 cm is laid on it;
- A reinforcing frame for the entire section is made of metal rods, 8 mm thick. It should not come into contact with the sand, therefore, bricks are placed under the frame with a step of 100 cm;
- The floor should be as flat as possible. For this, beacon systems are being created. Long rods are taken and attached to the walls of the garage strictly perpendicular to them. Beacons are also installed in the middle of the future slab. Lighthouses should not touch the slab;
- Now you can start filling. You need to start from the far corner, gradually moving towards the exit. The mixture is spread with a shovel;
- Alignment is carried out according to the installed beacons. You can use a rule or a long board;
- The smooth surface should be cured and hardened. This process takes about a week. Then you can start using your new garage!
As you can see, there is nothing particularly difficult in self-erecting a garage from a metal profile. Most of the time is required for the foundation to cure, and all other work can be done in a short time. This is an easy and affordable way to become the owner of a modern and practical garage!


