To an uninformed person, it may seem that the angle of inclination of the roof from the corrugated board is chosen by the architect solely for aesthetic reasons. But this is far from the case. In fact, the slope of a corrugated roof is one of the most important characteristics of a roofing system, and when choosing it, you need to take into account a lot of initial data.
Factors affecting the slope of the corrugated roof
One of the main factors that directly determines the slope of the profiled sheet is the climatic features of the area in which the house under construction is located. First of all, these are:
- Snow depth;
- The amount of precipitation falling as rain;
- The strength and prevailing direction of the wind.
What is the significance of the angle of inclination of the roof from the corrugated board is easy to see by considering, for example, the effect of the height of the snow cover on it.
Unlike rainwater, which drains off the roof very quickly, snow can linger on it long time... It is easy to imagine what kind of load a roof should withstand if the level of snow cover in some regions can be one meter or more. The greater the angle of inclination of the roof, the more difficult it is for the snow mass to linger on it, and with a certain thickness of the cover, the snow from the steep roof will inevitably slide under its own weight.
When choosing a roof slope from corrugated board, you need to take into account the characteristics of the material chosen for the roof. For example, a load-bearing profiled sheet with a large wave height can be used even on flat roofs of shopping centers, while a wall or universal profile can only be used on roofs with a steep slope.
When using any coating, it must be borne in mind that with too small slopes, the water will not have time to drain from the roof and may seep inside at the joints of the roofing. The minimum slope for the profiled sheet, at which this will not happen and you can do without additional measures sealing - 12 °. If the angle of the roof slope made of corrugated board is less than this value, then the overlap between the sheets must be additionally sealed with roofing sealant.
In addition, a slight slope of a profiled sheet roof will require the use of a more expensive profile with a greater bearing capacity of the connection with an increase in the load on the roof. The material consumption will also increase, since the less the slope of the roofing from the profiled sheet, the more overlap of the sheets is required, especially when it comes to vertical joints.
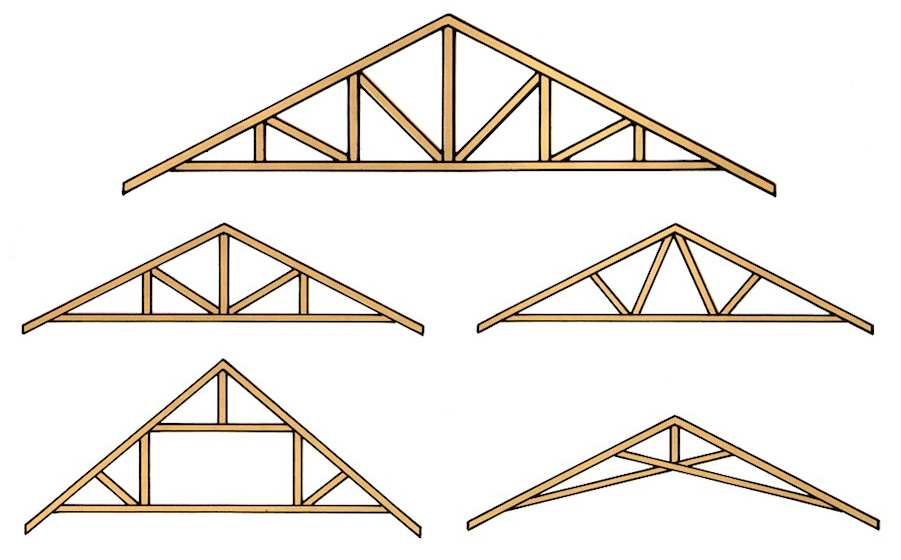
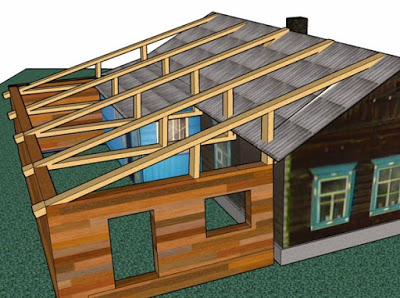
Among other things, for roofs with a slight slope, the rafter system is many times more difficult, since it must withstand more weight. In particular, the figure above shows how the slope of a pitched roof made of corrugated board affects the structure of the rafters. As you can see, with decreasing inclination angle, a set of additional elements, whose task is to redistribute the load from the rafter leg and provide the necessary support to the main elements.
The step of the lathing and the size of the overlap of the sheets, depending on the slope of the roof from the corrugated board
As mentioned above, the minimum slope of the profiled sheet roof, in which there is no need to additionally seal the vertical overlap, is 12 °. If the slope of the roof is in the range from 12 ° to 14 °, then the sealant is no longer required, but the need for an increased size of this overlap remains. The optimal slope for corrugated board is from 15 ° to 30 °.
The table below shows the values \u200b\u200bof the required overlap under the corrugated board, the angle of inclination of the roof is of decisive importance and can be in one of the specified intervals.
The consumption of materials required for the installation of the roofing system directly depends on the slope angle of the roof from the profiled sheet. At large angles of inclination, the length of the rafters increases, but at the same time, the installation of additional struts is not required. In this case, the consumption of the corrugated board itself also increases, but its own is more efficiently used. load bearing capacitytherefore, you can use a cheaper profiled sheet with a lower wave height.
In addition, the greater the angle of inclination of the corrugated roof, the larger the pitch of the sheathing and the lower the consumption of lumber. Also, the frequency of the lathing strongly depends on the brand of the profiled sheet. For example, if for C-21 profiled sheet at an angle of more than 15 °, the pitch of the lathing should be 650 mm, while for NS-44 at the same angle it is already 1000 mm.
| Profiled sheet mark | Roof slope, deg. | Sheathing step | The amount of overlap of sheets in a row |
|---|---|---|---|
| NS-8 | More than 15o | Solid | Two waves |
| NS-10 | up to 15o | Solid | Two waves |
| more than 15o | 300 mm | One wave | |
| NS-20 | up to 15o | Solid | One wave |
| more than 15o | 500 mm | ||
| S-21 | up to 15o | 300 mm | One wave |
| more than 15o | 650 mm | ||
| NS-35 | up to 15o | 500 mm | One wave |
| more than 150 | 1000 mm | One wave | |
| NS-44 | up to 15o | 500 mm | One wave |
| more than 150 | 1000 mm | One wave | |
| N-60 | not less than 8o | 3000 mm | One wave |
| N-75 | not less than 8o | 4000 mm | One wave |
For a bearing profiled sheet, this gap is already 3-4 meters, and there is no division according to the angle of inclination of the roof. There is only a minimum roof pitch of 8 °. Roofs with a smaller angle are already considered flat, so different requirements are imposed on them.
When calculating the amount of materials, it is necessary to take into account the size of the overlap of the corrugated sheets, which also depends on the angle of inclination of the roof.
The minimum slope of the roof from corrugated board
Above, it has already been mentioned several times about what the minimum slope for corrugated board can be, depending on the situation. Without the need for sealing joints, this is 12 °, for a bearing profiled sheet, with a corrugation height above 60 - 8 °. In principle, there is no maximum angle for this material - you can set it at least at an angle of 70 °, if the climate in your region allows it.
In addition, even 8 ° is a certain convention, since corrugated board is excellent for the device flat roofs... Although in this case the principle of manufacturing the roof changes - in particular, the profiled sheet in this case turns out to be at the bottom of the roofing pie, playing the role of an overlap.
If you need a classic roof, then you can calculate the minimum roof slope from corrugated board, knowing the maximum snow loads in the region. In particular, in Yakutsk the snow load reaches 55 kgf / m², and therefore it is simply unreasonable to build individual residential buildings with a low roof slope, while in the southern regions there is no such problem.
Calculation of the slope of the roof from corrugated board
When calculating the slope of a roof from corrugated board, four components must be taken into account:
- The weight of insulation, battens, counter battens and other layers of the roofing cake;
- The weight of the roofing itself;
- Snow load for your region;
- Wind load for your region.
Suppose that we will cover the roof with C21-1000-0.6 profiled sheet. The weight square meter corrugated board of this brand is 5.4 kg. We will use as thermal insulation basalt slabs with a thickness of 100 mm and a specific density of 150 kg / m³. Therefore, the mass of 1 m2 of insulation will be 15 kg... For the lathing, we use a timber of 200 × 200 mm made of pine with a pitch of 650 mm, so the mass of 1 m2 of the lathing will be 28.3 kg... We take the mass of the remaining components equal 3 kg / m².
Thus, the mass of the entire roofing cake is: 5.4 + 15 + 28.3 + 3 \u003d 51.7 kg / m²... The resulting value is multiplied by a factor of 1.1 in order to ensure the possibility of changing some materials of the roofing cake. In total, the total weight of 1 m² of the roof is equal to 56.87 kg / m².

Now you need to calculate the allowable slope based on the existing snow and wind loads. Suppose the house is built in the Novgorod region. It belongs to the III snow region, which can be determined using the map presented above.
So, our snow load is 180 kg / m². However, it must be taken into account with a correction factor µ, which depends on the angle of inclination of the roof:
- If the slope is minimal - the angle of the roof from the profiled sheet is less than 25 °, then the value of the correction factor is taken equal to 1;
- If the angle of inclination of the roof from corrugated board is from 25 ° to 60 °, then µ \u003d (60 ° -α) · (60 ° -25 °)where α - the required roof slope;
- If the angle of inclination of the roof made of corrugated board is more than 60 °, then µ equals 0, that is, the snow load is not taken into account when calculating the roof.
The wind load must be taken into account when calculating the angle of inclination. The Novgorod region belongs to the Ia wind region, where, as can be seen from the map below, the normal load is 23 kg / m².

The load acting directly on the roof is calculated using the following formula:
W \u003d Wn Kh C
Here Wn - normal load for the selected region, Kh Is a factor that takes into account the height of the building, and FROM - aerodynamic coefficient, which can range from -1.8 to 0.8, depending on the slope of the roof. Since it is rather difficult to calculate it, for our formula we will take the largest one - 0.8, which will simplify the calculations in the direction of greater roof strength.
So, suppose our house is located in an open area and has a height above 5 meters, then Kh will be equal to 1, and the wind load - 23 · 1 · 0.8 \u003d 18.4 kg / m².
Thus, taking into account the mass of the roofing cake and the effect of the wind, the load on the roof will be equal to 56.87 + 18.4 \u003d 75.27 kg / m²... Since the ultimate bearing capacity of the C21-1000-0.6 profiled sheet with a support step of 1.8 m and using the second support scheme is 253 kg / m², it is necessary to choose such a slope of the roof from the profiled sheet so that the load calculated by us, taking into account the snow load, is less than this value.
Because the 75.27 + 180 \u003d 255.27 kg / m², which is obviously more than 253 kg / m², the slope of the roof made of corrugated board in our case cannot be less than 25 °. Since making an angle greater than 60 ° is also impractical, we find that the value we need is in the range from 25 ° to 60 ° - that is µ must be calculated using the formula.
We calculate the minimum slope for corrugated roofing C21 under our conditions:
180 (60-α) (60-25) + 75.27 \u003d 253
Solving this simple equation, we find that α \u003d 25.441 °... Thus, the permissible minimum slope of the profiled sheet roof with the parameters we set will be 26 °. For greater reliability, a building located in these conditions and having the specified roofing cake, it is better to provide a roof with a slope of 30 °. Although it is possible to stop at the minimum value, given the fact that in the previous steps of calculating the slope of the roof from corrugated board, increasing coefficients were used several times.
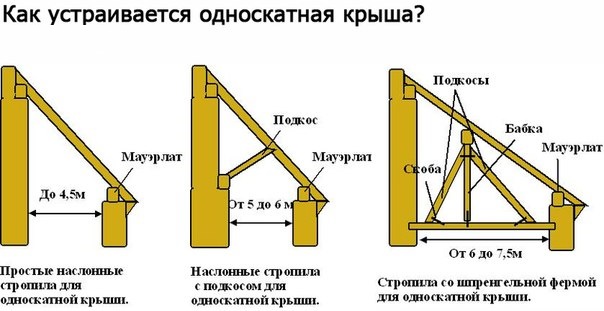
Shed roof most often it is used on extensions to private houses or any other household facilities. An important advantage is more simple construction, thanks to which it is erected much faster than multi-pitched roofs and has increased strength and reliability.
Also, the advantages include a very strong resistance to all kinds of aggressive influences. A pitched roof has a number of advantages over multi-pitched roofs. Such a number of advantages are based on the features of the roof structure and the appropriateness of the application.
Shed roofs are used in windy areas, since this type of roof is more resistant to wind influences due to its streamlined design. It is also used in regions where there is not much forest and the cost of wood is high. And of course, this type is used for various outbuildings: baths, sheds, pens for animals, garages, etc.
In addition to outbuildings, a pitched roof is widely used for residential buildings in design ideas.
Such a roof with correct installation will last up to 50 years. There are 2 types of exploited roofs: traditional and inverted. They differ in the order of the layers.

The roof provides maximum protection against precipitation, it can be easily restored in case of any damage or wear of individual elements. Some drawbacks are still present - it is required to build a structure taking into account the wind rose in a particular area, and in terms of its design characteristics, it is somewhat inferior to two- and four-slope ones. But for outbuildings, such a roof will be the ideal choice.
The shed roof rafter system is assembled very quickly and does not require any special skills and knowledge. All you need is an accurate calculation of the foundation, without which it will be much less reliable and of high quality.
The accuracy of the calculations is influenced by factors such as the angle of inclination of the roof, as well as the length and section of the rafters. In this regard, the recommendations listed below should be strictly observed:
if the horizontal size of the spans does not exceed 4 meters, and you intend to use a corrugated sheet or metal tile as a roof covering, then you can do without any reinforcing components.
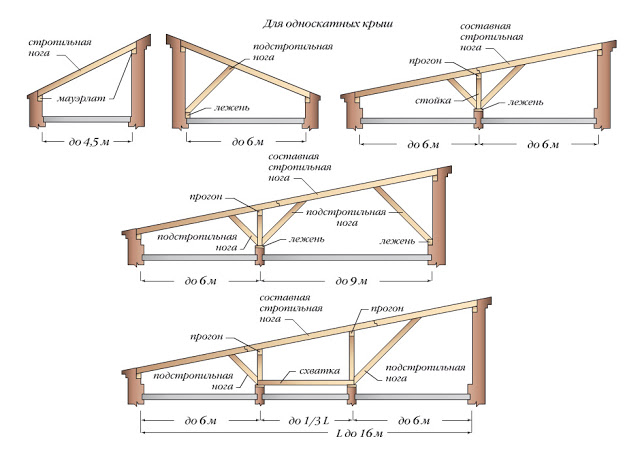
The rafters in this case are laid directly on the walls, which facilitates the work;
the design of the system requires insignificant reinforcement if the spans reach 6-6.5 meters. In its capacity, triangular struts are suitable, which are quite enough to ensure the required strength characteristics;
with even larger horizontal dimensions, you cannot do without a more serious reinforcement, represented by powerful vertical beams.

Also, the dimensions of the rafters used to install the system are highly dependent on the coating materials. For example, if for roofing material it is enough to use a beam of 40 by 40 mm, then for a heavier slate or metal tile this indicator should be increased, respectively, to 60x60 and 70x70. Today, it is easy to find a calculator on the net that allows you to quickly enter the required data and get the result for a specific roof structure.
The disadvantages include:
The need for constant roof maintenance due to snow load
Unsightly appearance

The need for reinforced waterproofing
A pitched roof is well applicable for the more southern regions of the country, since there is less snowfall. When using this type of roofing in a region with a high level of snowfall, it is necessary to regularly clean the roof of snow and check it twice a year for damage to the roofing material.
Roof structure
There are various designs depending on the size of the building and the area of \u200b\u200bthe future roof. rafter system roofs. Basically, the roof structure depends on the length of the roof span.
You also need to choose the correct slope angle. Recommended angle of inclination of the ramp:
For metal tiles - 30 degrees
For rolled roofs - 5 degrees
For corrugated board - from 8 degrees

For regions with heavy snowfall - at least 45 degrees
Advantages and disadvantages of a pitched roof
Low cost in comparison with other types of roofs
Less consumption of building materials
Low weight of the roof structure, suitable for buildings with a lightweight foundation
Low exposure to wind

Relatively simple installation
Suitable for small and large buildings
Wide range of applications: residential and non-residential buildings of any type
In addition, the complete sequence of work to be performed is described below:
Laying Mauerlat - a high-strength and massive load-bearing beam that will hold the entire structure on itself. Its dimensions directly depend on the angle of inclination of the roof. Installation work are carried out using anchor bolts great length. Before laying, roofing material is attached to the base, which plays the role of waterproofing;
Preparation of the mauerlat and rafters. It consists in making cutouts along the entire length of the beam at a certain distance, which depends on the steepness of the structure. Experts very strongly advise for this purpose to use an ordinary hand-held hacksaw, which will ensure the accuracy of the work and make all the inserts exactly the same in size. You must first mark the Mauerlat in order to avoid even the slightest inaccuracies;
Installation of rafters. On this stage a fairly simple and traditional scheme, practical for all roof structures, is used. First, the extreme elements of the system are mounted, after which the cord should be pulled between them in order to achieve the same slope over the entire roof surface. After that, the remaining rafters are installed. As fasteners, you can use long joinery nails with wide heads, which will provide a secure connection. At the end of the work, the aforementioned reinforcement is installed - vertical beams or triangular struts.
Both the support beam and the rafters used in the installation of the system must be properly prepared for installation. To do this, you need to carefully plan them, creating an absolutely smooth surface and treat them with antiseptics. This will significantly extend the service life. wooden structure, and also exclude the development of fungi and decay of the material.

Looks very harmoniously with a complementary lean-to veranda or a living room.
This installation option provides for savings in sawing materials and roofing fittings.
1. Laying the mowerlat. It is laid on a reinforced belt and pressed with studs or anchors.
2. Installation of support legs. The support post is mounted on the laid ceiling march. Fastened with plates or corners
3. Having checked the roof horizon with the help of a signal line, we begin to mount the rafter boards under the lace so that the roof remains in the same plane and the wave effect does not form.
4. Insulation. A pitched roof can be insulated with all types of mineral and polymineral insulation. Insulation is carried out between the ceiling boards at the height of your boards with an overlap on each layer of insulation. This method does not allow the formation of coincident joints and, accordingly, is not blown by falling wind gusts under the roof. And it allows excess heat and moisture to come out evenly through the vapor barrier into the ventilated space under the roof. The vapor barrier is mounted to the rafter boards from the bottom after they are stuffed with the ceiling hemming or laid after the ceiling hemming.

5. Waterproofing. The waterproofing layer is laid from bottom to top
the edge is lowered onto the cornice bar for natural drainage of moisture when it forms in the dew zone.
6. Installation of counter battens and battens is carried out along the control line
7. Installation of the roofing is carried out at the final stage.
The main distinguishing feature of a pitched roof is the absence of a ridge. The slope of the ramp is determined by walls with different heights. When designing, it must be borne in mind that the roof plane should be directed to the windward side.
The rafters are mounted on load-bearing beams that are laid on a Mauerlat or monolithic stiffening belt.
If the decision to install a pitched roof is made at the last moment, one of the walls can be extended. For this, additional vertical supports from a bar are installed on the leeward side, and inclined beams are attached to them.
When determining the slope of the slope, wind and snow loads are taken into account. Depending on them, the angle varies within 10 ... 60 degrees and increases with the growth of the total load. At small angles, the cross-section of the rafters should be increased.

As a rule, the angle of inclination of pitched roofs is small, so the attic space is not used and remains cold. Mineral wool is usually used to insulate the floor.
After laying the thermal insulation, the roofing materials are installed. First, the Ondutis waterproofing membrane is laid. ... To ensure water drainage, the film between the rafters should have a slack of 1-2 cm.
The first layer is laid along the lower eaves. Subsequent layers are laid with a slight overlap, and all joints are glued mounting tape Ondutis. The installed waterproofing membrane is fixed with a counter lattice, on which, in turn, the lathing is mounted.
The lathing for ondulin is made from a bar with a section of 50x50 mm and is mounted in accordance with the manufacturer's instructions:
If the slope of the roof is within 10 ... 15 degrees, the pitch of the lathing is 45 cm;
If the roof slope is more than 15 degrees, the lathing step is 60 cm.
A construction cord is used to level the bottom row of the roof. It is pulled between the nails driven into the ends of the extreme rafters.
Roof installation starts from the bottom row. Ondulin sheets are stacked with side overlap in one wave. Subsequent rows are laid with an end overlap of 17 cm and a lateral offset in a half sheet. The nails fastening the sheet are driven in a checkerboard pattern into the crest of the wave.
The absence of a ridge on a pitched roof complicates ventilation, therefore, it is necessary to equip supply and exhaust air vents under the lower and upper cornice. For protection from birds and debris, the vents are closed with ventilated filler.

It remains to add that there are no ribs and valleys on a pitched roof, so the installation of the roof is completed by installing tongs.
The slope of a pitched roof is calculated depending on the selected material, the expected load and other parameters. Slope of a pitched roof for some materials, calculation of a pitched roof:
· bituminous roof - up to 15 °, so as not to complicate the construction of the shed roof truss system. Maximum - 25 °;
· Asbestos-cement corrugated sheets (slate) - 35 ° for ordinary sheets, from 25 ° for reinforced profile;
· Corrugated board - roof covering for roofs with an angle of inclination from 5 °. At an inclination of 10 ° or more, the overlap increases, and the joints are filled with sealing tape.

seam roof - from 8 °, if sealed seam joints, you can make a slope of 3 °.
metal tile - the recommended slope of a pitched roof is 10 °. A tilt of 10-20 ° is allowed, in which case it is necessary to seal all joints of the sheets;
bituminous flexible roof tile - tilt from 11 to 18 °;
concrete and ceramic tiles - from 10 to 22 °. An additional waterproofing layer is made under the tiles.
Preparation for laying rafters
We take a board of rectangular section from 50x100 mm and treat it with antiseptic compounds. To calculate a single-pitched roof, namely the length of the rafters, 30-50 cm is added to the span of the roof.When sheet roofing materials are used, a size of 150 cm is suitable, for tiles and slate - 100-120 cm.
Do-it-yourself shed roof must be strong. To do this, the rafter boards are laid with their end up and cut into the Mauerlat beam, where the grooves are cut out in width slightly larger than the rafters themselves. To do everything efficiently, mark the places and sizes of the cutouts along the length of the bar. The slope of the cutouts is the same, so is the slope of the pitched roof.

Laying rafters of a pitched roof
The rafters of the pitched roof fit into the grooves. Maintain a consistent inclination of all rafter supports. For this, 2 outer boards are first installed. A fishing line is stretched between them to orientate the accuracy of the rafters laid in the grooves. Boards in several places are nailed to the Mauerlat beam using nails 120 mm or more.
With a large span between the walls (4.5 meters or more), you need to additionally strengthen the rafters. For this, triangular supports are used along the perimeter of the roof. You can also make separate supports in the center attic space.
![]()
Checking the gain quality. Under a weight of 70-80 kg, the rafters of a pitched roof should not bend. Having checked this, we proceed to the next steps - filling the battens on the rafter structure. Waterproofing and thermal insulation of the roof, installation of roofing materials is also done.
Step 3 - hydro-barrier and thermal insulation
So we figured out how to make a pitched roof with our own hands. Now let's proceed to the installation of the hydro-barrier and the installation of the thermal insulation material.
We will not consider this stage in detail, because we have already described the construction of roof insulation before.
For insulation work, polyurethane foam is suitable.
Step 4 - laying the roofing material
Slate or metal tiles can be used as roofing material.
Installation of slate
The slate is overlapped on the drain side. Each subsequent row of slate should overlap the previous one by 10-15 cm. The slate is hammered with special slate nails. This is done at the junction of 4 sheets (2 sheets each bottom and top). When driving in a nail, 4 sheets are grabbed. Along the edges of the slate sheet, 2 nails are also driven in from below and from above.

Laying metal tiles
The laying of metal tiles begins with filling the counter-lattice along the length of the rafters - a bar with a section of 50x50. To protect it from moisture, an anti-condensation membrane is applied to it. A crate is stuffed on top of the structure and roofing material is covered. The sheets are overlapped with special steel self-tapping screws with rubber gaskets.
We got to the final stage of installing a shed roof with our own hands.
1. We nail the wind board to protect the roof from the wind. It is nailed to logs protruding from above and below.

2. Installation of ebb tides. Select places to drain the water and nail down the ebb. This operation is simple and does not require detailed guidance. The rafter system of a pitched roof consists of individual elements, the support points of which are the opposite walls of the building. Most often in this case, roof rafters with a length of about 4.5 meters are used. If an overlap of a relatively large area is performed, it is necessary to use rafter legs and racks.
Shed roof garage, installation features
Let's also figure out how to build a shed roof for a garage. The single-pitched garage roof consists of a rafter system and roofing material. The rafters are laid according to the technology discussed above.

If a roof is being built without an attic space, the rafters are at the same time beams resting on the ends of the garage walls. When arranging an attic, the beams are laid across the garage. It is also necessary to expose the rafter legs. They rest on opposite walls and, with the help of struts and struts, increase the rigidity. If you need a single-pitched garage roof, do the work as you did when building a do-it-yourself roof for a house.

Shed roof made of profiled sheet - the main features and advantages
As mentioned above, a pitched roof is one of the most economical. The area of \u200b\u200ba pitched roof is significantly less than that of a traditional gable roof. Therefore, the device of a gable roof made of corrugated board with the same area of \u200b\u200bthe house will require much less materials. Not only the consumption of corrugated board for covering the roof is significantly reduced, much less insulation, waterproofing film and an expensive vapor-permeable membrane are required.
In addition, the pitched roof significantly saves heat. This is due to the fact that its shape creates the best conditions for air circulation. In any gable roof, a stagnant zone always forms between the roof arches in the ridge area. Rising up, warm air accumulates there and heats up the roof in vain.

In addition, the construction of a pitched roof is so simple that it can even be done by a layman. Of course, if, before making a roof from corrugated board, study all the necessary materials.
A pitched roof made of corrugated board can be either with or without an attic space. When building a roof without an attic, the ceiling of the upper residential floor is mounted at an angle, and a roof covering is laid on top of it. In this case, the need for a rafter system is completely eliminated.
Calculation of a shed roof made of corrugated board
The development of a project for such a roof is carried out in the same way as for any other type of roof. To select the design of the rafter system, the load on the roofing is first calculated. Have a gable or hip roof the wind load on different slopes is not the same, which significantly complicates the calculation of the loads. In the case of a pitched roof, all calculations are much simpler, since they are performed for one single slope.
It is very important to choose the right slope of the pitched roof made of corrugated board. When choosing the angle of inclination, all climatic features of the area must be taken into account, including:
· The amount of snow cover;
· The amount of precipitation in the warm season;
· The strength and prevailing direction of the wind.

On roofs with steep slopes, rainwater does not stagnate, and the snow mass disappears without lingering on the roofing. At the same time, as the angle of inclination of the roof increases, the wind load on the roof increases.
The choice of roof slope also depends on the material of the roof covering. So, for example, snow and water come off the metal surface of the corrugated board more easily and faster than from roofing coverings made of other materials.
The most optimal for single-pitched roofs made of corrugated board is considered to be a slope angle of approximately 25 degrees. The device of a single-pitched roof made of corrugated board with large slopes is unjustified, since this significantly increases the wind load not only on the roofing, but on building construction the whole building. A smaller angle of inclination of the roof will worsen the snow melt, and to compensate for the increase in its weight, it will be necessary to strengthen both the roof frame, and bearing structures building.
Features of the device of a gable roof made of corrugated board
The frame of the pitched roof made of corrugated board is very simple and rests on the so-called "curbs". They are made of the same material as the outer walls of the building. These curbs protect the pitched roof on both sides. Often, especially if the walls of the building are lined with sawn stone, a monolithic reinforced concrete belt is arranged along the upper edge of the masonry.
On a high and low curb, a Mauerlat is installed - a special wooden beam on which the rafter beams rest. When installing a monolithic belt, special studs are inserted into it during reinforcement for attaching the Mauerlat.
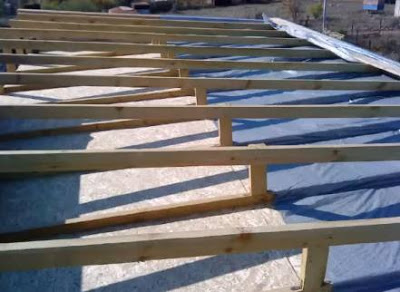
With long roof slope lengths, it may be necessary, as shown in the figure, to install additional struts.
Before covering the pitched roof with corrugated board, the rafter beams are laid on the installed Mauerlat every 70-80 centimeters. Their edges are carried out approximately 50 cm beyond the outer side of the curbs.
Sometimes the roof beams are not extended beyond the top curb. This design increases the reliability of the roof and reduces the likelihood of being blown up by the wind. But in this case, parapets made of stone or sheet metal are made over the curb to protect the wall from rain and melting snow.
Parapets exclude moisture from entering the wall and are made in such a way as to ensure water drainage to the surface of the roofing. At the same time, when installing a gable roof made of corrugated board, it is very important to reliably adjoin the roof to the curb.
How to cover a pitched roof with corrugated board?
The installation of the roofing begins with laying on top of the rafters waterproofing membrane... On top of the waterproofing, a counter lattice and a lathing are attached. On concrete or brickwork parapets under the wooden elements of the rafter system are covered with waterproofing from roll materials.
If there is an attic under the roof of the building, the insulation is usually laid along the floor of the building. This is done because the volume of the attic space under pitched roofs is usually small and cannot be used to accommodate living quarters. Therefore, it is not advisable to bear the cost of heating this space.
Due to the simplicity of the design, it is relatively easy to make a single-pitched roof from corrugated board with your own hands, without the involvement of specialists. In this case, the covering is laid in the same way as on any other pitched roofs.
Attach the profiled sheet from the bottom row. The next row is laid with an overlap of 150-200 mm on the previous one. Fastening with special roofing screws with heads in the color of the profiled sheet.
Many people prefer to complete the construction of their country house or summer cottages with an elegant roof. But not everyone has experience in calculating in the construction of houses, so you have to look for an easier option. In this case, a pitched roof comes to the rescue. How is it different from others? Firstly, a shed roof can be built independently, with minimal knowledge in this area. Secondly, you will be pleasantly surprised by the calculations when drawing up a project for such a roof. Shed roofs require almost half as much material as others.
If you are intimidated by the excessive simplicity of shed roofs from, this minor disadvantage can be corrected with a decorative coating. But first you need to carry out all the calculations for the roof.
What should be the ideal roof of your dreams? Strong, strong, reliable, which would not collect snow, water and icicles, and would not require constant maintenance. Most of these requirements for corrugated roofs correspond to the angle of inclination. It would seem that this parameter can be so serious? However, a lot will depend on the calculation of the slope in the future - even the roofing.
How to calculate the angle of inclination of a pitched roof made of corrugated board?
Consider the architectural features of the house in which you are going to build such a structure. So, for example, for non-residential small structures, the angle of inclination of a pitched roof can be minimal or almost imperceptible to others. We recommend choosing the corrugated board in order to "fill your hand". If you do not have experience in roof construction, the slope can be "worked out" on such small extensions, and only then move on to more global projects. If the angle of inclination of a pitched roof is more than 30 degrees, it is unlikely that such a roof will allow creating cozy and comfortable rooms under it. therefore optimal solution will create a roof with a slope of no more than 30 degrees.
If everything is clear with the maximum value, what should be the minimum slope of a pitched roof? If we turn to building codes, we can say that the minimum slope value for a roof of such a structure is at least 20. After all, building a roof at an even smaller angle simply does not make sense. More precisely, such roofs will not be considered pitched.
The single-pitched roof looks very interesting and original, connecting the floors offset by elevations. That is, in the lower part of such roofs from corrugated board, the first floor is conceived, which through the passage is combined with the second floor, which is designed in a higher slope of the roof.
Calculation of the slope of the roof of a shed structure
Each manufacturer of roofing materials indicates on their products the maximum roof slope value. We are not interested in the minimum indicators, because any material will hold on completely flat roofs. Next, we will look at the ratio of coverage and slope single-slope structures:
Calculate the angle of inclination of a pitched roof made of corrugated board: it should not be more than 10 degrees. However, even with this value, it will be necessary to increase the overlap, filling the joints with a special seal. The minimum angle calculation is 50. The corrugated roof looks very modern and at the same time simple. Inclined corrugated board - the perfect solution!
If metal tiles are used to decorate the roof, the slope of a pitched roof will be minimum 50, maximum calculation - up to 200. The higher the slope, the more there is a need to seal the joints. Even at an angle of 100, you will need to do this.
On the roof, installed at a large angle, slate shows itself perfectly. Have you noticed that it is very often used for gable roofs? This popularity is due to the special characteristics of the material. You should not use it if you plan to have a minimum angle of a pitched roof of 250 or less. Please note that slate sheets on high slopes should be applied, going with the previous sheet to the next.
You can admire your roof by covering it with a bituminous layer. It would seem that this material can easily complement the roof at a variety of angles, but this is not the case. Better to stick to an angle of 150.
The minimum slope of a pitched seam roof is three degrees. But in this case, you will have to additionally do the sealing of the seams. Do not exceed an angle of 80 in your calculations.
With a minimum roof slope of 110, it is recommended to use bituminous shingles... If the angles do not exceed 18 degrees, you can use a continuous backing layer. At higher angles, roll out the roll over the entire roof plane, insulating the holes.
Strict calculations should also be followed with heavier materials. There is a wonderful roof covering - the famous ceramic tiles. To admire a roof covered with this material, you must adhere to a minimum angle of 10 degrees. Previously, it is worth expanding a layer of waterproofing under it.
The slope of a pitched roof may be slightly different based on the recommendations of each specific manufacturer. In addition, you must take into account the peculiarities of the climatic zone in which the house is located. On a shed roof made of corrugated board or other materials, the load increases significantly during snowfalls, the formation of icicles. Therefore, there is no specific formula for calculating how to calculate the minimum angle of inclination of a pitched roof made of corrugated board. If you are not confident in your abilities, contact the professionals in calculating the slopes of pitched roofs made of corrugated board, bitumen, tiles.
How to calculate the slope of a pitched roof? It is not at all necessary to adhere to any specific calculations so that a pitched roof with a slope fits perfectly into the style and exterior of your home. Sometimes it is enough to get rid of the slope calculations, figuring everything "by eye".
Remember that it is necessary to calculate the slope of the structure at the stage of building the walls of the structure. After all, the roof will be installed on one higher and one low wall.
We hope we were able to answer your question: "What slope should a pitched roof have?" The slope of a pitched roof depends only on your personal preferences, as well as the desire to use certain materials. If you cannot make a calculation yourself, invite a professional. May the roof please you long years and always protects from the surprises of nature! Leave the exact calculation for the choice of roofing materials!
Such a simple structure as a pitched roof may seem very boring and ugly, but in the skillful hands of designers, such a building becomes almost the pinnacle of an architectural creation.
As a rule, a pitched roof is popular for summer cottage construction, for example, when covering garages, fixtures or any outbuildings.
Where else can you develop your creativity and make your home a beautiful palace, if not in a summer cottage village? But what is all the same attractiveness of a pitched roof, after all, its installation is extremely simple? Let's figure it out.
As a rule, they start with cons and pros, so let's consider them.
Benefits:
- Small massive structure
- Cheapness
- Ease of installation
- Durability
Disadvantages:
- A small number of projects with this type of roof. Therefore, if you want an original home, then you should look for a good architect who will carefully plan your project.
- Correct selection of the angle of the slope, starting from the region of residence
Not heavy, cheap, durable, and easy to install? In my opinion, this is what you need!
A pitched roof, although simple, requires a very thoughtful approach. It consists in the selection of the angle of inclination depending on the region of residence.
I heard a couple of times about how a bad designer sold a building project and then received a similar job, naturally with a different layout, but with an identical roof structure. He thought out in detail the rafter system, picked up the material of the covering, plums, etc., but did not take into account the region of residence. A large layer of snow caused the destruction of the entire wooden system.
The slope angle of the roof structure is calculated not only by the designers, but also by the manufacturers of roofing materials. Therefore, if the angle obtained in the calculations is less than from the manufacturers, then it is worth considering. But if you decide to leave such a slope, then nothing fatal may happen, and the roof will definitely flow.

IMPORTANT: Manufacturers of the same material may give different recommendations regarding the slope, some may have 14 °, the other 17 °, and according to GOST at least 6 °. Choose the manufacturer's number, but not less than GOST. Roofs with a slope of less than 12 ° must be subject to sealing joints.
Although my team is a master of their craft, all people make small mistakes.
In general, I once worked at a facility where the slope of the pitched roof was less than 12 °. And out of habit, working with slopes more than this value, I forgot to seal the joints of the roofing material. By the way, it is made with ordinary bituminous mastic, well, or roofing sealants. This work is not difficult, but extremely necessary. Without a sealant, a practically flat roof will not drain melt water well, and it will begin to leak. Fortunately, the customers did not notice this during work, but they still had to confess and finish it at their own expense.
From this it follows that it is not always worthwhile to blindly trust workers. You need to be fully prepared and well-read, well, or in extreme cases, just ask, maybe you will remind about something important.
By the way, here is a standard list of roof slopes with different coatings:
- Ondulin and slate - 6 °
- Roof tiles (ceramic, cement-sand) - 10 °
- Bituminous shingles - 12 °
- Metal tile - 6 °
- Slate slabs (asbestos-cement) - 27 °
- Decking - 6 °
Installation of a pitched roof
The tools that I usually use when building:
- Wooden beam 10-15cm in section
- Boards (more than 50mm thick)
- Hydro-, thermal insulation products
- Nails (from 12cm)
- Saw, ax, hammer
- Stapler, screwdriver, tape measure, plumb
- Level, pencil, knife, construction tape

Of course, lists of tools and materials are a good thing, you know roughly what you need, but often this is not enough, so look at the situation.
The entire technological process (the work itself) can be divided into stages:
- Laying cross rafters, mauerlat. Their fasteners
- Sheathing heat-insulating plates, waterproofing
- Installation of battens
- Laying roofing
Now let me explain the process itself:
- Let's start with the Mauerlat, because it is the support for the entire rafter system, and its function is to accept the entire weight of the structure and distribute it along the entire perimeter of the walls. No matter how light the rafter system is, you should not take a beam less than 100x100mm. The higher the slope, the thicker the timber. If the Mauerlat is laid on your own, then take this point very responsibly, check the horizon more than once using the level.
Do not forget to install the waterproofing between the Mauerlat and the wall masonry. As a rule, everyone uses ordinary roofing material for these purposes.
Anchor bolts to the walls
- The next step is rafter legs. You should not lay them very close to each other, this will make the structure heavier, increase the consumption of building products - in other words, it is not rational. The distance between them must correspond to the roof covering, i.e. the heavier it is, the smaller the gaps. For example, a step of 1.5m is suitable for slate, but for tiles it is better to take 1-1.2m
- When inserting the rafter legs into the Mauerlat, follow the dimensions of the future groove. Its width should be slightly more than the width of the leg. This is a pretty crucial step, because all the beams should lie in the same plane with one degree of slope. I can advise you to install the extreme legs on different sides of the walls, and stretch the string between them, this will facilitate the installation process.
For fastening wooden products, large nails from 12 cm are used. Therefore, it makes no sense to take less. Use nails to fasten the rafters to the vertical beam, and its overhang to the Mauerlat. I hope not to be reminded that all rafters must have the same size and cross-section.
- Large houses often imply a reinforced rafter system. It's all about the span distance, which is 4-4.5 m. It is with such large spans that props (struts) are arranged
- The vapor barrier material should be laid across the rafters, not along, and no tension is required. We place the strips of such material with an overlap (10-15cm). I would advise to seal the joints with construction tape.
- The insulation is placed directly on waterproofing film... Trace the cracks and gaps, they should not be, but the thickness of the insulation should be at least 20cm
- This is followed by a layer of waterproofing again, but not directly on the thermal insulation layer, but with a small gap. For this, I put wooden blocks. This manipulation is designed to create natural ventilation, so that the material does not rot. The very same fastening of the film is carried out to the same bars using a stapler
- After that, the installation of the lathing is done. I think this work will not be difficult for you, its installation is the same everywhere, and the device of a pitched roof allows even a beginner to make it. Bars and slats 5x5cm are ideal for this design. The distance between them should certainly be, but does not have of great importance, the main thing is to create ventilation
- The final step will be laying the roofing itself.
IMPORTANT: Correctly laid rafters will not bend with a person's weight (70-100kg), if this is the case, then reinforce the rafter system.
As for the waterproofing film, I sometimes lay it in several layers, this increases the reliability of the layer. All its fasteners should be carried out using special nails, a stapler and maintain a pitch of 15-20 cm.
By the way, the edges of the waterproofing material should be brought under the overhang of the roof and fixed there. The very length of the "plant" should be at least 20cm. Fixing again with a stapler. It is better to use a simple and fairly common method, but it is suitable for construction in simple structures (garage, chicken coop, etc.). For this, a strip is nailed along the entire length, thereby pressing the film. This method gives confidence that the "evil" wind currents will definitely not penetrate under the waterproofing, and your roof will not fly away.
An extension to the house, a garage or a bathhouse - it doesn't matter!
What could be better and simpler than a pitched roof in a shed, bathhouse, gazebo or garage? Never mind. This type of roof is actually created for these buildings.
The roof of the extension will be in contact with the main structure, and the rafter system is located separately. The ends of the rafters themselves will be located on the front wall, and their tops will be attached directly to the main building itself. I would suggest paying special attention to joining the frame to the main wall. The use of rigid fasteners can lead to irreversible consequences, because the shrinkage of a residential building and a new building differs, so one can pull down the other and destruction will occur.
At the junction of the new roof and the wall of the "old" building, I usually lay a frame made of beams, and on top of it beams. Fill the resulting joint with polyurethane sealant. Roofing material overlapped and wound under a sheltered place at home.
This will prevent precipitation from seeping through the joint. As for the roofing itself, it is used identically to the main roofing, naturally for aesthetic reasons, so if you are a creative person, you can experiment with other materials.
The garage is often a separate building and is not adjacent to anything. But there is nothing strange here and all the work is carried out according to the methods written above. In a brick garage, the installation of rafter legs is carried out in a niche. They are usually designed at the initial stages of construction. The step is 70cm.

Do not forget that no matter what material the wall is built from, everything wood materialsconcerning it should be treated with antiseptics and wrapped waterproofing material ... A pitched roof in a garage is a structure in which facade wall should be the highest in order to drain water from the entrance. And of course, do not forget about the overhangs, they should protrude 30-40cm.
It is worth noting once again that the simplicity and low cost of the rafter system does not limit you in your imagination, even a pitched roof made of corrugated board can make the entire building an entirely exclusive building that all your neighbors will dream of. I hope the photos on our website have dispelled the myth for you that a pitched roof is an ugly solution for arranging a building. Therefore, if you did everything correctly and beautifully, then such a roof will protect you from precipitation for more than a decade.


