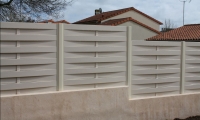
In the old days, homemade fences - wicker fences made of willow twigs were popular in villages. They were not very durable, but cheap. They were easyweave do it yourself. By the way, similarhedge is still found in Europe, only suchfence fromwell cursed boards, not from the vine. We call such hedges "Austrianwicker».
Undoubted advantages:
- Original appearancewicker fence able to decorate any site.
- The fence looks expensive, although the costs of digging in the posts and layingdIY boardsare very small.
- It protects well from prying eyes and at the same time provides air circulation. This has a beneficial effect on the development of plants - they bloom and bear fruit better.
- Economical - old boards can be used if they are well preserved.
- Environmentally friendly - only natural materials are used during construction.
- The speed of construction - in one day you canmake a wicker fence up to 15 meters long.
Among the shortcomings can be noted:
- The need to renew the protective coating of wood every two to three years.
- Relatively short service life - no more than 10 years.
- Price - it is lower than that of bricks and concrete blocks, but higher than that of corrugated board, for example. Can build do-it-yourself wicker fence made of boardsif there is a sawmill nearby with inexpensive lumber.
What are wooden wicker fences?
The construction of such a fence is quite simple. First, support posts and additional crossbeams are installed, and then planed boards are placed between them, intertwining them in a checkerboard pattern. Only the lower and upper parts are fixed.
Wicker wood fence there are two types:
- Vertical - this requires the installation of additional transverse strips for fastening the fence elements.
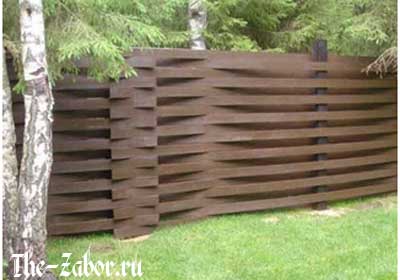
- Horizontal - the boards are held by their own weight and the bending of the wood. Installation requires the installation of poles and intermediate supports.
Fence - wicker from planed boards looks impressive and is easy to assemble. You are quite capable of buildingwicker fence made of boards yourself.
Preparing materials
Tobuild a fence, you need to cook:
- Support pillars. Metal pipes with sufficiently thick walls (2 mm and more), at least 4 cm in diameter, are suitable for this purpose. Supports can be usedmade of wood, asbestos-cement pipes - fill the middle with cement. Noble classics are pillars made of brick or stone. With them fence wicker from boards looks especially advantageous.
- Planed boards... The length depends on the type of fence you want to build. Forhorizontal elements you will need boards from 3 to 6 m long, 20-250 mm thick. Plank length may be shorter when placed vertically.
- Beams or posts made of wooden beams.They serve as additional support around which the fence elements are fixed.
- Cement, concrete, gravel -everything you need for installation of supports.
- Antiseptic impregnation for wood. Readywooden fence - wattle must be processed to protect against external influences. Sometimes the boards are covered with a septic tank in advance.
- Screws or nails, screwdriver, drill and other tools that may be useful for work.
Step-by-step instruction
We will tell youhow to build a fence by all the rules. FROM our detailed instructions any summer resident can handle the job. The main thing is to perform the actions in the specified sequence and try not to miss anything.
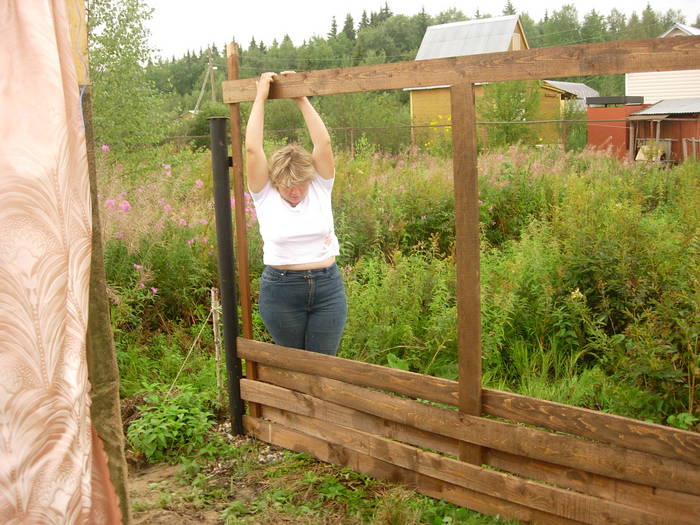
It is better to tackle the construction of the "Austrian wattle fence" together - it is much more convenient to lay ready-made elements from the prepared board.
- Site preparation and marking... At this stage, it is important to determine the length and configuration of the future fence, the dimensions of the sections. If there is a slope on the site, try to break up the areas in such a way that the drops are not striking and are reasonably located. As a rule, it is recommended to install poles every 3 meters to avoid sagging and increased windage. If thin planks are used, the step can be reduced to 2-2.5 meters. For work you need a cord and tape measure.
- Installation of support pillars... To install the post, it is necessary to deepen the support into the ground by about a third. It is good to use a garden or construction drill - this makes the job easier. Crushed stone or gravel is poured at the bottom. A concrete or metal pipe is installed and leveled using a plumb line. The voids are filled with rubble, stones, tamped and poured with concrete mortar.
If you plan to put wooden poles, be sure to treat the lower part with bitumen or special impregnation. Cover the top with an antiseptic to protect it from destruction. The base for the brick supports is made with great care - because their weight is quite large. To prevent your fence from squinting, fill strip foundation or install metal pipes according to all the rules, and then lay out the brickwork around them using the strapping method.
Attention! Take care of protecting the upper edge of the support - cut the wooden posts obliquely to protect from precipitation, and provide metal pipes with plugs.
- Laying boards.
- When installing a horizontal wicker fence, it is necessary to install restrictive corners at a distance of about 15 cm from the ground - they will fix the lower edge. Carefully wind the edges of the wooden board behind the support from top to bottom, bending it slightly. Do not overdo it or the board may burst. Place the next element in a checkerboard pattern.
The edges are fixed with screws. With a significant span length, additional racks must be installed. The top board is installed horizontally, without bending, and is securely fixed.
- Wickerstraight board fenceinstalled vertically, easier to mount. The length of the elements depends on which hedge height you prefer. You can build a low picket fence or hedge 1.5-2.0 m in height. On the support posts, transverse crossbars are fixed - usually two - between them and prepared planed boards are laid, alternating according to the wattle principle. The top and bottom planks are nailed horizontally, defining the hedge.
- Finishing treatment.Be sure to treat the finished structure with an antiseptic to protect it from ultraviolet radiation and the vagaries of the weather. Now in stores there is a large selection of wood preservatives. It is then recommended to cover the surface with two coats of exterior paint or varnish. Remember that the treatment will have to be repeated every two years, and after ten years of service, the boards will have to be replaced.
Now you know,how to make a fence from planed boards, resembling a wattle fence. Believe me, it is not difficult at all, and the result will exceed your expectations. Many summer residentswho madesuch a fence with your own hands, will confirm the truth of this statement.
An economical, beautiful and easy-to-manufacture fence - the braid can be installed in a matter of days with your own hands and does not require special training. Wicker planks will transform your site. It's also a great way to get rid of excess lumber left over after building a house. Go for it - you will succeed!
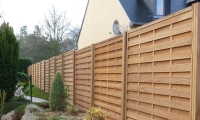
Retiring in your country house, you want to take a break from ultra-fashionable buildings, all kinds of structures made of ultra-modern materials. To feel at one with nature, many people try to build houses and equip them with natural materials... Today, all kinds of wooden fences... One of these options is an Austrian wicker fence. Many owners of summer cottages have discovered for themselves that plank weaving is not just beautiful, but also reliable, practical, and environmentally friendly. And if you install it yourself, it's also quite cheap.
Austrian braid - special notes in design
Advantages of a fence made of wicker boards
Austrian braid can serve as an external fence of the site, or as part of it. Sometimes such fences are used as a base for a curly flower garden, as part of a gazebo, or to separate the main yard from the garden. You can make an Austrian braid yourself in different heights. This fence has a number of undeniable advantages:
- Durability. Those who love to work with wood know a lot about the strength and quality of this material. A fence, carefully made with your own hands, will last more than one decade.
- Perhaps you cannot find a more environmentally friendly material than different types of wood. The hedge, made according to old traditions, will delight with its originality and attractive rustic style.
- The construction of such a fence is not particularly difficult. Its construction does not require any special knowledge and skills, as well as unfamiliar or very complex tools.
- It will not take much time to equip the Austrian braid. If you thoroughly approach the issue, having studied the principles and features of weaving from boards, in one day you can make several meters of a pretty fence with your own hands.
- For many, the factor of efficiency is almost the main thing when choosing a material for a fence. In this case, you can save even more if you use recyclable materials.
Installation of the fence "Austrian braid"
Like any other work, the construction of a fence from boards takes place in several stages. And it begins with the preparation of material and tools.
Training
For the construction of wicker wooden fencing will be required:
- Planed boards with parameters 2.5 or 2.0x10x6000. Before buying, it is better to study the properties of different tree species in order to choose the most suitable option for yourself.
- Concrete, wood or metal supports. The support post must be of such thickness that the boards can be bent without the danger of breaking them. For example, as metal supports recommend choosing shaped tube 40 × 40 with 2mm wall thickness.
- Self-tapping screws or nails for fastening.
- Varnish for applying a protective layer and wood preservative.
- A material that will fill the space between the fence and the ground, or will serve as the basis for the fence. In this case, a galvanized mesh can be used, brickwork or any other material.
- Crushed stone, cement, sand for the installation of support pillars.
Markup
Weaving from boards requires special care, so you need to make the markings in such a way that the line is even, and the height of the fence is the same along the entire length. At this stage, the following points must be considered:
- The distance between the supports should be the same and not more than 3 meters. In general, this distance is calculated based on the size of the board. During weaving, the boards should rest against the supports in clearly marked places. A short "step" between the supports allows you to make a more stable fence that will not "sail" in strong gusts of wind.
- At the places marked for the support pillars, you need to drive in the pegs, and pull the rope between them.
- In the places of the middle bend of the boards, intermediate posts should be installed.
- At the stage of marking, it is necessary to clear the area for the construction of a fence from shrubs, as well as level the ground.
Installation of support pillars
Supports from different materials needs to be prepared for installation. So, metal poles are pre-coated with a primer, caps are put on over the hollow posts to avoid moisture ingress, and wooden ones are cut obliquely from above so that moisture does not linger and spoil the wood.
In the marked areas, for the installation of the supports, you need to make holes 1 m deep and 25 cm in diameter.Using a drill, this work will be done easier and faster. Pillars are placed in the pits and aligned.
To put the supports more evenly, you can use a building level and a plumb line. Next, the pit is filled up by about one third, after which the position of the supports is checked again and the rubble is compacted.
The final stage is pouring concrete and leveling the pillars in height. To install the gate, you will need to install pillars with a large diameter. For greater strength, they are fastened together, for example, by welding a piece of metal channel between them.
Weaving features
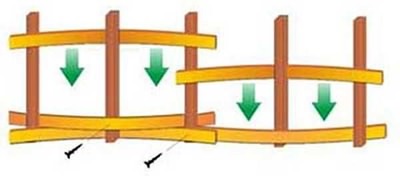 Fence "weaving" scheme
 When doing weaving with your own hands, be it vertical or horizontal, one thing needs to be considered general rule: the distance between the bottom line of the fence and the ground must be at least 15 cm. After installing the fence, this space is laid with bricks or filled with other suitable material.
To prevent the boards from slipping, a wooden stopper is nailed on wooden supports, and a corner is fixed on the metal posts.
Before weaving, the boards are treated with an antiseptic and opened with varnish. This preparatory work will protect wood from rotting and fungi, protect it from moisture. For the same purpose, the bottom of the fence is treated with bitumen.
- With horizontal weaving, one or two intermediate pillars are installed between the main support posts. They must divide the span into equal segments. The work is carried out from top to bottom. In order to make the structure more reliable, the boards are attached to the posts with screws or nails. The top board is usually simply nailed to the posts, not woven into the overall pattern, and the supports are covered with decorative inserts.
- For vertical weaving, intermediate horizontal logs are installed, which will serve as the frame of the future fence. Vertical weaving is no different from horizontal weaving.
Fence maintenance "Austrian braid"
A wicker fence is easy to build with your own hands, just as it is not difficult to take care of it. It is necessary to renew the protective layer of varnish once every two to three years.
You can decorate it in different ways, depending on your personal preferences. Someone loves the natural shades of wood, while someone prefers to paint the fence in a checkerboard pattern.
A wooden fence will last longer if you regularly carry out antiseptic prophylaxis. It is recommended to do this work twice a year: in spring and autumn.
A sincere desire to make your site unique and comfortable with certain skills will become a reliable assistant in the construction of a fence wicker made of boards.
Rustic design includes the use of natural materials and various decorative elements... With regard to the construction of various fences, the "wicker" fence is quite popular. This type of fence is very easy to implement, and anyone can build a fence "wattle" with their own hands.
Classification
Depending on the weaving technique, as well as on the height of the construction itself, this type of fence can have different subspecies. Depending on the last criterion, braided wood fences can be as follows:
- Low - up to 1 meter. Most often they act as a decorative structure or as a fence for flower beds.
- Medium - about a meter. They are used to divide the territory into certain zones.
- High - about 2 meters. They can serve as an alternative to the usual defensive formation, most often they are installed along the outer boundaries of the site.
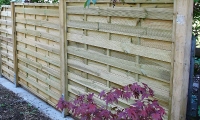
As for the weaving technique, it can be horizontal and vertical. Examples are shown in the figures below:
Examples of horizontal and vertical weaving
Pros and cons
Wicker wooden fences, like other similar buildings, have a number of advantages and disadvantages. As for the first indicator, it consists of the following points:
- Aesthetic appearance, which fits perfectly into the design of any site.
- Environmental friendliness. Wood is a natural and safe material for human health.
- Low cost. You can build a fence free of charge using available tools.
- Easy to install. Even a beginner can figure out how to weave a fence.
Despite all the advantages, this type of fence also has a number of disadvantages:
- More decorative than a protective device;
- The complexity of the repair;
- Relatively short service life.
Selection of material
The "braided" wooden fence, like any other construction of a similar typology, consists of supports and sections. Concerning supporting elements, then it can be various beams, metal pipes, wooden poles, stakes, etc.
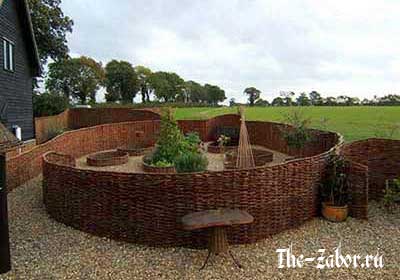
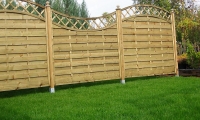
An example of registration of a suburban area
Vines or various branches are used as sections for construction. To give the design an aesthetic look, the branches can be pre-painted in one color.
Usually, for such fences, twigs of trees such as hazel, willow, and willow are used. However, you can use any young shoots of fruit trees.
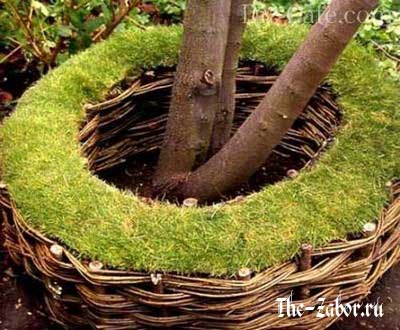
Weaving in landscape design
Various branches, which were selected in order to build a fence "wicker" with your own hands, must first be soaked in water. This will make them more flexible and easier to use.
Weaving technique
The answer to the question of how to weave a fence correctly is that this process should start from the bottom and gradually rise higher.
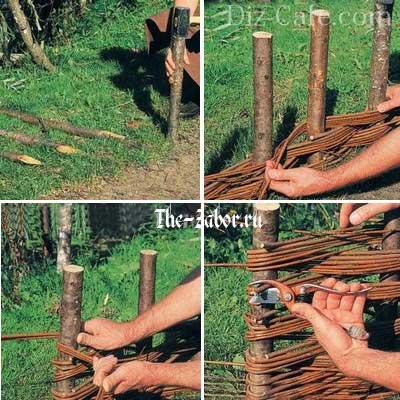
Photo: weaving technique
The building material is wrapped around the support and form a characteristic 8-shaped pattern, in which each subsequent branch is a continuation of the previous one.
Modern version - Austrian braid
In addition, boards can be used as material for such a construction. This design will be a fence "Austrian braid". You can get acquainted with this method using a small video fragment:
Wooden fence "Austrian braid" is also quite simple to build, but requires preliminary processing of wood with special means. This structure can be used as an external border. You should also pay attention to the fact that the fence made of Austrian braided wood is double-sided, that is, its front and back sides look exactly the same, and the absence of frames and crossbars is qualitatively reflected in its external appearance.
An example of a wooden fence
Wicker wooden fences are excellent decorative structures that can serve a wide variety of functions, from a simple support for plants to being used as a border for different areas of the site. This construction method has an attractive appearance, is environmentally friendly, safe and easy to build. Depending on which tree the fences are made from, it can have different qualities and weaving patterns. It all depends on the capabilities, imagination and wishes of the owner.
Plank weaving deserves special attention. This method is more robust than the branching option and can be applied to the outer boundary of the parcel. In addition, this design does not have crossbars and looks great both from the front and the wrong side.
In contact with
made of boards - an exclusive and unusual fence that looks extraordinary and attractive. At the summer cottage, in addition to the function of fencing and protecting the territory, it will play the role of decoration. In production given view the fence is not complicated.
Fence weaving methods
For the installation of the fence, planed boards are used, before that they are treated with an antiseptic, a primer in order to protect the material from insects and the appearance of fungus.
For the construction of the fence, supports made of wood or metal are installed at a width of two to three meters. In order for the structure not to loosen, it is better to concrete the pillars.
Supports that you decided to additionally clad with brick, stone, or concrete posts? are usually filled with a foundation along the entire length of the fence. Such a fence will look more solid.
The fence is woven in the same way as before when using a flexible vine - horizontal or vertical weaving. Only boards were chosen as material.
Wicker horizontal fence from the boards involves laying them parallel to the ground. For such a fence, the first pair of vertical slats are mounted in the span through which weaving will be performed. fastened to the supports with nails or self-tapping screws, especially the ends of the boards.
In a vertical wicker fence made of boards, two or three transverse crossbars are attached, through which the material is laid in a zigzag manner perpendicular to the ground. When weaving, the transverse logs should be framed by boards on both sides. The first two planks are set clearly horizontally, work starts from the post. The top board is often attached to the uprights without braiding. You can also fix the lower crossbar to the supports without a braid.
Both the first and second weaving methods look very beautiful. Wicker construction wooden fence held by the tension created by the bent board. The strength of the structure is due to how tightly the boards will be laid. The lower gap can be filled with brick or stone.
Wicker fence made of boards - beauty and originality
There are many variations for the execution of a wicker wooden fence made of boards, it all depends on the imagination of the performer.
For example, the use of narrow and wide boards allows you to create fences of different appearance. The wicker fence is more durable than the analogue from the vine, and it is also easy to make. To increase the service life of the fence, it must be covered with a topcoat - paint, drying oil, colored varnish.
An interesting option is to paint the fence in two shades. For example, the bottom is dark and the top is light. After a few years, the treatment with varnish and paint materials must be repeated so that the fence retains its beautiful appearance and lasts for more than a decade.
Decorative functions are only one of the advantages of this structure. In addition, there are still a lot of advantages: ease of installation, use of natural materials, ensuring reliable protection from uninvited visitors. In addition, such a design has a low cost and looks much more expensive, given the finance for its installation. A similar fence can be installed even from old boards that have not lost their strength.
Wicker fences are now quite rare, and the use of plaiting boards allows you to make an original decoration out of the fence. In combination with structures made of other materials, they will look harmonious on suburban area... The structure looks delicate and light, fits perfectly into the landscape design.
Fencing for country house, cottage or summer cottage is their integral attribute. And as the theater begins with a coat rack, so any sites from their fences. There are a lot of options for fencing, but not everyone can afford expensive massive fences. Alternatively, you can use the "Austrian wicker" from the boards.
Why the Austrian braid is unknown to anyone, but looking at such a structure, one might think that it was not without the participation of smart and mercantile Austrians. For all its complex, harmonious, massive appearance, the fence does not require much effort, knowledge and adaptations, and most importantly - costs.
Required material
Depending on what type of design you are counting on, you should decide on the amount consumable and with its quality. For fencing suburban area may fit third-rate wood material or even branches. And if a serious fencing is supposed, then the choice must be treated with utmost care. The best option there will be planed boards good quality, at least 2 cm thick.
Support pillars for such a structure can be wooden and metal, as well as brick and concrete pillars. It all depends on the preferences of the owners. The only thing that needs to be considered when erecting such a structure as a wicker fence made of boards is that the posts should allow the boards to bend. Based on the selected material for the construction of pillars, you should calculate the material and its amount:
- Woodworking may require nails or screws. This is necessary if the fence is located in a windy area, or for the owner to be fully confident in the strength of the structure.
- Antiseptics, varnish or impregnation that protects the material from moisture. These means should be processed before weaving. The paint will be needed at the end of the construction of the fence with your own hands.
- Any wooden structure afraid of moisture and insects. In order to preserve the structure for a long time, care should be taken that the wooden elements of the fence do not touch the ground. This requires a foundation or material that will become protective layer between the board and the ground. You can use gravel or expanded clay.
Where does the installation begin
For the construction of such a structure as a wicker fence made of boards, it is important to accurately mark the territory so that the supporting pillars are at the same distance from each other, in the same plane and are of the same height. The smoother the pillars are installed, the easier it will be to make an Austrian wattle fence with your own hands. The distance between the posts depends on the length of the board. To prevent the structure from creating windage, the poles should be installed at a distance of no more than 3 m.
The locations of the future supports are marked with pegs, which are connected with a strong thread. The next step is to accurately calculate the location of the intermediate posts. If the foundation of the fence is not supposed, then it is necessary to clear the ground and cover it with gravel or expanded clay (it is better to go a little deeper). This will prevent the growth of vegetation at the locations of the fence.
Depending on what the fence will be (vertical or horizontal), vertical intermediate posts or horizontal crossbars are installed.
When installing supports with your own hands, it is necessary to process the ends of metal or wooden supports with protective equipment. In drilled or dug holes with your own hands, the depth of which should be at least 1 m, supports are installed with the processed side down. The installed pillars are leveled using a plumb line and level, after which they are reinforced with concreting.
The concrete should be allowed to harden - at least 3 days. If the posts are metal and hollow, then you need to cover them with lids to protect them from moisture and debris getting inside. If the supports are wooden, then it is advisable to cut their upper part obliquely so that water does not linger on their surface.
DIY weaving options
Consider two options for weaving, although creative individuals can turn any work into a masterpiece and make their own using a combination of methods. But regardless of the weaving option, it should be separated from the foundation or soil. This is necessary to create air space to allow breathing of the bottom row or part of the boards, thus protecting them from dampness.
Vertical
In this variant wooden parts the barriers go around the crossbeams alternately, and they are installed quite tightly. This can be done with a light hammer by tapping each one. Due to the springiness of the material, it does not need to be reinforced with anything. The upper part of the fence can be framed with a longitudinal board, or not. It is important that the height of each part is extremely the same, then do-it-yourself weaving will be even fascinating.
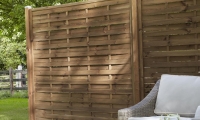
Unpainted wicker structure Painted vertical wicker fence made of boards
Horizontal
A horizontal version of a wicker fence made of boards with your own hands is no more complicated than a vertical one. Everything is done according to the same principle. A separate board is held, alternately bending around the intermediate posts. Rows fit tightly, and create springiness, so it is not necessary to fasten with nails. The last element, as a rule, is not woven, but is nailed to all support pillars. The boards may or may not completely cover the support posts. It all depends on the preferences of the owners.
Horizontal weaving of a fence made of boards with a canopy Decorated horizontally wicker fence with preservation of the natural color of the boards
Final work
Note that the less often there are intermediate pillars or transverse crossbars, the more massive the structure will seem. Often, the top of the structure is covered with a metal cover, so it can be protected from moisture. The bottom of the fence is impregnated with a bituminous solution before painting.
The finished fence should be painted periodically to extend its life. The paint can be selected in a natural color, which will give the fence a more natural effect. However, the decoration depends on preference. These procedures are easy to do with your own hands. Painting is done with a spray gun or brush.
The height of the fence and the thickness of the boards can also be varied. The type of the structure itself depends on the choice of the height and width of the parts. Wide boards will give the structure a massive and respectable look.
For the frame of a wicker fence made of boards, it is possible to use brick pillars and a foundation, then the fence will be strong, massive and solid. Such fences are perfect for log cottages.
There are many options, the main thing is to have the desire, patience and imagination to build a unique and inimitable fence with your own hands, which can be done in a few days.


