We make the first impression of the house and the cottage even before we entered the territory, sometimes - before we saw the house itself. The first thing that catches your eye is the fence. Everything else is after, and the first impression is from the fence. Some, albeit inexpensive, but attractive, I want to stop and take a look: original ideas always attract the eye. One of the most interesting is a wicker fence or wattle fence. Moreover, they are woven not only from vines or branches: there are braids from boards, but there are also from PVC rods. They all look different, but interesting and unusual.
What is a wicker fence made of
Let's make a reservation right away that there are two types of wicker fence - "wicker" - made of branches and "wicker" - made of boards. The manufacturing technique is very similar, therefore both of them belong to wicker fences.
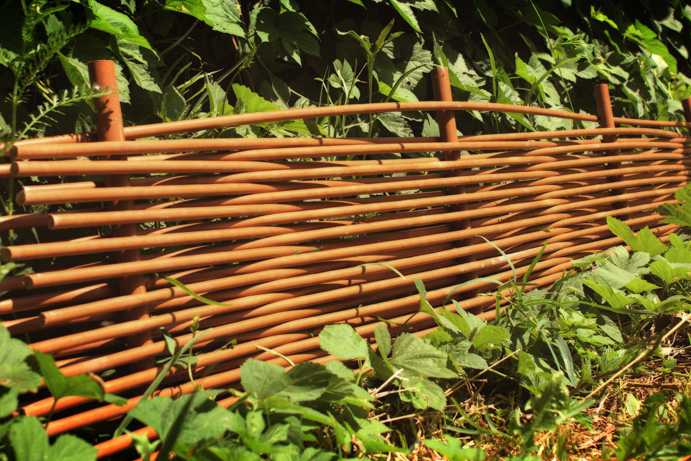
This is a wicker made of twigs or branches

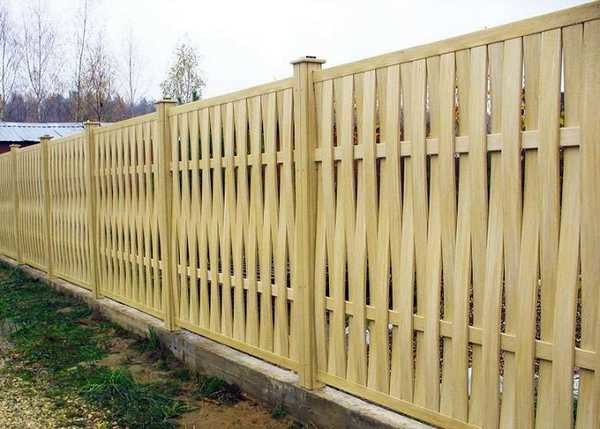
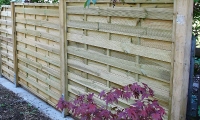
This is a wicker fence made of boards
What is the braid made of
Now about what can be used to make such fences. A fence made of boards - austrian braid - made most often from pine boards with a thickness of 20-25 mm, width - about 100 mm. The material is most often pine. It is more affordable, contains a large amount of resins, and therefore has a longer service life. But to prolong its "life" it will be useful to paint with compounds with anti-fungal properties.
Pillars for such a fence are made from a bar of at least 80 * 80 mm, but they are more durable from a profiled pipe. Size 60 * 80 mm or 40 * 80 mm, you can take square ones. Depends on how you will fix the board. The span between the supports is 2.5-3 meters, and an intermediate one is placed between them - from a bar of 40 * 40 mm or so. The exact span is determined locally and often depends on the flexibility of the board.
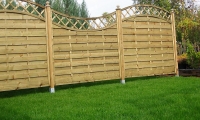
So that the metal pillars do not spoil the picture, they are covered with boards, which are fastened through with pins with inserted washers. You can make a plinth and pillars of bricks, and between them - a braid - vertical or horizontal - depending on your wishes.

What to use for wattle fence
Capes are made from young one-year-old shoots of several types of wood:
- willows (concrete);
- hazel (hazel);
- willow (red);
- aspen;
- birch;
- pVC rod.
The best are willow and hazel. Their core is dense, which is why the lines of operation are solid. The rest of the rocks quickly lose their appearance and strength.
PVC wicker - durable and quite attractive
The PVC rod for wattle fence appeared only a few years ago. And although it is not natural, it is in good demand: wood, even processed after a few years, loses its attractiveness. Plastic is not afraid of the sun or frost, long time does not change its appearance. Its disadvantage is that it needs to be bought, while the vine can be chopped.
Preparation of rods
Bark cleaner
Shoots are harvested in early spring or late autumn, their thickness is from 1 cm to 3 cm. On small fences - up to 1-1.2 m in height - there are tonic twigs - 1-2 cm, on higher ones - those that are thicker.
It is better to clean the bark on the twigs, and cover them with wood stain or wood oil. Brown color can be obtained by soaking the rods in potassium permanganate, gray - in copper sulfate.
Unrooted shoots can also be used, but then the bark will begin to flake off, the view will be unattractive. It is more convenient to clean the bark with a split thick branch or a "cleaner" (see photo). It is not difficult to make it from a suitable size piece of a branch.
If you plan to make a fence later, bunches of branches are laid in the basement. Before using the rods, they are placed in a container with water for a week, periodically refilling it. The rods swell, elasticity returns to them, it is easier to clean the bark. If the process is too difficult, you can soak the branches for another week. It should get easier. To make it really easier, you can stand over the steam. Then the bark is peeled off like a banana peel, but the very process of "soaring" is difficult.
Pillars
The basis of any fence is pillars. They can be made from thick, even branches or young tree trunks. The diameter is about 5 cm and more if you are planning a high wattle fence. They are buried or hammered into the depth of at least 50 cm, the installation step is about 50 cm, it can be more or less - it depends on the degree of flexibility of the prepared vine.
To make the pillars last longer, they are treated with bactericidal impregnations, the ends are burned over a fire (the old-fashioned method), dipped in hot bitumen, and soaked for a couple of days in a solution of copper sulfate.
If you put a wicker fence for the outer fence of the site, it is better to use a timber or metal pipes... If the weaving is horizontal, the section of the tube does not matter - in the sense that both round and square will do. Even a round one will be easier to work with. And with vertical weaving, it is more convenient to put the pillars from shaped pipe... Crossbars are attached to them, and it is easier to do this to a flat edge.
Weaving types

Then, having made a couple of fences, you can move on to more complex drawings. There are several schemes in the photo.


How to make a wicker fence yourself
We will consider the simplest option - a regular braid. For a start, you can practice on a small piece - you will master the technique, then you can start serious construction. For example, for training, you can make a fence for the garden or flower garden.
Horizontal braiding
We hammer six more or less thick pegs into the ground with a distance of 30-40 cm. We take the first vine, put it in a "snake" weaving between the posts. The vine alternately bends around the posts in front and behind.

We put the second rod in a mirror image to the lower one. If it starts from the back, then the next one is laid in front.

If there is a need to connect two vines, this is done on the nearest pole. The next one is simply laid as a continuation of the previous one. And the protruding ends are cut off after everything is assembled.
The third, and all odd rows, fit like the first, fourth and even - like the second. In general, we alternate the beginning in front of the pillar, then behind. Periodically, at the intersection of vines and near the pillars, they knock with a mallet - a wooden hammer, compacting the rows.

This is the horizontal fence. It can be continuous, or it can be shield. With continuous weaving, the pillars are installed around the entire perimeter, between them, one by one, vines are woven. It turns out to be an almost solid wall - the ends are brought out to one side and there they are cut obliquely so that it is not visible.
If there is no thick vine, you can put a whole bunch of thin twigs at a time. Hardly anyone will remove the bark from them, and a solid fence will not work either, but a small fence is easy. Such a fence made of twigs looks decorative, making it yourself is perhaps even easier.

When making panel boards, sections of a certain length are made. Set the required number of stakes - 4-6 pcs, vines are woven between them. After reaching the required height, the ends sticking out on the sides are cut off.
If necessary, the edges of the rods are nailed to the stakes with carnations. You get such shields as in the photo. Sizes can be different - more or less depends on the desire and type of fence.

When the required number of shields has been collected, they are installed in place, hammering the pointed ends into the ground. The nearby pillars can be tied together for greater stability. It turns out a wicker panel fence. See the video for an example of assembling wattle boards.
Installation of a shield fence can be done using metal posts. No special technologies:
- we drill holes below the freezing depth,
- we throw in a bucket of rubble, we tamp,
- we put a post, set it in height and adjust the vertical;
- concreting;
- we attach ready-made shields to the post.
One of the options for such an installation is in the video.
The same technology is used to make a wicker fence from boards. They only braid the boards, and the spans between the posts are made more.

Vertical braiding
The rods in a wicker fence can also be placed vertically. In this case, three to five crossbars are nailed to the posts. The first cross member is about 10 cm from the ground level, and then with the required pitch.
They weave like this: one end of the rod is pressed into the ground, for example, from the side closest to you. Then bend, alternately stretching between the bars. Next escape put on the other side. It turns out it is mirrored with the previous one. So they alternate - in front / behind.

Wicker fence with vertical braiding
Since the vine has a noticeable difference in size at the top and near the root, then in pairs they are turned upwards with a thick edge, then downwards. Then the same density is obtained at the top and bottom. If this is not done, it will turn out thickly at the bottom, rarely at the top. How to weave a vertical wicker, watch the video - a master class from a person who has made more than one wicker fence with his own hands.
A wicker fence is made of boards vertically. Only to make it look organic, and to extend the life of the boards, the tops are closed with a board stuffed on top. The ends are nailed to it. This also allows you to fix the boards, which is useful in this version - sometimes loose ones fall out.

You can also fix the boards to the lower crossbar. Only either from above or from below: so that the wood does not move when the humidity changes. Another point: if you make it from a raw board, it is worth considering that after first collecting everything without gaps, after drying you will have 1 cm slots between the boards. This applies to both the horizontal and vertical model.
The upper and lower rungs can be made of shaped tube. It's over reliable material, which also guarantees greater stability.

Photo ideas
It seems to many that a hedge of woven twigs and branches is only a decorative fence that cannot fully protect the site. If you look at the next photo, you can doubt this. Wow, such a fence, and almost opaque.

The main thing in this business is a thorough approach. Put pillars between which to braid everything very tightly. The service life may be small, but the costs are minimal. Moreover, both material and temporary.
If the usual weaving is already easy, you can try and do something extraordinary. For example, a wicker fence made of diagonally arranged branches. And you can't call it a frivolous structure either.

There is another interesting way of weaving - a pigtail. By practicing in small areas, you can do something bigger.

If you need a decorative fence in the yard, in the garden, in the garden, a fence made of branches can be made rare. Even rather thick branches are used, but you need to work with them immediately, until they have time to dry, or then you will not bend them.

By the way, if you use freshly cut willow twigs and stick them into the ground, after a while you can get a hedge: the willow takes root perfectly. You might get something like the following.

When planting hedges, use the same weaving technique. They only mold it from rooted shoots. Once they are stiff, you get a very solid fence. Breaking through it is not easy.


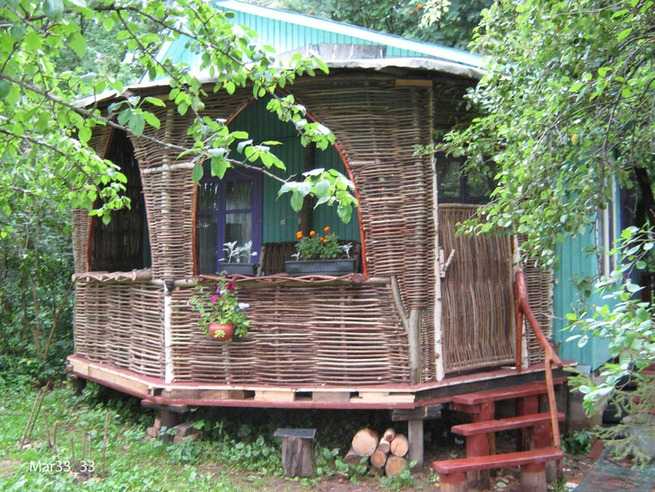
Not only the fence can be made wicker. It turns out that there are a lot of interesting things: gazebos, huts, elements of garden decor. 


In the old days, home-made fences were popular in the villages - wattle fence made of willow twigs. They were not very durable, but cheap. They were easyweave do it yourself. By the way, similarhedge is still found in Europe, only suchfence fromwell cursed boards, not from the vine. We call such hedges "Austrianwicker».
Undoubted advantages:
- Original appearancewicker fence able to decorate any site.
- The fence looks expensive, although the costs of digging in the posts and layingdIY boardsare very small.
- It protects well from prying eyes and at the same time provides air circulation. This has a beneficial effect on the development of plants - they bloom and bear fruit better.
- Economical - old boards can be used if they are well preserved.
- Environmentally friendly - only natural materials are used during construction.
- The speed of construction - in one day you canmake a wicker fence up to 15 meters long.
Of the shortcomings, it can be noted:
- The need to renew the protective coating of wood every two to three years.
- Relatively short service life - no more than 10 years.
- Price - it is lower than that of bricks and concrete blocks, but higher than that of corrugated board, for example. Can build do-it-yourself wicker fence made of boardsif there is a sawmill nearby with inexpensive lumber.
What are wooden wicker fences?
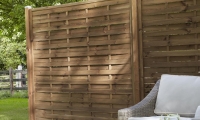
The construction of such a fence is quite simple. First, support posts and additional crossbars are installed, and then planed boards are placed between them, intertwining them in a checkerboard pattern. Only the lower and upper parts are fixed.
Wicker wooden fence there are two types:
- Vertical - this requires the installation of additional transverse strips for fastening the fence elements.
- Horizontal - the boards are held by their own weight and the bending of the wood. Installation requires the installation of poles and intermediate supports.
Fence - wicker from planed boards looks impressive and is easy to assemble. You are quite capable of buildingwicker fence made of boards yourself.
Preparing materials
Tobuild a fence, you need to cook:
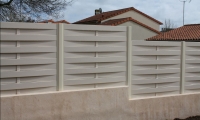
- Support pillars. Metal pipes with sufficiently thick walls (2 mm and more), at least 4 cm in diameter, are suitable for this purpose. Supports can be usedmade of wood, asbestos-cement pipes - fill the middle with cement. Noble classics are pillars made of brick or stone. With them fence wicker from boards looks especially advantageous.
- Planed boards... The length depends on the type of fence you want to build. Forhorizontal elements you will need boards from 3 to 6 m long, 20-250 mm thick. Plank length may be shorter when placed vertically.
- Beams or posts made of wooden beams.They serve as additional support around which the fence elements are fixed.
- Cement, concrete, gravel -everything you need for installation of supports.
- Antiseptic impregnation for wood. Readywooden fence - wattle must be processed to protect against external influences. Sometimes the boards are covered with a septic tank in advance.
- Screws or nails, screwdriver, drill and other tools that may be useful for work.
Step-by-step instruction
We will tell youhow to build a fence by all the rules. FROM our detailed instructions any summer resident can handle the job. The main thing is to perform the actions in the specified sequence and try not to miss anything.
It is better to tackle the construction of the "Austrian wattle fence" together - it is much more convenient to lay ready-made elements from the prepared board.
- Site preparation and marking... At this stage, it is important to determine the length and configuration of the future fence, the dimensions of the sections. If there is a slope on the site, try to break up the areas in such a way that the differences are not striking and are reasonably located. As a rule, it is recommended to install poles every 3 meters to avoid sagging and increased windage. If thin planks are used, the step can be reduced to 2-2.5 meters. For work you need a cord and tape measure.
- Installation of support pillars... To install the post, it is necessary to deepen the support into the ground by about a third. It is good to use a garden or construction drill - this makes the job easier. Crushed stone or gravel is poured at the bottom. A concrete or metal pipe is installed and leveled using a plumb line. The voids are filled with rubble, stones, compacted and poured concrete mortar.
If you plan to put wooden poles, be sure to treat the lower part with bitumen or special impregnation. Cover the top with an antiseptic to protect it from destruction. The base for the brick supports is made with great care - because their weight is quite large. To prevent your fence from squinting, fill strip foundation or install metal pipes according to all the rules, and then lay out around them brickwork by strapping method.
Attention! Take care of protecting the upper edge of the support - cut the wooden posts obliquely to protect from precipitation, and provide metal pipes with plugs.
- Laying boards.
- When installing a horizontal wicker fence, it is necessary to install restrictive corners at a distance of about 15 cm from the ground - they will fix the lower edge. Carefully wind the edges of the wooden board behind the support from top to bottom, bending it slightly. Do not overdo it or the board may burst. Arrange the next element in a checkerboard pattern.
The edges are fixed with screws. With a significant span length, additional racks must be installed. The top board is installed horizontally, without bending, and is securely fixed.
- Wickerstraight board fenceinstalled vertically, easier to mount. The length of the elements depends on which hedge height you prefer. You can build a low picket fence or hedge 1.5-2.0 m in height. On the support posts, transverse crossbars are fixed - usually two - between them and prepared planed boards are laid, alternating according to the wattle principle. The top and bottom planks are nailed horizontally, defining the hedge.
- Finishing treatment.Be sure to treat the finished structure with an antiseptic to protect it from ultraviolet radiation and the vagaries of the weather. Now in stores there is a large selection of wood preservatives. It is then recommended to cover the surface with two coats of exterior paint or varnish. Remember that the treatment will have to be repeated every two years, and after ten years of service, the boards will have to be replaced.
Now you know,how to make a fence from planed boards, resembling a wattle fence. Believe me, it is not difficult at all, and the result will exceed your expectations. Many summer residentswho madesuch a fence with your own hands, will confirm the truth of this statement.
An economical, beautiful and easy-to-manufacture fence - the braid can be installed in a matter of days with your own hands and does not require special training. Plank wicker will transform your site. It's also a great way to get rid of excess lumber left over after building a house. Go for it - you will succeed!
Many varieties are used as fences for land plots. building materials... Therefore, the variety of fences is great. Among them there are also exclusive options that are very rarely used. For example, a wicker fence made of boards, which resembles an ordinary hedge made of vines or branches. The difference between this design is the use of planed boards instead of branches. The result is a unique and stylish hedge that not only decorates the site, but also serves as its reliable protection. Such a fence is all the more profitable because you can build it yourself.
Wicker fence made of boards
Fence construction from boards
Structurally, a wooden fence made of boards is a row of pillars buried in the soil, between which rows are located boards. Due to the ability to bend, the boards with their edges engage with posts or with transverse slats. By the way the boards are arranged, vertical and horizontal types of wicker fence are distinguished:
Vertical option
 Wicker fence made of vertically arranged boards
 The lower, middle and upper horizontal strips are attached to the support pillars located at equal intervals between themselves. Wooden planks are vertically inserted between them. Each of them is fixed in three places to horizontal supports.
Horizontal option
 Wicker fence made of boards with a vertical arrangement
 Support posts are also used, and wooden planks are inserted between them, going around each support. Depending on the wishes of the owners, the boards can completely overlap the pillars, or they can only engage with them.
Advantages and disadvantages of a wicker fence
We list the positive aspects of fence from boards:
- Installation of such a fence is relatively simple. You can do it yourself.
- The resulting fencing is environmentally friendly.
- The appearance of a wooden fence is very unusual and unique.
- A wicker fence made of boards is erected very quickly. For 1 day with your own hands, you can make a span about 15 meters wide.
- Boards let air through themselves to the site well, but block its visibility from strangers.
- For the manufacture of the fence, it is permissible to use old boards of the required length and good quality.
Several disadvantages:
- The durability of the fence is relatively small. Since it is exposed to precipitation, it can last no more than 10 years.
- The cost of the boards is high. Although it is lower than the cost of concrete blocks, bricks or cinder blocks. It will be profitable to make such a fence in a region where there are no problems with cheap materials.
- It is necessary to renew the protective covering of the fence every 2 years.
Materials for the construction of the fence
If a decision is made to make a wicker fence from boards with your own hands, it is necessary to prepare in advance all the materials necessary for construction:
- Planed boards of any width. However, it should be remembered that the narrower they are, the easier it will be to mount them. The length of the boards is 3-6 m. The thickness is 2-2.5 cm. If a vertical fence is created, the length of the boards will be different.
- Support pillars. Can be used in this capacity:
- Metal pipes with a diameter of at least 4 cm, having a wall thickness of at least 2 mm.
- Concrete or brick pillars.
- Asbestos-cement pipes filled with concrete.
- Wooden posts.
- Crossbars or vertical posts. For the vertical version, horizontal logs are used, and for the horizontal version, vertical posts. Usually a wooden beam is used.
- Antiseptic, protective coating for wood. Processing is carried out on a ready-made fence.
- Building materials for the installation of support pillars. These are gravel, cement, sand.
- Galvanized screws or nails - for fixing the boards to the crossbars.
- Measuring tools.
The sequence of making a fence from boards
The work of installing the fence consists of several stages, none of which can be ignored:
Plot marking
Along the stretched cord, the locations of the support pillars are marked. The distances between them must be kept the same. Typically, the distance between the supports is 2.5-3 m. It all depends on the length of the boards available, since they must overlap the supporting pillars with their length. If thin beams are used as supports, these distances can be reduced by up to 2 m.
If you make the distance between the posts more than 3 m, then such a fence will have increased windage, and as a result of a strong wind, it may tilt.
Installation of support pillars
All work on the installation of supports can be done by hand. Depending on the type of pillars, the work is carried out as follows:
- Metal pipes. They are pre-primed and painted. Pits are dug with their own hands so that the pipes go into the ground by a third. The pits are set metal supportsare aligned in height and level. The lower third of each pit is filled with rubble. The remaining space is filled with concrete.
- Concrete posts. They are mounted on the same principle as metal pipes. You do not need to paint them.
- Wooden supports. They are buried a third of their length in the soil. The lower part, located in the ground, is pre-covered with a layer of molten bitumen, and then wrapped with two layers of high-quality roofing material. The upper part of the support is covered with an antiseptic layer, and then with varnish or paint. The top of the post is closed to prevent collapse.
Pits of appropriate depth are dug. A layer of rubble is poured into the bottom of each pit. They install pillars in the pits, fill all the free space with broken bricks, rubble, and construction waste. The upper third of the pit is filled with concrete.
Setting the limiters
To prevent the boards from sliding down, limiters are installed on the posts. If the pillars are metal, metal corners are welded to them at a certain height from the soil level. Pieces of timber are screwed onto wooden posts.
When installing a vertical fence, this point can be neglected.
Installation of boards
Depending on the type of fence, several crossbars are installed vertically or horizontally with your own hands. Further work depends on the type of fence:
- Horizontal option. Install vertical cross members so that each span is evenly divided. Installation starts at the top. The board is intertwined between the support post, the crossbars and the second post. The board is fixed with all supports and posts with self-tapping screws. All the following boards are mounted in a checkerboard pattern. The last board in the row is installed without bending. It is simply nailed to the supports.
- Vertical option. Horizontal logs are fixed on the support posts. The boards cut to the specified dimensions are inserted between the logs in a checkerboard pattern. Since they are short, a hammer can be used. Each plank is attached to several cross members to ensure structural strength.
Finishing the finished fence
The boards fixed to the frame must be treated with an antiseptic composition, and then covered with paint or varnish in 2 layers. This coverage should last for 2 years. After this period, the protective coating should be renewed. No other maintenance is required for the wooden fence.
A self-made fence made of boards is able to make any site unique, and the cost of such a structure in comparison with a brick or concrete fence will be significantly lower.
Unusual fencing of a summer cottage - a wicker fence made of boards
A wicker fence is rarely made today and is mainly summer cottages, where such a fence plays the role of a very original decoration. Previously, wickerwork was made of thin branches and vines, but today such a fence is often made from boards.
This type of fence is easy to manufacture, but it looks very attractive.
The advantages of braided construction
Decorative functions are only one of the advantages of a wicker wooden fence. Such a fence also has a lot of advantages:
- made from natural material;
- provides reliable protection from bad weather and unwanted guests;
- differs in ease of installation, which is easy to do on your own;
- has a low cost and looks much more expensive than the cost of it;
- can be made even from old boards that have not lost their strength.
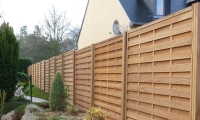
In the photo - a wicker fence made of boards
We prepare materials and tools
For the construction of wicker, planed boards are used, which are attached to posts made of metal pipes, brick, concrete or wooden beams. The strength of the finished structure is provided by the tensile force of the interwoven boards.
Materials and tools for the construction of a wicker wooden fence:
- planed board;
- support pillars;
- nails or screws (screws) for woodwork;
- level or plumb line;
- drill, shovel;
- sand, gravel, concrete.
Before starting work, all wooden elements must be treated with an antiseptic and a primer to protect the material from insects and fungi.
Step-by-step instructions for building a fence
Before starting construction, it is necessary to choose the material for the pillars and the direction of fastening the elements of the fence (horizontal or vertical).
The construction of a wicker fence made of boards with your own hands consists of the following steps:
- Performing markup
- Installation of supports
- Weaving and installation of a fence
- Final works (coating with paints and varnishes).

Territory marking
The construction of a fence always begins with the marking of the area that is to be fenced. On this stage construction, the following features must be taken into account:
- the step between the posts of a wicker fence is usually 3 meters, but if the supports are very thin, then this distance is reduced to 2-2.5 meters;
- the step width is calculated taking into account that both ends of each board "go" slightly behind the supports.
Installation of the fence must be carried out taking into account the nature of the terrain where the structure will be erected.
The operational life of the entire structure largely depends on this. When building on heaving soil, it is necessary to take care of arranging a drainage system, a special pillow and a foundation.
Erection of support pillars
After marking and determining the places for the pillars, they begin to erect the frame. It can be executed from wooden, metal, concrete or brick supports... The braided planks built into a brick fence look very nice.
The need for a foundation depends on the type of frame. When using wooden or metal pillars, you do not need to fill the foundation. It's enough to dig out required amount holes under them and equip them with a crushed stone pillow.
At this stage, several recommendations should be followed:
- In order for the pillars to exactly stand in one line, it is necessary to pull the cord around the perimeter of the fence under construction.
- The supports must be concreted, as in the construction of any solid fence... This is because wooden structure it turns out to be rather heavy, and too wide a span under wind load creates a “sail” effect and can quickly loosen an unreinforced fence.
- To protect against corrosion, the metal supports are coated with primer and paint, and the top is closed with plugs. To prevent rotting of the lower part of the wooden posts, bitumen or a special impregnation is used, and the top is cut at an angle to reduce the influence of moisture from rain and snow on the end.
- There should be a distance of 12-15 cm between the ground and the lower edge of the fence. Taking into account this parameter, support stops are installed, which during the construction of the fence will not allow the structure to "slide down". To do this, a bar is nailed onto wooden posts, and a corner is welded onto metal pipes.
Installation instructions for support pillars:
- recesses are dug with a depth of 100 cm and a diameter of 25 cm;
- supports are installed, the verticality of which is controlled by a plumb line or level;
- each hole is covered with a layer of sand, covered with gravel to a third of the depth, and carefully compacted;
- the recesses with the installed supports are poured with concrete under constant control of the verticality of the column.
It is advisable to close metal pillars with decorative inserts. For the construction of brick pillars, you first need to install metal pipes, and then overlay them with bricks.
Weaving a fence from boards
 When the supports are installed, they begin to install the spans. A wicker fence made of boards is usually made with horizontal or vertical weaving. In any case, weaving begins with the installation of two narrow boards in each span.
With vertical weaving, the first two boards are installed strictly horizontally. Weaving starts from the pillar. It is recommended to additionally fasten the boards with nails or screws. But herself the shape of the fence should only be held by the tension of the curved boards.
When performing horizontal weaving, the specified pair of boards is set vertically. Then boards are put on the supports, braiding them. The assembled wicker wooden fence will also be supported by the curved boards. Weaving must start from the top. The picket fence is attached to the supports with nails or self-tapping screws. The top board is often nailed to the supports without weaving.
Final work - applying paint and varnish composition
After completing the weaving of the entire fence, you can paint the boards or cover them with colored varnish... If antifungal impregnation of wood was not performed before starting work, then you need to do it after the construction of the fence and only after that proceed to the last stage - covering the boards protective layer... To do this, you can use varnish, enamel paint for outdoor use, drying oil and so on.
There can be quite a few variations in the execution of a fence of this type. It all depends on the desires, fantasies and capabilities of the person. But anyway after 2-3 years, it is imperative to carry out fresh painting of the boardsso that the wicker fence retains its beautiful appearance for a long time and has served for more than a dozen years.
Video about the installation of a wicker fence
The video shows the steps for building a fence from boards in stages:
Do you strive to make your fence stand out from others and at the same time do a good job with the duties of a protective structure? Then we recommend you such first-class and durable fences as the vertical wicker fence.
Wooden fence wicker vertical: product advantages
Products created from wood have always been in great demand in Russia. This is due to the fact that they are created from an environmentally friendly material that can withstand all sorts of mechanical and thermal influences. Wood fits effectively into any landscape design. If desired, you can paint it in the desired color.
Other features of our wooden products, which include a vertical wooden fence, can be added:
- a wide range of design solutions,
- excellent level of protection,
- quality control at each stage of creation,
- reliable fixation of the structure,
- variety of design solutions.
Partnership Benefits
For 25 years now, our company has been specializing in the manufacture of wood fences and other types of fences. On the company's website you will be able to familiarize yourself with samples of our work or get an explanation on any issue from professional employees. We will help you choose a wooden fence or gate, taking into account the natural conditions of the region, so that they can serve as a protective structure for a long time.
We install wooden products made from quality wood with the possibility of processing with protective impregnations. For high-quality fixation of the structure, the craftsmen use strong metal corners.
By purchasing from Smel-LTD, you will acquire a durable structure that will protect and also beautify your site!


