Modern and high-quality renovation is beauty in everything. To achieve this, the pipes must be hidden in the bathroom during the renovation. But for this you need to adhere to some rules in order to do everything correctly.
What should you remember?
Before you start, remember these simple rules:
- The minimum number of pipe connections is the key to success. This is achieved with the help of competent planning of the wiring and equipment placement.
- It is equally important to make small hatches so that valves, taps and a meter are always at hand.
- It is recommended to use joints made of the same material as the pipes with sufficient safety factor.
Rules for wiring wiring
It is important to take into account the specifics of each room and the type of wiring. And how to hide the pipes in the bathroom in the wall so that it is safe and in the future they do not start leaking? If the wiring is easy to get to, then, accordingly, it is easy to make repairs. Walled pipes, including sewer pipes, are difficult to repair in a screed or wall, since you will have to gouge holes to access them.
Allowed for bricking up:
- Steel pipes with welded connections.
- Brazed copper.
- On metal plastic pipesah press fittings that are crimped with construction pliers.
- Press fittings underneath XLPE.
It is forbidden to brick up:
- Threaded pipe connections.
- Threaded fittings, which are assembled using keys on metal-plastic components.
Best ways to seal up water pipes
Preparatory activities
The most common ways to hide pipes in a bathroom are:
- Wall.
- Screed.
- Drywall.
If it was decided to remove the pipes into the wall or screed, then before that it is imperative to plan everything and take into account many details, draw a wiring diagram, decide on the number, diameter and type of pipes. The fewer bends, turns on the pipes, the longer their service life will be.
Before drawing up a diagram, decide on:
- route and pipe diameter;
- the type of walls, whether it is allowed to cut them or not;
- elements and technical characteristics screeds.
Wall
Before you hide the pipes in the bathroom in the wall, you need to do the grooving (creating grooves) of the walls. It is forbidden to chisel walls horizontally if they are of panel type or brick with a width of half a brick. Otherwise, cracks and collapse may occur. The strobes are usually made using a grinder, after which it is necessary to expand the space in the places where the cuts are made with a chisel, chisel, sledgehammer or hammer. To get to the adapters and control taps, well boxes are constructed.
Screed
The main advantages of this method are convenience and practicality. No need to gouge walls, and plumbing and sewer pipes are laid along the shortest route.
Correct pipe laying assumes the full capacity of the pipe in the screed and still a residual layer to make the embedding and level the surface. We must not forget about the thermal expansion of pipelines; this can be avoided by using a corrugation in which they lie. For small rooms, this rule is optional, but it is not recommended to use hot water until the screed is completely dry.
If you plan to make an electric underfloor heating, then pipes are laid along the entire perimeter, however, if it is possible to lay the layer using tile-type glue, wiring is not allowed around the perimeter.
Drywall
How to close the pipes in the bathroom with drywall? The box is one of the best ways to disguise them. But, alas, this method is not always appropriate in small bathrooms. It is possible to hide both water mains and sewer pipes under the blocks.
At the time of purchase, it is advisable to consider moisture-resistant drywall type.
Using rack-mount profiles, please note that it is prohibited to lay pipelines inside them, otherwise it is possible to damage the surface of the water supply lines. Always measure the distance from the walls to the pipes and record or photograph as you lay the pipes so that there will be no future problems.
An easy way to sew up drywall pipes
The following will describe a relatively easy way to sew pipes in a bathroom. The main advantages of this option are low cost and ease of installation. It is especially appropriate to seal pipelines in large bathrooms and in rooms where major repairs begin and it is possible to determine in advance all the nuances.
When using steel pipes, they are cleaned of the old paint and varnish coating and a fresh one is applied. In addition, you should plan the future location of the waterways, take into account the thickness of the finishing material and walls, acquire tools and materials.

Before closing the riser in the bathroom and piping, build a frame following this diagram:
- With the help of a level and a plumb line, it is necessary to mark where the future wall will be.
- Fix with profile dowels according to the marked marks.
- Fasten the rack-type profile with self-tapping screws.
- Strengthen the structure transversely with crossbeams.
Having dealt with the frame, we will begin to sheathe it with plasterboard in the following sequence:
- Prepare blank material.
- Fix the sheets using self-tapping screws.
- Cut off the excess parts of the sheets with a jigsaw or saw. If the length is insufficient, do not allow the joint to coincide with the transversely fixed crossbars.
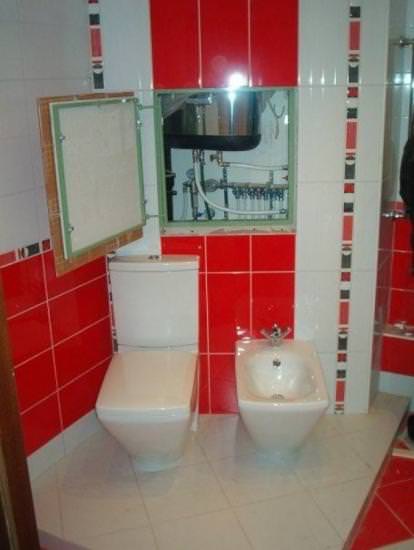
- Make an inspection hatch and openings for piping.
- Foam unnecessary slots between the ceiling, floor and walls.
- Install the hatch door so that you can reach the riser and valve.
- Outside, cover the blocks with putty, and glue the joints with a serpyanka.
- After the putty is dry, sand and prime.
- Do outdoor decoration.
Now it became clear how to close the pipes in the bathroom. But, so that later there are no difficulties, and the repair is of high quality, never forget about the reliability of the entire structure when you are laying out pipelines and their termination. Also consider all the nuances: the specifics of the premises, personal wishes and financial capabilities. By following the recommendations and doing the work carefully, you can achieve good results.
This question is of interest to many home craftsmen who have started repairing or rebuilding a bathroom. Indeed, the specifics of the premises require maximum cleanliness and tidiness, the decoration of the bathroom can sometimes compete with the operating room, and the appearance of the risers and valves does not fit into the overall environment. At the same time, not everyone has a clear idea of \u200b\u200bhow to hide pipes in a bathroom under a tile on their own, without involving workers from the outside. Consider the available options for solving the problem.
Ways to accomplish the task
How can pipes be hidden? There are only two options for resolving the issue:
Embed in the wall. The most time-consuming method, since to complete it, you will need to redo all the wiring again, and if you want to remove the pipes from the heated towel rail, the scope of work expands. But the result will be an even wall, without visible or guessed communications. This solution looks very solid, professional, but labor costs are quite high.
 Hide pipes under a box made of plasterboard, plywood or other sheet materials. The solution is much less labor-intensive, requiring no welding or brazing of pipes, but the box can take up significant space if the pipes are not laid neatly or if there are many of them.
In practice, most often you have to use both methods at once, since not everything can be removed into the wall, the water supply risers and, in particular, the sewer riser are difficult to hide in the wall. And a modern chrome-plated heated towel rail attached to the wall will lose its appearance from being adjacent to the eyeliner, so it is almost always hidden in the wall.
Which way to choose?
In order to decide how to close the pipes in the bathroom, several important factors should be considered. First of all, one must remember that nothing lasts forever, and sometimes you have to repair plumbing, fix leaks, strengthen weak welded joints, etc. Therefore, those areas that are planned to be hidden in the wall must be new, without defects in welding or soldering, (ideally, without joints), the cold water pipe must be waterproofed to prevent the concrete from getting wet from condensation. In addition, all communications in the bathroom have taps for plumbing and shut-off valves - valves, ball valves, to which free access must be provided.
 Water meters will require even more space and should be clearly visible. All these conditions can be fully met only during construction, when it is possible to design the wall in an optimal way in advance. The finished wiring with installed meters and other devices can only be closed with a box, all other solutions will require dismantling and laying pipes on a new one. Therefore, the choice of a way to mask pipes is dictated by the capabilities of the room and the expediency of performing complex work.
How to hide pipes in the wall
How to hide pipes in the bathroom so that they cannot be seen at all?
 If a decision is made to brick up the communications in the wall, you must first of all make sure of the quality of the connections, clarify the service life if the wiring is already in use, and, if necessary, replace everything with a new one.
 Then a channel is made in the wall - a depression in which communications will be located. Its width should allow the pipes to be freely positioned with the required distance between them, and the depth should be approximately twice the diameter.
If the channel width is not very large, then you can simply close it tiles... If the channel is too wide, then you will first have to plaster it, having previously insulated the pipes from contact with concrete.
For cold water pipes, a waterproofing cut-off should be made so that condensed moisture does not penetrate into the concrete. It is best to put a special foam shell on the pipe, which will eliminate fogging. The DHW pipes must be insulated from contact with the wall so that they do not cool down. For this, the same tubular sheath can be used.
How to close pipes in a bathroom with a box
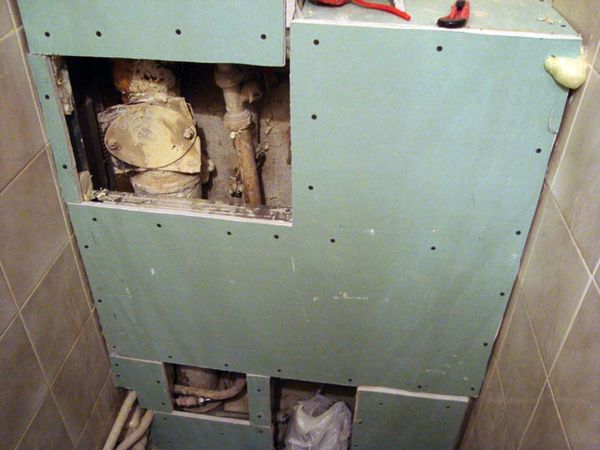
 This option is much easier to perform, since only the installation of the box is required, no action with the pipes themselves is required. Moreover, this is the only possible way disguise the sewer riser and risers of hot water supply and cold water supply. Any sheet material, from drywall to plywood or chipboard, can serve as the material for the box.
First, mark the location on the wall supporting elements future box. They can be wooden blocks, a metal profile for drywall, a mounting corner, etc. When marking, it is necessary to take into account the thickness of the material and the finishing layer (if you plan to glue the tiles, this will add at least 1 cm of thickness).
The points of attachment of the support bar are outlined, with the help of a puncher, holes are made for dowels or anchors.
A support bar is installed, to which the entire frame of the box is attached. During the construction of the frame, it is necessary to provide an inspection hatch for taking readings of water meters and for the possibility of using shut-off valves.
 The frame is sheathed with sheet material. Finished with tiles, wall panel, paint - the choice of finishing options is wide enough, the main thing is that the properties of the finishing material make it possible to use it in a bathroom.
How to remove pipes from a heated towel rail
 When moving or replacing a heated towel rail, pipes are most often hidden in the wall, using the already described method - a channel is cut through the wall with a grinder with a diamond disk, in which pipes with dressed insulation are installed. The main problem node is the junction of the heated towel rail. When installing, you need to pay close attention to the quality of the work, and it is best to stick the tiles in a few days in order to be able to observe whether a leak appears. It is possible to close the channel with tiles only if there is complete confidence in the reliability of the connections. A hidden area with an unreliable seam - the risk of flooding the neighbors from below. If the heating pipes are turned off for the summer period, you must wait until the heating season begins to check the tightness of the connections. Sometimes sections of pipes remain visible, it is easiest to paint them with white paint for heating devices.
If you don't know how to hide pipes in a bathroom, but are determined to act on your own, choose the easiest and least destructive option. If something goes wrong, you can always redo it without much loss.
 If communications are being replaced, it must be remembered that all locking elements and meters must be grouped in one place. This will provide access to all elements from one inspection hatch.
The camouflaged pipeline is not visible, how the connections behave is unknown, therefore those sections that will be hidden in the wall must be connected and isolated as carefully as possible.
It is quite possible to close the pipes in the bathroom yourself. This problem is completely solvable. The main thing is to decide on the way of doing the work and not overestimate your capabilities. The success of the work will depend on the accuracy and thoroughness of your actions.
In many magazines that are dedicated to renovation and design, you can often see pictures of very beautiful bathrooms. The main feature of such rooms is that there are no pipes at all: there are only walls beautifully tiled with expensive tiles. Undoubtedly, this design looks just great, so many would like to make it at home. So how to hide pipes in the bathroom and is it possible to do it yourself without resorting to the services of specialists?
To do this, you need the following tools:
- Bulgarian.
- Chisel.
- Roulette.
- Hammer.
What is the main difficulty?
It should be noted right away that it is unlikely to get exactly such a flawless result, as shown in fashion design magazines. And the point here is that the premises that are cited in such magazines have large areas. But the question of how to hide pipes in the bathroom can be solved positively. And all this can be done independently, without having any special skills. You just need to adhere to certain instructions, and then everything will work out.
The pipes that protrude from the walls of the bathroom do not in any way decorate its interior. But before you try to hide pipes in the walls of the bathroom or engage in bricking them in a screed, you should carefully understand. The fact is that it is not possible to carry out hidden installation with all types of water pipes.
The nuances of installing water pipes in the bathroom
If there is a competent collector wiring, then you can completely do without connections. But if the pipe needs to be lengthened or an additional tie-in is needed, then the connections will already be needed. You need to make sure that the connections are reliable, if everything is in order, then you can safely hide them in the walls. But there are connections that need free access in order to be able to perform periodic maintenance. Or maybe you need a replacement (which is highly undesirable).
So what can be walled up:
- In the bathroom wall, you can brick welded pipe joints that are made of steel.
- Brazed copper is also quite suitable for this.
- Press fitting on metal-plastic, which is crimped with special pliers. But at the same time, you need to carefully check the quality of the fittings, it must be flawless.
- XLPE fitting.
- Threaded pipe connections that are made of steel. Threaded pipe connections made of other materials are also not recommended to be bricked into walls.
- Threaded connections made of metal-plastic, which are assembled with keys.
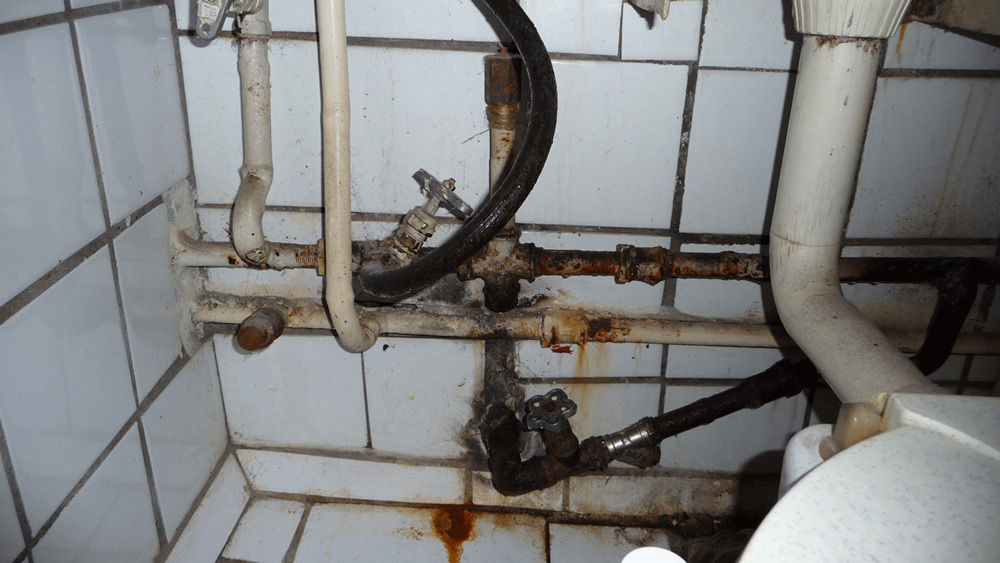
It is necessary to take into account the fact that water very easily finds its way, so you need to carefully monitor so that the connections do not weaken and do not become unusable. The pipes must be periodically inspected without fail. If an emerging leak is noticed, then all measures must be taken immediately to eliminate it. If this is not done in time, then this can cause serious negative consequences.
How to hide pipes in the bathroom walls?
If there is such a task, then it is imperative to do it. But here it should be borne in mind right away that horizontal slitting of panel walls is strictly prohibited. If the walls are made of bricks of insufficient thickness (half a brick was used), then chipping is also impossible. If you neglect these recommendations, you can get very serious trouble with the management company.
It so happens that, due to the material of the walls, chasing is simply impossible. In many prefab houses, the walls are very thin, so it won't work.
How to hide pipes in a screed?
This option (coupler) is one of the most convenient and reliable. To do this kind of work with your own hands is not as difficult as it might seem at first glance. It is noteworthy that the route can be laid along the shortest path. This is the reason that there is no need for horizontal wall slitting. If the thickness of the screed is insufficient, then this can lead to some difficulties. In order to hide pipes in the bathroom, the screed must necessarily contain the pipe, and there must also be additional layer... If the plans have an electric floor, then the pipes should be placed around the perimeter. This in some way reduces the advantage of laying along the shortest route. But there are those that can be laid on tile adhesive. This removes many restrictions.
It is recommended to lay the pipe in a corrugation so that it has mobility during thermal expansion. When the screed dries, it is very important to observe the appropriate temperature regime. Until the screed is completely dry, you cannot turn on hot water for a long time. Otherwise, cracks may form in the screed in those places where the pipes lie.
How to hide pipes in the wall using gypsum board?
This method is becoming more and more popular, as it is extremely simple and affordable. There is as much space for pipes behind the gypsum board sheathing. It is possible to hide not only water pipes, but also the entire sewerage system. But there is one significant drawback in this method - precious centimeters of area are lost. If the bathroom is not very large, then this disadvantage is very significant. This method of masking pipes in the bathroom wall is very suitable for new buildings. There is very often no internal layout, which makes it possible to install walls in places where the owner likes it more. But for the old "Khrushchev" and panel houses, this method is not suitable.
It is not recommended to lay pipes inside the rack profile, as self-tapping screws can get there (if they get there with sharp ends, then this will not lead to anything good).
Before hiding pipes in the bathroom, remember that beauty is not an end in itself. You need to be 100 percent sure that engineering communications are reliable and of high quality. Only then can work begin.
The grooves for laying the pipes must be cut with a grinder. You can pierce it with a chisel, but this must be done in such a way that the pipes fit there without problems. If the wall is made of plasterboard, the wiring should be done before installing the panels from. This must be done when installing metal frame... If the need arises, it will always be possible to make holes in such a frame.
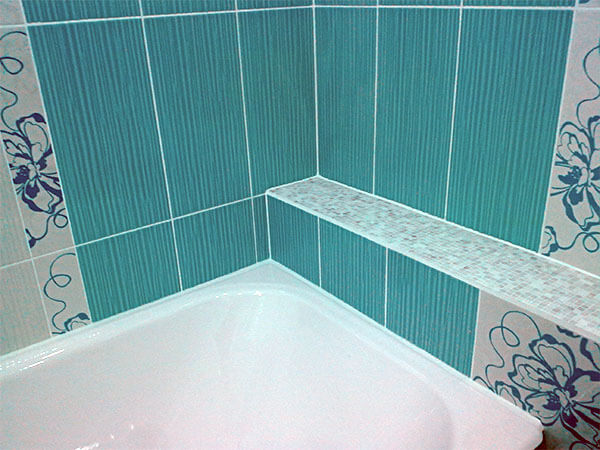
If the space behind the bathroom is not planned to be tiled, then the pipes in the bathroom may not be hidden in the wall. The bathtub itself will serve as a very good cover. They can be attached with clamps without much difficulty.
When the pipes are laid in the wall, it must be tiled. It becomes clear that there is nothing particularly difficult in such a case. In order for everything to work out at the highest level, you need to strictly follow the instructions. Then, of course, there will be no special difficulties.
Sewer and water pipes with shut-off valves, located in the bathroom or kitchen in the visibility zone, do not add aesthetics to the decoration of the room. At the same time, pipes of cold water supply and sewage systems are also an undesirable source of cold that lowers the temperature in the bathroom. In addition, condensation forms on the surface of these pipes, flowing down to the floor and requiring constant cleaning.
Before hiding the pipes in the bathroom, you must conduct a thorough inspection.
Consider ways to solve these problems, depending on the location of the pipeline and its purpose.
Installation of new systems during construction or overhaul
This situation simplifies the solution of the issue, since the installation "from scratch" with a properly thought out sequence renovation works allows you to repair the bathroom with less effort and time.
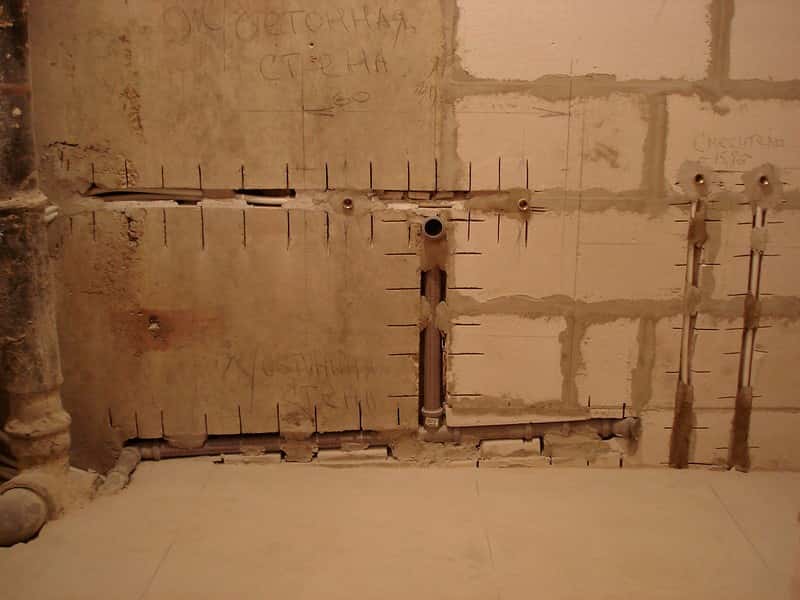
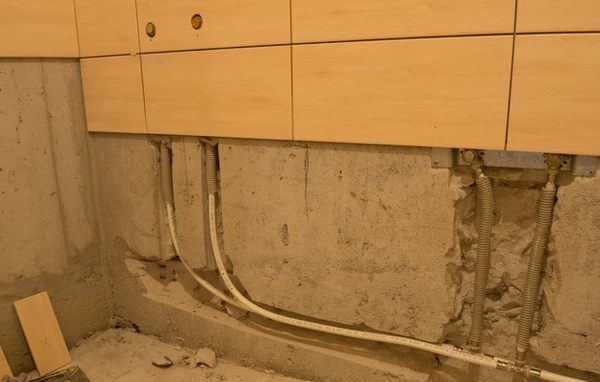
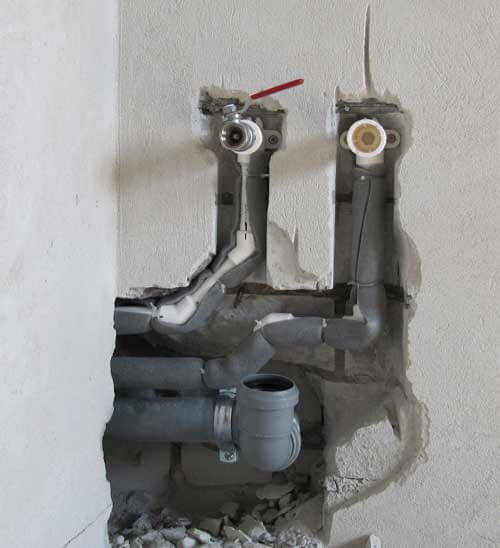
Installation of a water supply system for finishing with tiles
The routing of water pipes to hide the plumbing system is carried out along the walls before leveling plastering is performed. So that the plaster layer for covering the pipes does not have to be made unnecessarily thick, channels for the water supply are grooved in the walls of the bathroom. Using a grinder with a "dry cutter" according to the markings made on the walls, parallel cuts are made at a distance of the diameter of the pipes used, after which the material between the cuts is cut with a puncher or chisel with a hammer.
The hidden pipes under the tiles must be of excellent quality, then their service life will be as long as possible
The pipes in the channels before plastering are fixed with temporary clamps, which can be removed after the first layer of mortar has cured. Modern nylon and metal-plastic pipes, by virtue of their indisputable advantages, displaced steel material, do not need thermal insulation. After leveling plastering, the ceramic is laid over the wiring.
Sewer pipes, due to their significant diameter, are not recessed into the walls, since chipping the wall to such a depth is fraught with weakening bearing capacity.
The sewerage system can be closed with decorative shells made in various ways.
If the sewerage system is installed "from scratch", then when choosing plastic pipes, one should give preference to a thick-walled variety that is resistant to hot water, since the lining of the sewer pipes will complicate the repair in the event of a thin-walled material failure.
Sewer and water pipes, being in plain sight, can ruin even the most original design, so you need to hide them
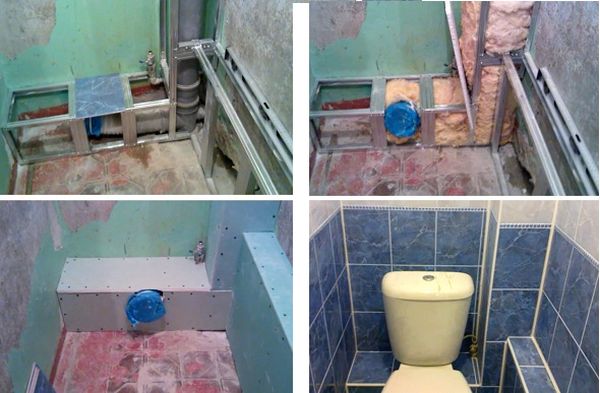
When making major repairs or performing work in an operated room, the technology for finishing the bathroom sewer pipes is the same. To hide sewerage system for an aesthetic shell, you need to make a box from a frame and cover. For horizontal sections of the sewer, a rectangular section of the box is selected, which makes it easier to maintain cleanliness on the floor. The cladding of the riser in the bathroom can be made on the frame of not only rectangular, but also round, semicircular or oval cross-section.
Frame fabrication
It is better to make the frame for the subsequent finishing of the pipeline from materials that are not afraid of water - steel, aluminum, plastic. Using for this purpose galvanized cd profiles with appropriate fasteners, used for the installation of drywall, will save time and effort. The frame is attached to the wall and floor of the bathroom with self-tapping screws, preferably in places that should subsequently be closed with a box. To firmly seal the pins of the frame in the wall and floor, you can cement them there in the holes carefully drilled with "crowns".
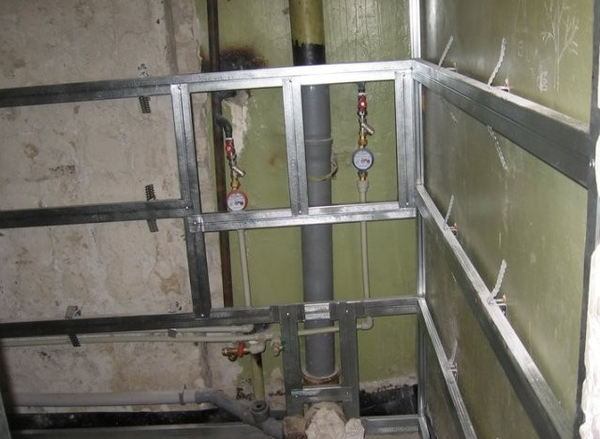
Metal grilles are mounted on an installed frame or directly to pipes
Between themselves, the frame parts are fastened with pull-type rivets or also with self-tapping screws. If the frame is made of steel without a protective coating, then after installation in place, it is covered with two layers of anti-corrosion paint (you can use lead or iron red lead diluted in drying oil).
Thermal insulation of coated pipes
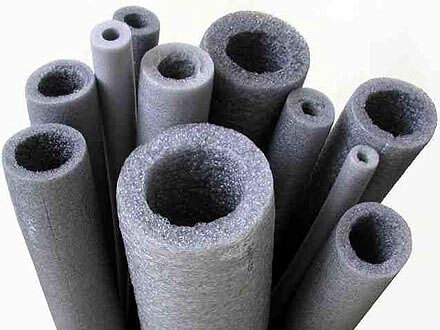
Thermal insulation is performed in order to exclude the formation and accumulation of condensation under the box, since a slight condensation of moisture will occur on the surface of even plastic pipes, the thermal conductivity of the material of manufacture is close to zero. The pipes are insulated with flexible foamed synthetic rubber ("K-Flex"), which is produced both in sheet and in the form of shell pipes with an inner diameter of 6 to 160 mm.
The sheet material is cut into strips, wrapped around the pipes in a spiral or strip, and secured with nylon cable ties. A longitudinal cut is made on the tubular casing (sometimes it already exists), and the insulation is put on the pipe, also with nylon clamps.
If there are remnants of sheet glass wool at hand, then it can be used for thermal insulation, only you need to work with this material in overalls, gloves, glasses and a respirator.
Frame finishing
To hide the pipes, the frame must be closed with a waterproof finishing material... The use of drywall for the manufacture of a box is not excluded, but it requires careful waterproofing of such a coating, since even moisture-resistant drywall (GKLV) is not designed for prolonged contact with water. And if a layer of moisture-resistant material is laid on top of the drywall, to hide it too, then the use of gypsum plasterboard generally loses its meaning. Therefore, it is advisable to close the pipes in the box with tiles, plastic, textolite or extruded polystyrene tiles with a thickness of 1-2 cm with a decorative face layer.
Closing the pipes in the toilet with plasterboard will provide free access to hidden communications in case of repair or elimination of an accident
The listed material, in addition to ceramic tiles, is attached to the frame with self-tapping screws. It is better to hide the corner joints and mating of the box with the walls under decorative plastic or metal linings, which can be glued with silicone sealant.
Laying tiles on the frame
To properly close the frame with tiles, you need to build a solid base. The possibility of using drywall for this purpose should be considered only as a last resort, in the absence of other materials.
A fine-mesh (2x2 mm) steel or nylon mesh is fastened on top of the frame with self-tapping screws, rivets, and a 2-3 mm thick layer of tile glue is applied with a flat spatula. After a day, the surface is ready for tiling, which is laid in the same way as on a regular base. After another 24 hours, the tile joints are rubbed with a moisture-resistant grouting mixture. Ceramic joints at the corners are trimmed with decorative plastic or metal trims for tiles.
![]()
In the bathroom, you can use moisture-resistant drywall - GKLV
If there is a revision window on the sewer section to be trimmed, then access to it must be provided. This can be done by mounting a ready-made hatch of the required size, assembled with a box, which are commercially available, in front of the vents. But you can do it easier - do not put the tile opposite the hatch on the glue, but only wipe its joints with colored silicone. This will allow, if necessary, to pull out the tile without damage, and then also lay it in place, and hide the window.
Riser finishing
The bathroom can have two risers - plumbing and sewer. You can also hide them in a rectangular frame box. Depending on the location of the risers, they can be closed with one box, or each riser is lined separately.
Riser waterproofing
To hide a vertical riser pipe, there is a technology that allows you to simulate a column. A heat-insulating tubular shell "K-Flex" of the corresponding inner diameter and with a wall thickness of 1.5-2.0 cm is put on the riser. The shell is put on the pipe in pieces 0.3-0.5 m long, and gaps of 3 cm.
Installation of the outer shell
A thin-walled plastic pipe with an inner diameter equal to the outer diameter of "K-Flex" is selected, and a cut is made along its entire length with a grinder. The gaps between the pieces of "K-Flex" -shells around the circumference of the riser are filled with polyurethane foam and, without waiting for its expansion, put on the riser a thin-walled plastic pipe cut along the riser, expanding the slot.
The pipe is pulled together with nylon clamps so that the expanding foam does not open it, and unfold with a slot towards the wall. A day later, the clamps are cut off and a thermally insulated riser is obtained in a shell of a plastic pipe, attached by its inner surface to the riser with rings of polyurethane foam between the sections of "K-Flex" insulation.
Facing the riser with mosaics
The surface of the plastic sheath is primed with an adhesion-increasing primer and finished with mosaics, laying it on a white cement-based adhesive mixture or a polyurethane-based compound.
If the mosaic is laid on a reactive composition, then the base does not need to be primed, but it must be degreased.
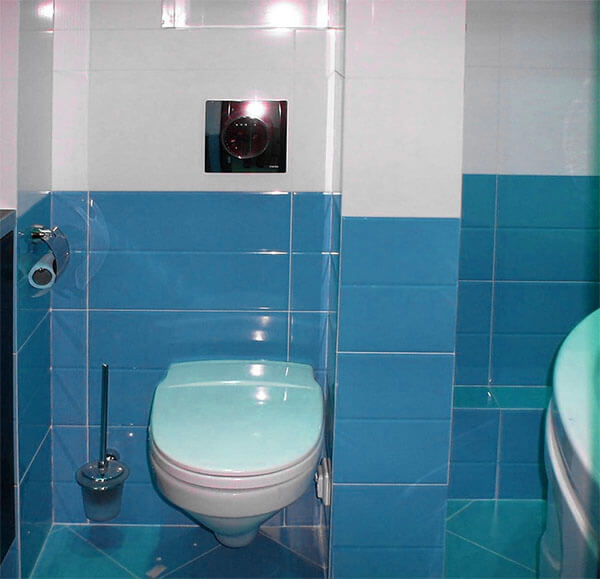
When the glue hardens, they grout the mosaic and - the sewer or water pipe in the bathroom turns into a column.
Conclusion
Finishing plumbing and sewerage pipes in the bathroom ceramic tiles and comparing the condition of the room with the situation before the repair, it is impossible not to come to the conclusion that it is not only desirable to equip and close the pipelines in the premises with a beautiful lining for aesthetic reasons, but also necessary to comply with sanitary and hygienic standards.
Utilities pipes running along the walls and on the floor connecting plumbing fixtures to the water supply and sewerage system can spoil any even the most sophisticated design.
In this case, neither unique 3D floors, nor beautiful wall decoration or beautiful porcelain stoneware on the floor will correct the situation.
To give the bathroom interior a proper look, you should think about how to remove the pipes so that they do not irritate the eyes, distracting attention from the decoration.
In addition, pipes running along walls or floors can be deformed in the event of any inadvertent mechanical impact. Typically in modern houses the distribution of water supply and sewerage systems is made with pipes made of polymer materials, which are not particularly durable.
Hidden pipe routing will not only improve the appearance of the room, but also prevent damage to them.
Let's see what are the ways to hide pipes.
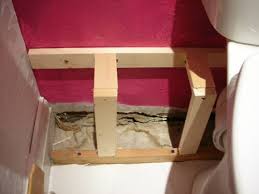
The most in a simple way removing pipes out of sight is disguise with the help of all sorts of cabinets, bedside tables and cabinets.
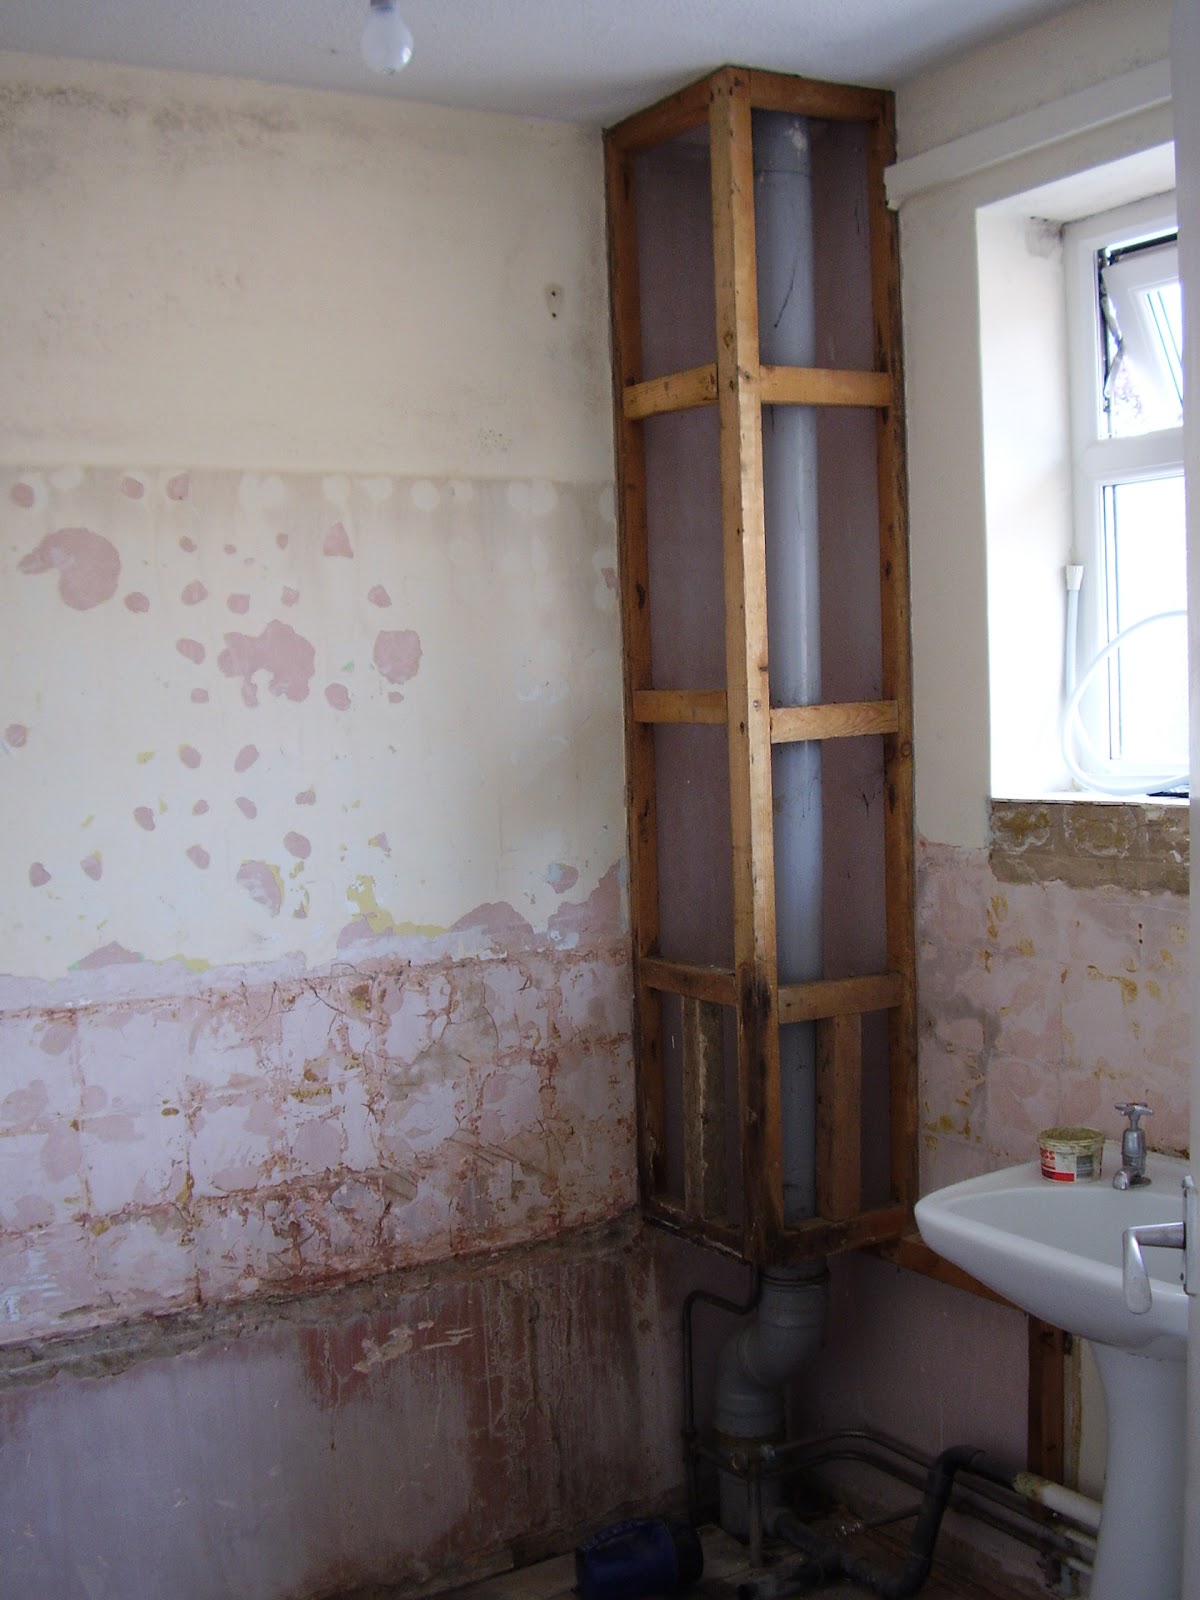
Vertical piping can be stowed away in a pencil case that will hide them from floor to ceiling.
The under-sink piping can be hidden in the under-sink cabinet.
Such methods are simple and allow you to give a beautiful appearance to the bathroom at the lowest cost by removing the pipes inside the furniture.
But this method has its drawbacks.
Firstly, you will have to make each cabinet in place, cutting out additional openings and holes in the side walls and internal shelves for piping through.
And secondly, such a cabinet will be difficult to use for its intended purpose - all the internal space will be occupied by pipes, and there may not be any space left for things. Therefore, other ways to hide pipelines are more often used.
The most aesthetic method that does not reduce the interior space of the room is to lay pipes directly in the walls.
However, this method has noticeable disadvantages:
- great laboriousness of performing strobes in the wall;
- inability to use threaded connections;
- the need to disassemble a section of the wall in case of pipe repair;
- the impossibility of such a gasket with insufficient wall thickness or in panel houses.
If you decide to choose this method, first make sure that the gasket will not cause loosening. load-bearing wall... After all, the stroba will literally "cut" the wall.
In addition, it should be remembered that the thickness of the groove must be sufficient not only for laying the pipes themselves, but also allowing the pipeline insulation to fit unhindered. As you can imagine, in the usual apartment building it will be difficult to make such holes in the walls without violating their bearing capacity. Therefore, it is better to consider another way. The least destructive and no less aesthetic is the laying of pipes in boxes.
Laying pipes in boxes
In one of the previous publications, we already talked about how to make a box in the bathroom. If you have read this article, you already know that doing the box on your own does not present any difficulties even for a person who does not have much experience in such work.
It looks like this hidden gasket very aesthetically pleasing, allowing the box to be finished in accordance with the overall interior design:
For the construction of the box, several meters of a galvanized profile and a certain amount of moisture-resistant gypsum board (GKLV) or gypsum fiber sheets are enough.
Instead of drywall, you can use light PVC panels, which, like drywall, are screwed to the profile with self-tapping screws.
Below you can watch a video on how to make a box in a bathroom from plastic panels:
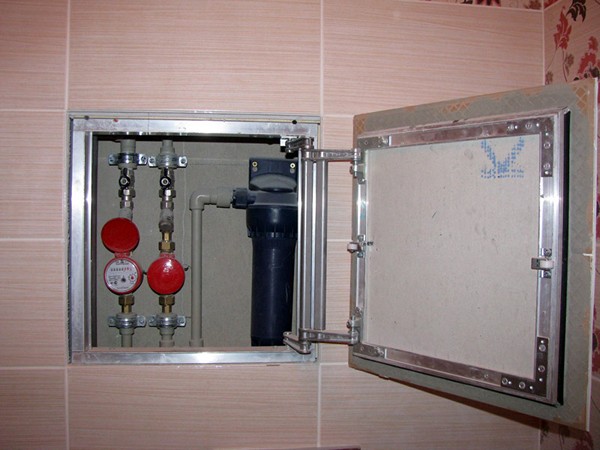
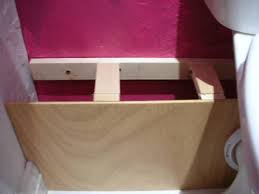
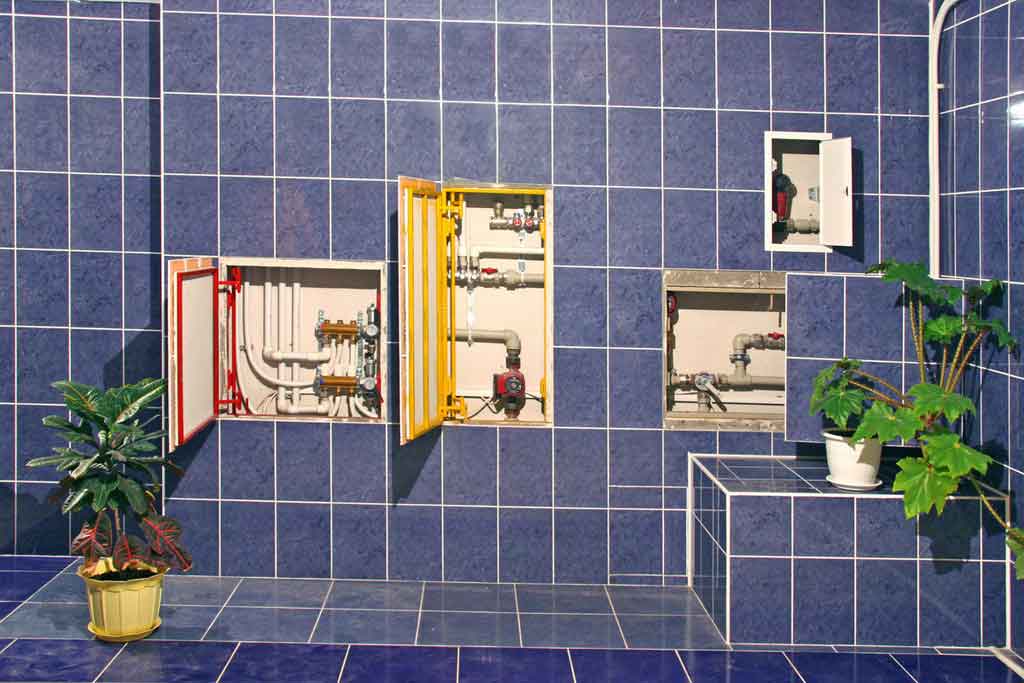
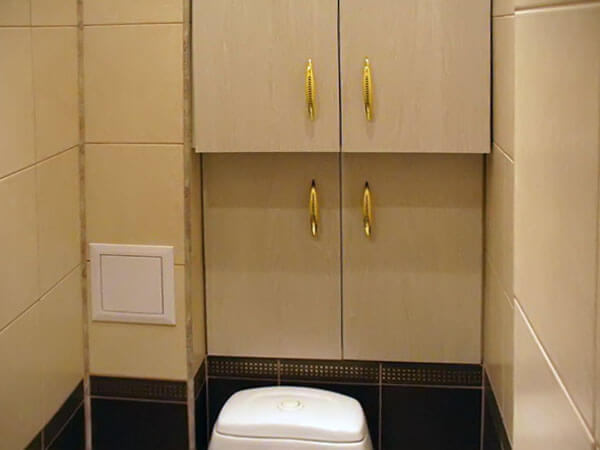
The main thing, when installing such boxes, is not to forget to install an opening hatch to provide access to the fittings that shut off the water, meters and revisions of sewer pipes. Factory-made hatches are available in stores today. different sizes, which are easily mounted in a box of the appropriate size:
As you can see, there are no special intricacies in the device of boxes and you can easily complete all stages of work yourself. However, you should know some of the nuances, which you can read about below.
Distances between pipe attachment points
Regardless of the material, all pipes have standard distances between their attachment points to the walls. This prevents possible sagging of the pipes under their own weight and the weight of the water in them. At the same time, in the horizontal sections of the pipe laying, the distances between the places of their attachment are made somewhat less than in the vertical sections.
For polypropylene pipes, most often used in the device of intra-apartment wiring, the distances between the points of their attachment, depending on the diameter and temperature of the water, can be determined from the table:
|
Nominal pipe diameter, mm |
Distance, mm |
||||||
In accordance with SP 73.13330.2012 Internal sanitary-technical systems of buildings, the distances between the fastening points of steel pipelines are taken according to the table:
|
Nominal pipe bore, mm |
The greatest distance between the means of fastening pipelines, m |
|
|
Non-isolated |
Isolated |
|
|
Pipe diameter, mm |
Distance between supports |
|
100 diameters |
|
The thinner the pipe, the more often you need to install supports. For vertical pipelines allowable distance between attachment points increases by 10%.
In addition, one should take into account the possible thermal expansion of pipes, which can lead to deformation and even rupture. Therefore, all fastenings should not be made rigid so that the pipe has the ability to change its linear dimensions under the influence of thermal expansion forces.
What else to keep in mind when installing pipes
When laying pipes hidden, you should take care of their reliable insulation. this is especially true for cold water pipelines. If the walls of low-temperature pipes come into contact with warm air inside the room, condensation can form on the surface of the pipe.
As it accumulates, condensation begins to drain onto the floor, where a small puddle gradually forms. Gradually building construction get wet and can begin to deteriorate.
If all this happens inside the box, then it is not difficult to guess that soon mold and fungus will appear in it, which not only threaten to spoil the whole view interior decorationbut will also become a direct threat to our health. After all, as you know, mold and mildew can cause lung disease.
Condensation can be prevented with reliable pipe insulation. Therefore, take care of purchasing insulation of sufficient thickness in advance.
Today, stores offer a large assortment already finished products made of foamed polymer materials. They are easy to install, do not rot and reliably isolate pipes from contact with air in the room.
Below you can watch a video on how to properly install Energoflex Super SK thermal insulation:
It is also possible to use thermal insulation made of mineral wool cylinders.
***
As you can see, there are several different ways remove pipes in the bathroom. The main thing is to choose the one that suits you best.


