In many homes, kitchen finishes are made of ceramic tiles, but time goes on, everything changes and improves. Old and familiar materials are being replaced by modern and better ones.
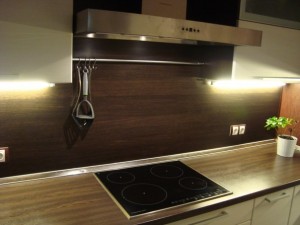
Some of them are wall panels... Most often they are used for the backsplash in the kitchen, which is the wall covering between the countertop and wall cabinets.
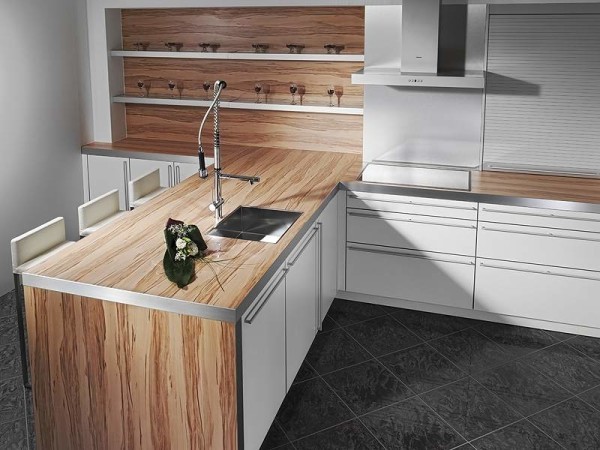
Photo: kitchen finished with wall panels
Requirements for apron panels
The apron protects the wall from dirt and temperature extremes. And also complements the stylistic solution of the entire room. Therefore, to select him, one must be guided by the following requirements, which he must meet:
- easy to clean and resistant to aggressive detergents;
- have high moisture resistance;
- have excellent resistance to mechanical stress;
- do not react to temperature changes;
- to fit into the overall interior of the kitchen, especially to be combined with the facade of the kitchen set.
Wall panels correspond to all this. Moreover, their installation does not require a lot of time and effort. The apron made by them will perfectly protect the walls from moisture and dirt accumulation. It will have good sound insulation, and during the cold season it will keep the heat in the kitchen. Does not require special care. A wide range of types of panels will pleasantly surprise and help you to implement any designs.

Types of wall panels and their features
Panels are distinguished by material of manufacture, texture, stylistic design and size. The latter are sheet, rack and slab. For their basis, the following materials are used: drywall, fiberboard and chipboard, plastic, and glass.

Plastic panels for the kitchen
This type of wall decoration has been around for a long time. Previously, it was used only in government agencies. have more durable characteristics, but still lose to other materials in resistance to mechanical stress.

The main advantages are reasonable price and easy installation of structures with them. Wide range of colors and textures. This is a budget option, but it makes it possible to bring a variety of ideas to life. Panels can be made of MDF and PVC.

They are easy to install, between them and the wall you can lay heat and sound insulation materials, hide electrical and communication cables. They can be easily cleaned with detergents without abrasive inclusions. In case of damage to some of their parts, you can easily replace it without disassembling the entire apron. They are notable for their low price, even in comparison with expensive wallpaper and paint. Many kitchen sets made of MDF. Therefore, an apron in color and texture, similar to the facade of kitchen furniture, will very harmoniously fit into the kitchen.

PVC panels are made of environmentally friendly materials, therefore they are not toxic. They are perfectly mounted and have high moisture resistance. They are equipped with stiffening ribs for high strength. It is a flame-resistant material that is highly resistant to scratches, chemicals and ultraviolet light.
Laminated wall panels
LMDF is an inexpensive material with a huge variety of colors. Installation is characterized by ease of fastening with a minimum of joining seams. The wall surface does not need to be specially prepared before installation. They come with one or two laminated surfaces, but it is worth choosing a double one, it has a higher moisture resistance. Such a plane is resistant to scratches and chips.
They are suitable for kitchens with an electric hob. In the vicinity of an open fire, in the case of using gas burners, the panels may deform over time.
Chipboard is more resistant to high temperatures and moisture than LMDF boards. They come in various colors, they can imitate any texture, ranging from natural stone and ending with the structure of trees of different species.

Laminated plywood
Such panels are glued veneer sheets, they are environmentally friendly and due to this they have gained great popularity. They are distinguished by high moisture resistance, resistance to high temperatures. For an affordable cost, you can purchase a fairly durable material with a long service life and an aesthetically beautiful appearance.
![]()
Postforming
These panels are made of wood shavings and covered with plastic on top. Found widely used for finishing kitchen surfaces. They are brighter and more colorful than film faced plywood. Resistant to high temperatures, not afraid of moisture and grease. But their cost is higher than that of plywood.

Fake diamond
Expensive, but strong and durable material. It is especially impressive when made of it: an apron, a countertop and a sink. Rarely used to decorate an apron because of its cost. However, it is popular with those who equip their homes from environmentally friendly materials. He is not afraid of moisture high temperatures, chemical and mechanical effects. If necessary, it can be easily restored.

Installation of panels should be done by professionals, so as not to spoil the work and get a seamless surface.
Glass panels for kitchen apron
They are versatile, they can fit into a small kitchen, or combined with a dining room or living room. They are also called "Skipped"... Match perfectly with glossy decor. They are made of ordinary or tempered glass.

Widely spread. These double-layer glass panels consist of glass and a colored film glued to it from the inside. Great effect for an affordable price. Variations are possible when chipboard is used instead of film. But such glass is quite fragile and should not be placed near the hob.
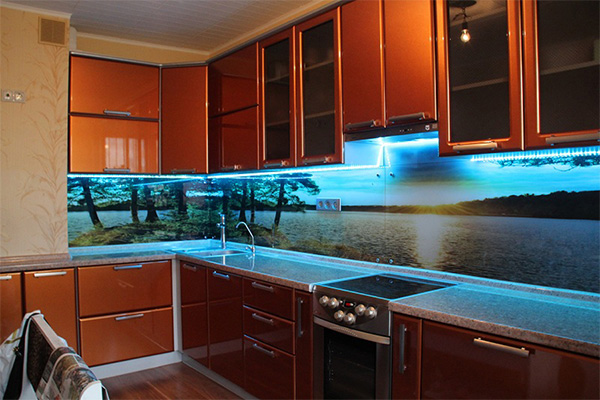
Therefore, they are increasingly popular tempered glass wall panels... Unlike normal, it is heat and scratch resistant. Has high strength. It is an expensive finishing material, but worth the money. With it, you can recreate flower ensembles, seascapes and even city streets on the kitchen apron. You can choose any drawing you like for such glass. Or to fulfill your imagination and order an invented version of the image, which will give the kitchen versatility. To achieve an unsurpassed result will help skinned with photo printing and volumetric 3D drawings.

Today there is an opportunity apply any pictures to glass using photo printing different colors and shades. The process is as follows: special paints are applied to the film with an ultraviolet beam using polymerization. They make it possible to reproduce both monochrome and color drawings. This image can be placed between two laminated glass with high quality and expansion.

It is especially interesting that such panels will act as an apron and at the same time become the main focus in the kitchen. Photo printing can be applied to different types of glass: mirror, corrugated or frosted.
This type of apron design finds more and more admirers not only because of its high strength characteristics, but also due to its affordable price. Moreover, not only the price of this material itself is taken into account, but also preparatory work before installing it.

The walls can be left intact without any special preparation, and this will be an obvious savings when calculating the total cost of repairs.
Laminate has always been associated with a comfortable floor covering. But few people know that modern fastening structures allow them to clad not only walls, but even the ceiling.
When laying flooring there are no particular difficulties, but decorating the walls in the kitchen with laminate is a much more complicated process.
Pros and cons
Advantages
Each kitchen apron should have a number of qualities suitable for use in difficult conditions or simply stand out from its competitors.

Material advantages:
- Acceptable price;
- Imitation natural wood, type, structure;
- A variety of colors, textures;
- Ease of installation;
- Simplicity of care;
- Environmentally friendly material;
- Practicality;
- Durability in the absence of mechanical stress.
disadvantages
Any product has both advantages and disadvantages. Laminate on the kitchen wall is no exception:
- Wet air;
- Sudden changes in temperature.
Types of laminated coverings

Modern technologies offer on the market several varieties of laminated coatings with similar properties. Let's take a closer look at them:
- MDF panel. They are distinguished by their low price, ease of installation to all types of lathing. The main disadvantage of the product is that its laminated surface is an ordinary varnished paper. Therefore, the material is hygroscopic;
- Chipboard. The lathing is not required at all. In addition, the laminated surface of the product is denser, which has a positive effect on its strength. The main disadvantage, again, is the hygroscopicity of the material;
- HDF laminate or laminated hardboard... It is a compressed material. It has a good density, which allows it to be used as a protective apron in the kitchen;
- Floor laminate... Normal floor covering used as kitchen apron, will perfectly cope with the responsibilities assigned to him.

DIY styling options are divided into two types:
- Glue or liquid nails. Installation is carried out on a flat base without the use of plaster;
- Lathing. A construction of slats or blocks on which the material is laid.
Depending on the installation method:
Kleeva. With this method of installation, the adhesion to the base will not be enough, therefore this installation option on the crate is not recommended.
Sheet pile. With the help of nails or staples, the structure is mounted on glue and wooden lathing, fixed by analogy with clapboard.
Clicky. More reliable fasteningthan tongue. It will securely attach the adhesive to the battens. Small nails are used as additional fixation.
Chipboard and MDF
You need 4 to 6 holes in the wall. Plastic dowels together with long screws will surely secure the product. We will cover the ends with a special profile for the edge. It is better to seal it with a sealant.
In this way, not only the material is fixed, but also additional protection from water. A special mirror holder will allow you to hide the caps from the screws. MDF panels are bonded by analogy. Unlike laminated chipboard, the ends of the panels are already laminated.


HDF
It is more difficult to make an apron for the kitchen from this type of laminate on the wall. We mount a more frequent crate of 2x4 cm slats. We process it with linseed oil, let it dry completely. This will help her fight moisture. We fix it on the wall.
A perfectly flat surface is not required. The design will completely hide all the imperfections of the wall. The mesh of the lattice is mounted no more than 30 cm. The recommended method of fastening and edging is with liquid nails. Despite the frequency of the lathing, less material is required than for other materials.

Floor laminate
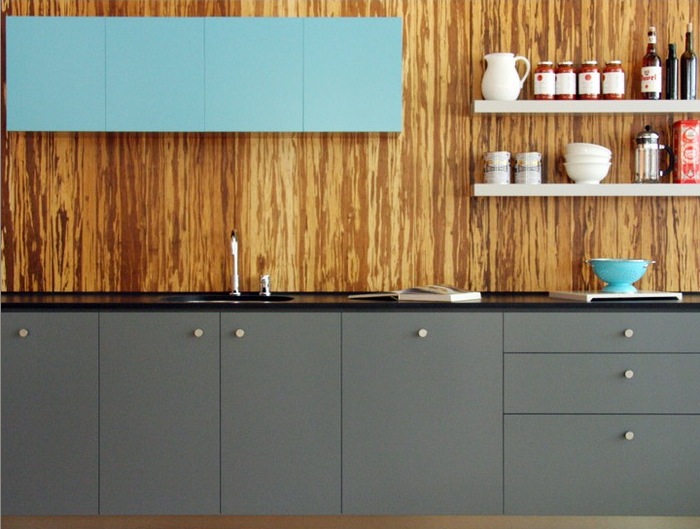
Conventional laminate is not only mounted over working area, but also on request throughout the area. We take the laminated panel, fasten it vertically in one row. The combination of a dark wood-like bottom with a light top has proven itself very well in practice.
We fasten the lathing with liquid nails. Locks, screws and nails are not possible. This design is necessary when the surface coverage is higher than the length of the board. With a perfectly flat base, the material is mounted without lathing.
If there are irregularities, then the crate becomes horizontal, in the form of four rows of slats, the thickness of which is no more than 25 mm. The edging is finished with a plastic or aluminum corner.


DIY installation
After purchasing the material, we bring it into the apartment. The ideal room is a corridor. We leave it alone for several days to get used to the microclimate of the house where it will be used. Then we start assembling the lathing.
Installation of the structure yourself is very simple. We take small blocks of 4x4 cm, attach to the surface 50 cm from each other.

The lathing is assembled both into the entire wall and on its part. Various compositions in the form of geometric shapes are possible. The square is suitable for an aquarium or TV. Here, your imagination is limitless.
After creating the crate, each element needs to be checked. It is necessary that each block is at the same level. Installation always starts from the bottom. We put every detail in stages, otherwise the entire cladding will take on a nasty look. We'll have to dismantle the structure and repeat the process from the very beginning.

Video instruction
Having studied all the advantages and disadvantages, types, methods of installing laminate flooring, you can choose the right option. Decorating the walls in the kitchen with laminate is nothing more than improvisation. Without it, it is impossible to get a decent result when decorating any room.
Often, laminate is used not only as a floor covering, but also for finishing an apron for the kitchen. You can use this material to cover the space on the wall between the countertop, stove, sink and wall cabinets with your own hands. Laminate is one of the most economical and practical materials for finishing a kitchen apron. It can be safely washed using chemicals, it practically does not wear off and does not fade. Such a coating can fit well into the interior of any kitchen.
The product can imitate tiles, granite, marble and wood in a variety of colors. There are two main types of laminate - moisture resistant and water resistant. The moisture resistant coating is made using wood covered with plastic in several layers. The waterproof material is made entirely of plastic. The waterproof analogue is not able to absorb moisture, and is equipped with an additional water-repellent layer - this gives it a high degree of reliability in constant contact with water and protects it from mechanical damage.
The main advantages of laminate flooring are:
- Ease of maintenance of the coating;
- High level of moisture resistance. The material is ideal for installation as an apron in the kitchen;
- Ease of installation;
- Low cost.
Other advantages of such a coating as kitchen laminate flooring include the availability of a wide consumer audience. Due to this, the material is widely used for cladding kitchen work surfaces. The laminated panel from which the kitchen backsplash is made has the longest possible service life.
With careful and proper handling of the product, its service life can be more than 10 years. Moreover, its original characteristics remain unchanged. Before starting the installation of a laminate kitchen apron, choose the right material.
 Working kitchen panels are made out with products of the 31st or 32nd class. This is due to the fact that an intense impact will be exerted on the apron during operation, which a material of this class is quite capable of withstanding.
The laminate flooring is formed from four layers. The protective transparent layer consists of environmentally friendly acrylic resin with additives. The next layer is decorative - it imitates different kinds coatings and finishes, including wood grain texture. The base layer contains compressed quality wood fibers. The bedding layer is presented in the form of paper impregnated with a special composition, which protects the material from getting wet.
Among the disadvantages of such a laminate finish, it is worth noting its low resistance to high temperatures.
Advice! It is not recommended to place the material behind a gas or electric stove. The distance between the slab and the covering should not be at least 10 cm. All seams must be reliably protected with glue so that water does not get into the space between the covering and the wall.
Installation tools
 Before starting work on installing the laminate on the kitchen apron, you should carry out preparatory work related to the selection of tools. Actions will be performed using:
- Electric jigsaw;
- Hammer;
- Construction level;
- Pencil;
- Rulers;
- Scotch tape;
- Laminate hammering block;
- Spacer wings;
- Screwdriver, dowels and screws;
- A soft spatula.
Preparatory work
 Mounting laminate panels on the wall near the kitchen work area begins with leveling the surface. This is done with a putty - this mixture will effectively smooth out and eliminate all noticeable irregularities and defects. Next, a crate is created on the surface, which can be constructed from wooden beams. All the elements of which it will consist, the crate should be at a distance of 30 cm from each other.
A concrete screed or inexpensive linoleum can be used for the base under the laminate layer. The main requirement for the base, which is attached over the lathing, is its evenness and a high degree of strength. The presence of distortions and irregularities can be checked using a building level. Wall irregularities can be leveled with a leveling compound.
Advice! Despite the moisture resistance of the laminate, care should be taken to create a protective waterproofing layer. It can be made using plastic wrap. In this case, the edges of the film should go beyond the laminate at least 5 cm.
Locking installation
 This method is simple and quick to install. It implies the presence of spikes and grooves on the laminate panels. Laying the first row begins from the upper corner, with a spike against the wall while resting the sheet on the lathing frame. The spike of the second panel (holding the first one by hand) is pressed at an angle of 45 ° into the end groove of the first tile until it stops.
Thereafter finished item fastened to the crate with screws. The installation of the second row panels is carried out in the same way. In order to finish the kitchen apron with such a coating, you will need a relatively small (compared to the floor) amount of laminate. The connection of the first and second row is performed using a special longitudinal lock. If necessary, adjustment of the panels to each other can be carried out by gently tapping a hammer through a wooden block.
For the reliability of fastening such an apron for the kitchen, the panels are laid "in a run-up", while each next row should move slightly away from the previous one. For convenience, each next row should be started with a pre-cut panel.
Glue installation
 This method, despite its cost-effectiveness, is considered more time-consuming and difficult, however, all assembly work you can do it yourself. Compared to the locking method, the implementation of such an installation will take much longer. However, this method is applicable to all types of walls. First, the laminate panels are bonded to each other with any suitable adhesive.
A thick layer of glue is applied with a brush to the end edge and groove of the panel, after which it is carefully inserted into the spike of the next product. Remains of glue are immediately removed with a soft spatula or damp cloth. It is important here to prevent it from drying out on the surface of the cladding. After laying the first row, you need to start gluing the second. Thus, an apron is made of laminate for the kitchen - all rows are connected in series with each other.
Advice! After installing the second row, it is advisable to stop working for 2-3 hours in order for the adhesive to completely solidify. After that, the installation continues.
If minor gaps are found at the joints, they can be eliminated with a special laminate sealant. This composition is firmly pressed into the noticed gap and rubbed with a soft spatula. It should be remembered that the laying of the laminate covering on the kitchen backsplash should be done with an orientation towards the "floating" method.
Rigid fastening can lead to deformation of the entire coating, despite the presence of a stable lathing. After all the installation work is completed, the wall covering will need to be left to dry for 12-15 hours.
The kitchen is one of the most functional rooms in the house. People try to approach the arrangement of this room with all responsibility. After all, the room should be not only beautiful and modern, but also as functional as possible. One of the significant elements of the room is the kitchen apron - this surface plays a protective role. Thanks to its presence, the walls do not get dirty during cooking.
Criterias of choice
Before you start creating a kitchen apron, you need to study in more detail the basic requirements that professionals often impose on such elements. If you decide to start arranging the protective surface yourself, pay attention to the following points:
- apron sizes. You can calculate the parameters yourself by performing the necessary preliminary measurements. Basically, the coating is mounted so that it goes slightly beyond the countertop area. Most often, the height of the apron does not exceed 85 cm. The choice of width depends on the location of the furniture;
- operational period. To create a kitchen apron, it is best to choose durable and reliable materials that are not afraid of moisture and temperature extremes. How long the protective coating will last you directly depends on these qualities;
- practicality. The surfaces are arranged near the sink and the stove, and therefore the aprons get dirty quite quickly. It is worth giving preference to materials that are easy to clean and do not deform under the influence of household products.


It should be noted that recently in the creation modern kitchens quite often laminate is used instead of an apron. This is due not only to the attractive appearance of the material, but also to the excellent performance. The laminate surface is easy to clean, it is not afraid of temperature changes and moisture.

Pros and cons
Most people are used to laminate flooring. But recently, modern interior designers are increasingly using this material for wall decoration and designation of functional areas in the room.
The laminated apron for the kitchen protects the wall well from various contaminants, has a high level of water resistance and does not differ in a complicated installation process. Various chemicals can be used to clean the surface. Even after regular washing, the apron does not lose its properties and appearance.

Another advantage of this option is its low cost compared to other materials.

It is worth noting that if you want to equip a laminated apron in the kitchen, it is best to use panels of the 31st and 32nd class. These types perfectly resist the effects of moisture, are not afraid of intense loads, which is important during operation.

As for the disadvantages, a significant disadvantage can be attributed to poor resistance to sudden temperature changes. The material is not recommended for installation behind a gas or electric stove, as it can deform after a while. The distance between the apron and the equipment must be at least 10 cm.

During installation, all seams are treated with special glue. This is done so that water does not get into the holes between the wall and the laminated apron.

Preparatory stages
You can install the laminated apron yourself. First you need to prepare the material and tools for work. In the process, the master will need a jigsaw, a building level, a screwdriver, spacer wings and a soft spatula. A pencil, ruler and tape are used as accessories. You will also need a hammer to work.

Before equipping a laminate apron, you need to carefully prepare the surface. The whole process starts with leveling the wall. For this, a standard putty is used. It should be noted that the composition helps to eliminate all defects and irregularities on the surface. After applying the putty, you need to start creating the lathing. For this, you can use small wooden beams.

It is necessary to fasten all elements for the crate so that the distance between them is at least 30 cm from each other. A concrete or linoleum screed is used as a basis for a laminate. During the creation of the lathing, care must be taken to ensure that the structure is strong and as even as possible. You can check the base for deviations using the building level.

When using a laminate as an apron, experts often create an additional waterproofing layer. It can be made using polyethylene film. Its edges should go beyond the material by at least 5 cm.

Basic installation methods
A laminated apron can be created in two main ways: lock and glue. The first option is simple, the process does not take much time. Laminate panels have special spikes and grooves, which makes installation much easier.

Installation of the first outfit should always start from the top corner. The spike should be near the surface. During installation, the laminate sheet rests on the crate. The second panel is pressed at a 45 degree angle. You need to fasten the sheet in the end groove of the first part.

After that, the laminate is fixed to the crate with screws. In a similar way, you need to install the second row. To create an apron in this way, you do not need a large amount of material. Fastening between the rows takes place using a longitudinal lock.


Sometimes it becomes necessary to neatly fit the panels to each other. In this case, you need to use a wooden block and a hammer.
![]()
The second way of fixing the laminate is glue. This option is considered more economical than the previous method, but it will take much longer to complete. The main advantage of this method is that it fits all walls.
First, the laminate needs to be fastened together using special adhesives for this. After that, the substance must be applied in a thick layer to the end edge and groove of the material. Then you need to carefully install the spike of the next panel. Leftovers adhesive composition must be removed immediately with a damp cloth. This must be done quickly so that the substance does not dry out on the material.

Installation of the second row is carried out in a similar way. If during the connection you notice that gaps have formed at the joints, you need to treat them with a sealant. The grout is applied with a soft spatula.

Basically, after installing the second row, the process is stopped for several hours. During this period, the glue hardens, which greatly facilitates the further installation process.


