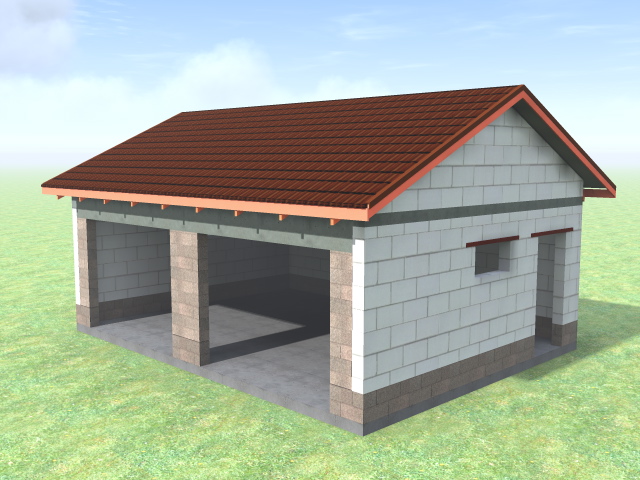
A garage is a necessary functional structure for both those who have a car and those who do not have a horse. Some put a car in it, carry out minor repairs in comfortable conditions, while others use it to store blanks for the winter and unnecessary things in the house.
To build a garage from foam blocks with your own hands is much more profitable than buying or ordering construction from a specialized company, but for this you need to have some knowledge and at least some experience in stone work. In the article we will tell you step by step about the technology of building a garage, highlight the main stages of work.
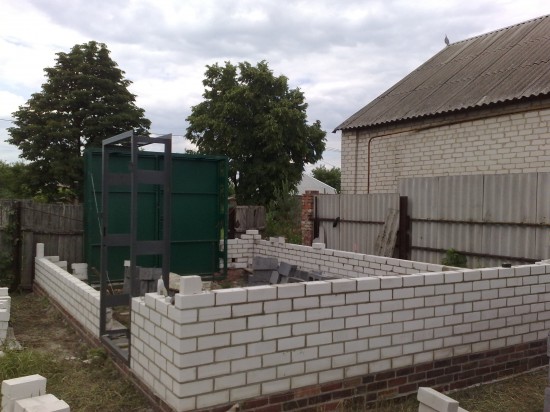
The first and most important stage of construction
No construction starts without a project and drawings, which indicate all the necessary parameters and specifications structures:
- Binding the garage on the ground (distance to the fence, house, other buildings).
- Building dimensions (length, width, height).
- Number of storeys (if you have a foam block garage with an attic).
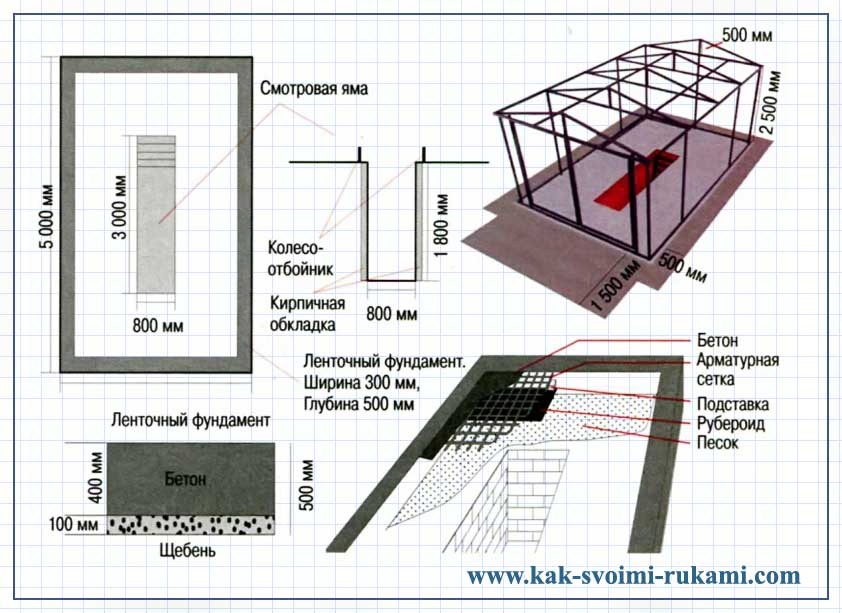
- The presence of a viewing pit or basement with dimensions and elevations.
- Communication scheme (light, heating, water supply, sewerage).
The drawings must indicate the estimated amount necessary materials (construction, finishing), the nodes of various constructions are developed in detail, the places of the waterproofing device and other related works are indicated.
In addition, the location must be indicated. groundwater, soil composition at the site, places of approaches and driveways to the construction site. All this documentation is provided by the construction company with which you conclude a contract. But if you decide to build a garage yourself, then it is quite possible to draw a sketch or drawing of a garage from foam blocks yourself.
Important! In this case, it is necessary to order from a specialized organization an analysis of the composition of the soil, the depth of freezing and the presence of groundwater. Otherwise, instead of a basement in the garage, a pool may turn out, since when excavating there is a risk of flooding the foundation pit with nearby waters. This is especially true when constructing a basement or viewing pit.
The basis of strength is the foundation
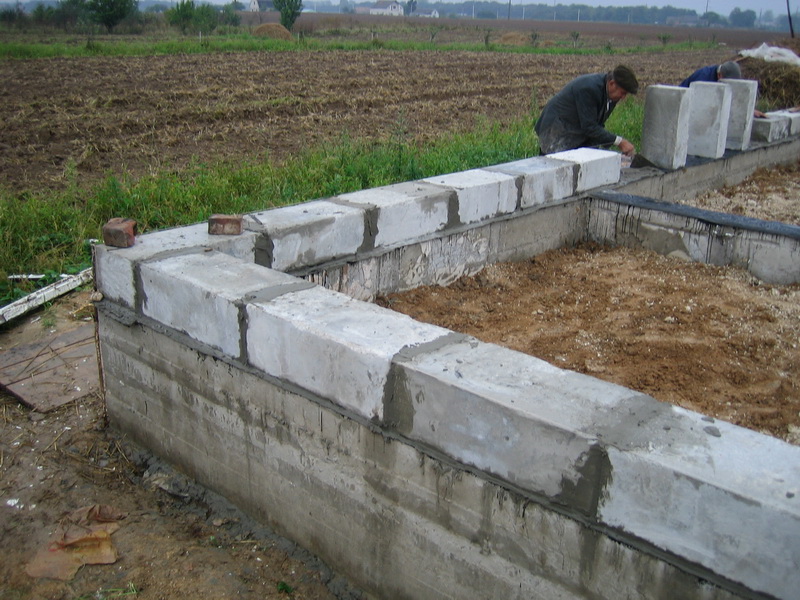
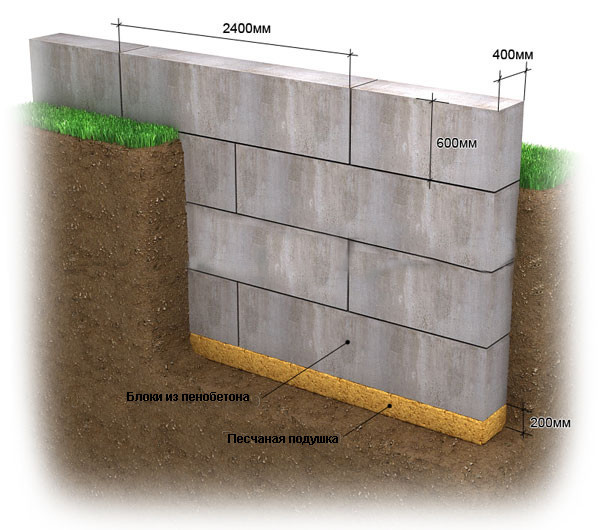
For the construction of a garage, a strip foundation ("tape") is most often used, this is the most stable and reliable construct (see).
Consider the main construction stages foundation devices for a garage with a viewing pit:
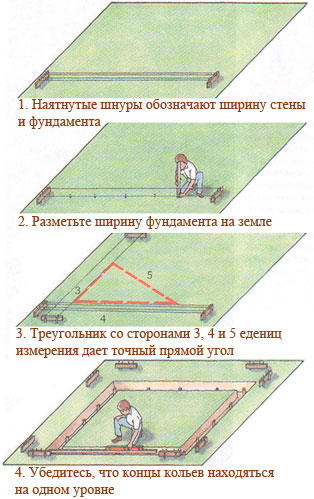
| According to the drawing, markings are made for digging the "tape" on the site. The axial threads are pulled, angles and diagonals are measured. Level the base under the foundation. The cast-off, on which the sowing is attached, is moved at least 1 meter from the edge of the foundation. |
|
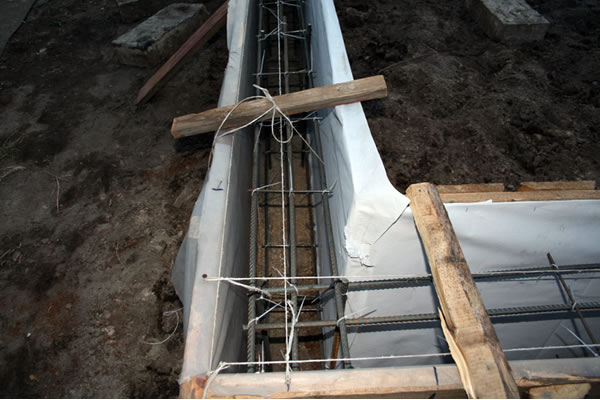
Dig a foundation pit for a viewing hole. It is made a little wider and longer than the actual one for the walls.
The optimal width of the pit is 1 m, the depth is 15 cm more than human height. |
|
| Select the ground for concreting the "tape" to the desired depth. The bottom of the trench is leveled and laid sand pillow 15–20 cm thick. |
|
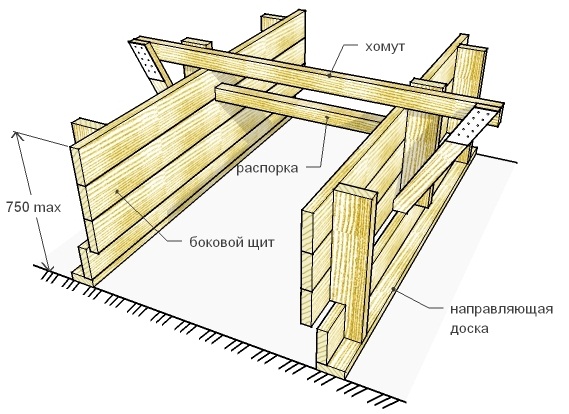
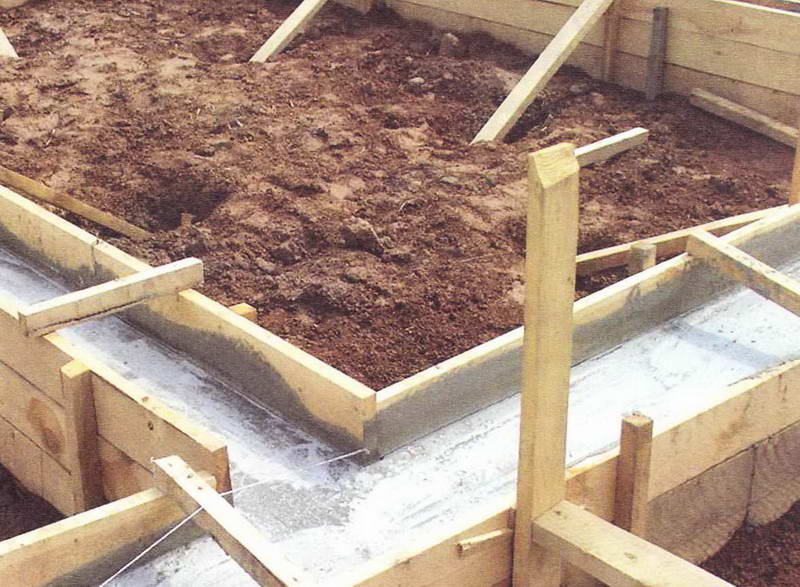
| The formwork is mounted for pouring concrete, carefully maintaining the design width of the foundation. The bottom of the shields in the trench is buried with stones or boards, the top is fixed with clamps made of wood or metal. |
|
| "Tape" is reinforced with knitted or welded frames, as well as individual rods of reinforcement with a diameter of 12-16 mm. Particular attention is paid to the corners of the structure. The free ends of the frames at the corner joints must intersect by at least 15 cm. The protective layer of concrete on the sides and top of the reinforcement is made at least 3 cm. The overlap of individual rods at the corners with an approach to the adjacent side is 30 cm. |
|
| The "tape" is poured with concrete not lower than M200 grade. The stronger the foundation, the lower the probability of movement and cracking of foam blocks. The concrete surface is smoothed and covered with a film until complete setting, periodically wetting with water to avoid drying out and cracking. Waterproofing the foundation on top is performed with roofing material, techno-nicol or other roll materials, or with several layers of bitumen. It is imperative to do this in order to avoid drip penetration of moisture into the body of the foam concrete. After removing the formwork, the sinuses are covered with dry soil and rammed. |
|
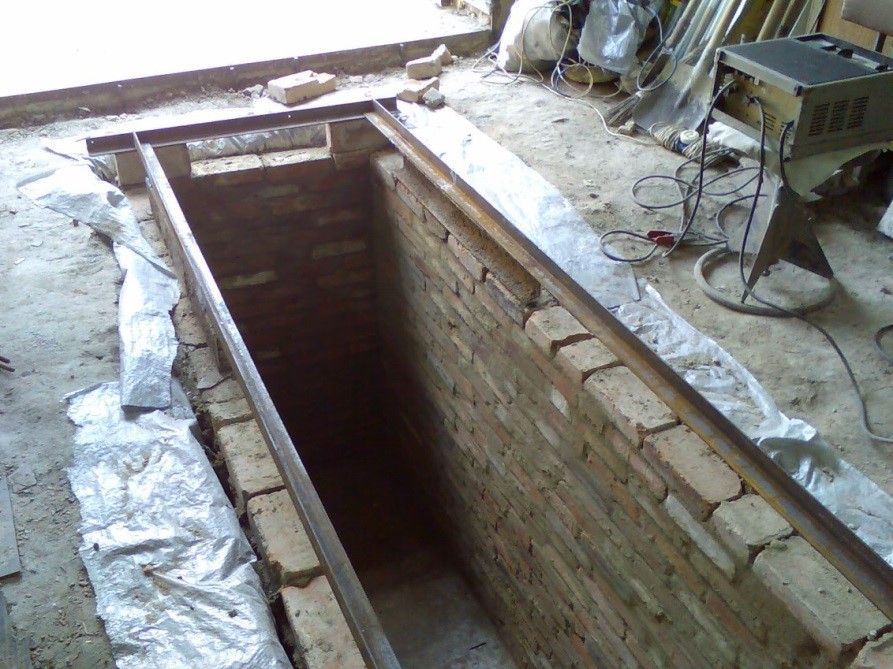
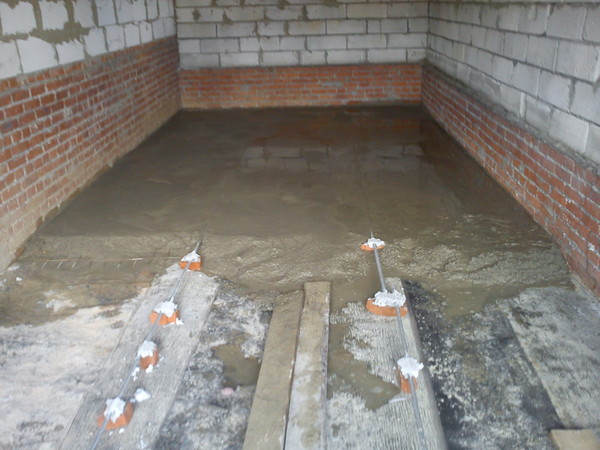
| The bottom and walls of the inspection pit are leveled, fine gravel 10–15 cm thick is poured onto the base and rammed. About the same layer of sand is laid along it, which it is advisable to spill with water and carefully tamp. Then the bottom and walls are waterproofed with a film with an overlap of the edges by 15 cm. An armo mesh is placed over the film and poured with concrete. The walls are built from bricks or other materials. A protective corner (wheel stop) is installed along the perimeter of the pit, onto which a mustache is welded to embed it in the concrete of the floor covering. |
|


For a one-story garage, the depth of the foundation is 40-50 cm, if the garage with an attic made of foam blocks, it is recommended to increase the depth of the trench to 1 meter.
Walling
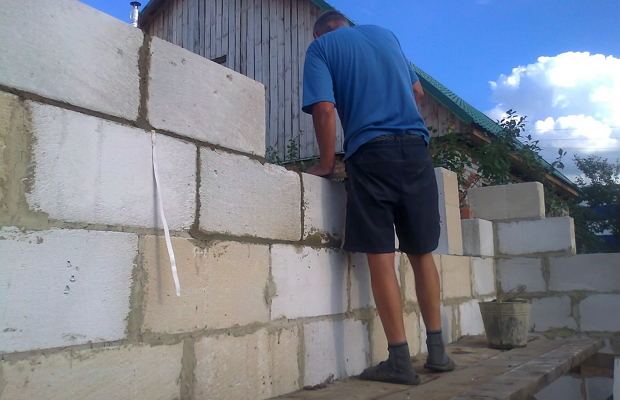
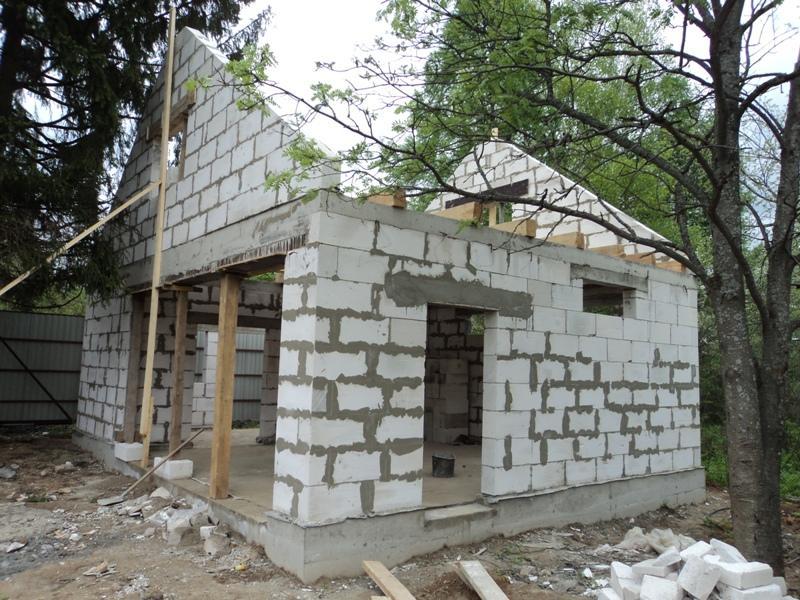
In order to build a garage from foam blocks with your own hands, it is enough to have at least some knowledge of masonry work (see). Foam concrete is an easy-to-use material, large block sizes speed up the workflow, it is perfectly cut and drilled. There are several mandatory rules that must be followed when laying foam blocks.
Let's talk about them in more detail:
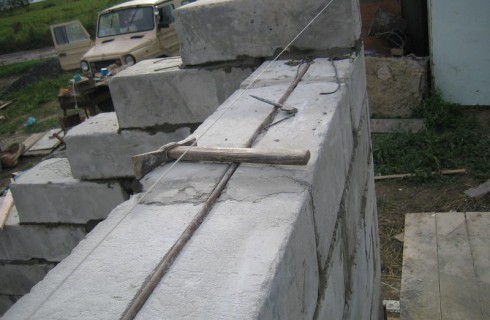
| For the outer walls of one-story garages, you need to take a foam block with a density of 600-800 kg / m3, if a garage with an attic, then higher. The laying is carried out with bandaging the seams - each subsequent row is shifted by 1/3 or half a brick in relation to the previous one. |
|
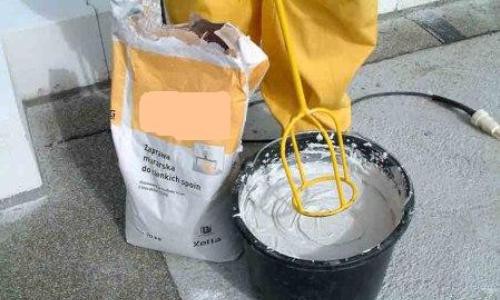
| For masonry use cement-sand mixture or . With glue, the seam is even and thin (up to 3 mm), respectively, the thermal conductivity of the walls decreases, the sound insulation increases. The glue mixture is easy to prepare, instructions are attached on the package. |
|
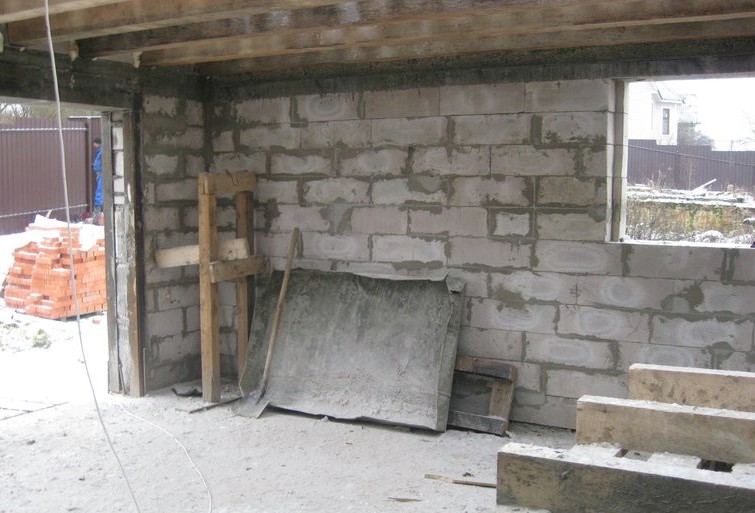
| The first row is placed on the waterproofing layer and leveled in level; the quality of the masonry of the subsequent rows depends on its verticality. The blocks are laid flat or on their side, depending on how thick the walls are in the project. Usually, a garage is made of foam blocks with a wall thickness of 200-300 mm. |
|
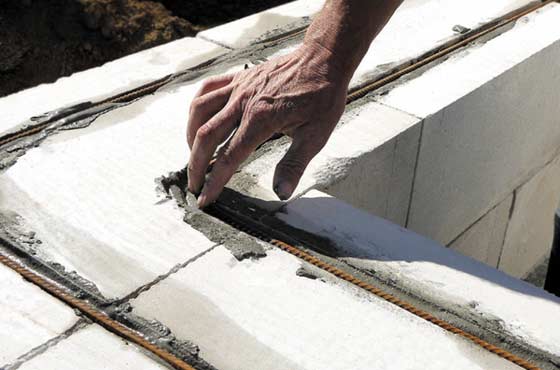
| The masonry must be reinforced every 2–3 rows. For this, separate rods with a diameter of 12-16 mm are used, for which two parallel strips are cut out on the top of the row with a grinder. The connection of the rods in the strips is done in a checkerboard pattern and should not be on the same level. You can use a reinforcement mesh, it must be completely drowned in the solution with an overlap of at least 15 cm, leaving on the long sides protective layer up to 3 cm. Particular attention is paid to the corners of the structure: the joints of the reinforcement should not fall on them. |
|
| Openings of gates and windows are covered with concrete lintels or two rows of metal corner. If desired, the gate can be installed immediately and loosened with temporary spacers, and then the masonry can be brought to them. |
|
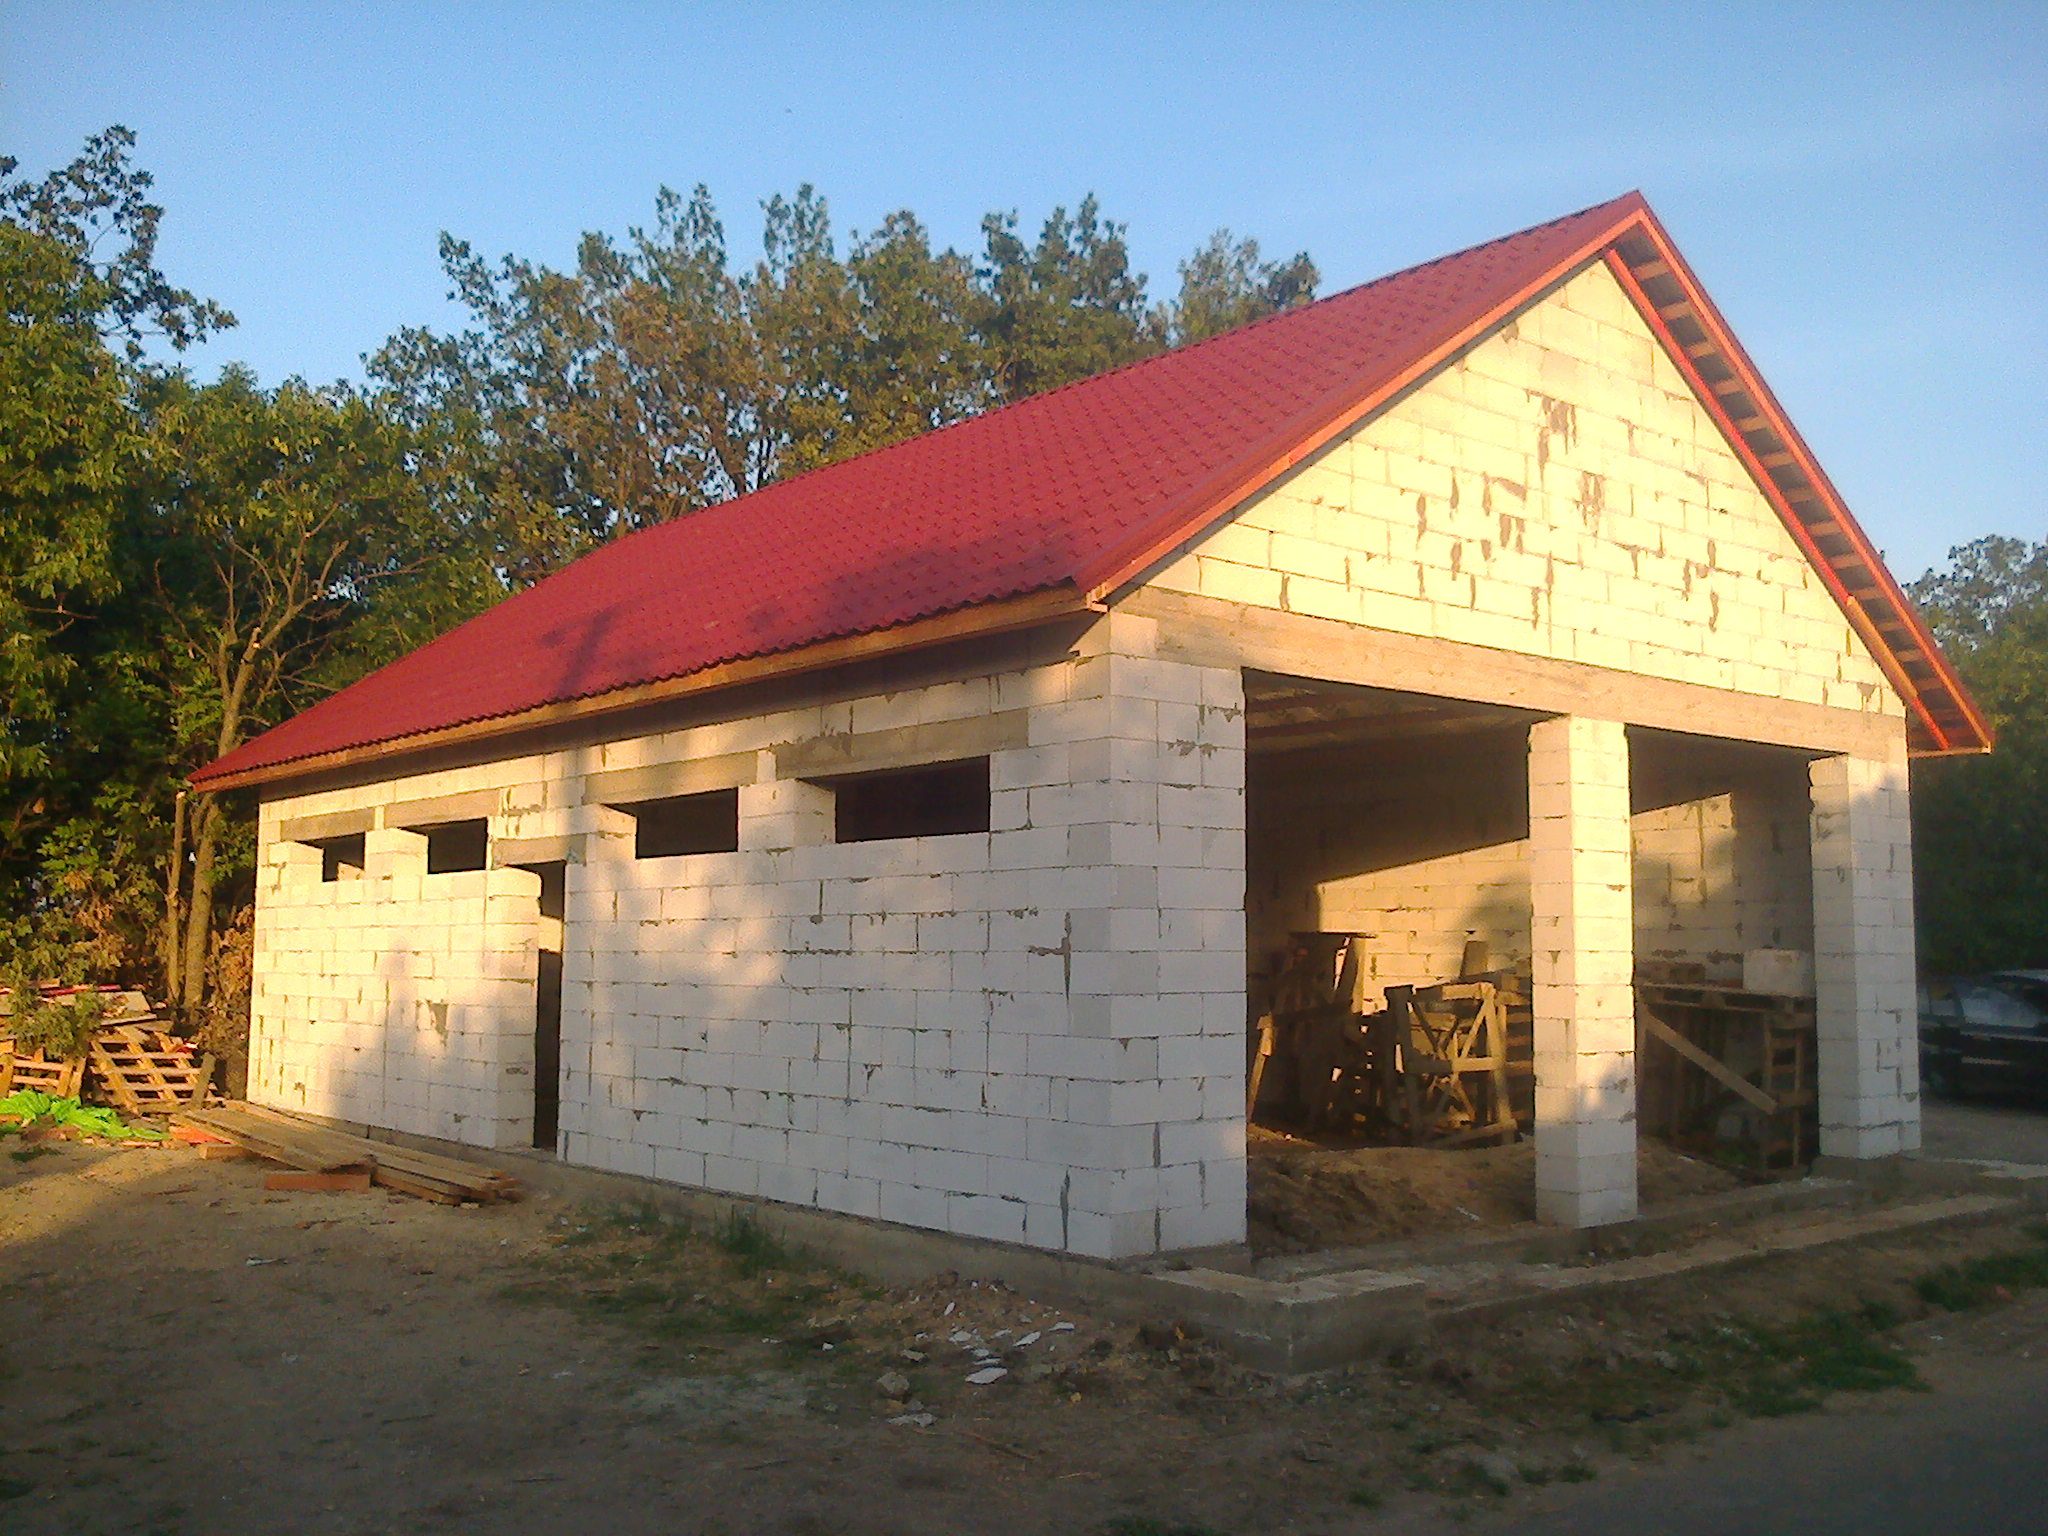
| For a pitched roof, the slope is taken out in blocks, laying the last rows with a ladder and cutting off the corners. For gable roof the pediment can be made of foam blocks or then made of wood, in the second case, the last row is leveled. |
|
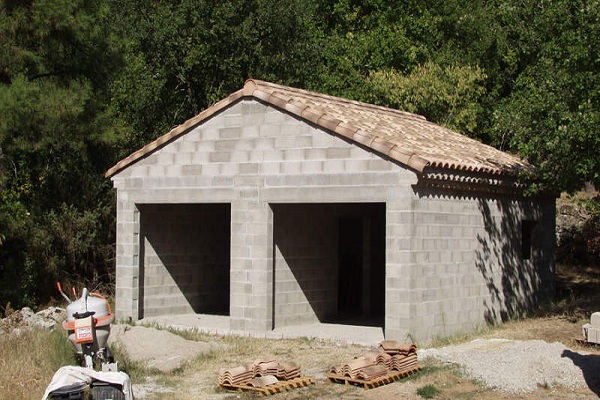
A week after the construction of the walls, the garage from the foam block with your own hands can be loaded with a roof.
Roof device
When roofing works we can distinguish the main stages, consider them on the example of a gable wooden roof.
Floor filling
The base is leveled, sprinkled with a layer of sand and tamped, then a layer of waterproofing is laid. The floor in the garage is exposed to increased loads, therefore it is necessary to reinforce it with a reinforcing mesh with rods diameters of 16-18 mm and with a cell pitch of 150-200 mm.
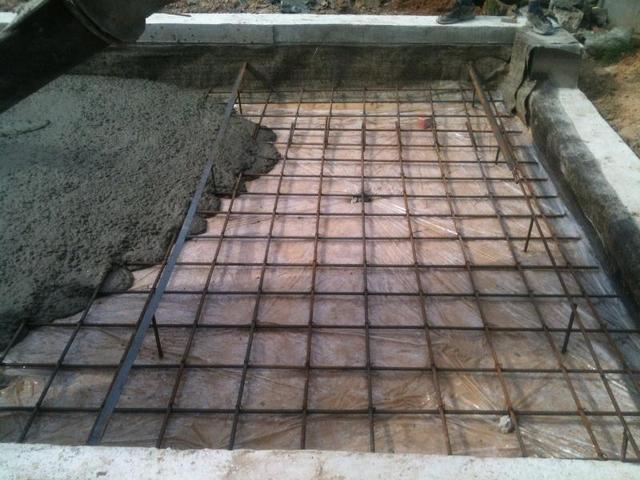
To penetrate the concrete under the reinforcement, the mesh is raised on “legs” 3-5 cm high, trying not to damage the film (you can substitute small spacers under the edge of the “legs”).
The upper protective layer of concrete above the mesh is made 5–7 cm. An expansion joint of 3 cm is left along the walls; for this, before concreting, an insulation of the same thickness is laid out along the perimeter, which can be removed after the concrete has set.
Communications and decoration
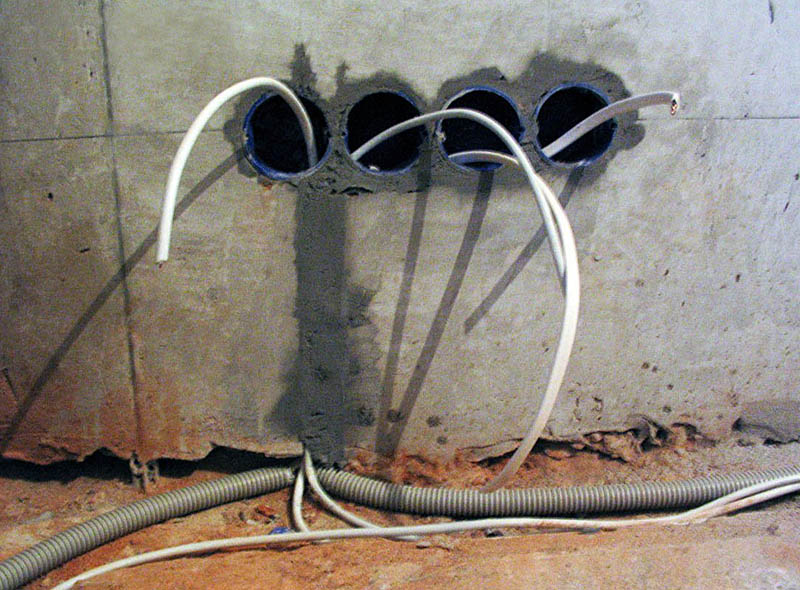
Since foam concrete is very soft material and lends itself well to drilling, then electrical wiring, ventilation and other communications can be carried out inside after the construction of the walls and installation of the roof. Or, during the laying process, install plastic sleeves in the right places.
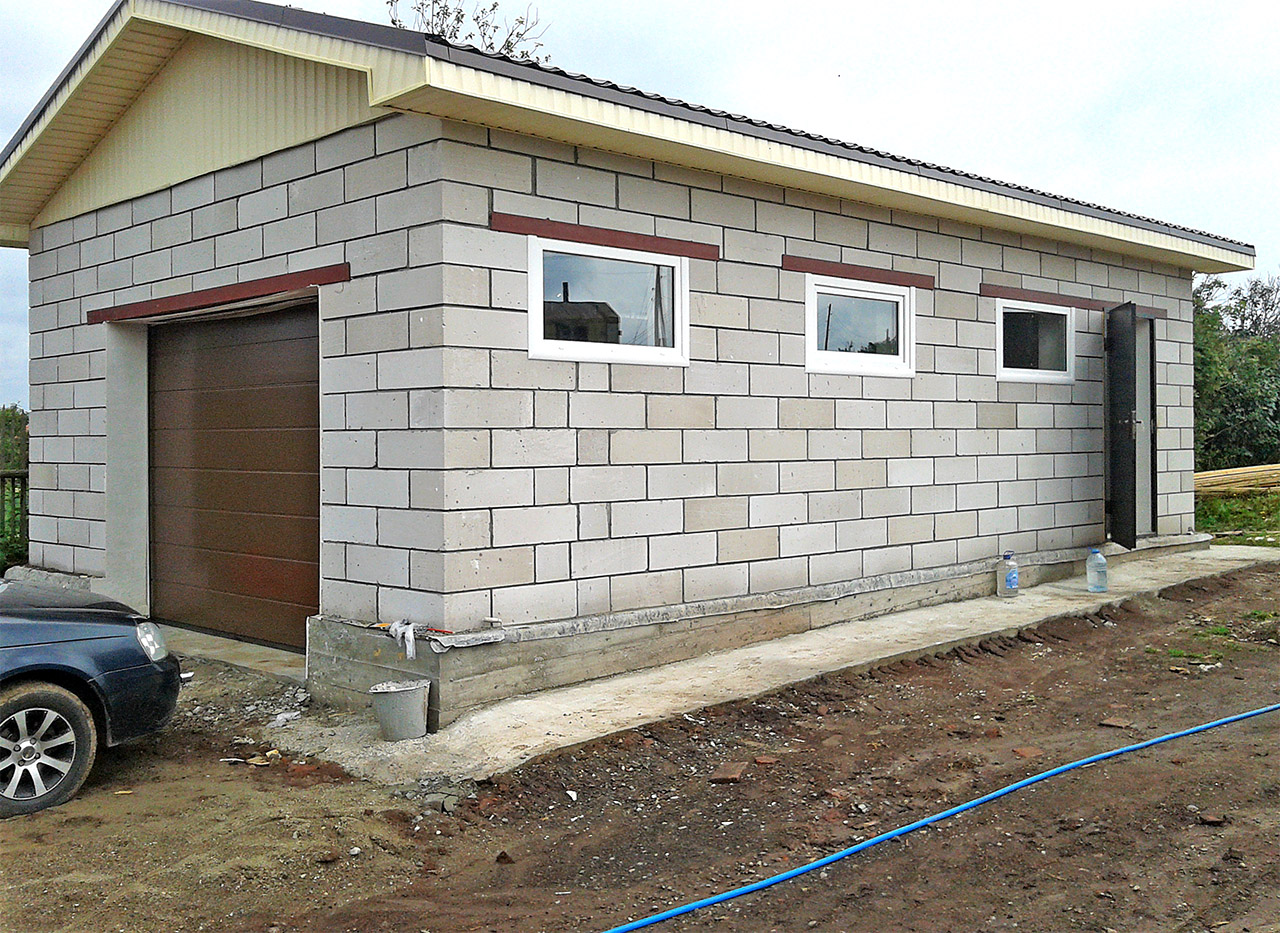
As for the finish, the choice of material depends only on the taste of the owner; any materials are suitable for the outer cladding:
- Wooden or plastic lining.
- Siding.
- Simple or decorative plaster (cm. ).
- Decorative tiles.
- Finishing brick.
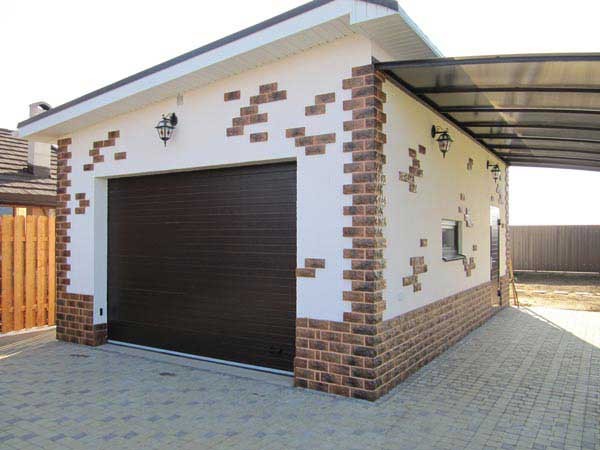
But the main condition is to protect the foam block from moisture penetration, which means that it is necessary to fix the layer under the casing waterproofing material: film, hydromembrane, etc.
Conclusion
As you can see from the material presented, building a garage with your own hands from foam blocks is a doable undertaking, and the price of such a building will be an order of magnitude lower. We hope that the photos and videos in this article will help you with this.
You can build a garage from foam blocks with your own hands without special skills in performing installation work. The main thing is to correctly develop a construction project and strictly adhere to its points.
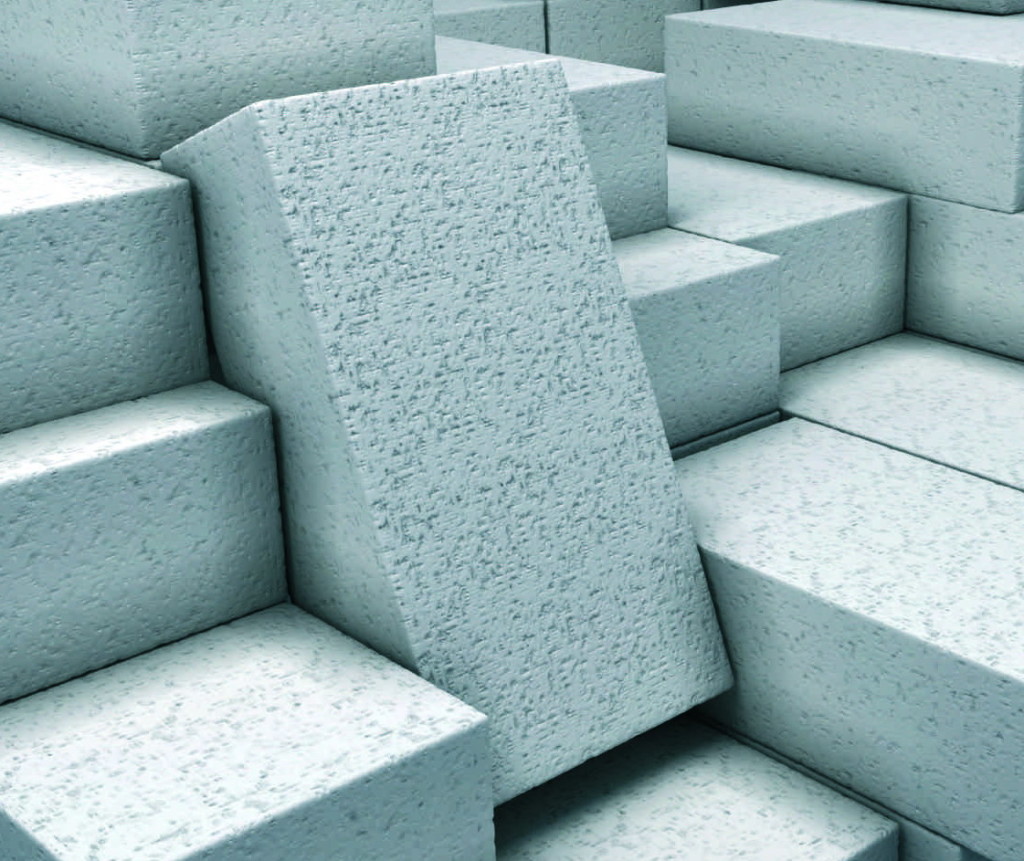
1 Foam blocks - cheap, easy to install
Foam blocks are a popular material with a lot of advantages. Its properties remain unchanged under the influence of sunlight, it is characterized by unique durability, resistance to cold and the ability to retain heat. A car in a garage built of foam blocks will not freeze even in severe frosts.
The next important feature of the material is its affordable price.
It is enough to compare how much the installation of a metal, reinforced concrete or brick garage and structures made of foam blocks costs to opt for the latter.
The very process of assembling and installing a structure from such blocks is much faster than building a garage from a different material.
From foam blocks it is easy for any car owner. This does not require renting heavy equipment, calling professionals, buying a special expensive tool. You can easily do all the work yourself. And this article will help you build a great garage properly.
It is worth noting that foam blocks also have certain disadvantages. The most serious of these is the inability of products to "breathe". This "minus" of foam blocks leads to the fact that condensation will form in the garage on the inside of your car, leading to their gradual destruction.
This problem is solved by installing a ventilation supply and exhaust system in the "motorhome", which must be equipped with a cooler powered by an electric drive. Installation of such a system, as you yourself understand, requires extra costs. But the general ease and efficiency of the construction of buildings from foam blocks covers this and some other disadvantages of the products under consideration.
2 We develop a project "auto-house" and estimate its cost
The construction of any garage begins with the creation of a project according to which the structure will be erected. There are no problems with this. You can order in specialized bureaus and architectural companies the most original projectwhich will enable you to build two-story garage, building for several vehicle, with a basement, billiard room or full sauna.
If you do not have the desire to pay for the finished project, you can easily develop it yourself using special computer programs (for example, ArchiCad). Such programs are great helpers for DIYers. They allow not only to correctly create a project, but also to determine the number of foam blocks that will be required for installation. And this will already give you the opportunity to immediately estimate how much the entire construction will cost, and you can immediately decide which garage to build - a chic two-story or more modest one level.

In practice, using the same ArchiCad is very simple. You just need to enter the thickness of the walls of the future building and the geometric parameters of the foam blocks. And the program, based on this data, will give out the exact amount of materials that you need. You will find out how much one block costs, multiply its price by the number of items required, and get the construction cost. To this figure, of course, you will need to add other costs (for the construction of the foundation, for insulation, metal beams, and so on).
After your project is ready, start marking the site where the garage will be located. This is done in an elementary way. You need to transfer the project from paper to land:
- at the corners of the future structure, install stakes that are 5–6 centimeters thick;
- pull a nylon or special construction cord between the pegs, thereby creating the outline of the garage (you need to achieve a clear 90-degree angle between the stretched threads);
- clearing the area bounded by cords.
After that, we will need to build the foundation for the garage. We'll talk about how to do this work further.
3 The foundation for the "auto-house" - the subtleties of arrangement
A heavy base for a garage made of foam blocks is not needed, since the products described are lightweight. At the same time, you need to understand that the foundation is equipped taking into account the properties of the land on which the construction is carried out.
If there is heaving soil on your site, you need to make a monolithic concrete slab as a base for the garage. Such a foundation "floats" as a whole with the ground during ground movements. This eliminates the risk of cracking the walls of the building. But on non-porous homogeneous soil, it is allowed to build an ordinary strip foundation. But only on condition that the groundwater in your area lies at a level of more than two meters.

Strip foundation and monolithic slab suitable as a base for simple garages. If you want to build a two-story "cottage", make a spacious one or a viewing hole, you need to do more solid foundation... Experts advise equipping in such cases a combined strip-pile foundation or a tape-deepened foundation. The latter is performed according to the following scheme:
- Dig a trench about 0.8 m deep around the perimeter of the future building. In this case, the width of the ditch should be 12–15 cm larger than the width of the foam block.
- Thoroughly tamp the earth into the trench.
- Pour a layer (about 15 cm), compact it.
- Pour crushed stone (thickness - about 10 cm) and tamp it too.
- Put the formwork, make a frame from metal reinforcement, insert it into the ditch.
- Fill the foundation with concrete (the procedure must be performed in one step).
Now you need to wait for the base for the garage to harden and dry completely.
4 Construction of a garage - we put up gates and erect walls
First, it is recommended to mount the gate, and then proceed with the construction of the walls (later we will partially wedge the entrance to the garage into the walls). We make the frame of the gate. From reinforcement with a cross section of 1.2 cm, we cut 40-cm rods, which we weld to the frame. We mount the gate in the opening (control the verticality!) And fasten it on both sides with timber braces.
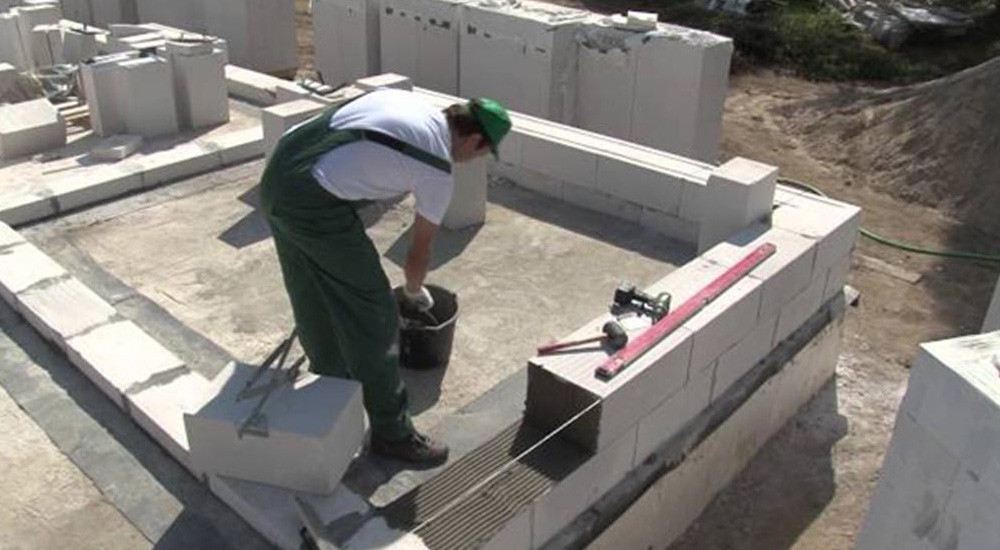
We begin to build the walls from the corners. Experts advise making walls from blocks 20 cm wide, and purchasing special products for the corners, which do not need to be sized during the masonry process. Fastening of individual foam blocks is usually performed with an adhesive designed for these purposes, or with a solution based on sand and cement. Better to use glue. It guarantees better thermal insulation of the structure. Its cost is relatively high, but the consumption of the composition is minimal.
Next, you need to pull the cord between the corners. It will serve as a guide for masonry walls. We proceed to the installation of the walls. It is imperative to reinforce the masonry every two rows of mounted blocks. The rods that we welded to the gate frame are embedded between the foam blocks (directly into the masonry).
The next stage of work is the installation of a lintel over the entrance to the garage. Here you need to do everything correctly and accurately:
- we weld a frame from a 5-centimeter corner (in terms of geometric parameters, the "skeleton" must repeat the gate);
- we mount a structure made butt to the wall of blocks inside the building;
- we fix the connection with a solution of cement;
- we mount an I-beam on the frame (its edges should go 20-25 centimeters into the masonry).
The hardest part is over. Now you can continue to lay the foam blocks on top of the lintel.
5 Final work - roof construction and floor pouring
When creating a project, you immediately decide on what the roof of your garage will be and how much it will cost. Usually, a do-it-yourself garage made of foam blocks is made with a simple pitched roof according to the following scheme:
- Mount I-beams across the walls of the structure (the distance between them is about 0.8 m) and embed them into the walls.
- Lay boards (thickness - 4 cm) on the lower shelves of the I-beams, and on them - a layer of roofing material.
- Pour slag, expanded clay or other insulation on the roofing material, and make a concrete screed. The thickness of the latter is about 2.5 cm.
- Apply the primer to the dry screed and isolate the structure from moisture with ordinary roofing felt using mastic (bituminous).
You just have to pour the concrete floor in your brand new warm and reliable garage. The thickness of the concrete layer is usually taken to be about 20–25 cm. It is advisable to make a powder of gravel, sand and crushed stone for the coating (the layer thickness of each of these materials is 8–12 cm).
Congratulations, you know how to build a foam block garage!
Foam blocks are a modern, high-tech, easy-to-process and easy-to-install building material. For the construction of various buildings from foam blocks, including full-fledged garages, you do not need to possess special skills and have a colossal budget at your disposal.
Foam concrete is much cheaper than its closest analogues and competitors. Having carefully studied the proposed instructions, you can completely build a garage from the material in question with your own hands, which will allow you to abandon the services of third-party specialists and save even more.
First of all, people choose foam blocks for their affordable cost. In the second - for light weight. The finished building will weigh much less than, for example, a garage made of the same brick. This allows you to minimize the cost of arranging the foundation. At the same time, foam concrete is quite durable. It will withstand the weight of the car and other garage accessories unambiguously.
One of the important advantages of foam blocks is their low thermal conductivity. This characteristic in the overwhelming majority of cases allows you to refuse to perform work on the thermal insulation of walls.
Ready-made foam concrete blocks are easy to assemble. All work is done in the shortest possible time and does not require the use of special heavy equipment.
However, like any other building material, foam concrete has its drawbacks due to the properties of the foaming agent.
The main drawback is that the blocks do not "breathe". Of course, someone will say that vapor permeability issues are not so important for a garage, but this is far from the case. Condensation starts to form in excessively humid conditions. It settles on almost all surfaces, including the car body. And for the car, such conditions are even more dangerous than if you simply kept it outdoors in rain, snow and other unfavorable weather.
In order to prevent damage to the car and other items in the room, the garage made of foam blocks is necessarily equipped with a ventilation system of the supply and exhaust type. The installation of such a system will entail additional costs, but they are negligible compared to the losses that the lack of ventilation can lead to.
The second drawback is low fire resistance. Of course, foam blocks, like any concrete, are relatively resistant to flame, but everything has its limit. If the fire spreads, the garage can burn completely. The situation is overshadowed by the fact that during combustion, foam blocks release substances that are very harmful to human health.
However, against the background of ease of installation, high performance properties and affordable cost, all of the above disadvantages become insignificant.
Before starting the independent construction of a garage from foam blocks, take the time to draw up a project. Learn the features of your site. You need to establish the type of soil and the depth of the water table. You should be guided by these parameters when choosing a type concrete base.
The project itself can be drawn in an old-fashioned way, i.e. on paper, or else take advantage of the benefits of civilization and do everything on a computer. There are many handy programs out there, for example ArchiCad. Libraries of such programs include many template elements, so that you can "build" a future garage at a convenient scale and at the same time determine how many blocks it will take to complete the work. To do this, you just need to know the dimensions of one building block, the dimensions of the structure and the thickness of the walls.
There are a number of additional factors to consider when sizing your garage. For example, how many cars and what size will be stored in the garage at the same time, whether you need a viewing hole, whether you need a cellar, whether you will install a rack with various fixtures or equip any other kind of workspace.
To store one car, a garage 5-6 m long, about 3.5-4 m wide and about 3 m high is quite enough. For the rest, focus on your needs and capabilities.
Lack of design skills or good ideas pay attention to finished projects from open sources. Try to find a project that fully suits your conditions.
Layout and foundation
Start marking up. In the corners of the future garage, put pegs made of metal or other suitable material... Pull a strong lace between the pegs along the contour of the future building. Make sure the corners between the ropes are exceptionally straight.
In fact, you need to transfer your garage project to the ground.
Stand where the garage door will be in the future. Imagine that you open the gate and watch to see if nothing is in the way. If there are no problems, continue. If there are interference, you need to try to get rid of them. Otherwise, you will have to look for another place to build a garage.

The best option for a foundation for a garage made of blocks is a tape concrete structure... The foundation is poured in a few simple steps.
First step. Dig a trench 80-100 cm deep. Select the specific depth in accordance with the type of soil and other related parameters. In general, a depth of 1 m is sufficient in the vast majority of cases. Make the dimensions of the foundation so that it exceeds the dimensions of the future garage by 10-15 cm on each side.
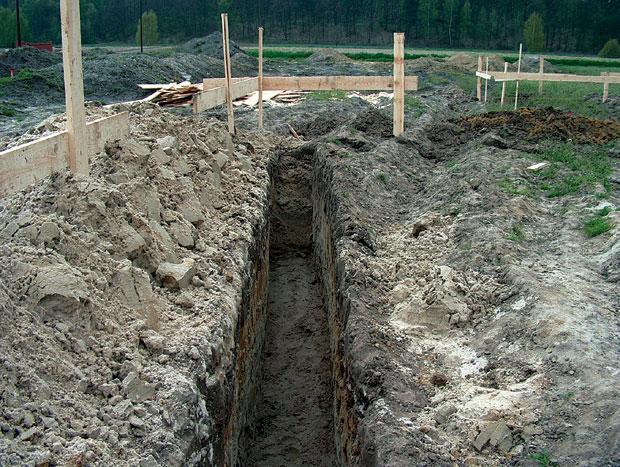
Step two. Compact the earth in the trench and proceed with the backfill layers. Cover with a 10-15 cm layer of sand and tamp thoroughly. Fill in an 8-10 cm layer of gravel and compact it too.
Step three. Install the formwork. Ordinary boards are suitable for its assembly. You can use ready-made formwork from factory production - there is no difference. Make sure the boards are on the same level. Your task is to get an absolutely flat foundation.
Fourth step. Weld the reinforcement cage. It should be in the form of a mesh with cells of 10x10 cm. For the assembly of the frame, it is recommended to use reinforcing bars with a diameter of 14 mm. 12mm rods are also suitable. Lay down reinforcement mesh into the trench.
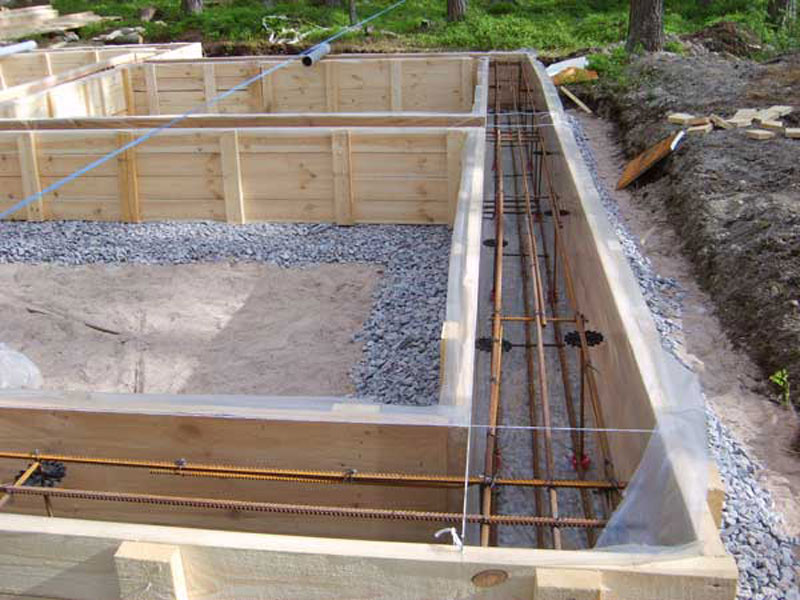
Fifth step. Prepare concrete. A standard solution is prepared from 1 part of cement (M400-M500), about 3 parts of clean sifted sand and 4-5 parts of aggregate in the form of crushed stone or gravel. Of course, water is added to the solution until a plastic homogeneous mixture is obtained. If you want to save time and effort, order ready-made concrete with delivery.

Sixth step. Pour concrete in one go. Smooth the surface of the foundation and let it dry for 3-5 weeks.
Gate installation
Video - Installation of lifting gates in the garage
First step. Lay the waterproofing around the base. Roofing material is usually used. Lay in a double layer.
Step two. Install the door frame and weld to it rods of 12 mm reinforcement, about 40 cm long. There should be at least 4 such rods for the height of each side of the frame. If possible, calculate the installation of the rods so that they are at the joints of the foam concrete blocks.
Step three. Prime and paint the gate leaves (leaf).
Fourth step. Hang the gate. Make sure they are perfectly level. Use the appropriate building tools - plumb line and level.
Fifth step. Fix the position of the door with wooden braces.
The construction of walls from foam blocks begins from any angle. In most cases, 20 cm is enough in thickness. Therefore, you need to buy foam blocks 20 cm wide and place them along the walls with the long side. This will reduce material consumption and significantly reduce the time spent on construction work.
Additionally, you can buy special corner blocks. Their use will greatly facilitate assembly worksince you do not have to deal with the alignment of corners during the masonry process.
Place blocks on cement-sand mortar or special glue. The use of glue is more preferable - this material will provide additional thermal insulation and better adhesion of the elements.
![]()
![]()
First step. Set up the corners. To do this, use the already iconic pegs and cord.
Second phase. Proceed directly to the laying. Start from any convenient angle. We laid a corner foam block - laid out a row of an adjoining wall - laid the next corner block - laid out a row of another wall. After every second row of foam concrete blocks, lay a special reinforcing mesh.
In the process of laying, do not forget to wedge the rods that you previously welded to the garage door frame between the foam blocks.
The most difficult stage of the work under consideration is the installation of a lintel over the gate and the subsequent calculation of the top of the front wall.
Stage three. Weld the frame to the size of the gate. Use a 5 cm corner to make it. Install the frame from the inside of the building close to the wall and secure it with cement mortar.
Install an I-beam over the gate and the erected frame. Lay so that the edges of the beam go into the laying of the foam concrete walls by at least 200 mm.
Fourth stage. Continue to lay the foam blocks.
At the stage of laying out the walls, decide what kind of roof you will build. Garages are most often equipped with pitched roofs... Novice builders are advised to give preference to just such roof structures.
The technology for constructing the roof in question requires that the walls under such a roof have a slope from the gate to back wall buildings. Reduce the height of the wall by about 5 cm with each meter. You can do everything yourself, because foam blocks are extremely easy to process, they can be cut even with an ordinary saw.

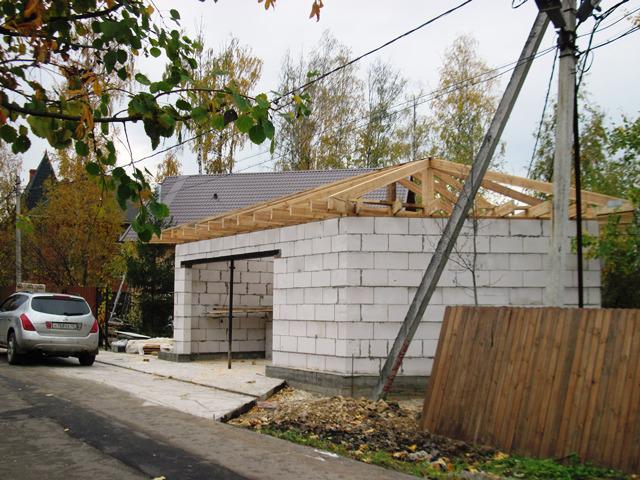
First step. Install I-beams across the walls of the building. The length of these beams should be approximately 250 mm longer than the width of the garage walls. Lay the beams themselves at a distance of about 800 mm from each other. Seal the beams into the masonry walls.
Step two. Place 4 cm thick wooden planks on the lower shelves of the fixed beams. Place the planks as close to each other as possible.
Step three. Place roofing felt on the boards. Pour insulation over the roofing material. Slag, expanded clay and other similar materials are suitable.
The roof slope should protrude from the walls by at least 200 mm on each side. So it will be provided reliable protection walls from atmospheric precipitation.
Fourth step. Pour a 20-30 mm concrete screed onto the insulation. Allow the screed to dry and prime it.
Fifth step. Lay roofing material on the screed. Also, waterproofing can be done with bituminous mastic. Glue the roofing felt across the roof, starting from the bottom of the ramp. Stick the canvases with an overlap of 10-15 cm. Thanks to the overlap, more effective removal of precipitation from the roof surface will be provided.
Sixth step. Install the visor over garage doors... A huge option of various designs is available on sale, choose to your taste.
Floor filling
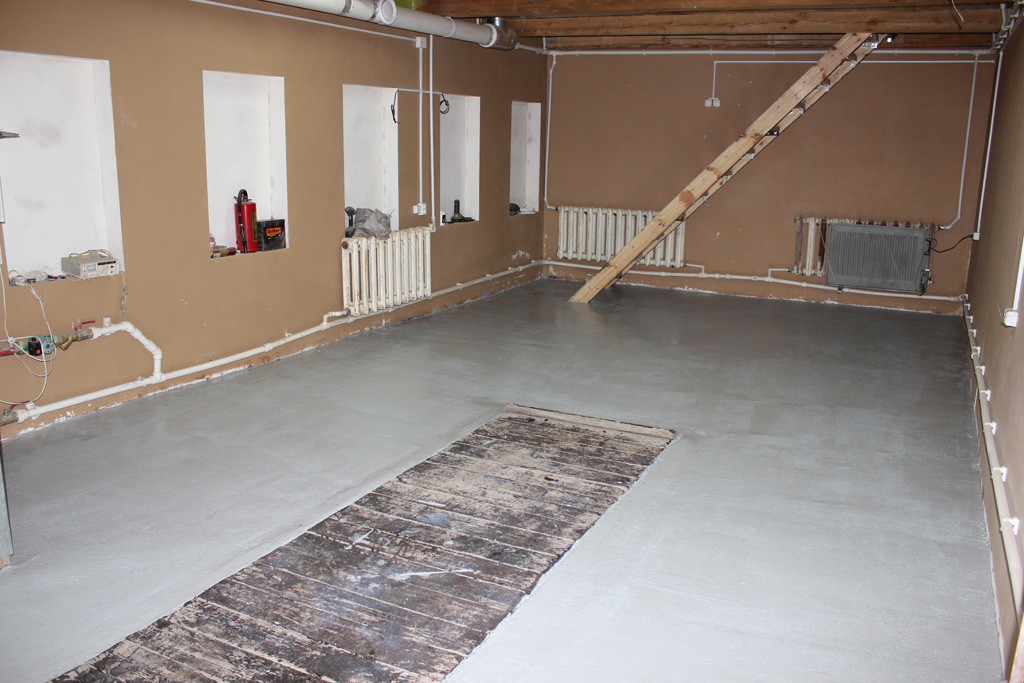
Finally, make the garage floor. The best way - concrete surface... Wood is hardly a sustainable material in terms of contact with vehicles and vehicles. Wooden flooring can be arranged only in the pedestrian zone.
First step. Thoroughly clean the base and backfill. Add a 15 cm layer of crushed stone first, then a 10 cm layer of sifted sand and finally a 10 cm layer of fine gravel. Each layer of backfill is carefully compacted.
Second phase. Fill the backfill with a layer of concrete screed with a thickness of at least 20 cm. Carefully level the screed and let it dry.
The blocks themselves will take 30-35% of the total construction cost. The largest item of expenditure falls on the arrangement of the foundation and roof. However, all other things being equal, a foam block garage will cost much less than similar buildings from most other popular materials. Follow the recommendations received and very soon you will be able to use your own garage.
Happy work!
Video - DIY foam block garage
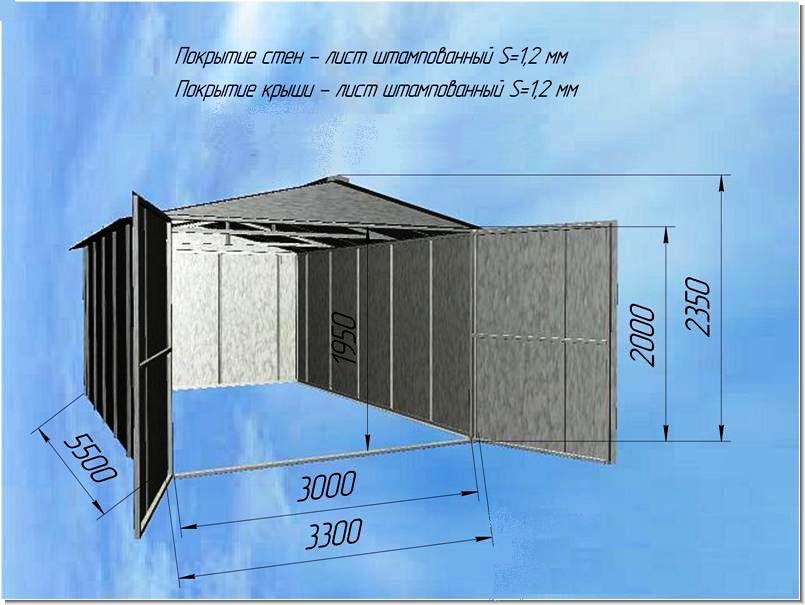
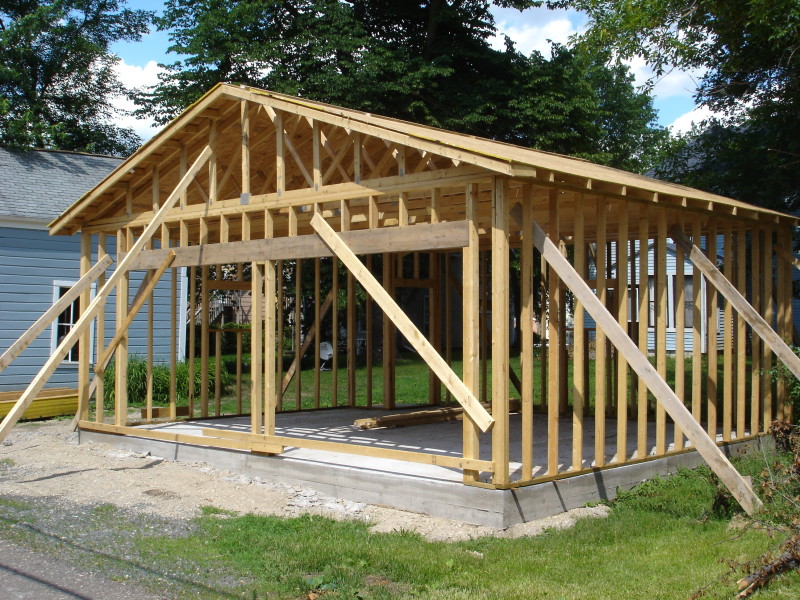
Where do motorists hide their iron horses from the weather? The answer to this question is simple. Of course, to the garage! It is both dry and warm, and the instrument is at hand. But how to build it yourself, with minimal investment and maximum quality is a question that interests many car owners. For this there is frame garage... Its construction does not cause difficulties, does not require excessive financial costs.
Advantages and disadvantages of a frame garage
First of all, it is necessary to note the advantages of a frame garage. The main advantage is its cost. Despite the fact that this building does not require large financial costs, good quality and durability is assured. This is another positive point. In this house, the "iron horse" will be dry, cozy and warm. Moreover, you can make a frame garage with your own hands.
Another undoubted advantage of this structure is that its construction does not require the involvement of additional forces, i.e., specialists. You can handle the construction yourself. And the work will not take much time.
The only drawback of the frame-panel structure is that its main material is wood. And it is known to allow moisture and cold to pass through. therefore frame house for a car, you need to waterproof and insulate well.
Photo gallery: frame-panel garages
Ready-made frame garage Frame garage in the process of assembly Frame garage in the process of assembly
Drawing up a detailed project: diagram, drawing, plan
Before starting work, it is necessary to prepare some documents. Without them, construction will be very difficult. These are plans, drawings and explanatory notes. All calculations and measurements are outlined in them.
An example of a frame garage project
Having prepared the necessary sketches, you will significantly reduce the time it takes to build a garage. But not every car enthusiast can boast of the skills of a draftsman and artist. Therefore, in order to thoroughly prepare, you need to either contact a professional or find information in an open source.
DIY frame garage: step by step instructions
All work takes place in several stages. Each of them is very important for obtaining a quality result, so none of them should be overlooked.
Site selection for construction
TO this stage need to be treated responsibly. Choosing the wrong location for the garage can lead to unpleasant consequences. To do this, you need to consider several factors:
- when choosing a place, think carefully about the approach to it by your car;
- it is not worth building a garage for a specific car (you need to think in advance how many cars, if desired, can be accommodated in the built garage);
- the site must be carefully prepared: remove all debris and vegetation, level and tamp the ground.
How much material is needed
After all the paperwork has been completed, it is necessary to purchase the required materials and tools that will be needed for construction.
And the question immediately arises: which frame is better to choose? Metal or wooden. Wooden will cost less, moreover, it is environmentally friendly and easy to process. The metal one will be more expensive, but it is more durable. Everything here is individual, at the discretion of the owner.
In addition to the material for the frame, you should also buy a large number of beams for the walls (section 100x100, 100x50 cm). They can be of linden, aspen or larch.
You will need concrete mortar in order to fill the foundation. You also need to prepare:
- hammer;
- shovel;
- level;
- gloves;
- formwork (boards for it).
This is a minimum of tools to get started.
Photo gallery: metal and wooden frames for garage
A garage frame made of a metal profile will cost more The material for the frame must be chosen taking into account your own capabilities A garage frame made of wood is lighter and easier to use
DIY foundation construction technology
The foundation in this structure must be very strong. There are 3 options to choose from:
- Columnar (pile) is not very convenient due to the fact that usually lighter structures are installed on it. Such a foundation is more suitable for building a bath or a gazebo.
- A monolithic slab will be ideal for the construction of a frame garage. When filling it, do not forget about the obligatory reinforcement and installation of the floor screed. The disadvantage of this option is that the concrete hardens very slowly, which sometimes takes a whole month. And further actions can be continued only when everything is completely dry.
- Tape. This type is the most beneficial. It is cheaper than a slab, and installation is not as long.
Step-by-step instructions for the construction of a strip foundation
The process takes place in several stages:

During the last stage of work, several rules must be followed:
- you need to do this at the same time;
- pierce it with fittings to remove excess air from the mixture, or work through the solution with a vibrator specially designed for this;
- cover everything with polyethylene;
- moisten the surface for several days in a row by pouring water on it;
- grind the plane;
- cover the foundation with roofing felt for waterproofing.
Photo gallery: the process of creating a strip foundation
Foundation construction Formwork and reinforcement Pouring process strip foundation concrete
Floor installation
The area for the future floor must be covered with a thin layer of gravel. Lay the reinforcing mesh on top and pour concrete. When it hardens, lay the roofing material, put the beams and nail the flooring to them. This is how a simple wooden floor is made. But it may be different.
If the foundation was installed on piles, then the floor laying technology does not require backfilling a layer of gravel. It is enough just to lay wooden planks, which will be strengthened a little in the future.
At this stage, you need to think over and make a viewing hole and a cellar, if necessary.
Photo gallery: varieties of flooring
Bright garage floor made of PVC boards Floor in the garage made of ceramic tiles Self-leveling floor in the garage The concrete floor in the garage does not need to be covered with wooden planks, but simply painted Simple concrete floor without additional finishing Wooden floor - a budget option for a garage
Building a frame made of metal or wood
This structure can be built on the basis of a metal or wooden frame. Let's consider both options.
Metal frame from a shaped pipe
The metal frame is characterized by high strength: it is resistant to fire and mechanical damage, but much more expensive than wood. Only now you need to work with it for someone who knows how to use a special tool, for example, a grinder, welding, drill. In order to make a frame garage from a pipe with your own hands, you will need rolled metal or a bent metal profile, for further sheathing with standard steel or profiled sheets, respectively.
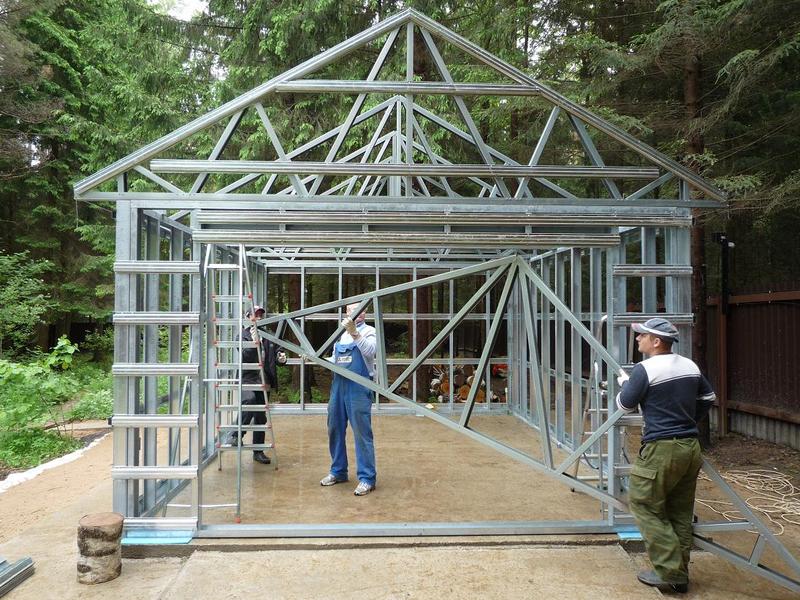
The metal frame of the garage during installation
The lower part of the frame is attached to the foundation with anchors and welding. You can also use self-tapping screws, but such a mount will be less reliable. Further in the corners should be installed racks. Attach the profiles with the corners outward to the bottom of the frame and anchors and weld. Then you need to collect the upper part of the "skeleton" and connect it to the supports. And finally, weld additional vertical posts and horizontal ribs around the perimeter.
It is imperative to take care of the profile above the place where the gate will be, otherwise the installation of garage doors will become problematic in the future.
The choice of the roof is at the discretion of the owner. It can be pitched, gable or flat.
The garage frame can also be purchased ready-made. This is much more profitable and the installation will be faster.
Advantages and disadvantages of a wooden frame house for a car
A frame made of beams will cost less than a metal one. It is built in the same way: the lower part is built, the posts are vertical and intermediate, the top, etc. But unlike metal frame you shouldn't save on material here. It is better to buy a quality timber.
When working with wood, it is allowed to use screws and nails (except for the junction of the foundation and the lower part of the frame, leave the anchor here.). The gaps between the posts should be between 30 and 120 centimeters.
Anyone who has at least basic knowledge in the field of building buildings can build a garage from foam blocks with their own hands. Foam blocks are a great option for solving a similar problem. With a minimum of material costs, the result is a durable and reliable shelter for your vehicle.
In a garage made of foam blocks, it will be reliably protected from negative environmental influences, and you will be able to carry out technical inspection and repairs in comfortable conditions. In this article we will consider the features of building a garage from foam blocks with our own hands.
One of the cheapest ways to build a garage is from foam blocks with your own hands. Foam blocks differ in such properties as:
- Profitability... As we have already said, the cost of foam blocks is one of the lowest among the materials suitable for building a garage;
- Ease... This material is relatively lightweight, which makes construction from it simple, convenient and inexpensive. For construction from foam blocks, a powerful foundation is not required;
- High strength... Despite their low weight, foam blocks have sufficient strength so that a garage built from them does an excellent job with its functions;
- Low thermal conductivity... A do-it-yourself garage made of foam blocks will create good conditions for both the car and its owner. After all, it will keep warm well. Often such buildings are not even additionally insulated;
- Ease of installation... Low weight greatly facilitates the construction process. This does not require heavy equipment and many working hands.
The excellent properties of foam blocks are due to the composition and production technology of this material. Its structure is porous, but air bubbles inside the material do not interact with each other. This provides a very low level absorption that aerated concrete does not have. Due to this, the indicators of thermal insulation, frost resistance and sound insulation of foam blocks are higher than that of aerated concrete. Therefore, it can be used even in places where the humidity level is high enough.
There is another advantage, because of which it is worthwhile to build a garage from foam blocks with your own hands: foam blocks do not need exterior decoration... Aerated concrete, on the other hand, should not be left open, as it is not resistant to moisture and may crack as a result of its penetration. Foam blocks are not in danger.
As you can see, foam blocks are an excellent choice for a building such as a garage.
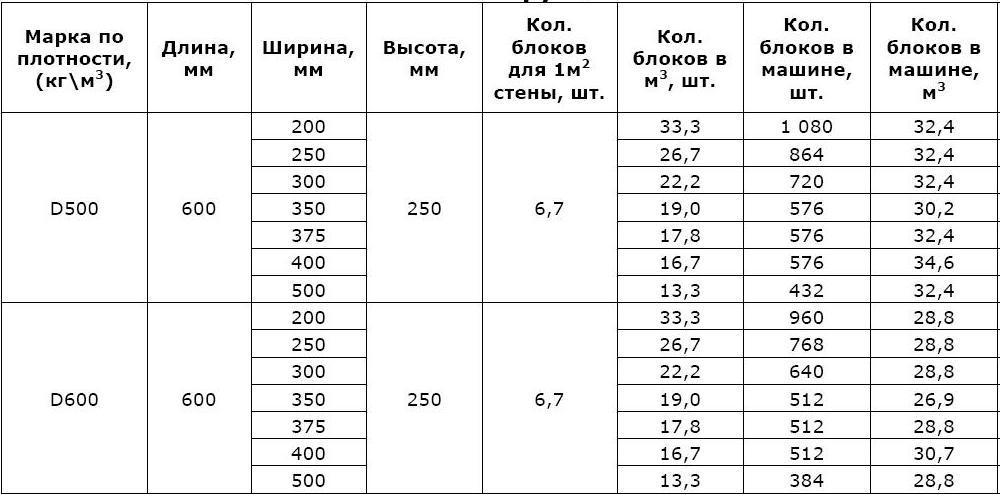
For the construction of a garage, blocks are usually used with dimensions of 600x300x200 mm. This allows you to choose the desired wall thickness - 200 or 300 mm. If you are building an unheated garage, then 200 mm for the walls is enough. If the building is heated, the thickness of the walls is determined by the climate.
- Determine the length of the perimeter: (5 + 6) * 2 \u003d 22;
- Determine the number of blocks: 22 / 0.6 \u003d 36.6;
- We calculate required amount rows. We divide the garage height by the block height: 3 / 0.3 \u003d 10 rows;
- Now you can easily calculate how many blocks are needed for the entire garage: 37 * 10 \u003d 370 pieces.
When calculating, do not forget to include gates and windows, if any. If the thickness of the walls is 200 mm, then about 6 blocks are needed for 1 m2 of masonry. Based on the total area of \u200b\u200bthe openings, you can calculate how many blocks will be redundant. For standard gates and windows, subtract 40-50 blocks. In total, a garage of this size will need about 300-320 blocks. This scheme allows you to easily calculate the required amount of material for a garage of any size.
Important! Please note that foam blocks are fragile, therefore, a fight is possible during transportation and work. Also take into account the seams. Therefore, it is better to purchase material with a margin of about 5%.

After you have decided what kind of garage from foam blocks you want to build with your own hands, you can proceed directly to the implementation of your idea. Any successful construction is based on a well-designed project.
Project
Future construction requires careful planning. The project is the basis for correct calculations and financial savings.
A garage project can be developed using programs on a computer or by contacting the professionals of design organizations. But this type of work can be done independently. This will take into account all your wishes and implement the project exactly the way you want.
Before designing, it is necessary to solve such important issues as:
- Do you need a viewing hole?
- Do you need a basement?
- Will there be inventory, equipment, etc. in the garage?
- Is there a work area in the garage?
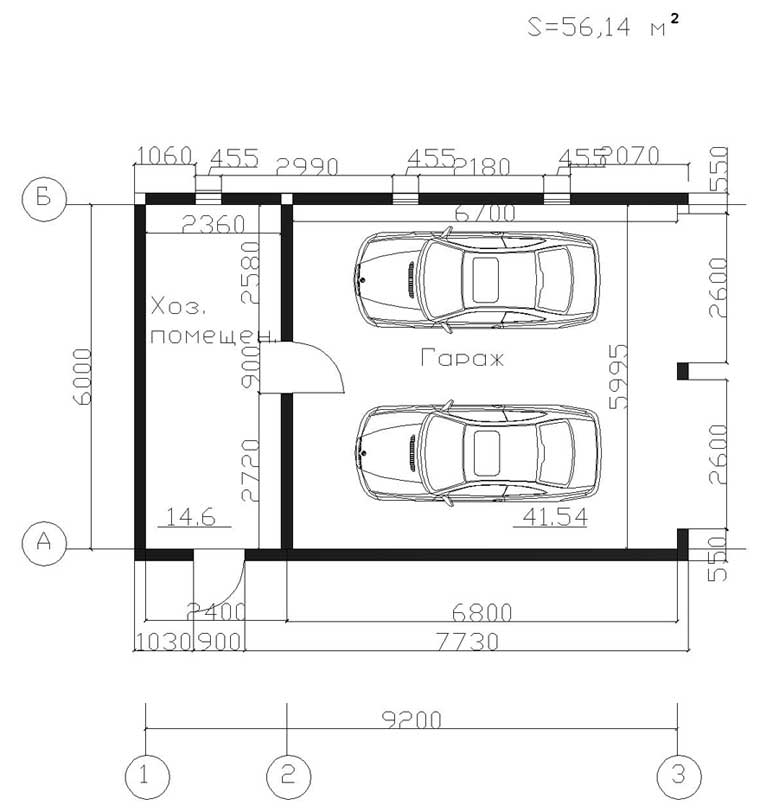
The answers to these questions will help you create a project that fully meets your needs. Also, based on the project, you can choose the optimal type of foundation, determine the necessary construction parameters. The standard, most demanded foam block garages are usually 3x3x6. You can always find ready-made options for standard projects on the Internet on specialized sites.
Foundation
An important element during construction is the foundation for a garage made of foam blocks with your own hands. Foam blocks, as mentioned above, are relatively lightweight. Therefore, they do not require a strong foundation. But its creation still needs to be given maximum attention, because the strength, reliability and durability of the future building depend on its quality.
Work on the foundation begins with the markup. To complete it, pegs will be required, which must be driven into the places where the corners of the future garage from foam blocks will be located. Then the pegs must be connected with twine. The angle between the ropes must be strictly 90º. And also the markup must fully comply with the dimensions defined by the project.
After you have marked out the area, evaluate the possibility of opening future gates. There should be no obstacles where the gate will open.
If the marking is successful, then you can go directly to the foundation device.
It is important here to choose the type of this element correctly. It is determined, in addition to the weight of materials, also by the properties of the soil. If it is dense enough, and underground waters lie at a depth of more than 2 meters, then it is enough to build it, 0.5 m deep.If the soil is heaving, then it is worth doing monolithic foundation.
Important! If you plan to build a garage from foam blocks with your own hands with a viewing hole, then the monolithic foundation disappears. In this case, you need to make a deep tape or tape.
Consider the technology for creating a strip foundation of 0.8 m:
- According to the markings, it is necessary to dig a trench, 800 mm deep and 350 mm wide;
- Align and tamp the bottom;
- Build a gravel and sand pillow. Tamp;
- Install the formwork and reinforcement frame;
- After that, you can fill in the solution.
The foundation must gain sufficient strength. This usually takes about a month. If a viewing hole is provided in your future garage, then this time can be spent on its creation.
The next stage of construction is the walls. They should be erected only after the foundation is solid. The work is carried out in the following order:
- The first blocks are placed in the corners;
- A rope is pulled between them;
- Further laying is carried out along the rope. The seams are laid with a special reinforcing mesh. Each next row is laid out in such a way that the middle of the block falls on the seam between the two lower blocks. Blocks are installed with their long side along the wall;
- At the required height, the upper door beam is embedded in the seams;
- At the level of the floor beam, masonry is carried out without displacement of blocks.
Important! If the roof of your future garage made of foam blocks will be pitched, then when erecting the walls, it is necessary to tilt to the rear wall with the calculation of 5 cm slope per 1 running meter.
The slope is done by trimming the foam blocks. If it is planned, then you need to think in advance how the gables will be closed. It can be foam block masonry or lining.
Most often, a simple garage is covered concrete wall... But when we talk about a garage made of foam blocks with our own hands, this option disappears, since the foam blocks may not withstand the weight of such a structure. Shed roof they choose more often when they are going to build a garage from foam blocks with their own hands. Projects from foam blocks can be with a gable roof.
Consider the technology for erecting a pitched roof:
- Beams that exceed the length of the wall by 200-250 mm are installed across the roof every 800 mm and embedded in the walls;
- Boards of 40 mm are tightly laid out from below;
- Roofing material is laid on the boards with a fold along the edge of 10 cm;
- Thermal insulation is laid on the roofing material. It can be slag or expanded clay;
- On the insulation sneaks cement-sand screed a thin layer up to 3 mi;
- After the screed is dry, it must be treated with liquid bitumen mastic;
- Then, across the building using the fusion method, it is necessary to spread the roofing material from the bottom point up. The canvases are overlapped.
Thus, you get a reliable and strong roof. All that remains is to make a visor. You can do it yourself from the corner or buy a ready-made one.
Goal
It is necessary to think about the device of the gate before erecting the walls. Reliable gates must be embedded in the masonry. You can use different gate designs when we build a garage from foam blocks with our own hands. The video about foam blocks most often offers the option of installing conventional swing gates... This option is ideal if you want to build an inexpensive and reliable garage. We bring to your attention instructions for installing such gates:
- Lay a waterproofing layer on the foundation before installing the gate. For this purpose, roofing material is well suited;
- Make a gate frame and weld to it on each side 4 pieces of reinforcement with a diameter of 12 mm and a length of 40 cm. Place the reinforcement pieces on the frame so that they coincide with the seams of the foam blocks;
- Before installing the door frame, paint and prime it;
- Install the gate, referring to the level and plumb line. During the installation process, the gate can be fixed using wooden blocks.
A reliable gate needs a solid foundation. Therefore, a beam must be made above the gate. It should be 200 mm longer on each side than the gate.
Important! If your project involves a second floor, then an armored belt must be erected around the entire perimeter of the building to hold the floor slabs.
Warming
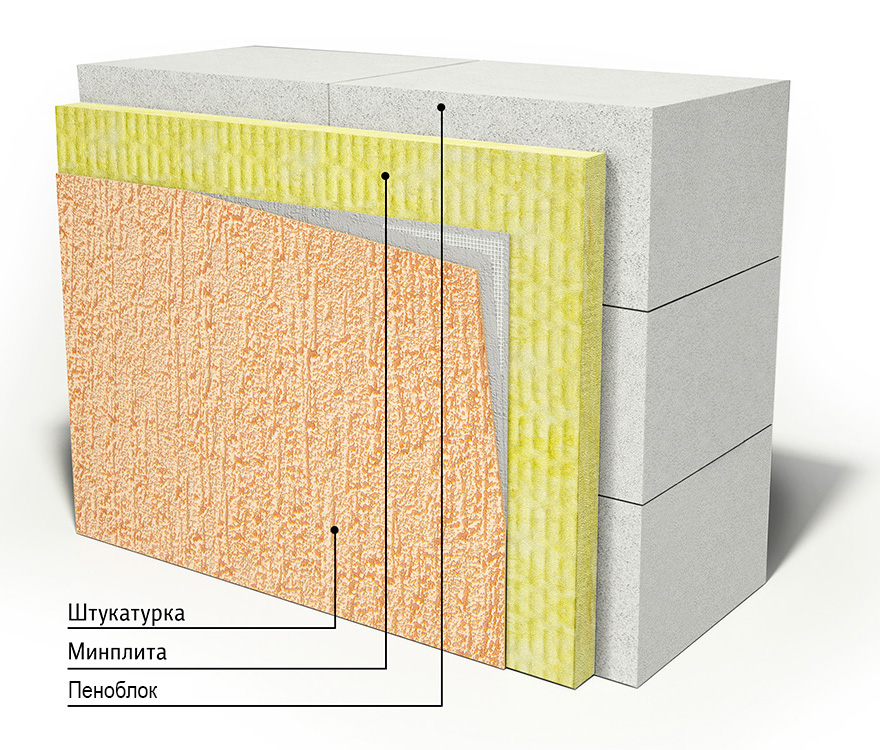
Insulating the garage must be done wisely. The temperature difference between inside and outside should ideally not exceed 5 ° C to prevent condensation from entering the vehicle. Therefore, it is very important to think over the ventilation, and carry out the insulation outside. The most popular materials for insulating a garage are:
- Styrofoam;
- Mineral wool;
- Glass wool.
They are lightweight, cheap and easy to use. The best option is considered to be basalt mineral wool, which provides excellent sound and thermal insulation characteristics the buildings. But the simplest and most affordable insulation option is foam insulation. It runs as follows:
- From below, a wooden plank is attached to the dowels, on which the first row of plates is laid;
- The adhesive is applied along the entire perimeter of the board with a notched trowel. Placement is staggered;
- Plates must be pressed tightly. After the glue dries, the insulation is additionally attached with plastic dowels.
- The foam must be protected from water. Therefore, it is covered with a layer of reinforced plaster. To do this, the slabs are covered with a thick layer of glue, in which the reinforced mesh is covered with overlapping strips;
- After the glue has dried, plaster and facade paint are applied to the surface.
Now you know how to build a garage from foam blocks with your own hands. Foam blocks can be purchased at a low price, but their cost will be about 30% of the cost of the entire construction. We will tell you further about the price at which the independent construction of a garage from foam blocks will cost.
If you want to save money, then you should build a garage from foam blocks with your own hands. The price of foam blocks is one of the most affordable among the materials suitable for such a task. In addition, due to the low weight of the foam blocks, significant savings on the foundation are formed. And its cost is usually a third of all construction costs. You also don't have to hire specialists and heavy equipment. In order to answer the question "How much does it cost to build a garage from foam blocks with your own hands?" you need to know all the conditions of construction, namely:
- The territory of the building, which determines the required type of foundation;
- Features of the project;
- The presence of a viewing pit;
- The need for insulation, etc.
Each project can have a lot of such nuances, and they all directly affect the prices for building a garage from foam blocks with your own hands. Videos and instructions will not give you an exact answer to the question about the cost of such a construction. But approximate landmarks can still be named.
So, you will need:
- Foam blocks. The price of wall foam blocks is approximately 2400-2900 rubles per m³. If you are planning partitions and compartments inside the garage, then you will also need partition blocks, the price of which is 2750-2850 per m³. It is also worth considering the cost of delivery if necessary, as well as the battle of material during transportation and work.
- Other materials: cement - about 200 rubles per 50 kg, sand - about 180 rubles per m³, gravel, crushed stone - about 1150, 1190 rubles per m³, timber - from 14 rubles per running meter.
"DIY foam block garage" - videos of this nature are often watched by those who want to save money, we bring to your attention a few points that will help solve this problem:
- Purchase materials during the discount season. Most building materials they make solid discounts in winter;
- Discard the concrete floor. In the garage, it is quite possible to do without a concrete base. Compacted soil covered with expanded clay is quite enough for such a building;
- Make an economical veneer. A garage made of foam blocks is quite enough to simply plaster to provide protection from moisture;
- Discard the viewing hole. In modern conditions, it is needed by a few car owners who are really professionally engaged in car repair.
- Save as much on the foundation as the soil will allow. If possible, choose a foundation on piles or poles.
We hope that the given tips on building a garage from foam blocks with your own hands will help you build a high-quality, reliable and convenient garage for you personally with minimal costs!


