Concrete floors are simply necessary at some objects: in warehouses, at terminals, in garages and others. That is, where a high load on the floor is expected, which another coating simply cannot withstand. The popularity of this coating is also explained by the fact that the device of concrete floors, although it requires adherence to technology, is quite capable of being performed independently.
Stages of a concrete floor
A number of requirements are imposed on concrete floors, which they must meet: durability, high chemical resistance, tightness, resistance to stress, absence of dust.
In order to obtain a concrete coating that meets all these requirements, it is necessary to fulfill two conditions: to use high-quality materials and strictly observe the technology, in which there are four main stages:
- preparation of the foundation;
- laying concrete in a screed;
- surface finishing;
- cutting of seams, their sealing.
Floor laying can be carried out both on the already existing cement-concrete base, and on the ground.
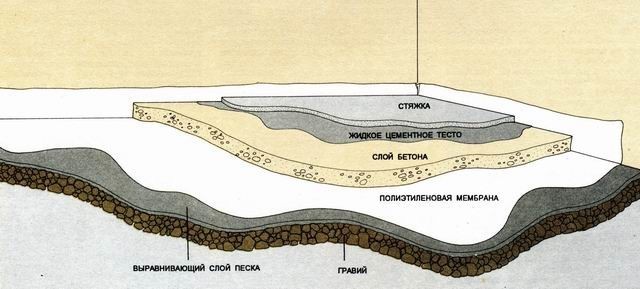
The device of a concrete floor on the ground, although an economical, but rather laborious way of arranging a floor. It is advisable to equip it in places where it is dry enough. A well-made floor on the ground has a layered structure.
A well-made concrete floor has a layered structure
There are several options, but most often the floor cake on the ground looks like this:
- soil compacted base;
- a bed of river sand filling;
- a layer of crushed stone or expanded clay;
- waterproofing;
- concrete screed (rough);
- vapor barrier;
- insulation;
- reinforced screed (finishing).
If necessary, adjustments are made to this scheme, depending on the tasks and conditions. The technology of the device of concrete floors also depends on this. Such a floor requires careful preparation of the base.
Foundation preparation
When laying on an old concrete base, careful preparation is carried out: the cracks are expanded and filled with a repair compound from cement-sand mixture or polymer. In places where the base cannot be repaired, it is completely removed and laid new concrete... Height differences are leveled, dust is carefully removed.
Preparation of the subgrade begins with leveling, which allows you to assess the amount of upcoming earthworks and determine the floor level. Then the soil is compacted with the help of special machines, which allows you to further avoid subsidence and cracking of the floor. Next, a "pillow" of river sand is laid and also compacted with the help of rollers or vibratory rammers. In order for the density of the pillow to be sufficient, the sand is laid 25% more, then moistened and only after that it is tamped to the desired thickness. A layer of gravel or expanded clay is poured over the sand.
Waterproofing, on the one hand, should prevent the absorption of moisture by the base from the concrete screed, and on the other, it should prevent the penetration of moisture from the soil. It is made using polymer membranes or roll materials, sometimes thick polyethylene is used without damage.
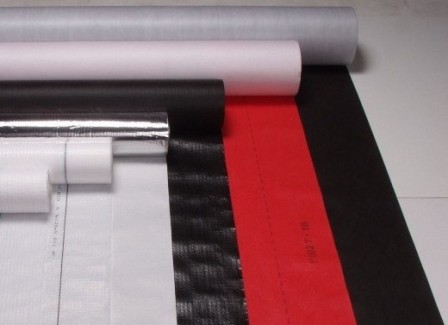
Waterproofing prevents moisture absorption of the concrete screed base and prevents moisture penetration from the ground
The waterproofing is laid with an overlap with an overlap on the walls (15-20 cm), the joints are glued with tape.
Laying a concrete base (rough)
This layer acts as a basis for waterproofing materials... A rough screed is made from the so-called " lean concrete", With the use of crushed stone (fraction 5 - 20). The requirements for it are not too high, so it fits quite simply. The thickness should be at least 40 mm, horizontal differences - no more than 4 mm.
Laying the vapor barrier
A layer of vapor barrier materials ( optimal solution there will be polymer-bitumen membranes, but other options are also suitable) is laid on a rough concrete base.
Floor insulation
It is very important to evaluate how necessary this procedure is, and what material is better to use for floor insulation. As a heater, materials that are resistant to moisture should be preferred, or provide them good waterproofing... The most often used as a heater is polystyrene, extruded polystyrene foam, mineral wool.
Laying the finishing screed
The finishing screed is laid in several stages:
- Reinforcement (can be carried out using a road mesh, and with increased loads it is better to use a frame made of rods from 8mm in diameter).
- Pouring concrete mixture (it is better to use the services of rented special equipment).
- Installation of lighthouses (lighthouses are installed approximately at a distance of two meters from each other, so that the ends of the rule can be supported on them).
- Floor filling (carried out 1.5 cm above the installed beacons).
- Leveling and compacting concrete with a vibrating screed or a rule.
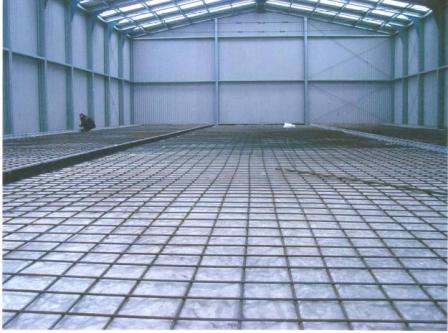
For reinforcement, a road mesh is used, and at increased loads, a frame made of rods
Surface finishing
After the completion of the process of placing and compacting the concrete, a technological break is made in order for the concrete to acquire strength. Depending on the air temperature and humidity, it can be at least 3 hours, but not more than 7 (the depth of the trace left on it should be 2-3 mm). During this period, the floor is roughly trowelled using trowels or discs. A little later, when the depth of the left trace is 1 mm, the finishing grout is performed.
Sometimes, to get a stronger and more durable base, topping is used, a special mixture based on cement and other substances, which is rubbed into the concrete. The use of special polymer impregnations can solve the dusting problem.
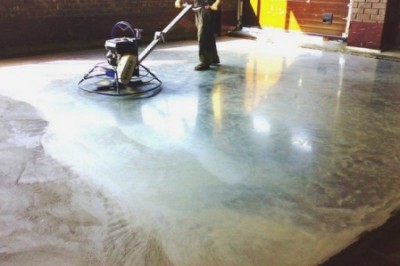
Floor troweling is carried out using trowels or discs
Cutting seams in concrete
Screed concrete is a rather fragile material, oddly enough, and is prone to cracking. In order to limit this process, expansion joints are cut in the concrete screed. There are three types of them:
- insulating - are made in the places where the floor touches all structures of the building: walls, columns, and prevent the transmission of vibrations;
- shrinkage - relieve stress during drying and shrinkage of concrete, which occurs unevenly;
- structural - they are made in those places where concretes, laid at different times, come into contact.
The seams should be cut as soon as the concrete acquires sufficient strength, but before the appearance of arbitrary cracks. The location of the seams is marked with chalk, they are cut in the sequence in which the concrete was laid. The cutting depth is approximately 1/3 of the concrete screed thickness. To facilitate the maintenance of the seams and to strengthen their edges, they are sealed. The type of sealant is selected depending on the operating conditions and the expected load on the floor. Before sealing, the seam is thoroughly cleaned of dust and debris. After carefully following all the steps, the screed is allowed to harden and dry.
1.2. When linking the card to specific conditions, the scope of work, the calculation of labor costs, the schedule of work and technical and economic indicators are specified.
Non-rigid underlying layers (gravel, crushed stone, asphalt concrete, sand, slag) can be used in industrial buildings, provided they are compacted with mechanical rollers.
In floors that can be exposed to corrosive liquids, substances of animal origin and organic solvents of any intensity or water, neutral solutions, oils and emulsions of medium and high intensity during operation, a concrete base layer should be used.
The thickness of the underlying layer should be set by calculation depending on the load acting on the floor, the materials used and the properties of the base soil. The thickness of the underlying layer must be at least, mm:
In cases where, according to the calculation, the tensile stress in the underlying layer 100 mm thick from concrete of class B22.5 is less than the calculated one, concrete of a lower class (but not lower than B7.5) should be used based on the provision bearing capacity underlying layer.
In the concrete underlying layers of the floors of the premises, during the operation of which sharp temperature changes are possible, it is necessary to provide for the device of expansion joints, located among themselves in mutually perpendicular directions at a distance of 8-12 m.
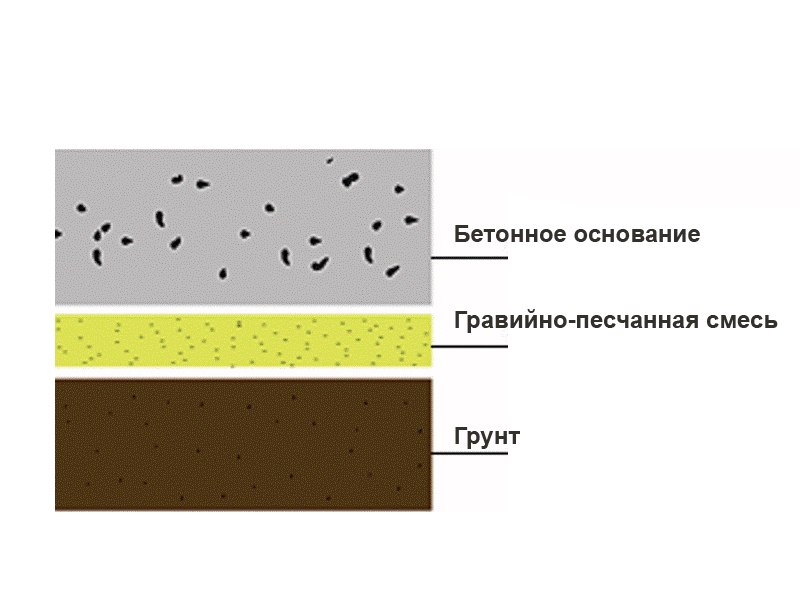
Bases for floors on water-saturated and unsaturated, macroporous (sedimentary) and non-sedimentary, bulk and natural soils are performed before the installation of the underlying floor layers.
When arranging soil foundations, remove vegetative soil (or peat), lower the level groundwater and dry clay, loamy and dusty soils saturated with water until their design bearing capacity is restored. When installing floors in unheated buildings, heaving soils protect against deformation in accordance with the requirements of the project against deformation. Macroporous soils are fixed or replaced with shallow soil. Loose or damaged soils before the flooring are cleaned of wood debris and compacted with mechanical rammers IE-4502 or IE-4505. productivity, respectively, 45 and 13 m: s / h. If the use of mechanical rammers can cause damage or displacement of prefabricated foundations or other adjacent structures, the soil is poured 10 cm thick and compacted with hand rammers.
The soil surface is planned according to the profile and level of the design marks. In this case, in accordance with the required level of the lower surface of the base, the soil is leveled, if necessary, it is poured and compacted. Only thawed soil is planned and compacted, without admixture of frozen soil, snow and ice.
When using soil mixtures, the composition of which is given in the project, they are evenly laid on the leveled base in layers of 50-75 mm thick and each layer is compacted.
The underlying layer of sand is made on a leveled base, laying the sand in a continuous even layer 5-10 mm thick and compacting it. To increase the degree of compaction, the sand is moistened to 7-10%.
The underlying layers of crushed stone are laid on the leveled base of the soil. The mixture is selected according to the granulometric composition and pre-moistened to 5-7%. The mixture is laid in continuous uniform layers with a thickness of 80-200 mm, leveled and compacted by hand, and in case of large volumes of work - with mechanical rollers weighing up to 8 tons. The crushed stone mixture is compacted until an even dense layer is obtained, which allows evenly distributing the load from the floor elements to the ground. If the thickness of the underlying layer exceeds 200 mm, the next layer is laid over the first layer, which is also compacted with rollers.
The underlying layers of gravel and slag are also made on a leveled base, respectively, of gravel-sand mixtures or blast furnace slag. The requirements for their moisture content are the same as for crushed stone mixtures; the thickness of one layer to be laid is 100-200 mm. The laid mixture is compacted with hand rollers. The mass of mechanized rollers should not exceed 5 tons for slag preparation and 12 tons for compaction of gravel-sand mixtures.
The underlying layers of adobe mixtures are laid on the leveled base in a uniform layer up to 100 mm thick. Each layer is compacted until moisture appears on its surface. When installing a multi-layer floor preparation, each subsequent layer is laid after the previous one has cured. In this case, to improve the adhesion between the preparation layers, the underlying layer is moistened with water. To prevent the appearance of cracks in the finished preparation, its surface is also moistened with water for several days after laying the adobe mixture.
The concrete mix is \u200b\u200btransported to the working site by dump trucks, carts, buckets or concrete pumps. If the floor is not reinforced, the mixture is placed from a dump truck or trolleys directly in the center of the section to be poured. If the floor is reinforced, the mixture is unloaded by tipping to the side, or a walkway is used.
When laying the mixture, the reinforcement must not be moved from its place, it is forbidden to move on it or install bridge supports on it. In this case, it may be necessary to adjust the installation of the reinforcement mesh.
When placing the concrete mix using a crane and a bucket, distribute the mix evenly on the surface without using a deep vibrator. The simplest and fastest delivery of the mixture is with concrete pumps, which ensure the distribution of the concrete mixture.
The strips are concreted through one, while the strips farthest from the roadway are first concreted and successively approached it. After the concrete has hardened in the adjacent strips laid between the beacon boards, the intermediate strips are concreted.
The side faces of the concreted slabs, forming expansion joints, are coated with hot bitumen with a layer of 1.5-2 mm before concreting the intermediate strips.
Shrinkage joints are formed by deepening a metal strip 80-100 wide and 4-5 mm thick into freshly laid concrete, deepening it by 1/3 of the thickness of the concrete preparation. The strip remains in the concrete for 20-40 minutes. after which it is removed. After the concrete has hardened, the formed shrinkage joints are filled with hot bitumen or cement mortar.
When arranging concrete preparations near foundations, pits, channels, it is necessary to concrete them in separate sections in a sequence that ensures the least labor-intensive supply of concrete mixture to these sections, its leveling, laying and compaction.
The concrete floor is an excellent base for the device polymer coating only on condition of its thorough preliminary preparation... The main characteristics that a concrete base must technologically meet for the further construction of an industrial floor: adhesion, strength, moisture content of the base.
The preparation procedure includes the complete removal of all contaminants from the surface; for this, an industrial vacuum cleaner is used. If wet cleaning was used to clean the concrete floor, the remaining liquid must be collected, and in the future all work should be carried out with a base moisture of no more than 4%. Nothing should impair the adhesion of the substrate to the applied subsequent coat.
Coating defects on the surface - chips, cracks - need to be repaired: putty, prime and, if necessary, paste over them with fiberglass. Conducted grinding of concrete floors using a mosaic grinder allows you to thoroughly clean the surface from dirt, traces of oil, dust and water. Fresh laitance must be removed from fresh, newly installed unripe concrete. Any concrete floors are prone to deformation; in order to minimize the risk and avoid damage to the coating, expansion joints are cut.

Strength
The existing regulatory documents regulate the parameters of surface strength, these are SNiP 3.04.01.87 and SNiP 2.03.13-88, decoration Materials and insulating floors. In accordance with these SNiP, the peel strength of the existing concrete base must correspond to at least 1.5 N / sq. Mm (1.5 MPa), and the compressive strength must be 20 MPa: the concrete grade must be at least M200.
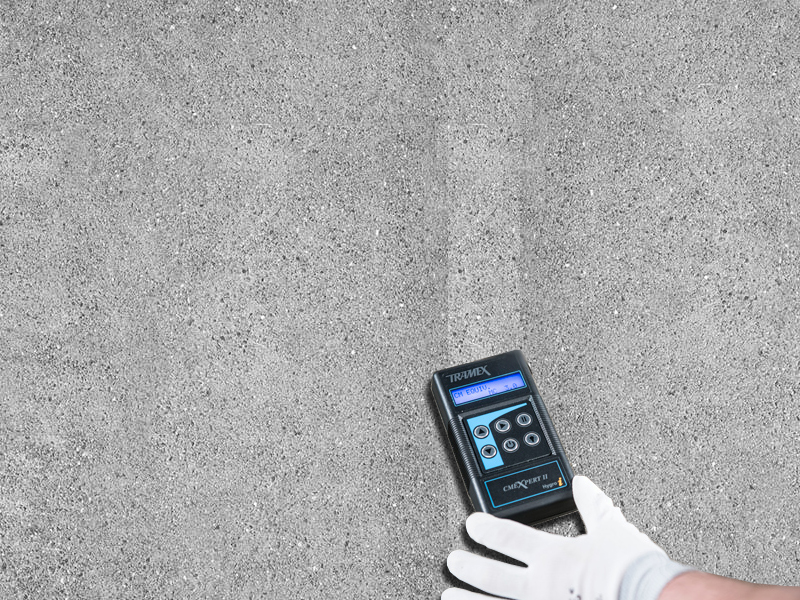
The untreated surface of the concrete floor is quite porous, it easily retains and absorbs moisture from the environment, seeping through the pores, moisture negatively affects the reinforcement elements arranged, causing corrosion and partial destruction of the concrete coating on it. To prevent this, the concrete floor is impregnated with special compounds. This completely closes the pores of the concrete, removes dust from the surface, insulates it from moisture ingress. The use of such hardeners is a mandatory element of high-quality preparation of a concrete floor;
Humidity
When on open ground a concrete base is arranged, it is necessary to lay it only on a drainage cushion of fine gravel or gravel. The installed drainage layer prevents moisture from penetrating through the capillaries in the material directly into the concrete thickness, which leads to delamination from the base of the polymer layer itself. The drainage pad is pre-leveled and tamped. Before carrying out work on laying the base of the polymer coating, the natural moisture content of the constructed concrete floor should not be more than 4 percent.
Temperature regime
When installing a new self-leveling floor, the recommended temperature regime must be observed. The optimal norm is an ambient temperature of at least +15 C. At a lower temperature in combination with an excess of humidity, condensation may form on the floor covering. When carrying out work in such conditions, the mixture used is overused, since the viscosity of the material increases, and the material becomes less fluid. When high temperature the environment, the process of surface hardening is accelerated, which is extremely undesirable, for two main reasons: the wear resistance of the surface decreases, in which case the appearance of the finished coating can be significantly affected.
For the subsequent installation of a polymer self-leveling coating during the preparation of a concrete floor, it is necessary to follow the established technological recommendations established for a specific type of surface, and it is also necessary to take into account the loads planned during operation.
With such a term as concrete preparation under the floors, sooner or later every person who decides to make repairs in own home or apartment.
The screed looks like a hardened layer of concrete mix, which is aligned in a certain desired plane.
This device is needed in order to make the surface even and then use it as a basis for the further construction of the floor. It is also called a screed. It looks like a hardened layer of concrete mixture, which is leveled in a certain desired plane.
At first it may seem that this is all very easy and anyone can handle this work. But it seems so only at first glance. This device has several nuances that anyone can encounter. This is primarily due to non-compliance with work technologies and incorrect mixing of the solution. Therefore, before you start mixing the base under the concrete floors, you should disassemble all the main mistakes separately. This must be done in order not to redo what did not work out the first time later. If in the process there are any difficulties, it is better to contact a specialist and consult with him.
Solution preparation
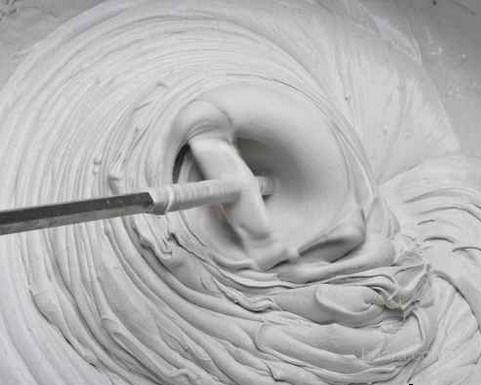
In order for the solution to obtain the desired consistency and become homogeneous during the mixing process, you need to use a concrete mixer. But this, of course, mainly concerns those who have large volumes of work. If the volume is small, then instead of a concrete mixer, you can use the most ordinary kitchen mixer to prepare the solution, or mix everything with a spatula. It must be said right away that even with all the applied diligence and perseverance, it will not work to get the same result as with.
The base of the concrete mix under the floor consists of the following three components:
- sand;
- cement;
- water.
Water here plays the role of a grout, sand - filler, cement acts as a binding element. If it is necessary to use additional filler, crushed stone and other materials similar to it are added to the base. How coarse the aggregate will be used depends directly on the planned screed thickness. The thicker it is, the larger the filler, therefore, must be used. Usually, the construction of a leveling screed is used, which is placed at a thickness of 4 cm. In this case, a fine aggregate is used, most often in the form of sifted sand.
In addition to the usual, standard, there are also specialized ones. Special means are added to them, with the help of which the usefulness of the properties increases. Experts strongly recommend doing this.
Mixing components
1. The first base that is poured into the cement mixing device is sand.
2. After that, cement is sent to the device. In a concrete mixer, they will be mixed for 5 to 10 minutes. The exact time depends on the volume of the ingredients. For the preparation of a leveling screed under the floor, the ratio is usually 1 part cement and 2 parts sand.
3. After the first two components are mixed, water is added to the mixing device. It is difficult to name the exact proportion, since this indicator directly depends on how wet the sand was poured into the device. You can define required amount water by eye. It will not be difficult even for a non-professional to do this. Ideal in consistency can be called the mixture that rolls inside the concrete mixer, imitating wave-like movements, and does not stick to its walls.
In order for the plasticizer to mix better with the concrete mass, it is better to dilute it in advance in some container with water, and then add it to the cement mixing device. Everything, on this preparation of the mixture to make the base for concrete floors, is completed.
Laying technology
When preparing the leveling layer under the floor, make it as even as possible.
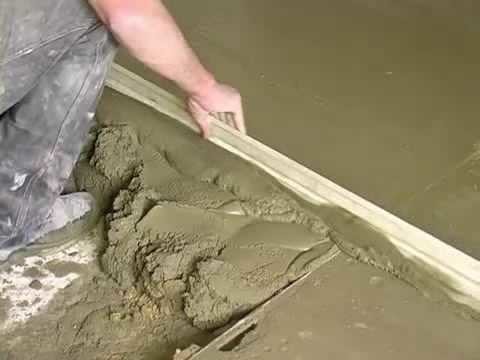
The most important thing when preparing a leveling layer under the floor is to make it as even as possible. This means that the selected plane device must be observed. Aluminum beacons will be good helpers in this. They look like aluminum strips that have small holes in the base. In hardware stores, these strips are usually sold in lengths of 2 and 3 m. On top of this lighthouse there is a spike measuring 6 and 9 mm in height. The height of the spike is usually chosen depending on the location of the tie and its purpose. The screed device is aligned with the lighthouse spike. But before proceeding with the leveling, the aluminum strip itself must be installed on the floor.
Screed device diagram.
The installation of the plank on the floor should begin with the preparation of the base of the floor surface, which will be leveled with a screed. This process includes removing and cleaning up dirt, debris and dust from all over the surface. After that, the places where the beacons will be installed are marked. For convenience, experts advise to lay them on the floors no further than one and a half meters from each other. These places should be moistened with a hose or a watering can with a splash guard. This must be done so that later, when a mixture of concrete is placed on the surface, particles of debris, sand and dust are mixed with the ready-made solution and hardened with it. The layer will be more uniform.
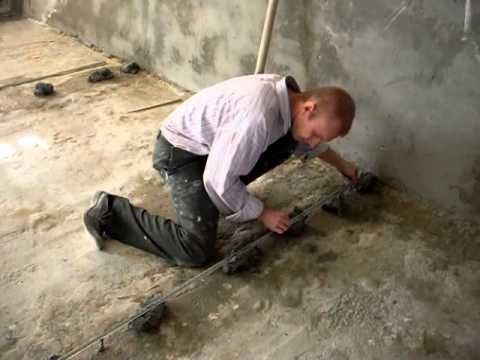
When the beacons are securely installed, you can proceed to the final stage of preparing the design of the leveling screed device.
After that, it begins directly concrete works... It is necessary to lay a layer of mortar on the floor at the marked places for installing beacons. Outwardly, the device will resemble a slightly oblong tubercle. This device will act as a lining for the pendulum. The height of this lining will depend directly on the thickness of the screed, which will need to be obtained in the end. The beacon is placed on a concrete hillock and pressed a little. This is done to more securely fix the beacon. Next, using a level, you need to align it. Whether the floor is even or not depends on the correct installation. Therefore, one should very responsibly and carefully approach this process. For setting, it is necessary to give the concrete a little time.
When the beacons are securely installed in the dried concrete, you can proceed to the final stage of preparing the design of the leveling screed device. To begin with, the surface is wetted over the entire floor area. A concrete mixture is placed in the resulting space between the beacons and leveled. Do any work related to concrete mortar, you need to very quickly so that he does not have time to grab. Once the work is completed, the aluminum beacons do not need to be removed. They remain in the screed.
According to this scheme, it is possible to design not only leveling concrete coatings, but also concrete screeds for various purposes.
Today we will consider the question of when concrete preparation under the floors is carried out, the production technology of the work, the concrete grades used, the requirements for the quality of work.
General Provisions
The concrete preparation for the floors serves, like the cement screed, for leveling the floor surface. The difference is that it is made of concrete, and the cement screed is made of mortar. In addition, the difference in strength characteristics, since the concrete base perceives and redistributes heavy loads, depending on the purpose of the room.
There is a concept of "concrete floor". Concrete preparation and concrete floor are very close concepts. They are made of concrete using a similar technology. The difference is that concrete preparation for floors implies the presence of a topcoat (mosaic, ceramic tiles etc.), but the concrete floor does not provide for this.
Concrete preparation for floors is carried out on the ground (in basements, when installing floors in private houses without a basement, etc.). If concrete preparation is carried out in workshops with increased load on the floor from equipment, in-workshop transport, in warehouses, garages, etc., then it must be reinforced.
Preparatory work for the device of concrete preparation
- We perform surface planning according to the elevation or profile provided by the project.
- We compact the planned base by ramming crushed stone or gravel.
- The underlying layers on the ground can be made of gravel, slag, crushed stone, clay, etc. up to 120mm thick and must be compacted.
- We expose the guide rails or formwork, depending on the area of \u200b\u200bthe concrete preparation being performed. If the concreting area is large, then we divide it into sections approximately 3-4 meters wide.
Device technology and care for concrete preparation under the floors
Concrete preparation must be carried out at an air temperature and a base on which the concrete mass is laid at least +5 degrees. Otherwise, you should use chemical additives, perform electric heating of concrete, arrange greenhouses. The work is carried out strictly according to the project, in compliance with the recommendations and the projected grade of concrete, its thickness.
- Before laying the concrete mix, the base is poured with water.
- We put reinforcement meshif it is provided by the project (when the preparation will take on heavy loads).
- We lay the concrete mix, compact it with vibrating screeds or vibrators and level it before the concrete starts to set.
- If the project provides for an expansion joint (for large concreting areas), then we perform it. For the formation of expansion joints, boards are installed, wrapped with tar paper, or planed and coated with hot bitumen. The boards are removed before the concrete has set and the joints are filled bituminous compositions, sealants.
- If it is dry, hot weather outside, then the completed concrete preparation must be watered with water to avoid cracking it, on the second day, covered with a layer of wet sawdust (20-40mm) and they must be kept moist for a week.
As has already happened, on my blog I published SNiP norms for the consumption of components for the preparation of solutions during the device cement screedplastering the walls. Today I publish the consumption rates of components for the preparation of concrete mass by brands, depending on the inert components.
Concrete in large quantities get to the construction site centrally from the mortar-concrete unit, and if we need a small amount of concrete for repair in the country, at home, in the garage, we are at a loss and mix the components in approximate proportions. I offer the opportunity to be guided by the norms of SNiP.
Consumption of materials according to SNiP for the preparation of 1m3 of concrete (on gravel)
| Concrete grade | Cement grade | Cement (t) | Gravel (m3) | Sand (m3) | Water (m3) |
| M-100 concrete (V 7.5) | |||||
| Concrete M-150 (V 10-12.5) | |||||
| Concrete M-200 (B15) | |||||
| Concrete M-250 (B20) | |||||
| M-300 concrete (B22.5) | |||||
Consumption of materials according to SNiP for the preparation of 1m3 of concrete (on crushed stone)
| Concrete grade | Cement grade | Cement (t) | Crushed stone (m3) | Sand (m3) | Water (m3) |
| M-100 concrete (V 7.5) | |||||
| Concrete M-150 (V 10-12.5) | |||||
| Concrete M-200 (B15) | |||||
| Concrete M-250 (B20) | |||||
| M-300 concrete (B22.5) | |||||
| Concrete M-350 (B25) | |||||
| M-400 concrete (B30) |
Quality requirements:
When accepting concrete preparation under the floors, its evenness, horizontalness and actual strength are checked. The evenness of the concrete preparation is controlled in all directions by a 2 meter long rail. The gap between the concrete preparation and the rail should not exceed 2mm. The deviation of the screed surface from the floor plane does not exceed 0.2% of the actual area of \u200b\u200bthe room.
We looked at how concrete preparation is performed under the floors. If you plan to perform a not very large section of work, then you can easily do it yourself where necessary. Good luck and solid, flat surfaces.


