The concrete screed has become indispensable even in the simplest private construction - it is almost always used to fill the floor. Therefore, the question of how to make a concrete screed with your own hands becomes relevant for almost any builder in a domestic environment.
Types of screeds
The practitioners have adopted three main types of concrete bases: floating, separating screed, and sub-base screed. Each of them has its own characteristics, but they have one main function - leveling the surface for further finishing. The main condition is that the minimum thickness of any screed should be in the range of 25-30 mm and not less.
The screed associated with the base has become widespread. Its advantage is an increase in the adhesion of concrete particles to the interfloor surface or the basement subgrade. Before pouring, it is recommended to clean the base from dust and dirt.
The floating concrete floor screed is used to provide additional protection and improve the properties of the floor covering. An insulating material is placed between the floor and the screed, which improves the screed's resistance to moisture or reduces heat loss. A bonus for residents of high-rise buildings is sound insulation from the lower floors.
A screed with a release layer helps if the substrate is damaged by grease. It is poured onto bituminous mastic or rolled roofing material. The thickness of such a screed exceeds 3 cm.
Surface preparation
The concrete floor screed will fully fulfill its functions only after thorough surface preparation: basic preparation (cleaning, debris removal, leveling), insulation, reinforcement and functional equipment of the underground space. Let's consider the sequence of adaptation of the surface to concrete.
Base minimum
The old coating is dismantled to the ground. Floor slabs or zero ground level are cleaned of dust and dirt, splinters, cracks and other defects are repaired. After that, the surface is primed. The primer is applied directly to the floor, leveling with brushes. Leave to dry for 5 hours.
The soil base in the basement is covered with a layer of expanded clay and sand: first, expanded clay is laid, and then it is covered with sand at least 10 cm thick. The layers must be tamped down and, if necessary, moistened with water for natural shrinkage. The embankment saves time and materials that would be required to fill uneven floors. The basic stage is completed with the laying of communications, infrastructure and even the arrangement of hiding places.
Insulation
It will be correct to take measures to protect the floor from moisture and preserve heat when creating a floor in a private house and unheated buildings: garages, basements, attics. The choice of materials determines the construction budget.
The main condition for reliable thermal insulation is the use of rigid insulation. These include expanded polystyrene, sheets of roofing material or a classic mound of expanded clay and sand. However, the embankment is not recommended to be made in multi-storey buildings due to poor sound insulation.
![]()
Roofing material can also serve as a waterproofing agent. Alternatively, a thick film or cellophane is used to protect against moisture. The strips are laid with an overlap of 10-15 cm and approaching the walls from 10 cm. Water supply and sewerage pipes are coated with sealant or mastic to the level of filling. Waterproofing is carried out in sanitary and hygienic rooms and on the lower floors of buildings exposed to damp and cold.
This preparation option is important for the soil surface. In addition, the floating screed must be reinforced.
The operation is performed using steel mesh or welded reinforcement. The addition of amplifiers to the solution is also allowed.
Procurement of materials
The preparation is completed with calculations and the acquisition of the required amount of concrete components. First of all, they find out its weight, so as not to overload the coating. The formula is simple: the thickness of the future concrete screed is multiplied by the density of the solution.
A durable concrete floor screed when pouring with your own hands will take a lot of time and knowledge. Also, for a good result great importance have the correct proportions of concrete for the screed and the grade of cement.
Markup
Work on the concrete floor begins by marking the boundary of the top fill level on the wall. A straight line is controlled by a laser or water level. The algorithms for working with these devices differ from each other.
So, the laser level is located in the center of the room and set the value. The minimum height for floor slabs is 20 mm. In garages, landfills and industrial plants where solid loads are envisaged, it is recommended to set a value of 40-50 mm. The laser beam itself will indicate points on the wall. Mark them with chalk.

Working with the hydro level is more difficult: a mark is placed on one of the walls at a height of 1.5 meters. A level is applied to it so that it coincides with the upper edge of the water in the flask. The other end is placed on an adjacent wall. The water in the flask will tell you where the mark is on it.
Similar actions are performed on all walls of the room. The marks are connected with masking tape, defining the zero level of the floor. The zero serves as a guide for determining the maximum and minimum points of the base. Measure 20 mm from the peak. At the obtained distance from the zero level, marks are placed and combined with tape.
Beacon orientation
In order for the concrete floor screed to be even, marking alone is not enough. Beacons come to the rescue - special slats that are distributed evenly over the floor plane. They are fixed using the same solution that will be used for pouring.

Before installing the beacons, you need to make lines of screws that will become the basis for the rails. The first of the lines is placed at a distance of 20 cm from the wall in increments of up to 80 cm between adjacent fasteners. Subsequent rows are set at a distance of up to 1.5 meters from each other, but slightly less than the length of the rule. Please note that the heads of the screws go deeper into the resulting layer by 6-10 mm. The key parameter is the height of the rail.
The evenness of the beacons is checked by the level. The site is left until the solution is completely dry.
Large solution
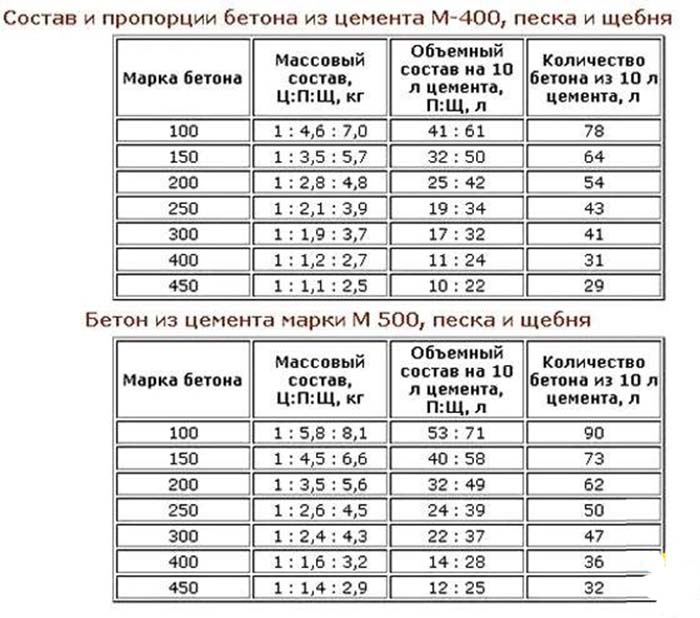
It is better to take strong M400 cement as a base and dilute it with three parts of sand with one part of water. The consistency should be conducive to the flow of concrete, but at the same time not be dry. Calculate required amount cement, sand and crushed stone will help this table.
Table 1 - As a screed: parameters for mixing
If the room, the house where the screed is performed is large, then the concrete is ordered from a nearby plant: such concrete is of better quality and will save the budget.
Fill
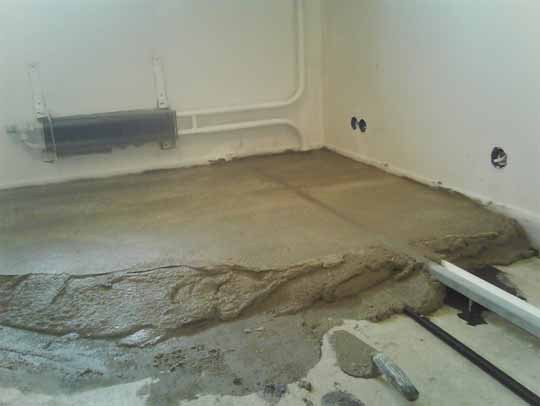
So, the solution is ready. The culmination of the process begins - pouring the floor with your own hands. First, the space between the beacons on the opposite side from the doors is filled. From time to time they take the rule in their hands and level the solution, add it to the necessary areas.
It will require a certain speed of work: the solution sets within an hour and then it cannot be leveled normally.

The areas between the lighthouses are flooded gradually. When the next strip is completed, the floor must be pierced with a thick rod to expose the air that has got into the concrete during leveling.
It is allowed to stand on the finished surface in a day. For this purpose, a chipboard bridge is used. If the tie is done correctly, it is allowed to remove the adjusting devices (beacons). The grooves from them are adjusted with mortar and leveled with a trowel. After this, the surfaces are allowed to dry completely. The next stage of work is grinding.
It is required to eliminate irregularities that form as a result. First of all, the space near the walls needs leveling: sometimes the base of the concrete screed does not fit with the wall, which is why bumps form in these places.
If they are not removed in time, they will interfere with the normal arrangement of furniture. Remove all swellings with a grinder with a grinding wheel attachment.
Perfectly flat surface is the key to successful installation floor coveringsin particular linoleum and laminate.
Plan for further work in the room at least two weeks after pouring. The concrete must dry well and adhere to the substrate.
It is a big mistake to speed up the drying of the screed. Concrete becomes strong through adhesion, for which water is the key element. If the surface is too dry, periodically moisten the concrete with a roller. Complete drying occurs in a month. During the entire period, the room is protected from drafts and mechanical stress.
Violation of the rules will lead to the formation of microcracks on the concrete. During operation, the concrete floor screed will lose its properties and there will be a need to replace it. If drafts cannot be avoided (for example, outdoors), dilute the mortar with a mixture with additives that increase the durability of the screed.
For urgent repairs, use dry leveling compounds prepared according to the instructions on the packaging.
The most versatile building material can be considered concrete. The floors are used in premises for various purposes: from country houses and garages to shopping centers and production facilities.
The decision about which grade of concrete is needed for pouring floors is made based on the compressive strength. It is by this value that brands and classes differ. The class shows the indicator of the guaranteed strength.
- For floors in an apartment and garage, experts recommend choosing brands M100, M150 and M200.
- The M100 grade serves as a preparatory material before reinforcement work or laying the foundation. It is often used to lay curbs and sidewalks. It is suitable for pouring underfloor heating.
- The M150 brand is used for the individual construction of cottages. It is allowed to be used if there are no chemically aggressive elements in the environment.
Description of brands
M150 is intended for foundations of fences or car parks, so this concrete can be used to fill the floor not only in an apartment, but also to use it as a suitable brand for installing a floor in a garage, if no heavy loads are planned. The main advantage is low cost.
The M200 grade is considered a medium strength material. According to the standards, it belongs to class B15. It is optimal for screed. The service life can reach decades.
In individual cases, in the production of floor mixes, brands M250 and M300 are suitable. M250 is weather resistant and can withstand groundwater and precipitation. The bestseller is the M300 mix. It is characterized by fast hardening, abrasion resistance, increased frost and moisture resistance. Their strength and ability to withstand high loads allows, in addition to leveling the floor with concrete, to make road surfaces.
Experts consider the use of more resistant grades M350 and M400 unprofitable in the private construction sector, and therefore these types are less in demand.
The composition of the mixture for floor screed is a certain set of main components:
- cement,
- water,
- rubble,
- sand.
Cement and water interact to form a stone, but without sand and crushed stone, this stone deforms and gives a large shrinkage. A mixture without crushed stone is called cement mortar.
Using different proportions, the properties of the mixture are changed. For greater strength, the proportion of cement is increased. In lightweight concrete, not crushed stone is used, but expanded clay. Additional ingredients are added to speed up the hardening process. Limestone, gravel or granite is suitable instead of crushed stone, depending on the desired structure. In individual construction, gravel is more popular: it makes the mixture cheaper without loss of strength. It can be used to make grades up to M450.
Filling technology
To make a flat concrete floor, you first need to prepare the surface, then lay the insulating material and then proceed with the pouring. Preparation involves removing the desired layer of soil and tamping the surface with crushed stone or gravel. Broken bricks can be added. The thickness of the screed should not be less than 5 cm. If additional loads are involved (for example, in a garage), then the screed is reinforced with a mesh.
The cable is laid in special grooves and a level is set: a line is drawn along the perimeter of the entire room at a height of 1 meter from the base of the door opening and 1 meter down is measured. In the center and along the walls, wooden pegs are driven into the ground, 1 cm below the set level, and gravel is laid. Then the pegs are removed, filled and leveled with sand, covered with plastic wrap and slats divide the room into strips.
Pouring starts from the far corner so that the floor level is slightly higher than the level of the battens. Using the rule, the surface is leveled, the slats are removed one by one and the pits are filled with a solution, moving towards the door. Upon completion, each strip is covered with oilcloth and, constantly moistening, left to harden.
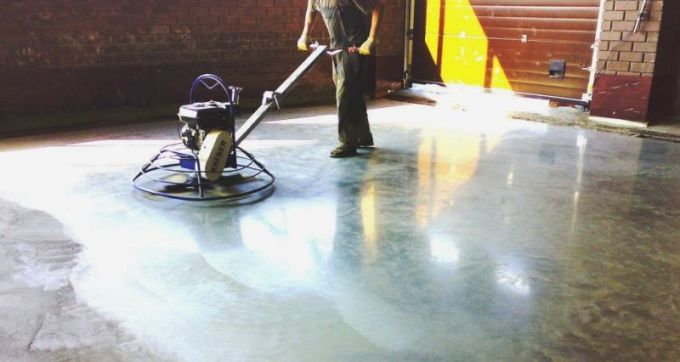
In a garage, the flooring can be painted or polished. The polished concrete floor is made using a professional grinder. This technology is called the system of the future. The surface is smooth, even, it is possible to decorate it. For example, polished concrete colored floors are often made in shopping malls and are durable and easy to maintain.
In private construction, laminate or wooden flooring is popular. Allow the board to dry for a while before laying it. Since it is not easy to estimate the percentage of moisture content of the slabs, to apply a vapor barrier layer and comply with all the requirements for installation, you often have to turn to the services of professionals. Therefore, concrete flooring works are offered by many contractors.
Prices
Since it is difficult to fill the concrete floor correctly without experience, it is advisable to contact specialists. An even fill will provide a quality finish. The contractor will not only be able to cope with this, but will also be responsible for the result. The price of filling the floor depends on the thickness, grade of concrete solution, the presence of reinforcement, grouting and other factors. In Moscow, the average price is 500-2,500 rubles per 1 m 2. When using a reinforcing mesh 3x50x50 square meter costs 608 rubles. Larger mesh is more expensive. The cost of work excluding the cost of materials - from 300 rubles per square meter.
Grades M100 and M150 with gravel cost 3300-3400 rubles, with granite - 4500-5000 rubles. The higher the strength readings, the more expensive the concrete cube. Delivery of 7 cubes within 10 km from Moscow costs 2,100 rubles.
What should be the composition of the floor screed solution? Mortar preparation is one of the most important stages of construction. The service life of the rough and finish coating depends on the quality of the do-it-yourself composition, as well as many specifications coverings - heat, noise and waterproofing. From the article you will learn how to prepare a floor screed solution so that the formed coating has the necessary strength and durability.
Types and functions of ties
Before kneading the cement-sand mixture (DSP) with your own hands, you should figure out what the screed is and why it is needed. The screed is a concrete layer that is located between the rough and finish coatings. The solution can be prepared using several technologies, depending on the type of mixture, the type of base and the requirements for the screed itself. What functions does this coating perform?
- Promotes the leveling of wooden and concrete sub-bases;
- Masks communications located on the floor;
- Protects the subfloor from mechanical damage and uneven distribution of the load on the coating;
- The concrete screed allows you to equip the "warm floor" system.
In some cases, pouring the solution with your own hands is done in order to achieve not horizontal, but a certain slope of the coating. As a rule, such work is necessary when arranging showers and bathrooms. Depending on the composition of the concrete and the method of preparation of the rough base, the following types of screeds are distinguished:
- Separators - fill cement-sand mixture carried out on a layer of waterproofing, which prevents moisture from entering the sub-base. This method is advisable to use when repairing rough floors on the ground, as well as on the lower floors of apartments, in which the probability of moisture seepage under the floor is high;
- Connected - the cement compound is poured directly onto the floor, but only if the moisture level of the base is low enough. Do-it-yourself pouring of this type of mortar is often done when repairing interfloor floors;
- Floating - such a screed is best done only when it is necessary to insulate the base. The solution is poured onto the heat insulator and reinforcing mesh. At the same time, the liquid mixture does not contact either the rough base or the walls. The minimum screed thickness must be 60 mm.
Screed strength according to SNiP

In order for the cement composition to acquire maximum strength after hardening, it is very important to observe the proportions during its preparation. The period of operation of the concrete and, as a result, the finish coating will depend on the degree of wear resistance of the coating. Few people think that the screed is experiencing not only the dynamic load created by a person when walking. The weight of the finished floor, furniture and other equipment also creates a very serious load on the coating, which over time can affect the integrity of the base.
What is the best concrete strength? The degree of wear resistance is determined by several factors:
- the purpose of the premises (industrial, residential, commercial);
- type of topcoat;
- floor structure.
According to the requirements of SNiP, prescribed in article 3.0401-87, the minimum strength of the screed must reach 150 kg / m 2. Also, in the recommendations for the construction of floors, regulated by SNiP, the strength of the concrete used to level the base should be at least 15 MPa. Taking into account the above points guarantees maximum durability of the screed.
It should be noted that the following parameters are indicated in the SNiP standards regarding the organization of the draft basis:
- When creating a concrete slope on an interfloor floor, the compressive strength of the CPF can be at least 10 MPa;
- In article 2.03.13-88, mentioned in SNiP, when arranging a self-leveling finished floor, the strength of concrete cannot be lower than 20 MPa;
- In one of the paragraphs of Article 3.0401-87 of SNiP, it is explained that the degree of strength of lightweight concrete laid on heat and waterproofing should be equal to 2.5 MPa per cm 2 of the coating.
According to the above requirements, the preparation of the working solution should be carried out using cement grade M150, not lower. At the same time, experts recommend taking building mixtures best quality, not focusing on the lower limit of permissible norms.
To mix the liquid composition with your own hands, you can use the following schemes:
- Ready mixes - compositions are made on the basis of cement, various additives (plasticizers) and sand. Depending on the concentration of individual components, the formed screed can acquire the necessary technical characteristics - frost resistance, moisture resistance, etc.;
- DSP is a liquid composition that includes cement and sand in a ratio of 1 to 3. This type of mortar has a high compressive strength, so it can be used to equip subfloors in private and commercial construction.
Concrete composition
When mixing a solution, you need to pay attention not only to the proportions, but also to the presence of additional components, such as plasticizers. They can perform various functions, ranging from increasing the degree of frost resistance of the screed to improving the water-repellent properties. The standard composition of concrete is sand and cement. But even these components can differ in their technical characteristics.
The following parameters affect the physical and mechanical properties of sand and cement:
- Fraction size. The sand can be fine or coarse;
- Cement grade. The higher the dry powder grade, the stronger the concrete surface will be after the screed hardens;
- The degree of humidity. The "wetter" the sand, the less water will be required when mixing the solution.
So, what are the components of the standard DSP?
- Cement. To prepare a high-quality mixture, it is best to use powder of the M200 brand and higher. It is important to take into account the "freshness" of the material. Over time, the cement cakes, which can affect its quality;
- Sand. When arranging a screed with your own hands, you need to choose river sand with a small amount of impurities - shells, pebbles, etc. It is best to sift sand before adding sand to the slurry;
- Plasticizer. Liquid synthetic additives make DSP more plastic and easier to work with. Plasticizers affect the rate of hardening of the screed, as well as the degree of its wear resistance;
- Fiber. This component is needed in order to prevent cracking of the screed. In a sense, it plays the role of a reinforcing mesh, preventing damage to the coating both during hardening and during operation.
Optimal proportions
When mixing a solution, first of all, they are guided by the proportions of cement and sand in its composition. Compliance with the basic conditions for the preparation of DSP guarantees maximum adhesion of the screed to the base, as well as its durability. In this case, the proportions for the mortar are selected in accordance with the brand of concrete and cement. After all, the degree of wear resistance of the coating will depend on these indicators.
The table below shows the optimal ratio of cement and sand for mixing the working solution:
| Mortar grade | Cement grade | Sand to cement ratio |
| 100 | 300 | 3:1 |
| 150 | 300 | 2:1 |
| 200 | 300 | 1:1 |
| 200 | 500 | 3:1 |
To fill the screed in an apartment, it is best to use a 150 or 200 grade of concrete. The price of the components is affordable, since cement of the M300 brand is used in the process of mixing the solution, which is one of the budget materials.
Features of solution preparation
How to make a DSP yourself? Consider an example of preparing a mixture for arranging a wet screed. As already mentioned, the recipe for preparing the composition is quite simple: cement - sand - water. The proportions will be as follows: 3 parts of sand is mixed with one part of cement. About 50% of the total volume of the mixture is added to the mixed mixture. How to make a solution?
- The first step is to mix cement and sand using a construction trowel;
- Water is added to a separate container and the prepared mixture is introduced into it;
- At the next stage, you will need a construction mixer, with which the solution can be brought to the desired consistency and uniformity;
- If a plasticizer is needed to improve technical qualities, it is added in the proportion indicated by the manufacturer on the package;
- When a creamy consistency of the solution is achieved, it is poured onto a prepared base and leveled.
Cost of work
The process of making DSP with your own hands is not easy for beginners who first encountered construction works... In order not to translate materials in vain, it is best to seek help from experienced craftsmen... What is the cost of preparing and pouring a concrete screed?
It should be said right away that the average price preparatory work depends on several factors:
- base area;
- type of rough coating;
- brands of materials used;
At the present time, an increasing number of owners want to do the screed in the house on their own, since this is really not a very difficult process and you can really do it yourself, even if you have not done it before. But before you start doing such work, you need to know first of all the technology for preparing the solution and the stage by stage of the work.
You also need to know exactly what proportions of the screed solution you need to use. 
Cement mortar and screed proportions
It must be used in the following proportions (calculations must be done first of all, depending on which brand of cement will be used):
Cement 600 - 1 to 3 - grades 300
Cement 600 - 1 to 4 - grades 200
Cement 500 - 1 to 2 - grades 300
Cement 500 -e 1 to 3 - grades 200
Cement 400 - 1 to 1 - marks 300
Cement 400 - - 1 to 3 - grade 150
Cement 300 - 1 to 1 - grades 200
Cement 300 - 1 to 3 - grades 100
At the present time, more often than ever, for a full screed, mortars of such brands as 150 or 200 are used. Since it is the mixtures of these types that allow the mixture to make the screed well, and also provide good strength for the floor.
Solution calculations. Floor screeds - proportions.
Take, for example, an area of \u200b\u200b40 m2 and calculate how many materials are needed to fill such a screed.
So for a site of 42 m2 * 0.05 (screed height) \u003d 2 cubic meters of mortar. If we take into account the factor that the ratio of cement and sand is 1k3, then sand is needed about 1.5 cubic meters, respectively, about 0.5 cubic meters of cement.
Types of concrete for screed
It is also necessary to take into account the fact that during the manufacture of the solution, its volume can significantly decrease. This is because smaller aggregate particles partially have the ability to seal the voids in the mortar. When making 1 m3 of concrete, you need to take a large number of dry elements. For example, for concrete, you need to take - 0.445 m3 of sand, 0.870 m3 of gravel, 0.198 m3 of cement, 185 liters of water.

For a different composition of cement, you need to take 0, 398 m3 of sand, 0, 882 m3 of gravel, 0, 196 m3 of cement and 180 liters of water.
How to make a screed for the floor with your own hands can be seen in this video.
Pouring screed in the house is one of the main types of work and at the same time one of the most responsible. It is very important here to observe the proportions of cement and sand in the mortar recipe. Sand and cement, which are mixed in one solution, give it the qualities necessary for the floor and meet all the requirements for the quality of the floor.
The main screed is the leveling of the floors, so that later it will be possible to put all kinds of floor coverings on top of this screed.
If the screed is made of high quality, then it needs to be equally used over the entire floor area. The most popular method that is used for the manufacture of screeds is cement grades m 400 and m 500, using cement of these grades, you need to take into account the ratio of 1: 3, that is, one third of the sand and one part of the cement. Large quantity sand can reduce the strength of the entire screed.
Concrete screed is the most popular type of subfloor. This is due to the simplicity of its execution, the highest strength and durability. In addition, correctly made of concrete is not susceptible to moisture.
What the screed consists of
First of all, it plays the role of a base for any flooring: ceramic tile, laminate, parquet, linoleum, parquet board, bulk polymer floors. Laid on concrete interfloor overlap it also distributes the load evenly and at the same time increases the strength of the house structure.

Typically, grade 150 concrete is used to screed the floor in a house or apartment. Sand and crushed stone are used as filler. In this case, the proportions of concrete for the following: cement grade 400 and sand 1: 3. There are the following types of concrete screeds:
- related to the ground
- Screed on a separating layer
- Floating
The first type is performed directly on the concrete floor or on the prepared subgrade basement room. In the first case, concrete slabs are cleaned of debris, weak particles of the upper layer and carefully treated with a deep penetration primer. This is usually done during new construction, when there is no danger of flooding the neighbors.

It will increase the adhesion of concrete particles to the slab, which will increase durability and strength. In the second case, when the screed is performed on the ground in the basement, the preparation is carried out as follows: ram the ground Then pours a sand-gravel mixture 10 cm thick and ram it again. Concrete preparation with a thickness of 50 mm is arranged on gravel and sand.
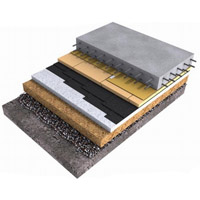
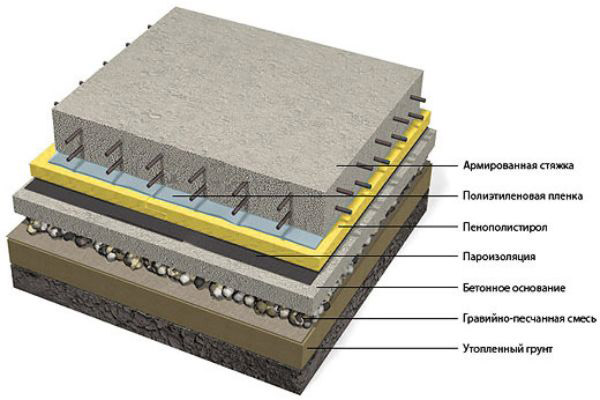
After setting with concrete maximum strength (3-4 weeks) we lay on it a layer of vapor barrier made of roofing material. We put a layer of insulation (expanded polystyrene or mineral wool) on the vapor barrier. From the top we lay a layer of waterproofing made of polyethylene film. After that, a concrete screed with reinforcement is performed. For reinforcement, a steel mesh 3-5 mm with a cell of 100 x 100 mm is used.
Screed on the separating layer is performed when concrete base damp or greasy. Roll insulators (roofing material) or bitumen mastics are used as a separating layer. On them, a concrete screed is laid, the thickness of which is at least 3 cm.
The floating screed is made on a layer of mineral wool, corrugated cardboard or expanded polystyrene boards. This is very effective if the room is located under an unheated room such as a garage.

In this case, the screed must be reinforced. Such a base has high heat-insulating and noise-absorbing properties, but its strength is lower than the first two options.
How is a concrete screed made
The weight of the concrete screed is pre-calculated in order not to overload the floor. If the strength of the floor does not allow the use of ordinary concrete, then a light screed is made of foam concrete of a porous structure.

Then mark the height of the future screed. On floor slabs, its height should be at least 20 mm. For marking, use a hydro or laser level.
It is enough to set the laser level in the center of the room and turn it on. The beam will indicate the marks at the set height and they will only have to be applied with chalk. For marking with a hydraulic level, you need:
- Place a mark on the wall at a height of 1.5 m from the floor
- Attach one end of the water level to the water level mark in the flask
- Attach the second end of the level to the adjacent wall and, focusing on the water level in the flask, put a mark
- This is done along all the walls, and the marks are connected with a painting tape (the resulting line is the zero level)
- The lowest and highest points of the concrete slab are determined from the zero level.
- Measure 20 mm from the high point, and the resulting distance to the zero level is transferred along the perimeter of the walls
- The marks are also connected with a paint thread.
It is also necessary to understand that the concrete screed belongs to the so-called "wet" works. If you do not take special measures for waterproofing, then you will simply flood the neighbors from below. Waterproofing can be done as follows:
- Floor slabs are cleaned of dust and debris
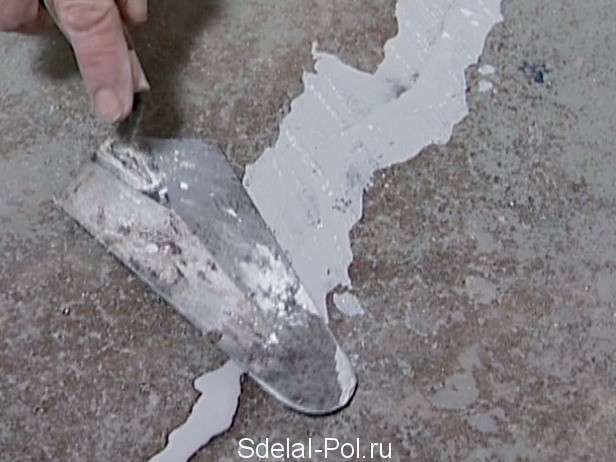
- Wide gaps in slabs and wall junctions are sealed with cement mortar
- After the solution has dried, they are primed and treated with a coating waterproofing mastic
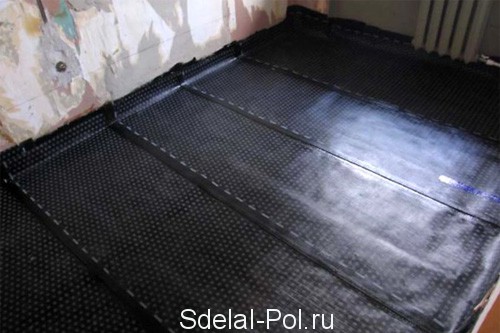
- Roofing material is laid on the prepared floor with an overlap of adjacent sheets of 10 cm

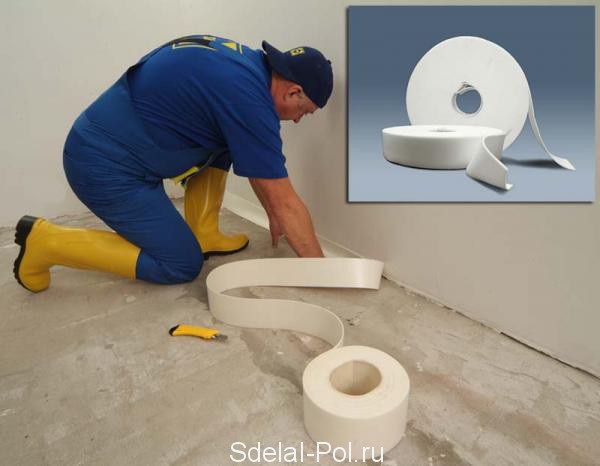
If you plan to use a floor heating system under the screed, then a damper tape made of expanded polypropylene is glued to the walls along the perimeter of the floor. This tape compensates for the expansion of the screed when heated and prevents it from cracking.
The device of the concrete screed is carried out in the direction from the window to the front door, so that you can go out without breaking the fresh coating. In this order, guide rails or beacons are installed on the waterproofing layer. Small diameter pipes or galvanized plaster strips 10 mm high can be used. It will tighten along them concrete mortar like on rails.
Lighthouses are installed on slides (slaps) made of gypsum quick-setting mortar. The height of the beacons is checked according to the level of the screed marked on the walls. To do this, apply the rule with a level of 2 m. From the long walls, beacons are placed at a distance of 20 cm, and between the neighboring ones they make an interval of 1.5 m. It is more convenient to pull the solution together.

Concrete is poured between the lighthouses just above their level. After that, the excess is pulled by the rule on itself in zigzag movements. When the entire screed is poured, it should gain primary strength within 2-3 days.
After that, you can carefully walk on it and take out the beacons. Places for laying beacons are filled with sand-cement mortar and rubbed with a wooden or foam float. The screed will finally dry out in 3-4 weeks.
Note! To prevent the screed from cracking in the room, drafts must be excluded. In the hot season, it is imperative to moisten it with water once a day.


