Wall insulation with penoplex - a tribute to fashion or the best choice modern man? It can be called an innovative material, and these are not just nice words, but the most that neither is the truth. Someone calls penoplex with the familiar word "polystyrene", but this is not entirely correct. These materials are really similar to the touch, but differ greatly in characteristics.
What is good about penoplex. Material properties

Penoplex properties
Penoplex is a monolithic material, and foam is bubbles that are not tightly fastened to each other. In addition, moisture can easily penetrate between them, and this material is not at all durable to a break, which cannot be said about the foam, which on occasion can be bent a little, it does not break at the same time. And this is the big difference between polystyrene and penoplex, because the latter, as a heater, has a number of positive qualities:
- Excellent thermal insulation performance.
- Zero water absorption.
- High soundproofing qualities.
- Quite high strength, but not to mechanical stress, but to compression.
- The material belongs to durable thermal insulation. For half a century, it retains its properties.
- The ecological purity of the material allows you not to worry about your health. It has a closed-cell structure and is produced using freon-free technology.
It is convenient to work with penoplex, since no special protective equipment is required. The material is well cut and hardly crumbles.
Penoplex, penofol, penoizol. What is the difference
1. Penofol. Positive and negative qualities

Insulation of walls with penofol is an excellent option if there is no desire to deal with foam-plastic plates. The material has excellent vapor and heat insulation. The negative qualities include some difficulty during installation, if there is wiring nearby.
2. Penoizol. Pros and cons of such insulation
Without some skills, it will not work to make insulation with penoizol with your own hands. The same foam is presented here in the form of self-hardening foam (the so-called carbamide foam). Therefore, it is necessary to make a hinged structure ( curtain facade), hold a vapor barrier membrane and under it "pump" our material in the form of foam. Such insulation - the best way for wooden house, since penoizol belongs to the category of breathable materials. The disadvantages include a rather large shrinkage when insulating lightweight structures in which there is no strong pressure, and increased hygroscopicity.
What makes these three heaters different? A quick analysis showed that the insulation of each of them is good in its own way, and each of the materials has its own pros and cons. Penofol can really insulate an apartment, house or even a car yourself. Penoplex requires preliminary preparation grounds. In the case of penoizol, it is recommended to use special reinforcing fibers, so that over time the material does not sag and does not lose its strength.
Insulation of external walls
For penoplex, the evenness of the base is very important. If you are a happy owner of it (you checked everything using a level, a plumb line and other special devices), then do not rush to rejoice. It still needs to be prepared in a certain way before starting insulation.
The preparation of the base takes place in several stages:
- We wipe off oil stains and dirt, easily peeling parts of the coating from the surface.
- Remove the old paint or varnish coating. We clean the base so that there are no traces left.
- We treat the surface with special compounds (moss usually grows near the ground). We'll need fungicides and antifungal drugs to remove the mold.
- We clean out the salt deposit completely.
- Before starting the insulation, get special fasteners and mark the places for future rainwater drains, places for air conditioning, window grills, electrical boxes, and finally, under your house number.
- If the walls of your house are just built and not even plastered, then they also need to be prepared. On concrete wall you need to carry out priming work. Moreover, the primer must include quartz sand. This will improve the adhesion of the adhesive to the substrate.
Remember to fix the ebb, slopes and window sills. When working with foam insulation next to them, leave protrusions of 1 centimeter, so it is easier to mount it.
Advice... If there are metal elements on the wall surface to be insulated with foam, take care to protect them with anti-corrosion primers.
If your subfloor leaves a lot to be desired in terms of evenness, it is best to re-plaster it. This is the most reliable option. There is a way to remove wall irregularities using special linings or insulation plates of different thicknesses, but this is painstaking work that requires accurate calculations and time, which we always lack. Also, if a little inaccuracy happens, the result will be substandard work with a pitiable end.
Installation of penoplex on the wall
 Fastening the foam begins with the installation of the basement profile. Do not forget to check everything with the level, otherwise the walls will be lined with material unevenly, which will lead to difficulties:
- The distance between the profiles is approximately 30 centimeters.
- We fix the penoplex with dowels. Moreover, for walls made of foam blocks, we make holes up to 10 cm deep.
- It is important to glue the profile tightly to the wall. Overlaps are not allowed!
- At the corners we use a corner profile.
- Insulation slabs must be "cut out", because window and door openings are made out with whole slabs, in which holes of appropriate dimensions are cut out for a window or door.
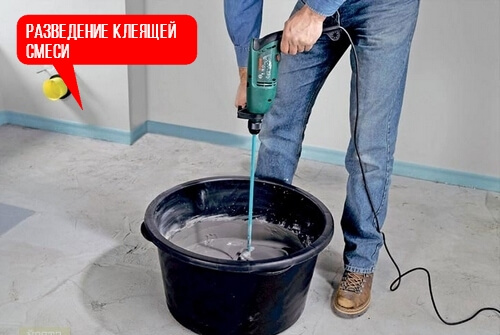
- Preparation of glue for insulation with penoplex includes pouring the finished mixture into water, mixing it thoroughly with a mixer. Let the mixture stand for 10 minutes and mix thoroughly again. The adhesive composition is ready, its shelf life is from 2 to 4 hours.
- Penoplex boards are not completely covered with mortar. But about 40 - 50% of their entire surface should be covered with a layer of glue.
- The first row must be glued to the profile. We gently press the plate to the base, making small rotational movements.
- Do not allow excess glue to enter the inter-seam space (installation features - a distance of 2 mm between the insulation plates).
- We mount Penoplex from bottom to top, in rows. The complete installation includes dressings as in brickwork - the joints of the upper rows should be in the middle of the slabs that are under them.
When mounting the corner, leave a ledge on one of the slabs, mount a slab to it on the other side of the corner, and carefully cut the ledge. This will make it possible to make the corner efficiently.
Advice... Penoplex boards are usually smooth, which makes it difficult for them to adhere to the substrate. Therefore, we add roughness to them. To do this, just roll them with a toothed roller for drywall or rub them with sandpaper. If you bought slabs with an already rough surface, roll them anyway. Additional adhesion to the glue and substrate will not be in the way.
To increase the reliability and increase the service life of the foam, after the assembly glue has completely solidified, the plates are nailed with special plastic dowels in the form of plates. To solve this problem, you will need drills with a diameter of 1 cm, a drill and a hammer.
Subtleties of additional fastening of penoplex
When installing dowels, the following nuances must be taken into account:

- The depth of the holes is 2 cm deeper than the dowel length;
- in order to calculate the length of the dowel, it is necessary to add the actual difference in the surface of the fastener and the thickness of the plates to be mounted to the height of the mounting adhesive.
- The attachment points on the slabs to be hammered should be located strictly staggered on each of them and cover the entire surface of the foam board.
- It is also necessary to drill the attachment points at the corner intersections of the slabs, which will maximize the fixation of the joints.
- Using a hammer, plunge the dowel into the slab until it is in the same plane with its surface. Only after this is the final fixation performed with a mounting nail.
All this will give the following advantages in the further operation of the insulated surface:
- Improving the wear resistance of the outer layer of the slabs.
- Increasing the resistance (resistance to adverse factors) of the outer layer of the foam board is carried out in different ways in the corners and on the surface. The corners are reinforced with overhead plastic corners, or with an overlapping reinforced mesh with a total layer thickness of 5 centimeters or more.
- Reinforcement of the surface of foam boards is made with a reinforced fiberglass mesh, which is applied to the assembly adhesive and then leveled with a spatula until completely immersed in it.
For the final finishing use plaster with a penetrating primer.
Thanks to this, the adhesion of the plaster layers is significantly improved and its resistance to the external environment increases. The finish coat can be painted or coated decorative plaster... It is better to give preference to acrylic. It will extend the life of your work up to 20 years.
Like?
Check out related articles:

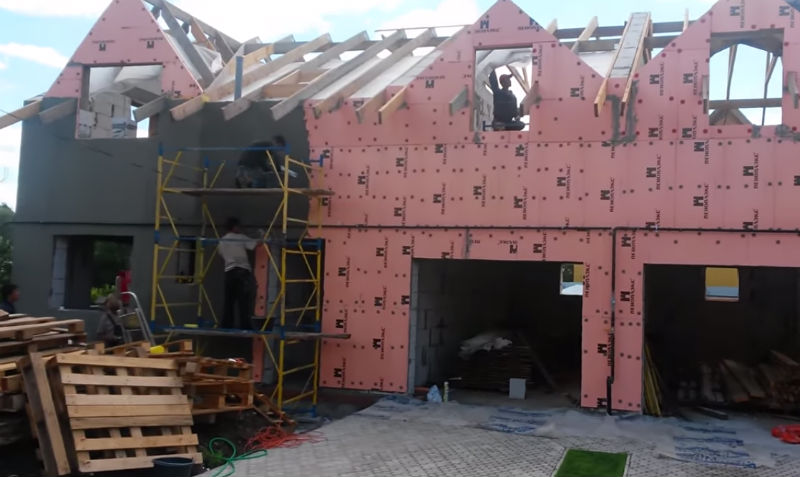
In all the variety of heat-insulating materials presented on the modern market, the leading place is confidently taken by extruded polystyrene foam - penoplex. This is due to its unique characteristics that provide a wide range of applications. The popular technology of facade insulation with penoplex is based on the simplicity of its processing and installation at a low cost relative to other materials.
Penoplex today is actively used in industry, construction of civilian facilities, agriculture, transport, when laying pipelines and roads. They are used to insulate basements, foundations, building facades, walls outside and inside, floors, ceilings and roofs. The result is a comfortable indoor environment. Buildings are reliably protected from temperature fluctuations. The service life is extended building structures... The material is also convenient in that you can carry out the insulation of the facade with penoplex with your own hands, without turning to third-party organizations.
Penoplex
Penoplex for exterior wall insulation
Due to its high thermal insulation properties, penoplex for insulation of external walls gives a much greater effect in thermal insulation of external walls of buildings than other materials - polystyrene and mineral insulation. Its main advantages:
- Low coefficient of thermal conductivity, which provides a high level of thermal protection. In addition, significant savings in materials and financial resources are achieved, since a thinner layer of foam is required for laying on walls than when using other types of insulation.
- Increased water resistance. Condensation from temperature extremes, precipitation and groundwater, does not penetrate the structure of the penoplex, its moisture absorption is practically zero.
- Sufficient strength characteristics that provide reliable protection against mechanical stress and damage to the wall covering. Withstands compressive forces up to 18 tons.
- Long service life. The original parameters of this insulation remain for many years, regardless of the influence of external factors - wind, temperature, precipitation. The preservation of a comfortable temperature climate in the room, the possibility of energy saving and efficient operation of the insulation for at least 50 years is ensured.
- Environmental Safety. Penoplex, used to insulate external walls, does not contain various substances harmful to human health, has a cellular structure, and is made from safe raw materials using a technology that does not use freon.
- Chemical inertness.
- Immunity to decay.
- Simplicity, ease of processing and installation. You can work with him in any weather. To obtain the required dimensions or contour, it is enough to use an ordinary knife.
- Completely unpretentious to storage conditions.

Penoplex houses
How to insulate a house outside with penoplex
The process of insulating the outer walls with a penoplex at home using foam from the outside is quite accessible, it is important to carry it out, adhering to certain rules. There are several sequential steps in how to insulate a house from the outside with penoplex:
- Preparation of walls and insulation for the upcoming installation work... The walls should be carefully leveled, loose layers, cement chips, old paint, dust should be removed. Apply a primer on the cleaned surface. If the surface of the insulation is smooth, it must be made rough, as it were, in order to provide better adhesion to the adhesive mass. For this, a special needle roller or other devices are usually used. With a corrugated surface of foam boards, there is no need to rough it.
- Tidying up low tides, slopes and windowsills... It would be nice to lay the gaps between the window sills and the wall with insulation using an adhesive composition. Also insulate the outer slopes. And in order to beautifully frame the window from the outside, you can use the same insulation, but of a lesser thickness. This should be done so that it protrudes beyond the wall surface by about a centimeter. This is necessary to ensure an even joint with the foam layer, which will then be applied to the wall.
- ... A special glue is used to install the external insulation. They begin to mount from the bottom, placing a bar on which the plates of the first row will rest. It is recommended to apply the glue over the insulation not in a continuous layer, but in drops, taking into account possible grooves. More glue should be applied in these places. When applying a two-layer insulation, a homogeneous layer of glue is applied second. Insulation plates are laid in a checkerboard pattern. The corners of the building are pre-reinforced with special corner elements.
- Securing the slabs by nailing to the wall... After gluing, at least three days must pass. After this time, the fixing holes are drilled with a perforator. Fastening is carried out with fungi or metal and plastic nails. Slots at the joints of the slabs are filled with polyurethane foam. Protruding joints are corrected with a clerical knife; it is not recommended to use a grater.
- Gluing and grouting of reinforcing mesh... Glue is again applied to the insulation, a mesh is applied and rubbed with a spatula at a distance of about 3 mm from the plate. After the glue dries, after about a day, the wall is treated with emery, all irregularities are rubbed.
- Insulation of external walls with foam - the final stage... A leveling layer is applied, then a primer and a fine finish. This can be, for example, plaster, which is already applied to the prepared wall surface.
In general, the solution to the question of how to insulate a house from the outside with penoplex is not quite difficult. You just need to prepare well in advance, decide on the type finishing walls, make a calculation of the required number of insulation plates.
Facade insulation technology with penoplex

In order to properly carry out the insulation of the building facade with foam boards, it is important to ensure the sequence of necessary work... The technology of carrying out insulation of the facade with penoplex provides for its phased implementation.
Preparatory stage
- Preparation of the working surface of the base: removal of dust, mastic and oil stains, mortar residues, delamination. It is better to remove paint and varnish coatings and salt deposits mechanically to the very base.
- Mold and fungal lesions are treated with special compounds. Vegetable bloom of mosses and algae - effective agents with bactericidal properties.
- Examination of the facade surface with a plumb line for irregularities. Leveling by plastering with a mortar of cement and sand.
- Metal structures, which will be hidden under the plates, are coated with paint and varnish against corrosion.
- Unplastered surfaces are treated with a fixing primer.
- Clean solid reinforced concrete bases from grease and prime.
- Prepare brackets for suspended structures, protection of window grilles, various plates and signs.
Leveling facade irregularities
In practice, several alignment methods are used:
- Special plastering solution. In this case, the installation of the plates is possible no earlier than after four weeks.
- By adjusting the thickness of the slab according to the calculated value.
- Special liners with leveling properties.
Installation insulation boards on the facade surface
- Base profiles are fastened with dowels-nails.
- Penoplex slabs are cut out. Only whole slabs are used around door and window openings.
- The plates are fastened from bottom to top in rows with special glue according to the principle of brickwork. If necessary, the surface of the slab is treated with sandpaper.
- It takes three days to dry the glue. After that, the slabs are fastened with dowels-nails, each at the corners and in the center.
Arrangement of abutments along the perimeters of door and window openings
Thermal insulation in the corners of door or window openings is made only from whole plates with fragments cut out in place. It is recommended to pay attention to the following:
- The overlap of insulation boards on the frame of the window or door block must be at least 20 mm.
- Insulation material is also mounted on the slopes of windows and doors.
- Preliminarily, the abutment profile is installed on the window and door frames. Installation of plates is carried out close to its inner side.
- In the corners of the opening, the profile is set at 45 degrees.
The installation of insulation of the building facade is completed with cladding, which is carried out by plastering in two layers on a metal mesh used as a base.
The use of modern insulating material - polystyrene foam for insulation of building facades and walls ensures guaranteed effective maintenance of the thermal regime in the premises. In addition, to a certain extent, the problem of ensuring the durability of structures, the safety of building structures and equipment is being solved.
Of significant practical importance is the fact that the installation of this insulation costs much less than using other materials. In addition, it is quite realistic to carry out the process of insulating the facade with penoplex with your own hands, without using the services of specialized organizations.
Error: the group does not exist! (ID: 1)
Among all the variety of thermal insulation materials, one of the first places is confidently occupied by penoplex (extruded polystyrene foam). This is explained by the fact that it has unique characteristics, thanks to which this insulation is widely used in various fields. The popular technology of wall insulation outside with penoplex is due to the simplicity of its processing at a low cost relative to other heat-insulating materials.
Extruded polystyrene foam has low thermal conductivity, it is waterproof, and it is also resistant to fire, therefore it is great for covering floors, walls or facades. The video presented in the article will clearly demonstrate the technology of wall insulation with penoplex.
Penoplex characteristic
 This thermal insulation material is most often used in the construction of civil objects, in transport, in industry, agriculture, in the laying of roads and pipelines. With its help, foundations, external and interior walls, ceilings, roofs, basements, building facades, floors.
Thanks to the material indoors comfortable conditions are created, and buildings are well protected from temperature fluctuations. In addition, the service life of building structures is significantly extended. The popularity of the insulation is also explained by the fact that the installation of foam on the wall can be done independently, without resorting to the help of professionals.
Due to its remarkable thermal insulation properties, penoplex gives a much greater effect as a result of wall insulation from the outside than other materials, such as mineral insulation and foams. Him the main advantages are:
- Low coefficient of thermal conductivity. This ensures a high level of thermal protection. In addition, materials and finances are significantly saved, because a much smaller layer of foam is applied to the walls for laying than when using other insulation materials.
- Increased water resistance. As a result of the temperature difference and various atmospheric precipitation, condensation begins to form, but the absorption of moisture by the penoplex is zero.
- Strength. Thanks to this characteristic, reliable protection walls from various mechanical damage.
- Long service life. This insulation can retain its original parameters long years, regardless of the fact that it will be influenced by such external factors as temperature, wind, precipitation. A comfortable temperature indoor climate can be maintained for more than 50 years.
- Environmental Safety. The material does not contain various substances that can have a negative effect on the human body, it has a cellular structure, and it is made from safe raw materials without the use of freon.
- Chemical inertness.
- Ease and simplicity of installation. You can work with it in any weather.
- Immunity to decay.
- Unpretentiousness to storage conditions of penoplex.
Technology of wall insulation outside with penoplex
Wall insulation outside thermal insulation material it is important to carry out in compliance with certain rules. The technology of such works is carried out in several stages.
Preparation of walls and insulation for installation
 The walls are carefully aligned, eliminating such disadvantages as:
- cement crumb;
- dust;
- old paint.
A primer is applied to the cleaned surface. If the insulation has a smooth surface, then you must try to make it a little rough to ensure better adhesion to the adhesive mass. To do this, you can use a special needle roller or other devices. If the plates for insulation have a corrugated surface, then it is not necessary to rough it.
Tidying up slopes, ebbs and window sills
You can lay the insulation between the wall and the window sills using an adhesive composition. Also also insulate the outer slopes... And for a beautiful framing of the window from the outside, you can also use insulation, but of a much smaller thickness, while it should protrude one centimeter beyond the wall surface. This is necessary to ensure smooth joining with a layer of foam, which will later be applied to the wall.
Installation and fixing of insulation boards
Installation of foam on the wall is carried out using special glue. Work begins from the bottom, placing a plank that will be used as a support for the first row of insulation boards. The glue is applied not in a continuous layer, but in drops, taking into account the possible recesses into which it is poured a little more. Plates must be laid in a checkerboard pattern. The corners of the building are reinforced in advance with special corner elements.
After gluing the boards to the wall, at least three days must pass. After that, holes are drilled with a punch for fasteners. The insulation plates are fixed with fungi or plastic and metal nails. Slots at the joints poured with polyurethane foam. If the joints stick out, then they are corrected with a clerical knife.
Gluing and grouting of reinforcing mesh
It is necessary to reapply glue to the insulation, after which a mesh is applied and rubbed in with a spatula so that it is located 3 mm from the plate. After the glue has dried, sand the wall and rub all the irregularities. Finally, a leveling layer is applied, then a primer and a fine finish.
Facade insulation technology
In order to properly insulate the facade of a building with penoplex, it is necessary to follow the sequence of the work performed.
Preparatory work
 First, prepare the work surface by removing dust, mastic and oil stains, solution residues, delamination.
Salt deposits and paint coatings must be removed to the very base. Places of mildew and fungus lesions are treated with special compounds, and algae and mosses are removed by means of bactericidal properties. Then, using a plumb line, check the surface of the facade for the presence of irregularities. If necessary, leveling is carried out by plastering with cement-sand mortar.
Metal constructions, which will be under the plates, must be covered with a paint and varnish material that prevents the formation of corrosion. The unplastered surface should be treated with a fixing primer. Solid reinforced concrete bases are cleaned of grease and primed. Then, the brackets are prepared, which will be used for suspended structures, various signs and plates, as well as for protecting window grilles.
Leveling façade irregularities
There are several ways to align:
- Using a special plaster mortar. In this case, the installation of insulation boards can be done only after four weeks.
- Thickness adjustment thermal insulation board by the calculated value.
- Application of special pads with leveling properties.
Installation of penoplex on the facade surface
First, they begin to fix the basement profiles with dowels. Then they start cutting the slabs. Only complete slabs should be used around window and door openings. Penoplex is fixed in rows from bottom to top using special glue, which dries for about three days. After that, using the dowels, the insulation is attached.
Thermal insulation in the corners of window or door openings made of whole slabspaying attention to the following:

In conclusion installation works start facing the facade of the building.
Thus, foam insulation of walls and facades of buildings guarantees a comfortable thermal regime in the room. In addition, with the help of such a heater, it is possible to solve the problem of the safety of construction equipment and structures. The video presented in the article allows you to understand the entire technology of wall insulation with penoplex.
In especially harsh winters, when you suddenly feel that the living space is too cool, one thing comes to mind - the cost of insulation work, what is it?
Quite high if you use the services of professionals, slightly lower if preparatory work do it yourself, and entrust the masters with insulation, and quite inexpensively if you take over all the functions of the master and the worker.
Penoplex is a heater that you can work with even with minimal knowledge in construction.
What is the difference between heaters
Polyfoam, penoplex, penoizol and polyurethane foam have good specifications... For an uninitiated person, they are similar at first glance. However, there are significant differences between these materials:
- Penoplex and polystyrene. Many people identify these materials, although there is a fundamental difference between them - the foam consists of individual granules filled with air, it easily crumbles and breaks if cut, does not withstand heavy loads. Penoplex is a monolithic insulation, does not crumble if cut, has a closed fine-mesh structure. The minimum water absorption allows it to be used for insulating foundations and basements from the inside and outside. Both insulation can be fixed in several ways - glued to mastic or glue, to foam or to fungi.
- Penoplex and penoizol. Foam plates can be easily assembled by yourself, while only a professional can insulate with urea foam. Penoizol does not need to be glued. It is blown into special cavities.
- Penoplex and polyurethane foam. Undoubtedly, polyurethane foam is one of the best heaters, allowing to carry out work on concrete and on other grounds, however, it is not possible to do such insulation with your own hands - the cost of such work is much higher than independent insulation with penoplex.
Distinctive material properties:
- does not provoke combustion;
- weighs little (it is easy to stick it);
- it is easy to cut, fasten, glue;
- has a relatively low cost.
Penoplex technical characteristics allow it to be used for different types insulation works both inside and outside. This must be taken into account when choosing the thickness of the insulation for different types of bases - wood, brick, concrete. It also takes into account what we will use it for - for the ceiling, walls or floor, under the concrete screed, from the inside or outside.

How to glue penoplex
What we glue
The material can be glued with special mastics and adhesives. Glue for penoplex should be universal, so that it can be glued to the base and slabs of material, and glue them together, and make plaster on top. On sale there is a large number of different dry mixes, mastics and adhesives for all occasions - for outdoor and indoor work, for dry and wet rooms.
And yet, glue for penoplex should not contain aggressive substances such as acetone, formalin, toluene and others like them. Since they destroy the material. You can glue the plates of extruded polystyrene foam together with glue or special mastic.
Penoplex fastening methods
Penoplex installation involves several options - it can be fixed directly to the base with glue or mastic, on foam or with fungal dowels.
Option 1. Installation with glue or mastic

Installation on glue or mastic
The mastic can only be used in well-ventilated areas. The dry glue mixture is diluted in accordance with the manufacturer's recommendation, applied along the perimeter of the plate in a strip of 3 cm and pointwise in various places (5 - 7 patches with a diameter of about 10 cm). The thickness of the glue is 1.5 - 2.5 centimeters. The minimum covered with glue is 40%. Do not forget to glue the joints of the slabs together.

Installation of foam on foam
Option 2. Foam mounting
Perhaps the easiest option. The polyurethane foam of the selected brand is shaken well, put on the gun. A thick "worm" of foam is applied to the prepared insulation slabs along the perimeter, plus an additional strip in the middle and gently press the slab against the wall. The evenness of the surface is checked using a level.
Option 3. Mounting on mushroom dowels

Mounting on mushroom dowels
According to experts, "holes" in the insulation contribute to additional heat leakage. Therefore, this method of fastening is mainly used as an auxiliary one, when it is assumed that only glue / mastic or polyurethane foam will not be enough. Holes are drilled in the foam and at the base, where the dowels-fungi are then inserted. The large surface area of \u200b\u200bthe cap allows you not to break the insulation.
Council. The instruction is very helpful. But it is best to watch the video, which clearly shows the ways of attaching the penoplex.
We insulate the floor from the inside
Penoplex floor insulation is the best option for using this insulation. The work can be carried out both on concrete and on the ground. If the work has to be carried out on the ground, then first a layer of sand or gravel is poured, everything is rammed and leveled. Plates of insulation are placed on top, then waterproofing and a cement screed.
We insulate the basement outside
 Warming the basement with penoplex is one of the good options.
To perform this type of work, it is necessary to free the base from the ground (if it is a little buried), clean it from dirt and let it dry. Make waterproofing. Next, glue the foam boards on the bitumen mastic of the selected brand. Thanks to special grooves at the edges of the slabs, the material joins without forming cold bridges. We also coat the joints with mastic.
Important. Despite its strength, penoplex is quite fragile. You need to cut it on a smooth and hard surface. Use a sharp knife in your work. You need to cut along a ruler so as not to spoil the plate.
We insulate the roof from the inside
 Insulating the roof with foam is not the best option. In comparison with mineral wool insulation, it is inferior in terms of energy saving - the rigid structure of the slabs cannot fill all the voids of the roof, because of which condensate can accumulate in them and cold bridges can form.
The roof is an important part of any private house (wood or brick). Warm air always rises. Therefore, if the roof has even small holes, most of the heat will evaporate.
In this regard, you can do several things:
- if you have a residential attic, then roof insulation from the inside is simply necessary;
- if the attic is non-residential, and you want to make a residential second floor, then there is nothing better than a ceiling.
In parallel, it is necessary to carry out work to ensure the thermal insulation of the roof. It is important not to forget that the roof is the cap of the entire dwelling, and it must be warm.
For insulation of the ceiling, you can use various materials, bulk, roll, slab. Remember to attach the penoplex to wooden base not difficult - you can glue, you can make a crate and insert plates between the guides and, at the same time, glue.
To insulate the ceiling from the inside, you can use any light insulation. For thermal insulation from the side of the resulting attic, you can use expanded clay, mineral wool slabs. Do not forget about the vapor barrier and waterproofing membrane.
To insulate the roof or ceiling from the inside, you can use light, foil-lined insulation in rolls based on foamed polyethylene or mineral wool. The cost of such heaters is higher than non-foil.
We insulate the walls
Penoplex is successfully used for exterior wall insulation work. In this case, plates with the lowest fire safety index - G1 are used. This insulation allows you to work both on concrete and on wood or brick.
Insulation of a wooden house
Do-it-yourself insulation of a wooden house from the inside with penoplex is not the best solution. If such material is fully justified for external insulation, then from the inside it is better to use other types of insulation, for example, clay plaster, Izoplat thermal insulation or decorative panels Isotex.
How to close the penoplex
Penoplex plastering is an important stage as in additional insulationand in protecting the material from external influences. All work can be done by hand. The cost of such a plaster mixture is more expensive than conventional cement.
Brief instruction:
- We select a mixture for work - choose a universal one, for example, the Ceresit or Ecomix brands.
- In order to glue the reinforcing mesh, we use a solution slightly thinner than the manufacturer recommends. Choose fiberglass mesh, alkali-resistant.
- We apply the adhesive mixture to the wall, we work quickly, as it dries quickly.
- Cut off a piece about a meter wide, as high as our surface.
- Now you need to glue it to the solution, sinking into it, leave the edges free.
- The next piece must be glued with an overlap. We also immerse it in the solution, then with smoothing movements from the center to the edges and diagonally cover it completely with the solution, including the joint.
- Let it dry and grout. We work with a plastic trowel with sandpaper.
- Apply a leveling layer from the same universal mixture, thickness about 3 mm.
- Place the joints of the leveling layer outside the mesh joints.
Council. First we put the corners of the house into the net. To do this, bend it so that even without effort you can see the edge, sink the mesh into the solution, smooth it out.
For a wooden house, ventilation is very important so that possible condensation does not collect on the surface between the insulation and the wall, therefore, a small gap must be left between the foam and the wall. If you insulate the walls of a wooden frame house, then a crate and small transverse bars are needed, which will hold the insulation plates at a distance from the wall.
On the Internet, you can find a lot of video materials on how to fix heaters, how to glue a reinforcing mesh, make a foam screed, make concrete insulation and much more. Don't forget to use it.
It is not difficult to insulate a house with your own hands. It is important to know the main points, have it at hand required material, and also want to save a little by doing all the work - from buying the material, to gluing it and finishing it - yourself.
Like?
Check out related articles:
It often happens: choose - choose, buy - buy. What to do next? What is where? What is what? There is no one to tell. You cannot be mistaken. It is a pity for time, effort, money.
The same can happen with a thermal insulation device. There is thermal insulation, there are walls. But how to fix the penoplex to the wall so that later it will not be excruciatingly painful?
The use of various technologies and materials in construction leads to the fact that it is impossible to give a universal answer to the question: what should be taken into account when attaching to the walls of the house? For different surfaces and operating conditions, methods of fastening and surface preparation have been developed. You need to know this in order to control those who carry out the insulation of the house. And even more so for those who insulate the house with their own hands, using their potential.
For different surfaces and operating conditions, methods of fastening and surface preparation have been developed.
Houses can be made of stone and wood building materials... Already at the stage of surface preparation, the features in the work begin to appear.
When preparing concrete and brick surfaces, you must:
- clean the walls from dirt, layers, paint, fuels and lubricants, and then remove dust;
- process copper sulfate (antiseptics) places where the fungus is spread;
- remove efflorescence on brick;
- to clear and repair cracks in the insulated wall;
- apply a deep penetration primer;
- smooth out irregularities with putty;
- apply a deep penetration primer after filling.

Preparing a tree is much easier. It is treated with impregnations that prevent wood decay. Wall material such as oriented strand board or thermowood can be omitted. Then the base is equipped with impregnated timber, which provides ventilation of the facade.

General installation rules
Correctly fixing the penoplex is very important to obtain a high-quality layer of thermal insulation. First of all, you need to fix the starting bar. It can be made independently (we use a wooden beam), or it can be prefabricated from perforated metal. In the second case, it is better to purchase a bar in accordance with the width of the insulation complete with the required amount corners (the corner can be external or internal).

Plank installation is carried out as follows. A horizontal line is bounced along the perimeter of the building along the level. It is better to use dowels for fastening the "start". Its use will allow avoiding the insulation sliding down and observing the "geometry" of the insulation, which is especially important when doing work with your own hands.
The side of the foam to which the adhesive will be applied must be rolled with a needle roller to create a roughness. It is necessary to mount the slabs from the bottom up with an offset of half the slabs of each horizontal row.
The side of the foam to which the adhesive will be applied must be rolled with a needle roller to create a roughness.
During installation, the plates are pressed against each other as tightly as possible. For a stronger and "warmer" connection, the second row is inserted into the grooves of the first. In order to save adhesive composition, it is possible to seal the joints with polyurethane foam at the end of the installation.

How to fix the insulation
How to fix the insulation outside? Fastening of the penoplex is carried out using:
- bitumen-polymer mastic;
- dry mixes on cement base;
- foam glue;
- disc dowels;
- "Liquid nails";
- polyurethane foam.
Mastic: the base of the foundations
 Bitumen-polymer mastics are one of the most common materials for their price and ease of work. Wide application this technology found when insulating the basements of buildings operating in extremely unfavorable conditions of constant humidity, the presence of reagents, and mechanical stress. They provide fast and reliable installation of the foam with stable resistance to harmful external factors. The mastics are sold in ready-to-use tubes. The tube is inserted into the sealant gun.
The composition is applied along the perimeter and pointwise to the center ( when laying the second and then next to it, it is applied in the grooves). Then the installed insulation is pressed for a short time. The glued insulation can be repositioned within one hour.
The glued insulation can be repositioned within one hour.
Dry mixes: simply reliable
The use of dry mixes allows you to glue penoplex to concrete and brick without any special costs and hassle. A dry mixture is added to the water in proportions, which are determined by the instructions for use. The solution is mixed using the drill mixer attachment, operating at the lowest possible speed. The resulting mixture is applied to the surface with a notched trowel, and the grooves are filled with a spatula. The insulation, installed in place, is held for one minute.
When fixing foam to a concrete wall and brickwork, a cement-based mixture is used as the main fastening element.
Foam adhesive: quick installation
Foam glue allows you to insulate smooth stone surfaces very quickly. Thanks to the high adhesion of the adhesive, smooth boards adhere perfectly to even concrete surfaces without further offset. The application technology is as follows. Foam adhesive is applied around the perimeter and in the middle of the board along the long side with a foam gun. With glue-filled grooves, the board is pressed down for 30 seconds. The setting time of the adhesive foam is on average 20 minutes. Further work with penoplex, installation on dowels and grouting is possible after 2 hours.
Further work with penoplex, installation on dowels and grouting is possible after 2 hours.
Disc dowels: durable
The use of disc dowels is justified in the case of a large area of \u200b\u200binsulation, or irregularities of the facade surface. For fastening to dowels, you need: a perforator (impact drill), a drill of the appropriate diameter and length, a hammer. Holes are drilled with a 50-60 mm deepening into the base. The holes are filled with polyurethane foam. Then the dowel is hammered in with a hammer so that the fungi of the dowels do not protrude above the surface slabs. It is best to use dowels complete with metal screws to increase the reliability of the connection. Installation of 5 dowels is sufficient for one plate. Adjacent sheets are fixed with one dowel. It must be installed in the joint between the boards.
Liquid nails: it will be a little expensive
 Liquid nails can be used to attach thermal insulation to a well-leveled and primed substrate. The glue is applied with a sealant gun pointwise along the perimeter and center of the sheet. Fastening is done by short-term pressing to the surface.
Expensive adhesive significantly increases the cost of installation... Even with high-quality bonding to the surface and ease of use, the technology of using "liquid nails" is economically feasible for small areas of insulation.
Polyurethane foam: an exceptional case
The fastening method also has the right to life. Foam is applied using a foam gun around the perimeter and center. To fasten the insulation, it is necessary to hold it for a long time until a stable adhesion occurs.
Fastening of the insulation with polyurethane foam is extremely limited due to the expansion of the foam, its destruction over time or under load. It is not recommended to use this installation option for external insulation.
Self-tapping screws: cheap and cheerful
Fastening with self-tapping screws using a screwdriver is permissible for insulation wooden wall on a previously installed crate. At the same time, it is recommended to install a washer under the screw head to avoid surface destruction and increase the reliability of the fastening.
The most widespread are the combined method of fastening using bituminous (adhesive) compounds and disc dowels.
The resulting layer of insulation is hermetic, capable of withstanding large mechanical loads and has an increased insulation coefficient.
After the installation of the insulation, a reinforcing mesh is installed with subsequent cladding.
Now you don't have to think: "How to fix it correctly?" The use of materials purposefully designed for the foam to the walls will avoid unnecessary waste of effort, money, time and get a durable layer of self-made thermal insulation.


