In this article, I will tell you how to do it yourself in the bathroom. It would seem that such a small room, what is there to tell. But in fact, there are many nuances that you can talk about for hours. For example, an inexhaustible topic for discussion can be some new collection of tiles that can be laid out in a non-standard combination, or using unusual design solutions when laying out.
I will tell you how to put tiles in the bathroom on the wall using the example of the Cayman collection, from the Ukrainian manufacturer Golden Tile. It is made in black and white with imitation of the texture of patent leather. I saw her in some photos on the Internet, and I liked her. In addition, black and white colors are classic, and will remain relevant even after decades. The cost of 1 square meter of backgrounds is 700 rubles / m².
The dimensions of the main wall are not very large - only 180 cm. Considering that the tile has dimensions of 25x40 cm, these are 7 whole rows and about 3-4 cm of the remainder.
Fast navigation through the article
Training
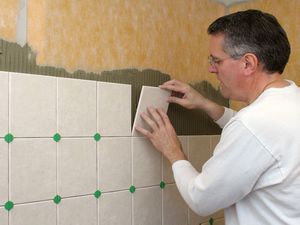
The bathroom was originally empty with leveled walls. If on your walls old finish - it must be completely removed, if the walls are uneven - level them. Sometimes this stage takes longer than tiling the bathroom itself. But according to the technology, it is necessary to do exactly so that the layer of glue on the wall is uniform everywhere and does not exceed the thickness specified by the manufacturer.
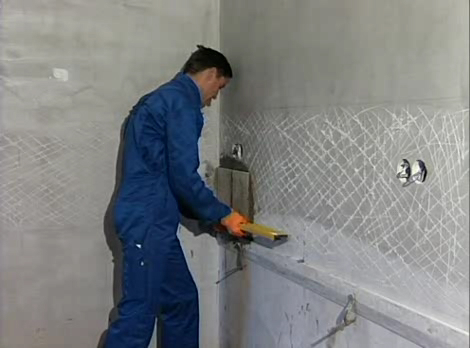
Initially, the walls are generously coated with a deep penetration primer using a roller.
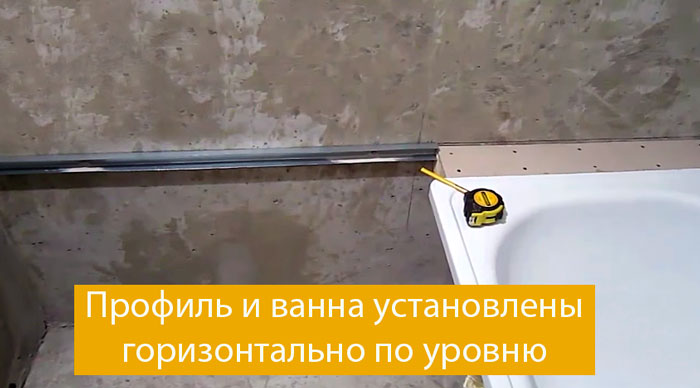
Then the bath itself is installed exactly on the horizontal level. This is important, because the laying of tiles in the bathroom will come from the bathroom. All types of bathtubs have a slight slope of the bottom for draining water, so the side should not be strictly horizontal.
Bath installation
A steel bathtub has 2 big drawbacks - loud noise when taking in water and fast cooling. These problems are easily solved by applying polyurethane foam to the bottom of the bath. Before that, do not forget to assemble and fix the siphon and legs to the bath in advance.
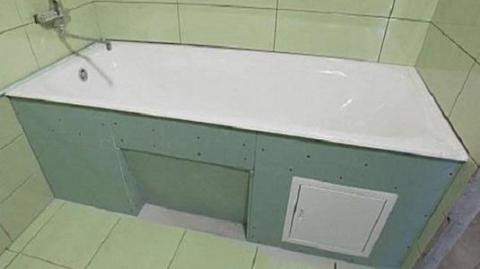
After installing the 170 cm bathtub, a 10 cm gap remained against the wall. Therefore, the remaining 10 cm had to be repaired with a homemade shelf made of several bars bolted to the wall, which were sheathed with plasterboard on top. There is no need to worry about water penetrating there, after the cladding, the base will be reliably protected.

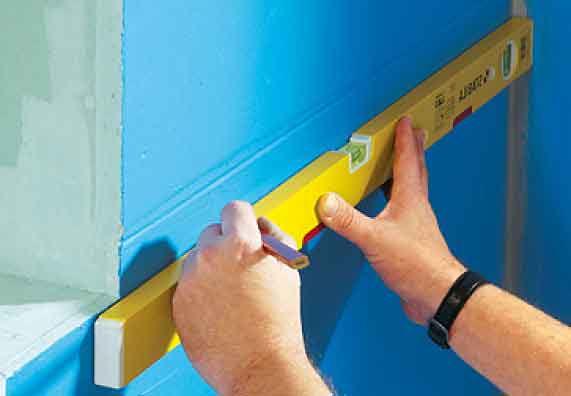
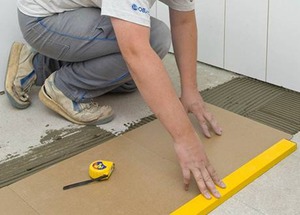
To continue even laying from the bathroom level along the perimeter of the entire room, you need to fix a temporary shelf from the profile to the wall at the level.
The floor will be cut in half of the tile, since according to the standard, the height of the bath from the finished floor to the side should be 60 cm, while our wall tiles are 40 cm high.
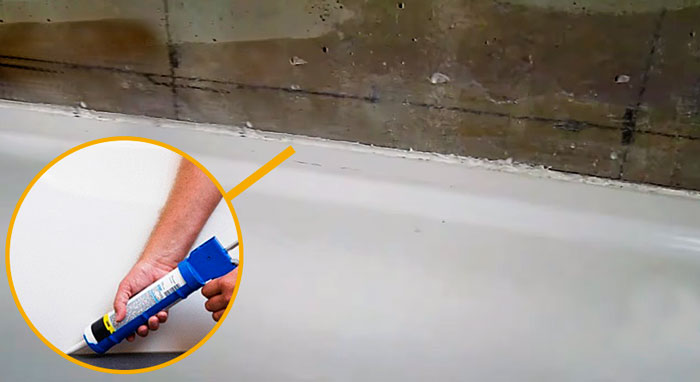
Also, before putting the tiles in the bathroom, be sure to walk along the wall with silicone plumbing sealant so that not a drop of moisture penetrates there. Read about in the article about grout.
Layout
To plan the layout, you need to decide in advance on the size and collection of tiles. To avoid unnecessary problems, it should fit as well as possible to the size of your bathroom, at least on the front wall. Ugly narrow cuts will greatly spoil the appearance of the cladding.
To figure out how to properly lay the tiles in the bathroom, I plan to lay out on paper or in the Sketch UP 3D editor. I create several options and choose the best one.
If we imagine a wall 180 cm wide and a tile 25 cm, then we get 7 whole rows and a narrow trim of 4 cm (taking into account the seams). And even if we start laying from the center, then 2 cm will remain on the left and right.
The feature of this layout was the black corner tiles that could not be cut, they must be uniform. Fortunately, the Cayman collection has friezes (borders) 3 cm wide, which allow you to solve problems with pruning.
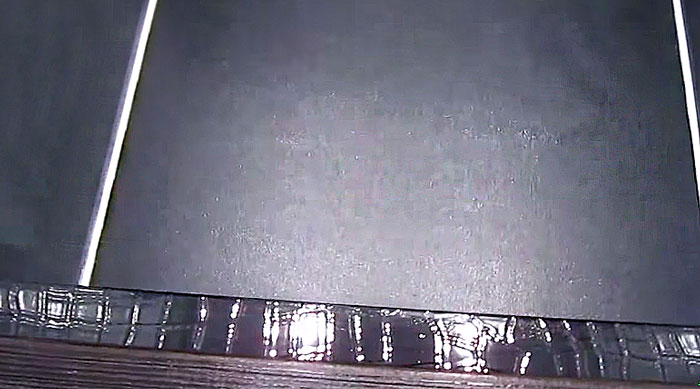
In the Cayman collection, floor tiles have a glossy surface and dimensions of 30x30 cm. The distance from the screen to the opposite wall is 93 cm, but a 3 cm cut will look ugly. We kill 2 hares at once: we replace it with a similar black one floor tiles, but with a matte rough surface.
Laying procedure
The most optimal way of laying in my opinion is from the bathroom level. This creates the most reliable waterproof seam (silicone + grout) + the edge of the side will be slightly recessed into the cladding. Also, this option is more beautiful, because you are guaranteed not to get a narrow strip over the side if you were laying the tiles from the floor.
After 20-30 minutes, the seams will harden a little and you will need to rinse the surface with a damp sponge, but do not wash the mixture out of the seams. The sponge must be clean, so you always need to dip it in a container of warm water.
When a white coating begins to appear on the cladding, you need to thoroughly wash it again with a clean cloth.
Conclusion
Laying the tiles in the bathroom with your own hands is complete. It remains only to install an outlet for a washing machine, faucets, a shower holder, hooks for clothes, a heated towel rail, a cabinet with a sink and shelves for hygiene items.
comments powered by HyperCommentsRepair of absolutely any bathroom involves replacing plumbing fixtures, pipes and, of course, tiles. It has a number of excellent advantages over other finishing materials:
- High quality tiles can serve their owners for many years;
- Such material practically does not need careful maintenance - no effort is required to clean it and it is enough just to wipe the tile with a damp cloth with a cleaning agent;
- A dense layer of glaze protects it from various corrosive chemicals;
- Laying tiles is easy and absolutely safe.
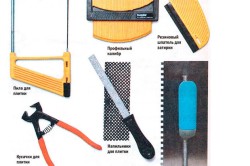
Many do not know how to properly lay tiles in the bathroom and are afraid to start this process on their own. However, it is worth leaving all doubts and carefully, slowly, start laying it. It is worth saying that before performing all the work, it is necessary to clearly calculate the amount of material and prepare a tool that may be needed at any time: brush, putty knife, roulette, ruler, level, roller, foam sponge, tile cutter and drill, and special crosses for seams.
If you decide to lay the tiles yourself, then you must follow the technological process that has been worked out over the years.
How do I get started?
First, you need to measure the walls in the bathroom and calculate the coverage area, and then purchase the tiles of the size and design you like. To get started you will need:
Specially created glue, which is either ready to use, or it is a dry mixture that is diluted with water before use;
For proper styling it is necessary to use level, tape measure and ruler;
To prepare the glue, you will need a bucket or other similar product, and to stir it, you will need a revolving electric drill with a special attachment.
- To process the seams at the final stage of work, jointing will be required;
- Notched spatulas for applying glue;
- A tile cutter, and if it is not there, then you can use a very simple advice: put the tile in water, and after a while, hold it with a special knife in the right place;
- Synthetic sponge;
- Moisture resistant primer;
- Waterproofing;
- For trimming the edges of cut tiles, you need a corundum block;
- Plastic crosses to keep the seam perfectly straight.

Preparatory work for self-laying tiles
In the technological process, the preparation of the walls is very important. For the coating to look beautiful, the laying surface must be well leveled. To do this, you need to perform a number of preparatory work.
First of all, the old coating is removed, even if it is fixed very securely and it will take time and some physical effort to remove it. In this case, the risk that the tiles will fall off will be minimal.
The next stage is cleaning the walls from small elements and dust, as well as checking using the level of their verticality. Basically, the walls of the bathrooms are uneven, so they need to be plastered. Experts recommend that before starting the leveling process, treat the working surface with an emulsion of rubber and bitumen. So you will protect the walls from excess moisture, improve adhesion to tiles, prevent the development of fungus.
If possible, let the plaster dry well, which will take about two weeks.
Final preparatory stage, but e last in importance, - coating walls with a primerresistant to high humidity. This coating will fill all the pores on the work surface, promoting good adhesion to the adhesive.
Mistakes when laying tiles. Video
We lay the tiles in the bathroom with our own hands
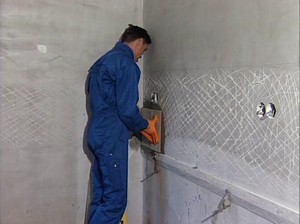
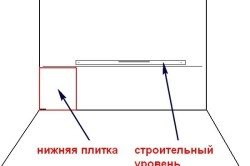
When the wall is ready, markings must be applied to it. This can be done using planks (thickness not more than 2.5 cm, width - 5 cm), level and plumb line. Place the tiles on the table or on the floor, set a bar under it, mark the seams and joints. Next, hang a plumb line in the upper corner of the wall, indicating the place where the installation will begin. This procedure should be done in all corners of the walls, which are supposed to be tiled.
Install the plank with the marked marking using a level (horizontally) below the marking point. Secure it securely. Repeat the same procedure with the other bar, only setting it with a vertical level. Secure. The resulting corner should be the starting point for tiling.
The process of laying tiles on the wall
When the wall is prepared, the planks are installed, you can start processing the wall with glue. This is best done with a spatula, trying to apply the glue evenly.
Advice: so that the glue does not dry out ahead of time, the wall area to be treated at one time should not be more than 0.5 m in length and 0.5 m in width.
The glue has been applied, you can proceed directly to the installation, which must be started from the starting angle obtained by the slats. During the installation process, try to apply force towards the floor. The tile can be moved over fresh adhesive for leveling as needed.
Advice: after laying each tile, check how it is laid with a level.
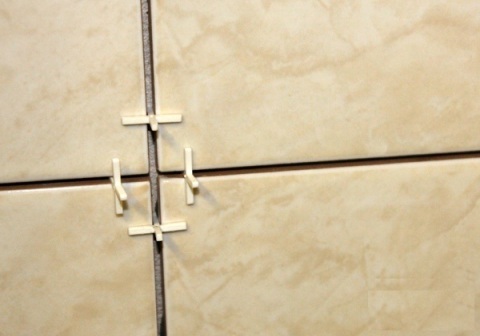
The rest of the tiles are laid in a horizontal row. Use cross-shaped plastic spacers to create gaps. The top row is laid only after the bottom row is finished.
For domestic tile cutting, a manual tile cutter is usually used. With this tool, the required size is easily set and trimmed.
Grouting
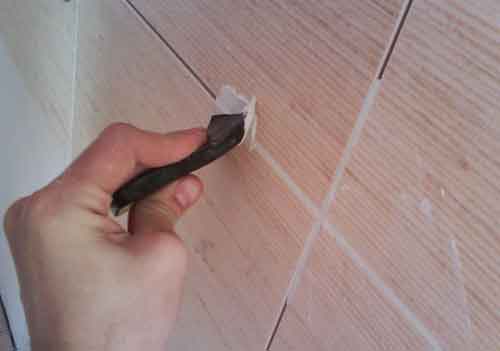
The final stage of installation is grouting. For this, a special solution is used, it is applied with a spatula with a rubber nozzle. The solution must be applied carefully, leaving no free space in the crevices. Its excess is perfectly removed with a soft damp sponge. After grouting is over, let the grout cool and “polish” the surface with a soft cloth.
Laying tiles on a wall in a wooden house
Laying tiles in wooden house possible in several ways:
- For cement... The wall is treated with an antiseptic against decay, covered with a layer of roofing material to protect it from cracking. The area of \u200b\u200bthe wall, prepared for this type of finish, is sheathed with slats on which a cellular mesh (metal) is hung. A layer of cement is applied, the surface is plastered and after it dries, laying is performed;
- On drywall with increased moisture resistance... The wall is revetted with plasterboard, carefully putty, and after drying, a liquid primer is applied. Next, you can lay the tiles in the manner described above.
Video of the correct laying of tiles
Laying tiles on the wall in the bathroom has its own distinctive features and methods of execution. In this article, we will look at the main points of this process and identify several important details and features when carrying out such repairs.
Work progress
How to lay tiles on the walls in the bathroom is decided by its size, the number of transitions and the screen in front of the bathroom.
So all the work will be done in several stages:
| Making a plan | First you need to make calculations. To do this, we take measurements and choose a tile. She may be different sizes and we must choose the optimal one. After all, waste must be minimized. |
| Purchase of material | In this matter, one must take into account that in any case there will be waste. And this is at least 5%. Also, when buying, the instructions for the material should be studied. There are usage options. Also pay attention to the back of the tile. It shouldn't be porous. |
| Plane preparation | The plane must be flat.
|
| Cladding | How to lay bathroom tiles on the walls will be described below. But don't forget that you must have the entire tool. They will not only need to lay tiles, but also cut them. |
Tiling on the walls in the bathroom is also creative. So you will have to immediately make up the pattern. The system of work will largely depend on this. Now let's take a closer look at how to lay the bathroom tiles on the walls.
Preparatory work
Tiling on the bathroom walls begins with the preparation of the base plane. It is on it that the tiles will be glued in the future. It is necessary to make a special screen (as a rule, drywall is used as a material for manufacturing).
The actions at the initial stage are always the same. It is recommended to install a bathtub and connect it to the sewer. When installing, it is important to use a level so that it is as level as possible, while not tilting towards the drain hole.
Attention: Modern types of bathtubs are designed in such a way that they already have a special technological slope, it is for this reason that an additional slope is not required during installation, it must be placed strictly horizontally.
Screen construction can be done in several ways.
Using bricks
To do this, you need to overlay the bath itself with material. It should be noted that the layout of the brick depends on its size (it can be carried out either only along the long side, or along the side and ends).
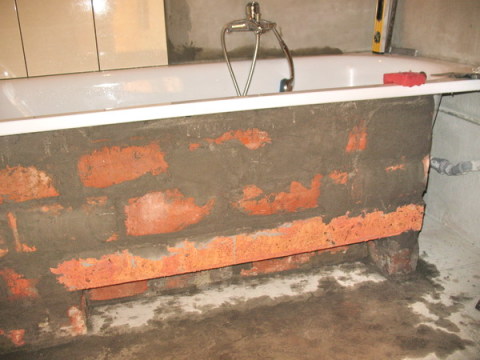
- Immediately before laying the masonry, it is recommended to mark the perimeter in such a way that the side of the bathroom protrudes outward, therefore, the brick partition will be located about a couple of centimeters deeper.
- It's not scary if the protrusion is a little larger, this will only add space for the further plastering process (see). Work with a brick will be carried out according to the method of splitting it, since the material has standard dimensional characteristics.
Attention: In order for the splitting to take place accurately enough, it is better to use a grinder and diamond discs. Even the resulting debris can be used without much difficulty.
When performing the masonry, it should be borne in mind that the upper rows are glued to the bath itself using special tile glue. If you create a blind screen, you should leave a small hole for the legs in the central part of the bath, this will make it possible to have close access to it in the future. The same is done in this case, this will significantly increase the adhesion of surfaces.
Using drywall
The cost of the material is not high, and you will get a flat surface. Then the laying of the tiles can be done without problems with your own hands. And it will take much less time, in contrast to the first option.
- First of all, apply the necessary marks using a level. It is enough to outline the vertical lines along the edges that fit snugly against the side of the bath and place a few marks on the floor.
- Further, without rushing, it is necessary to move the marking lines slightly inward, making it partially recessed. After the process of laying the tiles, you may notice that it will lose the ability to protrude. And it will be on the same level with the side.
- In order to correctly calculate the indentation, the dimensions of the materials used should be taken into account. When adding these indicators, the amount of the required indentation will be revealed.
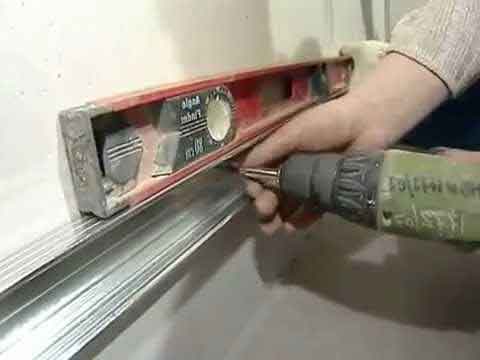
- Next, attach the profile itself with dowels. The process of installing a CD profile begins with obtaining parts of the required length, after which it is inserted into an already fixed profile and fixed with several self-tapping screws. In order to avoid deflection, it is better to secure it with wood wedges-stops.
- The profile will be firmly held by gluing wedges to the side of the bathtub. The resulting frame at the final stage must be sheathed with drywall, do not forget to pre-treat the ends with a sealant, which will further repel moisture.
Note also that not only the above materials can be used to create a screen, foam blocks and sheets of plywood, which are distinguished by increased moisture resistance, are also perfect.
Cladding
The first step is to decide. Which tile will you use in the future. In most cases, the same option is used for decorating the screen as for finishing wall surfaces, however, the use of another variety also takes place. The subsequent process consists of several stages.
Surface preparation
In this case, you should adhere to several fairly important rules:
- When using bricks, you should purchase a light plaster, and after drying, apply a primer;
- If the work is carried out using drywall, then it is enough just to thoroughly prime it. In this case, it is better to choose a primer so that it has the ability to repel moisture;
- To carry out the process of gluing the mesh on the chipboard, use a special one, in this case, a small layer of tile adhesive must be applied over the mesh.
Defining a tile layout
In cases where it is necessary to cut the tiles, it is best to lay the cut layer where they will be least noticeable.
- Place the horizontal row at the very bottom, and it is better to start the implementation of the marking from the side of the bath.
- As for the vertical row of that tile. Which has been cut, then its placement should be in the most inconspicuous corner.
- If, when calculating, it turns out that the gap is too small, then it is better to start laying out from the central part, then the corners will be covered with tiles of equal size.
Laying tiles
This process also has its own specific rules of action.
Let's consider the main ones in order:
- It is better to start the work directly with the preparation of the glue, as a rule, it is sold in the form of a powder, which is recommended to be diluted with water, taking into account the necessary proportions - they are indicated on the package itself;
- The resulting mass must be applied to the surface of the screen, and it is better if it is a small-sized area on which several tiles fit, this is due to the fact that the glue has the ability to dry relatively quickly, and the leveling process is better done with a spatula with teeth;
- The tile should be fastened only according to the previously made markings, and in order to clarify the correctness of its location, it is enough to slightly press on it;

- The glue is applied not only to the wall, but also to the tiles. After that, it is applied and pressed tightly, excess solution is removed. First, the row is laid out on dry on the floor and tried on. After all, everything should fit perfectly. If the element does not fit, it is adjusted using a tile cutter or grinder.
- To comply with the masonry, the seam is determined using plastic crosses. Then the seam will be uniform.
- The rest of the tiles are laid out in the same way;
- After the glue has completely dried (not earlier than two days), it is recommended to rub the seams so that the surface is as tight as possible. If necessary, the seams can be additionally treated with silicone sealant.
This kind of design makes it possible to create not only a harmonious, but also a perfect bathroom interior. It should be noted that this finish helps to hide the appearance of the pipes and the surface of your bath from the surrounding.
A few important tips
Special attention should be paid to the advice of specialists with considerable experience in this field of activity:
- The part under the bathtub can be detachable and created with magnets, especially since this will make it possible, if necessary, to remove it without much difficulty;
- In the central part, don't forget about the leg opening, and in length it should not be more than 40 cm, and in height not exceed 15 cm.
- The screen should not be completely blank, since in the event of an emergency, you will have to completely disassemble the entire structure;
- For the frame a metal profile with increased strength is more suitable;
- The resulting joint between the bathtub and the stove is recommended to be treated with a special grout or silicone.
The screen under the bathroom, decorated with tiles, is usually beautiful and neat. It not only makes it possible to isolate the unpleasant appearance of the part under the bath, but also significantly reduces the amount of time spent on cleaning.
Now you know how to lay tiles on the bathroom wall and you can do everything yourself. Before doing the work, watch the video in this article and photos that will help you do everything as quickly and without errors.
The bathroom is a room in which the humidity is always high enough. To repair it, you should select construction Materialswhich are resistant to moisture and tolerate temperature fluctuations well. A fairly popular option for decorating a bathroom is the laying of tiles, which has many positive qualities. However, there is a problem - the process of installing it with your own hands is quite complicated. Therefore, in order to put tiles in the bathroom, you should first study all the stages of work and watch a video lesson.
Tile - advantages and choices
In addition to the fact that the material has an attractive appearance and provides excellent waterproofing, it has many other virtues.
Advantages and disadvantages of tiles
- Long service life.
- Environmental friendliness.
- Fire safety.
- Moisture resistance.
- High strength.
- Resistant to wear and tear.
- Easy maintenance.
- A wide variety of textures and colors.
- Resistant to aggressive chemical compounds.
- Quite low cost.
- Slip resistance.
With a large number of positive characteristics, has a tile and its disadvantages:
- The material has high thermal conductivity, so the floor made of tiles is almost always cold.
- The tile has a high degree of rigidity, as a result of which it is not suitable for decorating children's rooms.
- During the delivery and installation of tiles, there may be defects (chips, cracks).
How to choose the right bathroom tile
Having decided on the colors and patterns, it is necessary to pay attention to characteristics and quality of tiles... All information about the material is on its packaging.
- Floor tiles are indicated by a black foot on a white background.
- The repetition of the same icon means a high level of material.
- There is a hand on the packaging of the wall tile.
- A foot against a shaded background indicates the increased durability of the tile.
To compensate for sometimes defective specimens and battle that come across, tiles should be purchased with a margin. For this to square meters coverage needs to be added ten percent.
In order for the purchased material to be of the same shade, you need to pay attention to the article, the numbers and letters of which must match.
Decorative finishes are purchased individually.
Before you start laying tiles with your own hands, you should buy the necessary related materials and prepare tools.
Together with the tiles you will need to purchase:
Tools that will be needed during installation:
- tile cutter;
- plumb line;
- putty knife;
- master OK.
Preparing the surface
The best surface for tiling is brick or concrete... The old coating must be dismantled. The tile is removed with a perforator. This work is rather long and dirty, therefore it requires patience. Place the ceramic material on a flat surface.
- The verticality of the walls is checked using a plumb line. Even minor deviations need to be corrected.
- Surfaces are leveled with a primer using a level, a beacon and a rule.
- A screed must be made on the bathroom floor.
- To protect against mold and increase adhesion, even surfaces are primed. The finishing material is selected taking into account the specificity of the room.
- According to the instructions on the package, the base is treated with two layers of synthetic waterproofing. This event is mandatory for rooms with high humidity.
After completing the preparatory work, you can start laying the tiles.
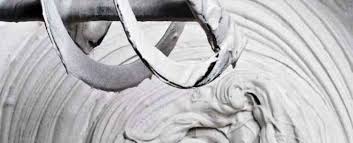
Preparation of adhesive solution
Ready glue you need withstand a few minutes and start laying the tiles.
How to properly lay tiles in the bathroom. Stages of work
On a primed and dust-free surface you can start laying tiles.
DIY installation of tiles on the walls
- In order for the first row to be mounted evenly, put a rail on the floor and level it. The tile should be glued along this strip.
- For the evenness of the following rows, vertical slats are nailed in the corners of the bathroom, into which nails are hammered and the threads are pulled. This will allow in the process of work to monitor the horizontal evenness of the laid material.
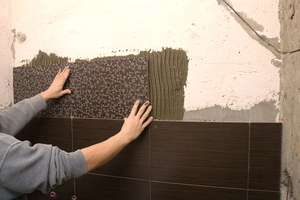
- Using a notched trowel, first apply the adhesive to the back of the ceramic and then to the wall.
- The tile is applied to the surface and pressed slightly. The adhesive should be evenly distributed.
- Similarly, adjacent tiles are glued, between which crosses are inserted.
- The seam thickness should be between three and four millimeters.
- If the whole tile does not fit on the wall, then its excess is cut off with a tile cutter. It is recommended to glue the cut-off parts of the tile in the corners, which will subsequently be closed by a washing machine, shower or cabinet.
- If a bathtub is already installed in the bathroom, a guide corner is glued to its surface, which is in contact with the wall. Subsequently, the seams between it, the tile and the bathroom will need to be filled with colorless silicone.
- The evenness of the laying should be constantly checked vertically, horizontally and diagonally.
- After gluing each tile, the protruding excess of glue is carefully removed, and the surface is wiped with a dry cloth.
After the glue has set between the seams, crosses are removed.
How to cut ceramic products correctly
 You need to learn how to perform this operation correctly, since during installation need for cutting occurs quite often.
- The tile is soaked in water for forty minutes.
- With the help of a marker, the cutting line is marked.
- The tile is laid on a hard surface and a cut is made along the marked line from the far corner towards itself with a tile cutter.
- The tile is placed on the table so that the cutting line is at its edge.
- The part of the product lying on the table is held with one hand, and the other hand should gently press on the part located on the weight.
- To make the cut line less sharp, you can grind it on a corundum block.
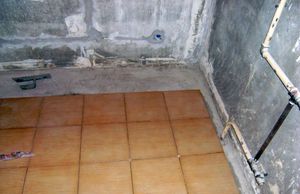
How to lay tiles on a bathroom floor
On a horizontal surface ceramic products are easier to lay - they will not "run away".
- Installation planning starts from the highest point of the floor. The least amount of glue is applied to it. In other places, for leveling, the layers of adhesive will be applied in a thicker layer.
- Laying should start from the most visible wall, which is located at the front door. This is due to the fact that poorly cut tiles will be glued to the opposite wall, covered by furniture.
- For an even arrangement of tiles throughout the entire area of \u200b\u200bthe room, including in the corners, beacons are set at the level. The distance between them should be less than the length of the rule or level. Tiles can be temporarily glued as beacons.
- Glue is applied to the surface of the ceramic product, the tiles are laid on the floor and tapped with a hammer to the level of the stretched thread. If the tile has dropped lower, then tear it off and add more adhesive.
Upon completion of the work, the bathroom will not be allowed to walk for 24 hours
How to get around obstacles with tiles correctly
 Often, during the installation of tiles in the bathroom, you have to deal with pipes, door frames, thresholds, sockets. In order for the surfaces to look beautiful after repair, these obstacles should be properly bypassed.
Installing tiles around a large pipe.
If the ceramic product will fit on the pipe with only one angle, then a curvilinear cut is made.
- A thick sheet of paper lays down in place.
- All excess is folded and the paper is cut off along the lines formed.
- The result is a cutting template.
Stacking around switches.
- The product is applied to the switch and the extra places are marked with a marker.
- Cutting is done along the marked lines and a place for the switch is cut out.
- By applying to the switch, the accuracy of the work done is checked.
Installation around a difficult obstacle.
An obstacle is considered difficult if several items fall on the hole. In this case, each sector should be marked at a certain place. Thus, it is necessary to deal with all tiles that fall on this obstacle. Holes in ceramics are cut with a special drill.
Grouting
- To prepare the grout, dry powder should be diluted with water and allowed to brew.
- The grout is rubbed into the seams with a rubber spatula.
- After the mixture begins to harden, wipe the surface to a shine with a cloth.
- It is recommended that you look at each seam to make sure there are no excess or pits.
- In order for the seam to be perfect, you can tap a piece of wire to it with a hammer, the diameter of which should be slightly larger than the seam width.
A high-quality grout will give the surface a finished and aesthetic look.
Adhering to all the tips and watching the video instructions, you can put high-quality tiles in the bathroom with your own hands and enjoy its appearance for many years.
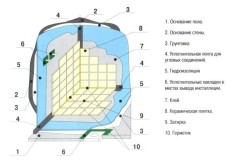
One of the most practical finishing materials for floors and walls in a bathroom is tiles, that is ceramic tile... Tile is not only durable, but also a hygienic coating that competes with other types of materials for bathroom decoration. To lay the tiles, you will need maximum responsibility at every stage of the tile covering the bathroom. All stages are reduced to:
- Preliminary preparation of the base.
- Buying tiles.
- Installation of tiles.
- The final stage associated with grouting.
Bathtub tiling is very popular because the tiles are easy to clean and combine designs.
You can prepare the base for pasting the bathroom with tiles, relying on the traditional method of completely removing the old cladding. But in some cases, it becomes impossible to remove old finishing materials from the floor or walls of the bathroom for a number of reasons:
- The old cladding material is so firmly adhered that considerable effort may be required to remove it.
- The bathroom will be clogged big amount debris and dust.
- The possibility of creating noise during the removal of old materials, which will make neighbors unhappy.
- If a fragile base was used to fix the old tile, and the removal is associated with additional repairs.
- If, as a result of removing the tiles, the level of the floor can drop, which can spoil the quality of the tiling.
- The preparatory stage should begin with leveling and priming the walls, as well as preparing the necessary tools.
Foundation preparation
The tiles on the wall begin to be laid from the bottom corner.
To correctly assess whether it is necessary to remove the old tile, it is necessary to tap each tile, which will determine the strength of the base. If the tapping resonates loudly, it means that the tile is partially peeled off from the base, but is held on to it. A new cladding cannot be laid on such a basis.
In the absence of many defects, you can simply remove tiles that made a rattling sound or cracked. Next, the opened cells are cleaned, and the remaining base after removal must be leveled with a cement-sand mortar. Leveling an old subfloor with cladding may make sense if there are a minimum of defects and the level of reliability of the old subfloor as a whole is suitable for laying new tiles on it.
When facing with tiles, be sure to take into account how the thickness of the walls will change. If the level of the floor is increased by at least 15 mm after cladding, the changes will be unacceptable, as it may be higher than the threshold at the entrance to the bathroom.
If a completely cleaned base is being prepared from the old facing tiles, then after cleaning the surfaces with a hammer and chisel, the base must be checked for cracks and depressions in the concrete.
The old plaster is replaced with new one and the walls are primed. If there are small cracks in the walls or depressions, then cement mortar or putty can be used to treat them.
The primer can strengthen the adhesion of the tile and the base. If the primer is not absorbed into the base as much as possible, then the tile will peel off. If the tile is glued to the old floor covering, then it should be cleaned of dirt and dust. Old tiles on the walls and on the floor are degreased, then cement patches from a penetrating primer such as Ceresit CT 17 are used.
For gluing the base with tiles, special tile adhesives are used, which have a high level of adhesion to any type of base. It is possible to enhance this property of the glue if the surface of the base is treated with a primer of the type concrete contact. After the substrate, treated with this type of primer, dries, it becomes grainy, which provides an excellent level of adhesion of the adhesive, even if the old tile was glazed.
Key recommendations
Having made all the appropriate measurements of the areas of the bathroom, they select the tiles by color separately on the walls and on the ceiling. This is because ceramic wall tiles are more slippery than floor tiles. During the masonry process, you may need to use the following types of materials and tools:
- Ceramic tiles.
- Grinders.
- Tile adhesive.
- Drills.
- Grouting.
- Chisel.
- Primers.
- Hammer.
- Level.
- Pencil.
- Sponges with a bucket.
Before laying the tiles on the floor surface, the tiles are laid out on a prepared base, which will allow you to check what the location will be finishing material... This will not only speed up the masonry process, but also allow you to cut the tiles in advance with a grinder, where necessary.
Laying should start from the center of the sub-floor, which can be shifted to the sides to achieve maximum symmetry. Then you can start laying the first row, moving towards the corners and walls of the bathroom. In order for each row to run parallel, alignment with a tensioned thread is necessary.
To prepare the glue solution, it should be mixed with water in small batches. When a liquid homogeneous mass is obtained, it can be applied immediately. The glue should not be very thick or liquid, since the tiles can be glued crookedly, it will begin to shift, dripping on the masonry base.
To avoid cracks in the tiles, seams should be made between the tiles. The more interesting and beautiful the tile pattern, the smaller the gap between individual tiles is made. For this, special plastic crosses are used, which are removed at the final stage of masonry. Then the grout is applied. It is matched to the color of the tiles, which can be the same or contrasting. If it is used in excess, then it is removed with a damp sponge.
The glue is applied to the base of the floor or walls with a spatula, on one side of which there is a smooth surface, and on the other - teeth. The adhesive is applied using the smooth side of the trowel, and the special notches allow for groove-like indentations. Excess glue from the surface of the finishing material is removed with a damp sponge.
In order for the installation to be correct, it is imperative to use a building level, which allows the tile to be adjusted every 2 or 3 rows. The fit should be done very quickly, as otherwise the glue may dry out and the tile will harden in the wrong position.
To fit the tiles, the rule is used if large areas are glued.
It must be attached to the floor and a level must be set on top. Individual elements of the tile sometimes fall below others, this is due to the uneven application of the adhesive composition.
Correct installation
Separate stages
Ceramic tiles in the bathroom are laid on the floor according to the following principle:
- Prepare the glue by making it an aqueous solution according to the instructions on the package, which is thoroughly mixed with a mixer attached to a drill.
- Laying the tiles should start in rows from the corner, heading towards the doorway.
- Before laying the tiles, the surface of the base is treated with an adhesive solution.
- It is necessary to pre-cut the tile with a grinder, before using which cuts are made on the tiles, and all unnecessary edges are broken off with pliers.
- After the tile is laid, you need to wait until the coating is completely dry. Next, the laid tiles are cleaned from glue.
- To shine the tile, you can use special tools that treat the entire surface.
Walls should also be glued with tiles, adhering to the following main steps:
- Make a markup of the wall from below and from above.
- Measure the required amount of finishing materials.
- Prepare the glue in accordance with the instructions containing information on the duration of the masonry process, which depends on the area of \u200b\u200bthe base of the wall to be tiled.
- The adhesive must be used in a timely manner, as it can dry out.
- It is imperative to use a building level to ensure that the rows are laid correctly and evenly.
- Laying tiles on the wall is necessary from the bottom up.
- Below, you can provide a border of tiles made by a grinder.
- After laying the tiles, clean them thoroughly.
- Apply the waterproof grout with a rubber trowel.
Material application
After laying the tiles on the bathroom walls, you can start using grouting by following the recommendations:
- Carry out the laying of the tiles, pressing each element to the surface of the walls with an adhesive. The use of maximum force should be avoided, since all the adhesive solution from the base can come to the surface. If the pressure is strong, then cracks may appear in the tile, which will lead to its cracking.
- The glue released from the outside is removed with a sponge if it has already become dry. Wet glue is removed with a plastic or wooden trowel, as metal tools will scratch the surface.
- If there is a pipe or other obstacles on the surface of the base, the tile is broken with tongs, with which it is necessary to make a recess of a special shape.
- Grouting is performed using a special rubber float. Move it diagonally across each tile. Drying of the trowel is very fast. The tiles are then washed immediately.
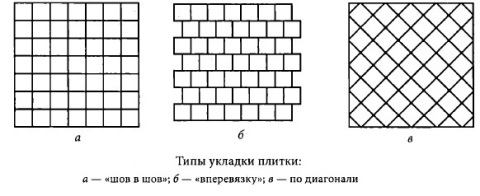
To put the tiles in the bathroom correctly, it is necessary to carefully control the masonry, that is, the evenness of its horizontal and vertical rows. There are three main ways to lay tiles:
- Diagonally.
- Seam to seam.
- Bandage.
The most popular is the method of laying a seam in a seam.If you use the masonry diagonally, then the angle should be about 45 degrees. The laying technology is reduced to connecting each corner with a cord to the center of the bathroom floor to mark the base. Align the tile element of the tile with the center of the bathroom to orientate along it. The dressing is created in the second row, then you can gradually move to the walls.


