The log house looks beautiful, so many would like to leave it in its original form without additional finishing. However, over time, the wood will begin to darken, stains of mold or blue may appear on it, and then the building will completely lose its original charm.
It's better to take care of the protection beforehand wooden house and provide it with a beautiful finish. Both external and internal cladding will be required. Then the walls will be able to serve for tens of years without any repairs. How to sheathe log house?
External cladding of a log house
There are a lot of answers to the question of how to sheathe a log house from the outside. There are dozens of materials on sale today that can completely transform the facade, but not all of them are suitable specifically for wood. Consider the pros and cons of the most requested options:
- Wooden lining. Outwardly, these are flat flat planks, which are easily interconnected along their length with the help of spikes and grooves. Its main advantage is environmental friendliness, which is so important for a wooden house.
She will be able to effectively close any insulation and will last a long time, but she needs to provide proper care... The lining will need to be protected from pests and moisture, it is advisable to treat it with an antiseptic and paint it regularly.
- A block house is a material that will allow a log house to be sheathed with an accurate imitation of a log, but the walls will look completely even and beautiful. It is durable, but also quite expensive material that requires proper professional installation. In addition, it is not suitable for those who want to change the appearance of the house, and not just protect it from the sun and biological threats.
- Metal siding is the strongest and most durable solution; it will be possible to sheathe a log house from the outside once for many years. Metal siding can be of any color, it is great for different types of insulation.
A special coating protects it from corrosion, so it is not afraid of any whims of nature. The downside of metal siding is a boring appearance. Many believe it is more suitable for an office building than a residential building.
- Vinyl siding is the most affordable and versatile design option. The advantage of vinyl siding is not only its strength and durability: it comes in a wide variety of colors and textures.
You can choose from panels of any color and thickness, or you can choose vinyl siding that mimics other materials. Whether you want to decorate your home like stone, brick, or imitate another finish, vinyl siding is the best solution.
Any version of the cladding can be used only after the shrinkage of the house is over: it takes at least a year, and it is better to carry out finishing work after the first year and a half. Any exterior cladding begins with caulking the building, as well as treating the walls with antiseptics.
After that, work is carried out on insulation with mineral wool, penoplex or other materials, the insulation is closed with a vapor barrier membrane. Only then is the selected outer cladding mounted.
Modern materials are very durable: vinyl siding is designed for several decades of service, even the lining will allow you to forget about any problems with the facade for a long time. Exterior cladding will give your home a beautiful look while protecting it from various threats.
Internal cladding of a log house
The question of how to sheathe a log house from the inside also causes a lot of controversy. Not everyone likes the idea of \u200b\u200bclosing the beautiful interior of a log cabin, but in old houses this is the only way to create a pleasant “urban” interior. In the interior decoration of a house, environmental friendliness comes to the fore: many materials cannot be used for this indicator, otherwise all the advantages of a wooden dwelling will be lost.
How to sheathe a log house inside? The most common materials and their benefits:
What coatings are best not to use in your home? It is better to refuse some materials right away, as they can pose a threat to the safety of the inhabitants of the house. Chipboard, fiberboard, OSB boards are most often made using toxic adhesives, and their use in decoration will not create a favorable environment.
Plasterboard sheathing is a controversial material: if installed correctly, it can be a rather profitable solution, but many do not like the very idea of \u200b\u200bblocking walls with sheet material of artificial origin. Each material has supporters and opponents, so the owner will have to decide for himself which option is better to choose for finishing the house.
JavaScript required or player update required!
After completing the long process of building a wooden house, you finally faced the question of how to complete the finishing of your log house? If you performed all the stages of construction yourself, then finishing will not be a big problem for you. This article will try to explain all the stages and features as clearly as possible, as well as give a maximum of useful tips and advice.
Advice: do not rush to decorate the house, if there is no strict need for this, it is better to wait a couple of years until the shrinkage of the log house ends, otherwise it may happen, so all your efforts will be wasted.
First of all, the finishing of the log house inside includes insulation and, wall insulation (caulking,) casing and casing, door and window openings, ceiling, attic, grinding logs, etc., but we will talk about them in the next article, but for now let's discuss:
Finishing the log house inside
Today there are a large number of materials for interior decoration, we will try to highlight the main types and directions. But do not forget that finishing the building from nutria should start with covering and insulating the floor.
Types of wall decoration:
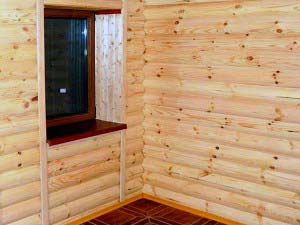
Clapboard Finish
The board, intended for covering the premises, does not exceed 220mm thick. Usually made from pine wood, less often from hardwood. According to the type of installation, it is divided into vertical and horizontal. After sheathing, this one looks very aesthetically pleasing and stylish.
The floor of such a log house can also be made of lining or oak, more are possible simple options: carpeting, linoleum parquet. The ceiling is also made of boards.
First of all, decide which type of installation suits you best. If the building is not large, for example a bathhouse, then you can apply the vertical method of laying. Well, in the case of larger buildings, such as a summer house or a residential building, it is better to use a horizontal installation method. This is due to the small length (usually 2.5m) of the lining, and when placed horizontally in a large building, joints will inevitably appear (this problem is partially solved by placing a vertical board across 2.5m). Before starting the attachment, it is advisable to treat the board with a special mixture to protect it from moisture, insects and fire (anticheptic).
Note: at this stage, you need to decide whether there will be additional insulation of the walls between the walls of the log house and the wagon board. If the thickness of the board is from 180 to 220 mm, you can do without insulation
Methods for fixing the lining
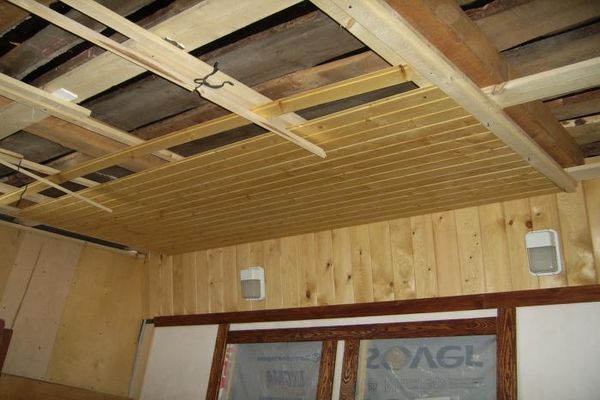
The most the best option fastening is fastening to the crate (especially if a rounded log was used in the construction). The lathing is made of horizontal bars located around the entire perimeter (at a distance of 50 cm from each other) of the building and helps to achieve an even laying of the wagon board. Another advantage of the lathing is the ability to hide the wiring and pipes behind it. If during the construction of a log house a profiled beam or glued beam was used, then you can do without the lathing (the walls of such a building are quite even in themselves).
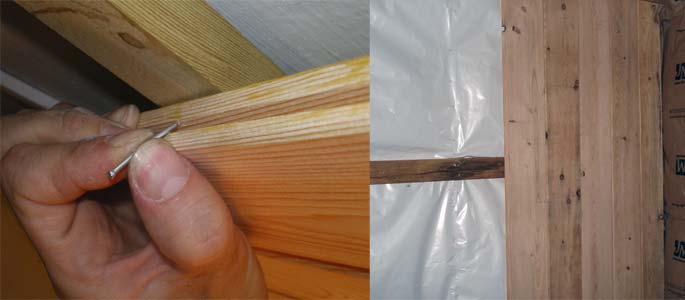
vertical installation of lining fastening with nails
Advice: it is better to carry out the wiring before the interior decoration, because during the work it can add a lot of trouble to you.
It is worth starting the installation from the corner of the building, while the installation itself will not be difficult due to the presence of a special “thorn-groove” clutch at the carriage board (it is better not to use a regular carriage board due to the difficulties when covering large volumes). This method of adhesion allows you to achieve an even and dense styling. Fixing the boards to the battens of the crate can be done in three different ways.
- Natural appearance
- Additional insulation
- Environmentally friendly material
- Ease of installation
- Quite high price
- The need to treat the board with a mixture of various harmful factors
Lining installation video:
DIY Block House decoration
The option of finishing a log house with your own hands with an imitation of a solid log can be presented as a wagon board (imitation of a rounded log) or as separate panels resembling a profiled bar. A very spectacular look and the original Russian design of such a finish makes it one of the most common options.
If a wagon board is used with a block house, then the installation process is no different from the above (I think it is not worth explaining that when only the horizontal type of laying is applicable). Boards in the chosen way are attached to the crate (vertical bars located every 50-60 cm), the boards should be laid from the bottom up. Remember, the last board will almost always be trimmed a little and will not be as noticeable at the top.
If you decide to use ready-made panels, then the installation process will take much less time and labor costs. Such panels are also attached to the lathing, but the finished structure looks less natural.
 Pros:
Pros:
- Beautiful imitation will create the feeling of a real hut
- Provides the ability to hide communications and insulate walls
- Great for different types interior
- Easy and reliable connection
- High cost
- If installed incorrectly, the panels look unnatural
House video block
Decorating a log house with plasterboard, how ridiculous it sounds, but still appropriate
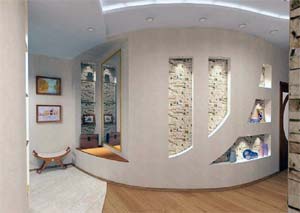 A very versatile option. But applying it to a log house is simply ridiculous, it will ruin the whole impression of the house and nullify its wooden primordiality. However, anything can happen in life, and it is possible that the combination of external antiquity and internal modernity was originally envisaged by you.
For this style, it is better to use a floor made of carpeting or parquet. The ceiling can either be sheathed with plasterboard or hinged.
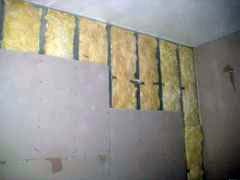
Plasterboard installation
With this option for finishing a log house with your own hands, you need to make a crate with a U-shaped profile along the entire perimeter of the building. Next, it is worth dissolving all the wiring (if it has not yet been done) and, in cases of need to insulate the walls (glass wool between the drywall and the wall of the log house is perfect). One of the main advantages of this finish is the ability to make projections and recesses in the wall (thanks to the versatility of the profile and drywall). Which in turn will allow you to hide pipes and batteries, make a niche in the wall for a TV and refrigerator, etc.
Fastening of drywall to the profile is done using self-tapping screws. After fastening, it is imperative to putty the joints to level the walls. Further, your imagination is limitless.
 Pros:
Pros:
- Almost limitless possibilities for giving the walls the desired look
- Simplicity and ease of installation
- Low material price
- A very original combination of past and present
- Kills the atmosphere of antiquity
- Requires additional insulation
- Weak resistance to mechanical damage (and it is very difficult to drive a nail into such a wall)
- Relative fragility (15-20 years)
The log house itself is the best finish
If the inner side of the timber itself looks respectable and beautiful, and no mistakes were made during the construction of the log house and it is warm enough, then 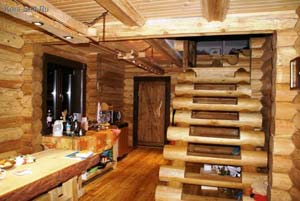 you can do without additional finishing at all.
It is better to make a wooden floor from parquet boards, or lining. The ceiling should also be trimmed with wood.
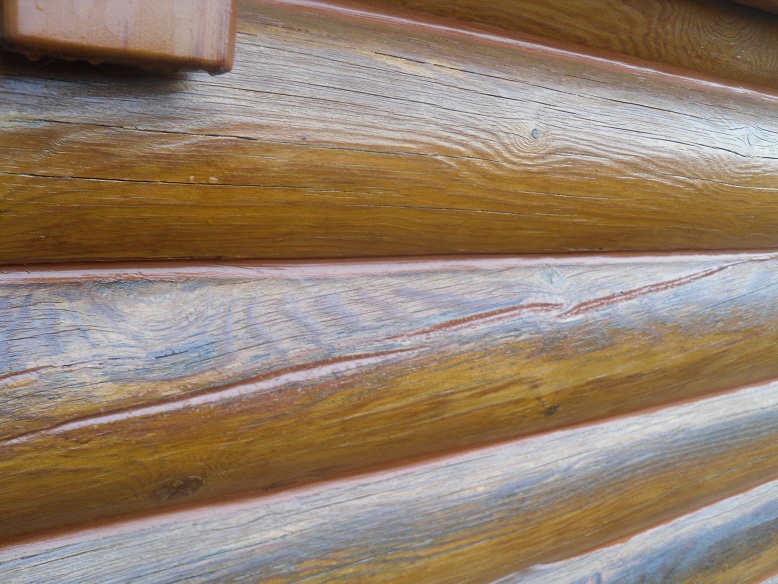
In the case when the blockhouse was built from rounded logs using the "in a bowl" technology, it is enough to simply cover the surface of the tree with a protective varnish - it looks great. In such cases, the wiring must be laid along the floor and corners of the building, covering it, for example, with a plinth. It is better to run the pipes under the floor, and those that are visible from the outside can be beautifully finished with a carriage board frame.
For a log house, chopped "in the paw" with a flat inner wall (if necessary, the wall can be trimmed with a workbench) the option of painting in the color you need is suitable (white or chestnut color will be, it looks the best).
Tip: putty the walls before painting - this will cut out knots, cracks and chips in the timber.
- There is no need to wait for the log shrinkage
- Minimum finishing costs
- Prostate of work
- Beautiful and natural look of a bar or log
- You will not be able to achieve a perfectly flat wall surface
- Difficulties in covering communications
- Limited design choices
- The need to periodically update the finish (approximately every 4-7 years)
Log putty
Mainly used for brick walls... It can be used as an option for interior decoration of a log house. To do this, use an acrylic or mineral plaster mixture for wood. This technology protects the tree well from moisture and other harmful factors. With the help of special additives, you can give it the desired color and shade. Plaster is applied to a special mesh attached to the log house with self-tapping screws. Align the walls with plaster, you can hide wires and telephone cables under it. You can also easily hide all kinds of chips and cracks in a bar or log. In general, during construction, be sure to have with you, for every fireman, to disguise the "jambs"
The floor can be chosen according to your preference, although it is wooden flooring will look out of place. The ceiling can also be anything, the best fit stretch ceiling and drywall, although you can make a putty and the ceiling itself.
- Cheapness of materials
- Minimum knowledge and skills in finishing
- Speed \u200b\u200band ease of the process
- Wide range of different shades
- Fragility (re-putty will have to be carried out every 5 years)
- A very ordinary look, it may not look harmonious in a log house.
- Difficulty hiding some communications. The pipes will be visible and aesthetic solutions to this problem are unlikely to be found.
Plastic finish
The use of plastic for finishing a log house with your own hands can be considered as an option for part of the premises, decorating the entire log house with plastic will be a real blasphemy. Plastic will be acceptable, for example, for a loggia, a balcony, any closet or closet. The bathroom and toilet can also be covered with plastic.
 The floor covering option can be very diverse and completely depends on your preferences and in which room the plastic is laid (tiles are suitable in the bathroom, etc.). The ceiling can also be sheathed with plastic, or use suspended ceilings.
Installation of plastic
There is, as is the case with the clapboard, a vertical and horizontal method of laying. Consider the more common vertical. The plastic installation process is in many ways identical with the wagon board. From the beginning, a frame is assembled, on which plastic panels will be attached. Further, in the upper and lower parts of the lathing, special profiles (molding) are attached, into which plastic will then be wound according to the "thorn-groove" principle.
Advice: the plastic panel should fit tightly into the molding, but do not force it into it, this can lead to both deformation of the panel (the panel can become a "wave"), and the skew of the molding itself, due to which the subsequent panels will not sit tightly.
Laying of plastic panels is carried out from the corner of the building, the panel is inserted from the beginning into the molding and then interlocked by means of a “lock”. Fastening to the lathing bars (profile) is carried out by means of nails and self-tapping screws, which are driven into a specially provided section of plastic called the "fastening tail". For a better connection between the panels, you can use special glue or liquid nails.
- It is easy to hide various communications and insulation elements behind plastic.
- Cheap and practical material.
- Parts are easy to assemble and cut to size.
- The variety of colors makes it possible to combine different options, creating contrasting and beautiful patterns.
- Not the most suitable option from an aesthetic point of view
- Good flammability of plastic
- Weak resistance to mechanical damage (although it is worth noting that the damaged area plastic panel can be easily replaced)
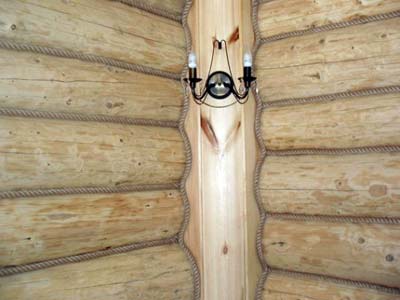
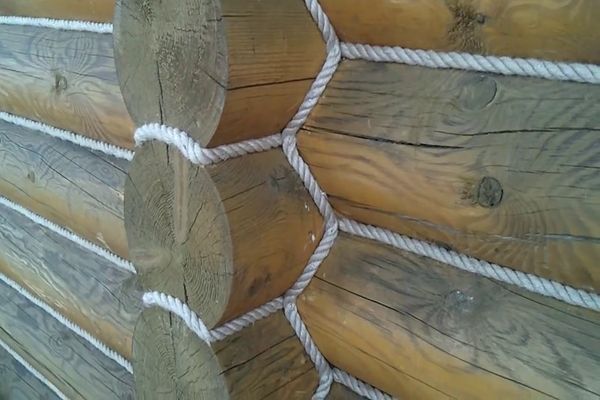
Finishing a log house with a rope
This is a decorative option for interior decoration, in which the main consumable is a special rope or rope (jute). This option is applicable only to a log house made "in a bowl" and preferably from a rounded log (if a regular timber was used, then the effect of such a finish is much lower).
The work on improving the home should be started only after all necessary work with a bar (antiseptic treatment and grinding). A decorative jute rope is used as a finishing material, which fits into the crowns of a log house and also performs a protective role. Jute rope prevents moisture and wind from entering the house and also helps keep warmth inside.
For this design, an oak floor or parquet board is suitable. The ceiling should be sheathed with a wagon board.
How to fix the rope?
It is worth starting work on finishing inside after the log house has settled a little and dries up (not earlier than a year after construction). There are several ways of laying a rope in a crown: using glue, staples or special nails with plastic caps.
Tip: treat the rope with special antiseptics shortly before installation.
Measure and cut off the required part of the rope, the edges of which, in order to prevent their dissolution, should be wrapped with threads and treated with glue or varnish. It is best to fasten the rope to the timber using a special glue, for this, apply a thin layer of glue in the place where the rope will be laid, carefully check the fastening in the corners of the frame.
Note: hot glue is applied to the logs with a gun, do not use ordinary glue and do not try to apply it in a handicraft way.
Video: finishing the crown of a log house with a rope
- Very original and mesmerizing appearance
- Low cost of consumables
- Additional protection of seams and log joints from wind and moisture
- A very painstaking process of laying the rope (haste and carelessness can lead to unpleasant consequences)
- With this form, there is no way to additionally insulate the walls with other materials.
- It becomes almost impossible to hide wiring and other communications.
Tip: Posting can be done by lower crown walls and corners of a log house, when laying a rope there, instead of nails, use small staples so as not to damage the wires.
Conclusion: it is the interior decoration of the log house with your own hands that will allow you to fully show your talent in design and realize your building potential. In it, you can apply a variety of methods and combine existing ones to create a non-repeatable interior and style.
Do you need additional finishing of the log house inside? What materials and what technologies are used to arrange interiors in wooden buildings. What finishing methods can be done by hand to save money?
These and similar questions are of considerable interest to many compatriots who have started the construction of a wooden cottage or summer cottage.
Basic information about finishing wooden residential buildings
Let's consider the main points that need to be considered when starting the arrangement of the interior of wooden buildings. First of all, it is necessary to take into account that only the internal finishing of the log house after shrinkage provides the best results.
As a rule, complete shrinkage of a log house occurs within 3-5 years after the walls are assembled. In buildings made of profiled timber, the shrinkage of the walls occurs within 1-3 years. The fastest way to start finishing work is in a house, the walls of which are built of laminated veneer lumber.
If you start facing wooden walls without waiting for their complete shrinkage, over time, the finishing materials may deform and you will need to repair or perform finishing work again.
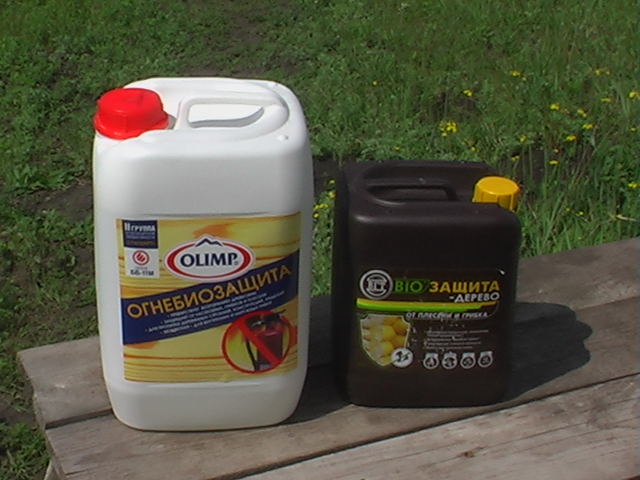
Important: Regardless of what materials will be used for wall decoration, it is initially necessary to treat the wood with antiseptic agents and fire retardants.
Important: The decoration of the log house of the bathhouse inside, as well as the arrangement of the interior space of a wooden house, can be carried out only after the gaps between the bars have been poured and window and door openings have been installed.
paints and varnishes
In fact, in a wooden building, you can do without expensive interior cladding, since logs or beams used as the main building material look very good in themselves. Therefore, the inner surface of the walls can be sanded to perfect smoothness and covered with furniture varnish.
As a result, the wood will be resistant to moisture and retain its original aesthetic properties for a long time. If desired, wood can be stained and varnished after complete drying.
The advantages of such processing of wooden walls include the following:
- tight deadlines for finishing work;
- small price of the finished result;
- the ability to independently perform work;
- the ability to carry out finishing work without waiting for the shrinkage of the house;
- the ability to select the best option among a wide range of colors of paints and varnishes on the market.
Lining
When starting to clad the walls of a log house with your own hands, it is advisable to use materials of natural origin.
Wooden lining is the one, to hide certain engineering communications and at the same time not to lose the aesthetic advantages inherent in a log house from a log or bar. If necessary, a layer of insulation or sound insulation can be placed behind the lining.
Along with numerous advantages, wall cladding with the use of such materials has one significant disadvantage - the consumption of free space in the room.
Currently on sale you can find three modifications of the lining:
- Regular boards, sanded and cut to the same size, but without any special cutouts or indentations. This type of finishing materials is cheap, but rarely purchased and mainly to save money.
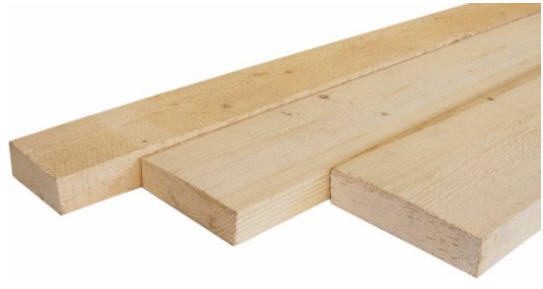
The installation instructions for such a lining are complicated, since the boards do not have connecting elements and, in the event of improper installation, impressive gaps can form between them.
The lining is fixed on nails or screws. It is preferable to use screws, since the nail can crack when driven.
- The universal lining is equipped with a thorn-groove lock. As a result, it is possible to fit the boards tightly to each other and thus avoid the appearance of gaps and distortions.
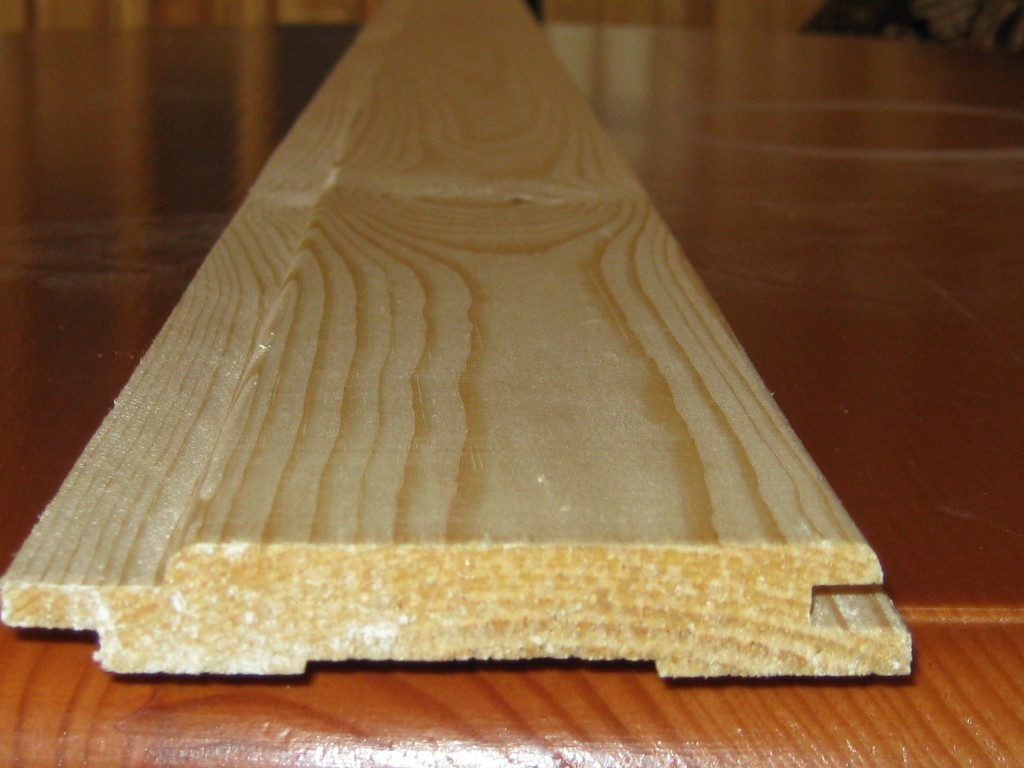
The price of the finishing material is slightly higher than the cost of the first modification, but such an overpayment of money is more than justified.
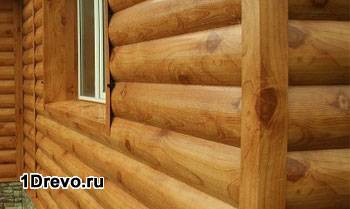
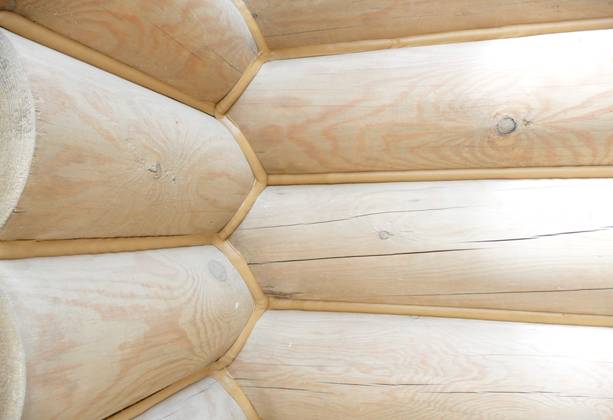
- A block house is a type of lining, the main difference of which is the semicircular cross-section of the cross section. Optimal results are demonstrated by internal finishing of the corners of a log house using a block house.
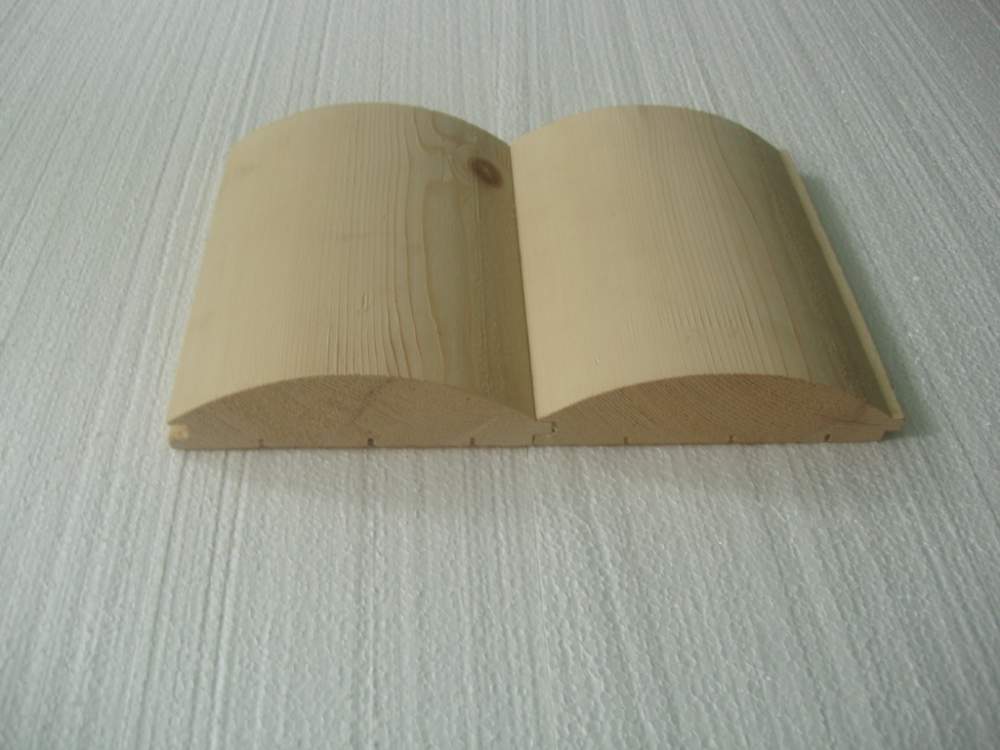
Such a lining is installed on the lathing with fixation due to the connection of the "thorn in the groove" type. As a result of finishing work, a wall is obtained that outwardly resembles the surface of the walls in a log house.
Drywall

The benefits of using drywall include the following:
- The ability to create various sometimes complex architectural forms;
- Fire safety, since drywall is a non-combustible material;
- Environmental safety, as drywall does not contain toxins and allergens;
- The strength and durability of the wall decoration, since the sheets of gypsum fiber board are resistant to mechanical stress;
- Acceptable price as this finishing material an order of magnitude more affordable than the same wooden lining.
Plaster
Finishing is carried out using special gypsum-based plaster mixes. The disadvantage of plastering walls in a wooden house is the tendency of the coating to crack over time.
Output
There are many ways to clad the interior space in a wooden house. Among the many techniques, you can probably choose the option that will become optimal solution for the interior of your cottage or suburban building. In order to choose the best finish was easier, watch the video in this article.
The finishing of the log house is the final stage of construction. Its task is to furnish the walls, ceiling and floor, and the result is a cozy and beautiful home. Finishing work is started no earlier than 1.5-2 years after the construction of the building. This time is needed for shrinkage. If you do not wait for it, there is a risk of deformation of the cladding.
Regardless of what materials are chosen for finishing inside the log house, its walls must be pre-treated with an antiseptic. It is recommended to think over and lay communications in advance. The choice of finishing materials largely depends on their location.
There are two main types of log house finishing: with preservation of the natural structure or facing with other materials. The first option is based on using the walls of the house as a decoration. The second involves cladding with plasterboard, clapboard, plastic. In any case, the interior decoration must meet the following requirements:
- be environmentally safe;
- have sufficient strength and durability;
- give the room an attractive look.
The choice of option depends on the preferences of the owner, his financial capabilities. It is interesting that often the owners of private houses tend to arrange them under city \u200b\u200bapartment, and residents of megalopolises choose natural materials... They start finishing after warming and laying the sub-floor.
Clapboard decoration
For cladding a log house, boards with a thickness of 2.2 cm are usually used, made of pine or deciduous trees. They can be placed vertically or horizontally to create an original design. For small rooms choose the vertical position of the cladding, and for volumetric - horizontal. Clapboard can be used to lay out the floor and ceiling. Material advantages:
- naturalness;
- creates additional layer insulation;
- environmentally friendly;
- uncomplicated installation.
The disadvantages include the high cost of quality materials. In addition, the lining itself requires treatment with an antiseptic (protects against fungus) and a fire retardant (increases fire resistance).
You can mount the lining directly on the walls or on the lathing. The first option is possible if the house is erected from glued or profiled timber, which provides smooth walls. The second option is used for a house made of rounded logs. In addition, it is preferable, since it allows you to lay insulation between the wall and the clapboard, as well as hide communications.
The lathing is made of bars, placing them approximately every 0.5 m perpendicular to the lining. They start to mount the boards from the corner. Installation is usually straightforward. Due to the presence of the thorn-groove clutch on the canvases, the individual elements are easily connected to each other, creating a solid structure. The market offers lining without connecting grooves and recesses. It is cheaper; screws or nails are used for fastening. But it is more difficult to achieve high-quality coverage with it.

Each board must be secured to the crate. To do this, use different methods:
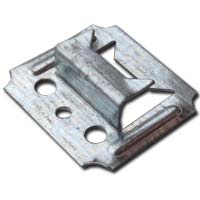
- On the kleimmer. This special device allows you to quickly and securely fix the lining. On the one hand, it is attached to the groove of the board, and on the other, it is screwed to the crate with a self-tapping screw.
- On self-tapping screws. A hole is drilled in the board, into which a self-tapping screw is screwed, fixing it to the bar. The hat should "sink" slightly in the lining. At the end of the installation, all holes are putty, sanded flush with the board. The minus of the method is laboriousness.
- On galvanized nails. A nail is driven into the groove at an angle of 45 degrees. Its head should not protrude above the surface so as not to interfere with the connection with the next element. The disadvantage of this method is that the groove is often chipped off, making it difficult to work.
Finished with painting or varnishing. The advantage of varnish is the preservation of the natural beauty of the wood. You can change the color of the boards or give them a shade with a stain.
Block house cladding
From the front, these boards have a rounded shape that imitates a log. On the back side there are ventilation slots. They provide air circulation to prevent condensation. The block house is mounted horizontally, starting from the bottom. The installation principle is no different from clapboard cladding. You also need to first make a crate, and then fasten the boards on top.
Using a block house inside the house, they achieve an accurate imitation of a real hut. The material goes well with different styles in the interior. The presence of special grooves on the board ensures the simplicity and reliability of the connection of individual elements. There are practically no downsides to the coating, except for the high cost.
Drywall
For some, finishing a log house with plasterboard may sound like a joke. Why spoil the natural beauty by turning a wooden house into an ordinary apartment? But this option is popular, and the result is often admirable. In this case, the floor is covered with carpet, parquet, linoleum. The ceiling is also mounted or a tension structure is mounted. Advantages of plasterboard walls:
- versatile material for creating intricate designs;
- sheets are easy to install;
- low cost.
The disadvantages are the need for additional insulation, low resistance to mechanical damage. All the beauty of a natural log house is hidden under the sheets.
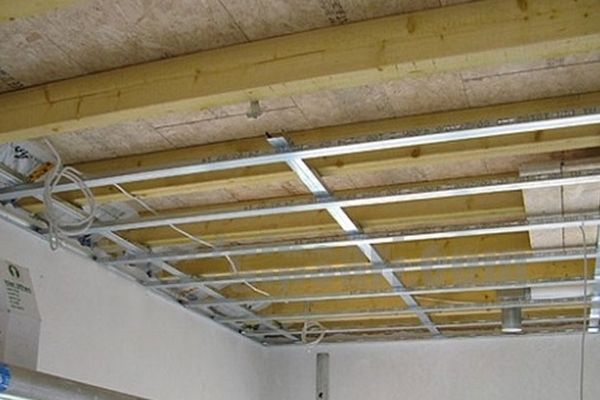
When mounting drywall inside a log house, first, a crate is made of a metal profile. Before that, you should lay electrical wiring and insulation. The sheets are attached to the profile with self-tapping screws. At the end of the installation, their hats must be putty flush with the wall. The popularity of drywall is due to the ability to quickly and easily make the walls even. They are suitable for wallpapering, painting, plastering, panel mounting or artificial stone... In addition, various structures are made from drywall, which decorate the room and increase its functionality.
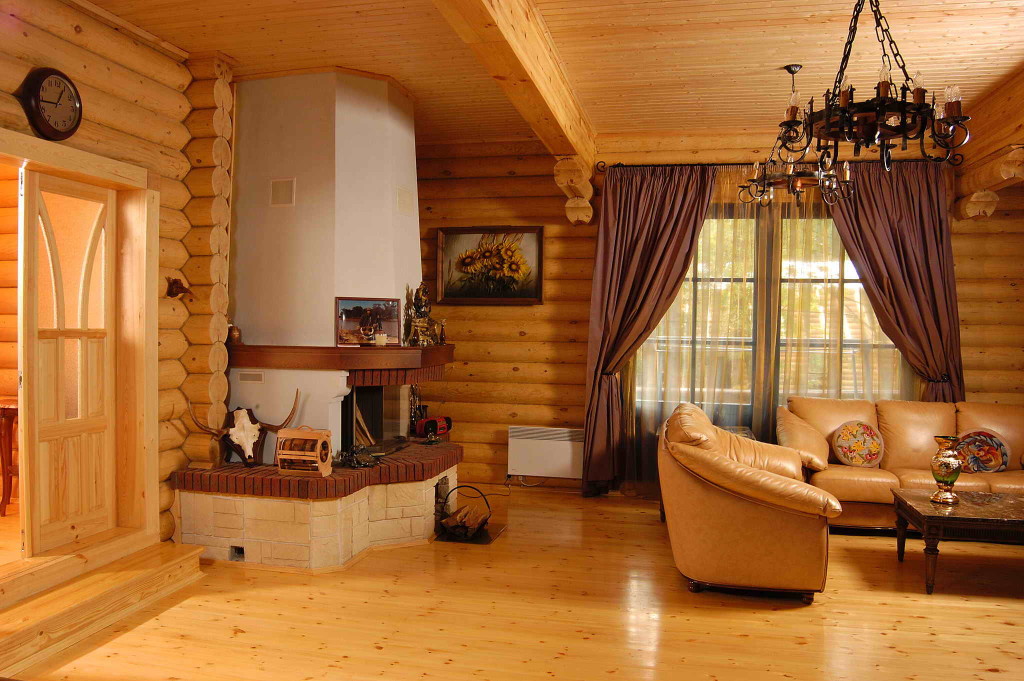
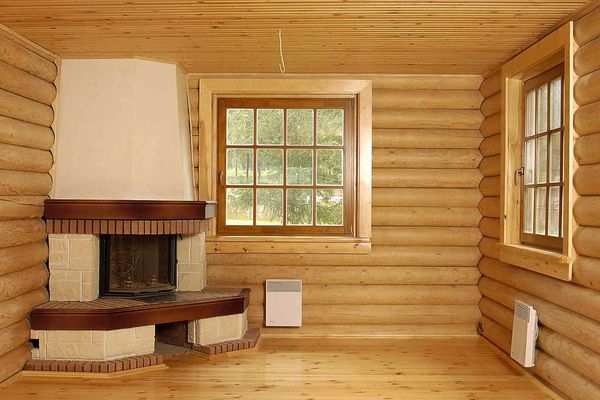
Log cabin in its natural beauty
If the inner surface of the walls is made neatly, then it may well remain unchanged. Such walls look respectable and give the house a cozy look. Of course, hi-tech or modern style will look ridiculous in it. But country, eco style or imitation of a hunting lodge will be absolutely appropriate. Of course, some work still has to be done.
For the floor, you can use a parquet board or lining. The best solution for the ceiling is wood. The decoration of a log house largely depends on the method of its construction. If it is built using the "bowl" technology of rounded logs, then the surface can be varnished. It will emphasize the beauty inherent in the tree and protect it from damage. In this case, the electrical wiring is laid under the baseboard. The pipes can be sewn into a wooden frame.

For houses erected "in the paw", flat walls are characteristic. If necessary, they can be brought to perfection by processing with a grinder. To hide cracks, chips, knots, the surface is putty. Finish with painting. Walls of white or chestnut color look spectacular.
Jute rope
- prevents the penetration of wind and moisture;
- keeps warm.
They start finishing after treating the timber with an antiseptic, grinding. The floor for such a cladding can be made of parquet boards or oak, and the ceiling can be sheathed with clapboard. You can start laying the rope six months after the end of construction. For fixing, use glue, staples, special nails with a plastic cap.
The crowns are filled with decorative jute rope, pre-treated with an antiseptic. To do this, take a piece of rope, the edges of which are coated with glue or wrapped with thread. With a gun, glue is applied to the joint of the beams, a rope is applied, nails are driven in every 15 cm. After finishing laying, the rope and logs are varnished. This log house finish is different:
- original look;
- low cost;
- economical consumption of materials;
- functionality.
The styling process must be done carefully, painstakingly placing each strand. The downside of this method is the complexity of doing hidden wiring power grids and pipes. Alternatively, the wiring can be routed along the lower rim, hidden under the rope. Another drawback is that it is impossible to additionally insulate the walls from the inside.
Leaving the log house its natural look, home owners receive a number of advantages:
- you can not wait for shrinkage at home;
- a minimum of funds will be required;
- simple finishing can be done independently;
- beautiful view guaranteed.
The disadvantages of this option are the difficulties that arise with communications. To hide them, you will have to mount boxes or frames. In addition, the choice of wall designs is very limited. The finishing will have to be renewed every 5-7 years.
A wooden blockhouse made of a log or a bar, brought under the roof, must stand for at least 6 months before starting finishing work. During this period, the structure will give the main shrinkage, and in the future, a change in the height of the walls as a result of drying out of the wood material will not fundamentally affect the appearance and functionality of the house.
Preparation for finishing
A log house that has stood for six months, a year or more should be carefully inspected. If the installation was performed in violation of the technology (for example, instead of wooden dowels, the crowns were fastened with nails), large gaps between the crowns may occur. In difficult cases, it is better to disassemble and re-assemble the log house.
It is important to decide on the type of wall decoration outside and inside. The log cabin itself looks decorative and does not need additional finishing. If it is supposed to be insulated, an external casing with a heat-insulating layer is mounted - in this case, natural air exchange through wooden walls, which provides a favorable microclimate.
Internal insulation for a wooden house is contraindicated, since you will have to install hydro and vapor barrier of mineral insulation or use non-breathable thermal insulation materials made of foamed polymer. Moreover, it steals space in the house.
Exterior and interior decoration may be required for a house made of old timber with an unattractive appearance. Outside, siding or blockhouse cladding is usually performed, inside the walls are finished with clapboard or drywall.
Decorating a house made of natural wood includes treating the log house with protective agents that protect the tree from fire, damage by insects and fungus. If you do not intend to sheathe the walls, they are covered with wood varnish, transparent or tinted, or use a stain of a suitable color. The treatment will need to be repeated every 3-4 years.
It is important to take care of the installation of the electrical panel and the electrical connection of the house to provide lighting and power to the hand-held power tool.
Outdoor work
Usually, a finished log house consists of wall structures, a roof covered with roofing felt, a sub-floor on each floor and an attic.
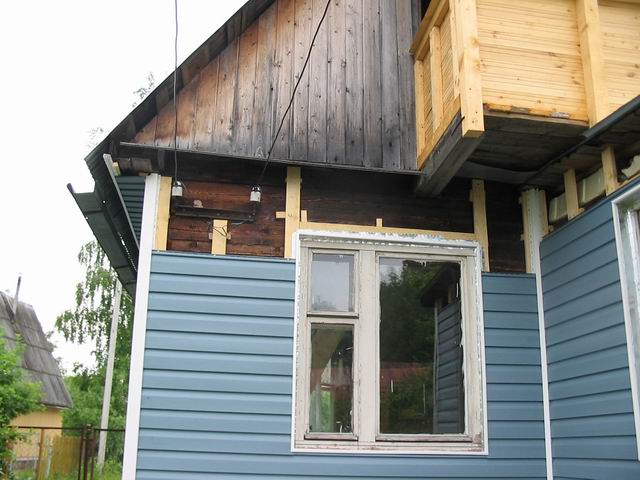
At the first stage, it is required to cut out all window and door openings according to the project. It is important to add 6-8 cm in height for each opening for further shrinkage of the log house, which lasts 3-5 years, depending on the characteristics of the material. In the sidewalls of the openings, grooves are cut out and casing bars are inserted. If this is not done, the edges of the openings can lead.
![]()
In the upper part of the door and window openings, casing boards are mounted, the gap between this element and the upper edge of the opening should be 6-7 cm, it is then filled with tow and closed with cashing.
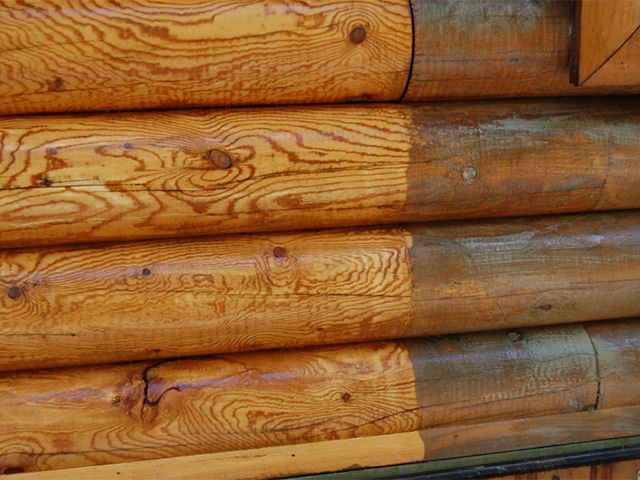
If it is decided to leave the outer walls without cladding, they are grinded from the outside with an angle grinder with a capacity of no more than 1 kW and an emery wheel "petal" with a grain size of 36-150 units. You will have to remove the protective cover from the tool if you have to process the curved surface of the logs. It is important to use a respirator and goggles as a lot of dust is generated during work.
After grinding the walls, finishing work consists in processing the log house with a fire retardant compound and subsequent caulking. The walls are tinted (optional), covered 2-3 times with a protective varnish for wood. Cornice overhangs are also processed and painted.
At the same stage, they begin to decorate the walls from the outside with a block house or other materials, if provided for by the project.
At the next stage, window and door blocks are installed, cashing is mounted. If the structure is wooden and needs painting, it is painted in the chosen color. Next, you should mount the drain and finish the base. Make sure that all communications are carried out to the house.
If the house is built on a pile-screw foundation, the basement must first be mounted to protect the house from freezing from below.
Internal work
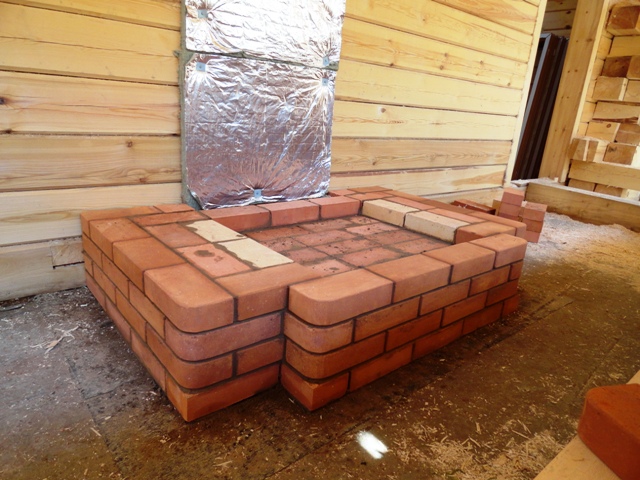
If it is planned to install a brick oven, fireplace or a powerful floor-standing boiler (in a specially designated room) in the house, a separate foundation must be erected under the unit. When choosing a place, pay attention to the location of the ceiling beams and rafter legs so that there are no problems with the installation of a classic vertical chimney. To complete the work, part of the subfloor will have to be disassembled.
Next is executed internal wiring communications and the floor of the first floor is mounted with insulation along the logs. The heat insulator is laid on the subfloor between the logs on top waterproofing membrane... The insulation is closed with a vapor barrier membrane, a counter-lattice is stuffed on the logs and the flooring is made of boards or plywood - the basis for finishing... In wet rooms, a thin screed is made under the tiling.
The walls inside the house are sanded and caulked, treated with a fire retardant compound, tinted and covered with water-soluble varnish. Cashing and window sills are installed on the windows, painted if necessary. Laying a twisted cord between the log crowns will add aesthetics to the walls and create additional protection against blowing and freezing.
Wall cladding with plasterboard, plastering, finishing with clapboard or other materials, if provided by the project, is performed after the installation of the base of the ceiling, which serves as the floor of the second floor or attic. Further, the ceiling is sheathed with clapboard or plastered. The floor covering is laid.
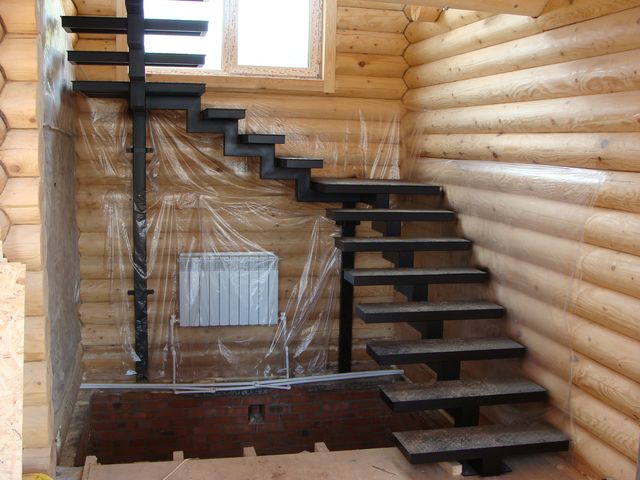
Then the stationary staircase is mounted, processed and painted. The full cycle of internal work is carried out at top floor... Mineral insulation is laid between the floor logs, protected by hydro and vapor barrier membranes - it serves as a sound insulator, prevents heat loss.
The roof is insulated, the gables and slopes are finished from the inside, the floor is insulated and the floor covering of the attic or attic is mounted, the baseboards are attached.
Electrical wiring in wooden houses, for safety reasons, is performed externally. The wires are hidden in decorative cable channels, overhead sockets are installed.
A separate stage is the arrangement of wet rooms. Interior decoration logging is performed after the structure has shrunk, but wooden structures constantly change their geometric dimensions, absorbing and releasing moisture. If wall cladding with tiles is planned, it is necessary to mount a frame made of sheet material, which will be held on vertical guides using special sliding fasteners.
The finishing of the log house after shrinkage is carried out according to the following principle: first of all, all dusty work is carried out, then finishing, and at the last stage, decorative elements are mounted.


