In the life of any person, repairs come from time to time. It may be associated with the acquisition of a new house or apartment, with a desire to update the interior of a familiar home. One of the ways to organize space is to create arched structures. Arches in a house can perform two completely different functions: combining space, when an arch is placed instead of doors; dividing a large area to select several zones of different function.
An arch instead of a door: types of portals
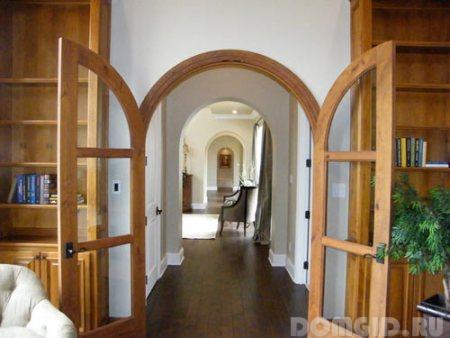
Of these two options, the arch in the doorway is more common, giving a more interesting look to the layout of the apartment. When replacing a door with an arch, it is necessary to consider the pros and cons of such a solution. The undoubted plus for a small apartment is the expansion of space. By combining a kitchen and a small room, you can arrange a dining room, where it will be convenient and pleasant to have dinner with family or friends.
If several arches are placed in a long and narrow corridor, then the feeling of narrow passages, like in a train carriage, disappears.

If an informed decision is made to install the arch, then we proceed to the choice of the form of the decorative structure:
- Rectangular;
- Semicircular with equilateral rounding;
- A semi-arch with only one rounded corner;
- Trapezoidal, the design of which consists of curved lines;
- Fantasy.
The downside of the arch instead of the door is that you can't close the door in order to highlight your piece in the apartment. If an arch is placed instead of a door to the kitchen, then the smell of cooked food will spread everywhere.
How to make an arch in a doorway
After the shape has been determined, it is recommended to make a template from cardboard, fiberboard or other materials at hand. Creating a template helps to represent the end result and more accurately calculate the quantity necessary materials... When designing, we take into account that the device of the arch in the existing doorway will reduce its height by about 10-15 cm.If the dimensions of the opening are insufficient for the embodiment of design ideas or the owners of the apartment are tall enough people, then you will have to increase the height of the doorway. Changing the height or width is costly, including labor, financial and time to coordinate the redevelopment in the respective organizations. Determining the shape, creating a template are the first stages of making an arch.
They are followed by:
- Dismantling the old door frame (if it has not been done earlier);
- Preparation of the wall surface for the installation of the arch;
- Wireframe creation;
- Installation of an arched structure;
- Fine finishing and decoration.
All these works can be entrusted to professionals, but if you wish, you can do everything yourself.
Instructions: how to make an arch with your own hands
The cheapest and most common material for arranging an arch, as for many other works, is drywall. We dismantle the old door frame. For more modern designs, this is easy. You just need to unscrew the screws and carefully remove the platbands. Old houses present various surprises to their owners. In ancient times, nails were used to fasten the platbands to the bars.
Carelessness during such work can lead to destruction of floors or their damage.
After dismantling, we carefully evaluate the intermediate result of the work. The former doorway and the wall next to it must be clean, level, without serious damage. Therefore, if cracks and chips are detected, we putty, this will help to subsequently finish them correctly and efficiently. If you plan to align the walls with plasterboard, then this can be combined with the arch device.
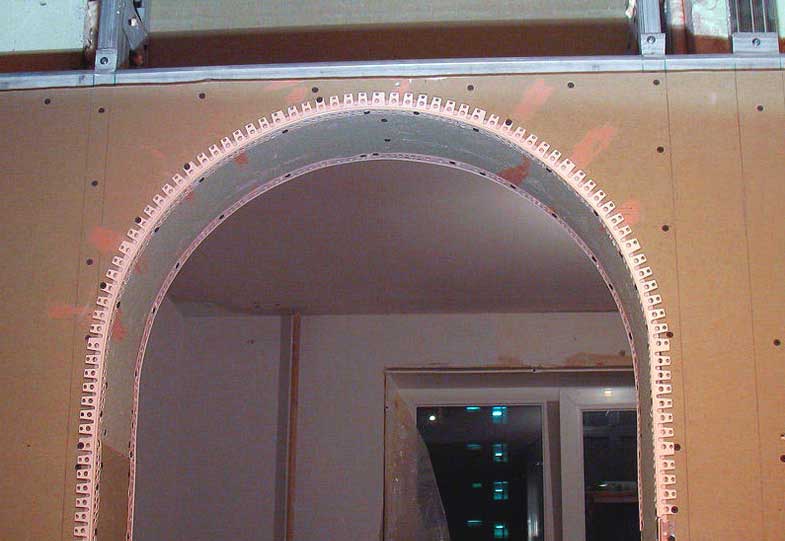
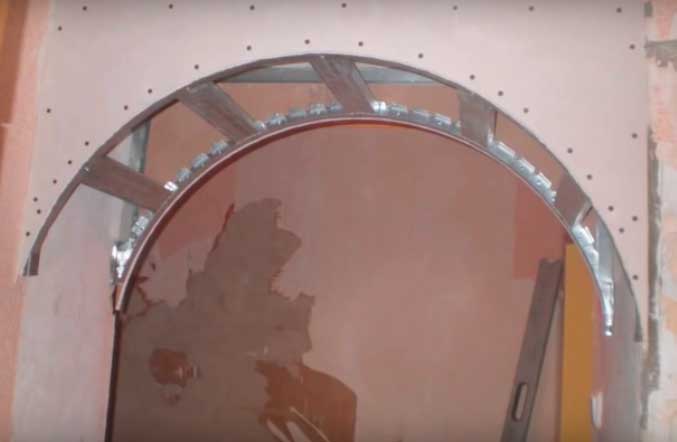
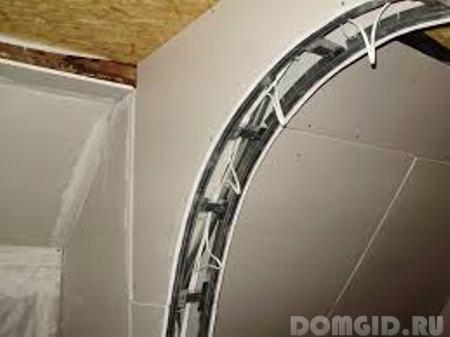
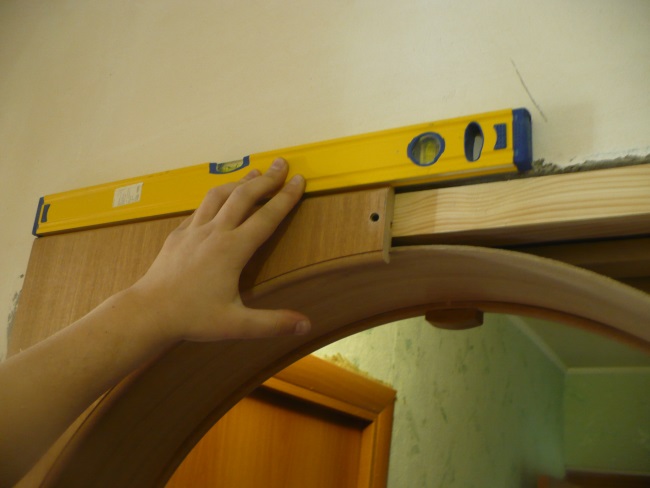
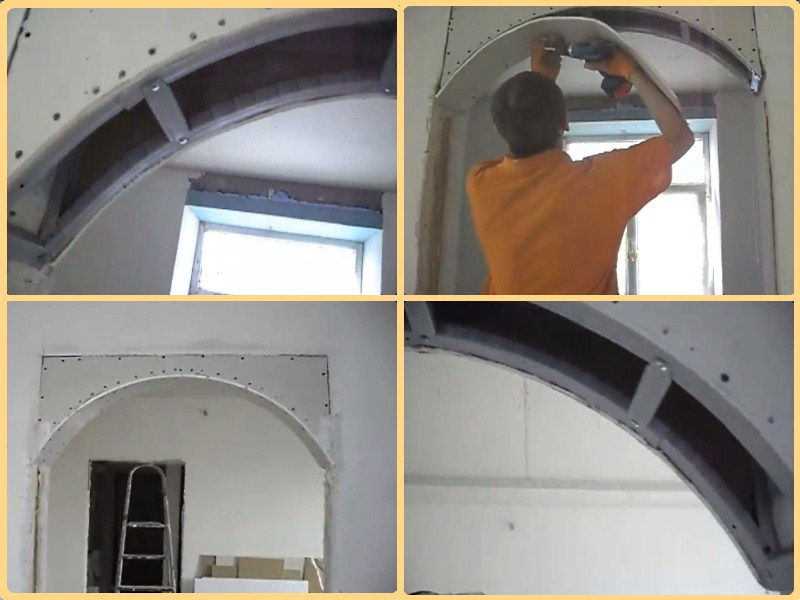
When the doorway is prepared, a U-shaped frame made of a metal profile is installed in it. It consists of one horizontal segment equal to the width of the doorway and two vertical ones, the length of which corresponds to our future design. The frame should be on both sides of the opening, that is, in fact, we make two of them. Two rows of holes of 10 cm are marked and drilled in the profile. Then the holes are marked and drilled with a perforator at the ends of the wall. The guides are attached to the walls.

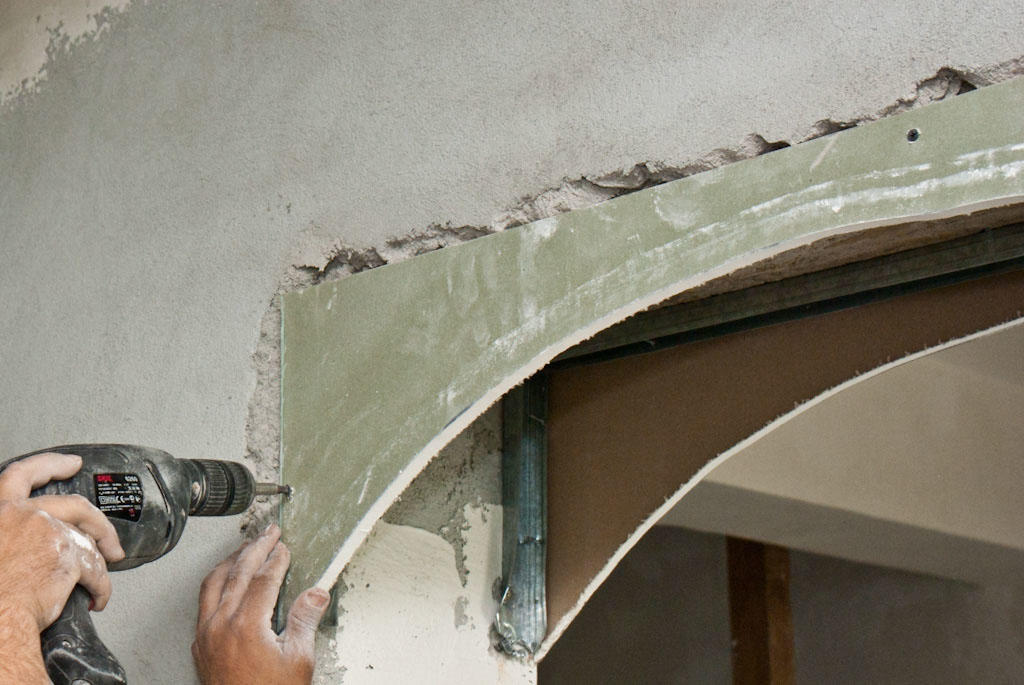
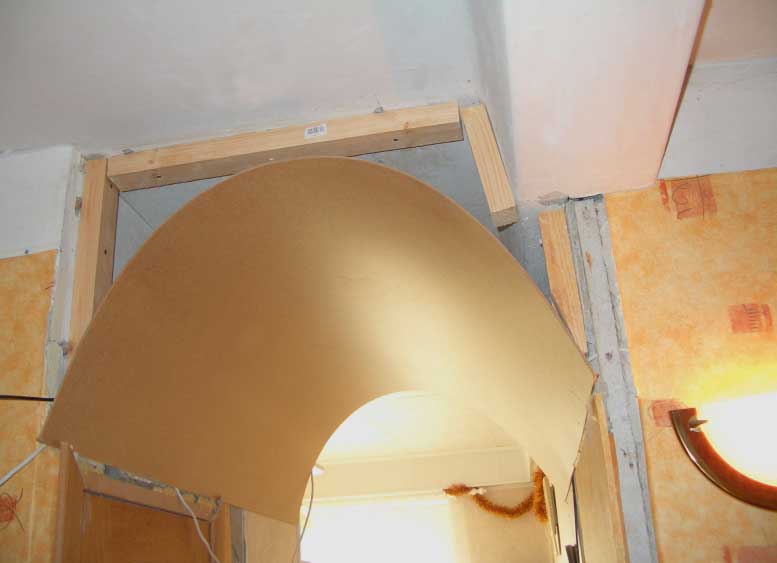
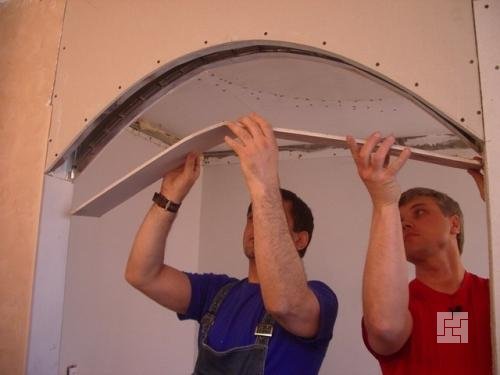
The turn came to use the template cut in advance. Sheets of drywall are marked out on it, with the help of a jigsaw, two parts are cut out for each arch and attached with self-tapping screws to the installed profiles. A profile must also be mounted along the edges of the attached template parts. Since we are considering how to make a semicircular arch, an important step is to give the profile for drywall the appropriate shape. To do this, we cut the edges of the letter P of our profile to the full height. The profile becomes obedient and takes on the geometric shape we need. Then it takes its place at the edges of the slices.
The next stage requires accuracy and care. It is necessary to correctly install the arcuate fragment of our arch. The profile is already installed, so we measure the length of the arc and the width of our part, cut out a rectangle. The difficulty lies in the fact that the rectangle does not really want to become an arc. If ordinary drywall is used, then the main method of "pacifying" it is wetting and simultaneously giving the desired shape. But this option may seem difficult to ordinary home craftsmen who are afraid of making mistakes. In this case, modern technologies suggest that we use arched drywall, which takes a semicircular shape much more easily than usual. We fasten our part in the usual way, moving from the center of the arch to the edges, and we are almost at the finish line.
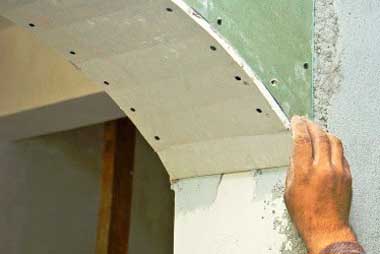
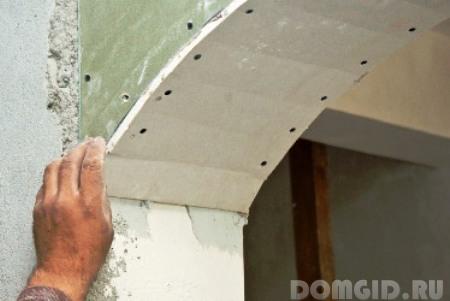
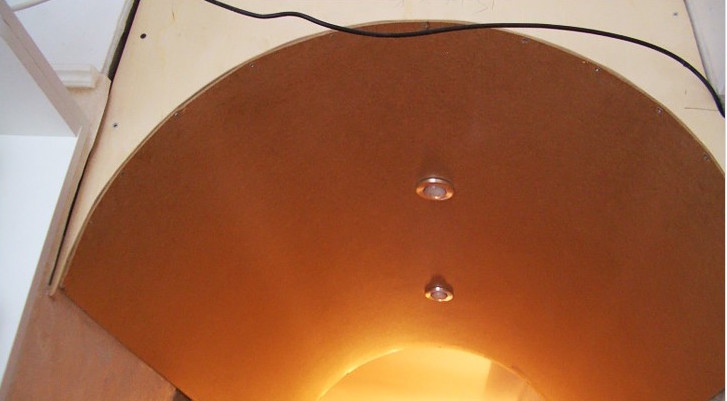
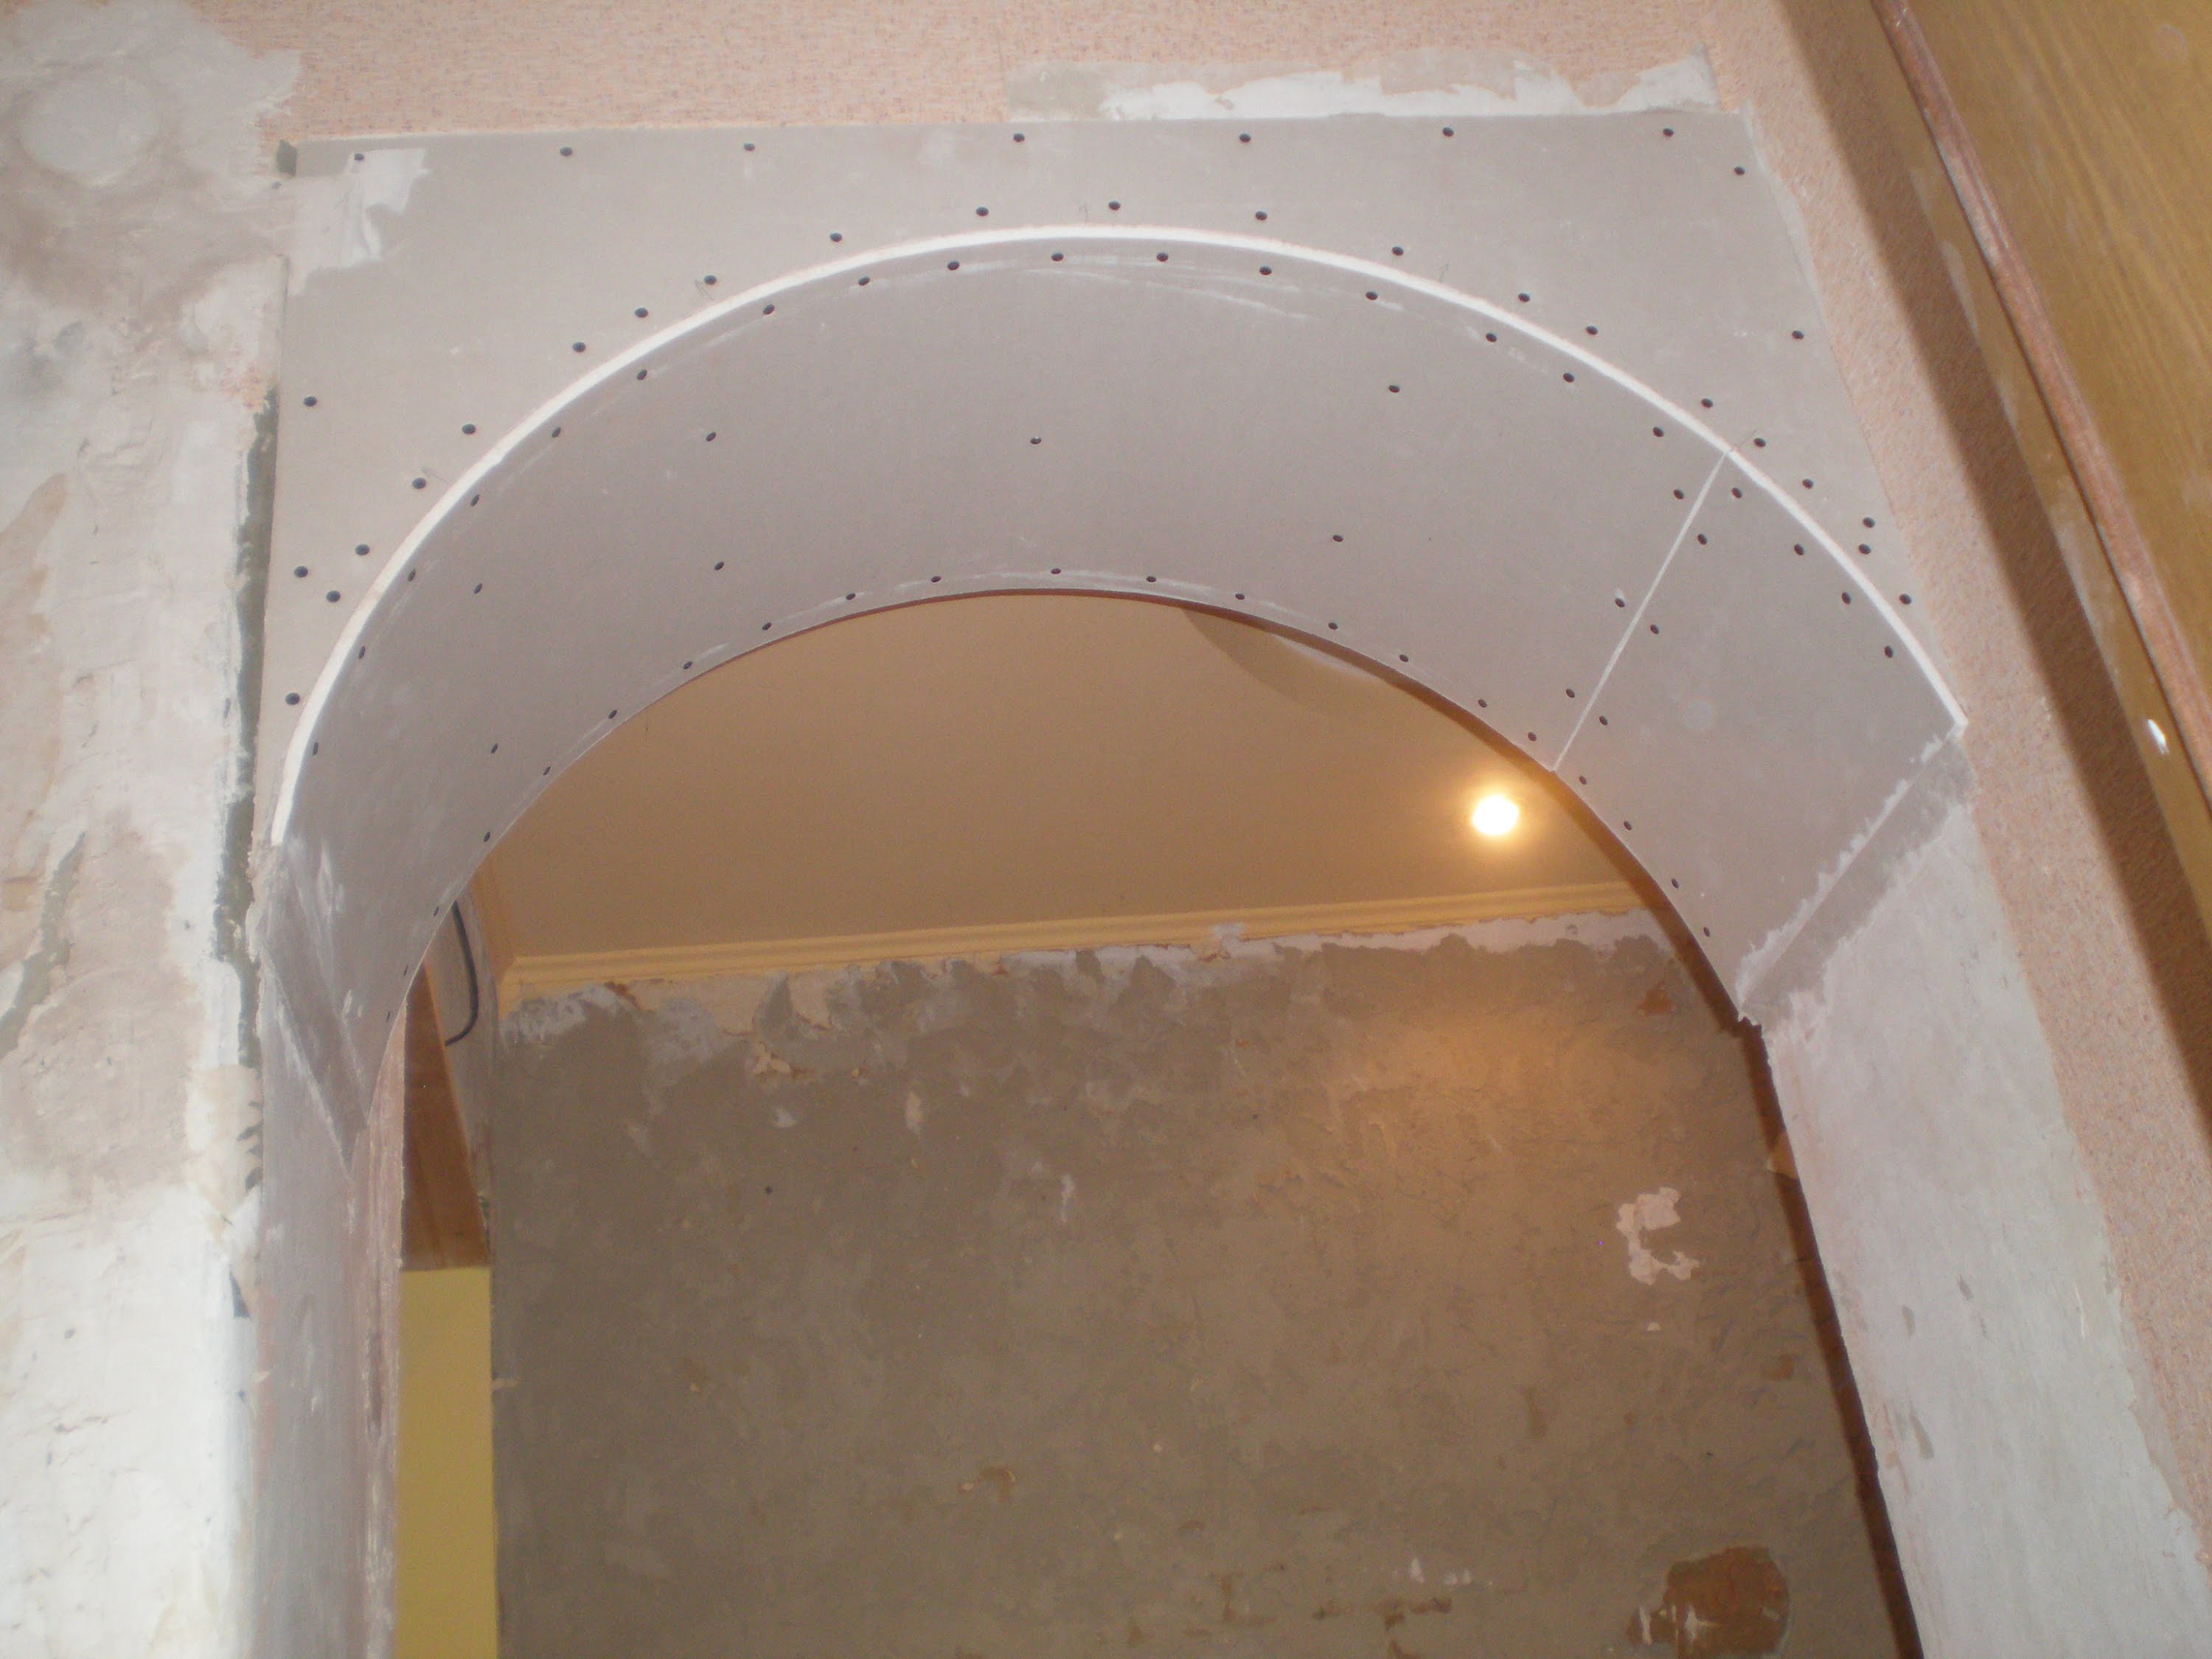
We process the edges of the arch, cut off the excess. After that we process the joints and the edges of the drywall with a perforated paper tape or serpyanka, putty, process sandpaper... The choice of putty for finishing depends on the future decor of our arch.
Remained finishing workwhich we will return to a bit later. If you plan to install lamps in a semicircular part of the arch, then you need to do this before starting the putty. If it is scary to tackle unfamiliar material, then you can put an arched structure made of plywood. In this case, two ways are possible: the first is similar to working with drywall, the second is described below.
Do-it-yourself door arch: making from plywood
To build such a structure, first measure the size of the arch of the future arch. A rectangle is cut out of a sheet of thin plywood, the width of which is equal to the width of the doorway and the length is equal to the size of the arc. Plywood is a malleable material, so the cut rectangle is evenly moistened, allowed to lie down for a short time, and bent to install in the opening.
It is important to put the cut out part neatly and evenly, this will require a certain skill.
Be sure to fix the part with self-tapping screws in the center, then along the edges. Fill the space between the resulting semicircular arch and the walls with polyurethane foam and wait for it to dry. If there is a lot of free space, then part of it can be filled with foam parts, and the remaining free space can be filled with foam. We cut off the excess foam, putty the facade of our arch using a serpyanka.
Less common designs are wood and brick arches. Despite the beauty and durability of such arches, their installation requires more expensive materials and the participation of professional craftsmen. The most interesting stage of creating an arch in the doorway with your own hands remains - finishing. Various decorative materials can be used here.
Most common:
- Wallpapering;
- Decorative plaster;
- Coloring;
- Bonding of finished styrofoam finishing elements; 0.00 (0 Votes)
Attention, only TODAY!
Arches are an architectural element that has existed since time immemorial. But in spite of all their archaism, the arches are able to add flavor to the modern.
As just an opening in the wall, the arch can serve various design requirements. She is able to visually enlarge a small room, and divide a large room into zones.
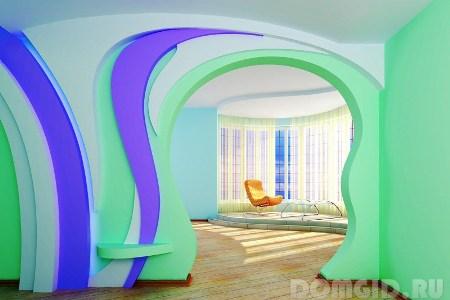
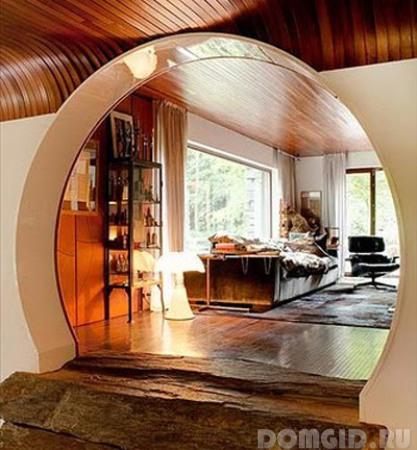
Interior arches can be of different sizes, it all depends on the goals and point of view of the designer. They can be of various geometric solutions, from an ordinary rectangular cut in the wall to futuristic asymmetric designs. Also, they may or may not have vaults, which, in turn, can also be of the most intricate forms and types.
Arches are made of bricks, wood, plywood, boards, MDF, drywall, plastic, etc.
Features of the device arch-portal
 In typical apartments, the simplest solution would be to make an arch by simply increasing the opening. It can be finished with panels of various materials: wood, plastic, etc. Such arches are called U-shaped or portal arches. Such arches are very easy to do with your own hands.
Naturally, first of all, you need to remove the tree, since it is completely unnecessary for the arch. Accordingly, we get rid of the platbands and the door frame. Then you need to level the resulting opening with cement mortar and let it harden. Everything, you can start finishing.
The portal arch is the easiest to perform, which is a significant plus, however, it looks quite simple and cheap. If we want something more presentable, then we cannot do without vaults.
For device vaulted arch we need to increase the opening in height, and therefore in width. There are two ways to go. First and easiest - we expand the opening already in the wall. And the second - we completely demolish the wall and erect its decorative replacement from plasterboard.
Do not forget that only decorative can be demolished and it is strictly forbidden to touch the capital (bearing) walls.
Otherwise, it can lead to the destruction of the entire building or part of it.
If you chose the first method - to expand the existing opening, then before starting work you need to mark the necessary boundaries of the future arch. In this case, the width of the opening that you will cut through should be 3-4 centimeters more than the width of the intended arch. And the height, the same centimeters from the top point of the future arch.
Following the markings, through holes are punched in the wall with a step of 10 centimeters. The opening is widened with a circular saw or a conventional sledgehammer.
 Side panels can be made of plasterboard by installing it on a U-shaped profile, or from chipboard. If everything is clear with chipboard, then it is worth dwelling on drywall in more detail.
On the main wall, to which we will join the plasterboard wall, we apply vertical markings under a plumb line, tobish the outlines of the end of the future wall. Observing the markings, we fasten the U-shaped profile with dowels to the wall.
From the side profile, we fasten the sections of the profile to the floor in length equal to the width of the future wall to the opening. In the same way we mount the profiles to the floor and to the opposite wall. We lay the profile along the ceiling from one wall to another.
We put two slats between the profile on the ceiling and the edges of the profile lying on the floor. Then, on the resulting frame, we fasten the transverse profiles every 20 centimeters. This must be done in order to prevent the drywall sheets from falling through.
Now you can mount drywall sheets - from both sides.
Construction of the arch vault
Getting started with construction interior arch with your own hands, special attention should be paid to the arch. Firstly, this is the most difficult part of the arch to manufacture, and secondly, its shape affects the entire structure. 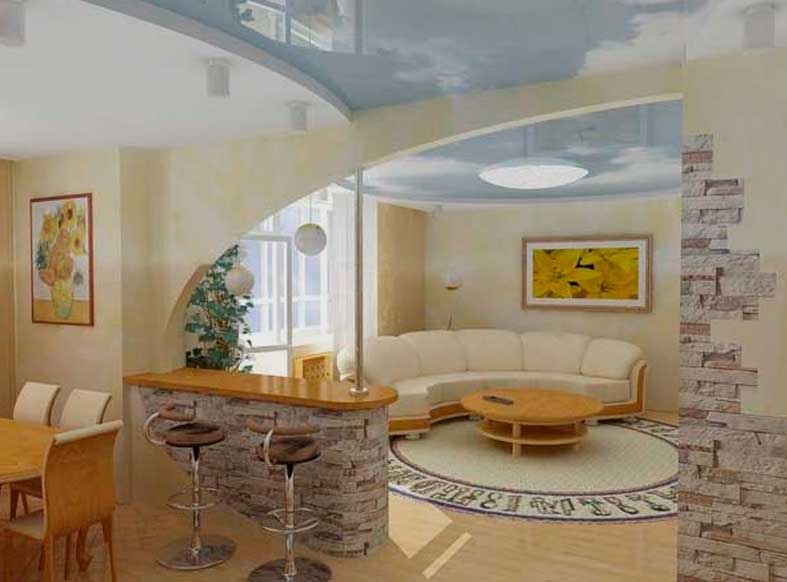
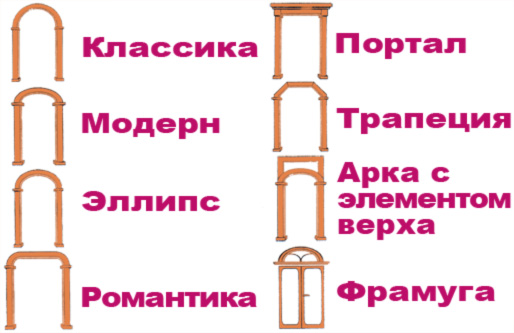
In addition to the above-mentioned portal arch, there are several more types: 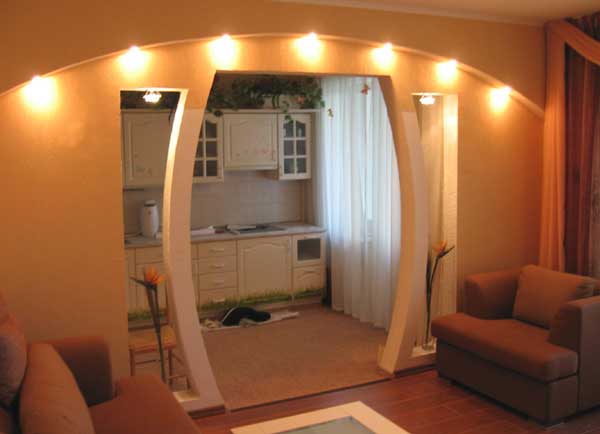
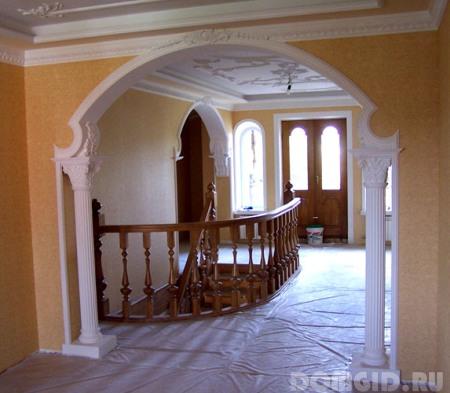
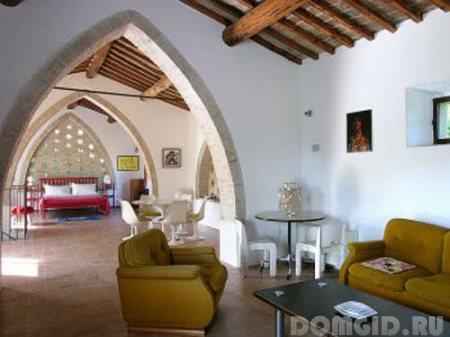
- Classic arch or Romanesque (vault in the form of a semicircle);
- Art Nouveau arch (half of the circle, cut by a chord. It is similar to the classical one, but with a flatter arch);
- Pointed arches (the vault is, as it were, composed of two circles that are leaning against each other);
- Arch "romance" (similar arches are made in very wide openings. The vault is in the form of two arcs connected by a straight interval);
- Prism (the arch is made without any roundness, consists of straight lines, between which obtuse angles).
The sides of the vaults are also made of plasterboard. Cut out a recess of the required shape from the bottom of the sheets.
 Since the prismatic interior arch consists exclusively of straight lines, it is easiest to make it yourself. To make a rounded vault, you will have to sheathe it with bent sheets of drywall at the bottom.
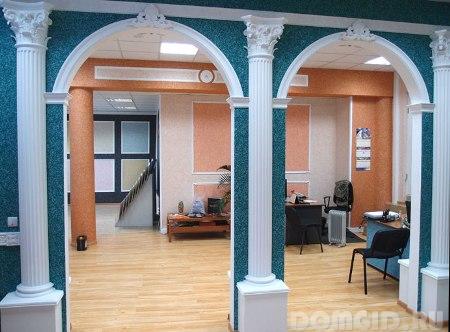
If you want to build an interior arch with your own hands, but there is doubt about your own abilities, then you can use standard ones or make them to order. Arches can be chosen in various designs, textures and materials.
Wooden arches will look expensive and presentable, but they will not be cheap either. Plus, the material is heavy in every sense. For hand-made work, fiberboard or MDF are better suited.
The assembly of the arch must be started from the top.
 First, we use the supplied wooden dowels. We assemble a vault from two pairs of panels. We connect with PVA wood glue. After gluing, we wait until it dries, and then from the bottom of the eaves of the arch.
Then we saw off the flexible plate of the inner part of the arch - with a margin of at least 10 millimeters.
We assemble the arch of the two halves, the halves are glued to the inner panel.
We install the arch in place and fix it with self-tapping screws or liquid nails. It is necessary to finish the side panels according to the dimensions of the openings with a small margin in length and width.
We saw off the platbands too, from to the cornice so that the saw cut was inside the arch. Then, we mount the platbands into the cornice of the arch using dowels. To do this, glue the groove of the casing with glue and insert the side panel into it so that the upper edge plunges into the groove.
We do the same with the second half of the arch.
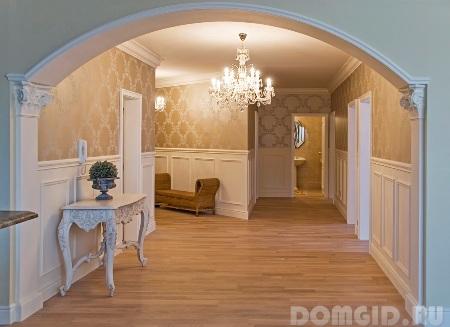
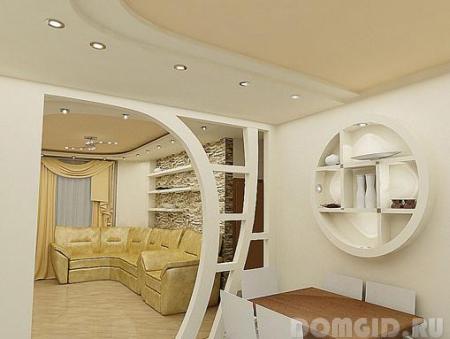
In architecture, it is customary to call a special element of a wall structure or partition an arch. Different forms of arches serve to smooth out the lines of the openings. It should be noted that the arch is a rather noticeable fragment of the interior and attracts attention, so it makes sense to make every effort for its high-quality and aesthetic finishing.
What are interior arches used for?
Homeowners resort to the construction of arches if, during its redevelopment, there is no desire to install doors, but there is a need for division or zoning of the room. There are many types of arch designs, but it should be borne in mind that they are absolutely the same in shape and size, they can look completely different in different interior options.
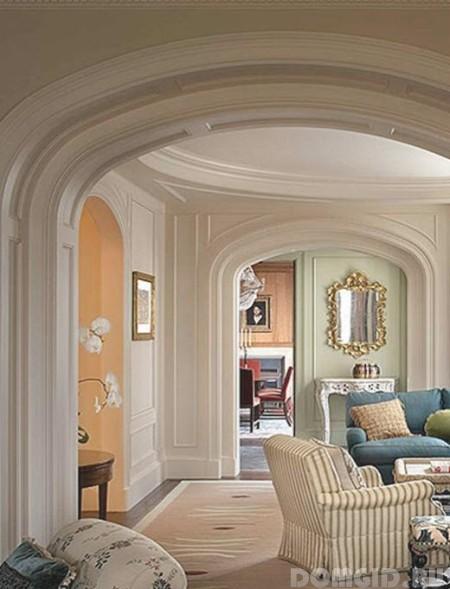
Installed in the hallway or corridor, arch:
- will bring grace to their interior,
- will eliminate the moment of monotony,
- will open up views of adjacent rooms, which will help improve visual perspective.
Although there is a decline in interest in open planning today, arches are still popular, the best place to use them is to separate the living and dining room or dining room and kitchen.
Naturally, the installation of the arch will require coordination of the color and stylistic solution of the premises that it combines, they should look like a single whole.
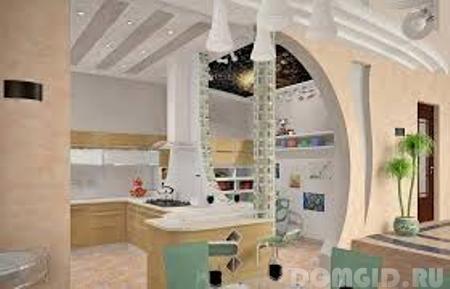
An indispensable element will be the arch in the opening between the room and the loggia attached to it. In this case, you can use a massive beam that separates the loggia with the main room as a basis for installing the arch.
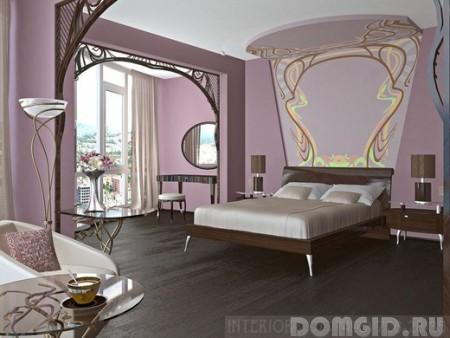
Another option that modern designers often resort to is the construction of alcove arches, which make it possible to highlight a cozy corner in a certain area of \u200b\u200bthe house, for example, in the bedroom, the allocation of the bed area is practiced.
About the device of arches
The best option is to provide for the presence of arched openings in certain places of the house even at the stage of drawing up the project, this will allow other construction works in parallel with the construction of the arch. But multi-storey construction today, as a rule, it is carried out according to projects that make it possible to receive apartments in the form of large studio rooms after the delivery of the house.
in a standard city apartment
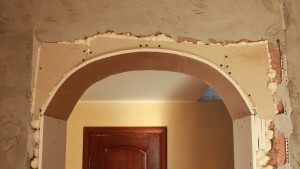
If the installation of the arch will be performed in place of a standard opening for the most ordinary interior door, then you will have to face the next moment. After dismantling the door frame, a transverse concrete beam will remain above it. It is clear even to a person who is ignorant of the intricacies of construction that it cannot be removed - this beam is intended to strengthen the wall in the opening, i.e. a place where there is no other support for it. Only a slight expansion of the opening is allowed.
A high round arch in this place will not work - the maximum that can be obtained is an opening with a height slightly less than standard height doors.
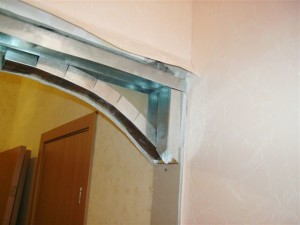
Before proceeding with the finishing of the arch, you will need to take care of its strengthening. You will need to make a welded U-shaped frame, you can install it from a channel in an arched opening. The vertical struts of the frame will take on the loads generated by the walls.

Only after strengthening the opening can you start creating the frame of the arch itself. It is made from a ceiling profile; notches are made on the profile to give the desired curved shape. After making the frame, they begin to cover it. Drywall is used as a cladding material, but plywood or fiberboard can also be used, it all depends on what materials are planned to be used for finishing work.
in a panel house
If the house in which the redevelopment is being made is panel, then there can be no question of changing the height or width - the arch in the doorway can only be installed that corresponds to the parameters of this opening - concrete walls designed for certain loads, it is very dangerous to violate their integrity. The advantage of this option is that the base of the arch does not need to be reinforced with a welded structure.
in a brick wall
If the wall is brick, then, as a rule, they resort to its complete dismantling and the subsequent construction of a new structure, already taking into account the arched opening. You can build an arch yourself, you can contact specialized firms and order ready productwith decorative trim.
Most often, in finished form, wooden arches or made of MDF are offered, of a wide variety of designs, having smooth lines or rigid geometric shapes, decorated with slotted gratings or carvings, colored stained-glass windows, etc.
If there is a desire to build an arch without any special financial costs, then you will need to dream up, choose the option that is optimal in shape and material of manufacture and do the work yourself.
Making a drywall arch with your own hands
A drywall arch is a frame construction, i.e. the work will be done in two stages:
- installation of a profile structure,
- plasterboard sheathing.
Before starting work, you should purchase the appropriate materials:
- drywall 12 and 6.5 mm thick,
- profiles and fasteners to them,
- arched reinforced corner (2 pcs).
You will need the most common tools:
- hammer and jigsaw,
- screwdriver and drill,
- compass and pencil.
The arch is installed in the following order:
- From a sheet of drywall we cut off a fragment corresponding to the width of the doorway, draw a semicircle in the upper part, cut out the outline of the arch with a jigsaw.
- Having retreated from the edge of the wall by the thickness of the plasterboard sheet, we fasten the profile using self-tapping screws and anchor dowels.
- Drywall sheets are attached to the profile with self-tapping screws, to simplify the process, we use a screwdriver. At the same time, we make sure that the heads of the screws do not protrude above the surface of the plasterboard. The spacing of the fasteners is at least 10 cm.
- If finishing material will have a solid weight, for example - if a decorative stone is used, then it will be necessary to strengthen the structure by adding jumpers made from a rack-mount profile along its inner perimeter.
- Then we cut out a fragment from the sheet, in length and width corresponding to the parameters of the arch arc. The resulting strip of material will need to be bent along the radius and attached to the corresponding section of the frame. If the arch has a sufficiently steep bend, then the gypsum board will need to be prepared: moisten it, give it the desired shape, fix it and leave it to dry completely. The curved surface obtained in this way will be easy to attach to the frame.
- After installing the last piece of the arch, you can start finishing work.
Arches decoration - the most popular varieties
plaster + painting
I must say that for decoration you can use a wide variety of materials - for which anyone has enough imagination. The simplest option is to plaster the surface of the arch and cover it with paint that was used to paint the walls in this room.
If desired, the arch can be highlighted in a different color; decorative molding can be used to finish the ends.
polyurethane
The second interesting option is the use of modern polyurethane material for finishing. It is used to make ornaments that imitate stucco molding, which is traditionally used to decorate walls and ceilings. Polyurethane wall decorations have a lower cost than decor using stone or natural wood. Installation of polyurethane products is extremely simple, for their fastening is used glue of the "liquid nails" type.
Polyurethane can be faced with both the front and the outer part of the arch. The design of the vertical part of the arch is often performed in the form of round columns.
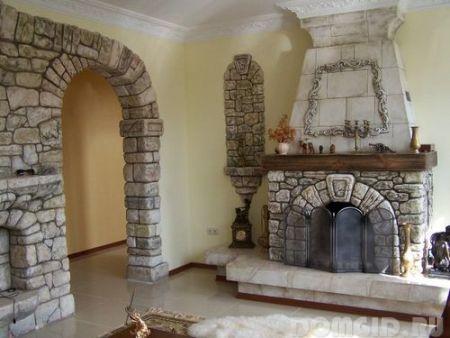
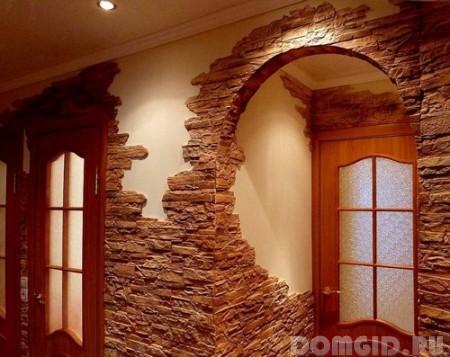
decorative and natural stone
The original look will give the arch finishing decorative stone... If finishing is done in openings load-bearing walls, then you can apply a natural analogue. You should not risk using a stone for finishing drywall surfaces - the load may be too serious for them.
The best option for drywall is artificial stone or flexible acrylic tiles, which also imitate natural material... The most popular types of stone are:
- granite and marble,
- shell rock and slate,
- travertine.
A deliberately rough or vice versa - a surface polished to a shine and exquisite shapes will give the arch a special appeal. The main thing is that the texture of the material is combined with the design style of the entire room and its functional features. Finishing natural stone is considered an elite material, its cost is quite high.
Artificial stone has a lower cost, because for its manufacture, gypsum or cement is used; for finishing the surface of drywall, it is better to choose stones made on the same basis. To reduce the weight of the material in its production, lightweight fillers are used - perlite or expanded clay. Modern technologies making artificial stone allow the production of analogs, which in appearance are almost impossible to distinguish from natural materials.
Some craftsmen make artificial finishing stones at home, for this you will need to purchase special silicone molds or make them yourself from silicone. As raw materials for the manufacture of stones, you can use balanced compositions, they are sold in hardware stores in finished form, it is enough to just dilute them with water.
acrylic tiles
A very simple and affordable way in terms of finance is gluing the surface with acrylic tiles. She can imitate texture different materials, including natural stone, clinker tiles or facing bricks.
wallpaper
This option is also quite affordable, it is advisable to choose wallpaper on a non-woven or vinyl base, they are more durable. You will also need a thick glue mixture that will allow good adhesion on the fold lines.
Arch in the apartment - how to decorate the walls around it
The design options for walls with arches can be varied:
The beauty of the arch trimmed natural stone accentuate a wall finished with textured plaster, in particular, if it is Venetian or micro-cement plaster. Of course, not everyone can do such a complex work with their own hands, you may have to contact the masters. But the results will be admirable.
The wall decoration looks good with textured, textile, fiberglass wallpaper, or veneered with stone, wood, bamboo, cork.
A combination of wallpaper with wood paneling or cheaper MDF panels is often used. Decorative molding is used to ennoble the border between materials. In general, different types of panels, including laminated, type-setting rack from lining, laminate, 3D panels, are the best suited for finishing the arched partition.
To decorate the spacious arched passage with wide walls, the same materials are used that were used to decorate the walls. In this case, you can refuse to use moldings.
Neatly executed arches decorate the room, eliminate the monotony of the wall, and zone the room. An interior with an arch loses its typical character, it allows you to easily get away from boring standards.
To avoid common mistakes:
- it will be necessary to perform all stages of work very carefully, mistakes made can lead to the need to start work from scratch,
- when choosing a finishing stone, you should pay attention to cobblestones of moderate size, rectangular and chipped tiles, imitation of sandstone or brick,
- for a better laying of tiles on an arched surface, notches can be made on the inner surface of the tiles,
- the joints should be repaired no earlier than a day after laying the tiles,
- the use of an arched plastic profile is not entirely appropriate in richly decorated interior options.
Updated:
 2016-08-13
How to make an arch in the doorway between rooms? This is not an easy task, and you will have to tinker a lot with choosing the right materials. Before starting work, it is also worth choosing the style of the future arch.
Door arches are decorative openings located between rooms. They are used as additional element interior that can emphasize the overall style of an apartment or house. A correctly chosen design will also visually increase the size of the room.
They are made from most common building materials - wood, concrete, stone and so on. Apart from their decorative function, they are no different from a regular doorway. In addition, the arch cannot always be placed where needed. Therefore, before making an arch in an apartment, you need to make sure that it will be appropriate. It is quite possible to make a door arch in an apartment with your own hands.
Before starting work, it is worth choosing the most suitable style of arch design, as well as the material from which it will be made. You can make a structure in two ways: correct the opening with tools or mount the frame.
The first option is quite laborious and requires careful measurements, detailed drawing, and cannot always be implemented.
The second method of creating arches is more acceptable to most DIYers. Having made just a few measurements, you can cut out the necessary structural details, mount the frame and secure it.
Another rather simple and affordable option can be considered the acquisition of a demountable structure. Most often it is made of polymer material, and you can very easily assemble it yourself.
Popular types and installation process
 Many are interested in making an arch in an apartment with their own hands. The design is attractive and unusual. To do it yourself is more than realistic. Collect from fiberboard or other material, decide for yourself. We will tell you how to make an arch correctly.
There are several ways to make an arch in an apartment, but it must necessarily correspond to the style and design of the neighboring rooms.
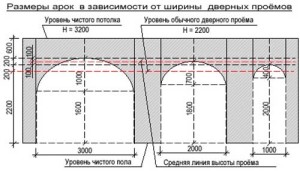
The most common and simplest type of construction is classic. The opening has rounded corners and a simple design. It can only be used when the wall height reaches 3 meters. Otherwise, it will not be possible to maintain the required radius of the upper bend, which should be equal to half the width of the opening.
Art Nouveau designs are more diverse in terms of style of execution. The main feature of this style is that the rounding radius of the upper part is always greater than the width of the opening. Art Nouveau openings are most often used in apartments.
The portal structure is a passage that visually resembles the letter "P". It does not require any special tweaks in the processing of corners, but you will have to significantly expand the passage.
After getting acquainted with the design styles, you need to consider in detail the question of how to make an arch with your own hands. In order to implement most of the ideas, you will need to significantly expand the passage, as well as get rid of the door frame. All wooden parts are removed, the hinges on which the door hung are dismantled. As facing materials of an arched opening, you can use:
- concrete;
- ceramics;
- brick;
- wood;
- polyvinyl chloride.
The surface must be cleaned, leveled and primed. All this will be needed for high-quality installation of finishing materials.
Installation of prefabricated structures is the fastest. How to assemble everything correctly? Just follow the manufacturer's directions, install the parts and fasten them together with the kit elements. Sometimes it may be necessary to create a homemade foundation.
Arch installation options
 How to make a door arch using a homemade frame? The frame elements are fixed to the walls with self-tapping screws. Most often, bent metal profiles are used as supporting parts of the frame.
The facing blank of the upper part of the opening must be bent. To do this, you will have to use a pre-made layout according to the size of the arch. The sheet is fixed on it and bent. To facilitate the shaping process, wood, plywood and fiberboard are bent using water treatment and a hot iron. GCR only needs to be moistened. The upper part is installed, then the side elements. All parts are screwed on with self-tapping screws.
Elements made of chipboard, wood and similar materials can be varnished. The most time consuming option is a do-it-yourself door arch.
- Armed with a hammer and chisel, you need to carefully round the top of the opening.
- After the opening acquires the necessary contours, you need to trim it with plaster.
- Then a layer of putty is applied.
- After the applied layers have dried, the parts are fixed with self-tapping screws or glue mixtures. If heavy facing materials are used, in addition to finishing the opening, you will have to start creating a foundation. To make it more stable, it is best to secure its elements with reinforcing inserts.
For those who are tired of boring doorways, an interesting solution can be the design of the passage between the rooms in the form of an arch. An arched opening will not only create a visual effect of increasing the area, but can also be an excellent addition to the interior of both rooms.
All kinds of arches are often used in the house. They have many advantages:
- they save space in the room, which is occupied by opening and closing doors;
- visually unite the space of the apartment, providing an easy passage between the rooms;
- visually zoning individual rooms without the help of doors, if the design concept requires it;
- make an apartment or house graceful, giving them a graceful and original look.
The main forms of arches used in living quarters
There are options for the design of the doorway, different in shape, which depend on the technical features of both rooms, which will be separated by an arch. In particular, the determining criteria for choosing the shape of the arch are the height of the ceiling and the width of the doorway. Because some are intended only for tall rooms, while others require widening of the opening. Before making an arch in the doorway, you need to carefully carry out all the necessary measurements, since the success of the entire process of the upcoming installation will depend on this.
The most common types of arches are:
- Classic (with the correct arc radius equal to half the width of the doorway).
- Art Nouveau (having a truncated arc radius that exceeds the width of the doorway).
- Romance (arches rectangular with rounded corners).
- Arch-"portal" (arches of a simple rectangular shape, repeating the shape of the doorway).
- Elliptical arches, domes, trapeziums and other non-standard arches.
- Semi-arches (arches formed by a small part of a circle with a large radius).
Any arch, made by hand or with the help of specialists, is made of: brick, stone, natural wood, plywood, chipboard or fiberboard, MDF, plastic, drywall.
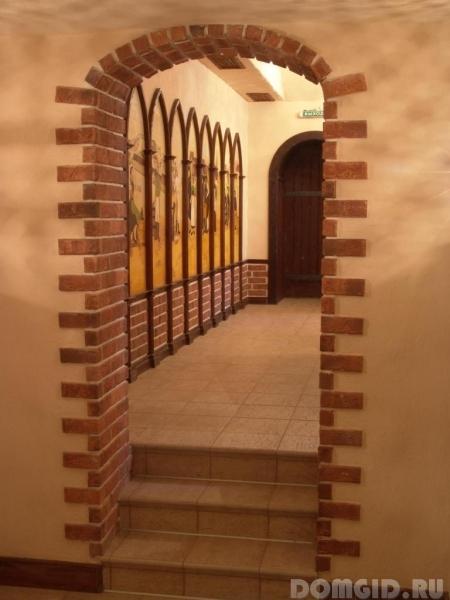
Arches made of brick, stone, concrete
Such arches in the interior look beautiful and solid, especially in the corridor or hallway, but installing an arch from these materials is not an easy task. In addition, this design is quite heavy, and this must be taken into account. Making an arch from stone or brick often requires an increase in the size of the doorway, and this is sometimes problematic.
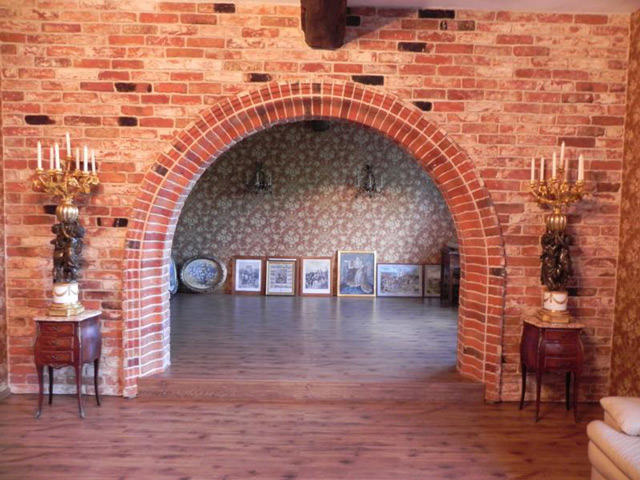
There are three main types of brick arches:
- Full, or ordinary (bricks are laid out in the form of a semicircle, the height of which is half the width of the doorway);
- Wedge-shaped (bricks in a special way, tightly laid with a wedge);
- Onion (bricks are laid along a truncated arc).
Making an ordinary brick arch is the simplest of the three described, and the wedge is the most difficult. Nevertheless, the technology of masonry is very similar in all three cases, but it requires certain skills. Therefore, before making a brick door arch, it is advisable to thoroughly study the process in theory and watch the corresponding video.
In general, the installation of an interior brick arch includes the following steps:
- design and manufacture of a template for the arch of the future arch;
- installation of a manufactured template;
- laying bricks in accordance with the selected arch shape;
- fixing the structure made;
- deleting a template;
- final finishing of the finished arch.
It is highly advisable to take into account the experience of others and not allow typical mistakes when making a brick, living room or other room:
- It is important to calculate the proportions of the future arch as accurately as possible, since non-observance leads to an uneven distribution of weight. As a result, cracks or collapse may occur.
- It is important to delete the template in time. If left on, the wood swells and does not lay properly. To avoid this, the template is covered with construction film before laying.
- You cannot use metal to make a template: the lack of the necessary elasticity prevents proper installation and uniform distribution of the load, which can lead to cracks.
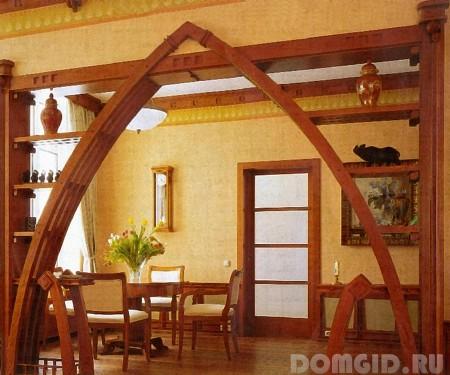
Do-it-yourself arch made of wood
Wooden arches look great in any part of the house, especially in the hallway, immediately declaring the solidity, good taste and high status of their owners. The process of making a wooden arch is not easy, it requires attention and some skill. Before you put such an arch, you need to decide what shape it will have by looking at the corresponding photos and videos.

So, for a hallway, kitchen or living room in hi-tech or minimalism style, wooden arches - "portals" are perfect. It is easier to make than other forms, but for all its simplicity, it makes the room refined and elegant. Installing an arch of a simple square or rectangular shape does not require special skills: you can connect its straight parts using staples or special glue.
Features of mounting wooden arches
Round wooden arches are created by joining individual small parts with glue or metal staples.
The process of installing a wooden arch begins with a thorough preparation of the place for it: the wall must be cleaned, leveled, and then given the desired shape for the opening, depending on the chosen shape of the arch. In the end, the size of the doorway should match the parameters of the arch.
The installation of wooden arches requires great care - both the structure itself and the part of the wall into which it is installed needs a careful attitude. The arch should fit into the opening exactly, without voids along the edge, without looking or hiding behind the edges of the wall.
At the end of the installation, finishing finished arch. Usually it is covered with paint or varnish to preserve its original appearance and mask irregularities, chips and dents.
How to make a semi-arch or arch from fiberboard or chipboard
Sheet materials such as fiberboard, chipboard or plywood are easy to install, and they cost much lower than natural wood... In addition, they are easy to trim as you wish. Chipboard or fiberboard are indispensable if you want to create a custom arch design and save money at the same time. In addition, it is not difficult to mount built-in lamps into an arch made of these materials - such an arch, in particular, in the hallway, will look very impressive.
How to make an arch in a plasterboard apartment
The easiest way. Making an arch from this material does not require special knowledge, and even not too much experienced master... Thus, it is good to make, for example, an arch leading from the hallway to the kitchen, since wooden arches are more difficult to install and they require special care in this area.
Installation of a drywall arch - the main stages
- Before making an arch with your own hands, you need to choose a project for the future arch and draw its full-size template.
- Installation of a metal profile
The best kind of profile for this is in the shape of the letter "P". In addition to the guide profile, special scissors and a hole punch are required for metal work.
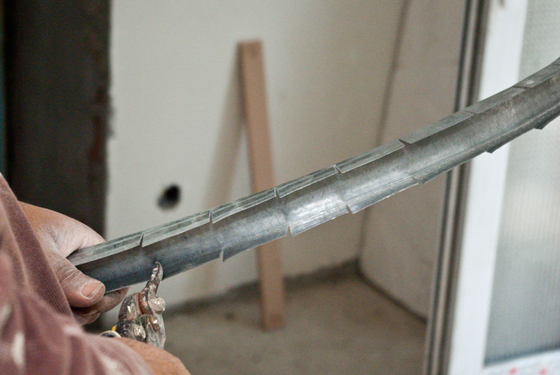
First of all, the required profile length is calculated, depending on the size of the selected arch. On the measured and cut off piece of the profile, cuts are made at a distance of about 1 cm from each other (this will help to give it the desired shape). Then, by bending the profile, an arch frame is obtained.
- Drywall preparation.
It is carefully bent to the shape of the frame. There are several ways to do this - to choose the best one, it is better to watch the corresponding video.
- Opening surface preparation
Here, you first need to level the wall, then strengthen the metal profile on both sides of the opening. Further, the previously curved part of the profile must be attached to the straight profile installed in the opening. And then assemble all parts of the arch structure and attach them using self-tapping screws.
- Finishing the finished arch in the kitchen, hallway, living room or other area of \u200b\u200bthe house
This stage includes processing with a perforated corner, sealing seams and joints of the structure, filling the arch and sanding its surfaces. Only after that, the arch in the hallway or other part of the apartment can be decorated to your liking.


