Interior decoration a log house always starts with the installation of all the necessary communications. According to the established tradition, finishing work begins from the walls, after which it moves to the ceiling, and ends with work with the floor. What will be the floor in your wooden house, it is better to take care even at the design stage of a log house - insulated or double.
Price list
| Name of works | Unit | Price |
| Wall decoration | ||
| Grinding (OCB) | m2 | 200 |
| Grinding (BRR) | m2 | 200 |
| Grinding (timber) | m2 | 200 |
| Polishing | m2 | 130 |
| Painting | m2 | t 80 |
| Painting (oil, varnish) | m2 | 80 |
| Painting from a pulivizer | m2 | 60 |
| Whitening | m2 | 80 |
| Sealing joints | m. | 90 |
| Insulation "warm seam" | m. | 90 |
| Cauliflower (OCB) | m. | 70 |
| Caulking (BRR) | m. | 80 |
| Caulking corners and ends | m. | Entrance to the station |
| Punching old material | m. | 35 |
| Decorating with decorative rope | m. | 50 |
| Aligning the ends of the log house | m. | 350 |
| Lathing (lighthouses) | m2 | 150 |
| Steam and waterproofing | m2 | 50 |
| Warming | m2 | 50 |
| Siding | m2 | 400 |
| Siding (lining) | m2 | 400 |
| Timber imitation | m2 | 400 |
| Plywood installation | m2 | 250 |
| Partition frame | m2 | 300 |
| Floor device | ||
| Installation lag | pC. | 1000 |
| Lag alignment | m2 | 200 |
| Rough floor | m2 | 220 |
| Steam and waterproofing | m2 | 50 |
| Insulation (50mm) | m2 | 50 |
| Plywood laying | m2 | 220 |
| Finishing floor | m2 | 400 |
| Skirting board | m. | 70 |
| Ceiling device | ||
| Lathing (lighthouses) | m2 | 150 |
| Steam and waterproofing | m2 | 50 |
| Insulation (50mm) | m2 | 50 |
| Lining | m2 | 400 |
| Timber imitation | m2 | 400 |
| Skirting board | m. | 90 |
| Windows, doors | ||
| I saw through the opening for the window | pC. | 1000 |
| I saw through the opening for the door | pC. | 1000 |
| Cage T-shaped | running meter | 700 |
| Antiseptic treatment | m2 | is free |
| Installation of extensions | m. | 200 |
| Cashing windows and doors | m. | 200 |
| Arrangement of decorative corners | m. | 150 |
| Window / door installation (1 unit) | 1 unit | 1500 |
Get an individual cost
Please note that in the first two years it is not advisable to carry out the interior decoration of the log house due to the shrinkage of the house. In general, the timber can dry out within five years. And since all finishing materials are fixed on the lathing, cracks, deformation and ruptures of the surface layer may appear due to shrinkage.
Interior decoration of a log house: work with walls
It is worth saying a little about wall decoration.
There are several options for wooden houses:
- ● plastic panels, siding;
- ● block house, lining;
- ● plaster;
- ● drywall;
- ● painting with paint, toning, varnishing.
Regardless of the method you choose, before proceeding with the installation of the walls, they must first be caulked from the bottom up. This is done both internally and externally. What is it for? Heat loss is significantly reduced. In addition, the tree is sensitive to insect pests, moisture, so you need to remember about the treatment with an antiseptic.
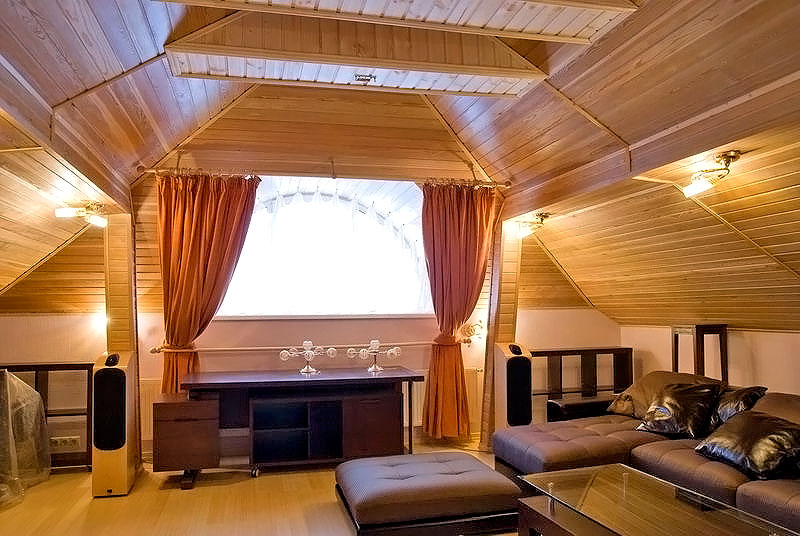
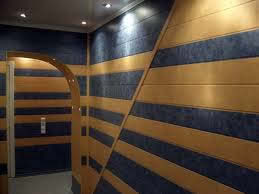
The interior decoration of a log house with a block house or clapboard is considered the most expensive, but at the same time the most desirable. It looks aesthetically pleasing, is an environmentally friendly material and, most importantly, effectively preserves the natural aura. wooden house.
Ceiling and floor: the main stages of interior decoration of a log house
Of course, the ceiling can be left in the form in which it is located before finishing work - with cracks, beams, etc. Such natural materiallike a tree, it always fits well into any interior. But the ceiling also requires finishing in order to protect the wood from dampness, mold, for decoration. What materials to use:
- ● Just like walls, the ceiling can be made with clapboard, which will further level it.
- ● Patterned and carved ceilings look great.
- ● The painted ceiling looks extremely original, especially since wood is a very grateful material with which it is a pleasure to work.
- ● It is better to install stretch ceilings in the bathroom and kitchen, since they successfully trap moisture, which is so destructive for wood.
- ● Multi-level structures on the ceiling can be created using drywall, moreover, it perfectly allows you to hide various communications.
 It is also worth mentioning those materials that should not be used. Better to learn from the mistakes of others.
These include:
- ● Plastic. It burns well and looks unpresentable.
- ● Tiled finish. This material will soon sink into oblivion. The only advantage is its low cost, due to which it can compete with other materials.
Please note that you should not use nails for fastening that are not covered with an anti-corrosion layer; for these purposes, galvanized self-tapping screws are more suitable.
If you want the room to retain the warm aura of a wooden house, then the floors are best done from laminate, boards or parquet. If this is not important, then any other materials will successfully fit into a modern country house. Particular attention should be paid to floor insulation. For this, you can use almost all existing technologies and materials for insulation.
Why choose our company for interior decoration of a log house?
Our specialists (carpenters, roofers, caulkers, grinders) do their job professionally and efficiently. Our company is chosen because we have:
- ● a guarantee for work is provided;
- ● everything is done on time;
- ● reasonable prices;
- ● payment upon completion;
- ● follow all innovations in the field of construction and decoration of log houses;
- ● free consultation of a specialist at the construction site.
After completing the long process of building a wooden house, you finally faced the question of how to complete the finishing of your log house? If you performed all the stages of construction yourself, then finishing the log house with your own hands will not be a big problem for you. This article will try to explain all the stages and features as clearly as possible, as well as give a maximum of useful tips and advice.
Advice: do not rush to decorate the house, if there is no strict need for this, it is better to wait a couple of years until the shrinkage of the log house ends, otherwise it may happen, so all your efforts will be wasted.
First of all, the finishing of a log house inside includes insulation and laying of a wooden floor, wall insulation (caulking,) upholstery and casing, door and window openings, ceiling, attic, grinding logs, etc., but we will talk about them in the next article , but for now let's discuss:
Finishing the log house inside
Today there are a large number of materials for interior decoration, we will try to highlight the main types and directions. But do not forget that finishing the building from nutria should start with covering and insulating the floor.
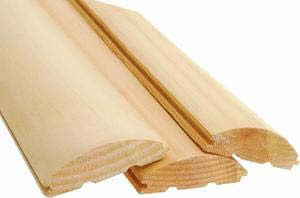
Clapboard Finish
The board, intended for covering the premises, does not exceed 220mm thick. Usually made from pine wood, less often from hardwood. According to the type of installation, it is divided into vertical and horizontal. After sheathing, this imitation of timber looks very aesthetically pleasing and stylish.
The floor of such a log house can also be made of lining or oak, more are possible simple options: carpeting, linoleum parquet. The ceiling is also made of boards.
First of all, decide which type of installation suits you best. If the building is not large, for example a bathhouse, then you can apply the vertical method of laying. Well, in the case of larger buildings, such as a summer house or a residential building, it is better to use a horizontal installation method. This is due to the small length (usually 2.5m) of the lining, and when placed horizontally in a large building, joints will inevitably appear (this problem is partially solved by placing a vertical board across 2.5m). Before starting the attachment, it is advisable to treat the board with a special mixture to protect it from moisture, insects and fire (anticheptic).
Note: at this stage you need to decide whether additional insulation walls between the walls of the log house and the wagon board. If the thickness of the board is from 180 to 220 mm, you can do without insulation
Methods for fixing the lining
The most the best option fastening is fastening to the crate (especially if a rounded log was used in the construction). The lathing is made of horizontal bars located around the entire perimeter (at a distance of 50 cm from each other) of the building and helps to achieve an even laying of the wagon board. Another advantage of the lathing is the ability to hide the wiring and pipes behind it. If during the construction of a log house a profiled beam or glued beam was used, then you can do without the lathing (the walls of such a building are quite even in themselves).
vertical installation of lining fastening with nails
Advice: it is better to carry out the wiring before the interior decoration, because during the work it can add a lot of trouble to you.
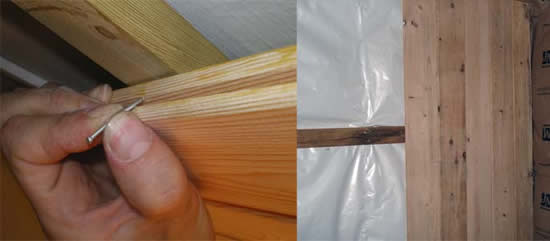
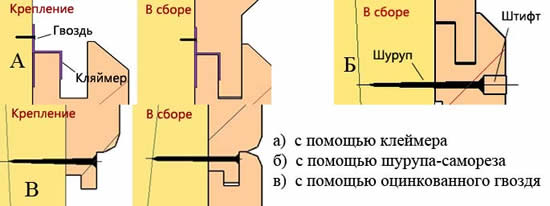
It is worth starting the installation from the corner of the building, while the installation itself will not be difficult due to the presence of a special “thorn-groove” clutch at the carriage board (it is better not to use a regular carriage board due to the difficulties when covering large volumes). This method of adhesion allows you to achieve an even and dense styling. Fixing the boards to the battens of the crate can be done in three different ways.
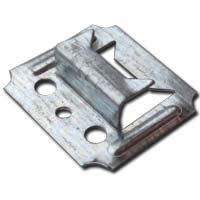
- With a special clamp (kleimer). The most preferable of the options due to the fast and most importantly high-quality grip. The kleimer is attached with one of its parts to the inner side of the groove of the carriage board, and with its other part it is connected to the batten rail using a self-tapping screw.
- With a self-tapping screw. A hole is drilled in the board about ½ of its thickness and a diameter of the size of the head of a self-tapping screw. Next, a screw is screwed into the hole, and the hole is closed with a pin, after which it is sanded until the pin is completely aligned with the board. The main disadvantage is the rather large amount of time required for installation.
- With a galvanized nail. The nail is tilted at 45º into the “groove” and carefully hammered in (Fig. Above), the head of the nail must be recessed, so as not to interfere with the lock when engaging. The disadvantage of this option is a large percentage of the "groove" chip and, accordingly, a large number of rejects.
- Natural appearance
- Additional insulation
- Environmentally friendly material
- Ease of installation
- Quite high price
- The need to treat the board with a mixture of various harmful factors
DIY Block House decoration
The option of finishing a log house with your own hands with an imitation of a solid log can be presented as a wagon board (imitation of a rounded log) or as separate panels resembling a profiled bar. A very spectacular look and the original Russian design of such a finish makes it one of the most common options.
If a wagon board is used with a block house, then the installation process is no different from the above (I think it is not worth explaining that with a block house only the horizontal type of laying is applicable). Boards in the chosen way are attached to the crate (vertical bars located every 50-60 cm), the boards should be laid from the bottom up. Remember, the last board will almost always be trimmed a little and will not be as noticeable at the top.
If you decide to use ready-made panels, then the installation process will take much less time and labor costs. Such panels are also attached to the lathing, but the finished structure looks less natural.
- Beautiful imitation will create the feeling of a real hut
- Provides the ability to hide communications and insulate walls
- Great for different types interior
- Easy and reliable connection
- High cost
- If installed incorrectly, the panels look unnatural
Decorating a log house with plasterboard, how ridiculous it sounds, but still appropriate
A very versatile option. But applying it to a log house is simply ridiculous, it will ruin the whole impression of the house and nullify its wooden primordiality. However, anything can happen in life, and it is possible that the combination of external antiquity and internal modernity was originally envisaged by you.
For this style, it is better to use a floor made of carpeting or parquet. The ceiling can either be sheathed with plasterboard or hinged.
Plasterboard installation
With this option for finishing a log house with your own hands, you need to make a crate with a U-shaped profile along the entire perimeter of the building. Next, it is worth dissolving all the wiring (if it has not yet been done) and, in cases of need to insulate the walls (glass wool between the drywall and the wall of the log house is perfect). One of the main advantages of this finish is the ability to make projections and recesses in the wall (thanks to the versatility of the profile and drywall). Which in turn will allow you to hide pipes and batteries, make a niche in the wall for a TV and refrigerator, etc.
Fastening of drywall to the profile is done using self-tapping screws. After fastening, it is imperative to putty the joints to level the walls. Further, your imagination is limitless.

- Almost limitless possibilities for giving the walls the desired look
- Simplicity and ease of installation
- Low material price
- A very original combination of past and present
- Kills the atmosphere of antiquity
- Requires additional insulation
- Weak resistance to mechanical damage (and it is very difficult to drive a nail into such a wall)
- Relative fragility (15-20 years)
The log house itself is the best finish
If the inner side of the timber itself looks respectable and beautiful, and no mistakes were made during the construction of the log house and it is warm enough, then you can completely do without additional finishing.
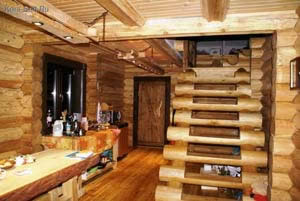
It is better to make a wooden floor from parquet boards, or lining. The ceiling should also be trimmed with wood.
In the case when the blockhouse was built from rounded logs using the "in a bowl" technology, it is enough to simply cover the surface of the tree with a protective varnish - it looks great. In such cases, the wiring must be laid along the floor and corners of the building, covering it, for example, with a plinth. It is better to run the pipes under the floor, and those that are visible from the outside can be beautifully finished with a carriage board frame.
For a log house, chopped "in the paw" with a flat inner wall (if necessary, the wall can be trimmed with a workbench) the option of painting in the color you need is suitable (white or chestnut color will be, it looks the best).
Tip: putty the walls before painting - this will cut out knots, cracks and chips in the timber.
- There is no need to wait for the log shrinkage
- Minimum finishing costs
- Prostate of work
- Beautiful and natural look of a bar or log
- You will not be able to achieve a perfectly flat wall surface
- Difficulties in covering communications
- Limited design choices
- The need to periodically update the finish (approximately every 4-7 years)
Log putty
Mainly used for brick walls... It can be used as an option for interior decoration of a log house. To do this, use an acrylic or mineral plaster mixture for wood. This technology protects the tree well from moisture and other harmful factors. With the help of special additives, you can give it the desired color and shade. Plaster is applied to a special mesh attached to the log house with self-tapping screws. Align the walls with plaster, you can hide wires and telephone cables under it. You can also easily hide all kinds of chips and cracks in a bar or log. In general, during construction, be sure to have with you, for every fireman, to disguise the "jambs"
The floor can be chosen according to your preference, although it is wooden flooring will look out of place. The ceiling can also be anything, stretch ceilings and drywall are best suited, although you can make a putty and the ceiling itself.
- Cheapness of materials
- Minimum knowledge and skills in finishing
- Speed \u200b\u200band ease of the process
- Wide range of different shades
- Fragility (re-putty will have to be carried out every 5 years)
- A very ordinary look, it may not look harmonious in a log house.
- Difficulty hiding some communications. The pipes will be visible and aesthetic solutions to this problem are unlikely to be found.
Plastic finish
The use of plastic for finishing a log house with your own hands can be considered as an option for part of the premises, decorating the entire log house with plastic will be a real blasphemy. Plastic will be acceptable, for example, for a loggia, a balcony, any closet or closet. The bathroom and toilet can also be covered with plastic.
The floor covering option can be very diverse and completely depends on your preferences and in which room the plastic is laid (tiles are suitable in the bathroom, etc.). The ceiling can also be sheathed with plastic, or use suspended ceilings.
Installation of plastic
There is, as is the case with the clapboard, a vertical and horizontal method of laying. Consider the more common vertical. The plastic installation process is in many ways identical with the wagon board. From the beginning, a frame is assembled, on which plastic panels will be attached. Further, in the upper and lower parts of the lathing, special profiles (molding) are attached, into which plastic will then be wound according to the "thorn-groove" principle.
Advice: the plastic panel should fit tightly into the molding, but do not force it into it, this can lead to both deformation of the panel (the panel can become a "wave"), and the skew of the molding itself, due to which the subsequent panels will not sit tightly.
Laying of plastic panels is carried out from the corner of the building, the panel is inserted from the beginning into the molding and then interlocked by means of a “lock”. Fastening to the lathing bars (profile) is carried out by means of nails and self-tapping screws, which are driven into a specially provided section of plastic called the "fastening tail". For a better connection between the panels, you can use special glue or liquid nails.
- It is easy to hide various communications and insulation elements behind plastic.
- Cheap and practical material.
- Parts are easy to assemble and cut to size.
- The variety of colors makes it possible to combine different options, creating contrasting and beautiful patterns.
- Not the most suitable option from an aesthetic point of view
- Good flammability of plastic
- Weak resistance to mechanical damage (although it is worth noting that the damaged area plastic panel can be easily replaced)
Finishing a log house with a rope
This is a decorative option for interior decoration, in which the main consumable material is a special rope or rope (jute). This option is applicable only to a log house made "in a bowl" and preferably from a rounded log (if a regular timber was used, then the effect of such a finish is much lower).
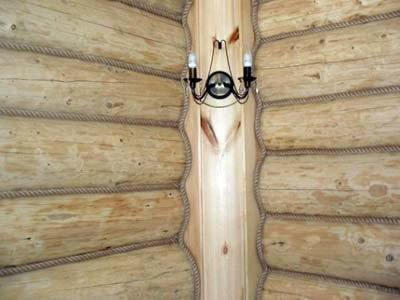
The work on improving the home should be started only after all necessary work with a bar (antiseptic treatment and grinding). As finishing material a decorative jute rope is used, which fits into the crowns of a log house and also performs a protective role. Jute rope prevents moisture and wind from entering the house and also helps keep warmth inside.
For this design, an oak floor or parquet board is suitable. The ceiling should be sheathed with a wagon board.
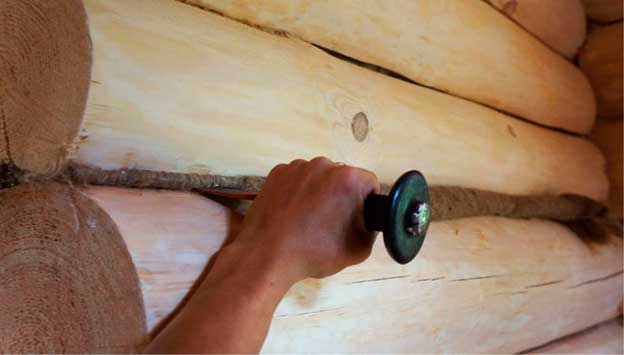
How to fix the rope?
It is worth starting work on finishing inside after the log house has settled a little and dries up (not earlier than a year after construction). There are several ways of laying a rope in a crown: using glue, staples or special nails with plastic caps.
Tip: treat the rope with special antiseptics shortly before installation.
Measure and cut off the required part of the rope, the edges of which, in order to prevent their dissolution, should be wrapped with threads and treated with glue or varnish. It is best to fasten the rope to the timber using a special glue, for this, apply a thin layer of glue in the place where the rope will be laid, carefully check the fastening in the corners of the frame.
Note: hot glue is applied to the logs with a gun, do not use ordinary glue and do not try to apply it in a handicraft way.
- Very original and mesmerizing appearance
- Low cost of consumables
- Additional protection of seams and log joints from wind and moisture
- A very painstaking process of laying the rope (haste and carelessness can lead to unpleasant consequences)
- With this form, there is no way to additionally insulate the walls with other materials.
- It becomes almost impossible to hide wiring and other communications.
Tip: Posting can be done by lower crown walls and corners of a log house, when laying a rope there, instead of nails, use small staples so as not to damage the wires.
Conclusion: it is the interior decoration of the log house with your own hands that will allow you to fully show your talent in design and realize your building potential. In it, you can apply a variety of methods and combine existing ones to create a non-repeatable interior and style.
Do you need a high-quality, reliable and aesthetically attractive finishing of a log house in Moscow? Contact Rmi-Stroyprofi LLC. Our company employs 5 teams of qualified carpenters with eight years of experience. Our specialization is wooden houses. We fulfill orders quickly; you receive the quality guarantees specified in the contract.
What is the finishing of a log house?
Turnkey log house finishing - a set of measures that is carried out to improve technical characteristics and the exterior of the building. It includes many stages, from polishing the log house to internal and external cladding with special materials.
A wooden house needs to be finished when it gives the main shrinkage - a year after construction. Usually, all work begins one year after construction. It is advisable that all activities take place during a warm and dry season. The best option is summer.
Grinding and polishing
Grinding and polishing is the first step of internal and exterior decoration log house. This procedure is the removal of the upper darkened layers of wood. Grinding of a bar is performed with an eccentric machine, logs - with a grinder, and its polishing is also carried out with an eccentric machine. For processing, discs with grain numbers 60-80 and 100-120 are used for the first stage and polishing, respectively. The house is polished both outside and inside.
Grinding has great importance, since it simultaneously performs several functions at once:
- protects wood from fungi and mold, since harmful microorganisms are removed along with the upper layers of the material;
- gives wood an aesthetically pleasing appearance, highlights its structure and returns a natural, even color to the crowns;
- increases the adhesion of wood, improving its adhesion to paint / impregnations, and ensures uniform application of products.
Plus, sanding and polishing just enhances the look of the entire building.
Cauliflower
Caulking - the second stage of finishing wooden frame outside and inside. This is the filling of the gaps formed as a result of shrinkage in the places of inter-row and corner joints. Jute, flax, moss or "Warm seam" sealant are used as insulation material. The latter is very durable, elastic, environmentally friendly and does not allow moisture to pass through.
Each gap in the joints is filled with the selected material: both between the crowns, in the area of \u200b\u200bthe grooves, and at the corner. Caulking is carried out immediately around the entire perimeter, outside and inside, starting from the lower rims.
Well-made caulk:
- prevents wood from rotting, as it does not let moisture into the gaps;
- significantly insulates the home, since cold air does not enter through the cracks, thereby reducing heating costs.
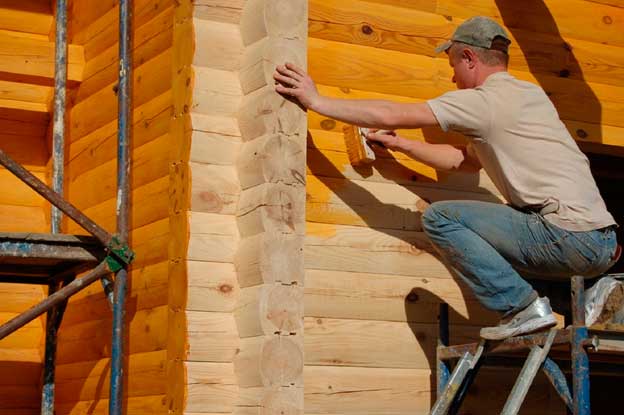
Log painting
The interior decoration of the log house and its external "transformation" is impossible without painting. The tools used often simply emphasize the natural texture of wood and reliably protect it from the effects of the external environment. A simple treatment of the log house with antiseptics and fire retardants is possible - these substances reduce its flammability, protect against decay, mold, and insects.
The paint is applied with brushes along the grain of the wood. This method of application ensures "rubbing" of the product into the wood structure: the paint penetrates into it, which ensures the durability of the coating. You can use alkyd, acrylic, water-based paints or natural oils. The latter are durable, evenly applied and retain the natural breathability of wood.
Painting a log house or treating it with protective equipment:
If there are blue spots on the log house, bleaching is performed. Removing stains is necessary so that the paint lays down evenly, you get an even color.
Exterior decoration of the house
The exterior decoration of a wooden house is done when the owner does not want to leave the traditional color of the building. In this case, the wood must be pre-treated with protective agents, after which finishing materials are mounted on it.
The market offers many solutions: vinyl siding, stone panels, facing bricks, block house, lining. The choice of materials is based only on your preferences and material capabilities. Each of them has its own advantages and installation features.
External finishing of the house:
- changes the appearance of the log house;
- provides additional hydro, steam, noise and heat insulation.
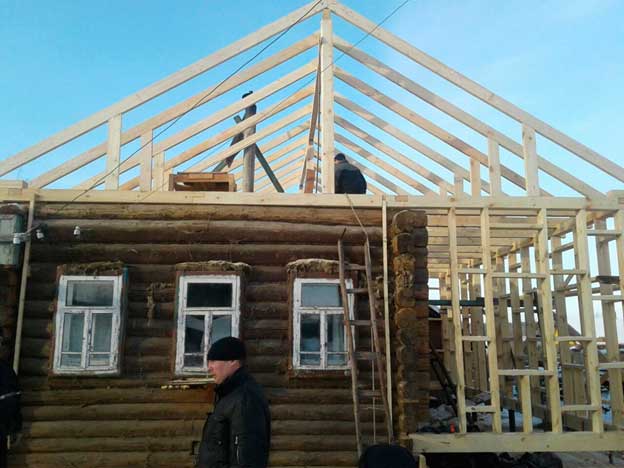
The difference between a log house without finishing and with it is obvious. For example, in this photo - the initial stage of exterior decoration.
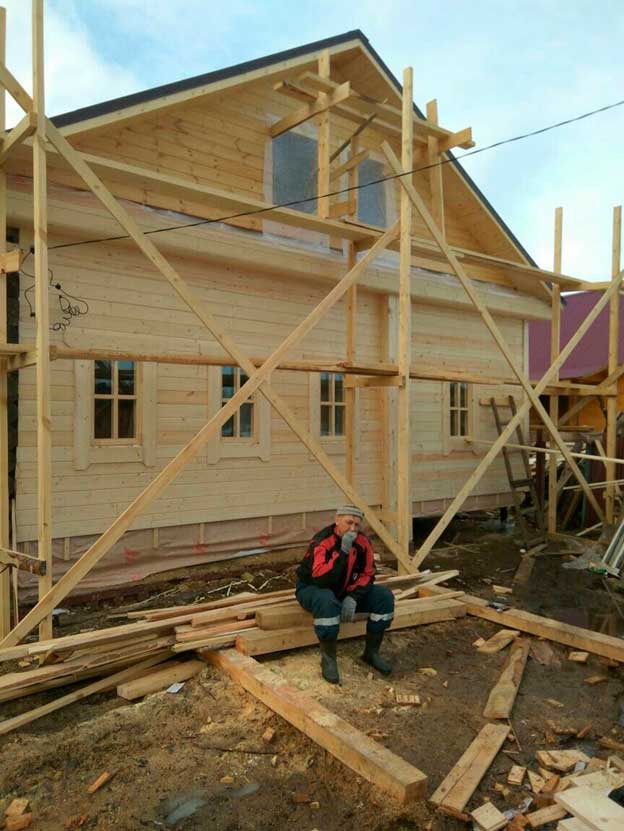
And on this - already the final stage of finishing:
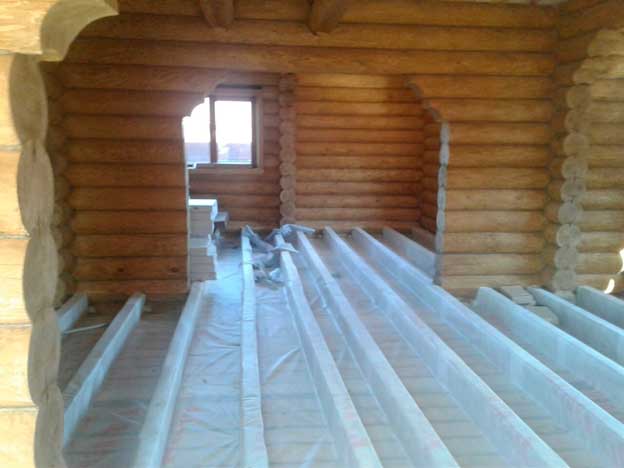
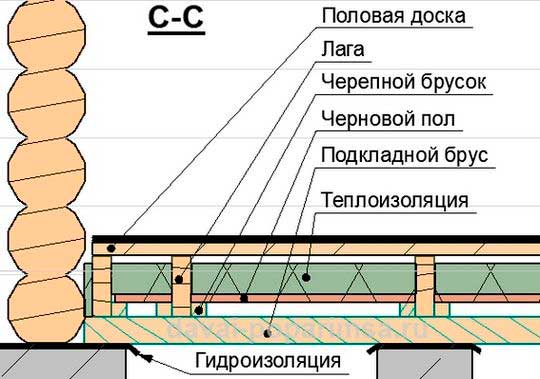
Floor installation
Internal finishing of a log house begins with the installation of a log. The subfloor is usually mounted from materials that can withstand high loads: beams with a section of about 100x150 or 100x200 millimeters. Several layers of insulation must be laid on the sub floor, and sometimes additional waterproofing. Mineral or basalt wool... After that, the final version is mounted.
The finishing floor in the finishing of a log house can be made of a variety of materials. Usually, in traditional solutions, grooved boards are used, which are additionally treated with protective materials and are painted (varnished). Parquet, laminate, tile, planed boards and other materials.
Installing a floor in a wooden house reduces heat loss due to additional insulation.
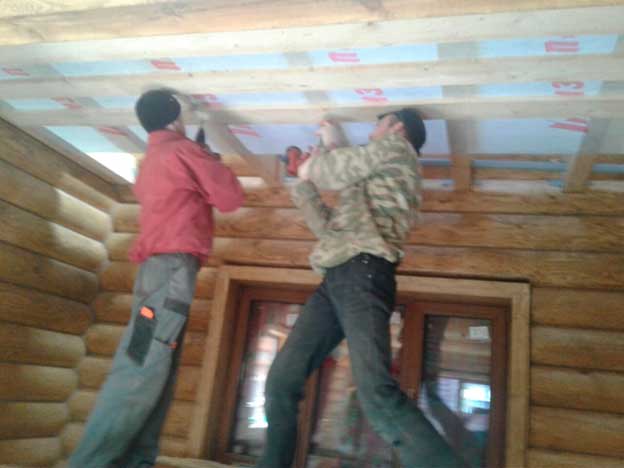
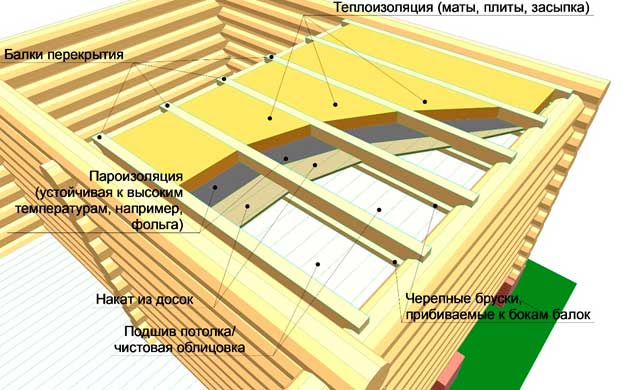
Installation of the ceiling and interfloor floors
Finishing a log house inside also includes the arrangement of a canvas or interfloor overlap. Beams and other elements supporting structure can be covered with various materials: boards, suspended or stretch ceiling, special finishing tiles. The choice depends only on your design preferences.
The main purpose of the ceiling is to create an aesthetically pleasing interior. If mounted interfloor overlap, it serves as a floor for the second floor and provides additional sound insulation between floors.
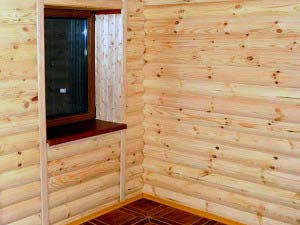
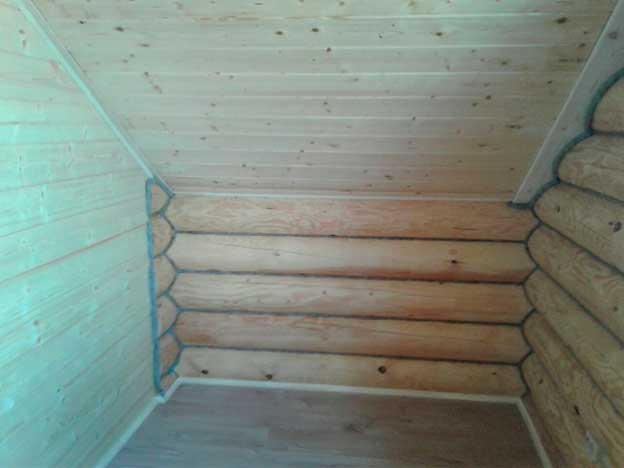
Internal finishing of a log house
From the inside, the walls of a wooden house can also be finished with various materials. Can be used: lining, imitation of a bar, standard painting, special decorative panels and many other materials. Most of them will require preparatory work.
The interior decoration of the log house is also intended to improve the interior. It is selected depending on what kind of design you want to create.
Additional services
In addition to the main stages of log house finishing described above, we provide additional services:
- punching old insulation material with caulking;
- finishing of joints with decorative rope;
- alignment of the ends;
- laying plywood with or without cutting;
- installation of OSB;
- laying tiles;
- installation of ceiling and floor skirting boards;
- installation of frame partitions;
We also provide engineering services. We equip water supply, heating, sewerage and drainage, as well as install electricity.
Why contact us?
We offer a reasonable price for turnkey log house finishing and provide you with comfortable cooperation. In LLC "Rmi-Stroyprofi" a formal agreement must be concluded, which spells out your guarantees. We do not violate deadlines, we use high-quality certified consumables, and we also comply with all the standards prescribed in GOSTs and SNiPs: for this customers love us.
Call or email us for details. The price for finishing log cabins is indicated in the price list.
Price list for finishing work of a wooden house
| Finishing a wooden frame | ||
| Round log grinding | m² | RUB 220.00 |
| Manual felling log grinding | m² | RUB 230.00 |
| Grinding timber | m² | RUB 230.00 |
| Glued laminated timber grinding | m² | RUB 230.00 |
| Polishing | m² | RUB 120.00 |
| Brush painting | m² | RUB 70.00 |
| Painting (oil, varnish) | m² | RUB 80.00 |
| Whitening | m² | RUB 60.00 |
| Painting (base, antiseptic) | m² | RUB 60.00 |
| Warming to sealants (warm seam) | m. | RUB 80.00 |
| Caulking (rounded log) | m. | RUB 70.00 |
| Caulking (manual felling log) | m. | RUB 70.00 |
| Caulking corners and ends | m. | RUB 100.00 |
| Punching old material | m. | RUB 30.00 |
| Decorating with decorative rope | m. | RUB 40.00 |
| Aligning the ends of the log house | m. | RUB 300.00 |
| Finishing work | ||
| Clapboard decoration (walls) | m² | RUB 350.00 |
| Clapboard decoration (ceiling) | m² | RUB 400.00 |
| Imitation timber finish (wall) | m² | RUB 400.00 |
| Imitation timber finish (ceiling) | m² | RUB 500.00 |
| Block house decoration | m² | RUB 450.00 |
| Finishing block house with cutting corners of 45 degrees | m² | RUB 550.00 |
| Clean flooring, tongue-and-groove board | m² | RUB 450.00 |
| Sub floor device | m² | RUB 200.00 |
| Draft stream device | m² | RUB 200.00 |
| Plywood laying | m² | RUB 200.00 |
| Laying plywood with cutting | m² | RUB 250.00 |
| Installation of OSB | m² | RUB 250.00 |
| Installation of skirting boards (floor) | m. | RUB 70.00 |
| Installation of plinth (ceiling) | m. | RUB 80.00 |
| Installation of beacons under the cladding with plane alignment | m² | RUB 150.00 |
| The device of frame partitions | m² | RUB 400.00 |
| Installation of logs (floor, ceiling) | m² | RUB 300.00 |
Prices for other works can be found


