Arrangement autonomous sewerage - the only solution to the issue of waste disposal for owners country houses in the absence of the opportunity to connect to central communications. One of the key stages in the arrangement of the system is the design and digging of a cesspool. Consider how to dig a hole for the sewer and what points should be considered when arranging a sewer trench.
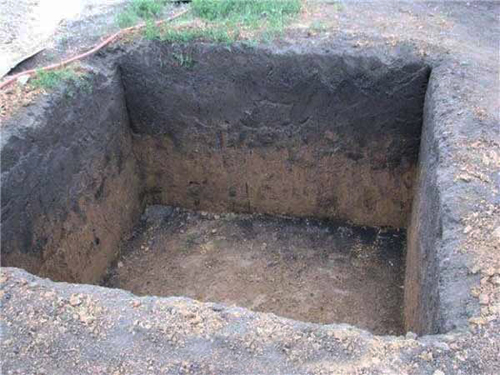
The simplest version of a cesspool is a recess dug in the ground, the walls of which are lined with moisture-retaining material, and the earthen floor acts as a natural filter.

The main purpose of the cesspool is the accumulation and disposal of wastewater
The anaerobic bacteria living in the soil cleanse wastewater from contamination, thereby providing natural filtration. But the arrangement of such a cesspool is possible only if the daily "portion" of wastewater does not exceed the volume of 1 cubic meter. This point is clearly spelled out in SNiP 2.04.03-85.
When a larger volume of effluent enters the cesspool, the filter layer becomes silted up, and the dirty water simply does not have time to cleanse itself, seeping into the adjacent groundwater. This is fraught with the fact that during the operation of the system, the water from the adjacent water wells and wells within a radius of 30 meters will be poisoned and become unfit for drinking.
The main types of septic tanks
The principle of operation of septic tanks is based on the fact that the waste entering the septic tank goes through several stages of purification. First waste water from sewer pipe enters the container, where heavy effluents settle at the bottom, and light suspensions form a thin film on the surface.
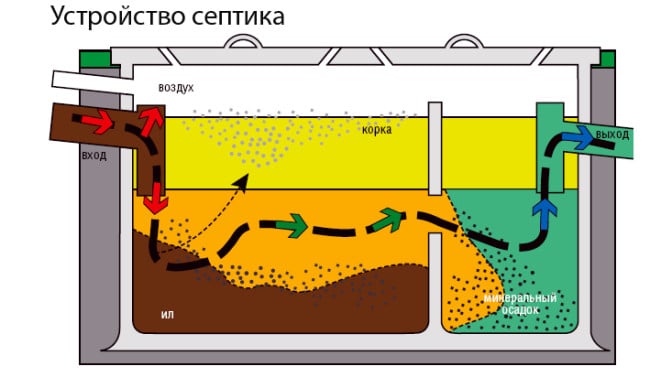
Due to natural precipitation, the liquid is purified by 40-50%
The clarified part of it goes to soil purification. In the drainage well, the liquid undergoes final filtration.
There are several types of septic tanks:
- Single chamber. It operates on a cumulative basis: the larger the volume, the less often it is necessary to pump out. In the design of such a structure, the absence of a concrete bottom is allowed.
- Two-chamber. The effluent flows first into the first chamber, where the heavy fractions settle and settle. The settled particles are processed by bacteria into sludge, and the clarified liquid enters the filter well. Such drains are pumped out 1-2 times a year.
- Multi-chamber. The most advanced option in terms of waste disposal. The drains entering the septic tank, alternately flowing into adjacent chambers, are decomposed by bacteria. As a result, at the final stage, the liquid with the minimum level of concentration of suspended solids is absorbed by the soil, bypassing the layer of filtered material.
Water from multi-chamber septic tanks is used for domestic needs and drained into nearby reservoirs
How to properly dig a cesspool
When choosing the type and optimal option for arranging a cesspool, they are guided by a number of factors:
- Daily rate of water consumption for all inhabitants of the house.
- Features of the terrain.
- Level and movement groundwater.
- The depth of soil freezing.
- Availability of conditions for the entrance of sewage equipment.

The capacity and dimensions of the cesspool directly depend on the number of people living in the house and the frequency of using the sewer system
When arranging houses of suburban areas intended for seasonal stay, a pit with a volume of 2 cubic meters is quite enough. meters. For houses year-round residence a more capacious building with a volume of 6 or more cubic meters will be required.
Important! When calculating the volume, it should be borne in mind that, on average, about 150 liters are consumed per day per family member. If we take into account household appliances, after which wastewater will rush into the same pit, then the daily volume can be safely increased to 400-500 liters for each family member.
Knowing the volume of the pit, it will not be difficult to calculate the dimensions of the container. To do this, use the formula V \u003d a × b × h. Where parameters "a", "b", and "h" correspond to the length, width and height of the pit. So, for example, to equip a receiver with a capacity of 6 cubes, you will need to dig a hole with a depth of 1.8 meters with a length and width of 2 meters.
When determining each of these parameters, several criteria should be followed:
- so that the depth of the groundwater is below the bottom of the excavated pit;
- the volume of the pit being built should not exceed the capacity of the cistern of the sewage equipment, which will pump out the wastewater.
When determining the dimensions of the pit, it should be borne in mind that its size should be slightly larger than the septic tank being built.
Video: how to calculate the volume of a septic tank
Determine the location of the pit
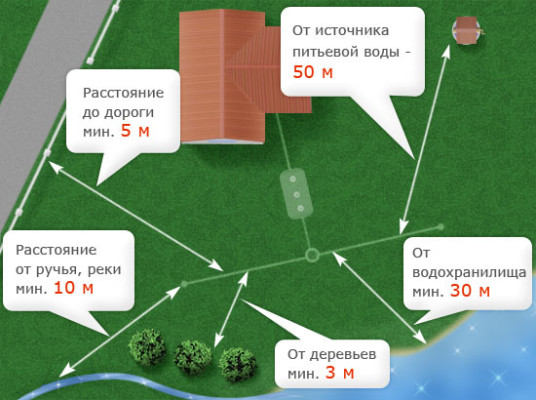
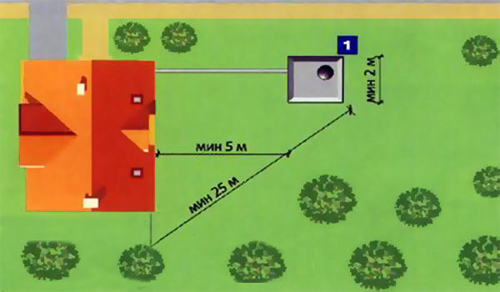
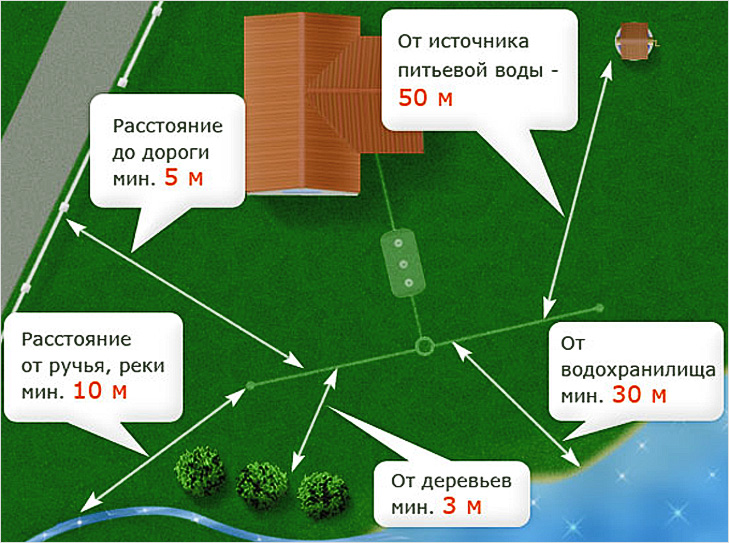
When choosing a place for a cesspool, one should focus not only on the terrain, but also take into account a number of points:
- the distance from the septic tank to the foundation of a residential building must be at least 5 meters;
- the distance from the fence should be 3 meters;
- the radius of the distance to the nearest well or well must be at least 25 meters.
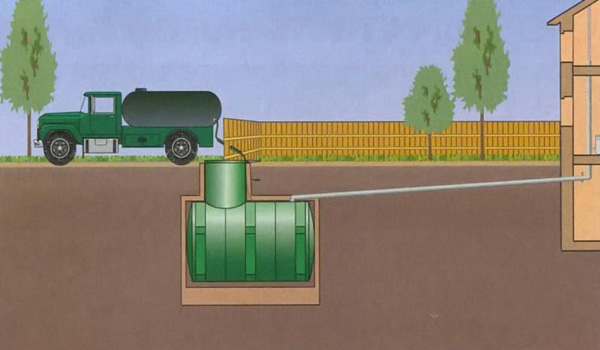
The key point when choosing a place for digging holes for the sewer is to ensure free access for the entrance of sewage equipment
The standard length of the sewer hose is 7 meters, three of which will be immersed in the pit. Consequently, the car should approach the well at a distance of 3.5-4 meters.
An important point! If the site is located at a slope, the sewer well is installed lower down the slope relative to other objects.
The load on the area under which the drive will be placed should be minimal. For the same reason, a sump should not be placed under a car driveway.
Choosing building materials
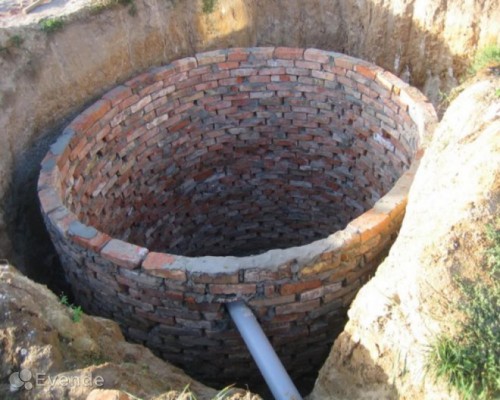
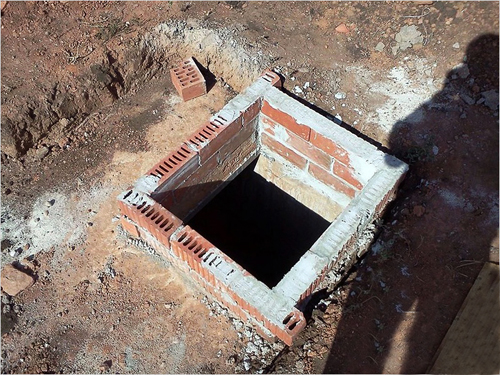
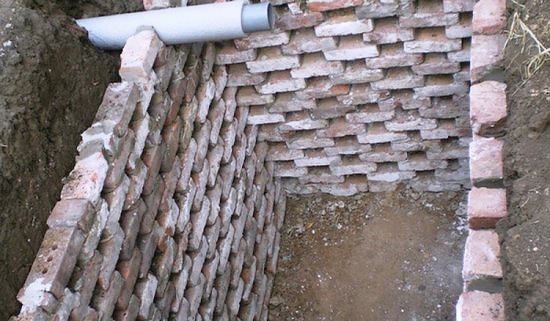
The simplest option for arranging a cesspool is to clad the walls with brickwork on a cement-sand mortar.
You can also use as storage capacity:
- Polypropylene tanks and Eurocubes. Capacities are different sizes and configurations. They are sold in hardware stores.
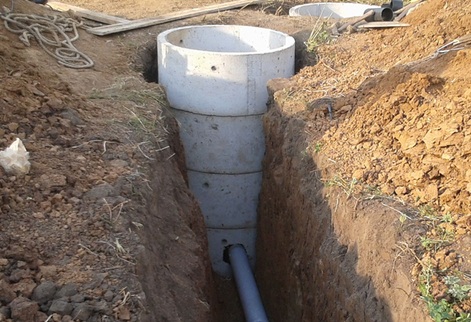
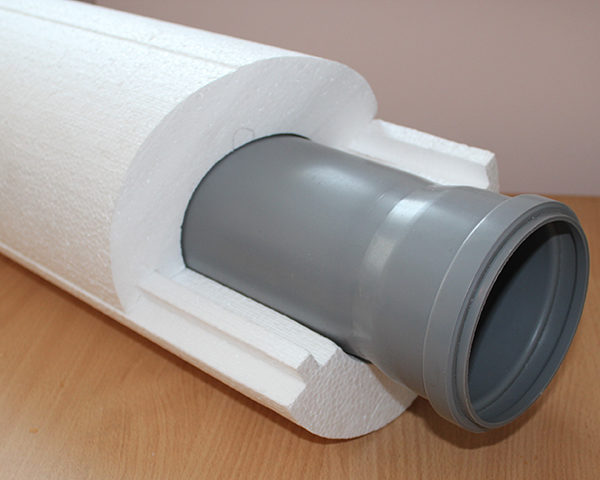
- Iron concrete rings factory-made, equipped with ventilation holes. They come in round or oval sections.
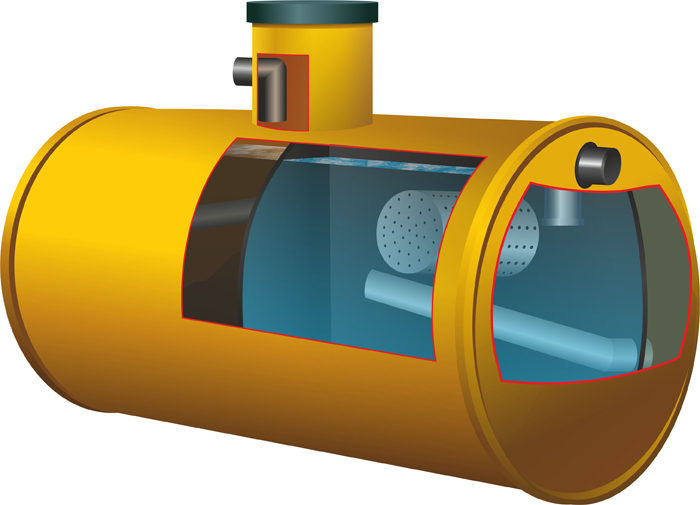
![]()
Lightweight and easy-to-install polymer containers are resistant to aggressive environments
To dig a hole for the sewer, you can use the means of small mechanization or do all the work on your own. The method of excavation should be chosen based on the cost of renting special equipment and the availability of free space for its entrance.
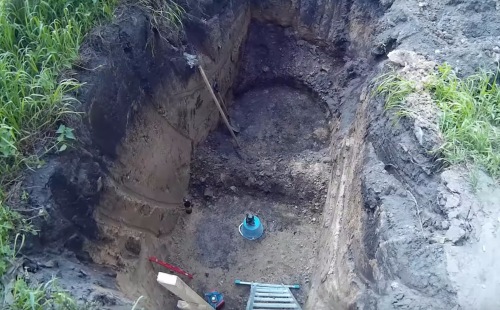
Digging a pit for a sewer well
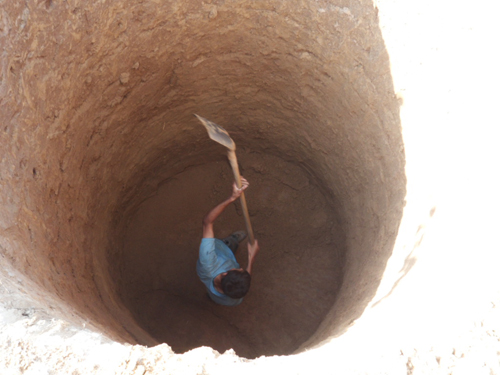
Having decided on the location of the pit, they begin to dig a pit. In most cases, it has the shape of a parallelepiped or a cube, the only exceptions are pits for installation reinforced concrete rings.
Video tutorial: how to dig a circular cesspool
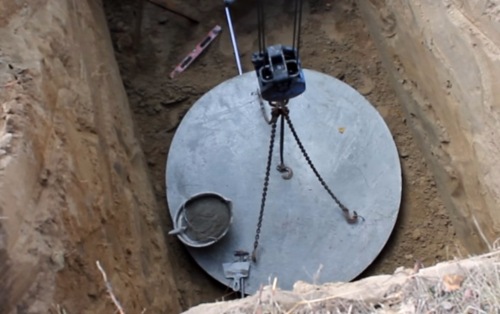
Engaging to accomplish earthworks special equipment, it should be borne in mind that the dimensions of the pit dug by the bucket are likely to exceed the dimensions of the tank, which will act as a septic tank. The subsequent installation of the same concrete rings, the weight of which is at least 400 kg, will be fraught with certain difficulties. Therefore, to carry out this kind of work, it is also worth using a crane with a long boom reach.
A few tips when ordering special equipment:
- To dig a pit with a depth of 3-3.5 meters and a width of 2-2.5 meters, it is better to order a small excavator equipped with a boom with a telescopic extension.
- By ordering an excavator that performs excavation work near your site, you can save on transportation time, which is also included in the hourly payment for the equipment.
- When ordering an excavator with a front digging bucket, you can immediately distribute the soil removed from the pit evenly over the site.
Advice! If you plan to take out the soil extracted from the pit outside the site, do not forget to leave some soil to fill the voids between the walls of the pit.
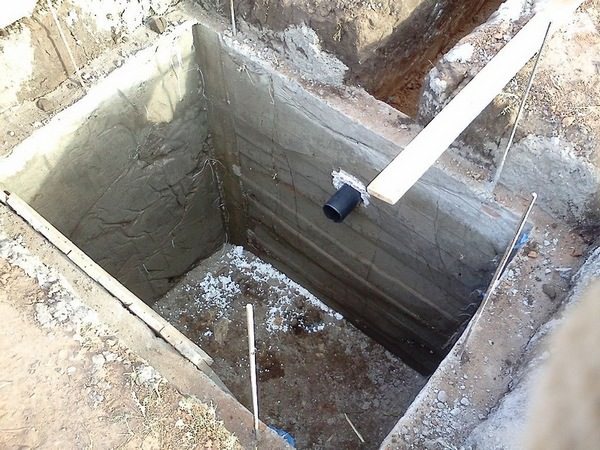
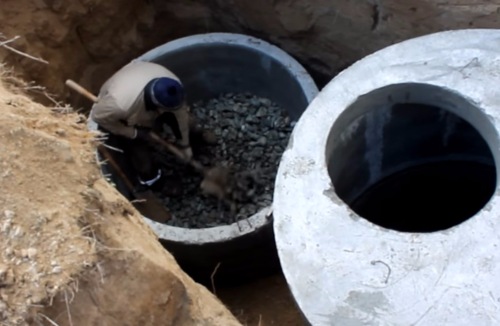
We equip the bottom and walls of the pit
The bottom of the dug pit is leveled and tamped. For the arrangement of the drainage base, the bottom is lined with a layer of crushed stone 30-40 cm thick. It is better to use large-fraction crushed stone. It is advisable to fill the voids between it with river sand.
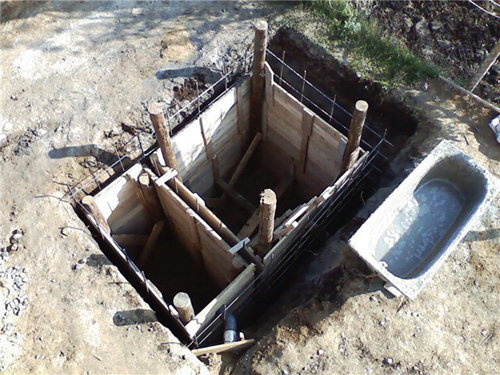
For construction concrete base, from reinforcement mesh make a grid measuring 20x20 cm.It is laid on a leveled area and poured with a concrete mixture 20 cm thick.
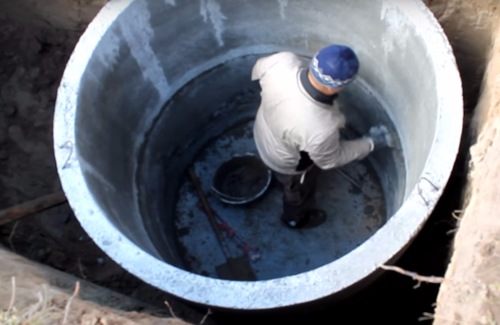
When the concrete has acquired the necessary strength, they begin to clad the walls. They are laid out along the perimeter of the concrete substrate.
The walls of the well can be made of brick or natural stone
Tip: using old brick for masonry, you can save on building material without compromising the strength of the structure being erected.
When arranging the walls, you need to leave about 20 cm of free space to the ground. Subsequently, it will be filled with rubble, river pebbles or small construction waste. A feature of the masonry is the presence of through voids between the stones. To protect the "windows" from the ingress of floating fractions, upon completion of construction, it is advisable to install polymer or galvanized boards with niches around the perimeter of the structure.
The masonry is carried out without reaching 80 cm to the ground level. A slab is built a little higher, creating it from a reinforcing mesh or using a concrete slab for this purpose. When arranging the floor, it is important not to forget to provide holes for pumping out the contents of the pit.
When constructing a drain pit with a double sump, not reaching 2 rows to the level of the drain pipe, overflow channels are installed. They are constructed from plastic sewer pipes D 95 mm.
The neck of the structure should be covered.
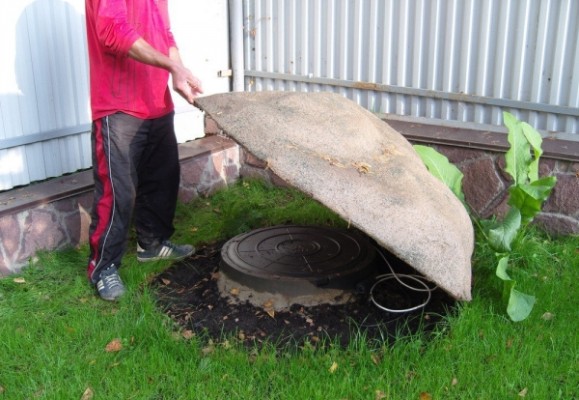
The hatch can be purchased ready-made or built from scrap materials
Important! The head of the sewer well should be located on an elevation. This solution prevents the penetration of rain and melt water into the sump.
We lay ventilation and waterproofing
It is worth approaching these stages of work with all responsibility, since they directly affect the normal operation of the sewage system.
To arrange waterproofing, pieces of roofing material are laid in the gap between the masonry and the ground. The remaining gap is filled with pieces of construction waste or rubble. As waterproofing materials you can also use:
- bituminous mastic;
- liquid glass;
- polymer compositions.
When using metal tanks from under the same fuels and lubricants as a storage tank for arranging a cesspool, do not forget to treat the outer surface with an anti-corrosion compound or bitumen.
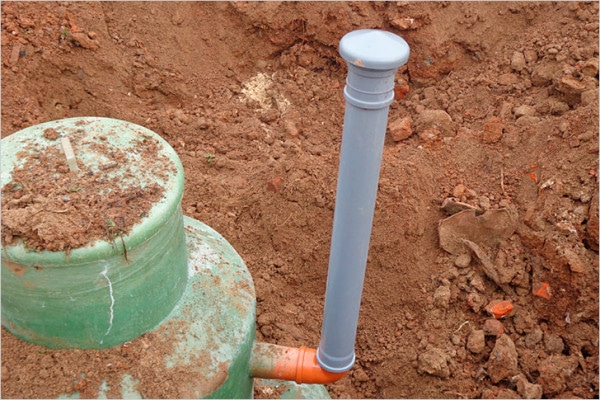
The technology of the ventilation device is reduced to connecting the waste pipe of the structure to the ventilation riser
For this purpose, it is better to use a pipe with a diameter of 100-110 mm. PVC pipe installed vertically, placed along the rear wall of the structure so that the lower part is above the wastewater level. The upper end of the pipe must rise above ground level by at least 60-70 cm.
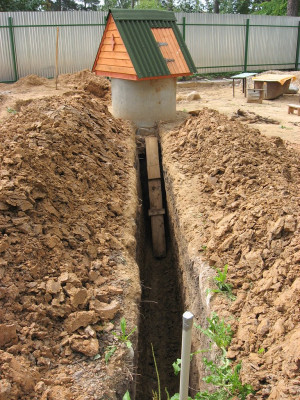
Installation of a trench for a sewer
The sewer pipe supplying waste water from the house to the cesspool must be laid in a trench. Its depth is at least one meter. This will eliminate problems with freezing even with a strong drop in temperature in winter.
You can dig a trench on your own or with an excavator.
The bottom of the trench must be flat so that the pipe does not have sagging along its entire length.
The width of the trench is on average 0.5-0.7 meters. But if the work is performed by an excavator whose bucket width is at least 80 cm, the trench is wider.
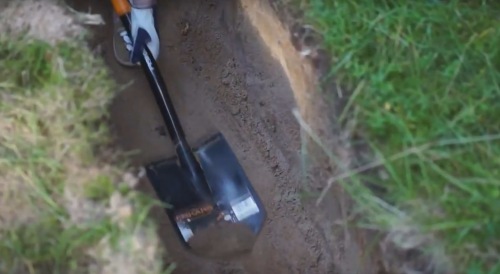
To simplify the manual trenching process, use a special trench shovel equipped with a long handle. It is convenient to use a hoe to loosen the soil. If turns are expected along the path of the trench, additional wells must be built in these places.
The bottom of the trench is lined with a layer of sand and tamped, creating a flat surface
Tip: If the ground at the bottom of the trench is soft, cover it with a layer of rubble and sand to create a harder surface, making sure to maintain the angle of inclination.
When digging a trench, the angle of inclination should be maintained. Drain pipe are positioned relative to the container at an angle of 5-10 ° so that the waste water is unimpeded by gravity. It is also not worth making an excessive slope, as this is fraught with the formation of mud plugs, arising from the fact that the speed of movement of the liquid will outstrip the speed of movement of dense waste.
Cesspool care
Regardless of the volume of the dug cesspool, it needs periodic cleaning. The frequency of pumping depends on the speed of filling the septic tank. With the correct calculation of the volume, on average, the frequency of pumping is 1-2 times a year. To reduce the frequency of pumping wastewater in a septic tank, experts recommend using special means - bioactivators.

The drugs are available in the form of powders, granules, tablets and liquid formulations
The active component of the products on sale is specially grown anaerobic bacteria and microorganisms that feed on organic waste. These bacteria do not have a destructive effect on the walls of the structure and do not pose a danger to human health and the environment. The liquid obtained as a result of processing with bioactivators has no odor and no harmful compounds, therefore it can be reused for domestic needs.
It is not difficult to build a cesspool on your own. The main thing is not to forget about the safety of your loved ones. After all, household wastewater, falling into an illiterately designed system, carries a health hazard, so you should not neglect sanitary standards in order to save a little.
A drain pit is the easiest way to arrange sewerage system in a private house. It is a reservoir that receives waste water.
Here they accumulate, are processed under the influence of natural processes, decomposing into water and mechanical impurities (fractions).
It looks like a drain pit in the country
There are several types of cesspools depending on the principle of operation.
And before thinking about how to do drain pit cheap and fast, you should consider them:
All these pits differ in efficiency, environmental safety, cost and complexity of installation. And in order to understand how to properly make a drain pit in a private house, you should evaluate all these factors for a particular case.
Where to place the drain pit
Initially, you should determine the place on the land plot where work will be carried out to equip the wastewater receiver. There will not be any special difficulties here, because there are special norms of SNIP, which are taken into account in this case. The drain pit should not be located closer than 5 meters to a residential building (house), as well as closer than 1 meter to utility structures. At the same time, the distance of the receiver from wells, orchards and vegetable gardens cannot be less than 20-30 meters.
Choosing a place for a drain pit
Important to remember! When choosing the location of the pit, one should take into account its accessibility to the sewer truck, with the help of which maintenance will be carried out in the future.
What materials to make a drain pit
When thinking about how to build a drain pit in a private house, you should initially choose the material. The service life of the pit itself, its safety in operation, as well as the price of the issue depend on it.
Consider the most popular and proven options:
We examined what material the drain pit is made of. The next point is the shape of the reservoir for collecting waste.
It can be absolutely any - rectangular or round. Both options take place and are widely popular.
But if we talk about a pit made of concrete mortar or brick, it is better to choose a rectangular shape.
It will be more convenient to work. More attention should be paid to the depth of the pit, calculating it taking into account the depth of the groundwater.
Thinking about how deep the drain hole should be, it should be borne in mind that the depth should be at least 1.8 meters.
The rest of the calculations will be carried out depending on the volume of the tank.
The depth of the drain pit is not less than 1.8 m
The volume of a drain pit for a private house is considered as follows: the number of residents is multiplied by the number of liters of water consumed by one person (150-200 liters).
The resulting figure is multiplied by 15 (the time interval between pumping). We convert the resulting figure from liters into m 3.
Brick drain pit (rectangular)
Compared to all of the above options, the arrangement of a brick cesspool is considered the most laborious, because here you will have to make brickwork, very carefully monitoring the tightness of the joints.
If a drain pit is being built in a private house with your own hands made of bricks, then you have to perform the following steps:
Now it remains to understand how to make a sewer drain in a private house, to lead pipes to the drain pit.
Here you need to observe the main indicator - the bias. So the drains will flow into the pit without lingering in the sewer.
The average slope is 1.5-2 cm per meter of pipe. In order to get the difference between different ends of the pipe, its length must be multiplied by the slope indicators.
The pipes are laid on a crushed stone bed, this will prevent soil contamination if a leak occurs.
Half a century ago, cities were built up with typical multi-storey and private houses with practically the same layout and arrangement. At that time, residents of the private sector were heated with wood in the stove, washed dishes in a basin, and, at the call of nature, went out into the street to a toilet-type toilet. But life never stands still, and what seemed like a luxury for 30-50 years and something beyond the brink of fiction is a reality and even a necessity today.
The drain pit will ensure the outflow of wastewater from the house
A modern person has a bad idea of \u200b\u200bhis life without an automatic washing machine, bathroom, toilet in the house, many have already acquired dishwashers. For such conveniences, it is required to take water somewhere and drain it somewhere. We will talk about where to dispose of used water and human waste in a private house.
Vacation man pit in a private house
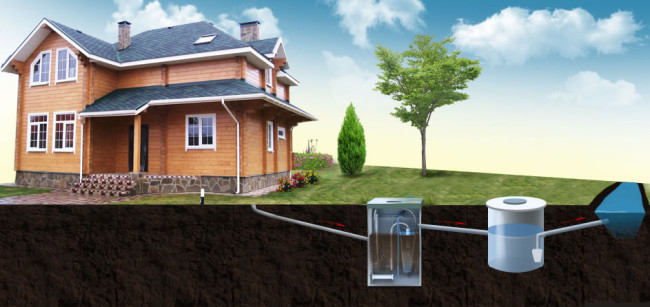
A drain pit in a private house with your own hands is the best way sewerage arrangement. The easiest way out of this situation is the central sewerage system. But it so happened that the tenants of apartment buildings have this advantage, and in the private sector the data engineering systems practically not practiced.
In private houses, an autonomous sewage system is used, where water from the houses goes through pipes to the sewers. Owners of their own homes often bury sealed factory waste water tanks on sites. This does not require the organization of the necessary filtration, there is no need to worry about mixing sewage and ground or drinking water.
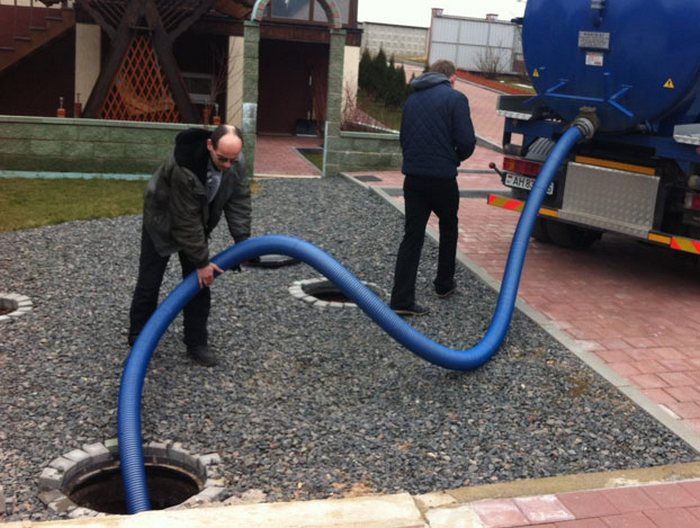
A closed cesspool requires frequent servicing
However, the use of a closed cesspool has its drawbacks: you need to constantly monitor the level of drains in the tank, regularly call the sewage service and regularly spend additional funds to pay for services.
Another legal, but quite expensive way of waste disposal is a complex purification and filtration system that requires investment and connection to electricity.
The cheapest option is a do-it-yourself drain pit with a natural filtration system. Such cesspools are not supported by law. There are a number of reasons for this:
- toxins can penetrate into nearby water sources, water intake ponds and wells, underground rivers;
- foundations located next to cesspool houses can sag in subsidence soils due to constant washout by drains;
- there is a risk of groundwater contamination with toxins, chemical poisoning fruit trees and cultivated plants with
- deeply penetrating root system.
How to make a drain pit yourself?
Not every person knows how to make a drain hole on a site correctly. Inexperienced owners make unforgivable mistakes when organizing a drain pit. Some choose the wrong place for arranging a cesspool, others try to brick the foundation pit tightly, close to each other. This greatly reduces the penetration of water into the soil. So that the drain pit in a private house does not have to be emptied several times a month, several points are taken into account:
- Suitable pit volume.
- Correct location.
- Preparation of the pit.
- Competent installation.
Choosing a location for a drain pit
Before digging a pit for a cesspool, it is necessary to correctly determine the place for it. More than one rule has been drawn up governing the norms for the location of the cesspool on the site:
- at the selected location, the groundwater level should not rise above 3-4 meters, since the minimum depth of the drainage pit is only 2 meters;
- the distance from the drainage pit to the nearest water source should exceed 20-25 meters;
- if there is a height difference in the selected area, the pit is located in the lowland;
- the removal of the cesspool from the house must be at least 7 meters;
- a free access of the sewage truck to the sewer pit is required.
Sump pit volume
How to make a drain pit correctly? To begin with, determine the volume. The calculations are easy. Take into account the amount of time that you live in the house. If this is a summer cottage for seasonal use, dig a drain hole big size doesn't make sense. A tank for two cubic meters is enough. When permanent residence full family from three people it is better to organize a two-chamber cesspool. Its volume is subtracted based on several parameters:
- The number of people in the family. Based on the rate of water consumption for each person, three people per month will use an average of 12 cubic meters of water. This volume of the drain pit is optimal.
- Soil quality. If the soil is heavy, dig the hole with a margin. If the soil is light and moisture permeable, the tank can be made 30% smaller.
- The depth of the pit does not exceed 3 meters, since with large dimensions, the hose of the sewer truck will not be able to remove all the sludge from the bottom.
- It is better to use an overflow well with two or three holes. Such an autonomous sewerage system contributes to a thorough purification of wastewater from solid particles and poisons, and prevents overfilling of tanks with waste.
Preparation of the pit
When the place for the pit is chosen, they proceed to digging the pit. You can speed up the process with the help of an excavator, which, accordingly, will pull unnecessary costs. If you are for the economy, you will have to dig yourself with the participation of a couple more men to catch. The size of the pit in depth and along the radius is dug 70-80 cm more.
This is due to the fact that a layer of sand and gravel is poured onto the bottom to filter waste or concrete pouringif you are making an overflow septic tank. A similar situation with the walls of the pit. Part will be taken by the lining, part by the drainage pad between the walls of the cesspool and the earthen pit. Therefore, you will have to dig more.
The upper fertile layer is used for their own purposes: installing a thermal bed, organizing an alpine slide, or simply scattering it around the garden. The bulk of the soil is removed outside the estate. Leave one cubic meter, then fill the lid.
As the dive progresses, the digger feeds the excess earth in a bucket on a rope, and the person in the hold pulls and pours the soil into a garden wheelbarrow to make it easier to take out. Observe safety rules so that a bucket that suddenly fell off does not hit the worker in the pit.
Internal arrangement of the walls of the drain pit
When the pit is ready, the next question will be how to overlay the drain pit. The first step is to prepare the foundation for future pit walls. You can have a drain pit made of cinder block, bricks, concrete rings, and even old tires. All, except for the last, materials shrink under weight, therefore they must prepare a kind of concrete foundation on a crushed stone pillow along the line where the walls will stand. When the pouring hardens, the forcing of the well itself begins.
How to lay out the well correctly? For this, we must not forget about the drainage holes. Not all bricks or cinder block are placed very tightly; they must leave openings of 5 cm through which excess water will leave. If you are using concrete rings, as for wells, thick perforations are also made downward for drainage.
It is not exactly necessary to lay out the hole, because no one will admire its walls. The main thing is to keep vertical and not forget about the holes. It is possible to build such a structure in 4 days (it is time to interlock the rows of bricks). Using a cinder block will cut your time in half. With a prepared foundation pit, concrete rings are easy to handle in a day.
Important! Be sure to leave a hole for the sewer pipe from the house before completely laying out the drain pit.
When the mortar is dry, fill the void between the earthen and chased walls. To do this, use large crushed stone, broken brick, pieces of broken concrete. This layer will serve as an excellent drainage, retaining large particles, and allowing treated water to pass into the ground.
At the bottom of the pit, 20–30 cm of river sand and the same amount of crushed stone of medium or large fraction are poured. This helps to retain sediment in the pit and does not prevent water from leaving the soil.
Overflow pit
This type of septic tank is the best solution for a family living in a private house. Does not require frequent calls of the sewer truck, safe for the environment. It will take longer to work on the overflow well, but the result is worth it.
The principle of operation of such a septic tank is that drains come from the house into the first, sealed well. Its walls and bottom are tightly closed and waterproofed. Feces and solids settle to the bottom, and the separated water flows through a connecting pipe into the next well. It is he who is built according to the above rules with perforations and a coarse filter at the bottom.
For reinsurance and in the case of using a large number of household appliances, jacuzzi, showers, families organize multi-chamber overflow wells on the site. The water from the latter, the purest, is often used for irrigation of crops in the garden and trees in the garden.
Important: The overflow pipe connecting the two wells must be at a level lower than the inlet pipe through which the waste flows from the house.
Waste pit cover
How to cover the cesspool? In the country, you can use a double wooden shield. In a private house, it is better to do everything efficiently and reliably. It is recommended to make a formwork over the pit with iron corners and reinforcement, and pour concrete. It is necessary to provide a hatch through which the intake of sewage and an opening for the ventilation pipe will be made. When the concrete hardens, the formwork is removed, and the cover is covered with earth, leaving only a hatch.
Sealed cesspools
If you are afraid of environmental pollution, make an airtight drain pit on the site. For this, the pit is prepared as described above. The bottom must be filled with concrete. The walls are driven out tightly, without gaps. Masonry or cinder blocks are additionally plastered outside, covered with bitumen from the inside.
Sealing of the seams is also required if you lay out the well with concrete rings. The entry point of the sewer pipe into the pit wall is also carefully sealed. Cover with a lid with a hatch (sold ready-made or poured on their own). The easiest option is to dig a pit and lower the factory plastic septic tank into it.
If you opted for a sealed cesspool, draw up a contract with the sewage service for regular pumping of sewage, and do not forget to monitor the level of sewage in the tank.
Warming
If the septic tank on the site rises above the ground, it should be insulated. Waste does not freeze in winter due to the activity of putrefactive bacteria. But in the upper part of the pit, the temperature still drops. Someone uses foam boards with a thickness of 100 mm or more to cover the pit. But rather, pour a 20-30 cm layer (depending on the climate) of expanded clay on the surface of the lid. This will protect the pit from freezing in winter, even at 30-degree frosts.
Sewerage is an inconspicuous, but the most important part of a comfortable life. And even though the residents of apartment buildings do not think at all about the issue of disposal of their waste, this issue is always relevant for owners of private houses. We hope our article will help you, and after all the work done, you will not know the trouble. At least with the sewerage system and its equipment in accordance with all the conditions required for high-quality functionality.
All the comforts of human living are associated with three components: electricity, water and sewerage. The owners of "summer residences" - summer cottages, small country houses - try to equip their seasonal dwelling with maximum comfort. Providing it with electricity is the simplest task, almost every corner of Russia is electrified. Water supply is decided by the arrangement of wells or wells. The most difficult issue - the local sewage system - also has a standard solution: a do-it-yourself drain pit is being built on the site.
A drain pit in a private house or in a country house is an elementary structure designed to collect and accumulate local sewage effluents. Household waste from toilets, kitchen sinks, washing machines and dishwashers is transported here through sewer pipes.
Any sewage treatment plant on the eve of this simplest collection of sewage is not provided. As the pit is filled, it is cleaned by pumping out the contents. Depending on the method of cleaning, the accumulated sewage is removed by special machines - sewers or, after processing with biological products, is used for watering plants and as fertilizer.
Types of drain pits
Drain pits are classified in relation to ground level and materials of manufacture.
In relation to ground level
According to this criterion, sewage waste collectors are divided into two groups:
- superficial;
- underground.
Surface collectors of sewage
This option is only suitable for use in the warm season. It is used extremely rarely, since the sewer network has to be laid on top in this case. The required slope (from the "supplier" of drains - sinks, toilet bowls, etc. - to the collector) can be provided only on condition that all sources of drains are located above the inlet of the tank. It is advisable to arrange surface drainage tanks in areas with a high level of groundwater.
Underground drain pits
Underground structures for collecting sewage are the most common. Depending on the amount of drains, the design of the drain pit may or may not have a sealed bottom. Sanitary standards Of Russia it is allowed to build pits without sealing the bottom if the daily volume of wastewater does not exceed 1 m 3.
In all other cases, a sealed underground reservoir is equipped.
By materials of manufacture
For the construction of the drain pit structure, the following materials can be used:
- ceramic brick;
- concrete (in the manufacture of a monolithic structure);
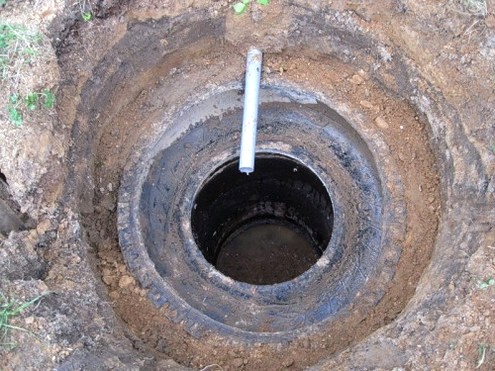
- used tractor tires;
- plastic;
- wood.
For the device of drain pits with your own hands, concrete rings are the most unsuitable option. For their installation, construction equipment is required - you cannot cope with heavy products manually.
The easiest and cheapest way to equip a drain pit in a private house or on summer cottage - decoration of its walls with tires. But such a design is unreliable in terms of tightness: there is a high risk of the liquid component of sewage drains getting into the soil.
Location - sanitary restrictions
Some homeowners think they can do whatever they want on their property, and they are deeply mistaken. Sanitary services are not asleep - they require strict adherence to the rules and regulations in force in the state, regardless of the type of property.
The location of the drain pit in a private house is also strictly regulated: the standards stipulate the minimum permissible distances from the waste storage tank to engineering structures, residential buildings and the boundaries of the site:
- to the water conduit (central) - 10 meters;
- to the underground gas pipeline - 5 meters;
- to the drinking well: 20 m - on clay soils, 30 m - on loam, 50 m - on sandstone and sandy loam;
- to a residential building (own and neighboring) - 10-12 meters;
- to the fence (site border) - 1 meter.
The maximum depth of the drainage pit is also regulated: it should not exceed 3 m, if the groundwater level allows it. These restrictions are contained in SanPiN 42-128-4690-88 and SNiP 30-02-97.
Important: Homeowners should be aware that non-compliance with sanitary requirements can lead to more than a fine - in case of damage to the health of others, a criminal case can be initiated.
In addition, when making a drain hole in the country with your own hands, it must be located on the site in such a way that it is possible to organize unhindered access to it for special equipment at the time of pumping out.
Tip: Practice shows that it is better to place a drainage pit from the windows of residential premises at a distance of at least 15 meters.
Construction procedure
The device of a drain pit in a private house with your own hands, regardless of the choice of material, is carried out according to the general algorithm:
Explosive gas is generated in sewer tanks. To divert him ventilation is arranged... Its role is played by a pipe brought out through the pit cover. Its dimensions are regulated by building codes: diameter - 100 mm, height - at least 600 mm from ground level.
Choosing a way to clean the drain pit
Before you build a drain pit in a private house, you should decide a very important question: how you will clean it. The amount of work on the improvement of the site depends on this:
- if it is easier for you to periodically invite specialists with a sewage truck, take care of organizing an access road;
- if you are ready to clean yourself, purchase a plastic container with a sealed lid and find out in advance who will receive your waste. Do not forget about hand and respiratory protection. Better if it is a gas mask, but, at worst, a respirator will do. Of course, you can't do without rubber boots.
 When arranging a drain pit, you need to take care not only of how to dig it out, but also how to clean it
 Modern technologies make it possible to significantly simplify the process of cleaning the drain pit if it fills up quickly, or even make it practically waste-free. We are talking about microscopic helpers - capable of converting wastewater into sufficiently pure water and a solid fraction suitable for use as fertilizer.
Bacteria not only decompose the contents of the drain, but also work hard to combat odors.
Just keep in mind, when deciding how to clean a drain pit in a private house, that biological products should be chosen in accordance with the composition of wastewater. Most bacteria cannot withstand contact with household chemicals: detergents and detergents are detrimental to them. However, microorganisms resistant to aggressive environments are also being grown.
After the bacteria have worked hard, you will need to pump out the liquid component using a pump (it is completely harmless to humans, animals and plants) and extract solid sediment from the pit.
Sewerage in a private house is absolutely necessary if you live there permanently, and it is highly desirable if you only bring the summer months there. I will help you figure out the basic diagrams of the sewerage system, and together we will analyze the algorithm for performing the key stages of the work.
Sewerage scheme
Sewerage for a private house is an essential condition for a comfortable stay. It is possible to use the street and cesspool only temporarily. Sooner or later, the question of creating an integrated system is understood.
Before making a sewage system in a private house, you need to decide on its configuration. The easiest way to do this is consistently:
- Analysis of existing communications. If the settlement has a centralized sewer network, then the work is simplified by an order of magnitude. It will be enough for us just to get to the collector pipe and connect to it.
To connect to a common collector, you need permission from the local administration, and it is better to entrust the work itself to specialists. But in any case, it will be much cheaper than making a sewer tank yourself.
- Determination of the type of tank. Here we have only two options: a septic tank or a cesspool. It is more difficult and more expensive to make a septic tank, but it needs pumping less often, a cesspool - on the contrary. Optimal choice - a septic tank combined with a biological treatment plant, but the high cost acts as a limiting factor.
- Choosing a location for the tank. In this matter, you need to be guided by the current regulations that determine minimum distance from a pit or septic tank to various objects. It is advisable to find a point in the lower part of the relief (dig less) at a distance of at least 10 m from the house and at least 15 m from the well / well.
- Allocation of a room.The sewerage system of a private house should link together all the water discharge points. It is worth collecting them as close to each other as possible, therefore we determine where the bathroom will be located. It is advisable to place it near outer wall, on the side of the house, where the reservoir will be - so we will spend less effort and money on laying pipes.
- Pre-planning.Based on the information received, we build a plan for the entire system and preliminarily calculate how much and what materials we need. According to the calculations, we plan the budget (we immediately put in it an excess of 30%) and evaluate whether the project will be "lifting".
If the preliminary stage ended successfully, you can proceed to purchasing and performing preliminary work.
Materials for creating an autonomous sewage system
An independent sewage system in a private household is a rather resource-intensive project. What is the minimum material required for its implementation?
The main items of expenditure are shown in the table:
| Illustration | Structural element |
 | Ready septic tank. Optimal solution for an autonomous sewage system - installation of a septic tank industrial production (Tank, Triton and analogues). Such products are equipped with multi-chamber tanks of sufficient volume and all the necessary devices for primary wastewater treatment, so we just have to install them. The main disadvantage - high price. |
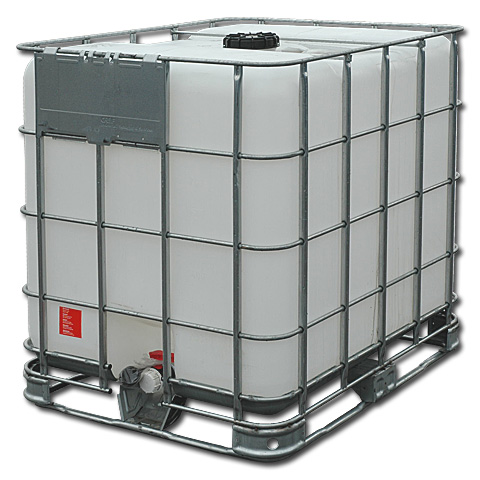 | Plastic container for a septic tank. A plastic (polyethylene, polypropylene) waste storage tank can be used as a reservoir. You can also purchase the so-called "Eurocube". A plus - complete tightness of the system. Minus - rather high cost and the need to install additional cleaning devices. |
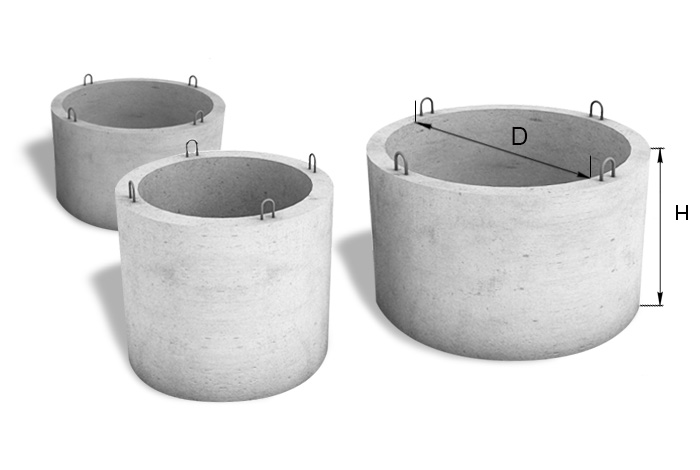 | Concrete rings. If saving money is a priority when creating a sewer system, then tanks for the accumulation and treatment of wastewater can be made from standard concrete rings. Disadvantage - the need to additionally seal containers and the complexity of installation. Perhaps, one cannot do without attracting a crane. |
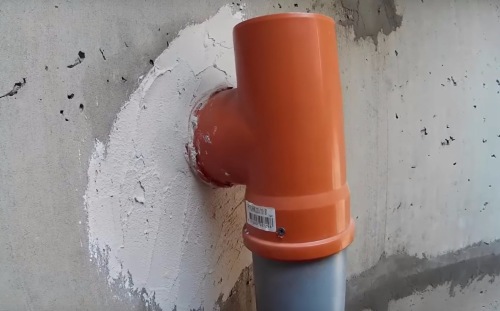
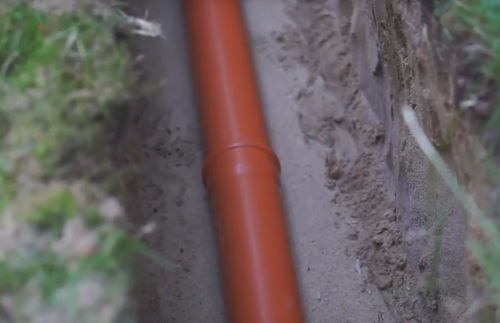
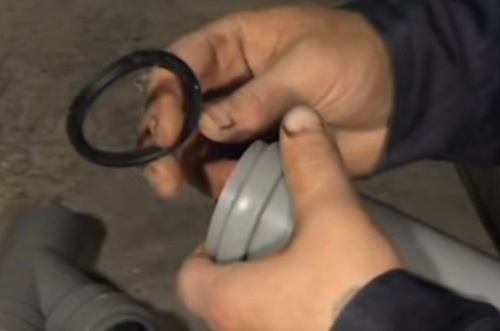
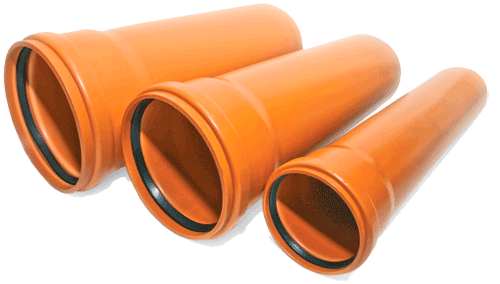 | Pipes for outdoor sewerage.
To connect the cesspool or septic tank with the house, special outer pipes (orange paint) are used. They tolerate temperature changes well and do not deform even under significant pressure when laid at depth. |
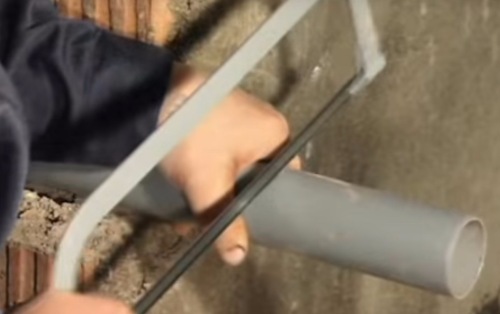
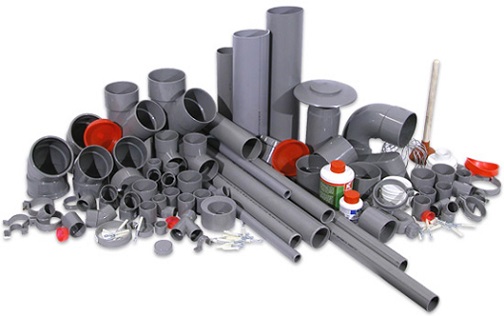 | Pipes and fittings for internal sewerage.
Internal sewerage wiring is formed from polypropylene (gray) pipes with a diameter of 110 to 40 mm. Together with pipes, it is advisable to purchase the required number of fittings for registration of turns, bends, revisions, etc. |
 | Pipe thermal insulation. When laying the outer part of the network, as well as when installing communications in unheated premises (basement, basement) there is a risk of pipes freezing. To avoid this, it is advisable to insulate the sewer system using casings made of mineral wool, polyethylene foam, polyurethane foam, etc. |
In addition to the basic materials that are used directly to create the system, additional ones will be needed:
- gravel and sand for excavation and drainage;
- cement mortar;
- sealant based on moisture resistant silicone;
- revision wells - if you need to lay a long or winding pipeline.
Outdoor work
Stage 1. The principle of operation and calculation of the volume of the septic tank
Sewerage installation in a private house includes two types of work:
- outdoor - consist in the device of the reservoir (cesspool or septic tank) and laying a pipe to the house;
- internal - involves the installation of piping in the house and the connection of water consumption points to it.
If possible, then these works are performed in parallel, but if not, then you need to start with the device of the outer part.
The most effective design for autonomous sewerage of a private house is a septic tank. Unlike a cesspool, it does not accumulate wastewater, but ensures its processing. At the exit, relatively clean water is obtained, which is filtered into the soil, polluting it with organic matter at a minimum level.
The septic tank works quite simply:
- Upholding... First, wastewater enters the first tank - a sump. It separates waste water into fractions: solid particles precipitate (sludge), light organic matter floats on the surface, and clarified liquid is collected in the middle part. Here, bacterial decomposition of waste takes place with the release of gaseous reaction products and mineralization of the residues.
- Overflow... An overflow hole is made in the wall of the first tank, which is located at the filling level. Through the overflow pipe, clarified water flows from the sump into the second chamber, and solid residues are retained.
- Filtration... In the second chamber (filtration or drain well), the clarified waste flows through the drainage layer at the bottom. Drainage also retains some of the contamination, so almost pure water enters the soil.
Almost all septic tanks work on this principle, both home-made and factory-made. The difference lies in the design of the tanks, as well as in their number. Sometimes a septic tank has not two, but three chambers - then another tank is added between the sump and the filtration tank for more effective cleaning.
Before you arrange a septic tank, you need to calculate its optimal volume.
The calculation of the volume of the septic tank is carried out according to the formula:
V \u003d n * Q * 3/1000where
- V - the required volume of the septic tank in cubic meters;
- n - the number of people permanently residing in the house;
- Q - rate of water consumption per person, liters per day;
- 3 - average duration of wastewater cleaning, days.
If we take 200 liters approved in SNiP as the consumption rate, then, for example, for 4 people the volume will be as follows:
V \u003d 4 * 200 * 3/1000 \u003d 2.4 m3.
Stage 2. Installation and equipment of the sewage tank
Now let's figure out how to properly make the sewerage system in a private house. The algorithm of work on the device of a septic tank in the table:
| Illustration | Stage of work |
 | Digging a pit. In the selected place, we apply markings to the site, after which we dig a foundation pit to install the tanks. We select the dimensions of the pit with a margin - so that a layer of bedding and waterproofing / drainage can be laid on the bottom, and a clay castle can be made on the sides. For septic tanks of a small volume, the pit is dug manually; for large-scale structures, it is better to use the services of an excavator. |
 | Preparation of the base. We level the bottom of the pit, and then lay it sand bed up to 20 cm thick. Tamping down. Under the installation site of the sump (first tank), you can pre-lay a waterproofing pad made of clay or a concrete disc, the diameter of which will correspond to the diameter of the well. |
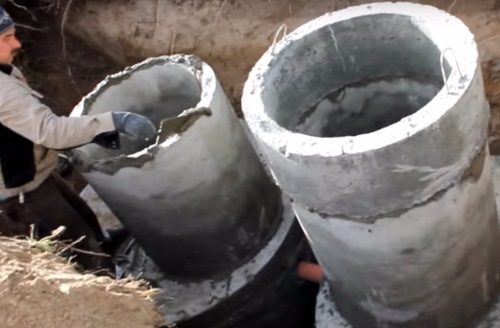
 | Installation of containers. We lower concrete rings to the bottom of the pit, from which we form two wells. We seal the joints between the rings in order to exclude the ingress of untreated wastewater into the ground. |
 | Tank bottom device. We make the lower part of the sump airtight, pouring a layer of concrete up to 10 cm thick. Additionally, you can treat the base with bitumen mastic and lay a waterproofing roll material. We fill in the drainage at the bottom of the filtration well: pebbles, gravel, broken ceramic bricks, etc. You can also make holes in the bottom ring of this tank or use a special perforated reinforced concrete blank. |
 | Overflow decoration. We connect both tanks with an overflow pipe, which we insert into the holes at a distance of about 1.5 m from the bottom. To prevent organic waste from entering the filtration tank from the sump, we install a T-shaped fitting on the pipe. Due to the presence of the lower branch pipe, such a fitting allows the selection of the clarified liquid under the surface organic film. The installation points of the overflow pipe are carefully sealed. |
 | Overlap and necks. Floor slabs with holes for hatches are installed on the wells. If the septic tank is located deeply, then the necks can be additionally used - narrower rings that provide access for cleaning, revision and repair. |
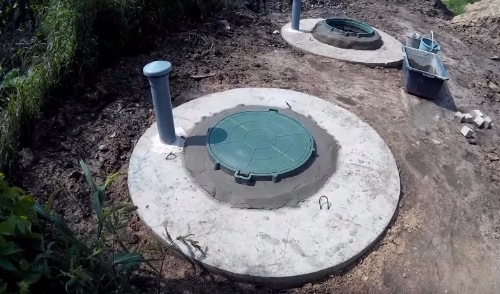 | Ventilation and hatches. We build a ventilation pipe into the ceiling. It is desirable to make it higher - this way the unpleasant smell will evaporate faster. We cover wells or separately withdrawn necks with hatches of a suitable diameter, fixing them with cement mortar. |
If the septic tank is below the groundwater level, then it is advisable to seal it outside using roofing material or bitumen mastic. Also, laying a dense layer of clay around the perimeter of the tanks - the so-called clay castle - will help prevent moisture from seeping into the chambers.
Stage 3. Laying pipes from the tank to the house
The next element of the external sewage system is a pipe connecting the tank to the house. Wastewater will flow through it to the treatment / storage facility.
Pipe laying technology:
| Illustration | Operation being performed | |
 | Digging and preparing trenches. We dig a trench with a depth of 50 cm to 1.5 m between the house and the septic tank (the deeper the soil freezes in winter, the more you have to dig). For the most efficient drainage, we form a slope towards the septic tank of about 2 cm per 1 m. At the bottom we put sand bedding up to 15 cm. We moisten the bedding and ram it. |
|
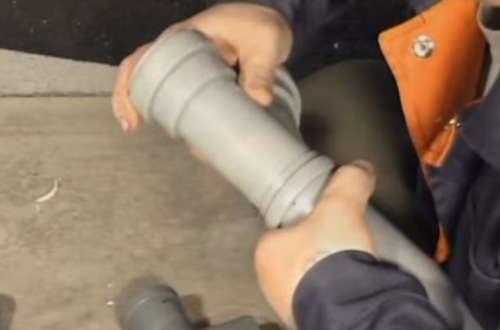
 | Pipe laying. We put a waste drain pipe in the trench. The optimum pipe diameter for the outside of the sewer system is 110 or 160 mm. |
|
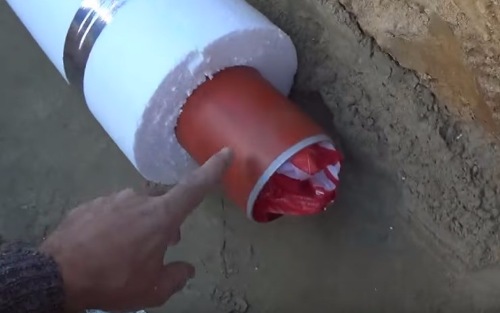 | Thermal insulation of the pipe. If the septic tank is located relatively shallow, and the pipe cannot be buried more than 1 m, the circuit requires additional insulation... To do this, we wrap it with rolled material based on glass wool or mineral fiber, or we use cylindrical casings of a suitable diameter. | Entering the house. The place of entrance to the house can be decorated in different ways, but most often the pipe is wound through a hole in the basement or foundation. It is advisable to insert a metal sleeve into the hole, which will protect the sewer system from damage during movements and subsidence. Also, the input node should be insulated. |
After the completion of these works, we fill up all the trenches and pits completely, and then we lay fertile soil or a layer of sod over the backfill.
It is also advisable to make marks on the wall of the house at the entrance. These marks will be needed when we look for exactly where the sewer pipes are laid.
How to make a sewer wiring correctly
Stage 4. The main elements of the internal network
The next stage is the arrangement of the internal sewerage system. Its configuration directly depends on where the sources of sinks are located, so here I will give a description of its main elements:
- Riser- central vertical pipe, large diameter (at least 110 mm), which unites all the circuits together. As a rule, in a private house one riser is made, but in large buildings there may be several of them. In the lower part, through the knee, it is connected to the outgoing sewer pipe.
- Fan pipe- mounted in the upper part of the riser, it serves to remove gases accumulating in pipes from the system to the outside. It is displayed in a separate ventilation shaft or connected to ventilation pipelocated above the level of the roof.
Without a waste pipe, the pressure in the system will increase, which can lead to incorrect operation shut-off valves... In addition, accumulated gases cause unpleasant odors.
- Trunk lines- pipelines with a diameter of about 50 mm (2 inches). Used to connect plumbing fixtures and other sources of drainage to the riser. Since the local sewage system is usually done by gravity (i.e., working without additional pressure), the pipes are laid with a slope towards the drain. For two-inch pipes, the optimum slope is about 3 cm per 1 m.
- Supply pipes- are used to connect outlets of plumbing fixtures with highways. The diameter of such a pipe cannot be greater than the diameter of the line.
- Revisions - special fittings, which are a single branch tee equipped with a closing hatch. The revision is placed at the base of the riser, at bends, forks and at the ends of highways. It provides access to the inside of the pipeline for removing blockages or maintenance work.
Step 5. Connecting pipes
All pipes are connected to each other using fittings that allow you to make turns, bends, branches, etc. When installing the system, it is advisable to avoid turns at sharp and right angles, forming smooth arcs - this way we reduce the risk of blockages in the place where the flow rate decreases.
Typical modern pipesequipped with sockets and elastic cuffs, easily assembled by hand :
| Illustration | Assembly operation |
  | Socket preparation. Insert rubber into the bell sealing ring... We level the seal by placing it in the groove and making sure that there are no bends and creases. |
 | Pipe connection. We insert the branch pipe into the socket and push it in until it stops. If necessary, turn the pipe so that the bend or inspection hole is in the desired position. |
After assembly, all pipes are installed on supporting surfaces. The instruction allows both hidden (in the grooves or behind the casing) and open gasket. In the second case, plastic clamps with a snap or screw fixation are used to fasten the pipes.
Flat siphon under the bath, choose a pipe diameter of at least 50 mm.
- Bathroom or shower - connected to the sewage system using compact siphons, which are placed under the drain holes. The optimum outlet pipe diameter is at least 50 mm.
Some models of shower cabins and toilets require a vertical sewage supply - this must be taken into account in advance when designing the system.
- Sinks in the kitchen and bathroom - are built into the system using siphons with water traps. The siphon is usually in the shape of a flask and is located under the sink, and it is connected to the sewer outlet with a flexible corrugated pipe.
- Washing machines and dishwashers - also mounted using flexible corrugated hoses. To connect such devices, a separate sewer pipe branch should be installed, equipped with a socket with a rubber sealing collar.
Conclusion
The sewerage system installation technology includes a number of nuances that directly affect the final result. Now you know them. You can clearly see the intricacies of the topic in the video in this article. You can get answers to any questions that arise in the comments to this material.


