- Vapor barrier layer: nuances
- Ventilation wooden house: some recommendations
Your wooden house requires insulation? But you don't know how to do it right? Then the following information will definitely come in handy. It's about. Although I would like to note that this method is not used as often as outdoor installation of insulation. Why is this method considered less popular?
Modern thermal insulation materials have high technical characteristics: light weight, flexibility, excellent indoor climate control.
There are several good reasons: firstly, the internal insulation option slightly reduces the living space; secondly, by performing the installation of insulation on your own, due to inexperience, you can get a violation of the microclimate due to high humidity. That is why it is best if the insulation of a wooden house from the inside takes place after consultation with specialists or professional builders. They will tell you how to insulate a wooden house inside correctly, quickly and correctly.
Please note that the method of internal insulation is fundamentally different from the installation of insulation outside the house.
Causes of a cold snap in the house and the procedure for work on thermal insulation
Usually houses built of wood are particularly comfortable: they are cool in summer and warm in winter. Most often, a cold snap in a wooden house can be caused by 2 main reasons. It:
- poor-quality or improperly mounted outer thermal insulation layer;
- the appearance of cracks in the walls of the house as a result of improper installation, or drying out.
After the reasons for the cold in a wooden house have become clear, you can proceed to familiarize yourself with the list of upcoming works aimed at its internal insulation.
This process will take place in several stages:
- First you will need to prepare the surfaces.
- Then seal up all the gaps.
- Equip a vapor barrier layer.
- Mount the crate.
- Install a layer of thermal insulation.
- Equip the ventilation system.
- Next comes the turn of finishing work.
And now about all these stages in more detail.
Back to the table of contents
Surface preparation for insulation
The first stage of insulation works provides preliminary preparation surfaces.
When working on laying heat-insulating material, it is necessary to protect the respiratory system and eyes from the ingress of fine dust and other substances.
First, clean all surfaces of the walls from dirt and dust. And then you can proceed to the careful processing of the wooden walls with a special compound that protects the tree from the reproduction of insects. It is very good if the composition you have chosen will additionally perform the function of preventing the process of decay of wooden surfaces, and protect it not only from moisture, but also from the danger of fire.
And yet, at the same stage, you need to take care of the safety of electrical wiring. If there is a variant of its surface location, then it must be separated from the wall. Close up the cracks
After completing all the above procedures, you can proceed to the second stage of insulation. It provides for the implementation of work to eliminate the existing cracks. They must be carefully caulked. Many people know that after a house is built from a bar, it is necessary to carry out an additional procedure to eliminate cracks, after about 1 year.
Naturally, this is done in the event that the house remained uninhabited. During the operation of the premises, re-caulking of the cracks can be carried out later, after about 3 years. What is the best way to seal the cracks? Usually, a material such as jute fiber is used for these purposes.
Of the tools, you will need a chisel, preferably wide and rather thin. For cracks of an especially large size, a tape tow is used, which is twisted in the form of a roller before being placed in the gap. It is necessary to fill the slots until the material used is no longer placed in them.
Back to the table of contents
Vapor barrier layer: nuances
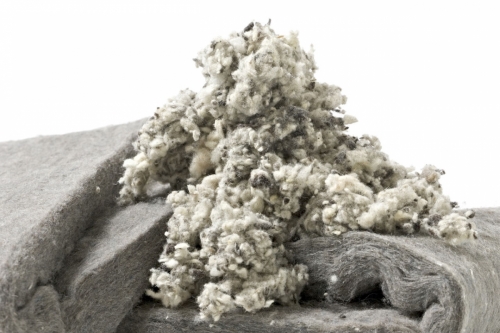
Cork insulation retains heat very well and lends itself well to processing.
The presence of a vapor barrier in a wooden house is very important, since as a result of insulation, the wall is blocked between 2 heat-insulating layers. In this case, the degree of humidity in the room increases, since the walls arranged in this way are not able to breathe. What to do in this case? A high-quality ventilation system saves, only with its help is an effective fight against moisture possible. If you do not allow dampness on the walls, then you will avoid the occurrence of the process of rotting wood.
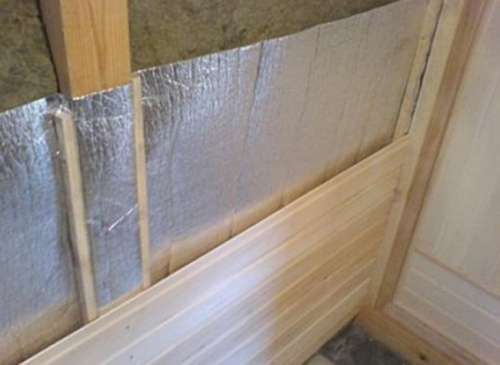
Simply put, you need to equip a high-quality vapor barrier. It is carried out using a special film, which is placed on the wall surface with its rough side towards the wooden surface.
Back to the table of contents
Lathing and thermal insulation layer
You can mount the lathing layer on the walls using a wooden beam. It is also allowed to use a metal profile, but only in the case of subsequent sheathing with moisture-resistant gypsum plasterboard sheets.
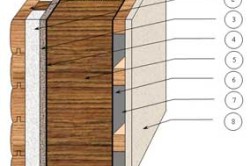
Wall insulation scheme: 1 - outer sheathing (lining); 2 - polyethylene; 3 - OSB board; 4, 6 - vapor barrier layer; 5 - thermal insulation layer (mineral wool); 7 - ventilation gap; 8 - inner lining.
In order for the corners of the battens to be even and correct, it is necessary to take care of the preparation of the corner posts in advance. To do this, measure the height of the room and cut the bar in accordance with this value. The section of the timber used for these purposes should be 50 × 100 mm.
As a result of these manipulations, you should get a stand that resembles the letter "G" in its outline. Each corner of the room should be equipped with such a rack. When mounting, do not forget to check that they are vertical.
Now you can start installing vertical bars with a step of about 0.5 m. The bar should have a cross section of 50 × 50 mm. Do not forget that all wooden battens must be pre-treated protective compound against decay and fire.
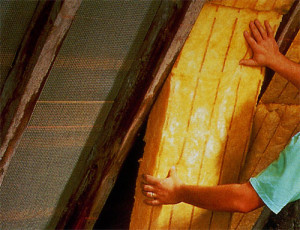
After the crate is completed, you can proceed with the installation of the thermal insulation layer. For these purposes, a material such as mineral wool is well suited. After you have unwound the roll of material, you need to cut it in accordance with the desired height value. And the width of the insulating layer should be 2 cm greater than the distance between two vertical bars.
Having placed a strip of heat-insulating layer between the bars, you need to fix it to the wall with anchors. Please note that anchors with large round caps are used. The second layer of insulation is fixed to the surface of the bars. The vapor barrier, or rather the film used for its device, will help to avoid dampness, and still prevent small particles of mineral wool from getting into the air. The vapor barrier layer is attached to the bars using a construction stapler.
Having bought or built a wooden country house, its owners may soon be faced with the need to insulate it. There can be quite a few reasons for the low temperature inside a wooden house. This can often be low-quality wood and insufficient log thickness. Therefore, in order to somehow remedy the situation, it will be necessary to insulate the wooden walls of the house. Insulating the walls of a wooden house is not particularly difficult, the main thing is to understand the technology of insulating wooden walls.
Features of the insulation of wooden walls
Due to its structure, wood has a number of unique qualities and requires a special approach in operation. The main feature of a material such as wood is its ability to "breathe". This means that wooden walls can independently regulate the microclimate in the house. You should also remember about the natural origin of the logs, which are prone to mold and decay. It is the naturalness of wood that imposes certain restrictions on the materials and methods of insulating a wooden house.
Let's start with materials for insulating a wooden house. They must have the following characteristics:
- high vapor permeability. Large or the same as that of wood 0.06 Mg / (m * h * Pa);
- have high moisture resistance;
- have high fire safety;
- be resistant to mold and mildew.
According to these basic requirements, the following materials are most suitable for insulating wooden walls:
- mineral wool;
- ecowool;
- sawdust-granules.
In addition, facing bricks can be used to insulate a wooden house, aerated concrete blocks, siding. Of course, a stone in combination with insulation will create the most effective thermal insulation, but then you have to sacrifice the external beauty of a wooden house.
Important! But it is categorically not recommended to use extruded polystyrene foam, polyurethane foam, polyurethane foam, various sealants or polystyrene for insulating wooden walls. These materials have extremely low vapor permeability, which in turn is fraught with the appearance of mold and mildew on the wooden walls, and ultimately rot.
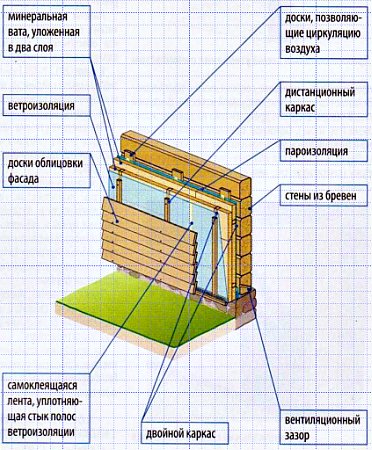
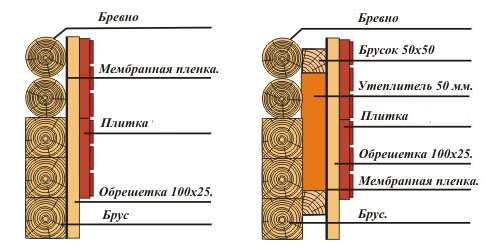
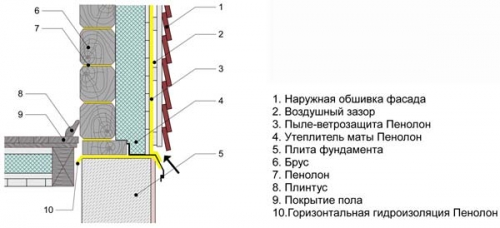
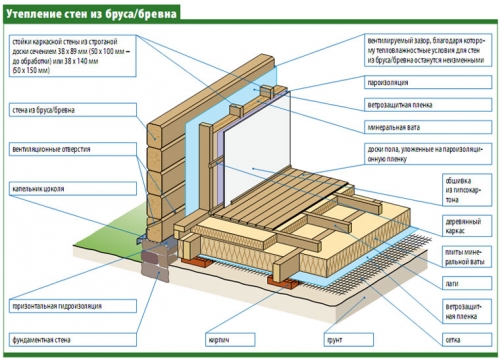
When preparing for the insulation of wooden walls, special attention should be paid to the technology of creating a heat-insulating layer. The main rule that should be observed in this case is as follows: the vapor transmission capacity of each subsequent layer should be higher than the previous one, in the direction from indoor spaces to the street. According to this simple truth, thermal insulation of a wooden house is created, which is a multi-layer cake. The structure of such a cake for insulating walls from the outside consists of lathing and counter lathing, thermal insulation, wind and moisture insulation. The internal insulation of wooden walls also obeys this rule, with the only difference that vapor barrier is used instead of wind insulation.
Important! If you cannot decide in any way how best to insulate wooden walls, from the inside or outside, then the answer is definitely one - you should choose the insulation of wooden walls from the outside. This is due to several reasons:
- First, the inner living space of the house will be preserved.
- Secondly, due to the properties of wood to accumulate and release moisture, the most effective is external insulation.
- Thirdly, external insulation of wooden walls is much easier to create.
- Fourthly, with external insulation, the number of cold bridges is minimal.
Of course, insulation of a wooden wall from the inside is also possible, but only if it is impossible to create external insulation.
Calculation of the insulation layer
Calculation of the optimal thickness of the insulation layer is one of the most important stages in the insulation of any house, especially a wooden one. This task must be approached with all responsibility, since an error in the calculations will at least entail unnecessary financial costs for insulation, and as a maximum will lead to damage to the wooden walls. Therefore, if you are not on friendly terms with formulas and calculations, it is better to contact specialists on this issue. We will consider an example of calculation with comments and explanations, by which you can determine which layer of thermal insulation is required for your home.
To perform calculations, you will need to refer to SNiP 23-02-2003 "Thermal protection of buildings", as well as TSN (territorial building codes). These regulatory documents provide all the necessary initial data for calculations and the calculation methodology. The calculations themselves are based on the thermal resistance of materials, which is constant and separately taken for each region. For example, in the Moscow region, this indicator is 4.15 (m2 * ° C) / W. It is also worth noting that the calculations should take into account the thermal resistance (R) of each material in the heat-insulating pie and sum them up. To perform calculations, the thermal conductivity of the materials used and their thickness are needed.
The formula for calculating the thermal resistance is as follows R \u003d P / K.
Where P - material thickness, K - material thermal conductivity coefficient. For example, a wooden wall is finished with facing bricks on the outside, and a layer of mineral wool is placed between them. Then the total resistance to heat transfer of such a wall will be equal to the sum of the resistances of each of the materials.
Based on the above formula, we will make a calculation for the thickness of the thermal insulation layer. The formula for calculating the following is P \u003d R * K. We take data on thermal conductivity from the table of thermal conductivity of materials or from the packaging of the material used, and the thermal resistance from regulatory documents.
For example, for Moscow and the region, the heat transfer resistance is 4.15 (m2 * ° C) / W. If we insulate a wooden wall 20 cm thick with siding with mineral wool, then for wood the thermal resistance is 0.806 (m2 * ° C) / W, and for mineral wool 0.045 (m2 * ° C) / W. Accordingly, the insulation layer must have a thermal resistance R \u003d 4.15-0.806-0.045 \u003d 3.299 m2 * ° C.
Now we take the thermal conductivity coefficient of mineral wool 0.41 W / m * K and multiply it by the thermal resistance P \u003d 3.299 * 0.041 \u003d 0.135 m. Similarly, you can calculate the layer thickness for any other insulation in different regions of the country.
It remains to calculate the area of \u200b\u200binsulation and purchase all the materials necessary for this. First of all, it is mineral wool itself, wind and moisture protection, as well as vapor barrier. In addition, you will need wooden slats 130x50 mm thick, with a height equal to the height of the wall to be insulated, and fasteners to them. As fasteners for wooden slats, you can use ordinary long self-tapping screws or metal corners with holes for self-tapping screws. The number of slats is taken on the basis that the distance between them should be 2 - 5 cm less than the width of the insulation mats. Fasteners are purchased at the rate of 1 - 2 attachment points per 1 linear meter. We also purchase 50x30 mm or 50x20 mm slats for counter-lattice. The total number of such slats is taken on the basis that the frame of the counter-lattice consists of 3 horizontal rows along the entire perimeter of the house.
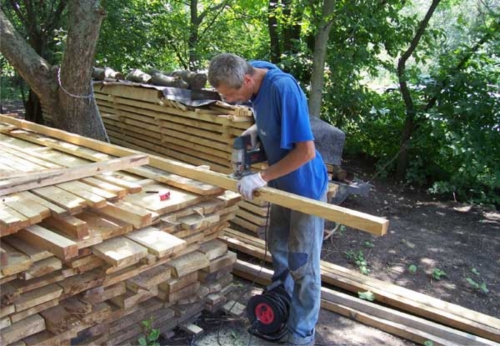
As already noted, the insulation of wooden walls from the outside is the simplest and most affordable way of insulation. Insulation of a wooden house should start in a year or two. This is important, since the tree shrinks during this time, which leads to a change in the height of the building. In addition, during shrinkage, new cracks will be found, which will have to be well caulked.
Do-it-yourself insulation of wooden walls outside is carried out in various ways. Consider the most common one - mineral wool insulation with siding trim. The work takes place in several stages:
1. We check the walls for cracks and the tightness of the fit of the logs or beams to each other.
2. If necessary, fill all the cracks found.
3. First, measure the total length of the wall from edge to edge. Then we break it into equal intervals 2 - 5 cm long smaller than the mineral wool mat.
4. We apply the markings under the lathing on the wall.
5. We prepare the lathing bars by cutting them to the required length.
6. First, we fix the bars along the perimeter of the wall. One above the base, one under the canopy and two at the edges.
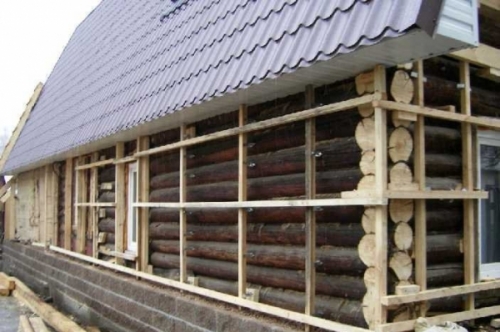
7. In the resulting box, first place and fix the frame around the window and door openings, and then the vertical lathing bars according to the markings.
Important! If the length of one bar is not enough to cover the height of the wall, then the missing pieces must be staggered in each subsequent rack. For example, the 1st post consists of a long piece from below, a short part from above, the 2nd post consists of a short bar from below, and a long one from above.
8. Now take the mineral wool mats and insert them between the frame posts. Since the distance between the bars is slightly less than the width of the mat, the rock wool will be held inside by the spacer. To reduce the number of cold bridges, mineral wool can be laid in two layers. To do this, it is enough to buy mats of smaller thickness. For example, if the thickness of the general layer of insulation is 13 cm, you can use mats 50 mm or 70 mm thick. In this case, each subsequent layer is stacked with an offset relative to the first.
9. On top of the insulation, we lay a layer of moisture and wind insulation from a superdiffusion membrane. We fix it to the frame with a stapler.
![]()
10. We fill the counter crate, thus creating a ventilation gap of 30 mm between the insulation and the finishing material.
11. Finally, the facade is finished with siding.
If finishing with facing bricks is planned, then it is better to use ecowool granules or sawdust-granules as a heater. When backfilling these materials between wooden wall and lining will fill all voids, thereby creating reliable thermal insulation. Insulation of wooden walls outside with mineral wool finished with facing bricks is similar in technology to siding. The difference lies in the used finishing materials and the mandatory presence of a brick foundation.
As already noted, the insulation of wooden walls from the inside is quite a rare phenomenon. Usually, this method of insulation is chosen when it is not possible to make external insulation. The technology for performing work is in many respects similar to outdoor insulation, but there are a number of differences. Let's consider in more detail the stages and features of the work when insulating wooden walls from the inside:
1. After shrinking at home, check them for cracks and caulk them thoroughly.
2. We drill small holes in the crowns for ventilation.
3. We mark the places for installing the counter-lattice.
4. Cut the bars for the counter-lattice and fix them to the wall. This will create a ventilated gap between the wall and the insulation, which in turn will keep the walls from getting stale from the inside.
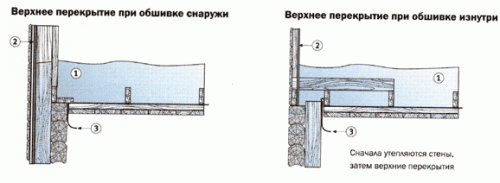
Important! Since the insulation will not be located over the entire area of \u200b\u200bthe wall, the floor, internal walls and ceiling will be natural bridges of cold. To cover them, you will need to insulate the surface of the ceiling and floor. How it looks can be seen in the photo showing the internal insulation of wooden walls.
5. We cover the counter-lattice with a superdiffusion membrane and fix it to the bars using a stapler.
6. We mark the places for the installation of the main lathing. We start from the corners and bring them to the center. At the same time, do not forget about door and window openings. In them, the bars will frame the opening along the perimeter.
7. First, we fix the bars along the perimeter of the wall, and then install the vertical bars and into the openings. We take the distance between the bars 2 - 5 cm less than the insulation mats.
8. Take the insulation and insert it between the battens. As in the case of external insulation, we lay out the insulation in two layers with an offset to each other. This will eliminate possible cold bridges.
9. On top of the insulation, we lay a vapor barrier and fix it to the racks using a stapler.
10. After completing the installation of wall insulation, we insulate the ceiling and floor. This will allow the wall insulation to be installed behind the floor and eliminate possible cold bridges.
11. We cover the walls with plasterboard and carry out the finishing.
The method described above for insulating a wooden wall from the inside involves the use of mineral wool mats. In addition to it, you can also use ecowool granules or sawdust-granules. But unlike external insulation, the granules will have to be blown into the space between the wall and the vapor barrier film, which is somewhat inconvenient and requires special equipment.
Carrying out work on the insulation of wooden walls requires only skillful handling of the tool. Of course, comparing external and internal insulation, we can note the complexity and exactingness when performing work inside the house. Therefore, if you do not have sufficient experience, it is better to opt for external insulation, and if it is impossible to turn to more experienced craftsmen.
Hello! Can you please tell me what is the best way to insulate the floor, walls, ceiling of an old wooden house? The floor was removed, we will do it on the logs. We plan to insulate the walls from the inside under the drywall. Ceilings from the attic. Our house is made of planks, between them there is a layer of nuts about 15 cm. Stove heating. I would like to get a more detailed answer: layer by layer (insulation-vapor barrier). We also plan to install plastic windows.
Unfortunately, the description you gave for your own home design is not complete. Therefore, the answer will be somewhat general. If any points remain unclear, ask additional questions.
Wall insulation
I dare to assume that your house has a frame structure. The frame is made of wooden beams, sheathed with boards on both sides. The internal space between the elements of the frame is filled with "nuts". Probably, this is a crushed shell of some nuts, free and ecological insulation.
Most likely, the walls have additional layers in the form of protective films. Previously, a narrow range of products was available: roofing felt or roofing felt, greenhouse polyethylene film, oiled paper. You will definitely need to examine the walls and attic floor for these films. And, with a high degree of probability, remove them. You don't need to touch the paper.
A little bit of theory to make it clear where to place which layer. In order for the wood to last a long time, and the porous insulation to be effective, they should not be wet. It is very important to ensure their ventilation, moreover, outside, and not inside. Inside the house, the air humidity is higher, so the frame and insulation are protected with a vapor barrier film from the inside. It is better to use a building reinforced polyethylene film, at worst - a regular one, denser. Foamed polyethylene can be used as a vapor barrier, it will be warmer. Sometimes two or three layers of thick kraft paper are sewn onto the frame. It, unlike polyethylene, “breathes” a little, lets water vapor out. But at high humidity it gets wet by itself.
There should be no vapor barrier films outside! If you find roofing material or something similar in the wall, be sure to remove it. It is necessary to provide free ventilation of the frame elements and insulation. At the same time, the insulation should not be blown by the wind. If the boards are fitted tightly enough outside, you can leave them that way.
"Correct" construction of the wall of the panel house: vapor barrier from the inside, wind protection and a ventilated gap outside
If there are gaps and you still have to partially disassemble the structure to remove unnecessary vapor barrier, we advise you to shoot a windproof membrane on the boards with a stapler, sew a 40-60 mm thick counter rail on top and attach a new finishing finish on it: siding, block house, lining. The space under the lock should be ventilated from bottom to top. Windproof membrane - non-woven textiles that prevent the penetration of drafts and water. At the same time, the membrane is "transparent" for gases and water vapor. It should not be confused with a hermetic vapor barrier.
If you decide to insulate from the inside, you will need to build a frame. It can not only be fixed to the walls, but also lean on the floor logs that you are going to make. There are two options: a dry wooden block or standard profile made of galvanized steel. The metal will weigh less than wood and the deformation will be minimal. For wall covering, it is more convenient to use a ceiling profile and fix it on perforated hangers.
In the intervals between the frame elements, you need to place a sheet insulation - mineral wool boards or foam. Mineral wool (glass or stone) is preferable from the point of view of fire safety, it is avoided by rodents. Polyfoam is significantly cheaper. It is completely vapor-proof, if there is an old film or roofing material inside, it can not be removed, there is no need for a new one. But if mineral wool is used, all existing vapor barrier layers must be removed, and a new one must be stuffed onto the frame from the inside, protecting the insulation. When marking the frame and lag, keep in mind that the width of the drywall is 1200 mm. Accordingly, the spacing of the racks is 400 or 600 mm. You should not save on the thickness of the insulation, if you do not live in the Krasnodar Territory: its share in the total cost is not so large. The minimum thickness is 10 cm.
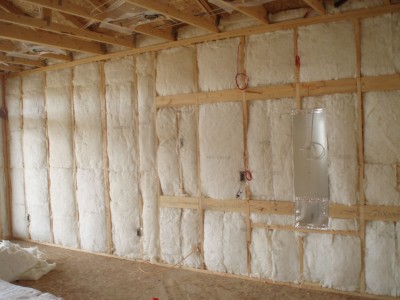
Wooden framefilled with mineral (glass) wool. Insulation in vertical voids can sag over time, so it is recommended to attach it to walls, boards in your case. The electrical wires that we see in the photo must be located in a steel corrugated hose
For foam, the frame should be vertical. It is enough to use the cheapest brand - PSB-15. It is more convenient to work with thick, 10 cm sheets. The slots should be filled with construction foam. There is no need to fix the foam to the wall.
Mineral wool is a little more complicated. The point is that too soft material over time, it will significantly sag in height, forming "cold bridges". And non-settling tough is very expensive. The golden mean - semi-rigid mats with a density of 80 to 150 kg / m2. At the same time, they still need to be fixed to the wall with special dowels with a large-diameter clamping head, about five per square meter. It is best to arrange a two-level frame for mineral wool insulation. The first level is mounted horizontally, the second across - vertically. In the second layer, horizontal bridges are made about a meter apart. This design prevents the insulation from settling; the number of dowels can be halved. The slab joints (5 cm thick) overlap. A frame filled with mineral wool must be closed with a vapor barrier.
Fixing the drywall, if the frame is aligned, is not difficult. Do not forget that self-tapping screws are different for a wooden and steel frame. If instead of drywall you decide to use a more durable material (for example, OSB), you can use backfill insulation: ecowool, perlite, expanded clay, and even "nuts" or crushed corn cobs.
Metal carcass and internal insulation with mineral (stone) wool. Milky film - vapor barrier. When filling the frame, it is recommended to cut the mineral wool 3-5 mm wider than the distance between the posts. This will avoid leaks. Cotton wool should be fixed to the wall with "fungi" or horizontal bridges should be made in the frame about one meter apart. This will prevent shrinkage of the insulation.
Ceiling insulation
Now about the ceilings. The technology is practically the same as for wall insulation. From the inside, a vapor barrier is needed, from the attic side, ventilation should be provided, if necessary, wind protection. In order not to lose in the height of the ceiling and for the convenience of work, most likely you will decide to insulate from above, from the attic. In this case, you can use only a vapor-transparent insulation - mineral wool. Use the softest, cheapest one.
An important task is to isolate the floor structure from moisture. Most rooms will likely have wooden floors. Having erected posts from bricks or concrete for logs, the soil between them should be carefully covered with several layers of dense polyethylene film. The ideal solution would be to use roofing material or its analogue by welding the panels together and gluing them to the walls. The space under the floor should be insulated. You can fill it with expanded clay or perlite: they are not afraid of moisture.
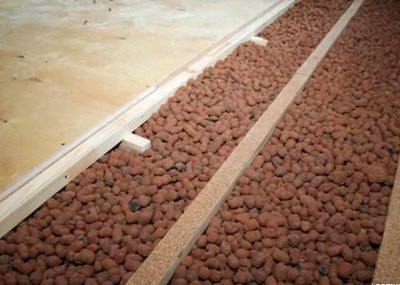
Expanded clay crumbs are often used for floor insulation.
Leave an empty space of 4-6 cm under the floorboards for ventilation. Place holes in the corners of the rooms, covering them with gratings. Concrete floors can be installed in the bathroom and kitchen. You can hardly make it heated. In order not to be cold, the concrete must be "warm", the mixture should be mixed on the basis of expanded clay, aggloporite, perlite or boiler slag, use the breakage of cellular concrete blocks. Do not forget to perform waterproofing from below. It is not worth laying tiles, linoleum on a foamed insulated basis will be more comfortable and practical.
So, just in case, we will repeat the important points and give additional recommendations:
- The walls should be inspected for vapor barrier materials and removed if necessary.
- The structure of the wall must ensure the removal of water vapor to the outside. For this, a vapor barrier is required from the inside, wind protection from the outside.
- Styrofoam in your home can only be used from inside the premises.
- Mineral wool is prone to subsidence in the walls, it needs to be fixed, horizontal bridges should be arranged in the frame.
- It will be useful to pre-process everything wooden parts fire-retardant agents. Use salt-based formulations, they are safe and inexpensive.
- Since you are planning to install sealed windows, coupled with the presence of a vapor barrier, the question arises about ventilation in the house. A stove serves as a good hood, but separate exhaust ducts must go from the kitchen and toilet to the roof. At worst - a fan with the discharge of polluted air through the wall directly into the street.
- Particular attention should be paid to electrical communications. If they are hidden, you will have to strictly follow the fire regulations. All wires must be laid in protective sleeves, and the installation and junction boxes are made in a special non-combustible version.
In professional construction, it is never advised to insulate a wooden house from the inside.
This is due to the dew point, which in this version gets into the supporting wooden walls and gradually destroys them.
But sometimes the situation forces us to resort to internal insulation (in addition, frame houses by definition they are insulated from the inside).
How, in this case, to reduce harm to wood, to arrange the layers correctly and what materials to choose. All this will be discussed further.
How to insulate the walls of a wooden house from the inside? There is always a high percentage of humidity in a residential building. People breathe, prepare food, and so on. Moisture gets on building materials and penetrates them.
With more correct, external insulation, materials are selected vapor-permeable.
After all, one of the main requirements is to let the tree "breathe", getting rid of condensation.
If you do the same with internal insulation, steam will reach the wooden walls and condense in front of them or inside them.
In winter it will be freezing, and in summer it will be damp.
Therefore, for internal insulation, on the contrary, it is better to use sealed materials.
The problem of removing humid stagnant air must be solved!
If the walls are sheathed with airtight insulation, you just need to take care of good supply and exhaust ventilation.
Consider the options:
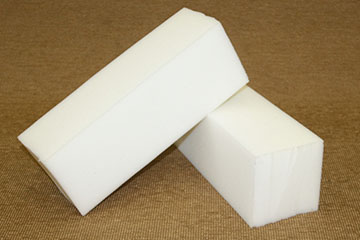
Styrofoam
The first one comes to mind because it is inexpensive, keeps you warm well and is practically impenetrable. But it is not recommended to make walls from it inside, due to its flammability.
Styrofoam in a matter of seconds turns into a molten mass, which gives off pungent smoke and drips. They are strictly forbidden to insulate ceilings, and walls - at their own peril and risk.
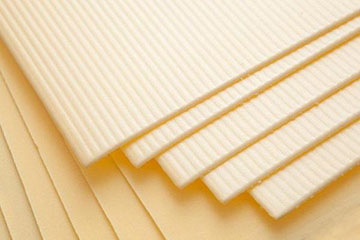
Extruded polystyrene foam
EPPS is Penoplex, Thermoplex and others.
The same foam, but made using a different technology.
Here it is, it resists fire much better.
In addition, its compression density is higher, which means that there will be no need to be afraid for dents on the wall. The price is higher than that of polystyrene, but the simplest safe installation pays for it.
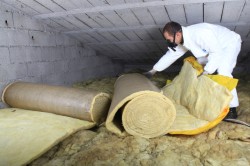
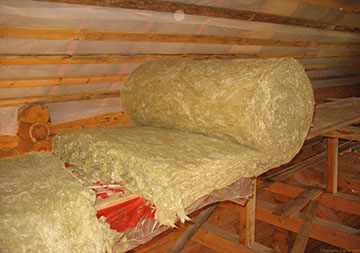
Mineral wool
Good insulation, fire resistant, affordable, but completely waterproof. If glass wool, basalt wool (or any other) will pick up moisture, its thermal insulation properties will drop to almost zero.
Constructing a bag of mineral wool wrapped in polyethylene is also not the best solution, because when fastening, holes in the film will still be obtained, and installation is troublesome, but in the absence of the best options, use technology.
Sprayed materials
 Spraying materials are gaining popularity, such as:
- polyurethane foam;
- penoizol;
- ecowool.
They have excellent thermal insulation properties, are non-flammable or belong to the middle category of flammability, rather small thickness.
The disadvantage of such materials is their high cost. Requires professional equipment and a team with special skills.
Other heaters
The rest of the materials are of little use inside. Insulation with plaster has practically no effect. Penofol - good stuffbut too thin. It can be used if a little insulation is required.
 In order for the house to be warm, it is not necessary to install a very powerful heating boiler. First you need to insulate the house. Read the recommendations.
Overview thermal insulation materials for wall insulation from the inside is presented.
Do you want to insulate the attic with foam? Follow the link to find out if you made the right choice.
Mineral wool insulation technology from the inside
In order to secure the soft mineral wool to the wall, a frame will be required. In addition to insulation you will need:
- Wooden bars on the frame.
- Thin wooden lath.
- Vapor barrier (polyethylene or glassine).
- Finishing materials, depending on your desire: OSB, drywall, fiberboard, PVC panels, etc.
Preparatory work
 IN preparatory stage includes a heat engineering calculation that will help you choose the thickness of the material for a particular wall that can retain heat inside the room.
The area of \u200b\u200bthe surface to be insulated is calculated and the required amount of material is purchased (for convenience, you can draw a diagram of the house on which to apply the dimensions of all walls, subtract the area of \u200b\u200bwindows and doors from them).
The wall must be free of traces of previous finishing. Wallpaper, plaster, nabel, etc. are removed.
All defects and irregularities are putty. If the work is carried out on the base log wall, then all the cracks will be caulked. The vertical is checked.
The walls are treated with an antiseptic and dried.
Instructions
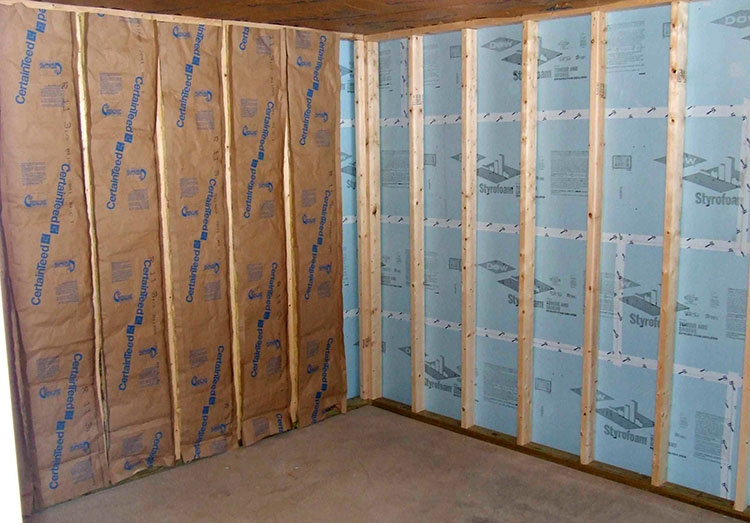
- A waterproofing film is attached to the wall. It should be well stretched so that there is little space between it and the wall. The film joints must be overlapped by more than 10 cm.
- A frame is assembled from boards or bars (placed vertically). The width between the lags is slightly less than the width of the mineral wool.
- Insulation is embedded, the roll should be tightly inserted into the gaps between the lags.
- Another layer of film is shot from above to the lags. Additionally, it is pressed against the insulation using slats. Let the film be slightly longer and partially cover the floor and ceiling.
Soft rolled mineral wool is more suitable for the floor and ceiling, and it is better to take mineral slabs on the wall - a denser insulation.
How to insulate a wooden house with foam from the inside with your own hands
Styrofoam, Penoplex or another grade of expanded polystyrene - the installation technology for all these materials is the same.
You can fix Penoplex in one of two ways:
- Using the glue method.
- With a frame.
Glue the method is simpler and cheaper, but it can only be used if the wall is even, flat, and as finishing selected plaster.
Internal insulation with foam
In this case, a special adhesive composition and fasteners with an umbrella-shaped head. The glue is diluted according to the instructions and applied to the sheet with even strokes. The canvas is leveled and fixed to the wall. Additionally, it must be reinforced with dowels with umbrellas.
Wireframe method. If the wall is log or uneven, it is better to build a frame. It is also more convenient to attach OSB slabs, drywall and plastic panels for finishing.
No additional layers Penoplex does not need waterproofing - EPP itself does an excellent job with moisture resistance.
It is important to fill the joints between sheets of expanded polystyrene with polyurethane foam. If this is not done, moisture will penetrate under the insulation.
Insulation and ventilation
A house insulated from the inside is no longer an "environmentally friendly" building. Synthetic materials will keep all odors, moisture, carbon dioxide, etc. inside themselves. Ventilation in such houses is simply necessary. Good ventilation will preserve building materials and people's health.
It is necessary to provide an inflow of fresh air and the possibility of the exit of "waste". Stress on heater will increase by about 1.5 times. Therefore, you need to take this into account and put it in the power of the device.
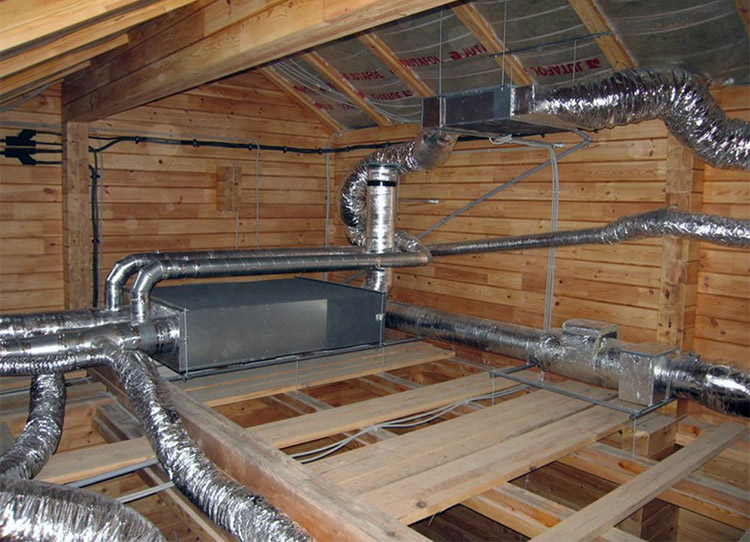
Ventilation in a wooden house
Installing a recuperator will help reduce heating costs (you can do it yourself).
You cannot save on ventilation. But if, nevertheless, the means do not allow making a full-fledged system, then at least a forced draft should be organized. And for a house with stove heating, the inflow is more important.
Conclusion
So, in many cases it is possible to avoid the internal insulation of the house, this is especially undesirable for a wooden structure.But if you have to, use your choice: mineral wool in a plastic bag, extruded polystyrene foam or spray materials.
Additional costs must be provided for the ventilation device.
 If done correctly, you can purchase several additional square meters living space. See step by step guide for work.
We will tell you about the features of choosing an uninterruptible power supply for a heating pump.
Video on the topic
Modern building codes oblige to insulate houses, which is done for a more rational use of energy resources. Moreover, insulation measures should be carried out both in stone and in wooden houses.
In contact with
Construction science recommends to do external insulation of buildings, since in this case the dew point is located outside the room in the insulation or in the outer layer of the walls. With such insulation, moisture will not condense on the walls in rooms.
But there are still cases when insulation of a wooden house from the inside - is the only correct solution. For example, if the owner of the house wants to preserve the beautiful appearance characteristic of houses made of rounded logs, or the laws prescribe to preserve the historical appearance of the building.
Modern building science allows you to make internal insulation wooden houses, but for this you must use the right materials and follow the technology.
Preparatory work
All work on the construction and arrangement of residential buildings must be preceded by engineering calculations... This also applies to the internal insulation of a wooden house.
The heat engineering calculation should show how effective the insulation will be and, in general, is there a possibility of internal insulation? Insulation will always fulfill its function, but the position of the dew point is of decisive importance.
The dew point should never be located on interior walls and even more so in insulation and calculations should show this. If the dew point is inside, then the room will be warm, but in the cold season it is constantly damp. And from the damp porous insulation gets wet, the walls of houses rot, mold and various unwanted animals are massively divorced.
Only if the dew point is not inside the room, even in the coldest period, you can confidently produce internal insulation. True, for this you will have to sacrifice part of the internal volume of the house, but without this - in no way!
Materials used for internal insulation
Materials used in the internal insulation of the house, must meet certain requirements:
- First, they must have a low thermal conductivity in order to fulfill their main function - insulation.
- Secondly, these materials must meet the fire safety requirements for premises.
- Thirdly, the material, alone or in combination with the mounting structure, must provide the required mechanical strength.
- And, finally, all materials used indoors must be environmentally friendly and not emit any chemicals into the ambient air that adversely affect the health of living beings.
Warming methods
Ways of insulating a wooden house directly depend on the materials used for this. Several types of them are used in modern construction:
- Mineral basalt wool slabs - are used most often. This material does not burn, it is environmentally friendly, its use provides excellent heat and sound insulation. Low mechanical strength requires the construction of the enclosing structure, and high hygroscopicity requires covering the mineral wool with special vapor barrier films.
- Expanded polystyrene plates (polystyrene), also found application in internal insulation. It is not recommended to use them, as they can release substances containing styrene into the air. When burning, pressless expanded polystyrene releases deadly substances: hydrogen cyanide and toluene diisocyanate. Therefore, you can use only extruded polystyrene foam, flammability class - G1. Insulation with expanded polystyrene also requires a building envelope.
- Glass wool - a widely used material for insulation. It has a lower price than basalt wool, however, it has a higher thermal conductivity. To insulate the interior with glass wool, only a material specially designed for this purpose should be used, which must additionally be covered with films. Small particles of glass wool are very harmful to health, therefore, installation is carried out only in protective equipment for the skin and respiratory organs. Requires enclosing structures.
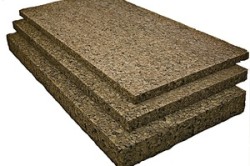
- Izoplat - modern insulation, which consists of a layer of pressed flax fiber and fiberboard with a thickness of 12 to 25 mm. High mechanical strength allows you not to make powerful enclosing structures, and the environmental friendliness of this material allows it to be used indoors. Izoplat's thermal conductivity indicators are worse, and the price is much higher than that of other heaters.
- Insulation with polyurethane foamsprayed onto the surface is a modern excellent method that requires special equipment. Fencing structures are needed for such insulation.
In this video you can watch how a wooden house is insulated from the inside with polyurethane foam.
Insulation of the walls of a wooden house from the inside
Sealing joints
 A wooden house, even an impeccably built one, lasts quite a long time. In addition to precipitation, when the heating is turned on, the wood is intensively drying out in the house, which affects the geometric dimensions of the log or laminated veneer lumber. Initially, even well-laid logs or beams can form enlarged gaps at their joints, through which heat will be mercilessly carried out into the atmosphere.
Therefore, the first operation to insulate a house is to seal the joints.
Fire bio-protection of wood
When insulated, the inner part of the walls will be hidden by a layer of insulation, and for a fairly long time. That is why the tree must be treated with a good fire-retardant composition, which on long time excludes the development of living creatures and makes it difficult for fire... It is not worth saving on this, you only need to choose good compositionsthat are guaranteed to provide the protection you need.
When processing walls with fire-retardant compositions, it must be taken into account that all enclosing structures, if they are wooden, must also be processed, since they will also be hidden in the insulation structure.
Heat insulation and ventilation
Why didn't they think much about the ventilation of houses before? Yes, because ventilation was carried out in a natural way - through leaks in wall and window structures.
Modern construction Materials and technologies exclude any leaks and gaps through which air can pass, but this does not mean that air should not circulate in the room. IN modern houses design a ventilation system that should supply fresh air to the room and remove exhaust.
Good internal thermal insulation must always be accompanied by ventilation. Only then will the microclimate in the room be normal. But ventilation is also required by the thermal insulation itself, which has a soft and porous structure, for example, mineral wool. Therefore, in the gap between the wall and the thermal insulation layer, there must be an air gap through which air must circulate freely, removing excess moisture, comparing the air humidity in the entire room.
Such gaps are very easy to implement in practice. A wooden strip of about 2.5 cm thick is attached to the walls with a certain gap, and a vapor barrier membrane is already attached to it. It turns out that there is an air gap between the wall and the insulation, which prevents the increased humidity of the inner walls and the insulation.
If the walls of the house are built from cylindrical logs, then the ventilation gaps are obtained in a natural way, and if from glued beams, then the ventilation gap is very desirable.
Vapor barrier
If used as a heater basalt wool, glass wool, non-pressed polystyrene foam, then vapor barrier must be done. For this, a vapor barrier film is attached to the ventilation crate using a construction stapler. The foil must be stretched enough so that there is a ventilation gap between it and the wall. the joining of two vapor barrier panels is done with an overlap of at least 10 cm using tape and a stapler.
If the inner space of the house will be insulated with extruded polystyrene foam, then a vapor barrier is not needed. This material already has the necessary waterproofing qualities and will be a reliable barrier to moisture.
Installation of the enclosing structure
With all methods of insulating the internal walls of a wooden house, except for Isoplat plates, the construction of a building envelope is required. Most often it is made of a wooden square bar in cross section 50 mm in size. The installation step of the bar is determined by the width of the insulation. If mineral wool insulation is used, then the distance between adjacent bars should be 10 mm less than the width of the insulation - for a snug fit. If extruded polystyrene foam is used, then the distance should be exactly the width of the insulation boards.
Before installation it is necessary to process all the bars with a fire retardant compound. Installation is carried out using screws of the required length directly to the wooden walls. If a crate was used for the ventilation gap, then the bars are attached to the previously mounted slats. In this case, it is better to wrap the screws in the holes pre-drilled with a thin drill. This will prevent possible cracking of the wood.
Sometimes plasterboard profiles are used as the enclosing structure, which are attached to the walls with straight suspensions. This should only be done when drywall will be used as the finish, and in all other cases it is better to use a wooden block. The thermal conductivity of wood is much lower than that of metal.
When insulating the ceiling, the enclosing structure is made similar to the wall one. When insulating the floor, the wooden logs themselves, on which it will be attached flooring, act as a building envelope.
Installation of insulation
Insulation is placed in the space between the enclosing bars. If a insulation sheet, then installation on the walls is carried out from bottom to top, and roll, on the contrary, from top to bottom.
Mineral wool slabs are placed on the floor, which makes it possible for them to hold on securely. However, it is still necessary to additionally strengthen the foam or mineral wool using special dowels with a wide head, one dowel per slab.
Roll insulation fixed from above with one dowel, rolled down and fixed with dowels at intervals of 1 meter. First, whole slabs or rolls are laid, and the remaining space where trimming is required is filled with insulation last.
Ceiling insulation, in the case of a sloping roof, rolls up from the bottom and can be fixed with dowels or with a cord. To do this, small carnations are stuffed onto neighboring bars with an interval of 15 cm, and then, after laying the insulation between the beams, a cord is pulled in a zigzag manner, which will securely hold the mineral wool.
If extruded polystyrene foam is used for insulation, then all possible gaps at the joints can be filled with polyurethane foam. Before applying the foam, the surfaces are moistened, and after it dries, all excess is trimmed with a knife.
Final waterproofing
After installing the insulation, if the insulation was made with porous materials capable of absorbing water, then it is necessary to cover the insulation with a layer of waterproofing, but with a special one - vapor-permeable membrane, which is, on the one hand, a reliable barrier to water, and on the other hand, the membrane freely releases water vapor from the insulation. Even if water has condensed in the insulation, it will come out in the form of steam until the moisture content of the insulation becomes equal to the humidity in the room.
The vapor-permeable film has two sides: one smooth and the other rough, through which water vapor escapes. With a rough side, such a film is laid to the insulation and fixed with a stapler to the enclosing structure. Joints with an overlap of 10 cm are glued with adhesive tape and fixed with a stapler. A vapor-permeable membrane is not needed for waterproof insulation.
The final stage of insulation will be the installation of the topcoat, which can be wooden lining, drywall, plywood, OSB boards and others.
conclusions
- Insulation of walls inside a wooden house is extremely rare and very often a necessary measure.
- Before installing the internal thermal insulation, it is necessary to carry out thermal calculations showing the position of the dew point in the cold season. Precise dew should not be on the inner walls and in the insulation.
- As insulation, you should choose only environmentally friendly from well-known manufacturers.
- Porous insulation must be covered waterproofing films from the side of the wall and a vapor-permeable membrane from the side of the room.
In contact with
Do you see inaccuracies, incomplete or incorrect information? Do you know how to make your article better?
Do you want to offer photos on a topic for publication?
Please help us make the site better! Leave a message and your contacts in the comments - we will contact you and together we will make the publication better!


